manuals.online logo
Brands
  1. Home
  2. •
  3. Brands
  4. •
  5. System air
  6. •
  7. Fan
  8. •
  9. System air VX-400 EV Instruction Manual

System air VX-400 EV Instruction Manual

ИНСТРУКЦИЯ
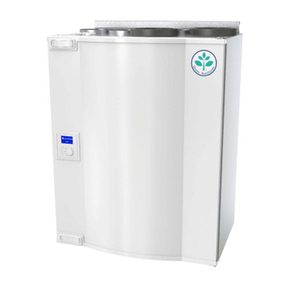
Systemair VX 700 EV R
VX-400/500/700 EV
Инструкция по эксплуатации
User and maintenance instructions
ВВЕДЕНИЕ
Компания Systemair производит приточно-
вытяжные агрегаты сутилизацией тепла с
1980 года. Эти агрегаты установлены в
тысячах зданий Норвегии идругих странах
Европы.
Агрегаты VX-400/500/700 EV
аккумулировали всебе опыт, накопленный
за время их эксплуатации. Вконструкции
агрегатов нашли отражение результаты
последних исследований вобласти
климатологии помещений ивлияния
климата на здоровье людей.
Большое внимание уделяется качеству и
высокой производительности агрегатов.
Однако качество работы агрегатов во
многом зависит от качества монтажа и
обслуживания, которым ипосвящена
настоящая инструкция по эксплуатации.
СОДЕРЖАНИЕ
ОБЩИЕ СВЕДЕНИЯ 3
ПРИНЦИП ДЕЙСТВИЯ 5 и6
ТРЕБОВАНИЯ БЕЗОПАСНОСТИ 7
ОБСЛУЖИВАНИЕ 8 и9
УСТРАНЕНИЕ НЕИСПРАВНОСТЕЙ 10
СЕРВИС 11
INTRODUCTION
Systemair have been manufacturing heat
recovery units since 1980. The units are
installed in thousands of buildings in Norway,
with increasing numbers in the U.K.
Experience from these installations is
incorporated in our unit, the Systemair
VX-400/500/700 EV. The latest results from
the studies of the indoor climate and its
influence on our health are taken into
consideration, and great emphasis is given to
quality and performance.
However, even after we have put all our
experience into developing the unit, the final
result depends on the quality of the total
installation and maintenance described in this
booklet.
INDEX
GENERAL page 3
OPERATION page 5 and 6
WARNING page 7
MAINTENANCE page 8 and 9
TROUBLESHOOTING page 10
SERVICE page 11
2
Рис. 1 Fig. 1
1.) Агрегат
2.) Шумоглушители
3.) Дренаж конденсата сгидрозатвором
4.) Забор свежего воздуха
5.) Выброс вытяжного воздуха
6.) Приточные диффузоры вжилых
помещениях
7.) Вытяжные клапаны во влажных
помещениях
8.) Водоотвод, если устанавливается
9.) Гибкие воздуховоды
10.) Спирально-навивные воздуховоды
11.) Изоляция воздуховодов
1.) Unit
2.) Silencers, inlet/extract
3.) Condensation drain with water lock
4.) Fresh air intake
5.) Discharge extract air
6.) Inlet diffusers in living rooms
7.) Extract louvres in wet rooms
8.) Soil vent pipe if installed
9.) Flexible ducting
10.) Spiro ducting
11.) Duct insulation
A.) Приточный вентилятор
B.) Вытяжной вентилятор
C.) Теплообменник перекрестного тока
D.) Электрический нагреватель
E.) Фильтр наружного воздуха
F.) Фильтр удаляемого воздуха
G.) Электрический нагреватель
H.) Панель управления
A.) Inlet fan
B.) Extract fan
C.) Cross flow heat exchanger block
D.) Electrical heater battery
E.) Fresh air filter
F.)
G.)
H.)
Extract filter
Preheater battery, el.
Control panel
3
Рис. 2 Fig. 2
ОБЩИЕ СВЕДЕНИЯ
Агрегаты Systemair VX-400/500/700 EV
представляют собой укомплектованные
приточно-вытяжные агрегаты для подачи
очищенного иподогретого наружного
воздуха вжилые помещения, атакже
вытяжки соответствующего количества
воздуха из туалетов, ванных идр. влажных
помещений. Агрегат имеет пластинчатый
теплообменник перекрестного тока и
систему контроля для обеспечения
безопасной иэкономичной эксплуатации.
Примечание!Агрегат поставляется как с
левосторонним подключением
воздуховодов, так исправым. В
этом руководстве показана
правосторонняя модель.
GENERAL
Systemair VX-400/500/700 EV is a complete
ventilation unit for supply of filtered and
preheated outdoor air to residential areas and
extract of a corresponding amount of used air
from WC, bathroom and wet rooms.
The unit is equipped with a cross flow heat
exchanger block in aluminium and control
functions to ensure safe and economical
ventilation.
Note!The unit is supplied as a right and a left
hand model. This manual only shows
the right hand model.
4
Рис. 3 Fig. 3
Принцип действия (Рис.3)
Агрегат имеет встроенную панель
управления. Следующими функциями
агрегата можно управлять посредством
встроенной, атакже дополнительными
выносными панелями управления:
Расход воздуха (скорость вентилятора)
Кнопки для выбора расхода воздуха в3
ступени. Выбор скорости вентилятора
производится кнопками (4) и(5). Индикаторы
(1), (2) и(3) указывают текущее значение.
Min (1) Минимальная вентиляция.
Используется ввыходные,
праздничные дни.
Norm (2) Нормальная вентиляция. Расход
воздуха для этого режима
задается на контрольной панели
(высокий/низкий). См. Инструкцию
по монтажу.
Max (3) Усиленная вентиляция. Когда
требуется дополнительная
вентиляция помещения.
Температура приточного воздуха
Кнопки для выбора температуры приточного
воздуха (5 ступеней). Уменьшение/увеличе-
ние температуры приточного воздуха произ-
водится кнопками (9) и(10). Индикаторы (6),
(7) и(8) указывают текущую выбранную
температуру.
Ступень 1 Индикатор (6) горит
Ступень 2 Индикаторы (6) + (7) горят
Ступень 3 Индикатор (7) горит
Ступень 4 Индикаторы (7) + (8) горят
Ступень 5 Индикатор (8) горит
OPERATION (Fig. 3)
The unit is equipped with an intergrated
control panel. In addition operation can be
made from one or more remote
controllers, with the following functions:
Airflow (Fan speed)
Switches for choise of airflow in 3 steps.
Increase/ decrease fan speed by pressing
the switches (4) and (5) alternatively. Lamp
signals (1), (2) and (3) show set airflow.
Min (1) Minimum ventilation. To be used
during holidays or when the
building is not in use.
Norm (2) Normal ventilation adapted to the
building. Airflow for normal
ventilation can be chosen
(high/low) by means of setting on
the control panel (see installation
instructions, Commissioning).
Max (3) Forced ventilation. Is used when
extra airflow is required.
Supply air temperature
Switches for choise of inlet air temperature in
5 steps. Supply air temperature is increased/
decreased by pressing switch (9) and (10)
alternatively. Lamp signals (6), (7) and (8)
show set supply air temperature.
Step 1 Lamp (6) lights
Step 2 Lamp (6) and (7) light
Step 3 Lamp (7) lights
Step 4 Lamp (7) and (8) light
Step 5 Lamp (8) lights
5
Когда утилизации тепла вытяжного воздуха
недостаточно, чтобы достичь требуемой
температуры приточного воздуха, автомати-
чески включается воздухонагреватель.
Индикатор (14) горит, когда воздухонагрева-
тель включен. (Рекомендуется делать уставку
температуры приточного воздуха как можно
ниже, но без рисков возникновения
сквозняков, что увеличит эффективность
работы агрегата).
Дополнительный воздухонагреватель
предотвращает замораживание иобразование
льда втеплообменнике. Индикатор (14)
мигает во время работы дополнительного
воздухонагревателя.
Кроме того, можно отключить воздухонагре-
ватель (Ступень ”0”). Вэтом случае индика-
торы (6), (7), (8) или (14) не будут загораться.
Фильтры
Индикатор (11) указывает на необходимость
замены фильтра наружного воздуха (E, Рис.2).
Агрегат продолжит работать, но его
эффективность значительно снизится, если
его не заменить. Периодичность замены
фильтров задается на контрольной панели
(6,9,12 месяцев). См. Инструкцию по монтажу.
Переустановите время работы фильтра после
его замены (См. Обслуживание. Пункт 2).
Примечание! Алюминиевый вытяжной
фильтр очищают по мере
загрязнения (См. Обслуживание)
”Летний режим”
Пластинчатый теплообменник на летнее
время может быть заменен летним блоком,
когда не требуется утилизации тепла. Это
увеличит подачу воздуха впомещения.
Работа агрегата по таймеру
При установке агрегата вкоммерческих
зданиях может потребоваться установка
внешнего таймера для его автоматического
переключения между дневным иночным
режимом сменьшим расходом воздуха. Если
при работе агрегата вночном режиме
согласно таймеру потребуется перейти к
дневному режиму, то необходимо нажать
кнопку (13, Рис.3) на контрольной панели.
Агрегат автоматически перейдет на режим
работы согласно таймеру через 3 часа.
Агрегат рекомендуется эксплуатировать
постоянно, выключать только для
обслуживания исервиса.
When heat recovery from the extract air is in-
sufficient to obtain set supply air temperature,
an electrical heater battery will automatically
be switched on. Lamp signal (14) will light up
when the heater battery is in operation. (In
general it is recommended to set supply air
temperature as low as possible, avoiding the
feeling of draught. This gives the ultimate
energy and ventilation efficiency).
An electrical pre-heater battery in the unit will
prevent rime and ice from building up inside
the exchanger block. Lamp (14) will flash
during defrosting.
In addition it is possible to switch off the
heater battery, step "0". In that case lamps
(6), (7), (8) or (14) will never come on.
Filter
Lamp signal (11) comes on when set
operation time between changing of fresh air
filter (E, fig. 1) has expired. The ventilation
unit can still be operated, but the efficiency
will be reduced if the filter is not replaced.
Operation time (6, 9 or 12 months) between
filter changes can be set on the control panel
(see installation instructions). Reset
operation time after having changed the filter
(see MAINTENANCE, item 2 - Changing the
inlet filter).
Note! The aluminium extract filter (F, fig.
1) must be cleaned as necessary
(See "Maintenance").
"Summer operation"
The exchanger block can be replaced by a
summerblock when heat recovery is not required.
This will increase the airflow and give a cooling
effect on hot summer days.
Operation from timer
When the unit is installed in commercial
buildings, it might be necessary to install a
separate week timer for automatic day and night
operation (reduced ventilation). If the building is
in use when night operation is in function,
override to day operation can be obtained by
pressing button (13, fig. 2) on the control panel.
The unit automatically switches back to operate
according to timer settings after 3 hours.
The system should operate continuously, and
only be stopped for maintenance and service.
6
1.)
2.)
3.)
4.)
Рис. 4 Fig. 4
5.)
Требования безопасности (Рис. 4)
Из соображений электро- ипожаро
безопасности при возможной неправильной
эксплуатации агрегата, следует выполнять
следующие требования:
1. Агрегат должен монтироваться встрогом
соответствии синструкцией.
2. Перед обслуживанием или очисткой
агрегата он должен быть отключен от
электросети.
3. Запрещается подключать квентсистеме
сушилку для белья идругое подобное
оборудование.
4. Перед пуском агрегата удостоверьтесь в
правильной установке фильтров.
5. Обслуживание необходимо выполнять в
соответствие синструкциями.
WARNING (Fig. 4)
In order to avoid electrical shock, fire or other
damage which might occur in connection with
faulty use and operation of the unit, it is
important to consider the following:
1. The system must be installed according
to installation instructions.
2. Insulate mains supply before service or
cleaning of the heat recovery unit.
3. Tumble dryer must not be connected
directly to the ventilation system.
4. Make sure that filters are mounted in their
place before running the system.
5. Maintenance must be performed
according to separate.
7
1.)
Рис. 5 Fig. 5
2.)
3.)
Техническое обслуживание (Рис. 5)
Обслуживание VX-400/500/700 EV необходимо
проводить 3-4 раза вгод. Помимо общей
очистки, должны выполняться следующие
работы:
1. Очистка вытяжного фильтра (По
необходимости, как правило, каждые 4
месяца)
Регулярно очищайте вытяжной алюминиевый
фильтр. Фильтр следует мыть вгорячей
мыльной воде или средством для мытья
посуды. Запрещено использовать средства,
содержащие нашатырный спирт.
2. Замена фильтра наружного воздуха (по
сигналу индикатора на контрольной
панели или 1-2 раза вгод)
Мешочный фильтр не подлежит чистке. Время
работы нового фильтра до замены
необходимо переустановить после его
установки. Нажмите кнопку 13 (Рис.3) и
удерживайте 5 сек. Желтый индикатор (14) и
один зеленый индикатор (6, 7 или 8, в
зависимости от выбранного периода работы)
замигает втечение нескольких секунд.
Изменение периодичности замены фильтра
Можно изменить продолжительность
эксплуатации фильтра. См. Инструкцию по
монтажу – Наладка, пункт 5.
Для приобретения новых фильтров
обращайтесь кВашему продавцу.
3. Проверка теплообменника (1 раз вгод)
Даже при соблюдении пуктов 1 и2 на блоке
теплообменника будет оседать пыль ижир.
Для поддержания высокой эффективности
теплообмена, важно вынимать иочищать
теплообменник периодически. Теплообменник
следует мыть горячей водой смылом или
средствами для мытья посуды. Запрещается
использовать моющие средства снашатырным
спиртом.
MAINTENANCE (Fig. 5)
Maintenance of the VX-400/500/700 EV
should normally be performed 3 - 4 times a
year. Apart from general cleaning the following
should be observed:
1. Cleaning the extract filter (As necessary.
Normally every four months).
The aluminium grease filter on the extract side
inside the unit must be cleaned regularly.
Wash in hot soapy water or in dish washer. Do
not use detergent containing ammonia.
Change the filter when necessary.
2. Changing fresh air filter (lamp signal on
control panel, 1-2 times per year or as
necessary)
The bag filter cannot be cleaned and must be
changed as necessary. Operation time
between filter changes must be re-set after
filter change. Press button 13 (fig. 3) for apx. 5
seconds. Yellow lamp (14) and one of the
green lamps (6, 7 or 8, depending on chosen
operation time) will flash for a few seconds.
Changing operation time between filter
changes
Depending on the condition of the filter, you
might need to change the operation time for
the filter. See Installation instructions -
"Commissioning" item 5.
Contact your supplier for new filter.
3. Checking the exchanger block (Once a
year)
Even if the required maintenance in items 1
and 2 is carried out, dust may build up in the
exchanger block. It is therefore of vital
importance for the upkeep of a high efficiency
that the exchanger block is removed from the
unit and cleaned periodically. Wash in hot
soapy water. Do not use detergent containing
ammonia.
8
4.)
Рис. 6 Fig. 6
5.)
6.)
7.)
ТЕХНИЧЕСКОЕ ОБСЛУЖИВАНИЕ (Рис.6)
4. Осмотр вентиляторов (ежегодно)
Даже при условии, что проводилось рекомендуемое
обслуживание, такое как чистка/замена фильтров, в
вентиляторах (4 и5) могут накапливаться пылежиро-
вые отложения. Это уменьшает производительность
вентиляторов.
Вентиляторы можно очистить ветошью или мягкой
щеткой без использования воды. Разбавитель красок
допускается использовать для удаления трудновыво-
димых отложений при условии его полного высыхания
перед установкой вентиляторов на место.
5. Проверка дренажа конденсата (раз вгод)
Дренаж конденсата (сливная магистраль) может
засориться частицами из вытяжного воздуха.
Проверьте проходимость сливной магистрали
проливкой воды вконденсатный поддон внизу
агрегата. Очищайте гидравлический затвор и
сливную магистраль по необходимости.
6. Очистка вытяжных жалюзи иприточных
диффузоров (по необходимости)
Система обеспечивает приток свежего воздуха вВаш
дом ивытяжку отработанного воздуха через систему
воздуховодов, жалюзи идиффузоров. Жалюзи и
диффузоры монтируются впотолке или стенах
помещений дома. Выньте диффузоры ижалюзи и
вымойте их горячей мыльной водой. Запрещается
менять местами диффузоры ижалюзи.
7. Проверка забора свежего воздуха.
Листья идругие загрязнения могут засорить заборную
решетку иснизить расход воздуха. Проверяйте
заборную решетку дважды вгод, очищайте по
необходимости.
8. Проверка системы воздуховодов (каждые 5
лет)
Даже при условии регулярной смены фильтров, пыле-
вые ижировые отложения будут накапливаться внутри
воздуховодов. Это снижает эффективность вентиля-
ционной системы. Воздуховоды должны периодически
очищаться или меняться. Жесткие металлические
воздуховоды могут быть очищены проталкиванием щет-
ки, смоченной горячей мыльной водой, через отверстия
для диффузоров или специальные сервисные люки
(если предусмотрены).
Внимание!Кроме того, крышный зонт изаборная
решетка проверяются раз вгод и
очищаются по необходимости.
MAINTENANCE (Fig. 6)
4. Checking the fans (once a year)
Even if the required maintenance, such as
cleaning/changing of filters is carried out, dust and
grease may slowly build up inside the fans (4 and 5).
This will reduce the efficiency.
The fans may be cleaned with a cloth or a soft brush.
Do not use water. White spirit can be used to remove
obstinate settlements. Allow to dry properly before
remounting.
5. Checking condensate drain (once a year)
Condensate drain (drain pipe) may after some time get
plugged by particles from the extract air. Check that
the drain pipe is open by pouring some water into the
condensate tray in the bottom of the unit. Clean the
water lock and drain pipe as necessary.
6. Cleaning extract louvres and inlet diffusers (as
necessary)
The system supplies fresh air to your home and
extracts the used indoor air via the duct system and
diffusers/louvres. Diffusers and louvres are mounted
in ceilings/walls in bedrooms, living room, wetrooms,
WC etc. Remove diffusers and louvers and wash in
hot soapy water as required. (Diffusers/ louvres must
not be exchanged).
7. Checking the fresh air intake
Leaves and pollution could plug up the air intake grille
and reduce the capacity. Check the air intake grille at
least twice year, and clean as necessary.
8. Checking the duct system (every 5 years)
Dust and grease settlements may, even if required
maintenance such as cleaning/changing of filters is
being carried out, build up in the duct system. This will
reduce the efficiency of the installation.
The duct runs should therefore be cleaned/changed
when necessary. Steel ducts can be cleaned by pulling
a brush soaked in hot soapy water, through the duct
via diffuser/louvre openings or special inspection
hatches in the duct system (if fitted).
NOTE! In addition roof cowl must be checked once
a year and cleaned as necessary.
9
Рис. 7 Fig. 7
Устранение неисправностей (Рис. 7)
При возникновении проблем перед вызовом
сервисной службы проверьте следующее:
1. Вентилятор (вентиляторы) не запускаются
Удостоверьтесь, что все предохранители иразъемы
подсоединены (питающая сеть иразъемы
вентиляторов).
2. Низкий расход воздуха
a) Проверьте уставки расхода воздуха на
контрольной панели.
b) Очистите или замените фильтры.
c) Очистите диффузоры ижалюзи.
d) Очистите вентилятор итеплообменник.
e) Очистите крышный зонт изаборную решетку.
f) Убедитесь, что воздуховоды не имеют
повреждений ине засорены.
g) Проверьте открытие диффузоров ижалюзи.
3. Холодный приточный воздух
a) Проверьте уставки температуры на контрольной
панели.
b) Проверьте пожарный термостат. При
необходимости перезапустите его нажатием
красной кнопки «Н» вагрегате.
c) Очистите вытяжной фильтр при необходимости.
d) Проверьте наличие льда втеплообменнике. При
необходимости остановите агрегат идождитесь
оттайки льда. При повторном замораживании
обратитесь всервисную службу.
e) Проверьте, не установлен ли вагрегат «летний
блок» вместо теплообменника.
4. Шум/вибрация
a) Очистите крыльчатки вентиляторов.
b) Выньте вентиляторы ипроверьте затяжку
крепежных винтов.
c) Удостоверьтесь, что установлены вибровставки.
5. Утечка воды
a) Проверьте, не засорилась ли сливная магистраль.
a) Проверьте уклон сливной магистрали, гидравли-
ческий затвор изащищен ли дренаж от
замерзания.
TROUBLESHOOTING (Fig. 7)
Should problems occur, please check or correct the
items below before calling your service
representative.
1. Fan(s) do not start
Check that all fuses and plugs are connected (mains
supply and fan plugs).
2. Reduced airflow
a) Check setting of airflow on control panel.
b) Change/cleaning of filter required?
c) Cleaning of diffusers/louvers required?
d) Cleaning of fans/exchanger block required?
e) Is roof unit/air intake clogged?
f) Duct system. Check visible duct runs for damage
and/or build-up of dust/pollution.
g) Check diffuser/louver openings.
3. Cold supply air
a) Check set supply air temperature on the control
panel.
b) Check if fire thermostat(s) is(are) still alert. If
necessary, reset by pressing the red button "I" in
the unit.
c) Check if the extract filter needs clesning.
d) Ice in exchanger block. Stop the unt and let the
ice melt. Call your service representative if
repeated.
e) Check if summerblock is installed in the unit.
4. Noise/ vibrations
a) Clean fan impellers.
b) Pull the fans out and check that screws holding
the fans are tightened.
5. Water leakage
a) Check that drain pipe is open.
b) Check grade towards drain, water lock and that
the condensate pipe is installed frost proof.
10
6. Неисправность
6. Alarms
Сигнал индикатора: Индикатор /Lamp :Lamps flash as follows
a) Короткое замыкание или разрыв
цепи вдатчиках.
6 7 8 14 a) Short circuit or breach in sensor(s).
b) Напряжение слишком низкое (<
210В). Индикаторы 6,7 и8 мигают в
соответствии суставкой температуры.
(6)
(7)
(8)
14
b) Voltage too low (< 210 V).
Lamps 6, 7 and 8 are flasing in
accordance with set inlet air
temperatures (see Operation).
c) Воздухонагреватель догрева
отключен по тепловой защите
(автоматический перезапуск). 6
8
14
c) The re-heater battery is switched off
due to overheating (automatic re-set).
d) Воздухонагреватель
предподогрева отключен по
тепловой защите (автоматический
перезапуск).
6
8
d) The pre-heater battery is switched off
due to overheating (automatic re-set).
Сервис
Перед тем, как вызвать представителя
сервисной службы, обратите внимание на
маркировку ипроизводственный номер на
табличке агрегата.
SERVICE
Before calling your service representative,
make a note of the specification and
production number from the data plate on the
unit, behind the inspection hatch.
Systemair, type VX-XXX EV
XXXXW, XXA, 220-240V, 50Hz
XXXXX-XX/XX
11
ПРИНЦИП РАБОТЫ
OPERATION, TYPE CE
cde Индикатор расхода воздуха
fg Кнопки задания расхода воздуха
hij Индикатор температуры
приточноговоздуха
kКнопки задания температуры
приточного воздуха
Индикатор замены фильтров
Не используется
Кнопка отмены работы по
таймеру. Перезапуск после
замены фильтра
Индикатор работы нагревателя.
Мигающий индикатор – цикл
оттаивания.
cde Signal airflow
fg Switches airflow
hij Signal supply air temperature
kSwitches supply air temperature
Signal filter change
Not in use
Switch override week timer. Re-set
of operation time after filter change.
Signal heater battery ON/
Flashing light = defrosting active
SystemairAB
Industrivägen3
SE-73930Skinnskatteberg,Sweden
Phone+4622244000
Fax+4622244099
www.systemair.com
СМОТРИТЕ ТАКЖЕ
Бытовые вентиляционные
установки
Комплектующие
вентиляции Заслонки Регуляторы и
контроллеры
Пульты управления Проектирование
систем вентиляции
Монтаж систем
вентиляции Воздуховоды
Воздухораспределительные
устройства

This manual suits for next models

3

Other System air Fan manuals

System air BF 150 User manual

System air

System air BF 150 User manual

System air FANTECH VHR100R User manual

System air

System air FANTECH VHR100R User manual

System air VR-400 EV Instruction Manual

System air

System air VR-400 EV Instruction Manual

System air Fantech SHR 8005R User manual

System air

System air Fantech SHR 8005R User manual

System air SYSWALL 21 User manual

System air

System air SYSWALL 21 User manual

System air KBR Series User manual

System air

System air KBR Series User manual

System air Villavent VR 400 DC User manual

System air

System air Villavent VR 400 DC User manual

System air Villavent VM-400 EV Instruction Manual

System air

System air Villavent VM-400 EV Instruction Manual

System air Fantech Rn Series User manual

System air

System air Fantech Rn Series User manual

System air Topvex TR 09 Series Troubleshooting guide

System air

System air Topvex TR 09 Series Troubleshooting guide

System air SAVE CONNECT 2.0 Owner's manual

System air

System air SAVE CONNECT 2.0 Owner's manual

System air AXC Series User manual

System air

System air AXC Series User manual

System air MAXK Series User manual

System air

System air MAXK Series User manual

System air ZRS 170 Manual

System air

System air ZRS 170 Manual

System air SAVE VTC 200-1 User manual

System air

System air SAVE VTC 200-1 User manual

System air DKEX Series Troubleshooting guide

System air

System air DKEX Series Troubleshooting guide

System air Sense SNX Manual

System air

System air Sense SNX Manual

System air CAP-C User manual

System air

System air CAP-C User manual

System air SAVE VTR 300/B User manual

System air

System air SAVE VTR 300/B User manual

System air Fantech 2VLD12 Series Quick start guide

System air

System air Fantech 2VLD12 Series Quick start guide

System air fantech CSF4 Manual

System air

System air fantech CSF4 Manual

System air RVF 100 Manual

System air

System air RVF 100 Manual

System air BF QW User manual

System air

System air BF QW User manual

System air BOR-S User manual

System air

System air BOR-S User manual

Popular Fan manuals by other brands

Tower Hobbies T662001 Safety and instruction manual

Tower Hobbies

Tower Hobbies T662001 Safety and instruction manual

LUCCI AIRFUSION QUEST II Installation, operation & maintenance instructions

LUCCI

LUCCI AIRFUSION QUEST II Installation, operation & maintenance instructions

Fanimation Bayhill LB230VZ owner's manual

Fanimation

Fanimation Bayhill LB230VZ owner's manual

SolarVenti SV7 installation manual

SolarVenti

SolarVenti SV7 installation manual

Titus TMR Installation & operation manual

Titus

Titus TMR Installation & operation manual

Aerostar SkyStar Installation and operation manual

Aerostar

Aerostar SkyStar Installation and operation manual

Di4 Aria Forze 35 manual

Di4

Di4 Aria Forze 35 manual

Arlec Breeze APF360 instruction manual

Arlec

Arlec Breeze APF360 instruction manual

Greenheck RV Installation, operation and maintenance manual

Greenheck

Greenheck RV Installation, operation and maintenance manual

Enviro HP Series Installation operation & maintenance

Enviro

Enviro HP Series Installation operation & maintenance

Sealey SFF12 instructions

Sealey

Sealey SFF12 instructions

Craftmade Builder Deluxe BLD42-LED-1 installation guide

Craftmade

Craftmade Builder Deluxe BLD42-LED-1 installation guide

Hunter Belfield instruction manual

Hunter

Hunter Belfield instruction manual

Carrier CRECOMZR077A00 installation instructions

Carrier

Carrier CRECOMZR077A00 installation instructions

Ridder Drive Systems PolyDrive RPD 506 Series product manual

Ridder Drive Systems

Ridder Drive Systems PolyDrive RPD 506 Series product manual

Hunter 21587 Parts guide

Hunter

Hunter 21587 Parts guide

HAMPTON BAY DC6-1A Use and care guide

HAMPTON BAY

HAMPTON BAY DC6-1A Use and care guide

Silvercrest SVW 50 A1 operating instructions

Silvercrest

Silvercrest SVW 50 A1 operating instructions

manuals.online logo
manuals.online logoBrands
  • About & Mission
  • Contact us
  • Privacy Policy
  • Terms and Conditions

Copyright 2025 Manuals.Online. All Rights Reserved.