SZdalos TP200 User manual

TPMS
TP200 USER’S MANUAL
V6.03.21

CONTENTS
1
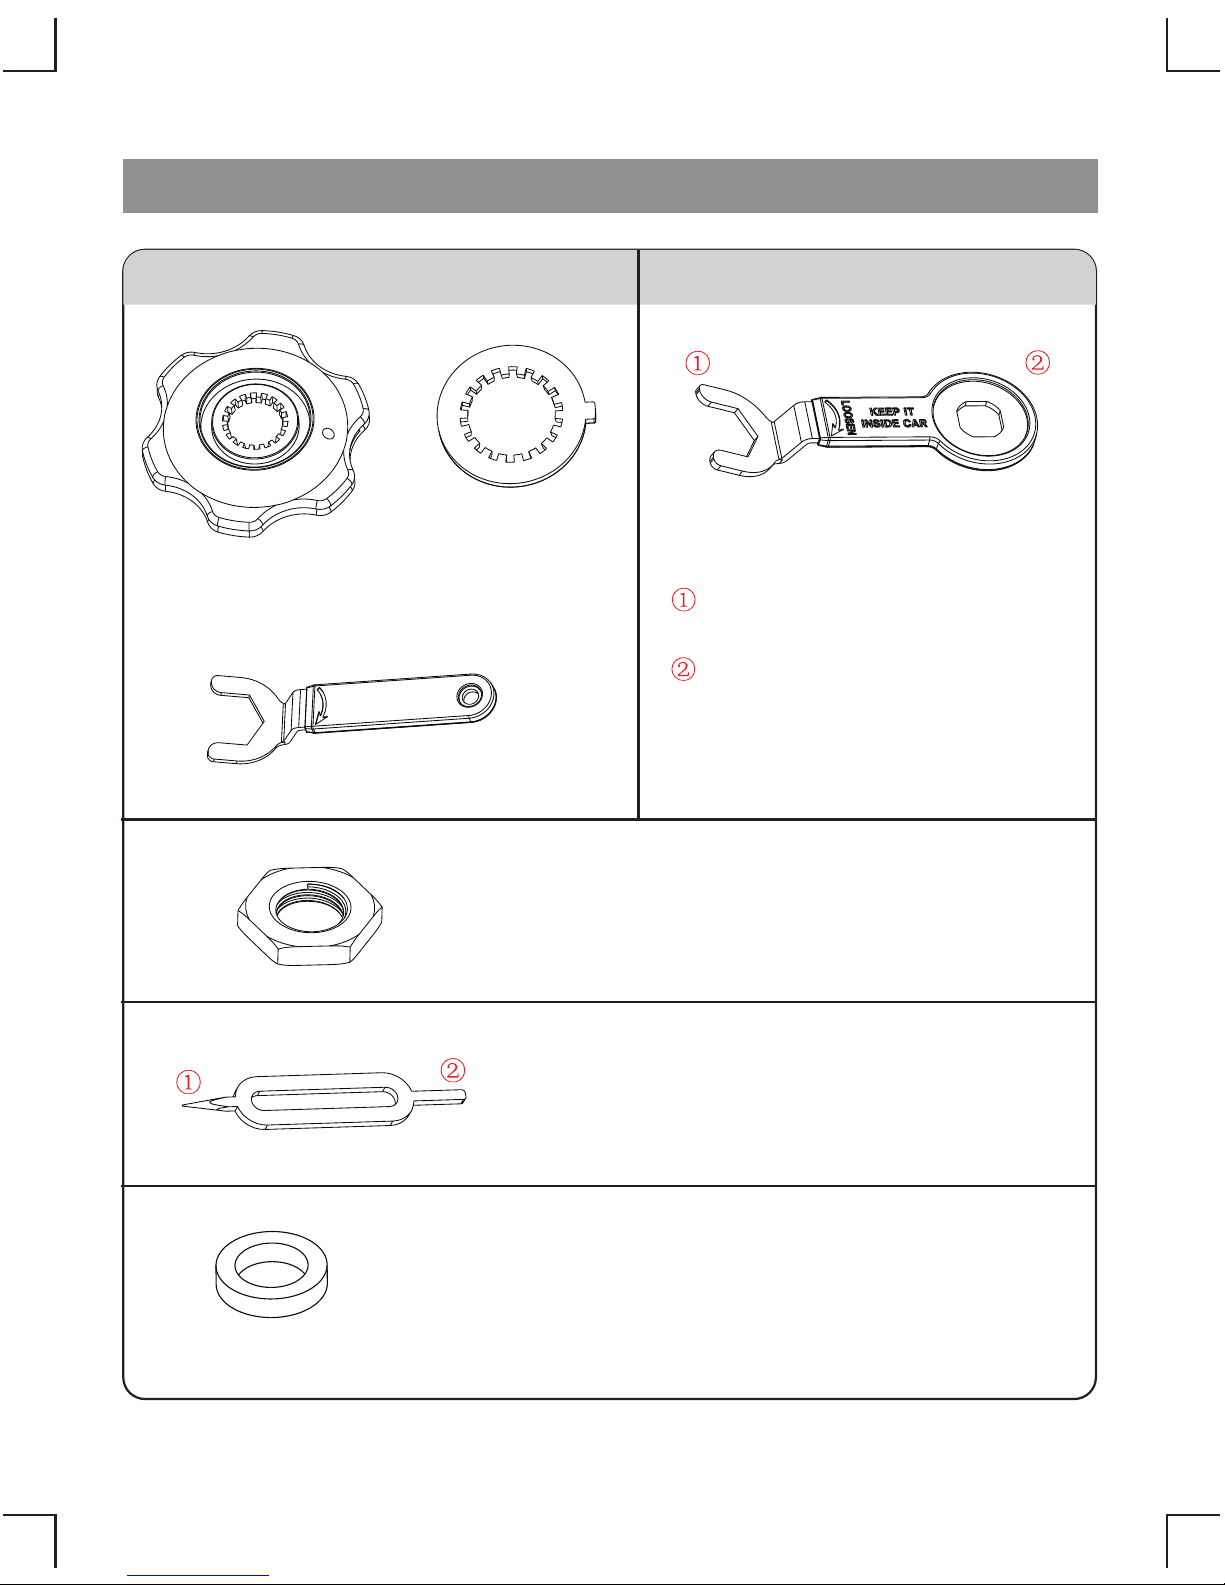
Packing List .................................................................................... 2
Standard Tools and Accessories ....................................................... 3
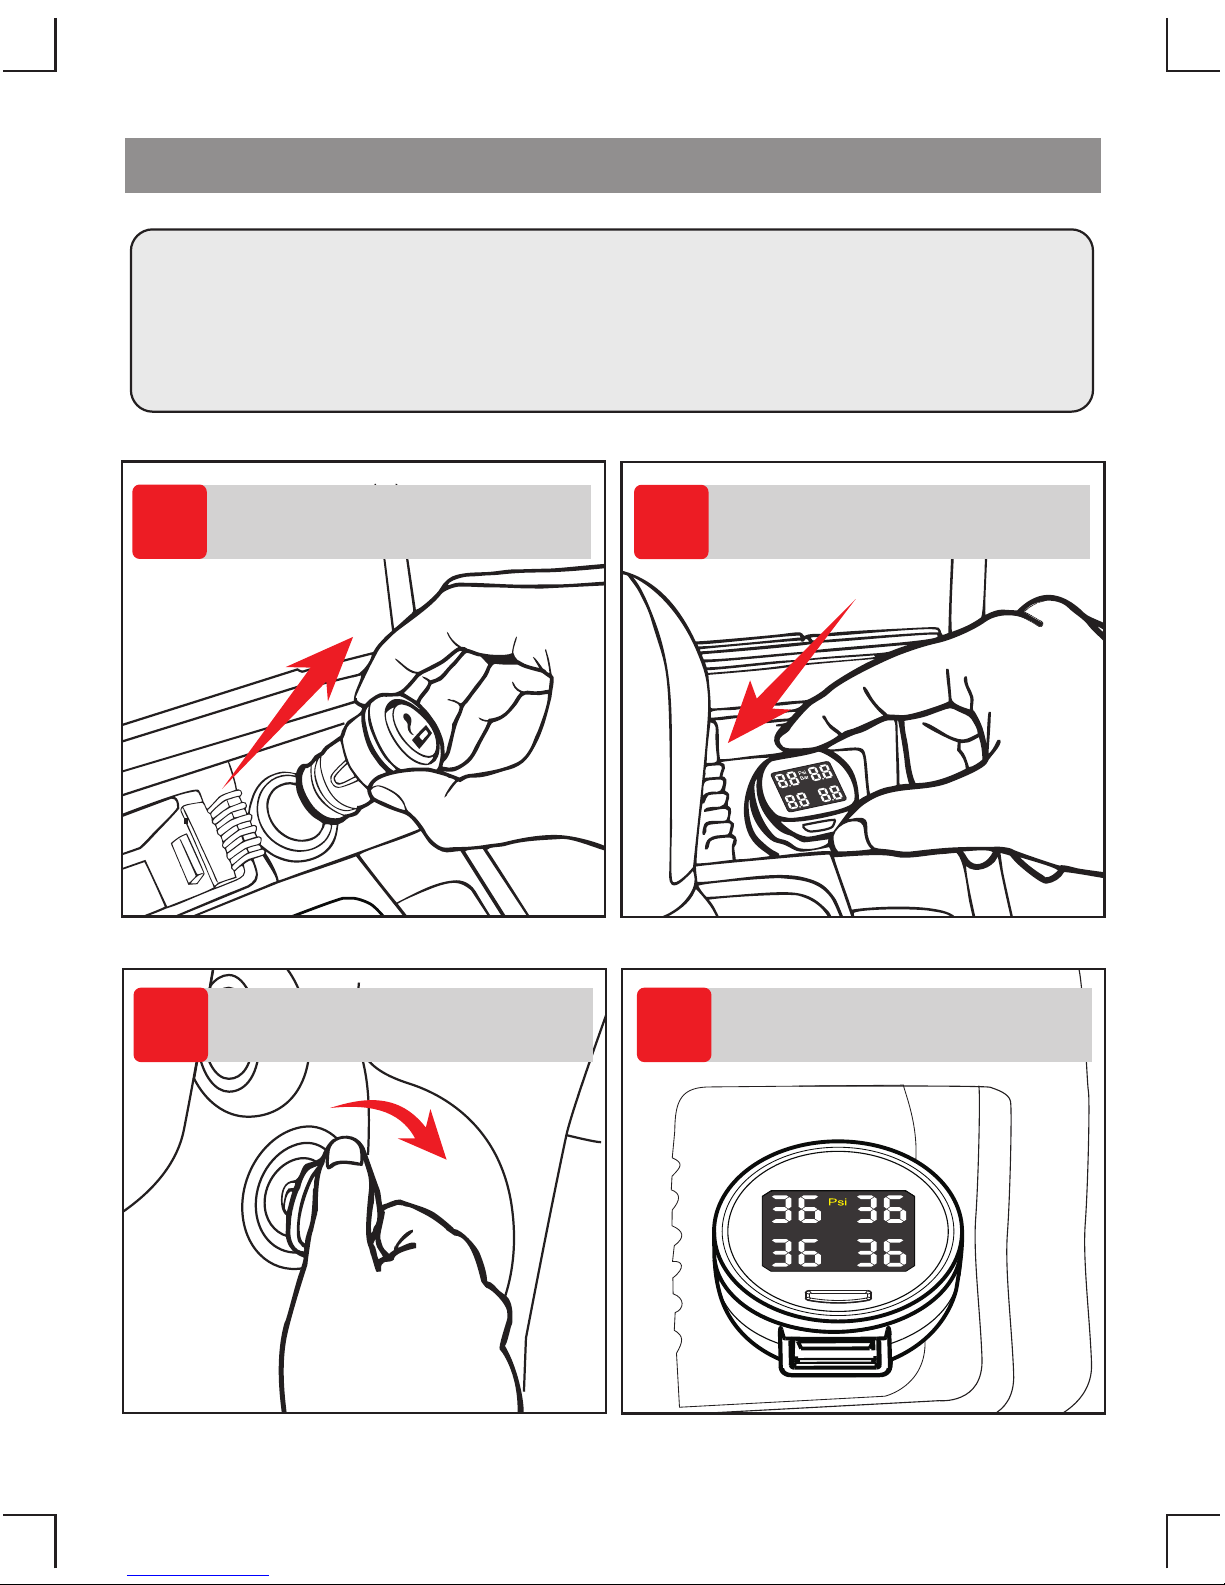
Display Power On .......................................................................... 4
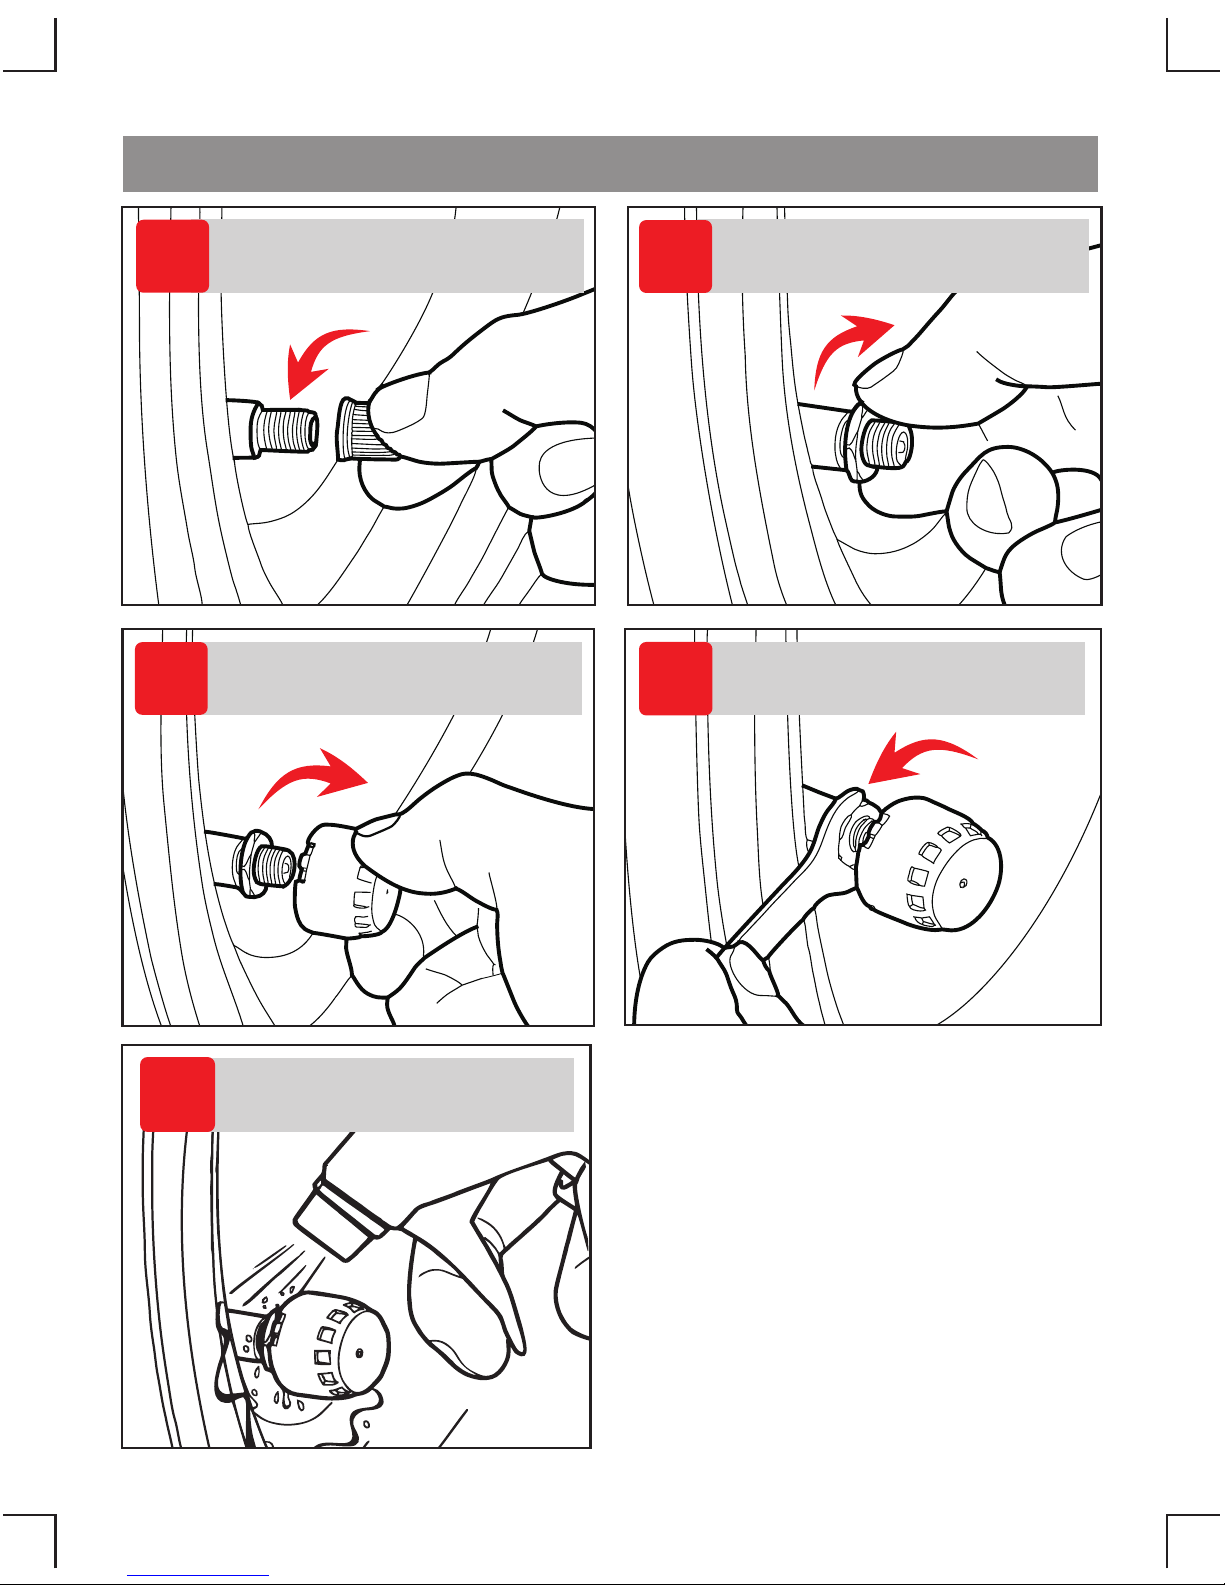
Installation of tire sensors.................................................................. 5
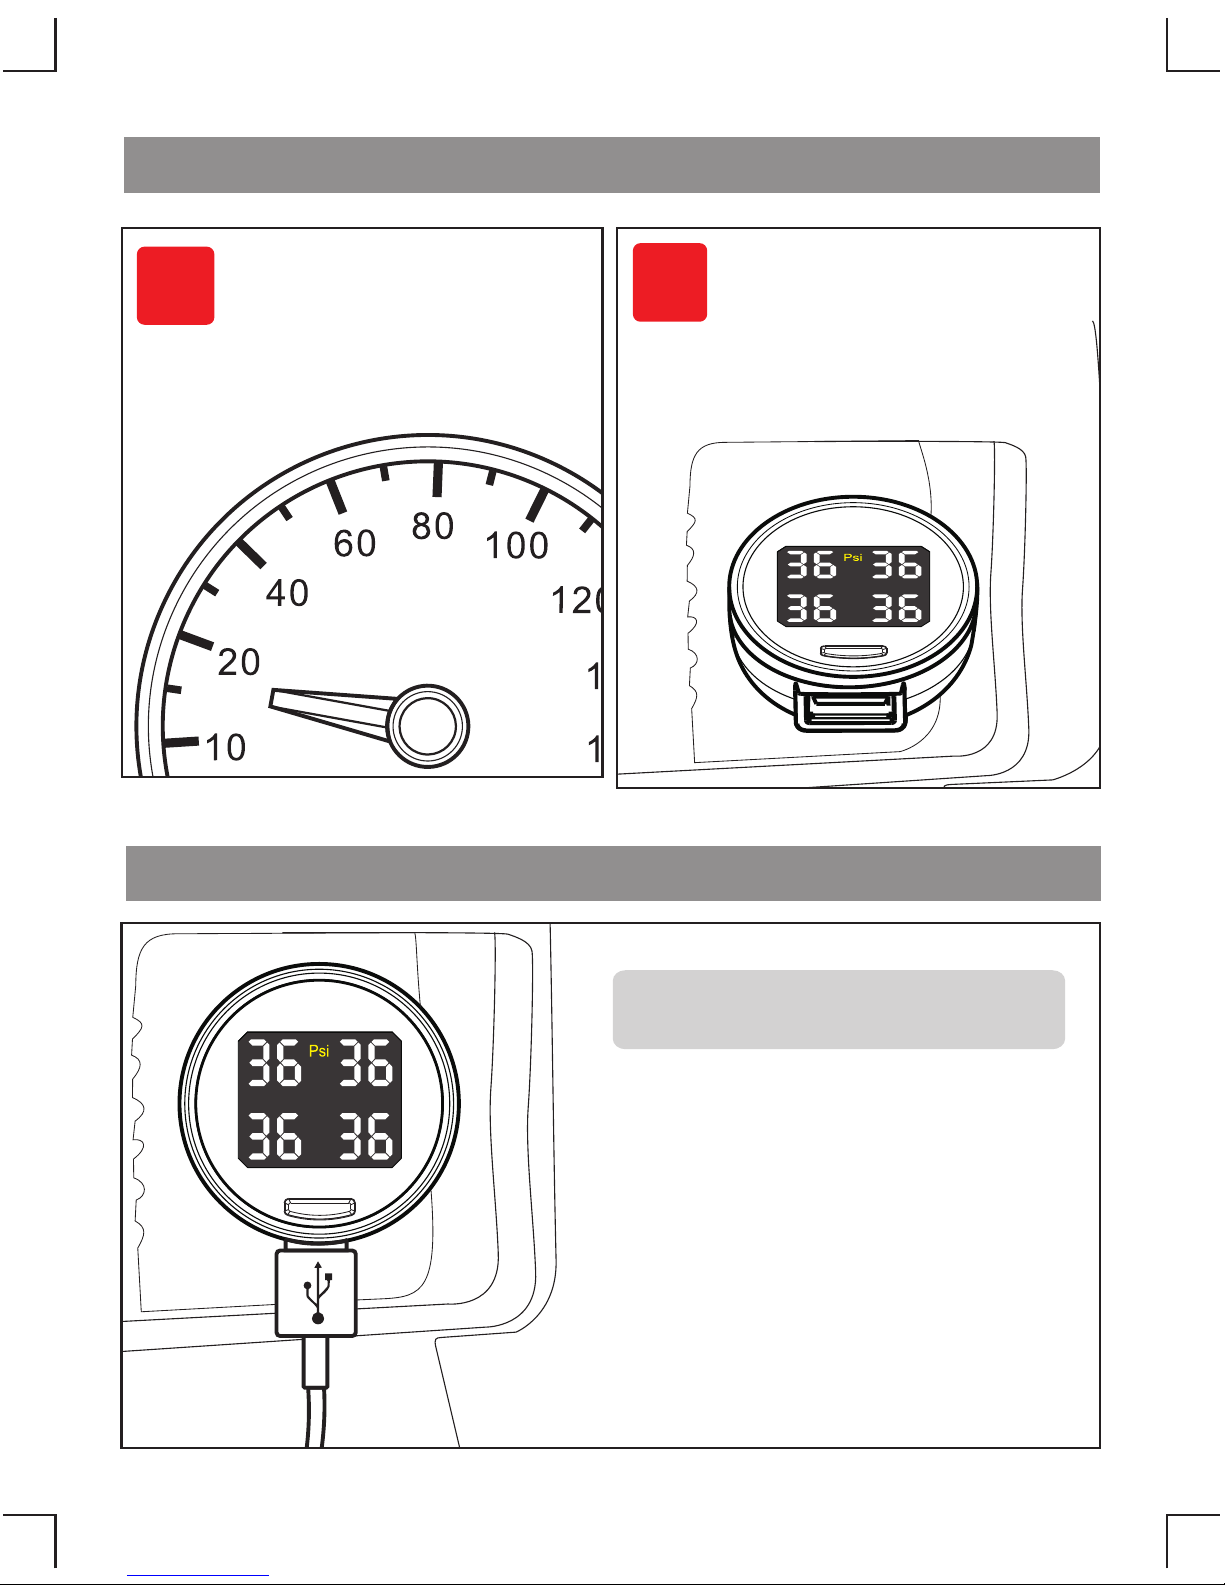
Driving checking ............................................................................. 6
USB charging Socket ...................................................................... 6
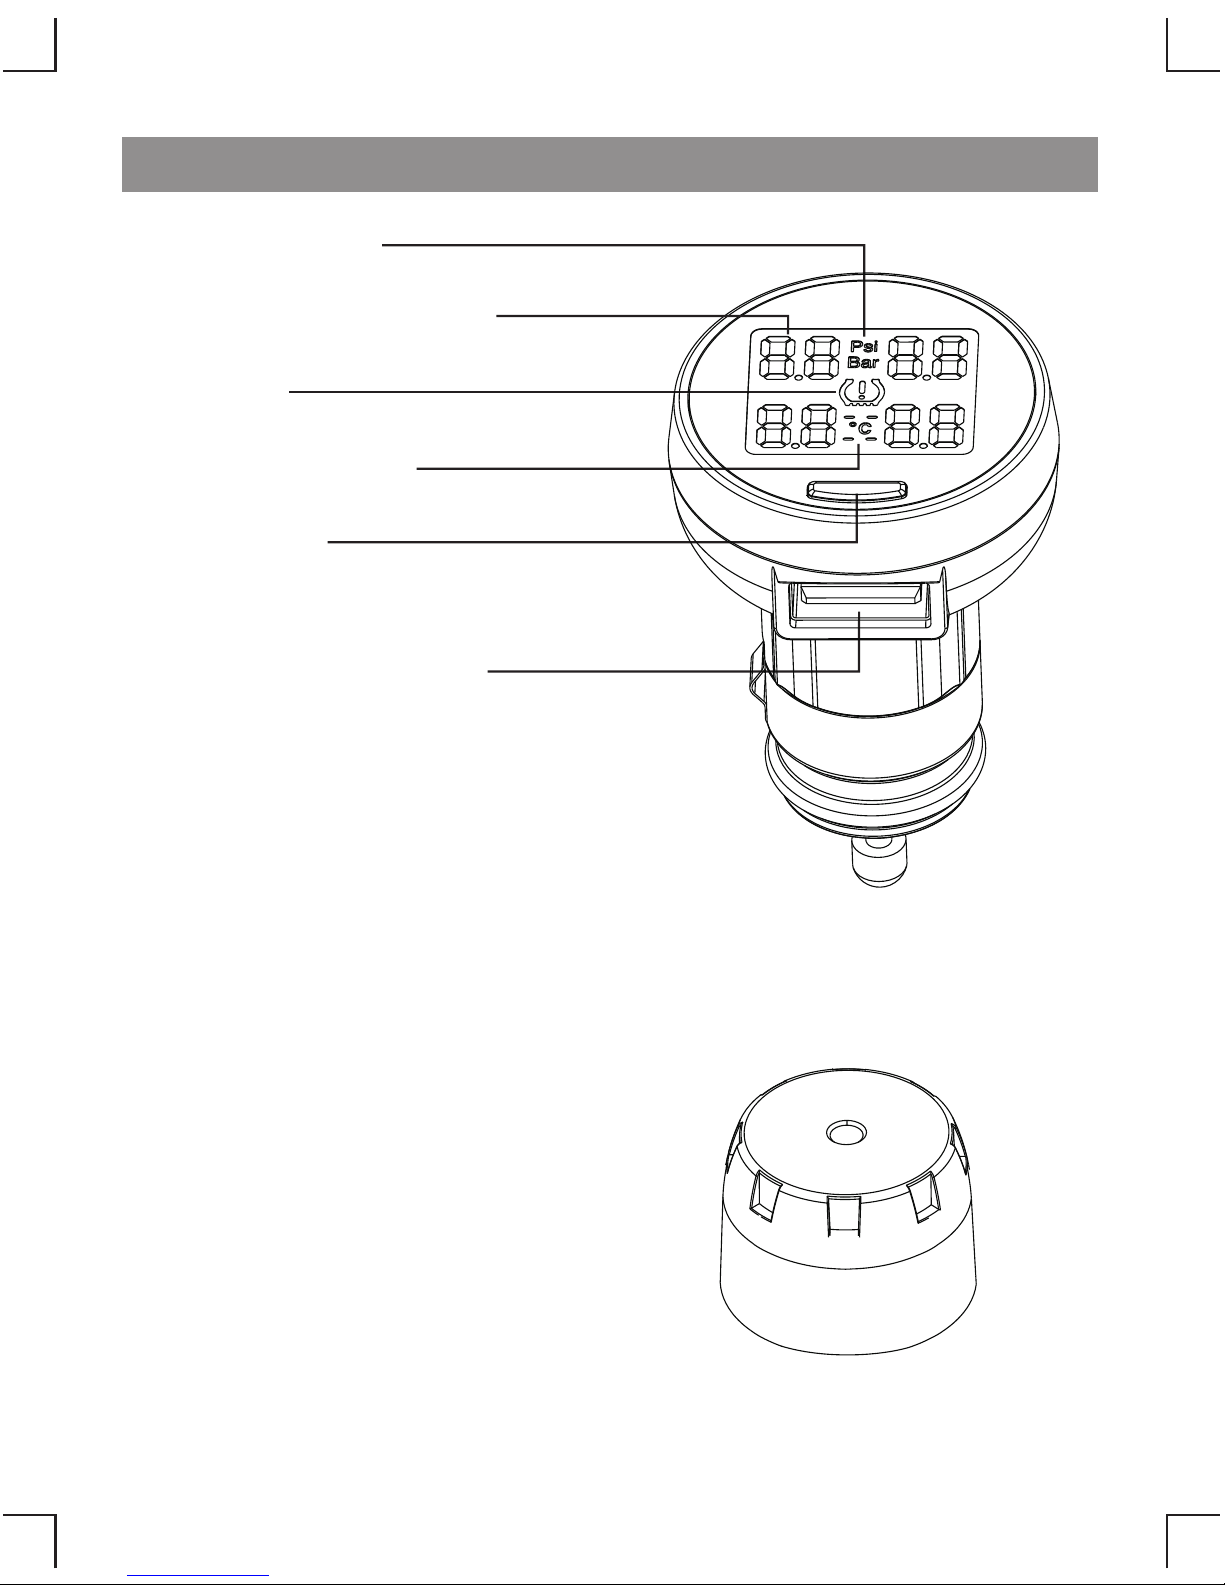
Display Functions ........................................................................... 7
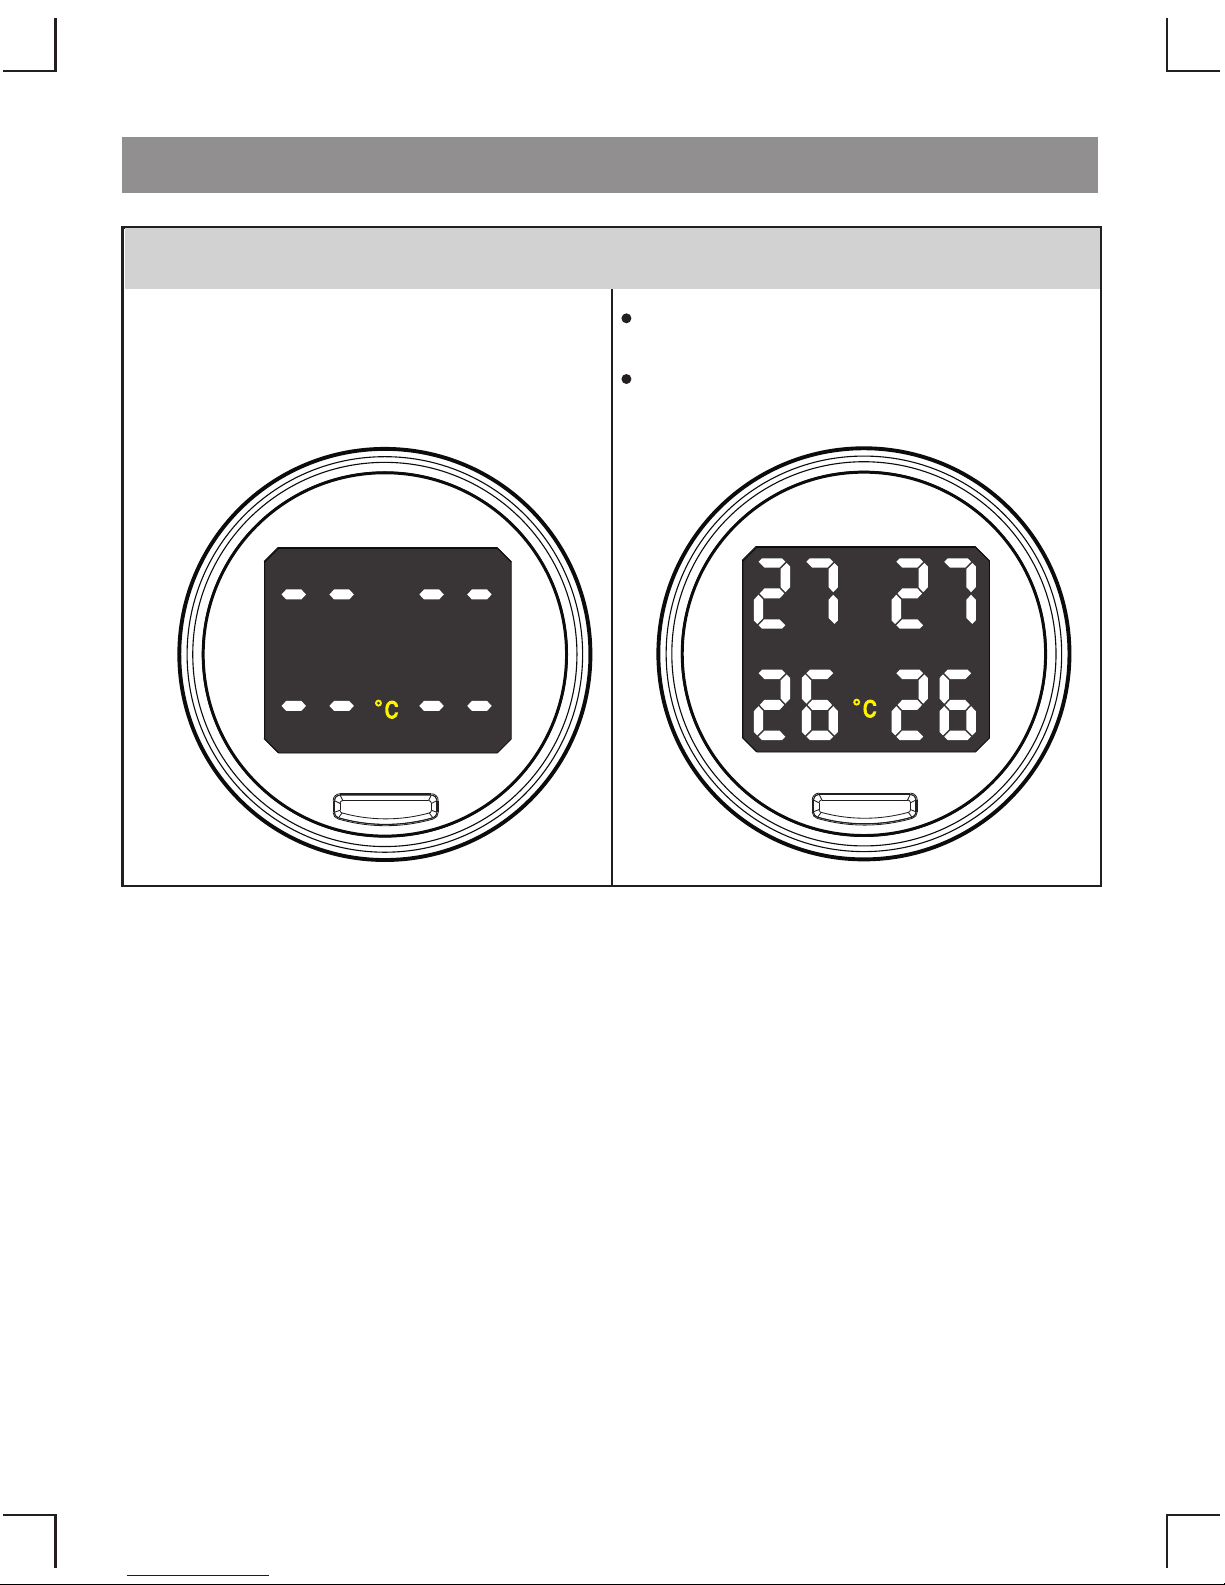
Temperature Query .......................................................................... 8
SET Button Functions ................................................................... 10
Pressure Unit Switching ................................................................ 10
High pressure alarm value setting (Factory default 46Psi) ............. 11
Low pressure alarm value setting ( Factory default 26Psi) ............. 12
Display and Sensor Code Learning ............................................... 13
2 Ways to Exit Code Learning Mode ............................................. 15
Sensor Exploded View ................................................................. 16
A: Replace Sensor Battery ............................................................. 17
B: Replace Sensor Battery ............................................................ 18
Leakage Reasons of Nonstandard Tire Valve ................................ 19
Technical Parameter: .................................................................... 20
FAQ .............................................................................................. 20
Notes and Statement ...................................................................... 21

2
Packing List
Pressure Unit
Warning
Value of Tire Pressure
Temperature Unit
SET Button
USB Charging Socket
Display
Sensor 4pcs

Uncap Wrench
(for replacing battery)
Hexagonal Nut 5pcs (one for backup)
Nut Wrench
Anti-dismantle
Locking Plate
2pcs(for backup)
If the silicon seal ring is damaged, please replace it by the
backup ring for avoiding leakage.
As shown in page 17 picture 3 - Replace Sensor Battery.
( for replacing the silicon seal ring)Ring Needle
①
②
for pulling out the silicon seal ring
for setting the silicon seal ring
Silicon Seal Ring 4pcs(for backup)
Standard Tools and Accessories
for locking the sensor with
hexagonal nut
A: Tools and Accessories B: Tools and Accessories
For fixing the sensor base when
unscrew the sensor cover to
replace battery
Combination Wrench
3

4
12
ON
34
Display Power On
Pull out the cigar lighter Plug in the display
ACC ON Display power on,
and start to receive data.
Important:
Before installing the sensors, display must be plugged in
and vehicle key turned from ACC.OFF to ACC.ON.

5
1Backout dustproof cap
of tire valve.2Screw- in the
hexagonal nut.
Screw- in the sensor in
proper tire according to
the mark in the .Cover
3Tighten the sensor by
nut wrench in reverse
direction.
4
5Check if it is leaking
with soapsuds.
Installation of tire sensors

6
>15km/h
1
2
Driving Checking
When the driving speed
is up to 15km/h, the
display will update the
data of tire pressure
automatically.
There is a USB socket in display,
it can charge some portable
products such as mobile phone or
MP3 while the tire pressure
monitor is working.
Output voltage: 5V
Output current: 1A
USB Charging Socket
With display power on
If all the 4 tire pressure
values are shown, it means
the system installed and
working successfully.

7
Bi-Bi-Bi-Bi-Bi-
Display Functions
all 4 tire pressure data shown
The display will show all the tire pressure
values right after the vehicle engine start.
Leakage
Warning
It means the tire may be stick by nail
or aged.
Abnormal
Pressure
Warning
The pressure is out of normal range
26 to 46Psi.
Above 46 :Bi-Bi-Bi-Bi-Psi
Below 26 Psi: Bi Bi Bi- - -
Sensor Battery
Run Out of Power
The lifetime of sensor battery is over 3
years.

8
Bi-Bi-Bi-
High Temperature
Warning
The tire temperature is higher
than 65℃.
Sensor
Disabled
Display Functions
Temperature Query
The display will show temperature unit
if the tire temperature is above 0℃, and
will show if it is under 0℃.
Press the SET button once shortly, the
display will beep once and show tire
temperature values as below , and then
go back to tire pressure values after 10
seconds automatically.

9
Display Functions
Temperature Range
The detected temperature range is from
-40 to 99℃.
The display will update the temperature
values only if driving speed is up
to 15km/h.
Display will show temperature values
as below when power on.

10
Bi-
SET Button Functions
Press SET button once shortly, the display will show the tire
temperatures.
Until the display beep once and release --- Pressure unit switching (Psi/Bar)
Until the display beep twice and release --- High pressure alarm value setting
(Factory default 46Psi)
Until the display beep thrice and release --- Low pressure alarm value setting
(Factory default 26Psi)
Until the display beep 4 times and release --- Enter the code learning mode
Until the display beep 5 times and release --- Restore factory defaults
Press SET button and hold on:
ACC ON, after display is power on, whenever press the SET button and hold on
until it beeps once and release, the pressure unit can be switched between “Bar”
and “Psi”. The factory default pressure unit is Psi.
Pressure Unit Switching
long
press

11
1 2
3 4
Bi-Bi-
High pressure alarm value setting (Factory default 46Psi)
Press SET button and hold on
until the display beep twice and
release, enter high pressure
alarm value setting.
long
press
The display shows the
current alarm value.
Press SET button and hold
on until the display beep
twice and then release to
confirm and exit setting.
long
press
short
press
The alarm value increases 1Psi by
each pressing SET button once
shortly, and it will be circular between
36 and 51Psi.

12
1 2
3 4
Bi-Bi-Bi-
Low pressure alarm value setting (Factory default 26Psi)
Press SET button and hold on
until the display beep thrice and
release, enter low pressure
alarm value setting.
The display shows the current
alarm value.
long
press
The alarm value increases 1Psi by
each pressing SET button once
shortly, and it will be circular
between 11 and 35Psi.
Press SET button and hold
on until the display beep
thrice and then release to
confirm and exit setting.
long
press
short
press

13
12
3
Display and Sensor Code Learning
Before the sensor installed in
tire, turn car key from ACC OFF
to ACC ON, plug the display in
the cigar lighter till it is working.
Press SET button and hold on
until the display beep 4 times
and release
long
press
The display will show the order 01-02-03-04 for FL-FR-RR-RL sensors,
and 01 starts to flash indicates FL sensor can be learned right now.

14
4
5
Install the FL sensor in front-left tire, display will beep once and show
the tire pressure value after 10 seconds, which means FL sensor already
learned successfully.
short
press
Press SET button once shortly
to enter the next sensor code
learning.
Display 02 starts to flash, install the
FR sensor in front-right tire.
And repeat above steps for rest
sensors.
If there is only one sensor need to be learned, press the SET button
one by one time until it shows the right tire.
Display and Sensor Code Learning

15
Bi-Bi-Bi-Bi-
1
Bi-Bi-Bi-Bi-Bi-Bi-Bi-
2
Bi-Bi-Bi-Bi-Bi-Bi-Bi-
After 4 sensors are learned successfully, the system will exit
code learning mode after 20 seconds automatically, and the display
will beep 7 times.
After 4 sensors are learned successfully, press SET button and hold on
until it beep 4 times and then release to exit code learning mode, and the
display will beep 7 times next.
20 seconds
long
press
2 Ways to Exit Code Learning Mode

16
Sensor Exploded View
Sensor
Silicon Seal Ring
Button Battery CR1632
Cover

17
A: Replace Sensor Battery
Lithium
Cell
CR 1632
3V
1Loosen the
hexagonal nut. 2Backout the sensor.
Silicon
seal ring
(Red)
Anti-dismantle
locking plate
3
Take out the anti-dismantle
locking plate.
4Backout the with
uncap wrench
Cover
5Replace the new
button battery 6Assemble the sensor in
reverse operation.

18
3
2
33
4
5
* No need to take out the sensor from tire if it is installed already, just
unscrew the sensor cover from the valve to replace battery
Back-out the sensor cover in
a counterclockwise direction
The uncovered sensor is as
follow picture
Replace the new button battery.
(Note the battery polarities)
Put back the sensor cover and
tighten in clockwise direction.
Battery replaced
successfully.
If the sensor is not installed in tire valve,
please use the combination wrench to
fix the sensor base, and then unscrew
the sensor cover.
B: Replace Sensor Battery

19
Leakage Reasons of Nonstandard Tire Valve
Standard Valve
The valve core is even with
the edge.
The valve thread
length ≥ 9mm
Leakage Reason 1 of
Nonstandard Tire Valve
The breach in the valve may
cause the leakage, please
replace it with a standard valve.
If the valve core is
higher than edge,
please adjust it
with nut wrench.
>9mm
If the valve core is
lower than edge,
please adjust it
with nut wrench.
Leakage Reason 2 of
Nonstandard Tire Valve
Leakage Reason 3 of
Nonstandard Tire Valve
Table of contents