TAKASAGO HX-S-G2 Series User manual

www.takasago-ss.co.jp
Constant-Voltage/Constant-Current DC Power Supply
HX-S-G2 series Instruction Manual
HX-S-030-200G2/HX-S-030-400G2
HX-S-060-100G2/HX-S-060-200G2
HX-S-0120-50G2/HX-S-0120-100G2
HX-S-0400-15G2/HX-S-0400-30G2
HX-S-0500-12G2/HX-S-0500-24G2
HX-S-01000-6G2/HX-S-01000-12G2

Table of Contents
Safety Instructions.......................................4
For your safety ........................................................ 5
Exporting.................................................................. 5
About tthis machine.....................................6
Features.................................................................... 6
Part Names and Functions..................................... 8
Front Panel (Comon to all models)........................ 8
Rear Panel........................................................... 10
Rear Panel (Each model individual part)..............11
Preparation and Connection .....................12
Unpacking .............................................................. 12
Placement .............................................................. 14
Connecting the Power Supply ............................. 15
Connecting the Input power source.................... 16
Connecting Loads ................................................. 17
Attaching the Output Terminal Cover ................. 19
Basic Usage................................................25
Startup Display ...................................................... 25
Default Settings ..................................................... 26
Returning Factory Settings.................................. 27
Backing-Up Settings............................................ 27
Operating as Constant Voltage Power Supply... 28
Operating as Constant Current Power Supply... 30
Remote Sensing .................................................... 32
Function Settings .................................................. 33
Setting Functions .................................................. 33
Function Settings Items List ................................ 34
General Functions ............................................... 34
Calibration, Isolated option, Panel Operation...... 35
Communication Functions, External Control....... 36
Status Display, Beep Sound ................................ 37
Sequential Operation Function............................ 38
Setting Output ON/OFF Toggle Mode.................. 40
Over Voltage Protection (OVP)............................. 41
Over Current Protection (OCP) ............................ 43
Setting Operation during Alarm........................... 45
Error Codes............................................................ 46
Useful Function ..........................................47
Memory................................................................... 47
Saving in Memory................................................ 47
Loading from Memory.......................................... 47
Panel Memory Savable Settings ......................... 48
Startup Mode Selection ........................................ 49
Variable Slew Rate................................................. 50
Sequential ON/OFF................................................ 52
Sequential ON/OFF Connection.......................... 52
Using the Sequential Function ............................ 53
Key Lock................................................................. 55
Key Lock Settings................................................ 55
Canceling Key Lock .......................................... 55
Variable Internal Resistance ................................ 56
Measurement Display Smoothing ....................... 57
Linearity Compensation ....................................... 58
Setting Beep Sound .............................................. 59
Sequential Operating Function............................ 60
Overview.............................................................. 60
Display during sequential operation .................... 67
e.g. 1 Setting of sequential operation.................. 68
e.g. 2 Setting of sequential operation.................. 69
Using Via Digital Data Communication....70
Summary.................................................................70
Multiple Connections.............................................71
Serial Port Settings................................................72
Command Send Interval........................................72
Accessing ...............................................................73
Access Procedure ................................................73
Communication with Multiple Connections ..........74
Communication Commands .................................75
HX-S-G2 Standard Commands ...........................75
HX-S-G2 Standard Command Format.................75
HX-S-G2 Standard Command Details .................78
IEEE488.2 Common Command...........................78
SCPI Command ...................................................79
HX Compatible Commands................................117
HX-compatible Read-Back Commands .............125
Notes .....................................................................128
Using in Series/Parallel Operation .........129
Parallel Operation ................................................129
Connection .........................................................129
Operation ..............................................................130
Series Operation ..................................................131
Connection .........................................................131
Operation ...........................................................132
Toggling Output ON/OFF with External Contacts in
Series Operation ................................................132
Calibrating Slave Unit Output Settings..............133

Table of Contents
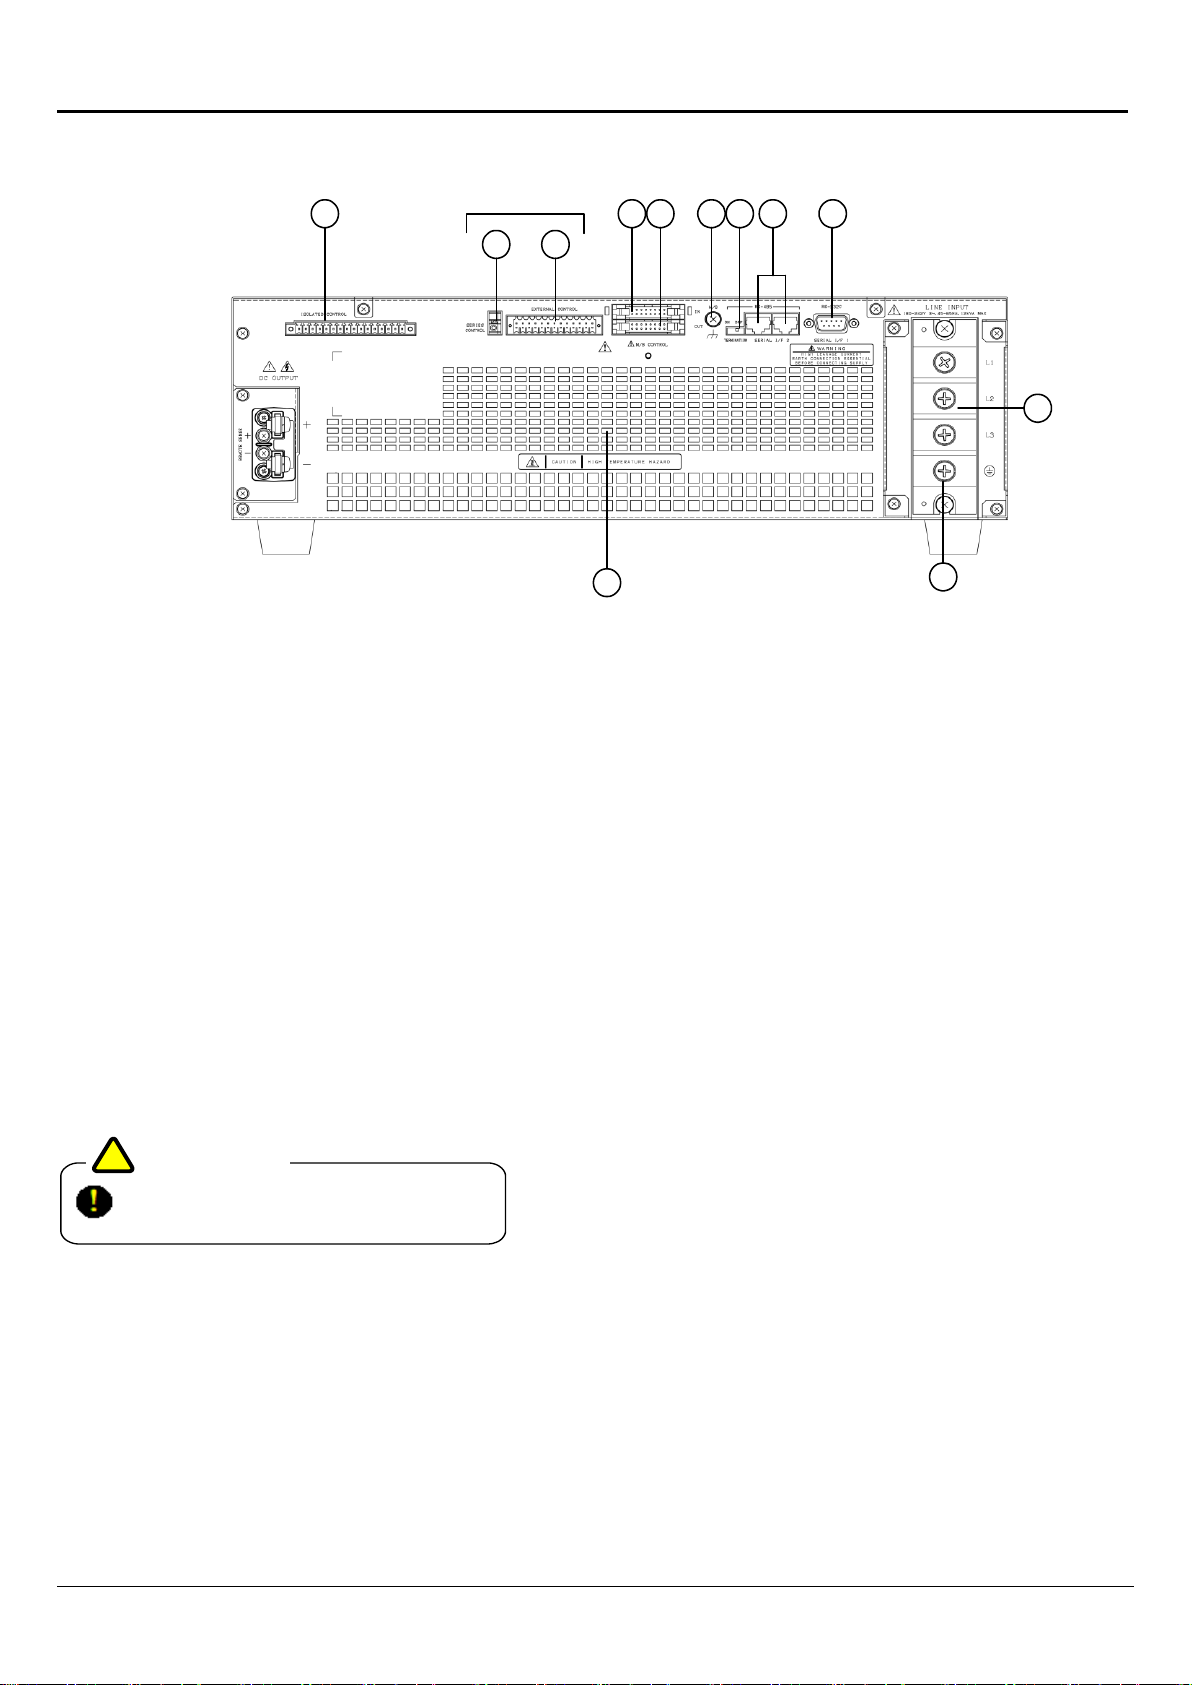
Controlling with External Analog & Contact
Signals ......................................................135
Using External Control Terminals...................... 135
External Control Connector Terminal List.......... 136
Isolated Control Connector Terminal List ..........136
Uses of Terminals ..............................................136
Toggling Output ON/OFF with External Contacts
............................................................................... 137
Toggling Output ON/OFF with Isolated External
Contacts ............................................................... 139
Toggling Output ON/OFF with External Contacts in
Series Operation.................................................. 141
TRIP Operation with External Contacts ............ 143
TRIP Operation with Isolated External Contacts
............................................................................... 144
Output Voltage Control ....................................... 145
Output Voltage Control with External Resistance
........................................................................... 145
Output Voltage Control with External Voltage ...149
Output Voltage Control with Isolated External
Voltage...............................................................150
Output Current Control....................................... 151
Output Current Control with External Resistance
........................................................................... 151
Output Current Control with External Voltage ... 155
Output Current Control with Isolated External
Voltage...............................................................156
Analog Output Monitor ....................................... 157
Output Voltage Monitor......................................157
Output Current Monitor......................................157
Isolated Analog Output Monitor......................... 158
Isolated, Output Voltage Monitor ....................... 158
Isolated, Output Current Monitor ....................... 158
Status Output....................................................... 159
Output Circuit..................................................... 159
LEVEL1_ALM, OUTPUT ON/OFF_STS ...........160
LEVEL1_ALM, ...................................................161
Special Loads...........................................162
Loads with Reverse Current .............................. 162
Pulse Current Loads ........................................... 163
Connection to Secondary Battery ..................... 164
Maintenance .............................................166
Warranty Period................................................... 166
Maintenance Service........................................... 166
Daily Maintenance and Inspection .................... 166
Lifespan of Parts ................................................. 166
Cleaning the outer of this equipment................ 166
Periodical check and replacement of air filter.. 167
Calibration ................................................170
Calibrating Output Settings................................ 170
Offset/Full Scale Calibration of Output Voltage
Settings..............................................................170
Offset/Full-Scale Calibration of Output Current
Settings..............................................................172
Offset/Full-Scale Calibration of Output Voltage
with External Analog Input ................................. 174
Output Voltage Control with External Voltage
(Isolated External Voltage) ................................ 174
Output Voltage Control with External Resistance(A)
...........................................................................176
Output Voltage Control with External Resistance(B)
...........................................................................178
Output Voltage Control with External Resistance(C)
...........................................................................180
Offset/Full-Scale Calibration of Output Current
with External Analog Input..................................182
Output Current Control with External Voltage
(Isolated External Voltage).................................182
Output Current Control with External Resistance (A)
...........................................................................184
Output Current Control with External Resistance (B)
...........................................................................186
Output Current Control with External Resistance (C)
...........................................................................188
Calibrating Meters................................................190
Voltmeter Offset/Full-Scale Calibration ..............190
Ammeter Offset/Full-Scale Calibration...............192
Offset/Full Scale Calibration of Output Voltage
Monitor (Isolated Output Voltage Monitor)........194
Offset/Full Scale Calibration of Output Current
Monitor (Isolated Output Current Monitor)........196
Specifications ..........................................198
Output Specifications..........................................198
Input Specifications.............................................199
Constant Voltage Characteristics ......................200
Constant Current Characteristics ......................201
Measurement and Display ..................................202
Protection Functions...........................................204
Remote Sensing...................................................204
Other Functions ...................................................205
Applied Standard (30V,60V,500V,1000V)............207
Applied Standard (120V,400V) Since 1 April 2021
...............................................................................207
External Control ...................................................207
Isolation/ Withstanding Voltage..........................209
Cooling..................................................................209
Operational Environment....................................209
Dimensions/Weight..............................................210
External Diagrams ...............................................211
Appendix ..................................................224
Appendix 1 Output Current vs Input Current....224
Appendix 2 Output Current vs Efficiency..........230
Appendix 3 Rush Current Wave Form ...............236
Appendix 4 Loaded Current vs Recommended
Conductor Area ....................................................237
Appendix 5 Circuit Block Diagram.....................238

Safety Instructions
4
Safety Instructions
This instruction manual uses the various symbols below to indicate areas of caution.
Please thoroughly read and understand these symbols and their significance prior to use.
The section “For your safety” contains information on items not included with your purchased product.
This manual uses the following marks and symbols to assist you in the proper use of this product.
Failure to observe precautions indicated by this symbol and improper use or handling of
the product will result in serious injury or death.
Failure to observe precautions indicated by this symbol and improper use or handling of
the product will result in serious injury or death.
Failure to observe precautions indicated by this symbol and improper use or handling of
the product may result in injury or property damage.
Items that must be observed are classified into the following marks.
This mark indicates items that are "Prohibited".
!
This mark indicates items that are "Mandatory".
!
This mark indicates general "Caution".
Symbols used within this manual are described below.
Contact with areas on the product indicated by this symbol may result in electric shock.
Unplug the power supply plug from the outlet. If
There is abnormal noise or smell Smoke appears Water or foreign objects has
entered the product
continual use of the product may cause fire or electric shock.
Dismantling or modification to the product is prohibited. Do not open the cover.
This may result in fire or electric shock. For repairs and adjustments please contact
your retailer.
Protective Earth Terminal. Please make a connection in earth.
Please connect for loads with earth terminals
!DANGER
!WARNING
!CAUTION

Safety Instructions
5
For your safety
This product is a power supply system for business use, which uses an input power of AC180V~242V (three phase).
Please be forewarned that it is not produced as an electronic device for general home use.
Improper use of this product may result in injury, electric shock or death, and may also result in fire.
Please thoroughly read and understand this manual prior to use. Further, this product should only be handled by a
specialist knowledgeable in electricity safety, or under the supervision of such a person.
Please read through this manual to ensure the proper placement and use environment for this product before turning
on power.
If any problems arise, please unplug the power supply plug from the outlet power immediately and contact Takasago.
Two or more persons are required to carry the this equipment. Turn off the input power switch "POWER"
and remove all cables from the main body beforehand. Hold the bottom surface during carrying.
Do not hold the handles on both sides. The handles are for rack mounting and not for carrying.
Exporting
Please contact Takasago in advance if wishing to export or carry this product outside of Japan.
Using this product near receivers (radios, televisions, etc.) may interfere with reception.
Please do not use this product in any medical, nuclear, or work involving human life.
Caution
1. Reproduction of the material contained within this manual without notice is strictly
prohibited.
2. Information contained within this manual may be altered without notification.
3. All material contained within this manual has been thoroughly examined. If by chance, any
errors, suspicious items, or omissions are discovered, please contact Takasago.
4. Takasago Co., Ltd. shall undertake no responsibility, regardless of clause 2, for any impact
this product may have on results.
Caution

About this machine
6
About tthis machine
The HX-S-G2 Series is the Switching DC Constant Voltage/Constant Current Power Supply capable of changing
from zero-volt and zero-ampere.
●The HX-S-G2 series allows the use of both the Constant Voltage and Constant Current modes, along with the ability
to be able to freely set the power from zero to full scale.
●The HX-S-G2 series, with full digital control, also grants settings with superior accurate reproduction.
12
6
0
18
24
30
050 100 150 200 250 300 350 400
Output Voltage(V)
Output Current(A)
HX030-200 HX030-400
30V Output Type
24
12
0
36
48
60
72
025 50 75 100 125 150 175 200
HX060-100 HX060-200
60V Output Type
200
100
0
300
400
500
0 3 6 9 12 15 18 21
HX0500-12 HX0500-24
500V Output Type
400
200
0
600
800
1000
1200
0 1.5 3 4.5 6 7.5 9 10.5 12
HX01000-6 HX01000-12
1000V Output Type
24
36
600
48
24
0
72
96
120
012.5 25 37.5 50 62.5 75 87.5
HX0120-50 HX0120-100
120V Output Type
160
80
0
240
320
400
0 3.75 7.5 11.25 15 18.75 22.5 26.25 30
HX0400-15 HX0400-30
400V Output Type
100
144 480
Output Voltage(V)
Output Voltage(V)
Output Voltage(V)
Output Voltage(V)
Output Voltage(V)
Output Current(A)
Output Current(A)Output Current(A)
Output Current(A) Output Current(A)
Features
Improved Parallel Operation (New Master/Slave)
Up to 10 HX-S-G2 power supplies of the same voltage output type
(maximum capacity 120 kW) can be operated in parallel.
Constant voltage transient recovery properties will not degrade, even
when increasing the number of parallel units, due to the new master-
slave method.
Serial Communication Port Standardized System
Equipped with a multi-drop communication port, one RS-232C or
RS-485 port is capable of controlling up to 31 units of supported
models.
* Special cable (T485-****: * is the code that indicates length.)
Supported models (as of July, 2012)
ZX Series
FK II Series
HX II Series
Useful Functions
Memory
Saving and loading can be done for 3 sets of panel setting
status. Tests such as voltage fluctuation test can be
conducted by easy operation.
Variable Slew Rate
Changes the slew rate for the rising and falling of the
voltage/current.
Startup Mode Selection
Equipped with a CC Priority Mode for loads with nonlinear V-I
characteristics similar to diodes, this function is capable of
preventing current overshoot when output is ON.
[Output Voltage/Current Range]

About this machine
7
Sequential ON/OFF
Sets the order outputs are toggled ON/OFF through a multi-
connection cable.
Protection Functions
Guards valuable loads and power supplies with Over Voltage
Protection, Over Current Protection, Over Heating Protection,
Excessive Input Current Protection, etc
External Analog Control
Able to control ON-OFF output with external contact points, and
voltages and currents based on external DC voltage (0~10V) and
external resistance (0~or 0~10kΩ)
*Full-scale and offset adjustments can be performed with the front
panel dials.
Analog Monitor
Outputs the output voltage and output current with 0~10V DC.
*Not suited for monitoring transient voltage/current waveforms.
Status Alarm Output
Outputs an alarm or operation status with a photocoupler output
(open collector) insulated from outputs and the earth.
Variable Internal Resistance
This function intentionally generates a voltage drop due to load
current when running in Constant Voltage mode.
With this function, the power supply is capable of approximating an
internal resistance of chemical batteries (during electric discharge)
and I-V characteristics of solar/fuel cells.
* Restricted to direct current operations. Not suited for
approximating transient effects.

About this machine
8
Part Names and Functions
Front Panel (Comon to all models)
1 234 5 6 7
8
35
①. VOLTAGE
Voltage Setting/Selection Dial
Selects the voltage, the OVP, and various other parameters.
Press the dial to change the settings number place.
②. CURRENT
Current Setting/Selection Dial
Selects the current, the OCP, and various other parameters.
Press the dial to change the settings number place.
③. OUTPUT
Output ON/OFF Toggle Key
Toggles output ON/OFF.
The factory default setting for the output, after inserting power,
is OFF.
Lights when the output is set to ON.
④. MEMORY
Memory Display/Settings Key
Saving and loading can be done for the panel setting status with
keys "A", "B", and "C". Also, depending on the Function item
setting, this can be used to select One-Action or Two-Action
loading method.
⑤. LOCK
LOCK Key
Locks panel from use.
Lights when Lock has been enabled.
Below are the 3 types of Lock settings. They can be changed by
each function setting key (FUNC.).
Locks everything but the LOCK key
Locks everything but the OUTPUT and LOCK key
Locks only the Voltage/Current Dial, PRESET, and FUNC. keys.
⑥. LOCAL
LOCAL Key
Switches between “LOCAL”, operated from the panel, and
“REMOTE”, operated by control via serial data communication.
⑦.FUNC.
Function Key
Used for setting various functions
Lights when Function settings are available.
⑧.POWER
Input Power Switch
Toggles power ON/OFF
㉟.Handle for Rack Mounting
Handles are used for fixing this equipment to the rack.
Do not carry this equipment with these handles.

About this machine
9
Front Panel (Comon to all models)
10 11
9
14 1517 19 20
12 13
18 16
⑨.Ventilation Panels
Panels which allow cool air to enter and cool the product internally.
⑩.DISPLAY
Display Key
Toggles the displayed measurement information.
Can be toggled between 3 display modes: Voltage/Current,
Voltage/Power, Power/Current.
⑪. PRESET
Preset Key
Used to set the output voltage and output current.
Lights when Preset settings are available.
⑫. OVP/OCP
Over Voltage Protection (OVP)/Over Current
Protection (OCP) Key
Sets the trigger point for the OVP circuit and the OCP circuit.
⑬. ALARM RESET
Alarm Reset Key
Hold down for 1 second or more to cancel an alarm.
⑭. REMOTE
Remote Display Lamp
Lights when control has been transferred to an external computer,
etc. being accessed via serial interface.
⑮. Number Display (Voltage)
Displays the output voltage and the output power. When setting
functions with the Function key, the item number will be displayed.
⑯. Number Display (Current)
Displays the output current and the output power. When setting
functions with the Function key, the parameter will be displayed.
⑰. CV
Constant Voltage Display Lamp
Lights when output is set to “ON” during constant voltage mode.
⑱. CC
Constant Current Display Lamp
Lights when output is set to “ON” during constant current mode.
⑲. kW, V
Measurement Unit Display Lamp
Lights when Number Display (voltage) displays a voltage/power
value.
⑳. kW, A, Ω, mΩ
Measurement Unit Display Lamp
Lights when Number Display (current) displays a current/power
value. Also, displays the unit of the corresponding resistance value
when setting the Variable Internal Resistance function.

About this machine
10
Rear Panel
30
21
22 23
24 25 26 27 2831
29
32
*1000V type is unimplemented
㉑. ISOLATED CONTROL
Isolated Control Connector
This is the Status/Alarm Output Connector.
It is used for external analog control input of isolation type,
analog monitor output, and contact input when the isolation
analog option is mounted,
Use the included specialized connectors.
㉒. SERIES CONTROL
Series Operation Control Connector
Connector for series connections.
When using in the slave mode, connect with the Master unit’s
minus output terminal using wires.
㉓. EXTERNAL CONTROL
External Control Connector
Connectors for external analog control input and analog monitor
output.
Use the included specialized connectors.
㉔. M/B CONTROL (IN)
Parallel Operation Control (Input) Connector
Control Signal Input Connector for parallel operations.
㉕. M/B CONTROL (OUT)
Parallel Operation Control (Output) Connector
Control Signal Output Connector for parallel operations.
㉖. TERMINATION
Termination Resistor ON/OFF Switch
When controlling one unit of this product via serial port, please
set the termination toggle switch to ON.
When using 2 or more power supplies, please set the first and
last units’ termination resistor ON/OFF switch to ON (set other
units' ones to OFF).
㉗. SERIAL I/F 2
Serial Port/Multi-Channel Connectors
Connectors for when controlling multiple HX-S-G2 Series
units or for controlling RS-485 type, serial ports.
Connected with special cable. (T485-****: * is the code that
indicates length.)
㉘. SERIAL I/F 1
Serial Port Connector
Connector for connecting computers etc. with serial cables
(RS-232C).
㉙. LINE INPUT
Input Terminal Platform
This is the terminal platform that connects the power of this
product
㉚. Ventilation Discharge Opening
Ventilation discharge opening for cooling the
product internally.
㉛. M/B FG
FG terminal for parallel connection cable
This is the terminal for connecting the FG of parallel
connection cable.
㉜.PROTECTIVE EARTH TERMINAL (M6)
As for parallel connection cables, be sure touse the
special cable (HXPH-****:*specifies the length).
!WARNING
Mandatory

About this machine
11
Rear Panel (Each model individual part)
HX-S-030-200
34
33
34
33
34
33
34
33
34
33
33
34
33
34
HX-S-030-400 HX-S-060-100/HX-S-0120-50
34
33
HX-S-060-200/HX-S-0120-100 HX-S-0500-12/HX-S-0400-15 HX-S-0500-24/HX-S-0400-30
HX-S-01000-6 HX-S-01000-12
㉝.DC OUTPUT terminal
Always use crimp terminals, please firmly tighten the
screws.
Please Once connected sure to attach the output terminal
cover.
㉞.REMOTE SENSE terminal
Remote sensing terminal or connector.
!
!
Mandatory
!CAUTION
A Crimp-Style Terminal must be used. Please be
sure to tighten all attachment screws.
After connecting, attach the output terminal cover
before use.

Preparation and Connection
12
Preparation and Connection
Unpacking
Please check the following accessories are included when unpacking.
Please confirm there is no scratches or dents on the power supply and accessories.
No.
Name
The
Number
Included
HX-S-G2 Series
Remarks
30
-200
30
-400
60
-100
60
-200
500
-12
500
-24
1000
-6
1000
-12
1
Input Terminal Cover
1
○
○
○
○
○
○
○
○
An Input Terminal Cover and
two M3 x 8mm screws.
It is attached to the ㉙LINE INPUTon
the rear panel at the time of shipment.
2
Dummy Connector
2
○
○
○
○
○
○
○
○
They are attached to the M/B
CONTROLs such as ㉔and ㉕on
the rear panel at the time of shipment.
3
Isolated Control Connector
1
○
○
○
○
○
○
○
○
It is attached to the ㉑ISOLATED
CONTROL on the rear panel at the
time of shipment.
4
External Control Connector
1
○
○
○
○
○
○
×
×
It is attached to the ㉓EXTERNAL
CONTROL on the rear panel at the
time of shipment.
5
Instruction Basic Manual
1
○
○
○
○
○
○
○
○
6
Basic Instruction Manual (CD-
ROM)
1
○
○
○
○
○
○
○
○
7
Sequential Operation Setting
Software (CD-ROM)
1
○
○
○
○
○
○
○
○
8
Output Terminal Connection Bolts
(for 30V, 60V and 120V type)
2 sets
○
○
○
○
×
×
×
×
The following are attached to the ㉝
DC OUTPUT terminal on the rear
panel at the time of shipment.
- A M12 x 30mm bolt
- Two M12 flat-washes
- A M12 spring-washer
- A M12 nut
9
Output Terminal Connection
Screws (for 400V,500V and 1000V
type)
2
×
×
×
×
○
○
○
○
M5 x 12mm screws are attached to the
㉝DC OUTPUT terminal on the rear
panel at the time of shipment.
10
Output Terminal Cover
(for 30-200 ,60V and 120V type)
1 set
○
×
○
○
×
×
×
×
- Two same-shape Output Terminal
Covers
- A support for mounting cover
- Two M3 x 6mm screws
11
Output Terminal Cover
(for 30-400)
1 set
×
○
×
×
×
×
×
×
- Output Terminal Cover (4-split)
- Six M3 x 6mm screws
12
Output Terminal Cover
(for 400V,500V and 1000V type)
1 set
×
×
×
×
○
○
○
○
- Two same-shape Output Terminal
Covers
- A support for mounting cover
- Two M3 x 6mm screws
13
Output Terminal Protection Tube
(for 30-200,60V and120V type)
2
○
×
○
○
×
×
×
×
14
Output Terminal Protection Tube
(for 30-400)
2
×
○
×
×
×
×
×
×
15
Wire bands for fixing Output
Terminal Protection Tube
4
○
○
○
○
×
×
×
×
16
Parallel Connection Terminal
Cover
1 set
×
×
○
○
○
○
○
○
It is attached to the rear panel at the
time of shipment
17
Remote Sensing Connector (30-
400)
1
×
○
×
×
×
×
×
×
It is attached to the ㉞remote sensing
terminal at the time of shipment.
18
Remote Sensing Connector
(for 1000V type)
2
×
×
×
×
×
×
○
○
It is attached to the ㉞remote sensing
terminal at the time of shipment.
19
Remote Sensing Connector Cover
(for 1000V type)
1
×
×
×
×
×
×
○
○
It is attached to the ㉞remote sensing
terminal at the time of shipment.
20
Wire bands for fixing Remote
Sensing cable
1
×
×
×
×
×
×
○
○
It is a wire band for fixing the cable for
remote sensing to avoid any
disconnection.
Note) "〇" represents the accessories are included while "×" means not-included.
Please check the all accessories in the list is included.

About this machine
13
No.
Name
The
Number
Included
HX-S-G2 Series
Remarks
120-50
120-100
400-15
400-30
1
Input Terminal Cover
1
○
○
○
○
An Input Terminal Cover and
two M3 x 8mm screws.
It is attached to the ㉙LINE INPUTon
the rear panel at the time of shipment.
2
Dummy Connector
2
○
○
○
○
They are attached to the M/B
CONTROLs such as ㉔and ㉕on
the rear panel at the time of shipment.
3
Isolated Control Connector
1
○
○
○
○
It is attached to the ㉑ISOLATED
CONTROL on the rear panel at the time
of shipment.
4
External Control Connector
1
○
○
○
○
It is attached to the ㉓EXTERNAL
CONTROL on the rear panel at the time
of shipment.
5
Instruction Basic Manual
1
○
○
○
○
6
Basic Instruction Manual (CD-
ROM)
1
○
○
○
○
7
Sequential Operation Setting
Software (CD-ROM)
1
○
○
○
○
8
Output Terminal Connection Bolts
(for 30V, 60V and 120V type)
2 sets
○
○
×
×
The following are attached to the ㉝
DC OUTPUT terminal on the rear panel
at the time of shipment.
- A M12 x 30mm bolt
- Two M12 flat-washes
- A M12 spring-washer
- A M12 nut
9
Output Terminal Connection
Screws (for 400V,500V and 1000V
type)
2
×
×
○
○
M5 x 12mm screws are attached to the
㉝DC OUTPUT terminal on the rear
panel at the time of shipment.
10
Output Terminal Cover
(for 30-200 ,60V and 120V type)
1 set
○
○
×
×
- Two same-shape Output Terminal
Covers
- A support for mounting cover
- Two M3 x 6mm screws
11
Output Terminal Cover
(for 30-400)
1 set
×
×
×
×
- Output Terminal Cover (4-split)
- Six M3 x 6mm screws
12
Output Terminal Cover
(for 400V,500V and 1000V type)
1 set
×
×
○
○
- Two same-shape Output Terminal
Covers
- A support for mounting cover
- Two M3 x 6mm screws
13
Output Terminal Protection Tube
(for 30-200,60V and120V type)
2
○
○
×
×
14
Output Terminal Protection Tube
(for 30-400)
2
×
×
×
×
15
Wire bands for fixing Output
Terminal Protection Tube
4
○
○
×
×
16
Parallel Connection Terminal
Cover
1 set
○
○
○
○
It is attached to the rear panel at the
time of shipment
17
Remote Sensing Connector (30-
400)
1
×
×
×
×
It is attached to the ㉞remote sensing
terminal at the time of shipment.
18
Remote Sensing Connector
(for 1000V type)
2
×
×
×
×
It is attached to the ㉞remote sensing
terminal at the time of shipment.
19
Remote Sensing Connector Cover
(for 1000V type)
1
×
×
×
×
It is attached to the ㉞remote sensing
terminal at the time of shipment.
20
Wire bands for fixing Remote
Sensing cable
1
×
×
×
×
It is a wire band for fixing the cable for
remote sensing to avoid any
disconnection.

Preparation and Connection
14
Placement
To ensure proper and safe use of this product, please observe the following.
Prohibited
Do not use in areas exposed to rain and water.
Prohibited
Do not place in areas in which flammable gases are present.
Prohibited
Do not insert any metallic pins, wires, screws, etc. in the front ventilation panels and in the rear fan
motor. Doing so may result in electric shock and/or fire.
Prohibited
This product was designed to be used in stable areas. Do not use or place in areas prone to
vibration.
Improper placement of the power supply may result in damage. Please see below for proper
placement.
How to place:
!
Mandatory
Use only in areas with a room temperature of 0~50℃, humidity of 20~90%RH, and which is absent
of any corrosive gases.
Prohibited
This power supply uses a forced air cooling system. Do not obstruct the front ventilation panels
and rear ventilation discharge opening. If affixing to a rack, attach ventilation panels or others to
the rear of the rack to prevent exhaust from staying inside the rack.
Do not close the front of switch to operate the input power switch "POWER" easily.
!
Mandatory
If using in environment where electric conductive contamination occurs, considerations needs to be
taken such as intaking air using duct.
!
Caution
Using this product near receivers (radios, televisions, etc.) may interfere with reception.
!WARNING
!CAUTION
!CAUTION

Preparation and Connection
15
Connecting the Power Supply
This product operates on a 180V to 242V and 45Hz to 65Hz three-phase AC power supply.
To ensure proper and safe use of this product, please observe the following.
!
Mandatory
Verify that the input power supply (power supply AC 180V to 242V) is turned off when wiring input
terminals.
!
Mandatory
A noise filter is built into the device to prevent EMI (Electromagnetic Interference).
Due to this, even the slightest amount of leaked current may result in electric shock if not properly
grounded.
For safety reasons, please ground the device.
!
Mandatory
Please use input power within ranges of 180V to 242V and 45Hz to 65Hz (three-phase).
The nominal power supply voltage is displayed near the rear input connector platform.
!
Mandatory
Each phase ground voltage (between L1-G, between L2-G, between the L3-G), please use the
following power supply line
At high power supply line than AC242V This may cause a malfunction.
*Star connection and the delta connection either will be available.
Set circuit breaker between feeding device and this equipment.
Connect the circuit breaker to the feeding device and the equipment.
The input power switch of the equipment is not used for cutting power from AC line completely.
The breaker should be compliant with IEC60947-1 and IEC60947-3.
The breaker should be installed the position where the equipment can reach easily.
The breaker should be exclusive use of this equipment.
Indicate that the device is used for cutting power from AC line and Function (ON [|], OFF[○].
This
device
L1
L2
L3
Disconnecting
device
G
Power
supply
equipment
!
Mandatory
Please connect maximum power consumption to a possible power supply.
!
Mandatory
For wiring to the connector platform, be sure to connect it tightly.
Fastening loosely may cause heating and burnout of the connector platform.
!
Mandatory
The cross-section area of the wiring material should be sufficient against load current.
Please refer to the Appendix 4 "Loaded Current vs Recommended Conductor Area" (page237)
when you select the wiring material.
Maximum Input Current is displayed near the input terminals at rear side.
!DANGER
!CAUTION

Preparation and Connection
16
Connecting the Input power source
!
Mandatory
Please ground wire using more than the cross-sectional area of the following.
・HX-S-030-200,HX-S-060-100,HX-S-0500-12,HX-S-01000-6,HX-S-0120-50,HX-S-0400-15:
8mm2(AWG8)more
・HX-S-030-400,HX-S-060-200,HX-S-0500-24,HX-S-01000-12,HX-S-0120-100G2,HX-S-0400-30G2:
21mm2(AWG4)more
2. Tighten L1, L2, and L3 cable to the terminal block with
screws.
3. Mount the terminal cover to the terminal
block with the appended M3 screw.
1. Tighten the grounding cable to the protection
ground terminal of terminal block.
Please connect the grounding cable to the
terminal block at first.
When the cables are removed, please turn off the input power switch (POWER)
and remove the input cable after the confirmation of no power supply from the
feeding device.
Then remove grounding cable in the end.
!CAUTION

Preparation and Connection
17
After wiring, be sure to set the attached output terminal cover.
Connecting Loads
Wiring material to the output terminal by attaching a crimp terminals in the figure below specified, please firmly tighten the
bolt / screw which is included.
30V/60V/120V Type
Load
+
-
C1 C2
If you want to ground it is done at the
load end.
Do wiring material twisting,
Route as close as much as
possible.
M5 Screw
Output terminal cover
Load
+
-
C1 C2
If you want to ground it is done at the
load end.
Wiring
material Do wiring material twisting,
Route as close as much as
possible.
M12 Bolt M12 Crimping
terminal
Protective tube Insulation lock
Output terminal
cover
400V/500V/1000V Type
Wiring
material
M12 Crimping
terminal
Output Terminal Cover
(Photo is HX-S-0500-12G2)
Twisting wires can minimize the ripple and noise at the load terminal.
The noise level can be lowered to be smaller than the standard value by connecting the C1
and C2 close to the load terminal.
Use C1 and C2 that are small and with high-frequency impedance, and connect the lead
wire cutting it as short as possible.
C1: Electrolytic Capacitor 100 to 1000 μF
C2: Film Capacitor 1 to 10 μF
MEMO

Preparation and Connection
18
!
Mandatory
Verify that the main power supply for the power supply is turned off when connecting loads.
Prohibited
Do not wire loads when voltage is being outputted from the power supply.
!
Mandatory
Use wires with sufficient cross section areas for load currents.
For selecting wires, refer to Appendix 4 "Load Current vs Recommended Cross Section Area"
(page237).
!
Mandatory
Attach crimp-style terminals to wires and securely fasten.
If insecurely fastened, wires may become deformed or burn out due to the generated heat at
connection points.
!
Mandatory
Please to use it always attached parallel connection terminal cover (already factory attached).
* 30V type has not been attached.
!DANGER
!CAUTION
Parallel
connection
terminal cover

Preparation and Connection
19
Attaching the Output Terminal Cover
■HX-S-030-200/HX-S-060-100/HX-S-060-200/HX-S-0120-50/HX-S-0120-100
1.Attach a supporter for attaching cover on one output terminal cover (both covers are identical in shape).
*. Insert the supporter for attaching into the center part of the inside of the output terminal cover and fix it in
place by screwing an M3x6mm from outside.
2.Connect the cable to the output terminal by M12x30mm bolt nut.
3. Put a “Output Terminal Protection Tube” to the output cable and output terminal.
And the “Output Terminal Protection Tube” fix with Insulation lock.

Preparation and Connection
20
4. Fix the output terminal cover to which the supporter for attaching cover has been attached on the left-side grooves
of the output terminal.
5. Fix the other output terminal cover on the right-side grooves of the output terminal.
6. Fasten the output terminal covers with an M3X6mm screw.
Attaching the output terminal cover is completed.
M3x6mm Screw
This manual suits for next models
12
Other TAKASAGO Power Supply manuals