Talet Equipment Mini Auger Bucket User manual

Talet Equipment International td.
Mini Auger Bucket
Parts & Operators Manual
P.O. Box 2351 Strathmore AB Canada T1P 1K3
www.taletattachments.com
sales@taletattachments.com
Toll Free 1-888-317-5878 Fax 1-403-934-3042

To The Owner
General Comments
Congratulations on the purchase of your new Talet Auger Bucket. Your unit was
carefully designed and manufactured to give you many years of dependable
service. Your Auger Bucket will require some minor maintenance to keep it in top
working condition. Be sure to observe all maintenance procedures and safety
precautions in this manual and the safety decals located on the bucket and on
any equipment on which it is mounted.
About This Manual
Read this manual before using your bucket. This manual has been designed to
help you do a better and safer job. Read this manual carefully and become
familiar with the operating procedures before attempting to operate your auger
bucket. Remember, never let anyone operate this unit without them having read
and completely understanding the “Safety Precautions” and “Operating
Instructions” section of the manual, or having them be fully trained by an
experienced, qualified person who has read and completely understands the
“Safety Precautions” and “Operating Instructions”.
Service
When servicing your Auger Bucket remember to use only original manufacturer
replacement parts. Substitute parts may not meet the standards required for
safe, dependable operation.
To facilitate parts ordering, record the model and serial number in the space
provided on the page. This information may be obtained from the identification
plate located on your bucket.
Model___________________Serial No._____________________
Your parts department needs this information to insure that you receive the
correct parts for your specific model of auger bucket.
Safety Alert Symbol
This is the “Safety Alert Symbol” used by this industry. This
symbol is used to warn of possible injury. Be sure to read all
warnings carefully. They are included for your safety and for the
safety of others working around you.

Safety Precautions
Take note; this safety alert symbol is found throughout this manual. It is used to
call your attention to instructions involving your personal safety or others. Failure
to follow these instructions can result in serious injury or death.
THIS SYMBO MEANS:
ATTENTION
BECOME A ERT
YOUR SAFE Y IS INVO VED
Signal Words: Note the use of signal words Danger, Warning, and Caution with
the safety messages. The appropriate signal word for reach has been selected
using the following guidelines:
•DANGER: Indicates an immediate hazardous situation in which, if not avoided,
will result in death or serious injury. This signal word is to be limited to the most
extreme situations; typically for machine components which, for functional
purposes, cannot be guarded.
•WARNING: Indicated a potentially hazardous situation in which, if not avoided,
can result in death or serious injury and indicated hazards that exposed when
guards are removed. It may also be used to alert against unsafe practices.
•CAUTION: Indicates a potentially hazardous situation which, if not avoided, may
result in minor or moderate injury. It may also be used to alert against unsafe
practices.
Safety Rules
To insure skid steer stability, and to prevent tipping, always observe the
following safety rules:
• Keep clear of auger while in operation
• Before operating the skid steer, read the operating and safety instructions
provided by the manufacturer. Observe all warnings and caution particularly
those which describe the use of seat belts and other operator restraints and
those which describe the proper way of carrying loads as close to the ground as
possible.

Safety Precautions
• When using the auger bucket, be sure that the proper weight of the load is not
too heavy. A light load sticking out too far can have the same tipping effect on
the loader as a heavy load carried too close.
• Do not attempt to dig with the auger bucket. If scraper blade is installed, scoop
from loose piles only.
• Do not obstruct your vision when traveling or working. Carry the Pauger bucket
low for maximum stability and visibility when traveling.
• Operate at speeds slow enough so that you have complete control at all times.
Travel slowly over rough or slippery ground and on hillsides.
• Avoid steep slopes or unstable surfaces. If you must drive on a slope, keep the
load low and proceed with extreme caution. Do not drive across a steep slope
under any circumstances. Drive straight up and down the slope.
• Avoid turning on an incline, if at all possible. If it is necessary, use extreme
caution and make the turn wide and slow with the bucket carried low.
• Never operate the bucket when people are standing by the bucket and cold be
injured by the auger.
• Never heap load heavy material where the combined weight of the bucket and
the material could exceed the rated capacity of the loader.
If you can't see where you are going then stop.
Skid-steer oader Safety
1.Read the entire skid-steer loader operators manual before ever attempting to
use the skid steer loader. This knowledge is necessary for safe operation.
2.Follow all safety decals on the skid-steer loader. Keep them clean and replace
them if they become worn and hard to read.
3.Know the limitation of your equipment. Do not use equipment for anything
other than what it was originally designed for.

Safety Precautions
4.Pay attention to the job at hand. Do not let your mind lose concentration on
what you are doing.
5.Use your seat belt and R.O.P.S. (Roll Over Protective Structure) when operating
the skid-steer loader. Keep belt and R.O.P.S. in good repair. Do not modify
R.O.P.S. or seat belt. Do not remove R.O.P.S. or seat belt. Overturning the skid-
steer loader without proper R.O.P.S. and seat belt can result in death.
6.Fasten your seat belt before and during skid steer loader operation. Remain
seated at all times.
7.Do not take passengers on the skid steer loader or attachment. There is no
safe place for a passenger.
8.Use hand hold when getting on and off the skid-steer loader. Failure to do so
could cause a fall.
9.Inspect the skid steer loader before you try to operate the unit. Check for
needed maintenance or repairs and have them done before using the equipment.
10.Never leave the skid steer loader running unattended. Always lower lift arms,
set parking brake, turn off engine, and remove key.
11.Wear appropriate clothing such as safety glasses, ear plugs, etc. Do not wear
loose fitting clothing; it may catch on the equipment. Always wear a hardhat
when operating the skid-steer loader to prevent head injury.
12.When driving on public roads use safety light, reflectors, slow moving vehicle
sign, etc., to prevent accidents. Check with local governments for regulations
that may affect you.
13.Turn off the skid-steer loader before performing maintenance. If the lift arms
must be left raised for any reason, use a positive lift arm lock to secure arms in
place. Serious damage or personal injury could result from lift arms accidentally
lowering.
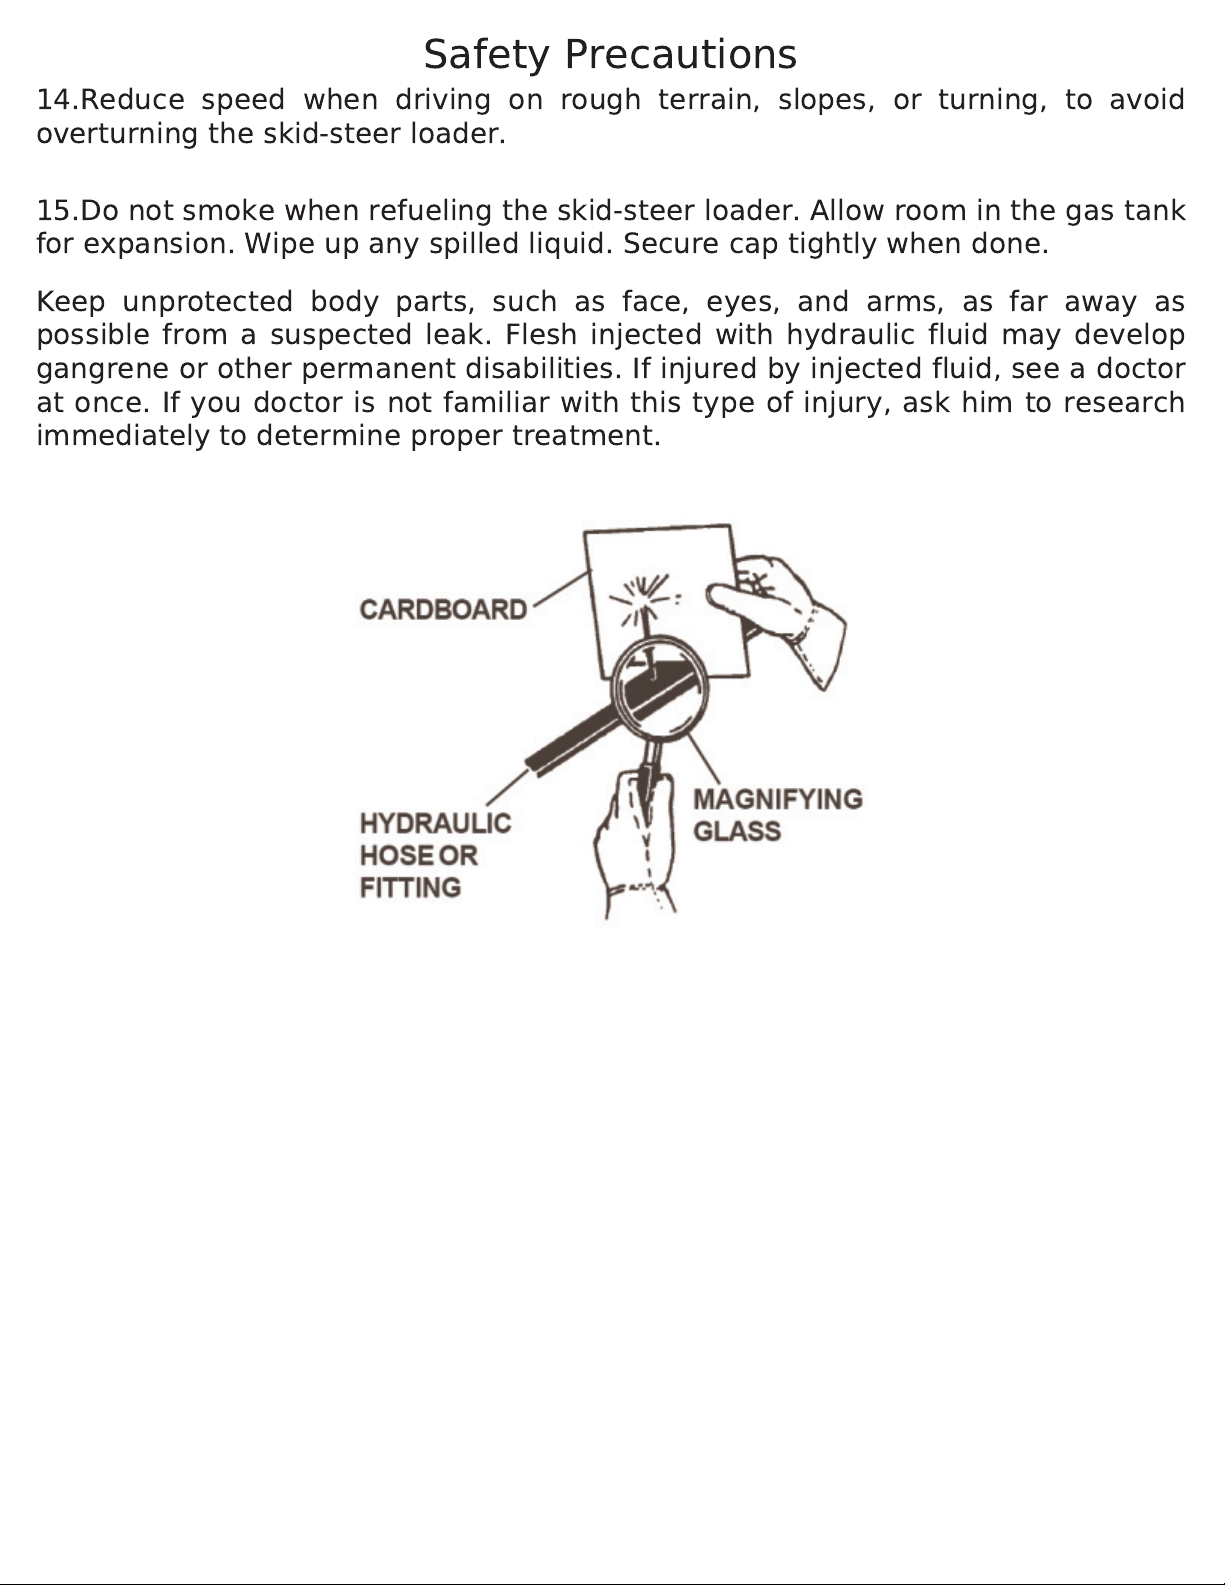
Escaping fluid under pressure can have efficient force to penetrate the skin
causing serious personal injury. Fluid escaping from a very small hole can be
almost invisible. Use a piece of cardboard or wood, rather than your hands, to
search for suspected leaks.

Safety Precautions
Keep unprotected body parts, such as face, eyes, and arms, as far away as
possible from a suspected leak. Flesh injected with hydraulic fluid may develop
gangrene or other permanent disabilities. If injured by injected fluid, see a doctor
at once. If you doctor is not familiar with this type of injury, ask him to research
immediately to determine proper treatment.
14.Reduce speed when driving on rough terrain, slopes, or turning, to avoid
overturning the skid-steer loader.
15.Do not smoke when refueling the skid-steer loader. Allow room in the gas tank
for expansion. Wipe up any spilled liquid. Secure cap tightly when done.

International Symbols
A TERNATOR
CHARGE
AX E CONNECT
AX E DISCONNECT
CAUTION
Control ever
Operating Direction
CONTINUOUS Y
VARIAB E
CREEPER RANGE
CY INDER EXTENDED
CY INDER F OAT
CY INDER
RETRACTED
DIESE
DECREASE
DIFFERENTIA OCK
ENGINE SPEED
FAST
HAZARD WARNING
FORWARD
HIGH RANGE
HORN
HOURS RECORDED
Increase
OW RANGE
IGHTS
NEUTRA
OI PRESSURE
POWER TAKE-OFF
(OFF)
POWER TAKE-OFF
(ON)
REVERSE
READ OPERATORS
MANUA
ROCK SHAFT
( OWERED)
ROCK SHAFT
(RAISED)
S OW
ENGINE WATER
TEMPERATURE

Pre-Operation
General Information
The purpose of this manual is to assist in setting up, operating, and maintaining
your auger bucket. Parts lists and diagrams along with optional equipment
available are located at the back of this manual. The illustration and data used in
this manual were current at the time of printing, however, we reserve the right to
redesign and change the auger buckets as may be necessary without
notification.
Preparing the Vehicle
Your skid-steer must be equipped with a universal quick-tach hitch and auxiliary
hydraulics. read your skid-steer loader operator's manual and know the
limitations of your skid-steer loader, it may require the addition of a
counterweight kit to ensure that the combined weight of the bucket and the
material does not exceed the rated capacity of your loader.
Do not use the mini auger bucket for mixing. Running this auger in the reverse
direction (mixing) will result in extremem pre-mature wear of the rubber
flighting.

Mini Auger Bucket Assembly

Mini Auger Bucket Assembly

Options

Options

Mounting Instructions
Installation Instructions
After determining the rated capacity of your loader and adding any
counterweight kits that are needed you are ready to install your bucket.
1. Remove the chutes and hydraulic hoses from inside of the auger bucket.
2. Remove dust plugs from the auger motor.
3. ocate the fittings from the chute box and install them into the motor. Do not
allow dirt or contaminants to get into the hydraulic system (motor, hoses or
fittings).
4. Tighten the fittings into the motor and install the hydraulic hoses provided.
5. Install the bucket by following your skid-steer operators manual for installing
an attachment. Be sure to lock the bucket to the skid-steer.
Note: Keep in mind that the buckets are manufactured with two mounts, one on
each side of the bucket to allow for right or left discharge.
To avoid serious personal injury make sure the bucket is securely latched to
the skid-steer toolbar. Failure to do so could result in seperation of the bucket
from the skid-steer.
6. Connect the bucket's hydraulic hoses to the machines auxiliary hydraulics
using the quick couplers.
7. Turn the auxiliary hydraulics to the forward or locking position and the auger
should rotate so that the material in the auger bucket is discharged through the
casing at the discharge end of the auger bucket. If the material runs back up into
the bucket instead or discharging, reverse the hoses at the motor end.
Note: It is recommended to coat the bucket with a water-based releasing agent
such as Kleen Kote before using. Contact your local concrete supply center for
more information.
8. Install chutes to the discharge end of your auger bucket.
Do not coat bucket with any petroleum based agent. Damage to rubber
components will occur.

Maintenance and Service
Maintenance
Your auger bucket is practically maintenance free. There is only one grease zerk
which is located in the motor mounting plate and greases the motor seal. Grese
the motor seal every 40 hours.
Thoroughly clean the auger bucket after each use and reapply a water based,
non-corrosive, releasing agent. Do not allow concrete to dry in the bucket and do
not allow water to freeze in the bucket. This will cause damage to the rubber
flighting and also could damage the bucket itself.
Perform service only when the hydraulic hoses have been disconnected from the
skid-steer auxiliary hydraulics
Service
Rubber Fliting Replacement
Rubber flighting disc replacement should be done only when performance has
been reduced or concrete leaks out of the discharge casing when the auger is
not rotating. It is not necessary to replace all of the rubber flightings at once.
Replace only the flighting that have extensive wear (usually the ones at the
discharge end of the auger. Removal of the auger is recommended when
replacing any of the flights. Disconnect the hydraulics prior to removing the
auger.
1. Remove the auger by removing the spring pin in the auger collar. We
recommend that you use a 1/2" punch and hammer.
2. Slide the auger away from the motor until the collar has cleared the shaft.
3. Pull up and slide towards the motor end of the bucket until the auger is free of
the discharge casing.
4. Place on a secure work platform and remove the lock nuts (just on the flitings
that are to be replaced) with a hammer and chisel. Replacement hardware is
included in the rubber replacement kit.
Note: One disc has been cut down in size, this disc replaces the disc closest to
the motor end of the bucket.
5. Replace worn rubber flights using the hardware supplied.

Clean Up, Removal and Storage
Clean Up Instructions
1. Run the auger bucket until all concrete or material is removed from the
bucket.
2. With the operator in the skid-steer operators seat, and the auger running in
reverse, have a second person add water to the discharge end of the auger
bucket.
When adding water or plraying water into the bucket do not lean into the
bucket or stand in any position that will allow you to inadvertantly fall into the
bucket. It is recommended to use a hose and stand a safe distance away from
the bucket.
3. After most of the concrete or material has been cleaned from the bucket it
should be raised and tilted forward to allow front access of the bucket so the
second person can spray water into the bucket, therefore rinsing out any
remaining material.
Do not reach hands or any other object into the bucket while hydraulic hoses
are connected to the skid-steer. Severe injury could occur.
4. Tilt the bucket back and lower to the ground. Disconnect hydraulic couplers
from the skid-steer and lift the splash guard at the discharge end and clean with
water, making sure there is not any material or concrete between the auger and
the casing.
5. Coat the bucket with a water based releasing agent.
Removal and Storage Instructions
Store unit in a dry location
1. Clean bucket thoroughly to ensure maximim performance and auger life.
2. ower the boom arms completely down onto the loader frame.
3. Turn off the engine. Move controls several times to relieve pressure in the line,
then disconnect quick couplers from the auxiliary hydraulics.
4. Follow your skid-steer operator's manual for detaching (removing) an
attachment.

Specifications

Decals

Warranty
All new Talet products are warranted to be free from defects
in materials or workmanship which may cause failure under
normal usage and service when used for the purpose
intended.
In the event of failure within twelve (12) months from initial
retail sale, lease or rental date (excluding cable, ground
engaging parts such as sprockets, digging chain, bearings,
teeth, tamping and demolition heads, blade cutting edges,
pilot bits, auger teeth, auger heads & broom bristles), if after
examination, Talet determines failure was due to defective
material and/or workmanship, parts will be repaired or
replaced. Talet may request defective part or parts be
returned prepaid to them for inspection at their place of
business at Strathmore, Alberta or to a location specified by
Talet.
Any claims under this warranty must be made within fifteen
(15) days after the Buyer learns of the facts upon which such
claim is based. All claims not made in writing and received
by TA ET within the time period specified above shall be
deemed waived.
THIS WARRANTY IS IN IEU OF A OTHER WARRANTIES
EXPRESSED OR IMP IED AND THERE ARE NO WARRANTIES
OF MERCHANTABI ITY OR OF FITNESS FOR A PARTICU AR
PURPOSE. IN NO EVENT SHA TA ET BE IAB E FOR
CONSEQUENTIA OR SPECIA DAMAGE.
TA ET'S IABI ITY FOR ANY AND A OSSES AND DAMAGES
TO BUYER, RESU TING FROM ANY CAUSE WHATSOEVER,
INC UDING TA ET'S NEG IGENCE, IRRESPECTIVE OF
WHETHER SUCH DEFECTS ARE DISCOVERAB E OR ATENT,
SHA IN NO EVENT EXCEED THE PURCHASE PRICE OF THE
PARTICU AR PRODUCTS WITH RESPECT TO WHICH OSSES
OR DAMAGES ARE C AIMED, OR, AT THE E ECTION OF
TA ET, THE REPAIR OR REP ACEMENT OF DEFECTIVE OR
DAMAGED PRODUCTS.
Table of contents