T&D RTR-500MBS-A User manual
Mobile Base Station
RTR-500MBS-A
Getting Started Guide
Thank you for purchasing our product.
This manual explains the basic usage and features of RTR-500MBS-A.
© Copyright T&D Corporation. All rights reserved.
2016. 03 16504810011 ( 4th Edition)
Safety Precautions &
Product Overview
Getting Ready
Installing the Software
Making Settings &
Transmission Tests
Installing the Device
Checking Data on T&D
WebStorage Service
Using T&D Graph to Access
WebStorage Data
LED Display / FAQ's /
Specications / Options

2
Index
Important Notices and Disclaimers ---------------------------- 3
Safety Precautions and Instructions ---------------------------- 4
Safety Precautions and Instructions ---------------------------- 5
Safety Precautions and Instructions ---------------------------- 6
What can the RTR-500MBS-A do? ----------------------------- 7
Package Contents ----------------------------------------------- 8
Part Names and Functions -------------------------------------- 9
Getting Ready -------------------------------------- 10
1 Preparing a SIM card ------------------------------------------- 10
2 Setting up the Device ------------------------------------------- 11
3 Registering with T&D WebStorage Service ------------------- 13
4 Setting up SMTP mail server ----------------------------------- 13
Installing the Software ----------------------------- 14
1 Installing the Software ------------------------------------------ 14
2 Connecting the Base Unit to a PC ----------------------------- 15
Making Settings & Transmission Tests ----------- 17
1 Making Basic Settings for Base Unit -------------------------- 17
2 Making Settings for T&D WebStorage Service --------------- 18
3 Registering a Remote Unit ------------------------------------- 19
4 Making Transmission Tests ------------------------------------- 20
How to Conrm Tests were Successful: -------------------------- 21
If a Transmission Test Ends in Failure: ---------------------------- 21
Installing the Device ------------------------------- 22
1 Connecting to an External Power Source (when applicable) 22
2 Installing Devices------------------------------------------------ 22
3 Turning Operation Switch to the <Run> Position ------------- 23
4 Accessing T&D WebStorage Service -------------------------- 23
Checking Data on T&D WebStorage Service ---- 25
Viewing Current Readings ----------------------------------------- 25
Downloading Recorded Data -------------------------------------- 25
Using T&D Graph to Access WebStorage Data ---26
LED Display -----------------------------------------------------27
FAQ’s -------------------------------------------------------------28
Specications ---------------------------------------------------29
Options ----------------------------------------------------------30

3
Important Notices and Disclaimers
In order to properly use this product, please carefully read all attached
documents before using. T&D Corporation accepts no responsibility for
any malfunction of and/or trouble with this product or with your
computer that is caused by the improper handling of this product and
will deem such trouble or malfunction as falling outside the conditions
for free repair outlined in the attached warranty.
• All rights of the attached documents belong to T&D Corporation. It is
prohibited to use, duplicate and/or arrange a part or whole of the
attached documents without the permission of T&D Corporation.
• Microsoft and Windows are registered trademarks of Microsoft
Corporation in the United States and/or other countries.
• Windows Vista is either a registered trademark or trademark of
Microsoft Corporation in the United States and/or other countries.
• All registered trademarks, company names, product names and logos
mentioned herein or for products being used are the property of T&D
Corporation or of their respective owners.
• Specications, design and other contents outlined in the attached
documents are subject to change without notice.
• Please follow the safety precautions outlined in the attached
documents carefully. We cannot guarantee nor are we responsible for
safety if this product is used in any manner other than was intended.
• On-screen messages in the attached documents may vary slightly
from the actual messages.
• Please notify the shop where you purchased this product or T&D
Corporation of any mistakes, errors or unclear explanations in the
attached documents.
T&D Corporation accepts no responsibility for any damage or loss of
income caused by the use of our product.
• Accompanying documents cannot be reissued, so please keep them
in a safe place.
• Please read the warranty and provisions for free repair carefully.

4
Safety Precautions and Instructions
The following items should be strictly obeyed for the safe usage of this
product, and for protecting yourself and other people from bodily harm
and/or damage to property.
Explanation of Symbols
Warning Symbols
DANGER Failure to follow the instructions with this symbol could
cause serious injury or even death.
CAUTION Failure to follow the instructions with this symbol could
cause personal injury or physical damage to equipment.
Explanation of Picture Symbols
Denotes an important warning or caution.
Denotes a forbidden action.
Denotes an action that should be carried out.
Notes about Operation
To prevent unexpected accidents caused by radio waves, make sure
to turn off the power when entering the following places and be sure
not to use in said places.
• Areas where explosive gas may be present including gas stations
• Areas where the use of the unit has been prohibited including
aircraft and hospitals
The SIM card stores the user’s cell phone number and other unique
user identication information. Please take adequate care to prevent
the loss or theft of your SIM card. Also, be sure to keep your PIN
number in a safe place.
When inserting or removing the SIM card, please be careful about the
following.
• Avoid exposure to static electricity when handling the card.
• Make sure to disconnect all cables (AC adaptor, USB cable, and
external power cable) from the RTR-500MBS-A before inserting or
removing the card.
• Be careful not to touch or scratch the IC area of the card.
• Make sure to insert the card in the proper direction.
• Do not force the cover open or closed.
Please note that this document has been written based on the
presupposition that the functions and specications of the SIM card
being used and the details of the contract have already been
conrmed between the user and the cell phone carrier.
T&D Corporation shall not be responsible for any damages which a
contractor, a user or a third party may suffer, whether direct or
indirect, due to the inability to communicate or use communication
devices.
To prevent unexpected communication charges, conrm the details
of your carrier's contract before using the product over a mobile
network.
5
Safety Precautions and Instructions
DANGER To Prevent Serious Accidents
Do not disassemble, repair or modify the unit and accessories.
Do not use the unit in any environment that is exposed to chemicals
and harmful gases. Doing so may cause corrosion and/or other danger
to the unit. Also, coming in contact with hazardous substances may
cause bodily harm to the user or people nearby.
Neither this unit nor any and all accessories are water resistant. If any
liquid gets inside the case or the device gets wet, immediately remove
batteries and stop using.
Do not handle the unit, remove batteries or cables with wet hands.
This product has been designed for private and/or industrial use only. It
should not be used in situations where strict safety precautions are
necessary such as with medical equipment, or in systems directly or
indirectly connected with human life or well-being.
Do not drop or expose the unit to a strong impact.
Do not connect any communication cables connected to the unit to
telephone line outlets. Continued use may cause re or electrocution.
Do not cut or process the cords for the AC adaptor or the communica-
tion cables. Also, do not twist, pull or swing any of the cords or cables.
To prevent damage to the unit from static electricity, remove static
electricity from your body by touching metal around you (such as a
door knob and window frame) before touching the unit.
Place and store the unit and accessories out of the reach of children.
Further, T&D is not responsible for any damage, malfunction or trouble,
whether direct or indirect, caused by the use of our products.
Do not use any power, battery, sensor, or cable other than those
specied by T&D Corporation.
Do not put anything on top of the AC adaptor.
This may cause overheating.
Do not disconnect the communication cable during wireless communi-
cation or USB communication.
Doing so may cause adverse effects to the unit and/or PC.
Make sure that the cable and AC adaptor are inserted fully, so as not to
cause an improper connection. Also, when unplugging the cable from
the unit, do not pull the cord, but hold the connector to disconnect.
If the unit produces heat, emits smoke or a strange smell, or makes
unusual noises, immediately unplug the AC adaptor, remove the
batteries, and stop using it. Also, disconnect the unit from the PC.

6
Safety Precautions and Instructions
CAUTION Do not place or store in the following areas:
• Areas exposed to direct sunlight
• Areas exposed to excessive heat or high temperatures such as near re or
heating equipment
• Areas exposed to static electricity
• Areas exposed to strong magnetic elds
• Areas exposed to dampness
• Areas subject to condensation or wet areas
• Areas exposed to excessive vibration
• Areas exposed to excessive smoke, dust or dirt.
CAUTION Other Precautions
• Use the unit in the specied operating environment. Do not use it for any
purpose other than for which it was designed.
• Condensation may occur inside the case when a unit is moved from one
environment to another where there is a great difference in temperature. Do
not use in areas susceptible to condensation.
• Do not use the unit in wet areas or places exposed to water such as
bathroom.
• When connecting the unit to your PC, make sure to follow all warnings and
directions from your computer manufacturer.
• We shall not guarantee the unit’s operation if it has been connected to a PC
using a USB hub or a USB extension cable.
• Do not insert any foreign objects into any of the units’ jacks.
• If the unit gets dirty, wipe it with a clean cloth.
• Make sure to remove dust and dirt from plugs of the AC adaptor and/or any
cables.
• Please note that this document has been written based on the presupposition
that details about contracts with an Internet provider, specic network
environments and the set-up of any other necessary equipment to enable
network connection has already been taken care of by the User and that
connection has been conrmed as workable.
CAUTION
Notes and Precautions for Installing Wireless Communication Devices
When installing wireless communication devices take special care in selecting
locations so as to ensure proper communication. Note that even after a
successful installation, due to changes in environmental conditions,
communication errors may occur when restarting the system.
As far as possible, try to keep wireless communication devices away from metals
and set them up in high unobstructed positions.
• Please take note that in many instances, walls, oors, stairs, fences and
desks will contain metals. In order to carry out communication between
indoor and outdoor units, please locate indoor units near a
window so that radio waves can be easily transmitted.
• Please install these devices more than 30cm away from
walls or boards containing metal.
• If wireless communication devices are placed in a metal
containersuch as a freezer or refrigerator, the possible
wireless communication range will be shortened. In most cases radio waves
are transmitted via doors and door openings so place devices as near to
doors as possible.
As far as possible, keep the devices away from noise-emitting sources.
• Equipment such as some industrial instruments, electronic devices or
uorescent lamps generate noise. Please place units more than one meter
away from such devices.
• Please place units more than 1 meter away from computers and other devices
which emit noise.
• Keep all wires as far away from wireless communication devices as possible.
Be careful about placing near any wiring or cables such as power supply
cables, telephone wires or LAN cables.
Because objects which contain lots of water, such as plants or soil, absorb radio
waves, we highly recommend that such objects not be placed between or near
wireless communication devices.
• When measuring temperature in a greenhouse it has been reported that as
plants grew, communication errors also increased.
• Do not place units directly on the ground.
Do not place devices which are using the same communication frequency
channel in the same area.
• If the same channel is used for multiple devices not only will more
communication errors occur, but battery life will also be shortened.
• If there is a possibility that devices with the same frequency channel will be in
wireless communication at the same time, please make sure to make changes
to the frequency channels so they are not the same.

7
What can the RTR-500MBS-A do?
RTR-500MBS-A is a Base Unit equipped with both wireless and 3G mobile communication capabilities. After collecting measured data (current
readings and recorded data) from Remote Units via wireless communication, the Base Unit can transmit the collected data via 3G mobile networks
to a server or e-mail account.
• This document explains the basic procedures and operations from set up to the monitoring of current readings and downloading of recorded data.
Further explanation will be given in the Operation Guide.
[BaseUnit:WarehouseNorth]
<RemoteUnit>
[Warning:Up/LoLimit]
<Enterance>
WarehouseNorth31.2℃4-2811:19
[Recovery]
<Enterance>
WarehouseNorthCH1BacktoNorm.
Subject:Warning
BaseUnitWarehouseNorthRemote
UnitEnterance20120523-070210.trz
Endofmail
Subject:RecordedData
BaseUnitWarehouseNorthRemo
[BaseUnit:FrozenDelivery301]
SN:339A4325
2011-06-07 11:50:14
[RemoteUnit]
<Group1>
ContainerCh127.9℃Ch239.0%
http://www.openstreetmap.org/
?mlat=35.658342&mlon=139.7517
16&zoom=15
Subject:CurrentReadings
New Message
To:
Remote Unit
Wireless
Communication
Wireless
Communication
GPS Antenna
(Not Included)
Base Unit
Repeater
3G Cell Tower
Remote Control
Warning Report Mail
External Contact Output
(Not Included)
Recorded Data
(attachment included) Current Readings Info
Location attachment (only when GPS activated)
Current Readings
Recorded Data
Start/Stop Operation
Request for Recorded Data
Monitoring Current Readings / Viewing Recorded Data
FTP
E-mail
Sending SMS Commands
Base Unit RTR-500MBS-A Current Readings The most recent measurements recorded by a Remote Unit
Remote Unit Any of the RTR-500 Series Loggers Recorded Data Measurements stored in the Remote Unit
Repeater RTR-500 (to expand the wireless communication range) Wireless Communication Short Range Radio Communication

8
Package Contents
RTR-500MBS-A
Antenna (x 2) USB Mini-B Cable
(US-15C)
AA Alkaline Battery
(x 4)
External Power Cable
(BC-0302)
Software
CD-ROM
Getting Started Guide
(Warranty Included)

9
Part Names and Functions
Operation
Switch
Included
Antennas
LED
Antenna Connector
(with protective cover)
SMA Female
Jack
SMA Male Jack
Optical Communication Area
Battery Cover
External Alarm
Input / Output
Terminal
USB Port
External Power
Connector
AC Adaptor Jack
( 4 EIAJ Voltage
Classication 2 )
10
Getting Ready
1 Preparing a SIM card
2 Setting up the Device
Connecting the Antennas
Preparing a GPS Antenna if necessary
Installing a SIM Card and Batteries
3 Registering with T&D WebStorage Service
4 Setting up a mail server (SMTP server)
• Do not connect a RTR-500MBS-A to your computer until the software has
been installed.
1 Preparing a SIM card
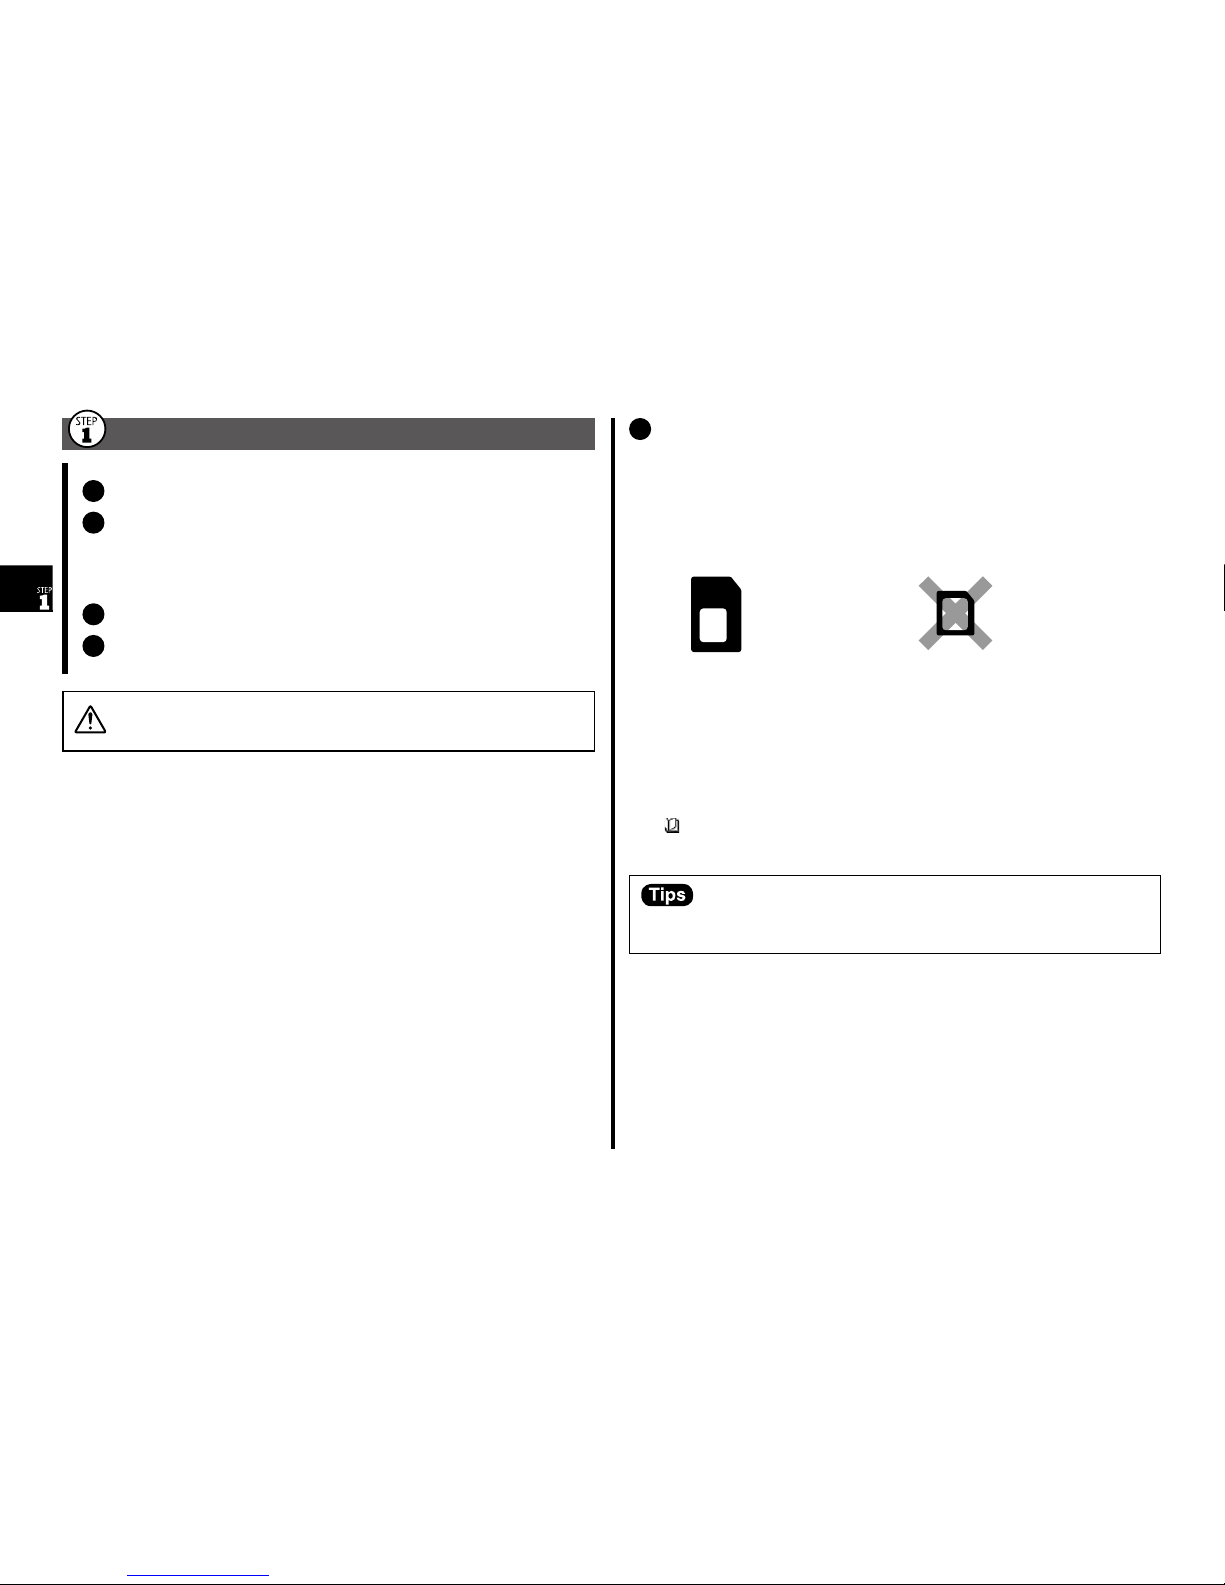
Please purchase a SIM card that meets the following requirements:
• The card is 3G mobile network compatible. (Voice call only SIM cards may not be
used.)
• The card has been or can be activated
• It is a Standard size SIM card
Standard SIM Micro SIM
Nano SIM
• The SIM card must also have SMS (Short Message Service) capability if the
following functions are desired.
- Warning Notication via SMS
- Remote control of the RTR-500MBS-A from a mobile device via SMS
commands(*)
* Available commands are the “start” command, “stop” command, and “read”
command. For more details, see the Operation Guide that comes with the
software.
[Operation Guide] > [Other Useful Functions] > [Controlling Base Unit via
SMS Command]
For the estimated data usage, please see p.28 [FAQ's] > [Q&A about SIM
Cards].

11
When purchasing a SIM card, you may be asked for the IMEI
number (depending on the type of SIM card).
The IMEI number for your RTR-500MBS-A can be found in the software
settings window.
1. Install the software (see p.14 [STEP 2: Installing the Software])
2. Connect an RTR-500MBS-A to your computer.
3. Open the "RTR-500MBS for Windows" from the Start Screen or Start
Menu of Windows.
4. Select “RTR-500MBS Settings Utility”.
5. In the [Base Unit Settings] menu, the IMEI can be found under
[Version].
6. Close the software and disconnect the RTR-500MBS-A from your
computer.
2 Setting up the Device
Connect the Antennas.
1.
Remove the protective covers from the antenna connectors (LOCAL/
CELLULAR) on the unit, and connect the supplied antennas.
If you wish to use the GPS function, connect a GPS antenna with an
SMA male plug (3V) to the GPS antenna connector on the unit.
Install a SIM Card and Batteries.
• When inserting or removing a SIM card, avoid exposure to static
electricity.
• Make sure to disconnect all cables (AC adaptor, USB cable, and external
power cable) from the RTR-500MBS-A before inserting or removing the
card.
• Be careful not to touch or scratch the IC area of the card. This may
cause poor contact.
• Make sure to insert the card in the proper direction.
• Do not force the cover open or closed.
2.
Remove the battery cover to nd the SIM card holder.
Card Holder

12
How to Remove the Battery Cover
While pressing down on the triangular mark ( ), slide the cover to the bottom of the unit
(). Lift off the cover ( ).
3.
Lightly slide the cover of the card holder to unlock it. Slowly lift up
the cover to its open position.
Unlock
4.
Making sure that the IC (gold area) is facing out, insert the SIM card
into the card holder until it ts completely.
Notch
5.
Close the card holder and slide the cover to lock it.
Lock
If the cover is not properly locked, it may cause insufcient contact with
the IC and result in a communication error.
6.
Insert the batteries, making sure they are in the proper direction
( / ), then close the battery cover.
Keeping batteries in the unit allows a backup source of power in the event
of power failure. If running only on batteries, the estimated battery life is
about 2 days. For longer continuous operation, please use an external
power source.
• Leaving alkaline batteries in the unit for a long period of time may cause battery
leakage and corrosion. When using as a backup source of power, we recommend
that the batteries be changed every few years.
• Make sure to use new batteries of the same kind.
• It is not necessary to set up an external power source before placing the device to
the place it will be used. Please see [STEP4: Installing the Device] > [Connecting
to an External Power Source] (p.22)
13
3 Registering with T&D WebStorage Service
By using T&D WebStorage Service, a cloud service provided by T&D
free of charge, it is possible to monitor the RTR-500MBS-A data over
the Internet.
If you don't use T&D WebStorage Service, please arrange a
provider's server or your own FTP server.
1.
Open your web browser and access the site:
http://www.webstorage-service.com/
2.
Click [Get a User ID] to go to the registration page.
3.
Enter an e-mail address and password for registration, and click
[Agree and Get a User ID].
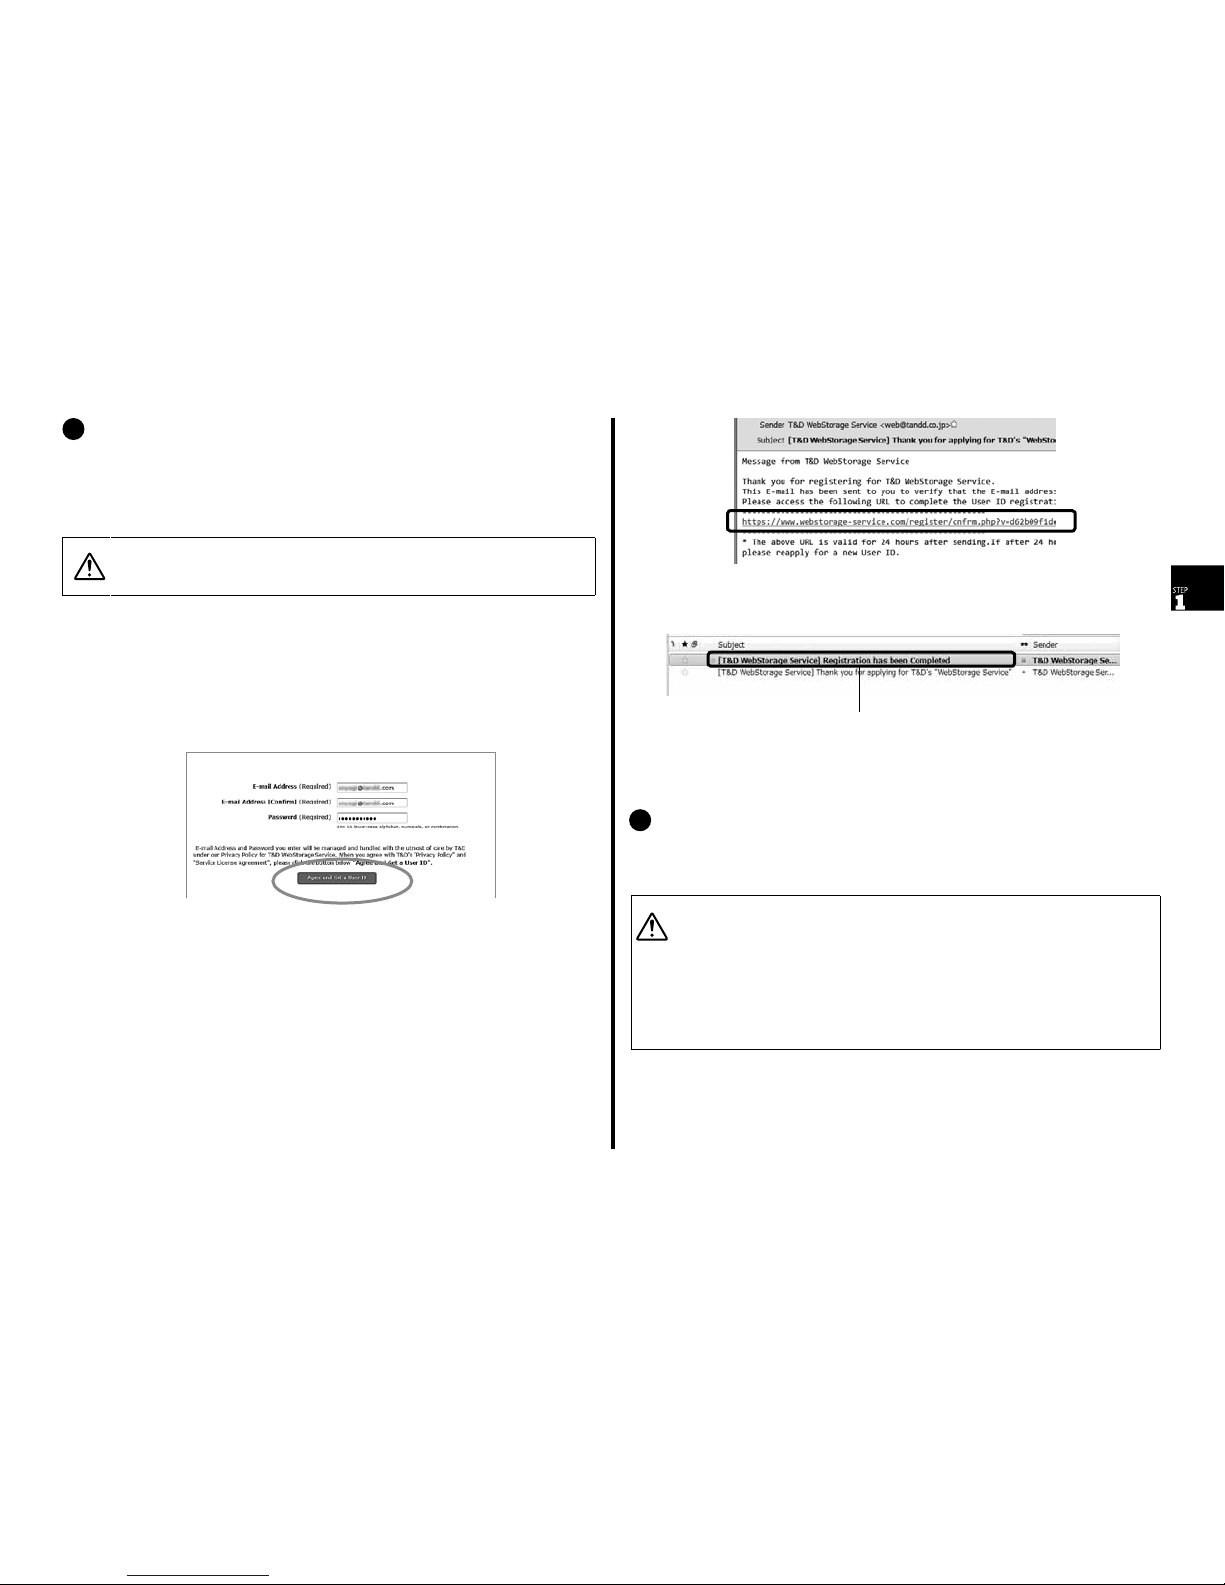
4.
An e-mail containing the necessary URL link will be sent to the
address you entered. Access the displayed URL to get a User ID.
5.
A completion notice will be sent to your registered address upon
completion of the User ID registration.
This e-mail contains important information such as user ID,
password, FTP server name, and settings information necessary
for making settings.
4 Setting up SMTP mail server
An SMTP server is required to send Warning Report, Current
Readings, and Recorded Data via e-mail.
• Check with your provider to make sure that the mail server you are using
supports one of the following mail authentication methods: SMTP-AUTH
(LOGIN), SMTPS (SMTP over SSL), or POP before SMTP.
• Some Internet service providers block port 25 (the default port for SMTP)
in an attempt to control Spam and viruses.
In this case, please use the outgoing mail submission port (SMTP port
587).
• To use SMTPS (SMTP over SSL), set the SMTP Port Number to 465.
14
Installing the Software
1 Installing the Software
2 Connecting the Base Unit to a PC
1 Installing the Software
1.
Start Windows and login using a User Account with Administrator
(Computer Administration) rights.
2.
Insert the software CD into the CD/DVD drive, and the [Install
Program] window will open automatically.
If the [AutoPlay] window appears:
Click [Run start.exe].
If the [Install Program] window does not appear
automatically:
Open [start.exe] from the CD/DVD drive.
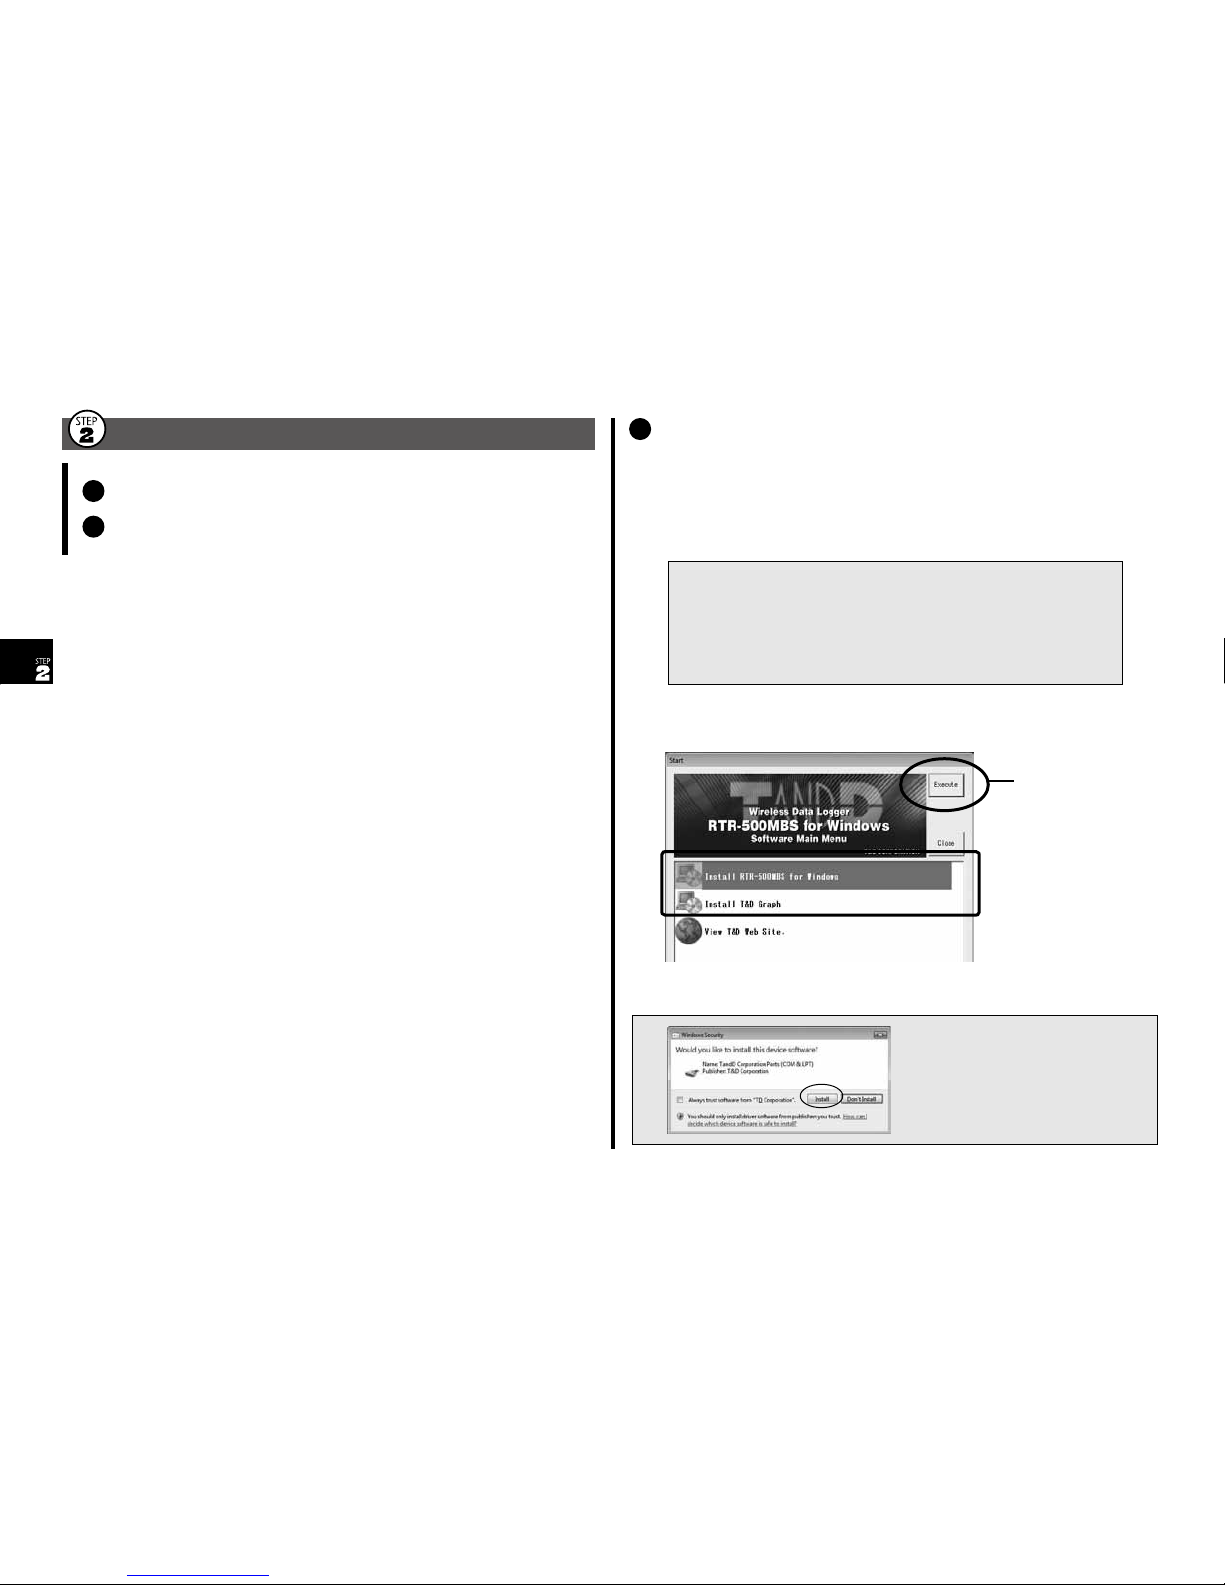
3.
Select [Install RTR-500MBS for Windows] and click [Execute] to
start the installation.
[Execute]
button
Make sure to install all
applications.
4.
Follow the directions as they appear to complete the installation.
If a window like this appears
during installation, click [Install].

15
5.
After installation, “RTR-500MBS for Windows” will appear in the
Windows Start Screen or Start Menu.
6.
Repeat the same procedures from to install all the applications.
2 Connecting the Base Unit to a PC
1.
Open the “RTR-500MBS for Windows” from the Windows Start
Screen or Start Menu.
2.
In the displayed launcher window, click and open the
“RTR-500MBS Settings Utility”.
3.
Turn the operation switch on the Base Unit to <STBY>, and connect
it to the computer with the supplied USB cable.
4.
The USB driver installation will start automatically.
5.
After the USB driver installation is completed, a window will open
where you can make or change various settings related to the
RTR-500MBS-A.
If the settings window does not automatically open:
If the settings window does not appear after one minute of USB
connection, try reconnecting the USB cable. If this does not work,
please see [ Help for Unit Recognition Failure] in the launcher menu
and check the USB driver.
16
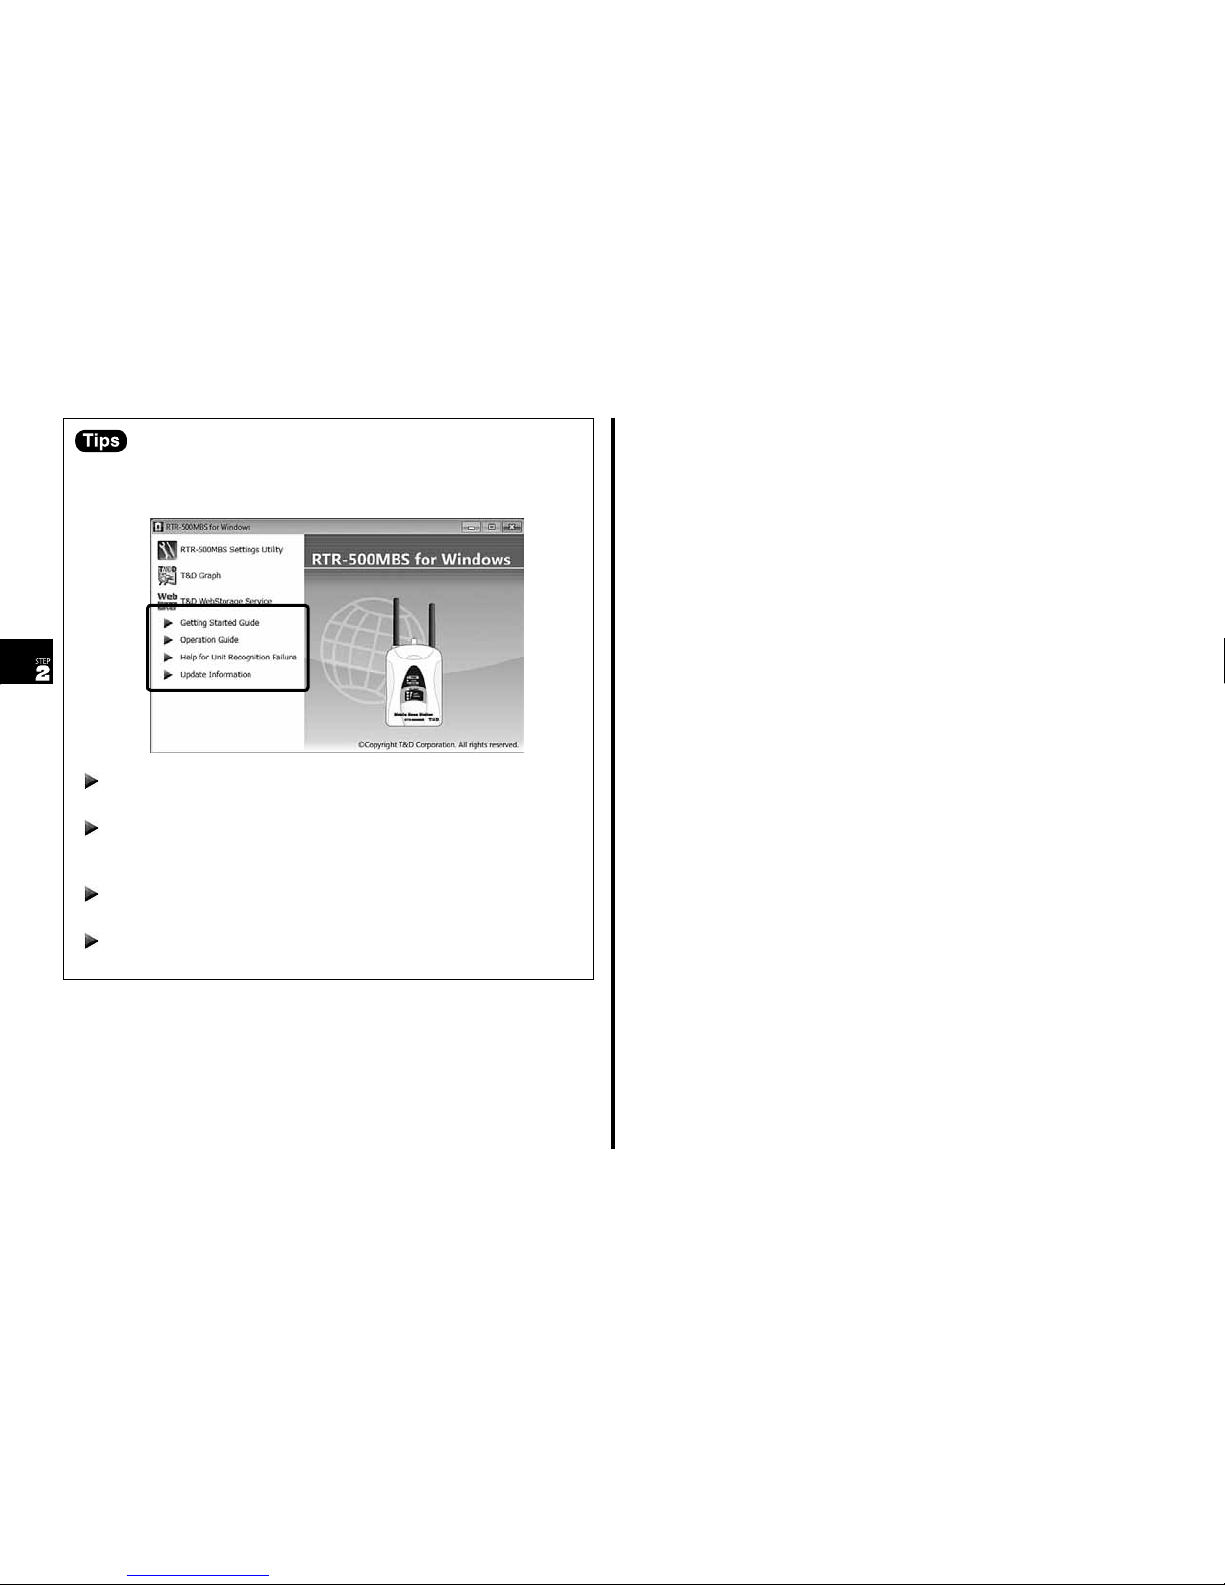
Troubleshooting and Detailed Info
Detailed information about software settings is provided. Please select
from the launcher.
Getting Started Guide:
This document is available as a PDF le.
Operation Guide:
This contains information about basic settings as well as advanced
settings for many useful functions.
Help for Unit Recognition Failure:
Click here for information on how to check and reinstall the USB driver.
Update Information:
Click here to check for update info.

17
Making Settings & Transmission Tests
1 Making Basic Settings for Base Unit
2 Making Settings for T&D WebStorage Service
3 Registering a Remote Unit
4 Making Transmission Tests
1 Making Basic Settings for Base Unit
• In order to prevent unnecessary or unexpected data
transmission, we suggest turning the Operation Switch on
the Base Unit to <STBY> until the units have all been set
up and ready for communication.
• Once the Operation Switch has been turned to the <Run>
position, auto-sending of current readings and/or recorded
data becomes activated.
1.
Open the "RTR-500MBS Settings Utility" and connect the Base Unit
via USB to your PC.
2.
The settings window will automatically open.
3.
Open the [Base Unit Settings] menu and enter the necessary
information such as the Base Unit Name and Mobile Data
Communication info.
Base Unit Name Assign a unique name for the Base Unit.
Mobile Data Communication Enter the information provided by your carrier.
4.
After having completed all entries, click [Apply] at the bottom of the
window to apply the settings(*).
* It is necessary to apply the settings in each setting menu.

18
5.
Open the [Clock Settings] menu.
Make necessary settings for [Time Zone] and other items. If
[Auto-Adjustment](*) is turned OFF, the clock on the RTR-500MBS-A
will not be adjusted automatically.
* Auto-Adjustment is a function whereby the RTR-500MBS-A uses clock
information sent from the carrier to automatically adjust the date and time. (This
may not apply with some carriers.)
* Adjustment is made when the Operation Switch is turned to the <Run> position,
and also every night around 00:10 according to the Time Zone Setting of the
RTR-500MBS-A.
6.
After setting the necessary items, click [Apply].
2 Making Settings for T&D WebStorage Service
1.
Open the [FTP Settings] menu and enter the following information.
* If you have set up a different FTP server, enter the necessary information
accordingly.
FTP Server ftp.webstorage-service.com
FTP User ID User ID issued by T&D WebStorage Service
FTP Password Password for T&D WebStorage Service
FTP Port Number 21
Passive Mode ON
2.
After setting the necessary items, click [Apply].
3.
Open the [Monitoring / Warning Settings] menu and enter the follow-
ing information.
Send Current Readings ON
Sending Interval Make settings for the interval of time between
transmissions of current readings.
Transmission Method FTP
File Name <base>_<time>
4.
After entering the necessary information, click [Apply].
5.
Open the [Settings for Sending Recorded Data] menu and enter the
following information.
19
Auto-Sending of
Recorded Data ON
Transmission
Scheduling Method Select either method.
Transmit by day
and time
Make settings here for dates and times for the
automatic downloading and sending of recorded
data. Up to eight patterns can be set.
If you select more than one date and time, make
sure that they are six or more hours apart.
Transmit by
Interval
Specify the interval at which you wish to have data
automatically sent and choose at what minute of the
hour you wish to have the next transmission occur.
Transmission Method FTP
File Name <base>_<remote>_<time>
6.
After entering the necessary information, click [Apply].
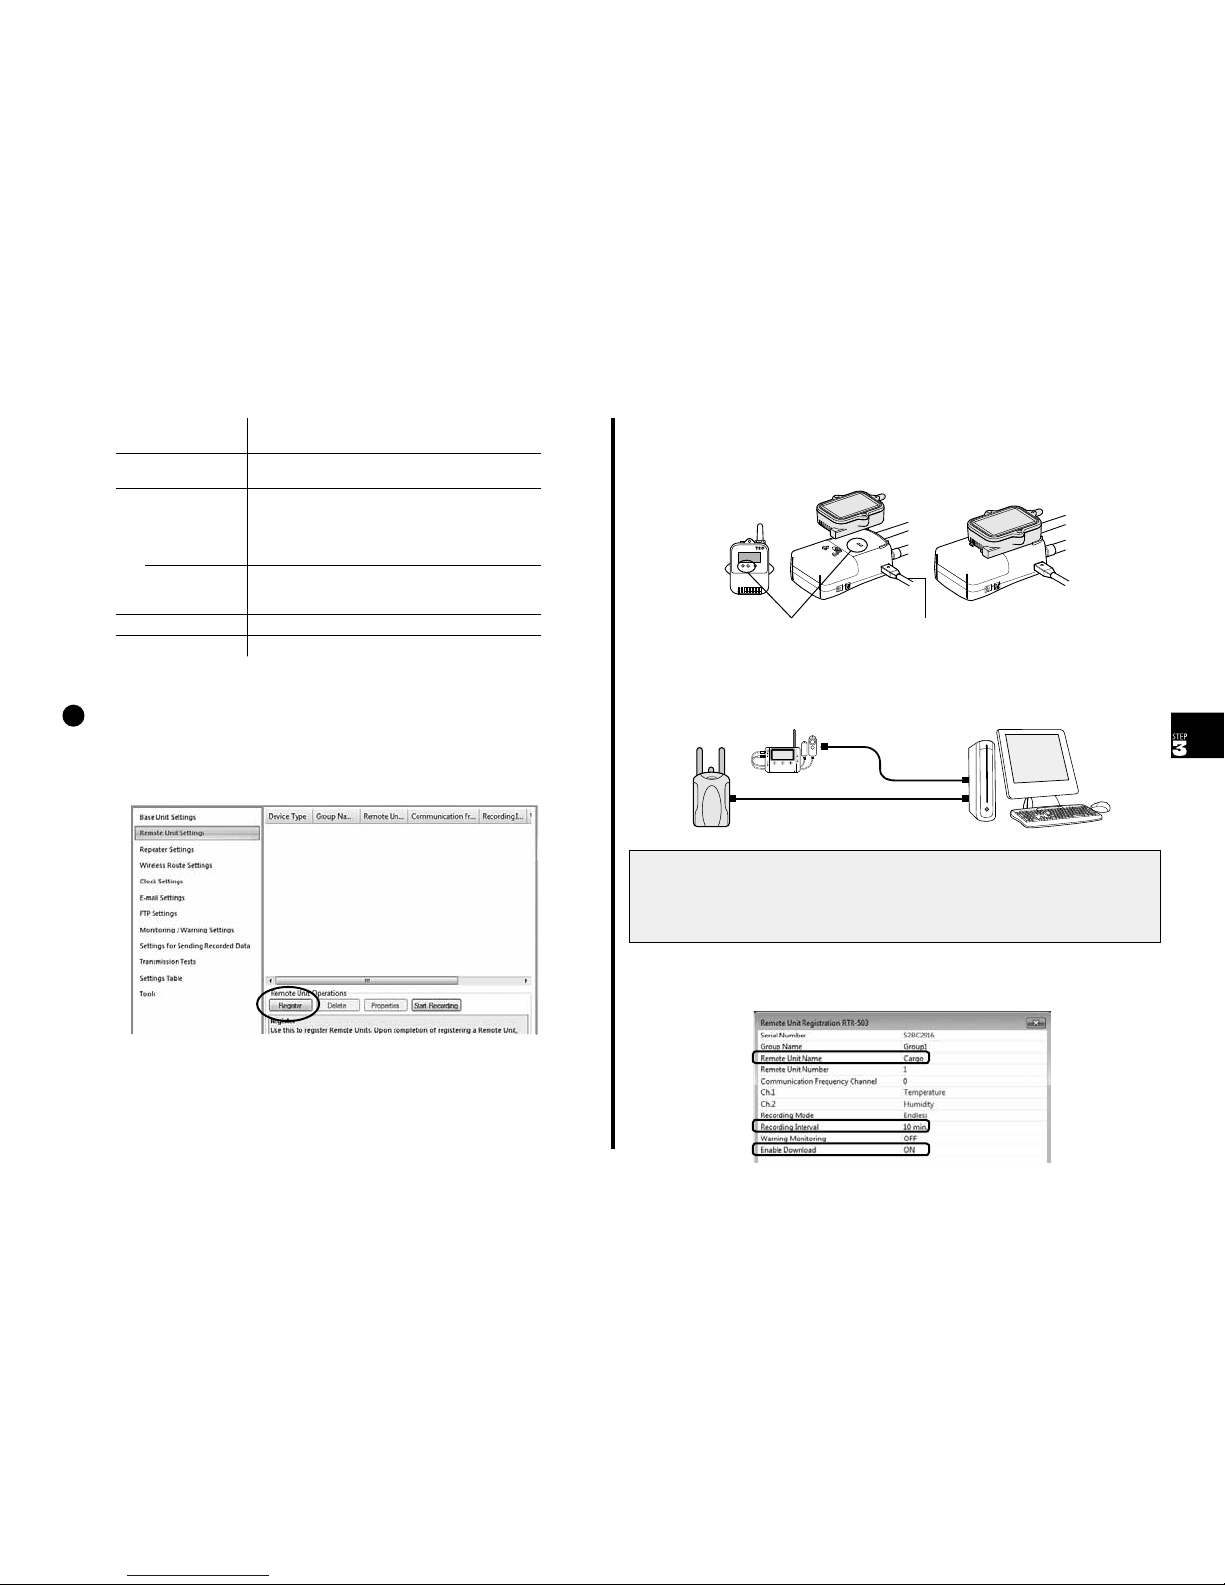
3 Registering a Remote Unit
1.
Open the [Remote Unit Settings] menu.
2.
Click [Register] to open the registration window.
3.
Click [Yes] to the conrmation message. Follow the on-screen
instructions and connect the target Remote Unit.
• Optical Communication: RTR-501 / 502 / 503 / 505 / 507
Place the Remote Unit face down on the Base Unit connected to the
computer so that the optical communication areas meet.
Optical Communication Area USB
• USB Communication: RTR-574 / 576
Connect the Remote Unit with a USB communication cable to the
computer.
USB
USB
If the screen does not change after connecting RTR-574 / 576:
• Do not connect more than one Remote Unit to your computer at one time.
• The USB driver may not have been installed correctly. Please see [Help for Unit
Recognition Failure], and check the USB driver.
4.
Enter the following information in the [Remote Unit Registration]
window.
20
Remote Unit
Name
Assign a unique name for the Remote Unit.
Recording Interval Select the desired interval.
Enable Download ON
Below are some examples of recording interval and maximum recording
time.
RTR-501 / 502 / 505 (Logging Capacity: 16,000 readings)
EX: Recording Interval of 30 seconds x data readings of 16,000 = 480,000
seconds (about 5 days and 13 hours)
RTR-503 / 507 / 574 / 576 (Logging Capacity: 8,000 readings)
EX: Recording Interval of 30 seconds x data readings of 8,000 = 240,000
seconds (about 2 days and 18 hours)
Recording Interval
1 sec. 30 sec. 15 min. 60 min.
RTR-501 / 502 / 505 4 hr and 26 min 5 days 13 hr 166 days 16 hr 1 yr 10 mos
RTR-503 / 507 / 574 / 576 2 hr 13 min 2 days 18 hr 83 days 8 hr 11 mos
• Upon reaching the logging capacity, the oldest data in the Remote Unit will be
overwritten and recording will continue.
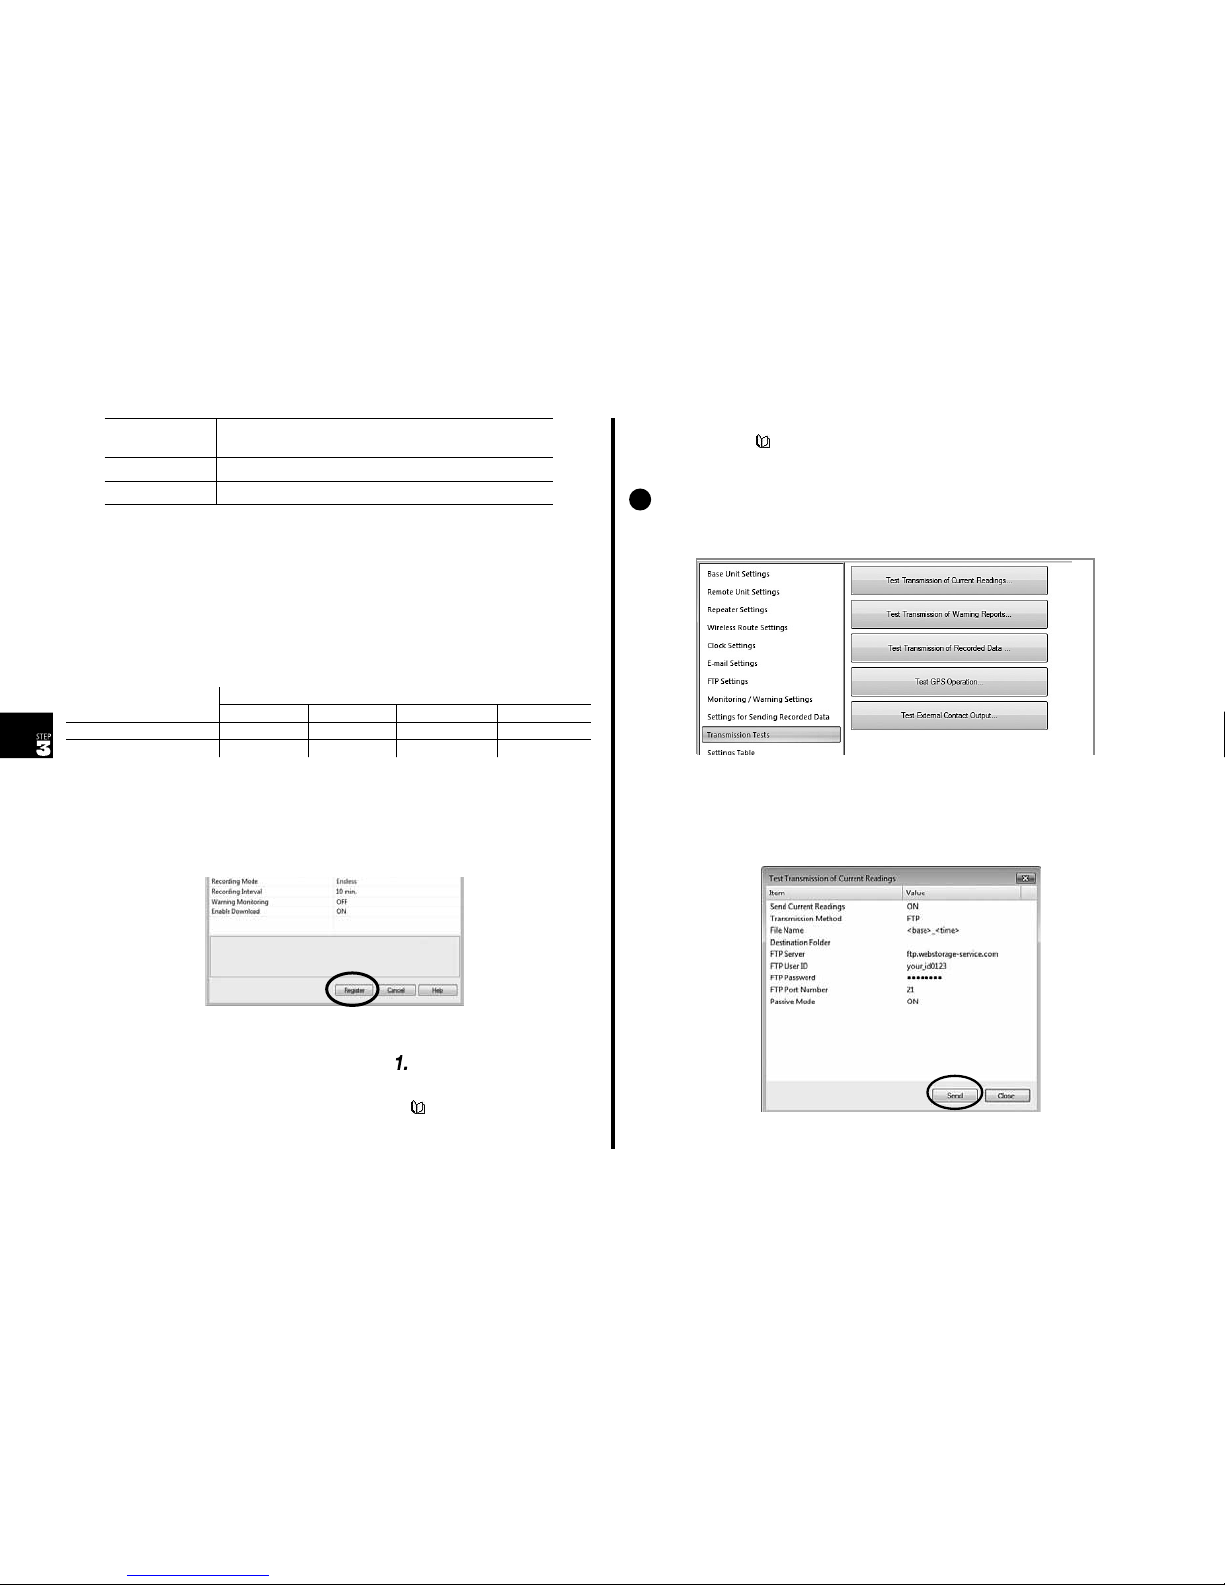
5.
After having completed all entries, click [Register] at the bottom of
the window to register with the Base Unit.
6.
The registered Remote Unit starts recording automatically upon
completion of the registration. If you wish to register other Remote
Units, repeat the same procedures from .
• It is also possible to assign a date and time for a Remote Unit programmed
recording start. For details, see the Operation Guide [ Other Useful Functions] >
[Starting Recording Manually].
• Remote Unit Settings can also be changed or added later. For details, see the
Operation Guide [ Other Useful Functions] > [Changing Remote Unit Registration
Info].
4 Making Transmission Tests
1.
Open the [Transmission Tests] menu.
2.
Click the button of the desired test to open the corresponding test
setup window.
Check the contents of the display, make any necessary changes,
and click [Send].
3.
Check to make sure that the test was successful.
Other manuals for RTR-500MBS-A
1
Table of contents
Other T&D Network Hardware manuals


Popular Network Hardware manuals by other brands


Patton electronics
Patton electronics OnSite 2884 Getting started guide

Allied Telesis
Allied Telesis GE8 datasheet

Clare Controls
Clare Controls ClareVision CV-M32810-08 installation guide

Panasonic
Panasonic WJ-NT104 operating instructions

Luxul
Luxul Xen XAP-1050 Quick install guide

AMX
AMX NXF-MINI Specifications


