T&D RTR-5W User manual
Introductory Manual
*This Introductory Manual explains in a simple manner the basic
operations and set up for RTR-5W. For a more detailed explantion, see the
User's Manual on the provided CD-ROM.
*This data logger is designed for network communication. It does not
include any RS-232 or USB communication interface. To make use of this
product you must connect it to a network.
The following items should be in the package with each main unit.
Package Contents
AC adapter
AD-0605×1
RISK OF ELECTRIC SHOCK
DRY LOCATION USE ONLY.
SHOCK HAZARD NON-
SERVICEABLE PARTS INSIDE.
LAN cable
LN-20W×1
Software
CD-ROM×1
Introductory Manual
(Warranty)×1
T&D CORPORATION
Shimadachi 817-1, Matsumoto, Nagano 390-0852 JAPAN
Tel:+81-263-40-0131 Fax:+81-263-40-3152
E-mail: [email protected]
Homepage: http://www.tandd.com/
Safety Precautions and Instructions *Please carefully observe the following safety measures when using our product.
To prevent any loss or damage to our customers, other people and / or property, and to ensure the proper use of our products we ask that before using our product you carefully read,
understand and follow the safety rules and precautions for our products as outlined below.
Explanation of Warning Symbols
WARNING
These entries are actions that absolutery under no circumstance
should be taken. The taking of such an action may
cause serious personal physical damage or death.
CAUTION These entries are actions that if taken may lead to physical injury or
damage to persons or things.
Explanation of Picture Symbols
Denotes an important warning or caution. In the symbol will appear another symbol giving
details. (EX: stands for CAUTION AGAINST ELECTRIC SHOCK)
Denotes a forbidden action. Inside the symbol will appear another symbol giving details.
(EX: stands for DO NOT TAKE APART)
Denotes an action that you, must take.
DANGER
Do not take apart, repair or modify the main unit. It may cause fire,
electrocution or damage. Ask the shop where you purchased the
product or T&D Corporation to carry out any repairs.
Do not connect or unplug the AC adapter with wet hands.
It may cause electrocution.
If water or a foreign body enters into this unit, immediately remove
the batteries and stop using it.
Continued use may cause fire or electrocution.
If any smoke or stange smells are emitted from the unit, immediately
cease using it.
Continued use may cause fire, electrocution or damage.
Do not drop the unit, or expose the unit to a strong impact. If that
happens to the unit, immediately remove the batteries and stop using
it.
Continued use may cause fire or electrocution.
Make sure to periodically remove dust and dirt from the AC adaptor
plug.
Dust can cause moisture to accumulate and can lead to poor insulation
which may result in fire.
While installing and using this product, make sure to always follow
your computer manufacturer's warnings and cautions.
Do not use this unit in wet or humid places, such as a bathroom.
Continued use may cause fire, electrocution or damage.
To avoid poor connections, be sure to push the AC adapter and the
LAN cable securely into the jack. When pulling out a cable from the
logger, make sure to hold the connector plug to pull it out.
Do not place heavy or hot things on top of cables. It may cause
electrocution or damage.
To prevent damage to the unit from static electricity, remove static
electricity from your body by touching metal around you (door knob,
window frame) before touching the unit.
Static electricity may cause not only damage to the unit, but may cause
breaks in or a loss of data.
CAUTION
This unit is not water-resistant.
If the unit gets dirty, wipe it with a clean cloth and a mild detergent.
We are not responsible for any malfunction or trouble caused by the
use of our product or by any problem caused by the malfunction of
our unit.
Please be fully aware of this before using our product.
This product has been designed for private or industrial use only. It is
not fo r us e in s itua t ions wher e str i ct s afety prec a ution s ar e
necessary such as in connection with medical equipment, whether
directly or indirectly.
Do not expose the unit to harmful gases or chemicals. It may cause
corrosion and/or other danger to the unit and to the people handling
the unit.
Condensation may occur if the unit is moved from one environment
to another where the difference in temperature is great.
Use the unit in an environment where the ambient temperature is from 0 to
60and the humidity is from 20 to 80%RH (no condensation).
RTR-5W
×
KCOHS CIRTCELE FO KSIR
.
YLNO
ESU
N
OITA
C
O
L
YR
D
-NON DRAZAH KCOHS
.E
D
I
S
N
I
STRAP ELB
A
ECI
VR
E
S
×
×
×
導入ガイド
KC
O
HS
CIR
TC
E
LE FO
KSI
R.YLNO ESU NOITACOL YRD-
NON DRAZAH
KCOHS.EDISNI STRAP ELBAECIVRES
Do not use or store the Web Wing WL in any of the following places.
Doing so may cause electrocution, fire and/or other adverse effects
to the device and/or your computer.
Areas exposed to direct sunlight
This will cause the inside of the device to become overheated and may
cause fire, deformation, and/or other damage including malfunction.
Areas prone to strong magnetic fields
This may cause damage including malfunction.
Areas exposed to water leakage
This may cause electrocution or other damage including malfunction.
Areas exposed to excessive vibration
This may cause injury, malfunctionm, damage or loss of proper electrical
contact.
Areas near fire or exposed to excassive heat
This may cause damage including malfunction and deformation.
Areas prone to smoke, dust and dirt
This may cause damage including malfunction and deformation.
Wireless Regulations
Radio, EMC and Safety Regulations
This device complies with part 15 of the Federal Communications Commision (FCC) rules. Operation is subject to the following conditions:
(1) This device may not cause harmful interference, and
(2) This device must accept any interference received, including interference that may cause undesired operation.
Note:
This equipment has been tested and found to comply with the limits for a Class A digital device, pursuant to part 15 of the FCC Rules. These limits are designed to provide reasonable protection against harmful
interference when the equipment is operated in a commercial environment. This equipment generates, uses, and can radiate radio frequency energy and, if not installed and used in accordance with the instruction
manual, may cause harmful interference to radio communications. Operation of this equipment in a residentional area is likely to cause harmful interference in which case the user will be required to correct the
interference at his own expense.
Changes or modifications not expressly approved by the party responsible for compliance could void the user's authority to operate the equipment.
This device complies with RSS-210 of the Industry Canada (IC). Operation is subject to the following two conditions:
(1) this device may not cause interference, and (2) this device must accept any interference, including interference that may cause undesired operation of the device.
1. Getting the RTR-5W Ready to Use
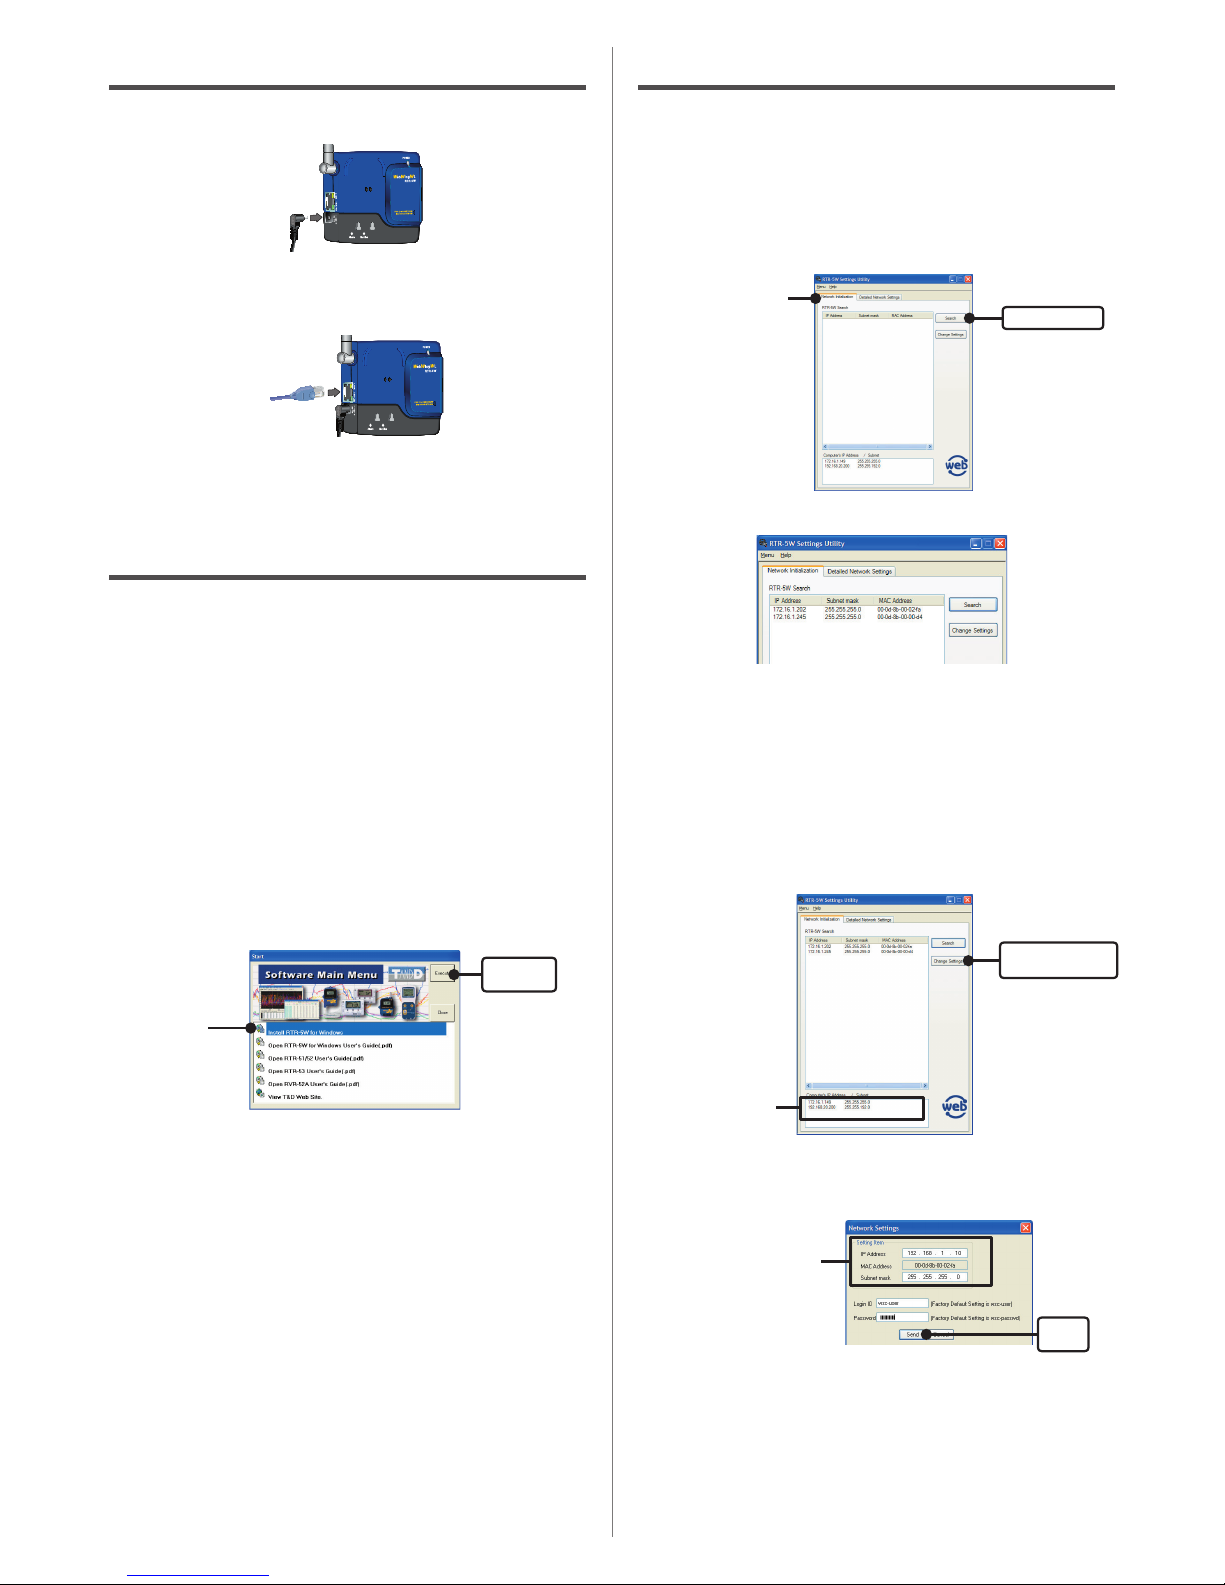
1. Connecting the AC Adapter
* To ensure a proper connection make sure that the plug is completely inserted.
2. Connecting the LAN Cable
- When fi rst making settings, please connect to a computer that is connected to a
local network (same broadcast domain).
* To ensure a proper connection make sure that the plug is completely inserted.
To connect an RTR-5W logger directly to your computer without using a hub, you must
use a cross LAN cable. (Please purchase a cross LAN cable separately.)
For how to directly connect to a computer or for how to connect to use a Wireless LAN
card, see [Connecting to a Network] in the User's Manual on the CD-ROM.
2. Installing the Software
PC Operating Environment
Microsoft Windows 7 32/64bit English
Microsoft Windows Vista 32bit English
Microsoft Windows XP 32bit(SP2 or above) English
Microsoft Windows 2000 English
Browser Internet Explorer 6.0 or above
- Is Windows® operating properly?
If Windows is not operating properly,
RTR-5W for Windows
may not be installed
correctly or it may not operate properly.
- Please quit all other applications.
If other programs are open, please close and quit all of them, making sure to quit all
Quick Start programs such as a virus checker. To install
RTR-5W for Windows
, it is
necessary to have Administrator rights (Computer Administrator) for the computer in
which you wish to install it.
1. Open Windows®.
2.
Place the accompanying CD-ROM into your CD-ROM drive.
In a few seconds, the "Install Program" window will appear.
* If that window does not automatically open, please open it by double clicking the CD-ROM icon
in "My Computer" on your desktop. Also, if the fi le appears in the CD-ROM folder, click on the
"start.exe" icon.
[Execute]
button
Click
3.
Select Install
RTR-5W for Windows
and click the [Execute] button to
start the installation.
4.
Follow the directions to install.For more details about the installation,
see the User's Guide on the CD-ROM.
5.
After installation has been completed,
RTR-5W for Windows
will be
registered in the Window's [Start] Menu.
There are 5 applications within
RTR-5W for Windows
.
RTR-5W for Windows
In order to use this system it is necessary to carry out registration for wireless communication
between an RTR-5W base station and RTR-51/52/53/RVR-52A data loggers, make recording
settings, make warning monitoring settings and then gather recorded data.
Network Settings Utility
Make all network settings for RTR-5W.
Temp / Humidity Graph
View temperature and humidity data.
Multi-scale Graph
View voltage, temperature and humidity data.
Event Viewer
View data recorded with the RVR-52A Event Data Recorder.
3. Network Initialization Settings
NOTE:
- Please note, that upon purchase, all RTR-5W units are set with the same IP address. To make IP
address changes, connect one RTR-5W unit at a time and carry out the changes.
Do not connect more than one unit with the same address to the network at the same time. - This
explanation is about how to connect to a local network and is not about how to connect to the
Internet. If you wish to use by connecting to the Internet, see "Connecting to the Internet" in the
User's Manual on the provided CD-ROM.
1.
In
Network Settings Utility
, click on the "Network Initialization" Tab and
then click on the [Search] button.
*After clicking, the search results will be shown in about 5 seconds.
[Search] button
"Network Initialization"
Tab
* The factory default settings for RTR-5W are as follows:
IP Address: "192.168.1.200", Subnet Mask: "255.255.0.0".
[If no units are detected]
- Check the connection between the computer and the RTR-5W.
- Check the hub power switch and the network cable type.
- In some network environments, it may be necessary to make changes to the IP address and
subnet mask at the computer side in order to carry out a search. To fi nd out more details about
checking and changing a computer's network settings, see "Network Initialization Settings" in
the User's Manual on the provided CD-ROM.
2. Making Changes to the IP Address and Subnet Mask.
1. From the displayed list, select the RTR-5W to which you wish to make settings
by either double clicking on that address or select and click on the [Change
Settings] button.
*The [Network Settings] window will then appear.
[Change Settings]
button
Computer "IP address"
and "Subnet mask"
2.Enter an IP Address and Subnet Mask that is appropriate for your network.
For example, if your computer IP address is "192.168.1.1", and the subnet mask is
"255.255.255.0", then set the RTR-5W IP address as "192.168.1.10".
*If you are unsure, ask your company network administrator.
Enter the “IP address” and
“Subnet mask”
[Send]
button
3. After entering the above, next, enter the login ID and password.
* The RTR-5W factory default login ID is "wsc-user" and the password is "wsc-passwd". Make
any necessary changes to the login ID and password at "Detailed Network Settings".
4. After checking for entry errors, click the [Send] button. After transmission has
been completed, a message will appear.
Click the [OK] button to complete the settings.
*After settings are completed, the RTR-5W will automatically restart. During the restarting
process, a search cannot be performed, even if you click the [Search] button. It should take about
30 seconds.
4. RTR-5W Clock Settings
If the clock settings for the RTR-5W are not set correctly, the clock in the Web Viewer and
the time of Warnings will also be incorrect. Please make sure to set correctly before
beginning to use.
Clock settings can be made directly using RTR-5W for Windows software, but if RTR-5W
is rebooted, the clock settings will be initialized. However, by making settings to enable the
SNTP server, it is possible to have the clock automatically reset to the current time upon
rebooting.
Ex) Making SNTP Settings
1. Open the
Network Settings Utility
, click on the "Detailed Network Settings" tab,
and gather the current settings.
2. Click the [Change Settings] button and the "Detailed Network Settings" window
will appear, where you can make changes to the settings.
3. Under [SNTP Settings], click “ON” to change the setting.
SNTP Settings
4. After making the settings, enter the info for the recipient of the settings and
click the [Send Settings] button.
5. A message will appear asking you if it is OK to restart the system. Click the [Yes]
button to restart.
6.After the restarting has been completed, the settings will have been
successfully made.
5. Remote Registration
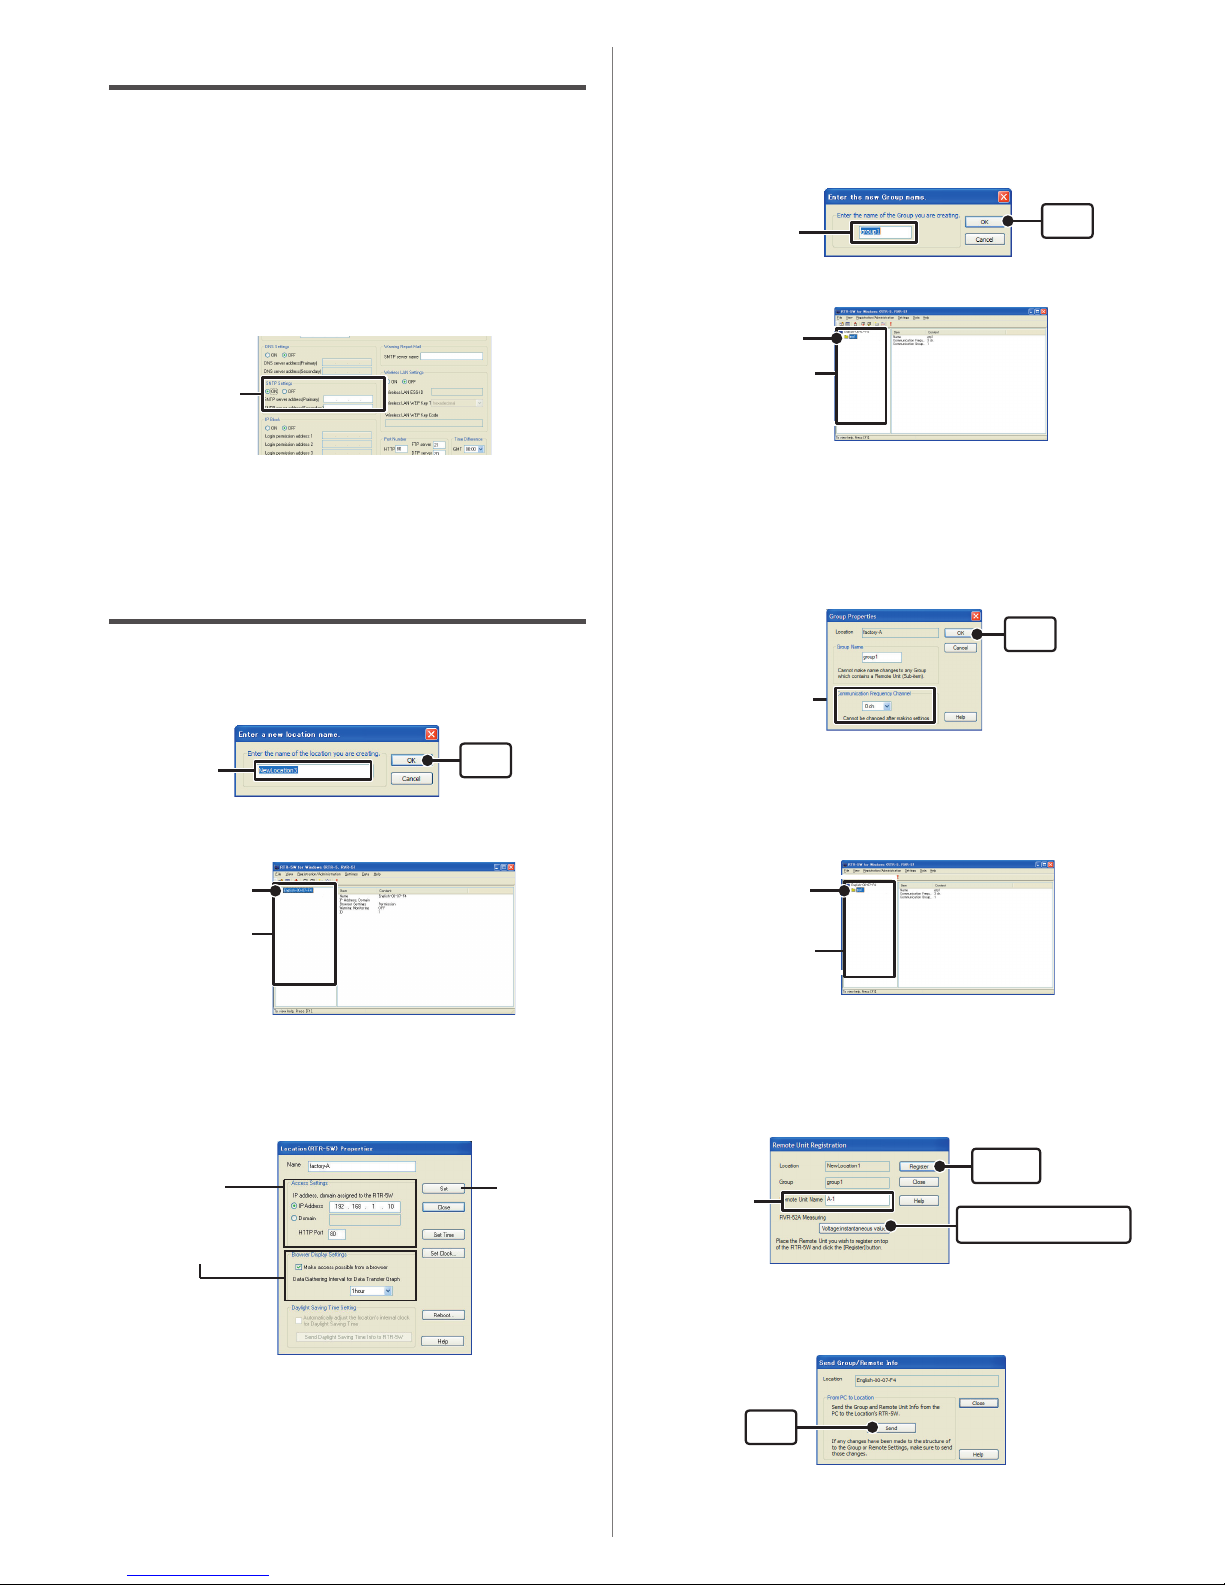
1. Create a Location
1. Open
RTR-5W for Windows
.
2. In the "Registration / Administration" Menu, click on [Create Location (RTR-5W)]
to display a window where you can enter a name for the new Location.
Enter the Location
Name
[OK]
button
* In the Location name, you cannot use a space, or any of the following characters [\/:,;*?"<>|&].
3. After entering the Location Name, by clicking the [OK] button, the Location will
be created in the Administration Tree.
Administration
Tree
Location Icon
4. Click on the desired Location Icon. In the "Registration / Administration" Menu,
select "Location (RTR-5W) Properties" and enter the same IP address that you
previously entered when making settings in the Network Settings Utility. When
using the network default settings, enter the IP address and Domain that was
assigned.
* By right clicking on the Location icon, a popup menu will appear where you can select
"Location(RTR-5W) Properties" to display the properties window.
*If necessary, make settings in the "Browser Display Settings" section of the Properties Window.
- Making access possible from a browser
It is possible to make permit / forbid access from a browser.
- Data Gathering Intervals for Data Transfer Graph <Selections: deactivate, 15, 20, 30
minutes, 1, 2, 3, 6, 12, 24 hours>
This setting is for the intervals for gathering data when monitoring the current readings via the browser and
viewing in simple graph form.
5. After making entries, click the [Set] button to send the settings to the RTR-5W that was
entered into the "Access Settings" Bar and settings for the Location will be completed.
2. Creating Groups
1. In the "Registration / Administration" Menu, click on "Create Group" to display
a window where you can enter a name for the new Group.
* In the Group name, you cannot use a space, or any of the following characters [\ /:,;*?"<>|&]
(Up to 8 characters can be entered.)
Enter a Group Name
[OK]
button
2. After entering the Group Name, by clicking the [OK] button, the Group will be
created in the Administration Tree.
Administration
Tree
Group icon
3. Click on the desired Group Icon. In the "Registration / Administration" Menu,
select "Group Properties" and assign a Communication Frequency Channel for
the selected Group.
* By right clicking on the Group icon, a popup menu will appear where you can select "Group
Properties" to display the properties window.
- Once a Communication Frequency Channel setting has been made, it cannot be changed.
- If a different Group is located nearby and there is a possibility that communication could occur
at the same time, please make sure to set the Communication Frequency Channels for each
Group to a different setting. If two Groups use the same Communication Frequency Channel at
the same time, there is a great possibility that a communication failure will occur.
4. Click the [OK] button to finish the Group settings.
3.
Registering a Remote Unit
1. Place a Data Logger face down on the RTR-5W.
2. Select the Group in which you wish to register Remote Units from the
Administrator Tree. In the "Registration/Administration" Menu, select "Remote
Unit (RTR-5, RVR-5) Registration" to display the Remote Unit Registration
window.
* By right clicking on a Group icon, a popup menu will appear where you can select "Remote
Unit Registration" to display the registration window.
3. Enter a name for the Remote Unit and click the [Register] button to finish the
registration.
* In the Remote Name, you cannot use a space, or any of the following characters [\ /:,;*?"<>|&]
(Up to 8 characters can be entered.)
-If you are using an RVR-52A logger, click the [RVR-52A Measuring Mode] button and select the
desired measuring mode.
If you wish to register other Remote Units, repeat the process as in steps 1~3.
4. Sending Registration Info to an RTR-5W
1. Select a Location from the Administration Tree, and in the "Settings" Menu,
select "Send Group / Remote Info".
[Send]
button
2. Click the [Send] button to send the registration info to the RTR-5W and
complete the settings.
* After making any changes to the settings, make sure to repeat step 4 above.
Assign a Communication
Frequency Channel
[OK]
button
Administration Tree
Select the Group into which
you wish to register a
Remote Unit.
Enter the Remote
Unit Name
[Register]
button
[RVR-52A Measuring Mode]
button
[Set] button
[Access Settings]
When using the network default
settings, enter the IP address and
Domain that was assigned.
[Browser Display Settings]

9. Downloading Recorded Data
It is possible to download recorded data by two methods: [Wireless Communication] or
[Optical Communication].
NOTE:
If the computer clock is set incorrectly, the time of the downloaded data will also be
incorrect. Make sure the clock settings are correct before starting a downloading session.
Ex) Download Data by Wireless Communication
1. Open
RTR-5W for Windows
.
2. From the Administration Tree, select the Remote Unit from which you
wish to download data, and in the "Data" Menu, select "Download Data".
[Download]
button
Specify the
download range
[Open Graph]
button
[Specify the File Name]
button
The selected
Remote is
displayed.
3. Select the Download Mode.
4. If you wish to save the file by specifying the location, click the [Specify
File Name] button and make Saving Location Settings.
5. Click the [Download] button to start downloading.
After downloading has been completed, select the name of the Remote Unit
from the list and click "Open Graph" to view the data in graph form.
10. Viewing the Current Readings Monitor
(accessing via browser)
1. Open Internet Explorer.
2. In the address, enter the IP address that was entered in the
Network
Settings Utility
in the form of a URL that begins with http://...and then
press the [Enter] key. The RTR-5W Series Web Viewer will appear.
After this, anytime you wish to view an already initialized RTR-5W, enter the address
as above, and press the [Enter] key to open the RTR-5W Web Viewer.
Enter address
[If the Viewer does not appear]
Check the IP address and subnet mask, and repeat the steps in "3. Network Initialization
Settings".
3. Once the RTR-5W Web Viewer is displayed, the current readings monitor
for all Remote Units registered to that RTR-5W will automatically appear.
In the Current Readings Monitor, gathered data will appear from the Remote Unit(s) at the data
gathering interval set in the "Location Properties" in
RTR-5W for Windows
. If you wish to view
the most recent readings, click the [Gather Current Readings] button.
[Gather Current Readings]
button
6. Placing a Remote in the Field
The wireless communication range, if unobstructed and direct, is about 100 meters [330
feet. ].Place the Remote Unit(s) within 100 meters of the RTR-5W Station in a spot where
stable wireless communication can occur.
7. Wireless Communication Test
Gather the current data readings from each Remote Unit and check to make sure that
wireless communication is possible between the Remote Units and the RTR-5W Station.
1.
Place a Remote Unit in the actual place from which you wish to measure
and record data.
2. Select the placed Remote Unit from the Administration Tree, and in the
"Data" Menu, select "Gather Current Data".
* By right clicking on the Remote Unit icon, a popup menu will appear where you can select
"Gather Current Data" to display the "Gathering Current Data" window.
3.
Click the [Gather] button to start communication with the Remote Unit
and the current data readings will be displayed.
If the current readings are not displayed, move the Remote Unit to a different Location and
try gathering the current data again.
8. Starting Recording
NOTE:
If the computer clock is set incorrectly, the programmed start time will also be incorrect. Make sure
the clock settings are correct before starting a recording session.
1.
Open
RTR-5W for Windows
.
2. From the Administration Tree, select the Remote Unit for which you
wish to make recording settings, and in the "Settings" Menu, select
"Start/Stop Recording".
3.
Set the Recording Conditions.
4. Click the [Start Recording] button to send the recording condition
settings via the RTR-5W Station to the Remote Unit and complete the
set-up.
[Gather]
button
The selected
Remote is displayed.
© Copyright T&D Corporation. All rights reserved. 2010.08 16507020008 3rd Edition
Other manuals for RTR-5W
2
Table of contents
Other T&D Network Hardware manuals


