TaoTronics TT-HE005 User manual

尺寸:160mm*110mm
骑马钉
封面128g铜版纸,内页80g书纸

Model: TT-HE005
TaoTronics Oil-Filled Radiator
User Guide
E-mail:
MANUFACTURER
Manufacturer: Shenzhen NearbyExpress Technology Development
Co.,Ltd.
Address: Floor 7, Building E, Galaxy World Phase II, Shenzhen, China
Rev_1.1_EN
MADE IN CHINA
www.taotronics.com

Contents
01 IMPORTANT SAFETY INSTRUCTIONS
06 Package Contents
07 Product Diagram
08 Assembly Instructions
10 Operations and Functions
15 Battery Replacement
16 Specifications
16 Cleaning and Maintenance
18 Troubleshooting
19 Warranty and Service

01 02
Thanks for choosing TaoTronics Oil-Filled Radiator. Please read this
User Guide thoroughly before use and retain it for future reference.
IMPORTANT SAFETY
INSTRUCTIONS
READ AND FOLLOW ALL SAFETY INFORMATION AND
INSTRUCTIONS.KEEP FOR FUTURE REFERENCE.
FOR HOUSEHOLD USE ONLY
When using electrical appliances, basic precautions should always be
followed to reduce the risk of fire, electric shock, and injury to per-
sons, including the following:
1.Read all instructions before using this heater.
2.Surface of this heater will become hot during use. To avoid burns,
do not touch hot surfaces with bare hands. Use handles when mov-
ing the unit.
3.High temperature. Keep combustible materials, such as furniture,
pillows, bedding, papers, clothes and curtains at least 3 feet (0.9
meters) from the front and top of the radiator and keep them away
from the sides and rear.
4.This appliance is not intended for use by persons (including chil-
dren) with reduced physical, sensory or mental capabilities, or lack
of experience and knowledge, unless they have been given super-
vision or instruction concerning the use of the appliance by person
responsible for their safety.
5.Do not allow to be used as a toy. Close attention is necessary when
used by or near children. Children should be supervised to ensure
that they do not play with the machine or remote control.
6.Always unplug the heater when not in use.
7.Do not operate any heater with a damaged cord or plug or after the
heater malfunctions, has been dropped or damaged in any manner.
Discard heater, or return the heater to an authorized service facility
for examination, electrical or mechanical adjustment or repair.
8.Do not use outdoors or on wet surfaces.
9.Do not handle any part of the plug or machine with wet hands.
10.Suitable for dry locations ONLY. This heater is not intended for
use in bathrooms, laundry areas and similar indoor locations. Nev-
er place the heater where it may fall into a bathtub or other water
container. Do not use or store where it may get wet or in the imme-
diate surroundings of a bath, a shower, or a swimming pool.
11.Do not run cord under carpeting. Do not cover cord with throw
rugs, runners or the like. Do not route cord under furniture or ap-
pliances. Arrange cord away from traffic area and where it will not
be tripped over.
12.To disconnect the heater, turn it off first, then remove the plug
from the outlet.

03 04
13.Connect to properly grounded outlets only.
14.Do not insert or allow foreign objects to enter any ventilation or ex-
haust opening as this may cause electric shock, fire or damage to
the heater.
15.To prevent a possible fire, do not use with any opening or exhaust
blocked, and keep free of dust, lint, hair, and anything that may
reduce airflow. Do not put any object into the inlet grill or the ex-
haust opening as this may cause an electric shock or fire, or dam-
age the appliance.
16.A heater has hot or arcing or sparking parts inside. Do not use it
in areas where gasoline, paint or flammable liquids are used or
stored.
17.Use this heater only as described in this User Guide. Any other use
not recommended by the manufacturer may cause fire, electric
shock, injury to persons or other damage to property.
18.To prevent overload and blown fuses, be sure that no other appli-
ance is plugged into the same outlet (receptacle) or into another
outlet (receptacle) wired into the same circuit.
19.If there is a loose fit between the plug and the socket or the plug
becomes very hot, the socket may need to be replaced. Check
with a qualified electrician to replace the socket.
20.It is normal for the plug and cord to feel warm to the touch. A plug
or cord which becomes hot to the touch or becomes distorted in
shape may be a result of a worn electrical outlet. Worn outlets or
receptacles should be replaced prior to further use of the heater.
Plugging heater into a worn outlet / receptacle may result in over-
heating of the power cord or fire.
21.The output of this heater may vary and its temperature may be-
come intense enough to burn exposed skin. Use of this heater is
not recommended for persons with reduced sensitivity to heat or
an inability to react to avoid burns.
22.Ensure the heater is on a stable, secure surface to eliminate the po-
tential of tipping it over.
23.Always plug heaters directly into a wall outlet / receptacle. Never
use with an extension cord or relocatable power tap (outlet / pow-
er strip).
24.Be sure that the plug is fully inserted into appropriate receptacle.
Please remember that receptacles also deteriorate due to aging
and continuous use: check periodically for signs of overheating or
deformations evidenced by the plug. Do not use the receptacle
and CALL your electrician.
25.Check that neither the appliance nor the power cable has been
damaged in any way during transportation.
26.Make sure that no pieces of polystyrene or other packaging mate-
rial have been left between elements of the appliance. It may be
necessary to pass over the appliance with a vacuum cleaner.
27.Do not attempt to modify or repair the product by yourself. Doing
so could void the warranty and cause damage or personal injury.
Only a repair technician may disassemble or repair this product.
28.Choking hazard – This remote control unit contains a small battery.
Keep the remote control away from children and do not swallow
the battery. If the battery is swallowed seek medical advice at
once.

05 06
29.If the machine is not working as it should, has received a sharp
blow, has been dropped, damaged, left outdoors, or dropped into
water, do not use and contact the Customer Support.
30.Before cleaning, or storage, or when not in use, always turn the
heater OFF and unplug it from the electrical outlet and allow to
cool.
31.IMPORTANT - This appliance has a polarized plug (one blade
is wider than the other). To reduce the risk of electric shock, this
plug is intended to fit in a polarized outlet only one way. If the plug
does not fit fully in the outlet, reverse the plug. If it still does not
fit, contact a qualified electrician. Do not attempt to rig this safety
feature.
DANGER-High temperatures may be generated under certain ab-
normal condition.
Do not partially or fully cover or obstruct the front of this heater.
READ AND SAVE THESE
INSTRUCTIONS
Package Contents
①1x TaoTronics Oil-Filled Radiator Body (TT-HE005)
②1x Remote Control
③1x CR2025 Type Lithium Battery (installed in Remote Control)
④1x U-Shaped Bolt
⑤2x Caster Mounting Plates
⑥4x Wing Nuts
⑦1x Thank You Card
⑧1x User Guide

07 08
Assembly Instructions
The heater is packaged with the casters unattached. You shall at-
tach them before operating the heater.
Important: Do not plug in and operate the heater if the casters are
not assembled correctly in place. The heater must always be used in
an upright position (casters at bottom, controls on top).
1.Carefully take out the radiator body from the box and remove all
packaging materials.
2.Take out the caster assemblies and turn the radiator body upside
down on a scratch-free location. Make sure it is stable and will not fall.
3.Rear Casters: Unscrew the wing nuts from the included U-shaped
bolt, attach the U-bolt to the U-facing flange between the last two fins.
Insert the threaded ends of the U-bolt into the mounting holes on the
plate. Screw the wing nuts back to the U-bolt and tighten properly.
Note: The rear casters must be mounted between the last two fins.
Product Diagram
Handle
LED Display
Control Buttons
Front Panel
Cord Wrap
Caster Assembly
Power Cord and Plug
Radiator Fins

09 10
Operations and Functions
Remote Control
Note: For added convenience, the same control buttons can be
found on the remote control.
4.Front Casters: Put the other caster mounting plate on the front cov-
er against screws. Screw the wing nuts back to the U-bolt and tight-
en properly.
Note: Do not over tighten, which may cause the damage of
radiator flange.
5.Turn the heater right-side up after the casters are installed securely.
Make sure the casters installed can move freely.
6.Place the heater on a firm, level surface free from obstructions, and
at least 3ft. (0.9m) away from any wall or combustible material. Plug
into an appropriate voltage AC outlet. Your heater is ready for use
now.
Temperature / Timer +
Timer Button
LED Display
Temperature / Timer -
ECO Mode
Power ON/OFF/
Heat Level Setting
Power ON/OFF
Temperature / Timer +
Heat Level Setting
Timer Button
Temperature / Timer -
ECO Mode

11 12
Operations and Functions
Plug the heater into an appropriate voltage AC outlet, the unit will
enter standby mode with a beep and power indicator on red.
LED Display
• Shows the setting temperature (40-95°F), heat level (H3, H2, H1) or
Auto Start/ Stop time (00-24H) while setting.
Power ON
• Press once to turn the heater ON: Power indicator turns green &
highest heat level “H3” flashes on LED display, then setting
temperature is displayed after 3 second.
Power OFF
• Via Control Panel: Repeatedly press to OFF, or press and hold it
for 2 seconds.
• Via Remote Control: Press once again.
Heat Level Setting
• Via Control Panel: When the unit is on, repeatedly press to cycle
through H3 -> H2 -> H1 -> OFF -> H3 with setting temperature
displayed after 3 second.
• Via Remote Control: When the unit is on, press to adjust the heat
level (H3, H2, H1)
Temperature Adjustment
• When the unit is on, press the or Button to adjust the
temperature from 40-95°F in 1°F increments.
• Press and hold the buttons to quickly skip to the desired
temperature. The set temperature will flash three times to confirm
your setting.
• When the setting temperature is reached, the heater may keep
working for additional minutes to maintain the setting temperature.
• Default setting temperature: 86°F
Timer Setting
• Auto Stop Timer: When the unit is ON, press the Timer Button, then
press the or Button to set the number of hours (00-24H) you
want the unit to run before it switches off. When time is up, the unit
will automatically stop running.
• Auto Start Timer: When the unit is OFF (with the heater plugged into
an electrical outlet), press the Timer Button, then press the or
Button to set the number of hours (00-24H) you want the unit to start
running automatically. When time is up, the unit will automatically
start running.

13 14
• Press and hold the or Button to quickly skip to the desired time.
The set time will flash three times to confirm your setting.
• To cancel Timer setting, adjust the timer setting to 00 or turn off the
unit.
ECO Mode
• When the unit is on, press the ECO Button to run under ECO mode.
• In ECO mode, the heater will run in the highest heat level (H3) for 10
minutes and then in the lowest level (H1) for 30 minutes.
• Default setting temperature: 77°F
• Press the ECO Button again to cancel the ECO mode, the heater will
restore to the original setting state.
• In ECO mode, press the Power Button on the control panel or Heat
Level Button on the remote control once, the heater will exit ECO
mode and restore to the highest heat level (H3).
• When Auto Start Timer is set, the ECO Button is ineffective.
Other Safety Features
Auto Shut Off
• When the parts become excessively hot, the heater will shut off
automatically to avoid overheating. Unplug it from the electrical
outlet. Allow it to cool down, then plug it back into the outlet.
• When the heater is tipped over, the heater will shut off automatically.
Place it on a flat, level and stable surface.

15 16
Battery Replacement
1.Remove the battery holder by
pressing the locking tab A with
your thumb and pulling it out as per
arrow B.
2. Properly dispose the old battery.
3. Replace with a new CR2025 Type
Lithium Battery, making sure the (+)
side facing up.
4. Gently push in the holder until securely locked into place.
CAUTION:
• Danger of explosion if battery is incorrectly replaced. Replace only
with the same or equivalent type.
• Do not attempt to dismantle or charge the batteries.
• Do not dispose the batteries in fire, batteries may explode or leak.
Specifications
Model TT-HE005
Input 120V~ 60Hz
Rated Power 1500W
Remote Control Battery CR2025, 3V
Cleaning and Maintenance
It is recommended that the heater be cleaned at least one time during
the operating season and before off-season storage in order to
provide the optimum level of performance.
Always disconnect the appliance from the mains by switching it off
and removing the plug from the power outlet before cleaning.
•Turn the heater “OFF”, unplug it and wait for the heater to cool
down.
•Use only a soft cloth to gently wipe the outer surfaces of the heater
clean.
•Do not use any cleaning agents or detergents.
•Never immerse the heater in water and never allow water to drip
into the motor housing. Be sure not to wet the Heating Element and
the switches.
+
-
A
B
17 18
• For storage, you may leave the heater covered to protect it from
dust. Store it in a cool, dry location and wrap the cord around the
cord wrap on the unit so that it will not be tripped over or damaged.
Caution:
•Do not allow water to run into the interior of the heater as this could
result in a fire or electric shock hazard.
•Any other servicing should be performed by an authorized service
representative.
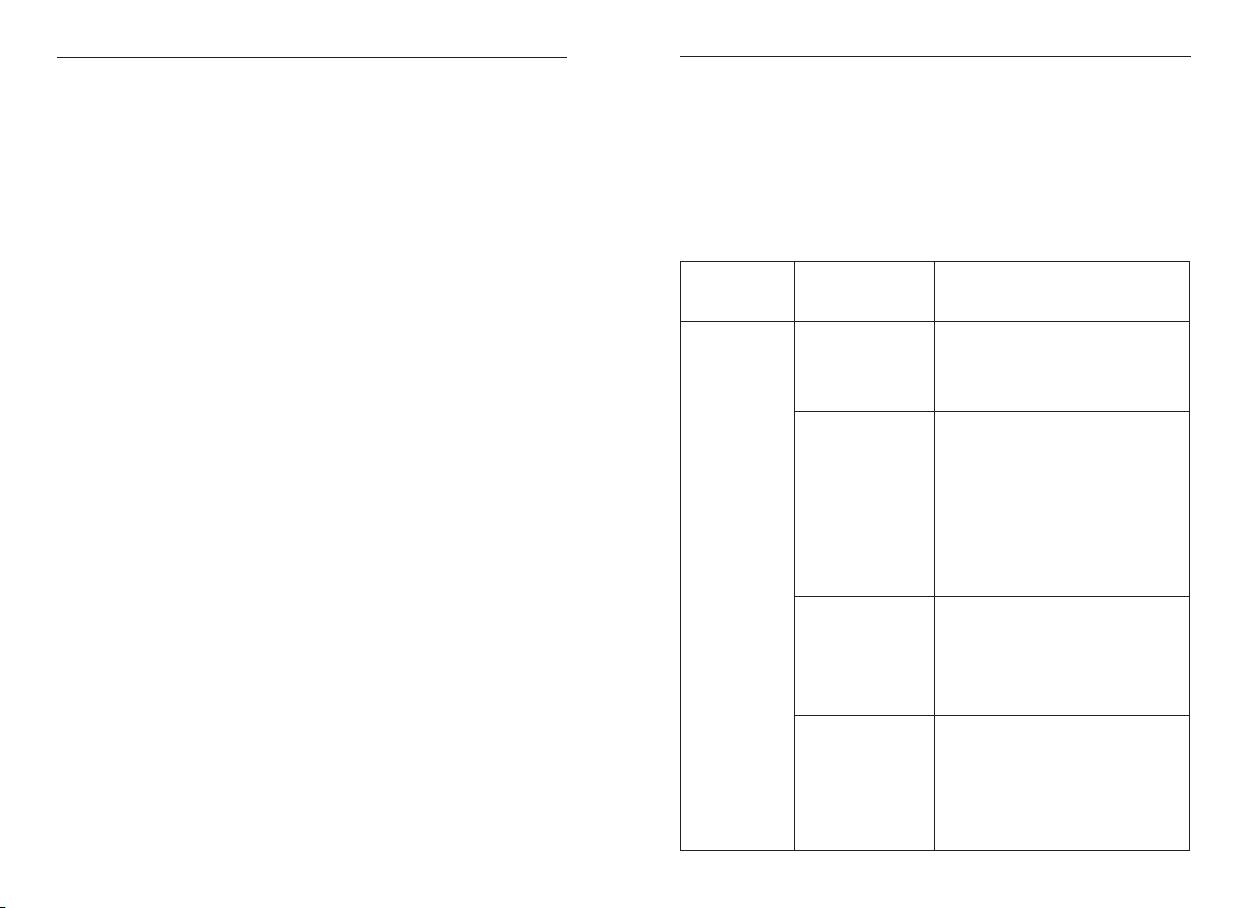
Troubleshooting
The following troubleshooting guide addresses the most common
problems. If problems persist, contact the Customer Support at
Problem Possible
Causes Solution
Heater does
not start
Power cord is
not properly
plugged in.
Connect the plug to a powered
electrical outlet.
Overheat
Protection has
been activated.
Turn the heater OFF, unplug it
and allow it to cool.
Check and remove any objects
on or adjacent to the heater.
Wait 5-10 minutes before
plugging the unit back in.
No power
is passing
through the
unit.
Ensure that your circuit breaker
or fuse is working properly.
Ensure your heater is placed on
a flat and even surface.
Setting
temperature
is lower than
the room
temperature.
Make sure the thermostat is set
at a higher temperature than
the room temperature.

19
Problem Possible
Causes Solution
The heater
suddenly
stops during
heating
The
temperature
exceeds the
threshold of the
thermal cut- off.
Turn off the unit and unplug it
from the power outlet. Allow
it to cool, and then plug it into
the electrical outlet again.
The heater is
tipped over.
Place it on a flat, level and
stable surface.
Warranty and Service
This product is covered with TaoTronics product and labor warranty
for 12 months from the date of its original purchase. If any problems
occur, please contact the TaoTronics Customer Care Centre via the
contact information listed in this User Guide.
We can only provide after sales service for products that are sold by
TaoTronics or TaoTronics authorized retailers and distributors. If you
have purchased your unit from a different place, please contact your
seller for return and warranty issues.
Table of contents
Other TaoTronics Heater manuals


