Streetwize SWCH400 User manual

a
, F
Fa
H
eate
r
r,
an & Defroster
Please read and retain these instructions for future reference.
M17 1RY
Streetwize Accessories:
Unit 1, Royce Trading Estate, Ashburton Road West, Trafford Park, Manchester M17 1RY
www.streetwizeaccessories.com
12Volt
SWCH400 Manual AW (Rev) 2018.qxp_Layout 1 20/07/2018 10:58 Page 1
1. This product is not a toy. Do not allow children to play with or near this item.
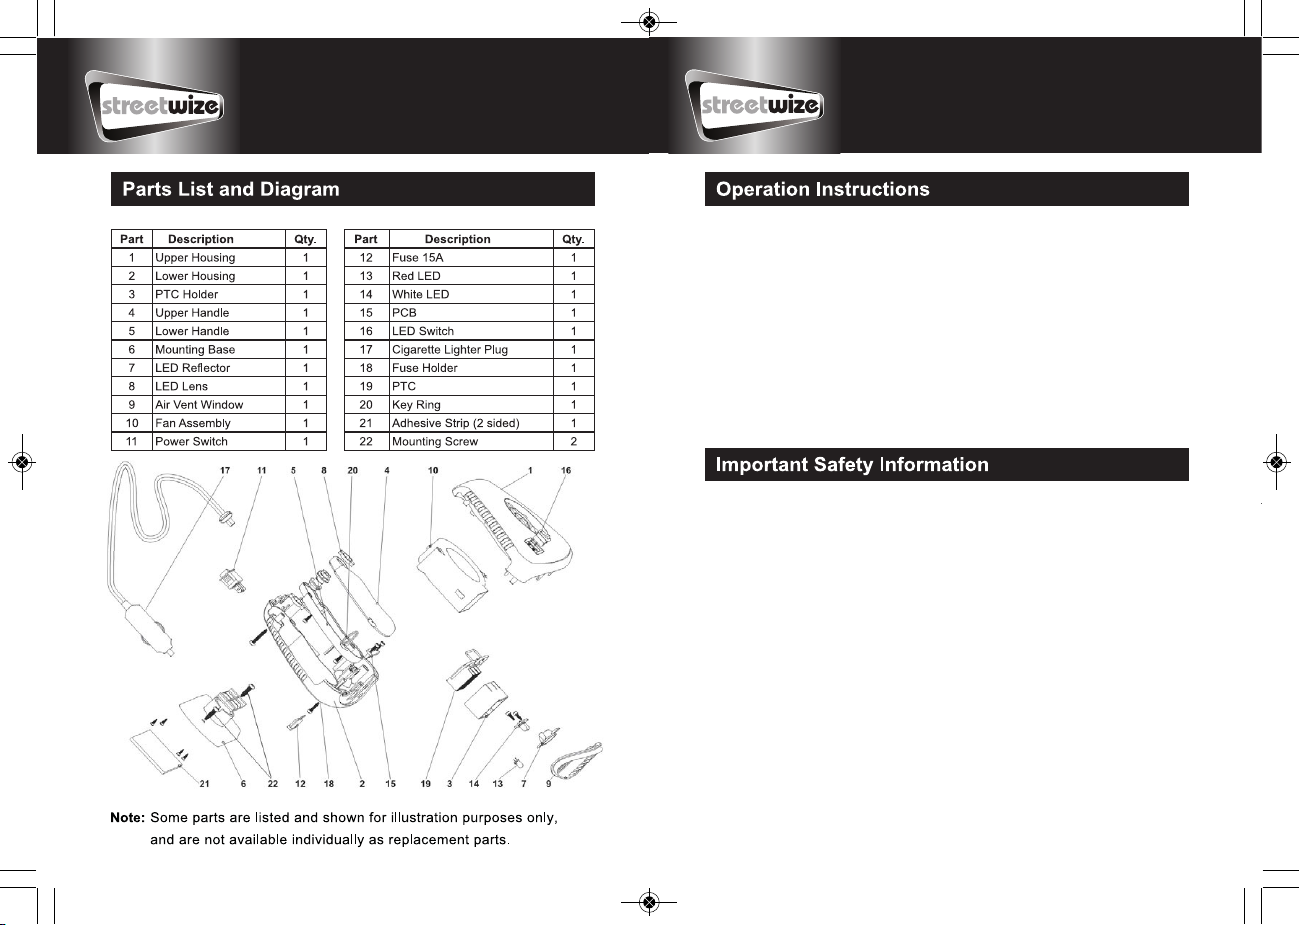
2. The Heater's base can be mounted to the vehicle using Mounting Screw (22)
or the Adhesive Strip (21) as desired.
3. Verify that installation surface has no hidden wires or other components
before drilling or driving screws.
4. Do not mount or use when tired or when under the influence of alcohol, drugs
or medication.
5. Do not exceed the vehicle manufacturers rated fuse capacity in the Power
Socket circuit at all times.
6. Do not leave heater plugged in while starting vehicle or while vehicle's engine
is off. Low voltage during these circusmstances will increase heat in the
wiring and may blow the fusible link in the receptacle or another fuse.
7. Check vehicle manual to ensure the Power Socket receptacle is rated at
15 Amps or greater. Do not use a socket extension or pigtail to operate
this Heater.
8. Only use this Heater for up to 15 minutes at a time, and allow to cool between
uses. Do not operate other 12VDC appliances at the same time.
NOTICE: To prevent blowing a fusible
link on the Power Socket, only use with
15 Amp rated Power Socket receptacle.
1. Place the Power Switch (11)
and the LED Switch (16)
in their O (off) positions.
Plug the Power Socket (17) into the
vehicle's Power Socket receptacle.
2. The Heater can be removed from the
Mounting Base (6). By holding the
Handle (4/5) the Heater can be moved
around as needed.
3. The LED Switch (16) turns
the light on/off.
4. To select either the fan only or the
heater and fan, press the Power
Switch (11) to the setting as marked.
Toggle the Power Switch to the center
position to turn off these functions.
WARNING! Do not operate longer
than 15 minutes at one time, allow
heater to cool completely after use.
5. Unplug the Heater before
leaving the vehicle.
SWCH400 Manual AW (Rev) 2018.qxp_Layout 1 20/07/2018 10:58 Page 2
Table of contents
Other Streetwize Heater manuals

Popular Heater manuals by other brands


Desa
Desa HD12CB owner's manual

Atlantic
Atlantic Alcove Installation and operating manual

Ridea
Ridea Living Othello Mono Slim Instruction and installation booklet

Dru
Dru VENTEO Instructions for installation and operation

Lasco
Lasco CC13650 operating manual

Truma
Truma Ultraheat S 3004 Operating instructions & installation instructions


