Target Blu Eye 2 User manual

Know what’s out there...
INSTALLATION MANUAL | TARGET BLU EYE 2

2
CONTENTS
IN THE BOX 3
INSTALLATION SEQUENCE WITH LED DISPLAY 4
CHECKING SUITABILITY OF MIRROR GLASS FOR LED DISPLAY 4
MOUNTING LED DISPLAY IN REAR VIEW MIRROR 4
CONNECTING AND PLACING MICROSWITCHES AND DISPLAY CABLE 4
INSTALLING FIRMWARE 4
ACTIVATE ‘INSTALLER MODE’ 6
LOCATION FOR THE ANTENNA 6
EXIT ‘INSTALLER MODE’ 7
ANTENNAS 7
TECHNICAL SPECIFICATIONS 9

3
IN THE BOX
• Target Blu Eye 2 receiver
• LED display for mounting in the rear view mirror (including 2 micro switches and connection cable)
or
• LCD display
• VCD dipole antenna for invisible mounting behind front or rear bumper
• Connection cable between receiver and display
• Power cable with fuse
• USB drive
• Quick start instructions

4
INSTALLATION SEQUENCE WITH LED DISPLAY
1. Check the suitability of the mirror glass for the led display:
• After dismantling the rear view mirror, always rst check whether the mirror glass allows enough light from
the LED display to pass through.
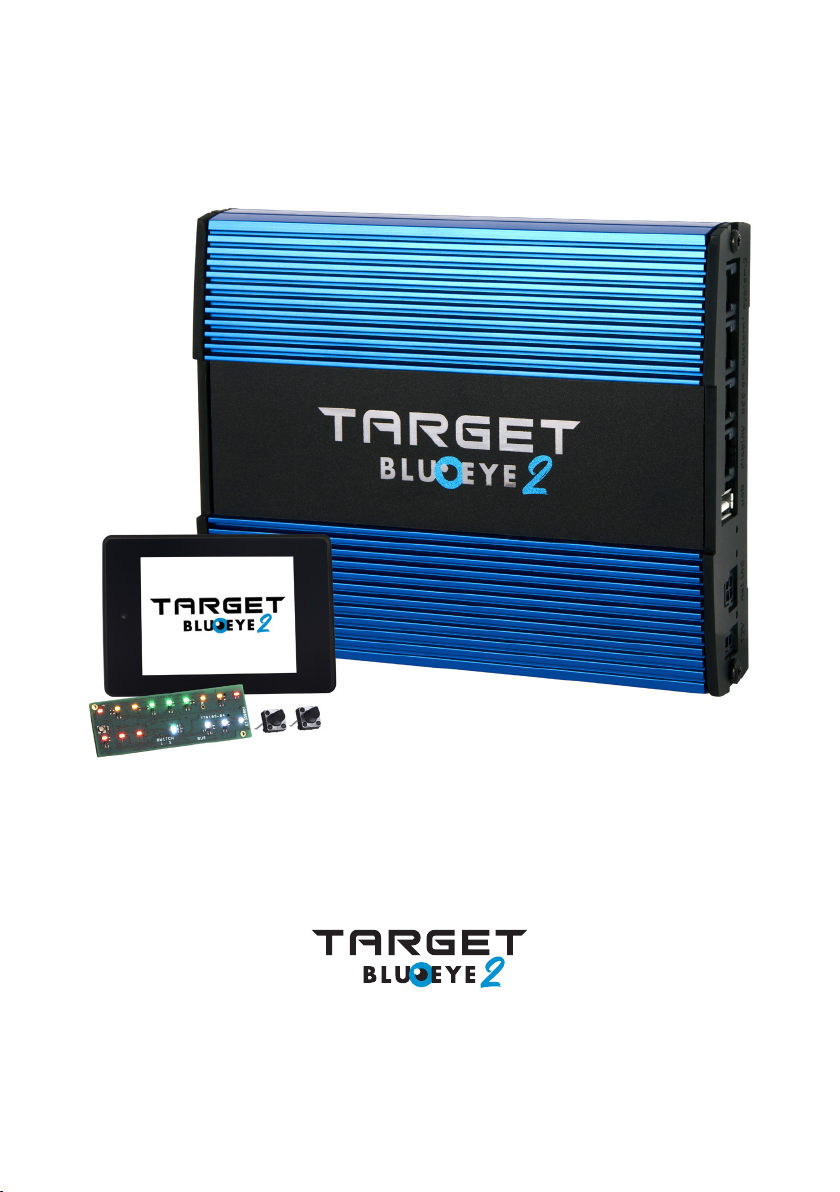
• Connect the display cable to the connector of the display marked‘bus’. Connect the other side of the display
cable to the‘display’connector of the receiver.
• Connect the power cable to the receiver’s‘power’connector and connect it to a 12V power supply.
• Hold the display against the mirror glass and judge whether the LEDs are clearly visible through the mirror
glass during the display start-up.
2. Mounting LED display in the rear view mirror. See illustration 1:
• Press the LED display against the inside of the mirror glass at the desired location and apply quick-drying
2-component adhesive to the 4 corners of the display.
3. Connecting and placing microswitches and display cable. See illustration 1:
• Connect the red and black wires to a microswitch using a solder joint. Use tape or shrink tubing to insulate
this connection. This is button 1.
• Connect the green and white wire by means of a solder joint to a microswitch. Use tape or heat-shrink tubing
to nsulate this connection. This is button 2.
• Connect the connector with the microswitches to the connector of the display marked‘switch’.
• Drill 2 holes of 3.5mm diameter in the underside of the mirror housing. Mount the buttons a maximum of 5
centimetres apart.They can then still be operated simultaneously with the ngers of one hand.
• Mount button 1 on the left and button 2 on the right seen from the driver’s position.
• Place the button in the drilled hole and then apply a quick-drying 2-component adhesive to the top.
• Feed the display cable through the mirror bracket and connect it to the display connector marked‘bus’.
Connect the other side of the display cable to the receiver’s‘display’connector.
• Connect the receiver to the car’s power supply voltage switched via the ignition switch (+15).
INSTALL THE FIRMWARE
• Insert the USB drive into the USB connector of the receiver.
• Switch on the car’s ignition; all LEDs of the display light up.
• When the LEDs are o and the status LED lights alternately white/red; switch o the car’s ignition and
remove the USB drive. A‘device list’has been copied to the USB drive.
• Go to the website https://www.blu-eye.eu/en/my-blueye/ and click‘Register New Blu Eye’.
Here you will nd the instructions required to install the Blu Eye rmware.

5
ext led12V usbdisplayadd on system1system2
POWER
EXT LED
USB
DISPLAY
ADD ON
SYSTEM 1
SYSTEM 2
SWITCH
BUS
C
H
1
SWITCH
BUS
12
Illustration 1

6
After the rmware is installed; install theVCD dipole antenna using‘Installer Mode’. Proceed as follows:
ACTIVATE‘INSTALLER MODE’
• Connect the antenna to the antenna connector on the receiver.
• Switch on the car’s ignition; wait until the status LED of Blu Eye lights green.
• Press and hold buttons 1 and 2 simultaneously for 5 seconds; a beep sounds. The status LED fades
yellow.
Note! This setting runs through the menu for setting volume and brightness of the LEDs. This
menu is activated after pressing both buttons for 2 seconds. Press and hold both buttons until
‘Installer Mode’is activated.
• The LEDs on the display indicate the amount of interference picked up by the antenna. An acoustic signal
corresponds to the number of LEDs on the display. This facilitates the search for an interference-free location
for the antenna when the display is not visible.
LOCATION FOR THE ANTENNA
• Determine the location for the antenna: on a corner of the front or rear bumper (see illustration 2):
• Mounting in the front bumper gives the best reception to the front. Mounting in the rear bumper gives the
best reception to the rear.
• Always mount the antenna vertically and with the red radial pointing upwards.
• Preferably x the antenna with duct tape to the outside of the chosen location rst. Start the engine and
switch on all lights and accessories.
Due to reections from signals in the workshop, it may be necessary to drive the car outside
to reliably perform this test.
• LED lighting of the vehicle itself is a common source of interference. This is caused by the pulse-rendering
control of the LEDs. Preferably place the antenna as far away as possible from LED lights and lighting wiring.
• When‘Installer Mode’indicates that the chosen location on the outside of the bumper is suciently
interference-free, move the antenna to the same location on the inside of the bumper.
• If there is not enough space behind the bumper to mount the antenna completely vertically, mount the red
radial as vertically as possible and bend the black radial to a maximum of 45 degrees.
Never mount the antenna right next to (>5 cm) or on metal parts of the vehicle!
• Check that the antenna has interference-free reception even at this location.
Indication Result
Excellent
Good
Doubtful
Poor
Very poor

7
• Fix the antenna permanently to the inside of the bumper. Use a 2-component sealant or thermal adhesive for
this purpose and make sure the surface is dry and clean. Fix the antenna at least at the marked points as
indicated by circles (see illustration 2).
• This will prevent the radials from moving relative to the substrate.This movement can lead to fading and
thus to unwanted Blu Eye alerts.
Important: for maximum performance of Blu Eye, only the rst or second green LED should be lit
at the selected antenna location.
EXIT‘INSTALLER MODE’
• Press and hold buttons 1 and 2 for 2 seconds; a beep sounds.The status LED lights up green.
• Blu Eye is now ready for use.
• Refer to the user manual for the operation and handling of Blu Eye.
ANTENNAS
TheVCD dipole antenna supplied is suitable for most common situations and ensures good reception results. In the
unlikely event that theVCD dipole antenna cannot be used or maximum reception is desired, we oer a choice of
the following alternatives:
• Modication of the existing sharkn antenna: a modication of the sharkn antenna is possible for almost
all car makes. This modication is carried out byTrackTechnologies’technicians. Performance: better than
theVCD dipole antenna.
• Plate antenna (18 cm long) with angled mounting base. Suitable for mounting on roof or rear spoiler.
Performance: better than theVCD dipole antenna.

8
ANT - 1ANT - 2
ANTENNA
FRONT rear
r
r
ear
Illustration 2

9
TECHNICAL SPECIFICATIONS
• Supply voltage: 10 - 16V.
• Power consumption: maximum 550mA
• Fuse: 3A
• Frequency range: 380 – 430MHz.
• TETRA detection by means of‘Waveform recognition’, no decoding
• Temperature range: -20°C - +50°C
• Receiver dimensions: 137 x 114 x 32mm. (l•w•h)
• Receiver weight: 475 g
• LED display dimensions: 54 x 18 x 5.6mm. (l•w•h)
• Weight LED display: 6 g
• Antenna Dimensions: total length antenna elements: 345 mm.

Zuidergracht 21 | 3763 LS Soest | the Netherlands
www.tracktechnologies.nl | www.blu-eye.eu
Table of contents
Other Target Receiver manuals
Popular Receiver manuals by other brands

Magenta Research
Magenta Research MultiView AK500 Quick reference & setup guide

Yamaha
Yamaha RX-V750 owner's manual

Danfoss
Danfoss RZ1 user guide

Yamaha
Yamaha RP-U100 owner's manual

Technomate
Technomate TM-5500 Series Quick setup and installation guide

Logitech
Logitech Bluetooth Audio Adapter Complete Setup Guide

Tecsun
Tecsun PL-360 Operation manual

Distech Controls
Distech Controls Open-To-Wireless Wireless Receiver installation guide

Ssl
Ssl ML44D user manual

HAMTRONICS
HAMTRONICS R306 Installation, operation and maintenance

Hyundai
Hyundai H-CMD7084 instruction manual

Rohde & Schwarz
Rohde & Schwarz EB200 Pocket guide