manuals.online logo
Brands
  1. Home
  2. •
  3. Brands
  4. •
  5. Tascam
  6. •
  7. Recording Equipment
  8. •
  9. Tascam HS-8 Mounting instructions

Tascam HS-8 Mounting instructions

TASCAM HS-8 1
HS-8
D01162820A
New functions in firmware V1.20
A tape emulation mode has been added for use with an editor/
synchronizer that supports the Sony P2 protocol using the RS-422
connector.
Tape emulation mode
The tape emulation mode emulates linear time-based operation
like that of tape. Using transport control via RS-422, the unit can be
operated like a tape machine. With“00:00:00:00” as the tape starting
point, each take is located by its start TC position.
Example:
01:00:00:00
01:00:00:00 02:00:00:00 02:50:00:00
02:00:00:00
03:00:00:00
Take 1 Take 3 Take 2
Time line
Start TC position
NOTE
Only takes in the currently loaded folder can be played back in this
mode. Takes in other folders cannot be played back in tape emulation
mode.
REMOTE SETUP screen RS-422 page
ª
ON and OFF buttons have been added for the RS-422 tape emulation
function. Turning it ON will automatically pause the transport. This
function only works when the Serial Mode is set to RS-422.
NOTE
If the HS-8 is playing back in emulation mode, changing settings
will not be possible. The following pop-up will appear if you try to
change a setting. (Some settings are excluded from this restriction.)
To change a setting, press the STOP key once to stop the transport
beforehand. After making the change, press the PLAY or PAUSE key
to resume emulation mode.
Home Screen
ª
When the tape emulation mode is ON, TAPE appears as the left
indicator (1) at the top right of the Home Screen.
When a take that is playing back matches the time of the emulated
tape, this indicator appears lit.
When there is no take that matches the time of the emulated tape,
this indicator blinks.
When the tape emulation function is ON, the time code display (2)
is limited to one of the following three types.
Display (2)Meaning
(Nothing
shown)
The elapsed time from the start of the take is shown.
If there is no take that matches the time of the
emulated tape, the starting time of the next take is
shown.
REMAIN
The remaining time until the end of the take is
shown. If there is no take that matches the time of
the emulated tape, the remaining time (length) of
the next take is shown.
TAPE The emulated tape time is shown.
Sync and time code settings (SYNC T/C
ª
screen) SETUP page
On this page, the
•STATUS section contents have been changed
from the project time code frame type to the input time code
frame type.
You can now change the project time code frame type. It cannot,
•
however, be changed during playback or recording.
HS-8
2 TASCAM HS-8
Sync and time code settings (SYNC T/C
ª
screen) CLOCK page
If the master clock is set to VIDEO and the tape emulation mode is
ON, the VIDEO and time code frame rates must be matched.
For example, if NTSC 29.97Hz VIDEO is the master clock, the project
time code frame type must be set to 29.97DF or 29.97NDF. For this
reason, if the master clock is VIDEO, the STATUS section Project
item of the SYNC T/C screen CLOCK tab has now been made to
show the current time code frame type.
Project screen
ª
When a take list is shown, by touching the START TC/LENGTH
title area, you can now switch the display between take lengths and
start time codes.
NOTE
During tape emulation, the take list ENTER button and buttons in
pull-up menus are disabled.
Support for Japanese display
Japanese folder and file names can now be displayed. Japanese
input, however, is not supported by this unit.
Support for turning Chase ON/OFF via
RS-232C
Chase can now be turned ON and OFF via RS-232C.
NOTE
Please contact TASCAM customer support for information about this
unit’s RS-232C command protocol.
Sony P2 REC command support
The SONY P2 protocol REC command is now supported.
NOTE
Please contact TASCAM customer support for information about this
unit’s protocol support.
TASCAM HS-8 3
HS-8
Firmware V1.20 fixes
The following pop-up messages have been changed.
Old message New message Details Remarks
CFn not recommended format
for Recording/Playing.
When media loaded:
CFn formatting not optimal
for Recording/Search.
When recording starts:
CFn formatting not optimal
for Recording.
The media was not formatted by
this unit, so proper recording and
search cannot be guaranteed.
Format if for use with this unit.
n = 1 or 2
This appears when the
card is formatted with a
cluster size that is smaller
than the standard of this
unit.
CFn not recommended for
Recording/Playing.
(not UltraDMA)
When media loaded:
CFn not recommended type
for Recording/Search.
(not UltraDMA)
This card does not meet the
specifications required by
the system, so using it for
proper recording/search is not
guaranteed.
n = 1 or 2
HS-8
4 TASCAM HS-8
Owner's manual addendum
Importing files recorded by other devices
BWF format files recorded by other devices can be imported to this
unit and played back. In addition, files created by other TASCAM HS
series units can be played back without rebuilding them first if they
meet the following conditions.
8 tracks or less (when sampling frequency is 176.4 or 192 kHz, 4
•
tracks or less)
Sampling frequency (Fs) of 192 kHz or lower
•
NOTE
Since the sampling frequency (or sampling rate—the Fs item value
in this unit) that can be played back is fixed for each project, the
sampling frequency of an imported file must match the project Fs
setting.
Preparations before importing
ª
Check the sampling frequency (sampling rate) of the file that you
want to import beforehand.
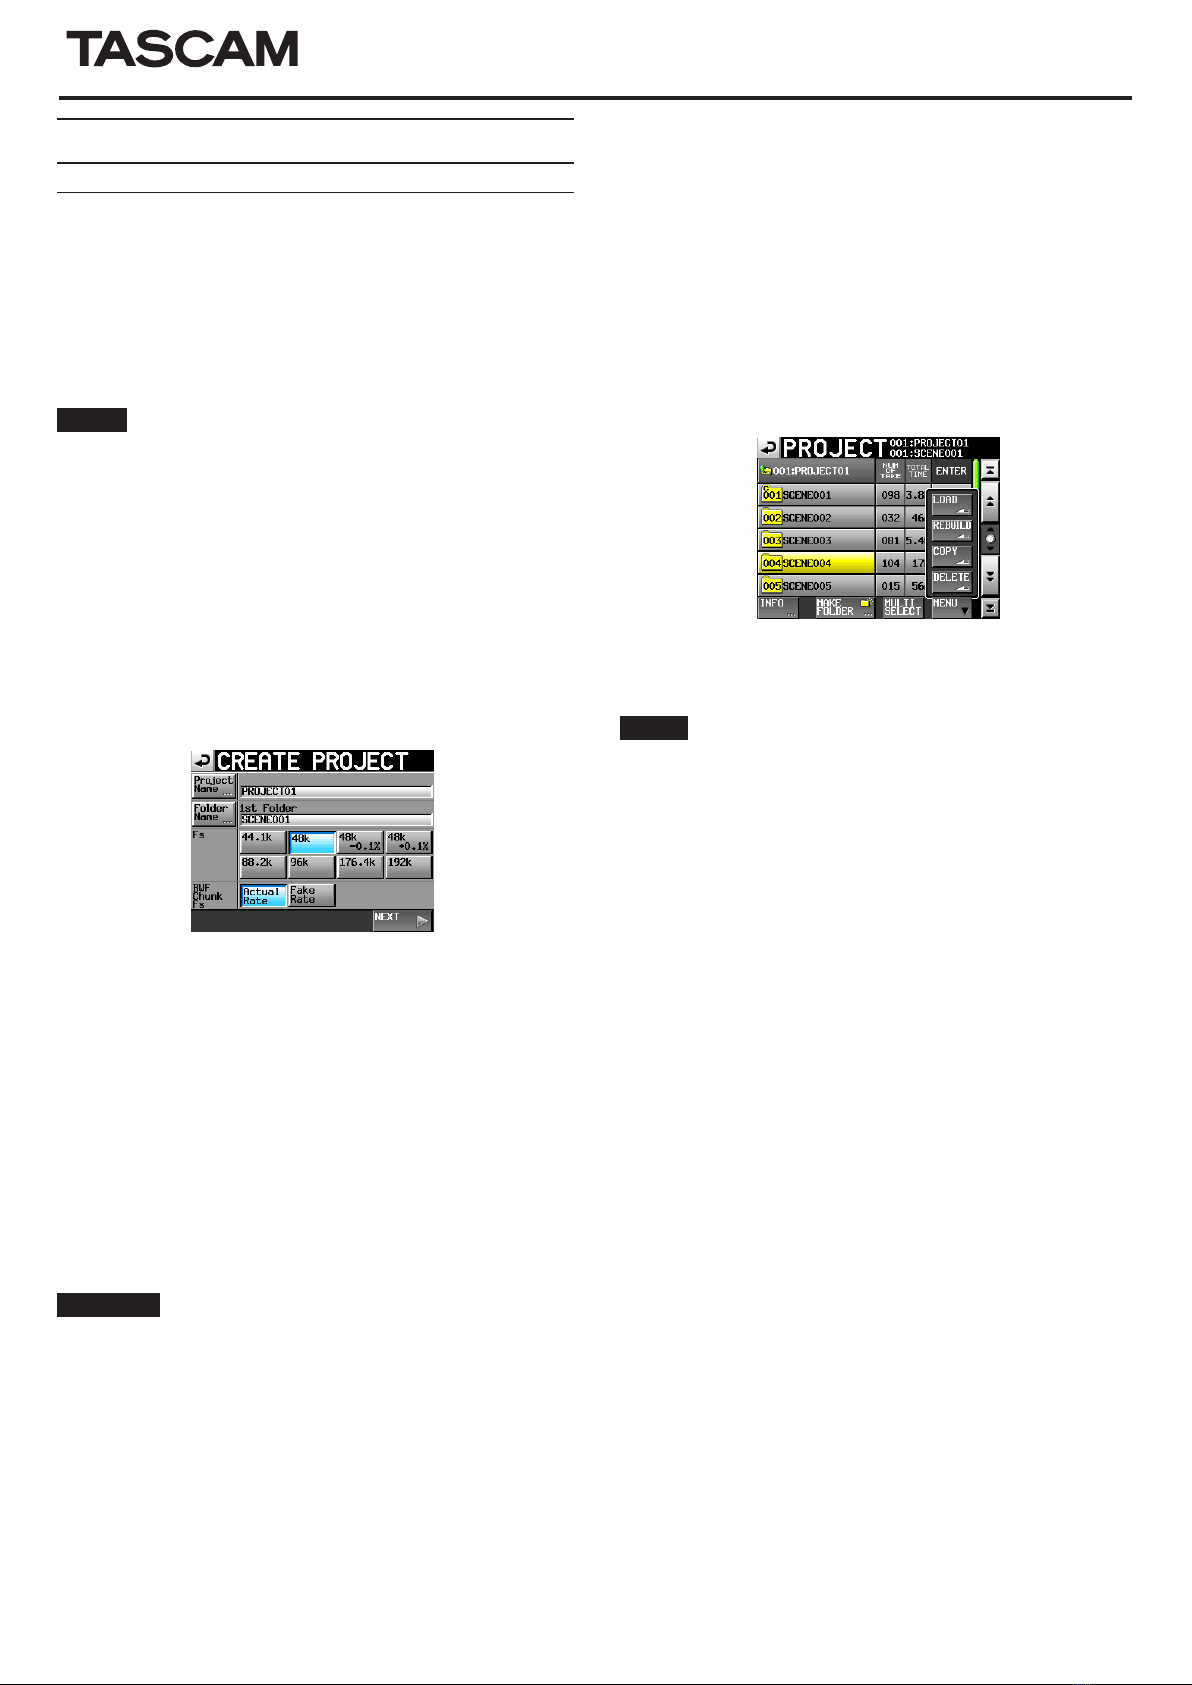
1 Select a project that has an Fs setting that is the same as the
file sampling frequency or create a new project. If creating a
new project, set the Fs item on the first page of the CREATE
PROJECT (first page) screen to match the file sampling
frequency.
]
2 Create a folder if necessary.
3 Remember or make a note of the name of the project and
folder that you want to import the file into. In this example,
the project is called “PROJECT01” and the folder is called
“SCENE004”.
4 After confirming that the indicator of the CF card slot that
contains the CF card is not blinking rapidly, remove the CF
card.
5 Insert the CF card into the CF card slot of a computer or other
device. If the CF card has been formatted by this unit, it will
be recognized by a computer as a drive named HS-8. This
explanation assumes the drive name is HS-8.
6 Copy the BWF format file (or files) into the SCENE004 folder,
which is inside the PROJECT01 folder on the HS-8 drive.
CAUTION
Do not remove a CF card while it is being written to. Doing so could
cause data to be damaged or become unreadable. Please see the
manuals for the computer, card reader and/or other device that you
are using.
7 Remove the CF card from the CF card slot of the computer or
other device.
Preparing imported files for use with this unit
ª
(rebuilding the folder)
1 Insert the CF card that contains the copied file(s) into the CF
card slot.
2 Press the PROJECT key on the front panel to open the
PROJECT screen. Press the“e” button to the right of the
project PROJECT01 that contains the imported file(s) to
open the folder list.
3 Select (highlight in yellow) the folder SCENE004 that
contains the imported file(s).
4 Touch the MENU button, and then touch the REBUILD button
in the pull-up menu.
During rebuilding, the progress status appears in a pop-up
window. When rebuilding completes, the pop-up disappears.
Imported files will be recognized as takes.
TIP
You can rebuild an entire project if you select a project from the
PROJECT list and touch the MENU button and then touch REBUILD
in the pull-up menu. You can rebuild an entire CF card if you touch
the MENU button and then touch REBUILD in the pull-up menu
without selecting a project from the PROJECT list. The higher the
level in the file structure, however, the more time that rebuilding
takes.
Printed in China

Other manuals for HS-8

4

Other Tascam Recording Equipment manuals

Tascam MMR-8 User manual

Tascam

Tascam MMR-8 User manual

Tascam DP-02 User manual

Tascam

Tascam DP-02 User manual

Tascam DP-008 User manual

Tascam

Tascam DP-008 User manual

Tascam dr-44wl User manual

Tascam

Tascam dr-44wl User manual

Tascam CD-RW901 User manual

Tascam

Tascam CD-RW901 User manual

Tascam LR-10 Instruction Manual

Tascam

Tascam LR-10 Instruction Manual

Tascam DA-98HR User manual

Tascam

Tascam DA-98HR User manual

Tascam DR-100 MKIII User manual

Tascam

Tascam DR-100 MKIII User manual

Tascam MD-CD1 User manual

Tascam

Tascam MD-CD1 User manual

Tascam Portastudio 2488 User manual

Tascam

Tascam Portastudio 2488 User manual

Tascam US-224 User manual

Tascam

Tascam US-224 User manual

Tascam CC-222SL Guide

Tascam

Tascam CC-222SL Guide

Tascam DR-10L Pro User manual

Tascam

Tascam DR-10L Pro User manual

Tascam DR-60DmkII User manual

Tascam

Tascam DR-60DmkII User manual

Tascam Digital Portastudio DP-24 User manual

Tascam

Tascam Digital Portastudio DP-24 User manual

Tascam HS-4000 User manual

Tascam

Tascam HS-4000 User manual

Tascam DR-07MKII How to use

Tascam

Tascam DR-07MKII How to use

Tascam 2488MKII User manual

Tascam

Tascam 2488MKII User manual

Tascam BB-1000CD User manual

Tascam

Tascam BB-1000CD User manual

Tascam DA-3000 User manual

Tascam

Tascam DA-3000 User manual

Tascam TASCAM TA-1VP User manual

Tascam

Tascam TASCAM TA-1VP User manual

Tascam MMR-8 User manual

Tascam

Tascam MMR-8 User manual

Tascam HD-R1 Manual

Tascam

Tascam HD-R1 Manual

Tascam Sonicview 16XP User manual

Tascam

Tascam Sonicview 16XP User manual

Popular Recording Equipment manuals by other brands

Yamaha MDR-1 Handling instructions

Yamaha

Yamaha MDR-1 Handling instructions

Rimage RX400 user guide

Rimage

Rimage RX400 user guide

AMX DAS-M-0404 installation guide

AMX

AMX DAS-M-0404 installation guide

ABB IP Touch 7 manual

ABB

ABB IP Touch 7 manual

v.link VL3-MBN51 manual

v.link

v.link VL3-MBN51 manual

National Geographic NG3900 instruction manual

National Geographic

National Geographic NG3900 instruction manual

Palmer PAN 04 user guide

Palmer

Palmer PAN 04 user guide

Extron electronics TLI Pro 201 Setup guide

Extron electronics

Extron electronics TLI Pro 201 Setup guide

Focusrite Saffire user manual

Focusrite

Focusrite Saffire user manual

PAC GM1A-RS manual

PAC

PAC GM1A-RS manual

Vult Freak DIY Kit Assembly guide

Vult

Vult Freak DIY Kit Assembly guide

JVC XL-R5000BK Service manual

JVC

JVC XL-R5000BK Service manual

IMG STAGE LINE MFX-204 instruction manual

IMG

IMG STAGE LINE MFX-204 instruction manual

DJ-Tech DJM-101 user manual

DJ-Tech

DJ-Tech DJM-101 user manual

Ashly 2.24GS operating manual

Ashly

Ashly 2.24GS operating manual

Epson Connect-It SD-DSWIFIB brochure

Epson

Epson Connect-It SD-DSWIFIB brochure

roger schult M/S-Master junior W2389j (f) operating manual

roger schult

roger schult M/S-Master junior W2389j (f) operating manual

Behringer VIRTUALIZER DSP1000 user manual

Behringer

Behringer VIRTUALIZER DSP1000 user manual

manuals.online logo
manuals.online logoBrands
  • About & Mission
  • Contact us
  • Privacy Policy
  • Terms and Conditions

Copyright 2025 Manuals.Online. All Rights Reserved.