Task Force 227684 User manual

18in. 12 A 2-in-1 Electric Mower
227684
Instruction Manual
IMPORTANT:
Read safety rules and instructions carefully before operating equipment.
1
TM
Questions, problems, or missing parts?
Call our Customer Care Center at 1-877-888-3872, Monday through Friday, 8:00 am (C 5:00 pm EST.
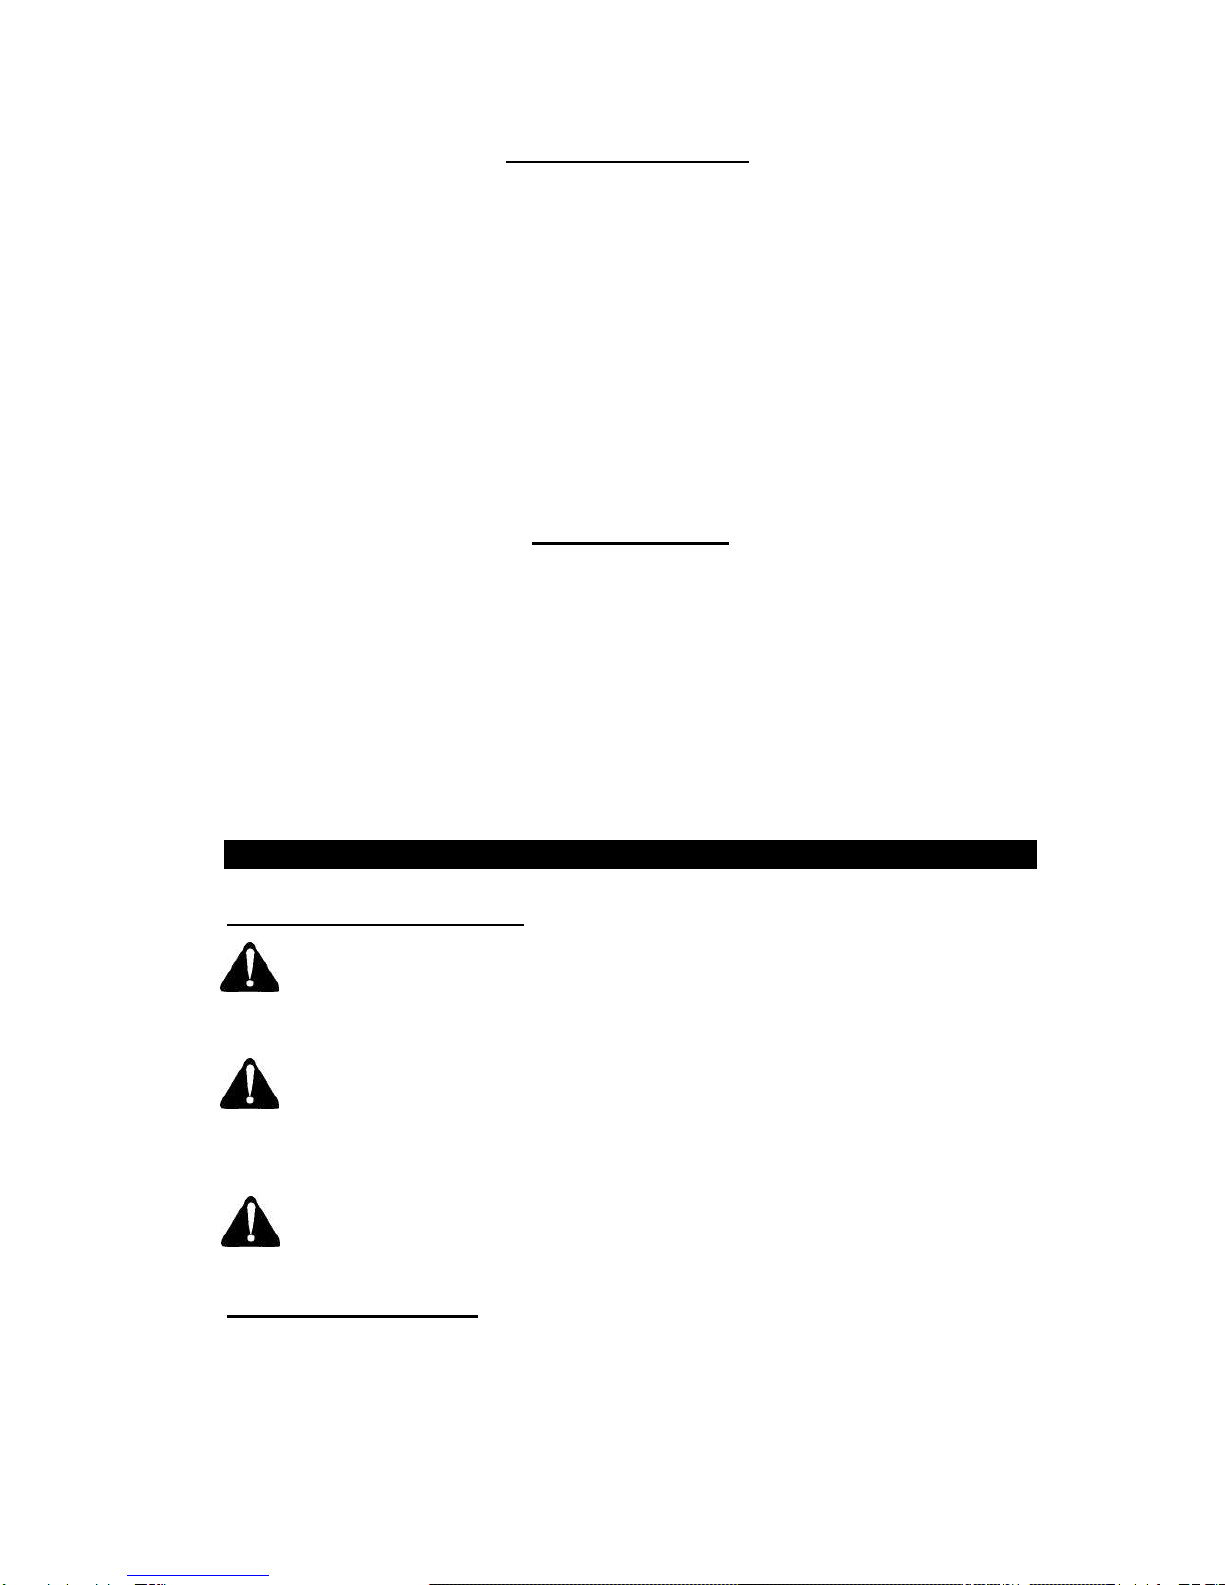
TABLE OF CONTENTS
Content Page
Safe Operation 2
General safe operation 2-4
Slope Gauge 5
Children 5
Service 5-6
Assembling Your Lawn Mower 7-8
Operating Your Lawn Mower 9-13
Maintenance 14-16
Troubleshooting 17
Warranty 18-19
SPECIFICATIONS:
Model Number 227684
Motor 120 V~, 60 Hz, 12 A
No-load Speed 3600 RPM
Cutting Path 18in.
Height Adjustments 1 7/8 – 3 5/8 in.
Wheel Size 7 in.
Weight 40 lb
Certification CSA # 218549
SAFE OPERATION
READ ALL INSTRUCTIONS!
WARNING: This symbol points out important safety instructions, which if not
followed, could endanger the personal safety and/or property of yourself and others.
Read and follow all instructions in this manual before attempting to operate this
machine. Failure to comply with these instructions may result in personal injury.
DANGER: This machine was built to be operated according to the rules for safe
operation in this manual. As with any type of power equipment, carelessness or error
on the part of the operator can result in serious injury. This machine is capable of
amputating hands and feet and throwing objects. Failure to observe the following
safety instructions could result in serious injury or death.
When using electric lawn mowers, basic safety precautions should always be
followed to reduce the risk of fire, electric shock, and personal injury.
GENERAL OPERATION
1. Read, understand, and follow all instructions on the machine and in the manual before
attempting to assemble and operate. Keep this manual in a safe place for future and regular
reference.
2. Be familiar with all controls and their proper operation. Know how to stop the machine and
2

disengage them quickly.
3. Never allow children under 14 years old to operate this machine. Children 14 years old and over
should read and understand the operation instructions and safety rules in this manual and
should be trained and supervised by a parent.
4. Never allow adults to operate this machine without proper instruction.
5. To help avoid blade contact or a thrown object injury, stay in the operator zone behind the
handles and keep children and bystanders at least 20 M (75’) from the machine while it is in
operation. Stop the motor if anyone enters the area.
6. Thoroughly inspect the area where the equipment is to be used. Remove all stones, sticks, wire,
bones, toys and other foreign objects, which could be tripped over or thrown by the blade.
Thrown objects can cause serious personal injury.
7. Plan your mowing pattern to avoid discharge of material toward roads, sidewalks, bystanders
and the like. Also, avoid discharging material against a wall or obstruction, which may cause the
material to ricochet back toward the operator.
8. To protect your eyes always wear proper eye protection while operating or performing
adjustments or repairs. Thrown objects which ricochet can cause serious eye injuries.
9. Always use a face or dust mask when operating in a dusty environment.
10. Dress Properly – Do not wear loose clothing or jewelry. They can get caught in moving parts.
Use of rubber gloves and footwear is recommended when working outdoors.
11. Ground Fault Circuit Interrupter (GFCI) protection should be provided on the circuit(s) or outlet(s)
to be used for the lawn mower. Receptacles are available having built-in GFCI protection and
may be used as an added measure of safety.
12. To prevent electric shock use only with a CSA/CUL listed extension cord set suitable for outdoor
use, such as Type SW–A, SOW–Α,STW–Α,STOW–Α,SJW–Α,SJOW–Α,SJTW–A, or
SJTOW–A.
13. Extension Cord–Make sure your extension cord set is in good condition, is heavy enough to carry
the current your mower will draw, and is polarized (one blade of plug is wider than the other). A
100' length of 14 AWG should be used. A 50' length of 16 AWG or a 150' length of 12 AWG cord
is an acceptable alternative. A longer length or undersized cord will cause a drop in line voltage
resulting in a loss of power and overheating.
14. To reduce the likelihood of disconnecting the lawn mower from the extension cord set, be sure to
use the cord restraint provided as shown in the illustration below:
15. To reduce the risk of electric shock, this lawn mower has a polarized plug (one blade is wider
than the other) and will require the use of a polarized extension cord. The mower plug will only fit
into the polarized extension cord one way. If the plug does not fit fully into the extension cord,
reverse the plug. If the plug still does not fit, obtain a correct polarized extension cord. A polarized
extension cord will require the use of a polarized wall outlet. This plug will fit into the polarized
outlet only one way. If the plug does not fit fully into the wall outlet, reverse the plug. If the plug still
does not fit, contact a qualified electrician to install the proper wall outlet. Do not change the
equipment plug, extension cord receptacle, or extension cord plug in any way.
16. Home circuit–This mower should be operated on a 15 A circuit. If you experience difficulty in
starting with a standard 15 A fuse or circuit breaker, contact your nearest authorized service
3

facility. Do not use a higher rated fuse or breaker without consulting your power company.
17. Do not abuse the cord by pulling the mower by the cord or yanking it to disconnect it from the
receptacle. Keep cord from heat, oil, and sharp edges.
18. Many injuries occur as a result of the mower being pulled over the foot during a fall caused by
slipping or tripping. Never operate this machine in bare feet, sandals or lightweight (e.g. canvas)
shoes. Don’t hold on to the mower if you are falling; release the handle immediately.
19. Never pull the mower back toward you while you are walking. If you must back the mower away
from a wall or obstruction first look down and behind to avoid tripping and then follow these
steps:
•Step back from the mower to fully extend your arms.
•Be sure you are well balanced.
•Pull the mower back slowly.
•Repeat these steps as needed.
20. Do not use lawn mower for any job except that for which it is intended. Do not force the lawn
mower.
21. Do not operate the mower while under the influence of alcohol or drugs.
22. Stay Alert: Do not operate the mower when you are tired. Watch what you are doing. Use
common sense.
23. Do not put hands or feet near rotating parts or under the cutting deck. Contact with the blade can
amputate hands and feet.
24. Never attempt to make a wheel or cutting height adjustment while the motor is running.
25. Avoid dangerous environments.Never operate the mower in the rain or in wet or damp grass.
26. Mow only in daylight or in good artificial light. Walk, never run.
27. Stop the blade when crossing gravel driveways, walkways or roads.
28. If the equipment should start to vibrate abnormally, stop the motor and check immediately for the
cause. Vibration is generally a warning of trouble.
29. Stop the motor and wait until the blade comes to a complete stop before removing the grass
catcher or unclogging the chute. The cutting blade continues to rotate for a few seconds after
the motor is shut off. Never place any part of the body in the blade area until you are sure the
blade has stopped rotating.
30. Never operate mower without proper trail shield, discharge cover, grass catcher, blade/motor
control or other safety protective devices in place and working. Never operate mower with
damaged safety devices. Failure to do so can result in personal injury.
Slope Operation
Slopes are a major factor related to slip and fall accidents that can result in severe injury. Operation
on slopes requires extra caution. If you feel uneasy on a slope, do not mow it. For your safety, use
the slope gauge included as part of this manual to measure slopes before operating this unit on a
sloped or hilly area. If the slope is greater than 150, do not mow it.
4

1. Mow across the face of slopes; never up and down Exercise extreme caution when changing
direction on slopes.
2. Watch for holes, ruts, rocks, hidden objects, or bumps which can cause you to slip or trip. Tall
grass can hide obstacles. Remove all objects such as rocks, tree limbs, etc., which could be
tripped over or thrown by the blade.
3. Always be sure of your footing. A slip and fall can cause serious personal injury. If you feel you
are losing your balance, release the blade/motor control handle immediately, and the blade will
stop rotating within 3 seconds.
Do Not:
1. Do not mow near drop-offs, ditches or embankments; you could lose your footing or balance.
2. Do not mow slopes greater than 150, as shown on the slope gauge.
3. Do not mow on wet grass. Unstable footing could cause slipping.
Children
1. Tragic accidents can occur if the operator is not alert to the presence of children.
yKeep children out of the mowing area and under the watchful care of a responsible adult.
•Be alert and turn mower off if a child enters the area.
•Before and while moving backwards, look behind and down for small children.
•Use extreme care when approaching blind corners, doorways, shrubs, trees, or other objects
that may obscure your vision of a child who may run into the mower.
2. Never allow children under 14 years old to operate a power mower. Children 14 years old and
over should read and understand the operating instructions and safety rules in this manual
and should be trained and supervised by a parent.
SERVICE
1. When servicing use only identical replacement parts listed in this manual. Use of parts which do
not meet the original equipment specifications may lead to improper performance and
compromise safety!
2. Before cleaning, repairing, or inspecting, make certain the blade and all moving parts have
stopped. Disconnect the power cord when not in use to prevent accidental start-ups.
3. Follow instructions for lubricating and changing accessories.
4. Inspect lawn mower power cord and extension cords periodically and replace immediately, if
damaged. Lawn mower power cord should be repaired by an authorized service facility only.
5. Keep handles dry, clean and free from oil and grease.
6. To reduce a fire hazard, keep the motor free of grass, leaves and debris build-up.
7. Check the blade and motor mounting bolts at frequent intervals for proper tightness. Also,
visually inspect blade for damage (e.g., bent, cracked, and worn).
8. Maintain your mower with care.Keep mower blade sharp and clean for best and safe
performance. Mower blades are sharp and can cut, wrap the blades or wear gloves and use
extra caution when servicing them.
9. Keep all nuts, bolts, and screws tight to be sure the equipment is in safe working
condition.
Do:
5
10. Never tamper with safety devices. Check their proper operation regularly.
11. After striking a foreign object, stop the motor and disconnect the power cord. Thoroughly
inspect the mower for any damage. Repair the damage before operating the mower.
12. Grass catcher components, discharge cover, and trail shield are subject to wear and damage
which could expose moving parts or allow objects to be thrown. For safety protection,
frequently check components and replace immediately with original equipment manufacturer's
(OEM) parts only, listed in this manual.
13. When not in use, store lawn mower indoors in a dry area, locked-up and/or out of the reach of
children.
Double Insulated Lawn Mower
Double insulation eliminates the need for the usual three-wire grounded power cord and grounded
power supply system. Wherever there is electric current in the mower, there are two complete sets
of insulation to protect the user. All exposed metal parts are isolated from the internal metal motor
components with protecting insulation.
IMPORTANT: Servicing of a lawn mower with double insulation requires extreme care
and knowledge of the system and should be performed only by a qualified service technician. For
repair service we suggest you return the lawn mower to your nearest authorized service dealer.
Always use original factory replacement parts when servicing.
SAVE THESE INSTRUCTIONS!
WARNING: IT IS YOUR RESPONSIBILITY
•To restrict the use of this machine to persons who read, understand, and follow the warnings
and instructions in this manual and on the machine.
6

SLOPE GAUGE
Use this page as a guide to determine slopes where you may not operate safely.
DO NOT OPERATE your lawn mower on such slopes.
WARNING
•Do not mow on inclines with a slope in excess of 150(a rise of approximately 2-1/2’every 10’)
•Operate mower across the face of slopes, never up and down slopes.
ASSEMBLING YOUR LAWN MOWER
Loose Parts in Carton
•Side discharge.
•Instruction Manual.
•Top handle
•Nuts.
Tools Required
•Pliers.
Assembling Handle
1Remove any packing material which may be between the upper and lower handles for shipping
purposes.
2Pull up and back on the upper handle to raise the handle into the operating position. Make certain the
lower handle is seated securely into the handle mounting bracket (see Fig. 1).
3The upper handle may be adjusted to three different height positions. To adjust the handle to the desired
position, align one of the three marks on the top of the lower handle insulators with the mark on the
upper handle insulators (see Fig. 2).
7

Figure1 Figure 2
WARNING: The handle insulators are not only used to adjust handle height, but are
also a safety device and should never be altered in any way.
4Tighten the hand knobs on each side of the handle. Make sure that the carriage bolts are seated properly into
the handle insulators.
5Using pliers, squeeze one leg of the lower handle against the handle mounting bracket. Insert the
hairpin clip into the inner hole on the weld pin.
6Repeat on the other side. Make certain all nuts and bolts are tightened securely.
INSTALLING THE CHARGE CHUTE
yPull out the key, and wait for blade to come to a complete stop.
yOpen mulch door by pulling on the mulch door finger grip.
yAlign the discharge chute arrows with the positioning arrows on
the lawnmower deck and insert the discharge chute.
yPosition the chute until the chute hooks are trapped under the
deck hooks and release the chute and door.
WARNING: Never operate the mower without the proper trail shield, mulch plug,
side discharge deflector, motor/blade control or other safety devices in place and
working. Never operate the mower with damaged safety devices. Failure to do so can
result in personal injury.
Lower handle
Knob
Upper handle
8

OPERATING INSTRUCTIONS
KNOW YOUR LAWN MOWER
Fig 3
Upper handle
Switch
Side discharge
chute
Motor
housing
Lower handle
Height adjustment
lever
Wheel
Read this operator's manual and safety rules before operating your lawn mower. Compare the
illustration in Fig. 3 to your lawn mower in order to familiarize yourself with the location of various
controls and adjustments. Save this manual for future reference.
WARNING: The operation of any lawn mower can result in foreign objects being
thrown into your eyes, which can cause severe eye damage. Always wear safety
glasses while operating the mower, performing adjustments or repairs.
Cord Restraint: The cord restraint is located on the back of the upper handle and when used
properly, helps to protect the motor/blade control assembly and extension.
Height Adjustment Lever: A single height adjustment lever, located by the left rear wheel,
provides cutting height adjustments. The lever adjuster has six height positions. Height of cut will be
changed when the lever is moved from one position to another. Simply depress the lever towards
wheel to desired position. This sets all wheels to the same selected position.
Mulch Plug: The mower is equipped with a mulching plug that cuts and re-cuts the grass for finer
clippings. Refer to the next section for tips when cutting with the mulch plug in place. The mower
should never be used without the mulch plug mounted to the mower. It should not be removed even
when the side discharge deflector is in place.
9

The side discharge deflector is a device to be mounted on the machine when the grass is too high to
mulch or when side discharging is preferred. The grass clippings produced when using the side
discharge deflector will be noticeably larger than those produced when mulching.
Side discharge
cover Side discharge
chute
Side discharge
chute
Side discharge
cover
OPERATING YOUR LAWN MOWER
Cord Connection
Extension Cord Selection
Shown below is the length of extension cords and its corresponding acceptable cord ratings.
•50' Cord use 16 AWG
•100' Cord use 14 AWG
•150' Cord use 12 AWG
The extension cord should be CSA approved for outdoor use.
IMPORTANT: Using extensions cords of the wrong gauge will diminish the
performance and possibly the life of the electric motor, and may also cause breakers to
trip or fuses to blow in your home's fuse box.
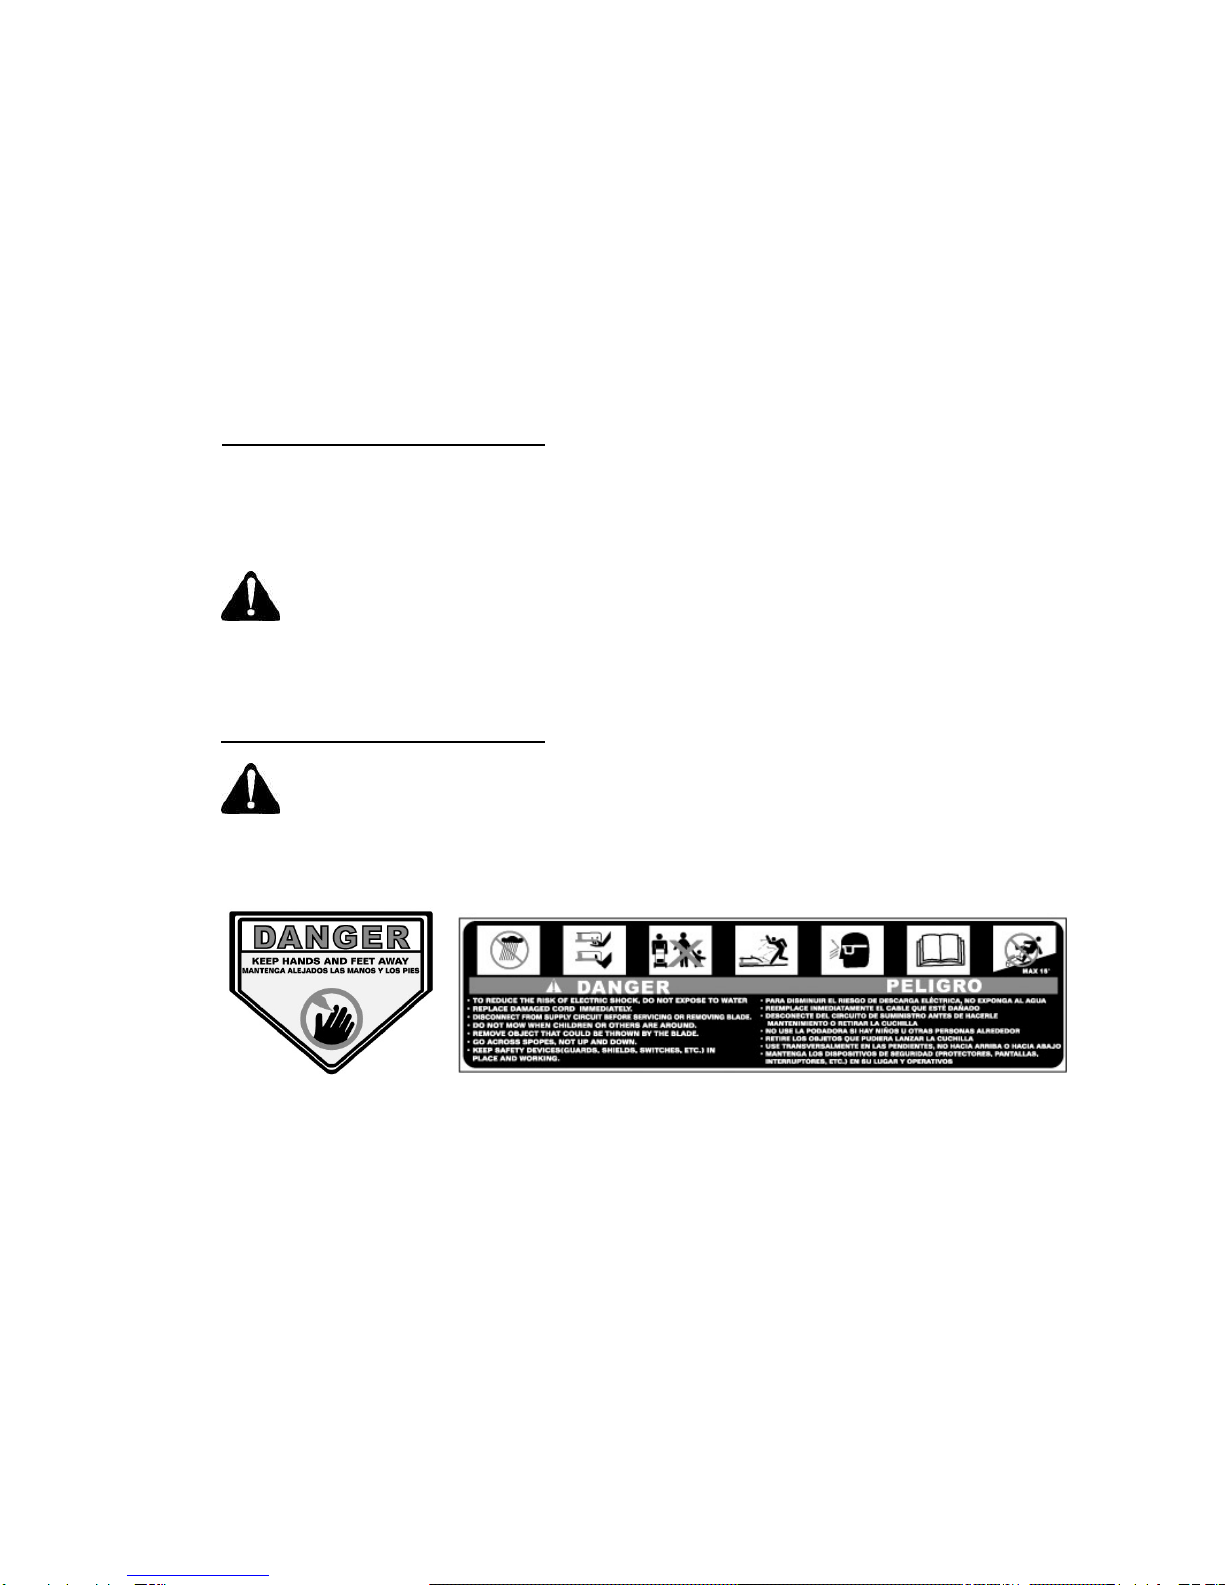
Cord Restraint
Attach the extension cord (not provided with unit) to the cord restraint as follows:
1. Form a small loop in the extension cord. Allow enough excess cord to make the connection to the
motor/blade control (approximately 20”).
2. Slip the loop through the slot on the bottom of the cord restraint, and up over the tab, to prevent
disconnection from the motor/blade control during operation (see Fig. 4).
3. Keep the cord restraint as close to the motor/blade control as possible.
Fig. 4
Cord
restraint
Side Discharge Deflector
10
Connecting to the Motor/Blade Control Assembly
Connect the plug to the extension cord fully inserting the plug into the mower. The mower is
equipped with a polarized AC power plug (one blade of the plug is wider than the other), which will fit
into the plug on the extension cord only one way. If unable to make a full connection, try reversing
the plug on the extension cord. If the plugs fail to fit, contact a qualified service technician.
Connecting to the Electric Power Source
WARNING: This mower should be operated on a 15 A circuit. If you experience
difficulty starting on a standard 15 A fuse or circuit breaker, contact a qualified service
technician. Do not use a higher rated fuse or breaker without consulting your power
company.
Plug the extension cord into any convenient 120 VAC 60 Hz outlet or receptacle for your source of
power. This outlet may be located either outdoors or indoors. To avoid blowing fuses, pick an outlet
that is not overloaded. Do not use oversized fuses without consulting an electrician.
T = Obstacles
Outlet (Start here)
Switch use
NOTE: The wheels on mower are set to a low-cutting position for shipping purposes. For best
results, raise the cutting position until you determine the height best suited for your lawn. See
cutting height adjustment in “Making Adjustments”
Fig. 5
Upper handle
Switch
This mower is equipped with a safety switch. To operate the switch, insert your finger into the opening
and push the lever out so that you can grasp it with your other hand. Pull the lever back to turn the unit
on and hold it against the mower handle to keep it running. To turn the mower off, just release the
lever.
WARNING: The blade continues to rotate for a few seconds after the motor is shut off. If
motor does not come to a stop when the motor/blade control handle is released, contact an
authorized service dealer.
11

NOTE: A high-pitched noise and sparking may occur as the electric motor decelerates. This is
normal.
Mowing Your Lawn
NOTE: A sharp blade will greatly increase the performance of your mower, especially in
high grass conditions. Be sure to check the blade and sharpen it at least once a year as outlined
in the Maintenance section.
•Make sure the lawn is clear of stones, sticks, wires and other objects that could damage the
blades lawn mower or motor. Such objects could be accidentally thrown by the mower in any
direction and cause serious personal injury to the operator and others.
•To prevent electric shock, do not operate the mower in damp or wet conditions.
•Always start from the point closest to the power source where the cord is connected. Never
mow in circles; always travel back and forth across the lawn, starting from the point closest to
the outlet and then moving away from the outlet so the cord lies behind the mower, in the cut
portion of the lawn, out of the way (see Fig. 6).
•Do not allow the extension cord to wrap around trees, shrubs or other obstacles. When picking
up the extension cord, wind the cord in a series of equal loops to prevent it from tangling.
•When cutting heavy grass, reduce walking speed to allow for more effective cutting and a proper
discharge of the clippings. For a healthy lawn, always cut off one-third or less of the total length
of the grass. The average lawn should be approximately 1 1/2—2”during cool months and over
2”during hot months. If there is growth, the lawn should be cut in the fall.
Mulching Tips
•For effective mulching, do not cut wet grass because it tends to stick to the underside of the deck,
preventing proper mulching of grass clippings. New or thick grass may require a narrower cut. The
ground speed should be adjusted to the condition of the lawn. If mowing has been delayed and the
grass has been allowed to grow in excess of 4", mow twice to reduce the grass height to 3 1/4"
maximum.
WARNING: If you strike a foreign object, stop the motor,and unplug from the power
supply circuit. Thoroughly inspect the mower for any damage. Repair the damage
before restarting and operating the mower. Excessive vibration of the mower
during operation is an indication of damage. The unit should be promptly inspected and
repaired.
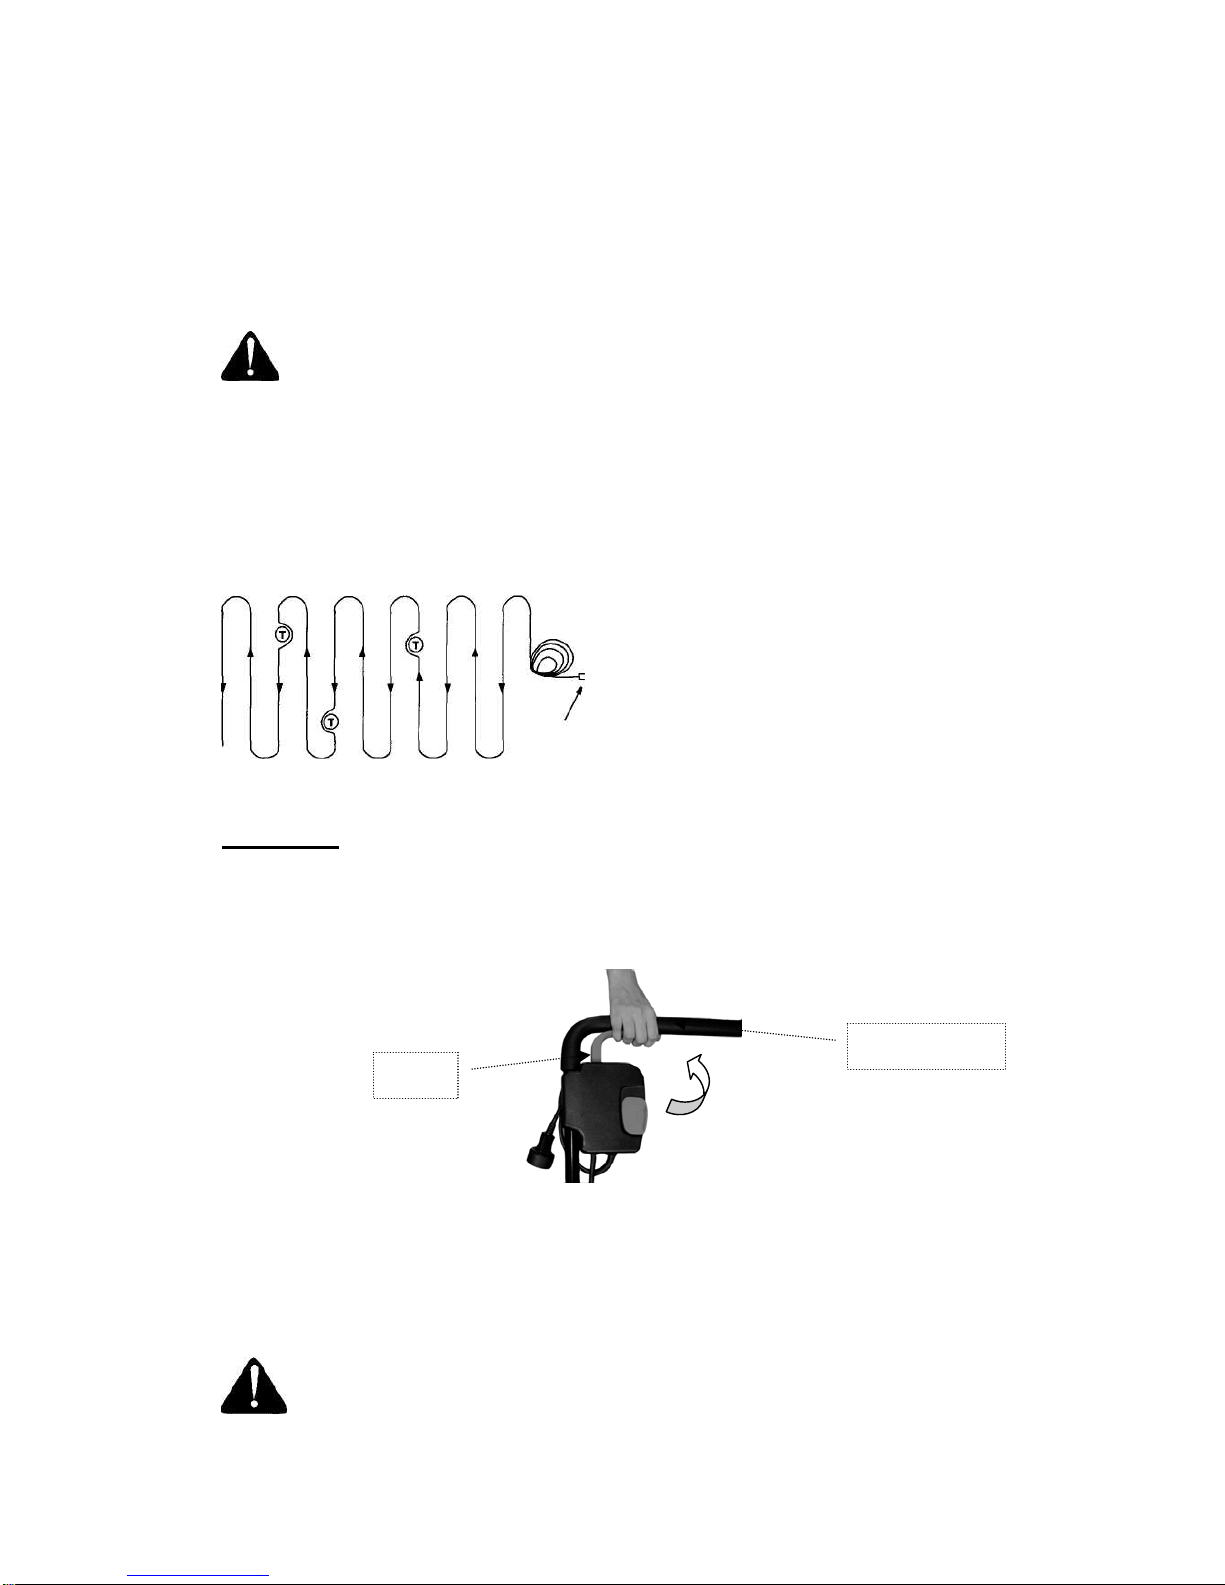
MAKING ADJUSTMENTS
Cutting Height Adjustment\
A height adjustment lever provides cutting height adjustment. The adjuster has six (6) height
positions. Height of cut will be changed when the lever is moved from one position to another.
WARNING: Before adjusting height, ensure that you UNPLUG THE POWER CORD
•To raise the height, pull the height adjustment lever from the current stop position and pull it
12
towards the back of the mower.
•To lower the height, pull the height adjustment lever from the current stop position and push it
towards the front of the mower. CUTTING HEIGHT POSITIONS
POSITION CUT
1 1 7/8in.
2 2 1/4 in.
3 2 1/2in.
4 23/4in.
5 3 in.
6 33/8in.
7 3 5/8 in.
MAINTENANCE
Fig. 8
Motor spindle sleeve
Fan
Plate
Blade
Locking plate
Blade nut
WARNING: Always stop the motor and disconnect from the power source before
cleaning, lubricating or performing repairs or maintenance on the lawn mower.
Cutting Blade Replacement
WARNING: Always protect hands by wearing heavy gloves and/or wrapping
cutting edges with rags other material when performing blade maintenance. Be
certain to disconnect the power supply.
Removing the Blade
•Stop the motor and disconnect the power supply to the mower. Turn the mower on its side.
•Wedge a block of wood between the blade and mower deck to prevent the blade from turning
when the nut is removed.
•Using a 15 mm wrench or socket, loosen the blade nut and remove the blade (see Fig. 8).
Installing the Blade
WARNING: The blade hardware is not only used to attach the blade assembly, but
13
Cutting height
adjustment lever
is also an insulated safety device and should never be altered in any way. If
replacement is necessary, use original equipment parts as shown in the parts list on
pages 18/19.
•Make certain the blade hub assembly has bottomed out against the motor shaft.
•Place the cutting blade, locking plate, and blade nut against the blade hub assembly and thread
the blade bolt on finger-tight (see Fig. 8).
•NOTE: Make certain to replace the parts in the exact order in which they were removed.
When installing the cutting blade, make sure it is installed with the curved ends pointing
towards the mower deck and not towards the ground.
•Torque the blade nut down using a torque wrench to ensure that the bolt is tightened properly. The
recommended torque for the blade bolt is 450 - 600 in-lbs. To ensure safe operation of your unit,
all nuts and bolts must be checked periodically for proper tightness.
Sharpening the Blade
To sharpen the blade, first remove the blade as outlined in the previous section. DO NOT attempt to
sharpen the blade while it is attached to the mower.
•The blade can be sharpened with a file or a grinding wheel.
•When sharpening the blade, follow the original grinding angle as a guide. It is extremely important
that each cutting edge receives an equal amount of grinding to prevent unbalancing the blade.
•Test the blade by balancing it on a round shaft screwdriver or a blade balancer.
•If the blade is not balanced, remove metal from the heavy side until it balances evenly.
WARNING: An unbalanced blade will cause excessive vibration when rotating at
high speeds. It may also cause damage to the mower and could break, causing
personal injury.
•Reinstall the blade as described earlier in this section making certain to torque the cutting blade
nut to specifications.
Mower Deck
WARNING: To reduce the risk of electric shock, do not expose the mower to
water.
The underside of mower deck should be cleaned after each use as grass clippings, leaves, dirt and
other debris will accumulate causing rust and corrosion.
•Remove any buildup of grass and leaves on or around the motor cover (do not use water). Wipe
the mower clean with a dry cloth occasionally.
•If debris build up on the underside of the unit, while using, stop the motor and disconnect the
mower from the power supply. Tilt the mower forward, or on its side, and scrape it clean with an
appropriate tool.
Lubrication
At the beginning and end of each mowing season:
14

•Lubricate the springs on the rear discharge door with light oil.
•Lubricate the height adjustment levers and related hardware with light oil.
•Remove the wheels and lubricate the surface of the axle bolt and the inner surface of the wheel
with light oil.
•Remove the blade and blade hub assembly and lubricate the motor shaft with light oil or engine oil
(see Fig. 8).
STORAGE
The following steps should be taken to prepare the lawn mower for storage.
•Make certain the power supply is disconnected.
•Clean mower as instructed in previous section.
•Inspect and replace/sharpen blade, if required. Refer to the Maintenance section.
•Lubricate the mower. Refer to Maintenance section.
•Store mower in a dry, clean area. Do not store next to corrosive materials, such as fertilizer and
rock salt.
•Wipe extension cord to remove any foreign substance such as oil or stains. Replace extension
cord if cut or damaged in any way.
•Wind cord in a series of equal loops to prevent it from tangling.
•Store mower indoors in a cool, dry place, out of the reach of children. Do not cover lawn mower
with a solid plastic sheet. Plastic covering trap moisture around the mower causing rust and
corrosion.
The handle may be folded away completely for storage.
•Loosen the hand knobs on the sides of the handle, and fold the upper handle down.
•Remove the hairpin clips, pull outward on each side of the lower handle, and lift the sides of the
lower handle past the edges of the handle mounting brackets. Fold the lower handle forward.
Make sure not to bend or kink the power cord.
15

TROUBLESHOOTING
Trouble Possible Cause(s) Corrective Action
Handle not in position. •Carriage bolts. •
A
djust the height of the handle
and make sure that the carriage
bolts are seated properly.
•Tighten hand knobs.
Mower not starting. •Cord disconnected from the
motor control.
•Motor control switch defective.
•Extension cord not connected
to the mower plug.
•Extension cord not connected
to power source.
•Tripped circuit breaker in the
house.
•Reconnect the cord and using
the cord restraint keep the cord
close to the motor/blade control.
•Replace motor control switch.
•Connect the extension cord to
the plug on the mower.
•Connect the extension cord to a
live 120 V AC 60 Hz AC
receptacle.
•Reset the house circuit breaker.
If it trips again call a qualified
electrician.
Mower cutting
grass
unevenly.
•Lawn is rough or uneven. Cutting
height not set properly.
•Move the wheels to a higher
position.
•All wheels must be placed in the
same cutting height for the
mower to cut evenly.
Mower not mulching
properly.
•Wet grass clippings stick to the
underside of the deck.
•Wait until the grass dries before
mowing.
Hard to push. •High grass or cutting height too
low.
•Rear of mower housing and
blade dragging in heavy grass.
•Raise cutting height.
Mower vibrating at
higher speed.
•Bent motor shaft.
•Blade is unbalanced.
•Stop the motor, disconnect the
power source and inspect for
damage.
•Repair before restarting. If
vibration persists, take it to a
service dealer.
•Balance the blade by grinding
each cutting edge equally.
16

LIMITED WARRANTY
The manufacturer warrants to the original purchaser that each new product and service part is free
from defects in material and workmanship and agrees to repair or replace under this warranty any
defective product or part as follows from the original date of purchase.
1 YEAR—Warranty on all electric/cordless OPE products.
THIS WARRANTY IS NOT TRANSFERABLE AND DOES NOT COVER:
•Products sold damaged or incomplete, sold “as is”, sold reconditioned or used as rental
equipment.
•Delivery, installation or normal adjustments explained in the owner’s manual.
•Damage or liability caused by shipping, improper handling, improper installation, incorrect
voltage or improper wiring, improper maintenance, improper modification, or the use of
accessories and /or attachments not specifically recommended.
•Repairs necessary because of operator abuse or negligence, or the failure to install,
operate, maintain and store the product according to the instructions in the owner’s
manual.
•Damage caused by cold, heat, rain, excessive humidity, corrosive environments and
materials, or other contaminants.
•Expendable items that become worn during normal use.
•Cosmetic defects that do not interfere with tool functionality.
•Freight costs from customer to vendor.
•Repair and transportation costs of products or parts determined not to be defective.
•ANY INCIDENTAL, INDIRECT OR CONSEQUENTIAL LOSS, DAMAGE, OR EXPENSE
THAT MAY RESULT FROM ANY DEFECT, FAILURE OR MALFUNCTION OF THE
PRODUCT. Some states do not allow the exclusion or limitations on how long an implied
warranty lasts, so the above limitations may not apply to you.
WARRANTY REPLACEMENT PARTS are available by calling the toll free number,
1-800-444-6742, 8:00am – 5:00pm EST, Monday through Friday.
17
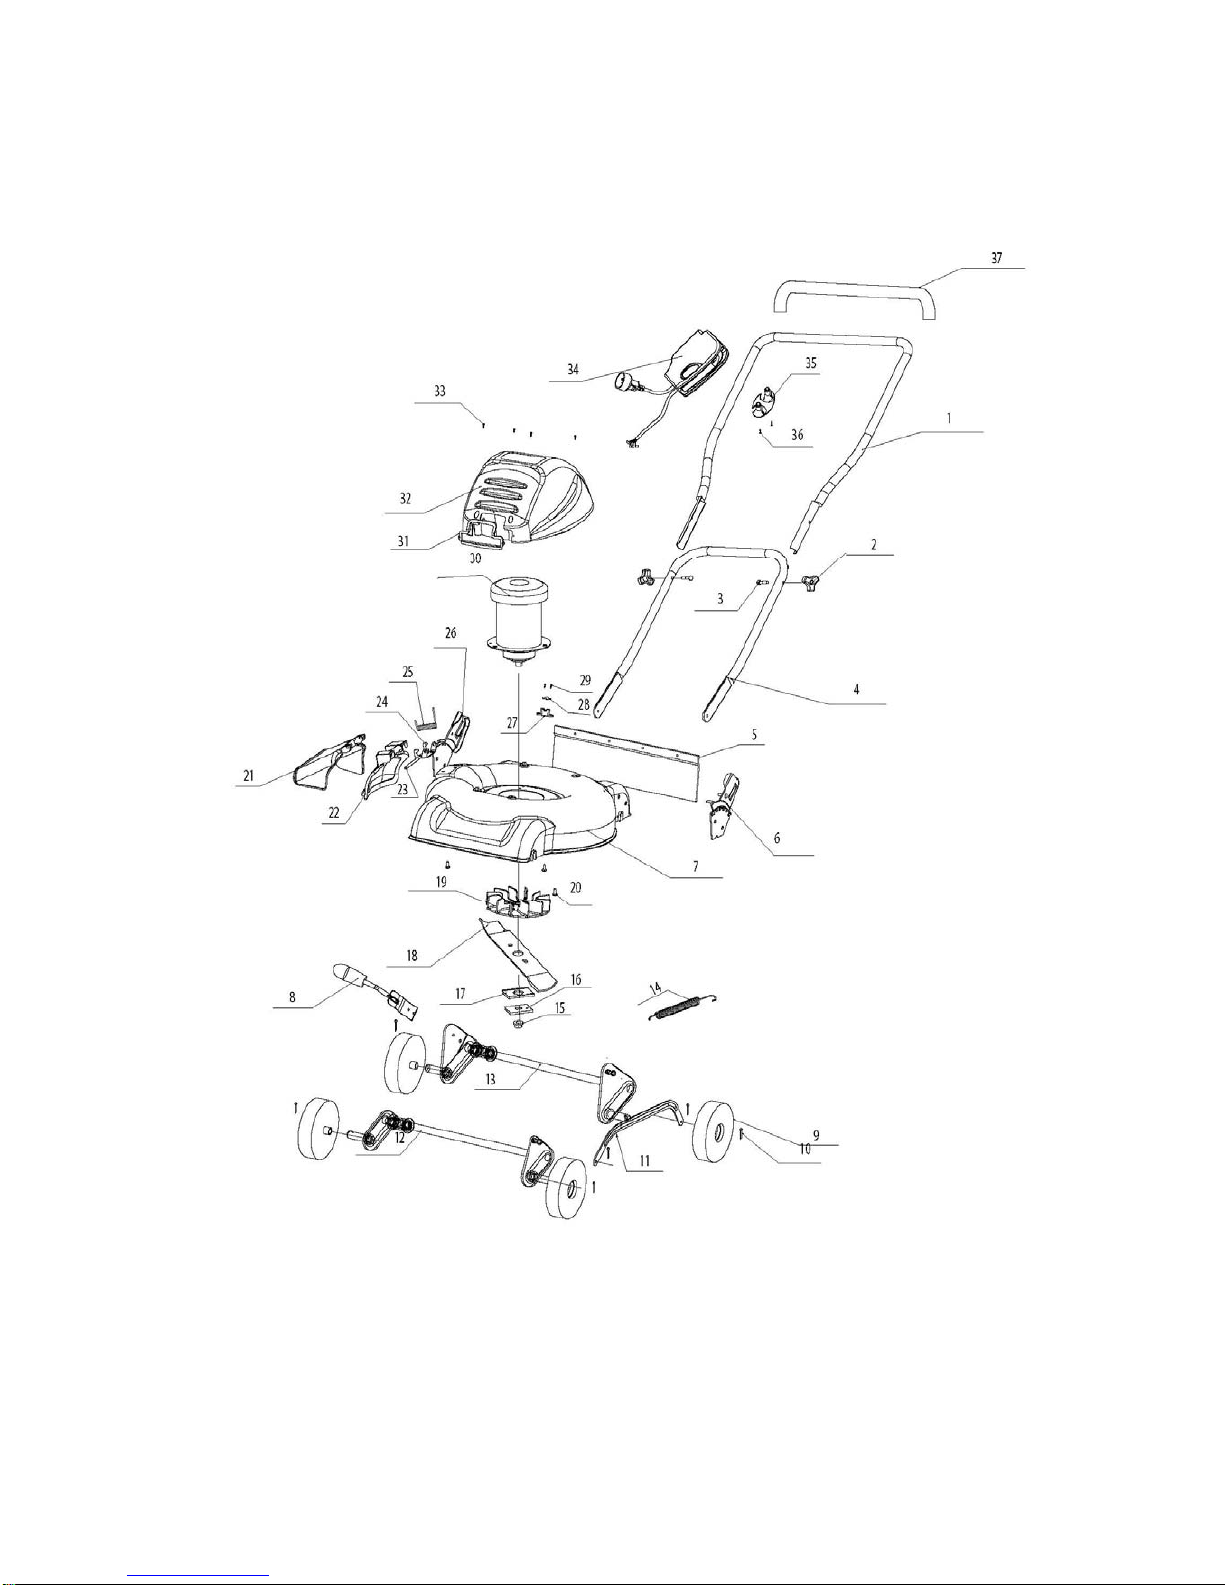
PARTS LIST
18

Item N0. Part N0. Qty Description
1 3331237 1 Upper handle
2 3410737 2 Knob
3 3220837 2 Long bolt
4 3331337 1 Lower handle
5 3420237 1 Rear rubber curtain
6 3330737 1 Left handle bracket
7 3310137 1 Deck
8 3330537 1 Height adjustment lever
9 3420137 4 Wheel
10 3290137 6 Hairpin clip
11 3330537 1 Link bar
12 3320137 1 Front wheel shaft assembly
13 3320237 1 Rear wheel shaft assembly
14 3340137 1 Spring
15 3220737 1 Blade nut M10
16 3331035 1 Blade plate
17 3411635 1 Blade locking plate
18 3330137 1 Blade
19 3410237 1 Fan
20 3220137 1 Cross screw
21 3410637 1 Side discharge chute
22 3410537 1 Side discharge cover
23 3320537 1 Side discharge cover shaft
24 3330637 1 Side discharge cover bracket
25 3340237 1 Spring
26 3330737 1 Right height adjustment level
27 3331237 1 Cord path
28 3410403 1 Cord holder
29 3220303 2 Cross screw
30 3610137 1 Motor assembly
31 3411237 1 Grill
32 3410337 1 Motor housing
33 3220337 4 Cross screw
34 3110137 1 Switch assembly
35 3410737 1 Cord restraint
36 3220437 2 Cross screw
37 3490137 1 Foam sleeve
19
Table of contents
Other Task Force Lawn Mower manuals


