manuals.online logo
Brands
  1. Home
  2. •
  3. Brands
  4. •
  5. Task Lighting
  6. •
  7. Lighting Equipment
  8. •
  9. Task Lighting LCDM600 User manual

Task Lighting LCDM600 User manual

LCDM600
Single Colour Strip Controller Set
LED SPECIALISTS
Features
• Mini style dimmer with single channel constant voltage output
• Smooth dimming and switching without any flickering
• 2.4GHz wireless technology, remote distance up to 30m with no obstructions
• Auto-transmitting function, one receiver can transmit the signal from the remote to another receiver
within 15m. The remote control distance can be beyond 100m
• Can connect with external push switch to achieve on/o and dimming function
• Compatible with data repeaters to expand the output
Technical Parameter
LED Remote
• Output signal: RF(2.4GHz)
• Working voltage : 3VDC(CR2032)
• Standby time: 1 year
• Remote distance: 30m unobstructed
• Size: L107×W58.5×H9mm
LED Receiver
• Input voltage: 5-36VDC
• Output power: 12V Max 96W, 24V Max 192W
• Output current: 1CH, 8A/CH
• Size: L97×W33×H18mm
Dimension
97mm
33mm
18mm
Dimens io n
9mm
58.5mm
107mm
58.5mm
Features
LED Receiver
Input voltage:5-36VDC
Output power:12V Max 96W, 24V Max 192W
Output current:1CH, 8A/CH
Size :L97×W33×H18mm
LED Remote
Output signal: RF (2.4GHz )
Working voltage :3VDC (CR2032 )
Standby time :1 year
Remote distance: 30m unobstructed
Size :L107×W58.5×H9mm
Mini style dimmer with single channel constant voltage output
Smooth dimming and switching without any flickering
2.4GHz wireless technology, remote distance up to 30m with no obstructions
Auto-transmitting function, one receiver can transmit the signal from the remote to another receiver
within 15m. The remote control distance can be beyond 100m
Can connect with external push switch to achieve on/o and dimming function
Compatible with data repeaters to expand the output
Technical parameter
Remote function
On/O: Turnon/o light
Brightwheel: Touch to changebrightness
Bright+/-:To adjust brightness, short
press
10 levels,longpress
for
1-5s
100%,75%,50%,25%: Built in with 4 levels of brightness
3 Scene: Brightness memory, shortpressrecall the scene,longpress 2s
to
save
the
currentbrightness
intothe scene
Match guide
Use Match key
1. Match:Short press
the
match key o
n
the receiver, within 5s, press on/o key of the remote
2. Delete:Long press
the
match key o
n
the receiver for 5s,
to
delete
on
matched remote
Use Power-up
1. Match:Switch o the power, then switch on again, short press the on/o key 3 times on the remote
quickly within 5s after the power is on, the link is done once the light blinks 3 times
2. Delete:Switch o the power, then switch on power again, short press on/o key 5 times on the remote
quickly within 5s after the power is on, the unlink is done once the light blinks 5 times
LCDM 600
Single Colour Strip Controller
Set
External push switch(optional)
1. Short press: Turn on/o light
2. Long press(1-5s): When the light is on, increase or decrease brightness continuously
3. Long press(10s): When multiple controllers share a on/o key, this can achieve
simultaneous adjustment
Brightness levels
Brightness +
Brightness -
Dimming
Wheel
3 Scenes
On/Off
Remote Function
97mm
33mm
18mm
Dimens ion
9mm
58.5mm
107mm
58.5mm
Features
LED Receiver
Input voltage:5-36VDC
Output power:12V Max 96W, 24V Max 192W
Output current:1CH, 8A/CH
Size :L97×W33×H18mm
LED Remote
Output signal: RF (2.4GHz )
Working voltage :3VDC (CR2032 )
Standby time :1 year
Remote distance: 30m unobstructed
Size :L107×W58.5×H9mm
Mini style dimmer with single channel constant voltage output
Smooth dimming and switching without any flickering
2.4GHz wireless technology, remote distance up to 30m with no obstructions
Auto-transmitting function, one receiver can transmit the signal from the remote to another receiver
within 15m. The remote control distance can be beyond 100m
Can connect with external push switch to achieve on/o and dimming function
Compatible with data repeaters to expand the output
Technical parameter
Remote function
On/O: Turnon/o light
Brightwheel: Touch to changebrightness
Bright+/-:To adjust brightness, short
press
10 levels,longpress
for
1-5s
100%,75%,50%,25%: Built in with 4 levels of brightness
3 Scene: Brightness memory, shortpressrecall the scene,longpress 2s
to
save
the
currentbrightness
intothe scene
Match guide
Use Match key
1. Match:Short press
the
match key o
n
the receiver, within 5s, press on/o key of the remote
2. Delete:Long press
the
match key o
n
the receiver for 5s,
to
delete
on
matched remote
Use Power-up
1. Match:Switch o the power, then switch on again, short press the on/o key 3 times on the remote
quickly within 5s after the power is on, the link is done once the light blinks 3 times
2. Delete:Switch o the power, then switch on power again, short press on/o key 5 times on the remote
quickly within 5s after the power is on, the unlink is done once the light blinks 5 times
LCDM 600
Single Colour Strip Controller
Set
External push switch(optional)
1. Short press: Turn on/o light
2. Long press(1-5s): When the light is on, increase or decrease brightness continuously
3. Long press(10s): When multiple controllers share a on/o key, this can achieve
simultaneous adjustment
Brightness levels
Brightness +
Brightness -
Dimming
Wheel
3 Scenes
On/Off
On/O: Turn on/o light
Bright wheel: Touch to change brightness
Bright+/-: To adjust brightness, short press 10 levels, long press for 1-5s
100%, 75%, 50%, 25%: Built in with 4 levels of brightness
3 Scene: Brightness memory, short press recall the scene, long press 2s to save the current
brightness into the scene
Match Guide
Use Match key
1. Match: Short press the match key on the receiver, within 5s, press on/o key of the remote
2. Delete: Long press the match key on the receiver for 5s, to delete on matched remote
Use Power-up
1. Match: Switch o the power, then switch on again, short press the on/o key 3 times on the
remote quickly within 5s after the power is on, the link is done once the light blinks 3 times
2. Delete: Switch o the power, then switch on power again, short press on/o key 5 times on
the remote quickly within 5s after the power is on, the unlink is done once the light blinks
5 times
External Push Switch (optional)
1. Short press: Turn on/o light
2. Long press(1-5s): When the light is on, increase or decrease brightness continuously
3. Long press(10s): When multiple controllers share a on/o key, this can achieve
simultaneous adjustment
Wiring Diagram
Malfunctions analysis & troubleshooting
1. The product shall be installed and serviced by a qualified person.
2. The product is non-waterproof. Please avoid the sun and rain.
3. Good heat dissipation will prolong the working life of the controller. Please ensure good ventilation.
4. Please check if the output voltage of any power supplies used comply with the working voltage of the
product.
5. Ensure all wire connections and polarities are correct and secure before applying power to avoid any
damages to the LED lights.
6. If a fault occurs please return the product to your supplier. Do not attempt to fix this product by yourself.
Safety information
Malfunctions
Causes Troubleshooting
Uneven intensity
between front and
rear,with voltage drop
No response
from the remote
No light
Wiring diagram
Push Switch
(optional)
Power Supply
5-36VDC
Constant Voltage
AC110-230V
Single color LED strip
LED power supply voltage and power select:
● 5V lamp, Input 5V power supply, can load 0~40W,
● 12V lamp, Input 12V power supply, can load 0~96W,
● 24V lamp, Input 24V power supply, can load 0~192W,
● 36V lamp, Input 36V power supply, can load 0~288W,
The power supply power must larger than load power 20%.
+
1. Reduce cable or loop supply
2. Change wider wire
3. Replace higher power supply
4. Add power repeater
1. Replace battery
2. Reduce remote distance
3. Re-match the remote
1. The battery has no power
2. Beyond controllable distance
3. The controller did not match the remote
1. Output cable is too long
2. Wire diameter is too small
3. Overload beyond power supply capability
4. Overload beyond controller capability
1.No power
2.Wrong connection or insecure
1.Check the power
2.Check the connection
Malfunction Analysis and Troubleshooting
User Manual Ver 1.0.3 Page 2
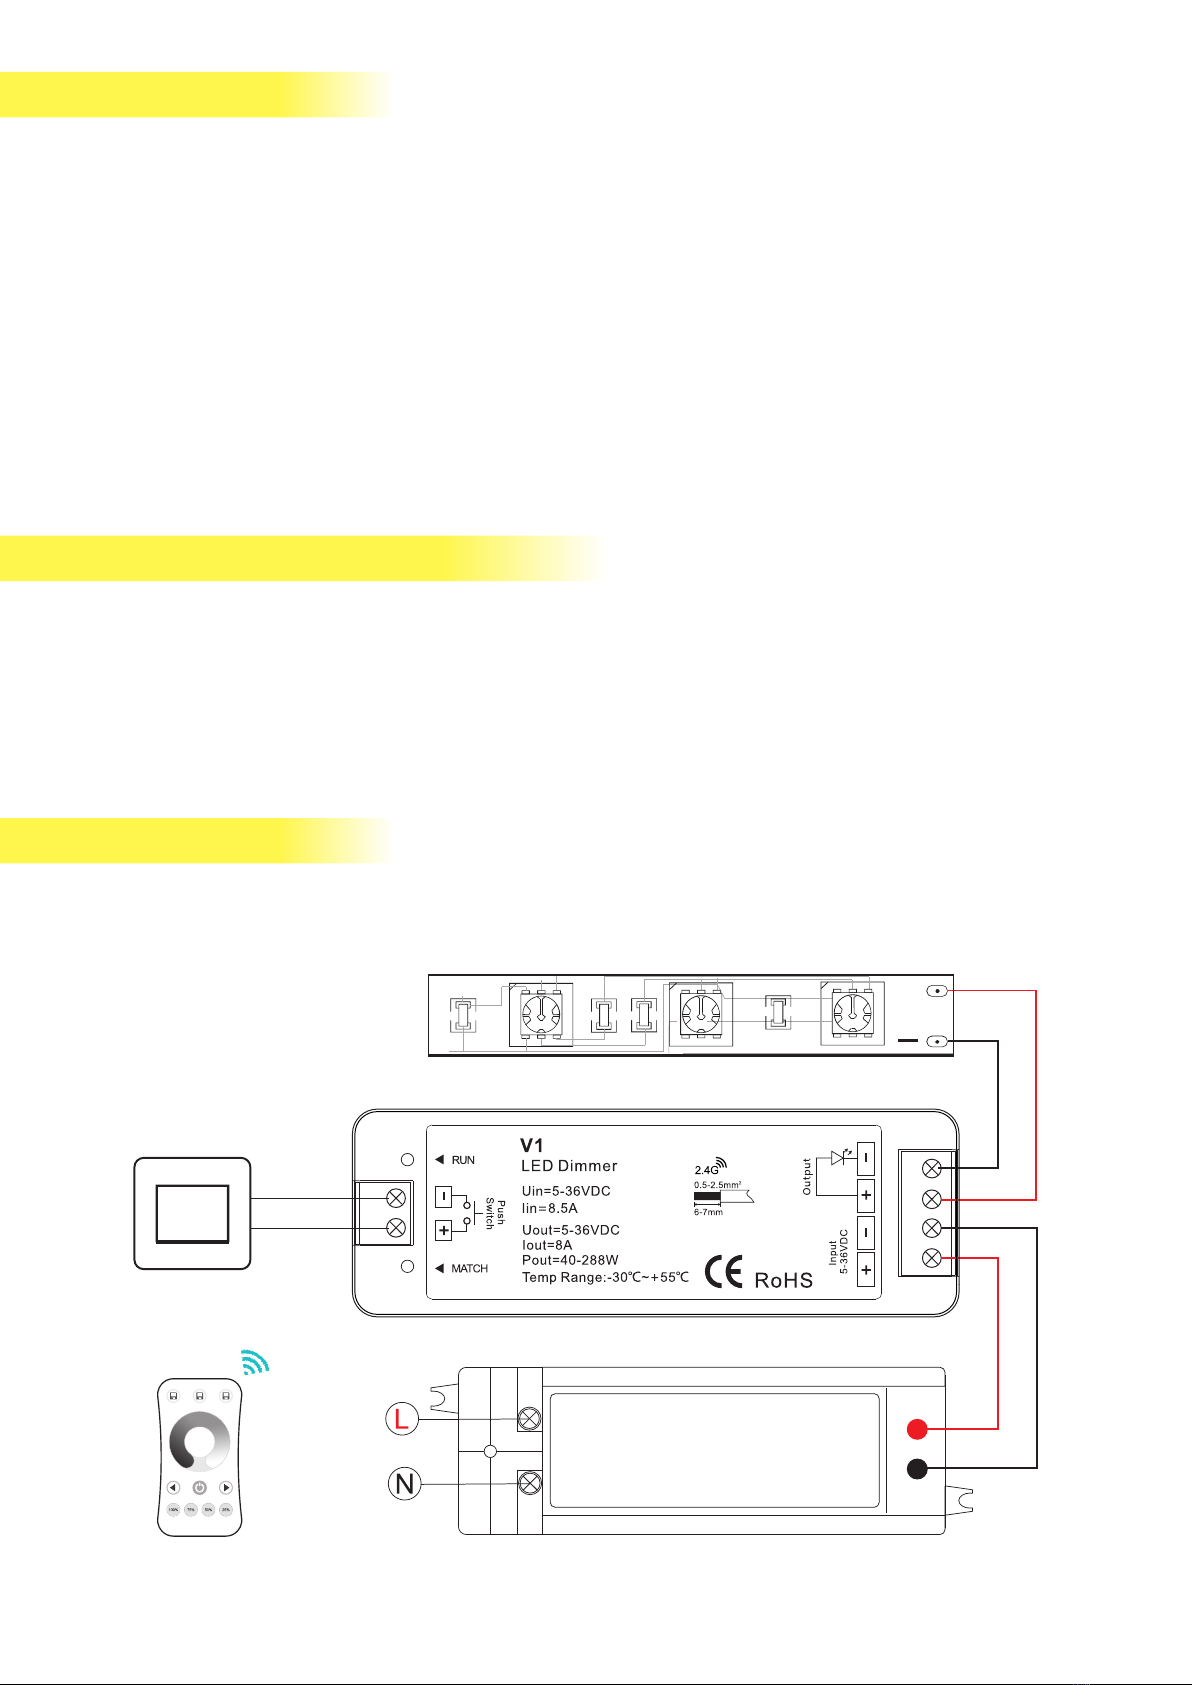
Match Remote Control (two match ways)
Use the controller’ s Match key
Match:
Short press match key, immediately press on/off
key (single zone remote) or zone key (multiple zone
remote) of the remote.
Use Power Restar t
Match:
Switch off the power, then switch on power again,
immediately short press on/off key 3 times on the remote.
The light blinks 3 times means match is successful.
Delete:
Switch off the power, then switch on power again,
immediately short press on/off key 5 times on the remote.
The light blinks 5 times means all matched remotes were
deleted.
Delete:
Press and hold match key for 5s to delete all match,
The light blinks 5 times means all matched remotes
were deleted.
End user can choose the suitable match/ delete ways. Two options are offered for selection:
Bright-
Mode
Color wheel
Speed/Saturation
Turn on/off light.
Color wheel: Touch to change static RGB color.
Mode: Short press run the next dynamic mode, long press 2s run mode cycle.
Speed/Saturation : For dynamic mode, adjust speed, short press 10 levels long press 2s get the default speed.,
For static color, adjust saturation, namely change current static RGB color to mixed white slowly,
short press 11 levels, long press 1-5s for continuous 256 levels adjustment.
Bright+/-: Adjust brightness, short press 10 levels long press 1-5s for continuous256 levels adjustment.,
/ / ,R G B: Short press getred green or bluecolor directly,
long press 1-5s adjust R/G/B brightnesscontinuously toachieve millions of colors.
continuouslyW+/-: Short press turn on/off white(RGB mix), long press 1-5s adjust saturation ,
namely change current static RGB color to mixed white slowly.
Scene: Short press recall the scene long press 2s savethe currentcolor into the scene.,
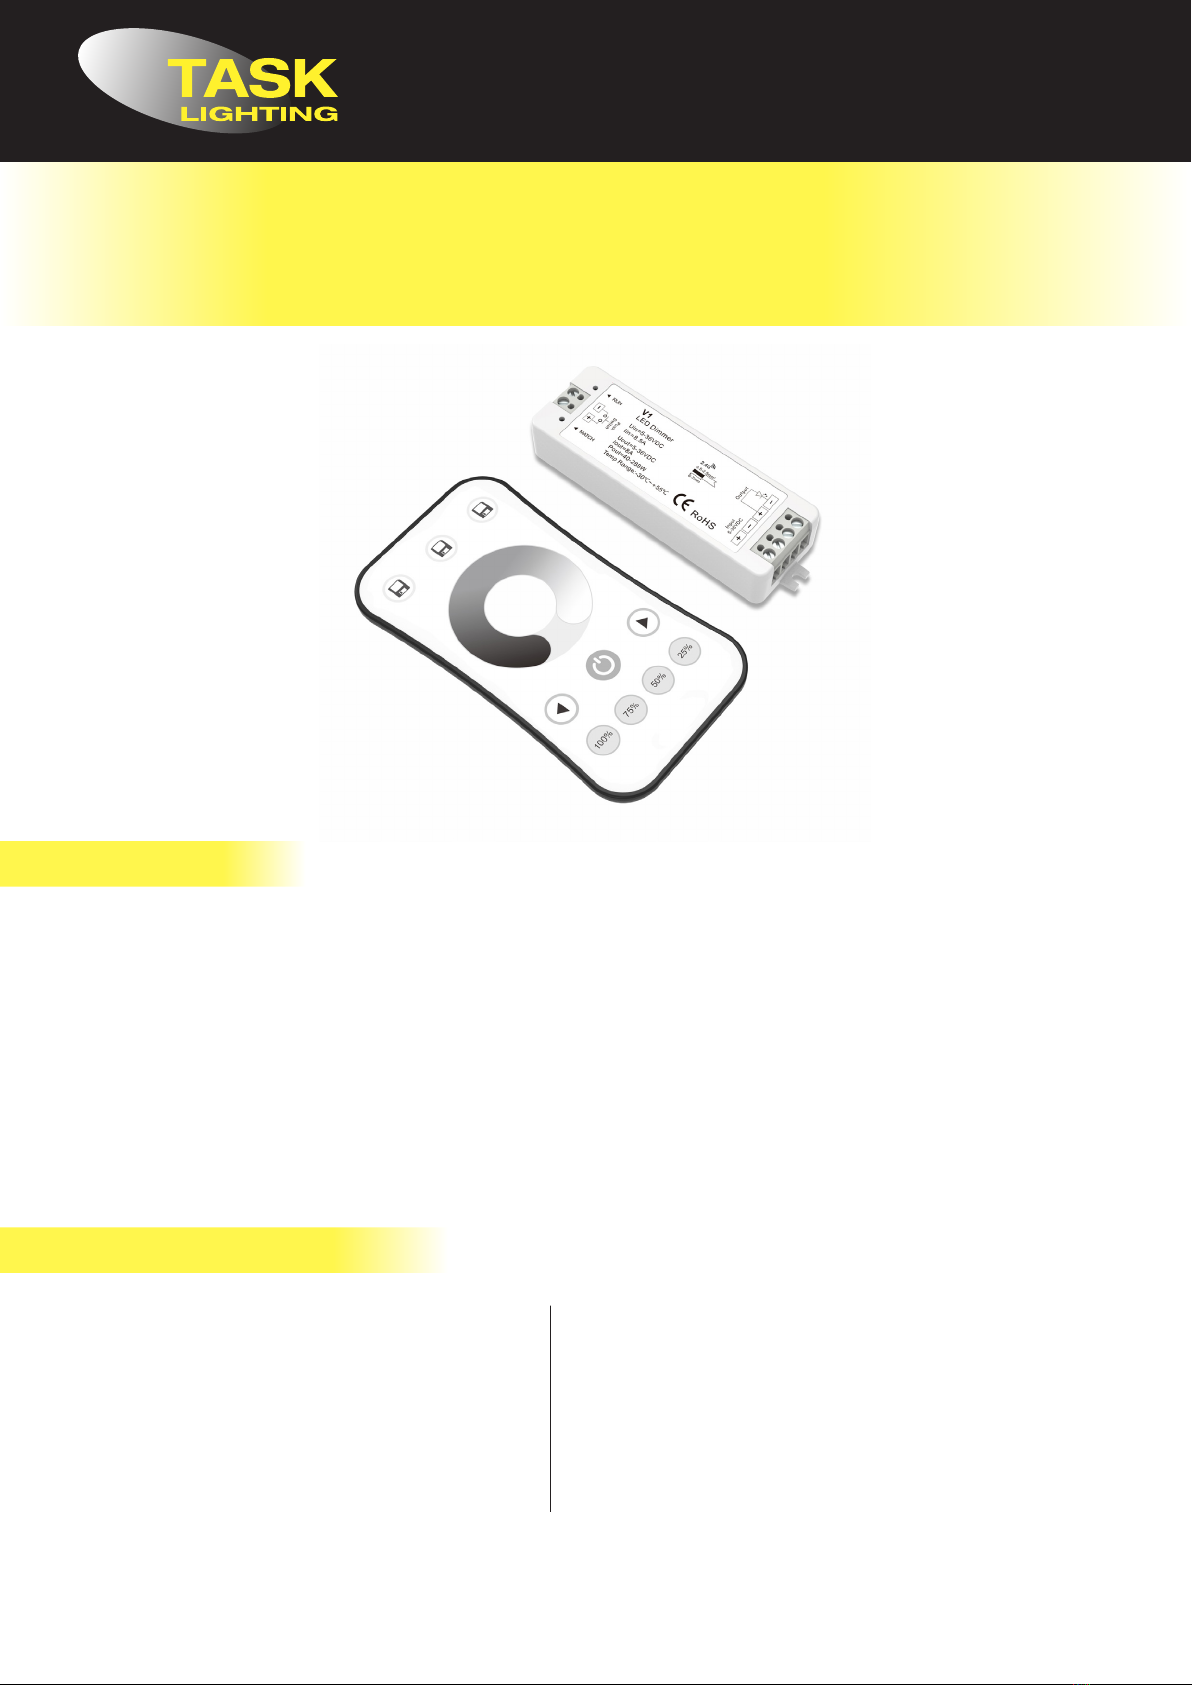
R emote f unction
On/ Off
R/ G/ B/ W+/-
Scene
Bright+
V3 + R8-1 RGB LED Strip Controller Kit
* When light is on, touchthe color wheel,the indicator will display red.
* To extendbattery life,no touch or press key operationafter afew seconds,
the touch wheel will enter sleep state, youneed press any key to make touch wheel quit sleep state.
M a lfunctions a na lysis & t roubleshooting
Malfunctions
Causes
Uneven intensity
between front and
rear,with voltage drop
1. Output cable is too long.
2. Wire diameter is too small.
3. Overload beyond power supply capability.
4. Overload beyond controller capability.
No response
from the remote
1. The battery has no power.
2. Beyond controllable distance.
3. The controller did not match the remote .
No light
Troubleshooting
1. Reduce cable or loop supply.
2. Change wider wire.
3. Replace higher power supply.
4. Add power repeater.
1. Replace battery.
2. Reduce remote distance.
3. Re-match the remote.
1.Check the power.
2.Check the connection.
Dyna mic m ode l ist
RGB jump
RGB smooth
6 colour jump
6 colour smooth
Yellow cyan purple smooth
1
2
3
4
5
6
7
8
9
10
RGB fade in and out
Red fade in and out
Green fade in and out
Blue fade in and out
White fade in and out
A pplica tion notes
All the receivers are matched with one RF remote.
RF remote
30m 30m
Auto-transmitting:One receiver can transmit the signals from the remote to another receiver within 30m,
as long as there is a receiver within 30m, the remote control distance can be limitless.
Auto-synchronization: Multiple receivers within 30m distance can work synchronously when they are controlled
by the same remote, under same dynamic mode and with same speed.
Receiver placement may offer up to 30m communication distance. However, we recommend for indoor applications
that receiver placements should be no further apart than15m.
30m
1. No power.
2. Wrong connection or insecure.
No. No.
Name Name
Safety Information
1. The product shall be installed and serviced by a qualified person.
2. The product is non-waterproof. Please avoid the sun and rain.
3. Good heat dissipation will prolong the working life of the controller. Please ensure good
ventilation.
4. Please check if the output voltage of any power supplies used comply with the working
voltage of the product.
5. Ensure all wire connections and polarities are correct and secure before applying power to
avoid any damages to the LED lights.
6. If a fault occurs please return the product to your supplier. Do not attempt to fix this
product by yourself.
LED power supply voltage and power select:
• 5V lamp, Input 5V power supply, can load 0~40W,
• 12V lamp, Input 12V power supply, can load 0~96W,
• 24V lamp, Input 24V power supply, can load 0~192W,
• 36V lamp, Input 36V power supply, can load 0~288W,
The power supply power must larger than load power 20%.

Other Task Lighting Lighting Equipment manuals

Task Lighting T-C-RGB180 User manual

Task Lighting

Task Lighting T-C-RGB180 User manual

Task Lighting Sempria LED Q Series User manual

Task Lighting

Task Lighting Sempria LED Q Series User manual

Popular Lighting Equipment manuals by other brands

Squareled Hi-Precision 200W RGBW user manual

Squareled

Squareled Hi-Precision 200W RGBW user manual

Generac Power Systems MAGNUM MLT4250 owner's manual

Generac Power Systems

Generac Power Systems MAGNUM MLT4250 owner's manual

Lightolier IS-LFK Assembly and installation

Lightolier

Lightolier IS-LFK Assembly and installation

Chauvet COLORado PXL Bar 8 Quick reference guide

Chauvet

Chauvet COLORado PXL Bar 8 Quick reference guide

Clas Ohlson 18-2422 quick start guide

Clas Ohlson

Clas Ohlson 18-2422 quick start guide

GVA Lighting PIXEL TW installation guide

GVA Lighting

GVA Lighting PIXEL TW installation guide

EuroLite SRC-146 user manual

EuroLite

EuroLite SRC-146 user manual

LumX INSPEC DUO GRIP instruction manual

LumX

LumX INSPEC DUO GRIP instruction manual

EURANEG AirCop quick start guide

EURANEG

EURANEG AirCop quick start guide

LIVARNO home 1105-W manual

LIVARNO home

LIVARNO home 1105-W manual

Ibiza COMBILED20 manual

Ibiza

Ibiza COMBILED20 manual

Starter Bi-Color Spot LED Panel 4.0 instruction manual

Starter

Starter Bi-Color Spot LED Panel 4.0 instruction manual

Goobay 58288 user manual

Goobay

Goobay 58288 user manual

MJ LED LIGHTNING MJ-1044-6IN1 user manual

MJ LED LIGHTNING

MJ LED LIGHTNING MJ-1044-6IN1 user manual

ChiliTec SMD pro Series Operation manual

ChiliTec

ChiliTec SMD pro Series Operation manual

Chauvet COLORband user manual

Chauvet

Chauvet COLORband user manual

Klang SL-1 DUAL instruction manual

Klang

Klang SL-1 DUAL instruction manual

Larson Electronics IND-HVAC-ACS-R1-DP-24-2L-XB instruction manual

Larson Electronics

Larson Electronics IND-HVAC-ACS-R1-DP-24-2L-XB instruction manual

manuals.online logo
manuals.online logoBrands
  • About & Mission
  • Contact us
  • Privacy Policy
  • Terms and Conditions

Copyright 2025 Manuals.Online. All Rights Reserved.