Tasty Chips Electronics Integral User manual

Tasty Chips Electronics
Integral
User manual
© Tasty Chips Electronics 2022-2023
Document version
Document version 2.2.a
Applicable firmware version 2.2.x
1

Introduction
Integral is designed to offer high quality true-stereo convolution reverb in a compact package, for use with
guitar or line-level sources like synths or even mixers.
Aside from being able to accurately recreate acoustic spaces, Integral has ample potential for creative sound
design by allowing the user to stretch and manipulate the impulses, and load external impulses from a USB
stick. Impulses can be directly recorded to the unit and instantly audited, and an expression pedal input is
provided to give hands free control over parameters.
2

Table of contents
Introduction 2.
Warranty 4.
Getting started 4.
Signal path 5.
Understanding the display 6.
Using the envelope controls 7.
Using the remaining parameters 7.
Shift functionality overview 8.
Using the dual convolvers 9.
Expression pedal 9.
Choosing samples 10.
Recording responses 11.
Presets and system settings 11.
System menu 12.
Firmware update s via USB 13.
Firmware installation failsaf e 13.
Recommended hardware 14.
Troubleshooting 15.
Features 15.
Credits 16.
Contact 16.
3

Warranty
The Integral comes with a 1 (one) year warranty on factory defects. Warranty is effective from the date of
shipping of the unit.
“Factory defects” covers
- Broken parts (for instance cracked screen, broken buttons, or knobs)
- Non-functional unit (“dead on arrival”)
- Semi-functional unit with serious defects (for instance inability to access the USB stick, mute audio inputs
or outputs).
In case of such defects, you can reach us at info@tastychips.nl, and claim your unit to be repaired. We’ll
contact you with all the necessary information for return shipping and will refund all postage costs incurred.
Please understand that shipping and repairs may take several weeks depending on the severity of the defect
and your location in the world.
We’ll first attempt to repair your unit. If, and only if, the unit is damaged beyond repair, we’ll send a new unit.
Getting started
1. Connect the Integral to a 9 or 12 volt power supply that supplies at least 500 mA.
2. Hook up audio output cables.
3. Press Play [►] to test the output of the selected response.
4. Press Play [►] again to stop the test.
5. Hook up the audio input. If you are using a mono input, use the L input.
6. To begin with a blank slate, make sure the Predelay is completely 0, Xfade is centered, and Wet is
maximized. The Pos knob should be 0. The Attack setting should be 0, and Release should be
maximized, enabling the full response to be used.
7. If used with a line level source or in an effects-loop, press the line/inst switch in to prevent clipping.
8. Press the A or B footswitch and enjoy the reverberated sound!
9. Turn the Select knob right to try the next response.
4
Tip: The Integral accepts both center negative and center positive DC power supplies.

Signal path
As you can see the two internal convolvers both have their own processing chain PRE for predelay, a high-
pass filter, and followed by a Mid-Side matrix (aka stereo width on the front panel).
The bypass footswitches switch the signal going into the convolvers, leaving the tails to fade out naturally
when you switch them off. With a pair of quick taps you could apply the effect to just one phrase for example.
Predelay delays the signal going into the convolver, this has the dry signal appear more forward compared to
the convolution product, allowing you to make small spaces sound bigger and create clarity in dense reverbs.
The high-pass filter is typically employed to keep bass and sub-bass from blowing up. Combining a bass-
heavy input with a bass-heavy response sample often calls for such a feature.
Mid-Side is used to exaggerate or diminish stereo effects in the input signal. It may be used to turn it
completely mono, or amplify the width. Even with mono input you can still widen the stereo image, if your
response is stereo.
The convolution chain is followed by wet attenuation. Finally, the convolver outputs are crossfaded and
summed with the dry signal.
5
Tip: On the high end of its range the width pot may boost the apparent volume slightly,
you might need to adjust the wet knob accordingly.
Note: Only one convolver is controlled by the knobs and buttons at any one time.

Understanding the display
After startup the Integral will show the main screen most importantly sample waveforms and control values.
The display shows the response sample in a straightforward way, along with its name at the bottom, and an
action message at the top. Such an action may be “WET -6.0DB”, “ATTACK 0.500s”, “CONVOLVER A”. So
either value updates, or discrete actions.
The display shows either convolver A or convolver B. You can see a blue “A” or an orange “B” near the upper
right corner of the screen. Either push the Select knob to toggle between the two, or press the corresponding
footswitch to toggle which convolver is controlled by the knobs.
The display shows up to 4 sample channels. Everything you need for true stereo reverbs. From top to
bottom, these are
If a plain stereo sample is loaded instead of a 4 channel sample, only two channels are visible. Why these 4
channels? This is for the so-called stereo matrix. The left input can also influence the right output and vice
versa.
The samples are displayed at full length, and the amplitude is logarithmic so that details in the reverb tail
may be better visible. Between the channels the difference in amplitude is exaggerated. This quickly tells you
if the response is off-center.
The overlaid blue lines show the AR (Attack-Release) envelope.
Near the upper-right corner of the screen you may see a red “C” appear from time to time. This indicates the
total wet signal is clipping or almost clipping. The Integral then automatically limits the gain, you may want to
attenuate the wet signal, or switch between the line and instrument input modes, depending on the situation.
On the bottom of the display the current sample filename is displayed.
6

Using the envelope controls
An attack-release type envelope allows attenuation of parts of the response sample. The start position (time)
of this envelope can be set using the “Pos” knob. Setting the position will completely skip over any sample
data that comes before this position in the response sample. The combination of these three knobs allows
you to precisely focus on any specific part of the response, for instance the tail, or only the early reflections.
The position control has a precision of 1024 steps. The Release and Attack [ + Release] settings have the
same resolution, and using their exponential control curve you can achieve very short attacks or releases
and still accurately control them. The attack and release time are displayed on screen down to milliseconds.
The applied envelope attenuates the response in places. To have no attenuation at all (to actually disable the
envelope’s function) turn Attack and Pos to 0, and turn Release to its maximum. Note that the Integral uses
normalization after applying the envelope. This will preserve signal power, however it can also significantly
boost the wet signal. You can compensate by turning down the Wet knob.
Note that when attack is non-zero, you may experience a gap in the audio. Each time the envelope is
changed the convolver recomputes and restarts. Since a longer attack will result in low volume, you may
hear short gaps in the output as you continue to change the envelope. This can be compensated by
increasing Slew. See the section “Using the remaining parameters” for more information on that.
Using the remaining parameters
Predelay: 0-2.0s in with an exponential control curve. Using this often influences the perception of the size
of a reverberating space. For instance, you can make a short reverb of a small room appear bigger by
turning this up a little. Adjustment of this control causes the convolver to recompute its data. This may take a
short while. Also note that the convolver restarts after adjustment and it starts with playing back the delay.
Highpass filter cutoff [⇧ + Predelay] To keep the convolution from blowing up you can cut away some low
frequencies from the audio input. The high-pass is a 12dB per octave filter with a full range of 0 to 20000
hertz, and an exponential sweep gives fine adjustment in the lower frequencies.
Stereo width: This is a Mid-Side matrix control that either turns the input into mono (turn it down to 0), or
exaggerates the stereo effect (turn it completely right). The center keeps the stereo input audio signal exactly
as it is.
Pitch [⇧ + Stereo width] Hold down Shift and turn the Stereo width knob to pitch bend just the impulse
response. This does not change the pitch of the convolved signal itself, but changes the timing and formant,
and allows you to tune resonator-style impulses. Completely left means -2 octaves, completely right means
+2 octaves. Center keeps the response the same pitch.
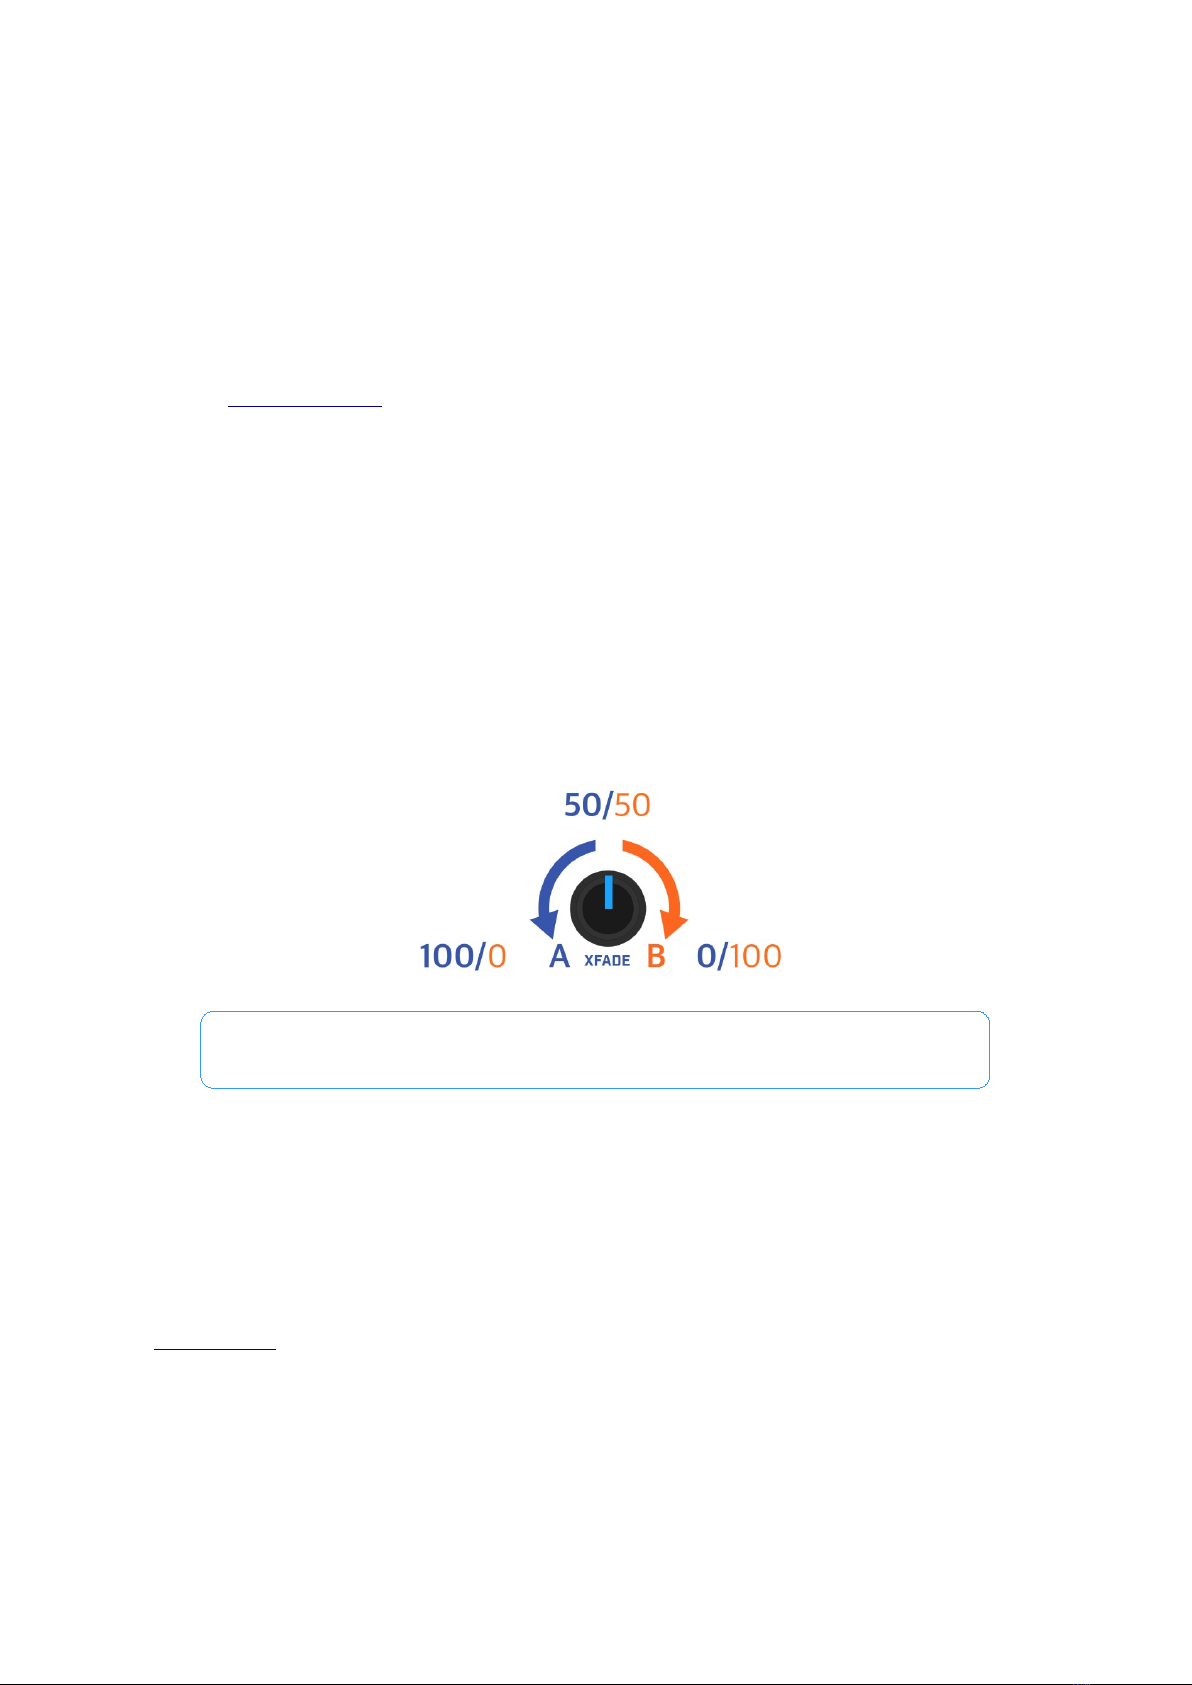
Xfade: Crossfade between convolver A (left on the knob) convolver B (right on the knob). Please read the
section “Using the dual convolvers” for more information.
Slew time [⇧ + Xfade] recomputation slew time controls the crossfading time between newly computed
response and old response. Such a cross fade occurs when a new impulse response is offered to the
convolver. For instance when a new response is selected by turning the select knob, or when the envelope
or envelope position is changed. A short slew time sounds more choppy, but you’ll hear the new response
faster. A larger slew is especially useful with longer envelope attack.
7

Shift functionality overview
Knob/Button: Normal function: Shift function ⇧]:
Width Knob Stereo width Impulse pitch
Xfade Knob Convolver crossfade Slew Time
Predelay Knob Predelay time High pass filter
Release Knob Release time Attack time
Wet Knob Wet level Dry level
Encoder Push Swap convolver System menu
Encoder Turn Prev/Next impulse Prev/Next folder
Play Button Preview impulse Preview impulse with processing
(Width, pitch & envelope)
Footswitch A Toggle Convolver A Record
(Press again to stop recording)
Footswitch B Toggle Convolver B Store
(Hold to save preset)
8
Using the dual convolvers
The Integral runs two internal convolvers simultaneously. There’s one in the foreground, which is directly
controlled by the knobs, and there’s one in the background. The background convolver is not currently
controlled by the knobs, but holds another response sample and it has its own (static) settings such as
another envelope, filter settings and pitch, but it can be controlled via expression pedal if you choose. For
this see the “Expression pedal” chapter.
The Xfade (crossfade) knob creates a mix between the two convolvers
1. Set up your foreground convolver using the “select knob” to choose a response, and turn the other
knobs (except crossfade) until you have a satisfying convolution.
2. Now press “select”. This switches the foreground convolver into the background. The display will let
you know “CONVOLVER B”
3. Turn Xfade to the left a bit to hear the convolver A, and to the right for convolver B.
4. Select a nice new response sample for convolver B by turning “select”, and set the parameter knobs
to your liking.
5. Wiggle Xfade. If you’re using reverb responses, you are now traveling between spaces!
E pression pedal
The Integral accepts a standard expression pedal to provide hands-free control over a chosen parameter.
You need a TRS expression pedal with a linear sweep and a resistance of at least 10 kOhms. Please read
the “System menu” chapter for more information.
9
Tip: You can toggle between the two encoders by pressing the Select encoder, but you
can also simply press the A or B footswitch to control the corresponding convolver.
Choosing samples
The Integral offers a file chooser to help you browse through vast libraries of samples and settings. All
samples and settings are present in one big list, through which you can quickly scroll back and forth. No
diving into directories, no choosing of data types to load. Turn the Select knob to enter the file chooser
screen. Turn a bit more to start choosing another sample.
The Integral’s USB port allows you to use a USB stick or Micro SD card (via a USB-SD adapter). It also
comes pre-loaded and with loads of original responses recorded by the Tasty Chips Team and others, there
are over 60 samples in the Integral’s internal flash memory.
Once a USB drive/SD card is inserted the Integral will automatically register all the.wav files in the root
directory, and in the folders in the root directory. Note that it does not scan any deeper than 1 level! This
means that folders in folders are skipped. It slurps up all the sample file names and compiles them into a big
list you can scroll through. It may take a few seconds before the Integral has correctly mounted and
processed all the files. It accepts USB sticks formatted in FAT, ExFat, and Linux Ext filesystems.
If there are a lot of responses on the USB drive/SD card, you may want to hold down Shift [] when turning
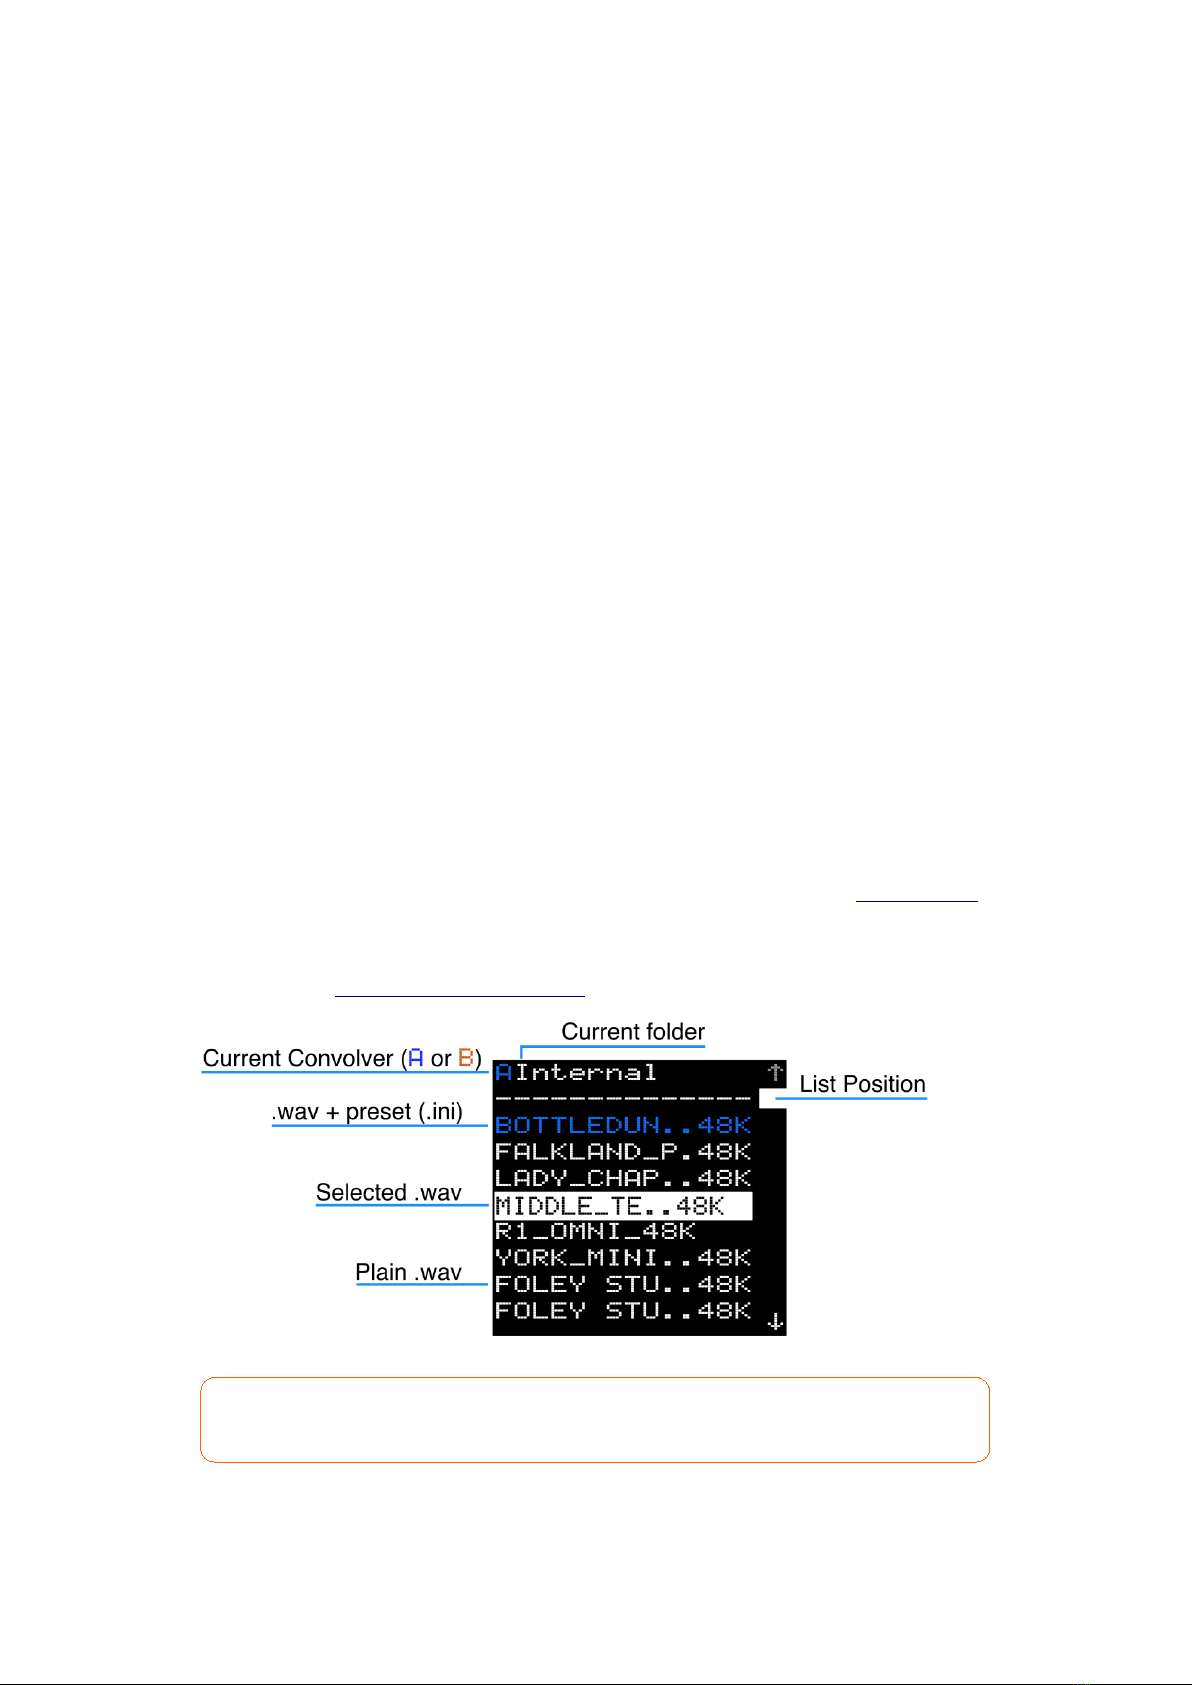
the Select knob. This jumps from folder to folder instead of from file to file. While browsing, the ECR shows
the current folder at the top of the screen. This also helps you to distinguish if samples are in internal
memory or are external.
Browsing automatically loads and activates new samples. When Play [►] is active, you can easily preview
sounds this way. In the top left corner it also shows A or B to tell the user which convolver’s sample and/or
preset we’re loading.
When you have selected a sample you like, return to the main screen by pushing Select, or wait for 4
seconds if you have the AUTO EXIT feature enabled in the menu. For this read the “System m enu ” chapter.
Some files are shown in blue. This means they’re accompanied by an .ini file, with patch data inside. Push
and hold the Select knob to load it. These patch files are created when you save your system presets.
Please read the section “Presets and system settings” for more information on that.
10
Note: The Integral will accept impulses of all commonly used samplerates, however it’s
advised to use the Integral’s native samplerate of 48k, as this will load the quickest.

Recording responses
Press Shift [⇧] and the left footswitch, this starts the recording process. The convolution engine will be
disabled while recording and only dry output is heard. The recording stops when the left footswitch is
pressed again, or when it has recorded for 20 seconds. You can now use the recording as if it were a
response, apply the envelope, position, and modulation. Madness will ensue.
When a USB stick is inserted, you can store the recording by pressing Shift [⇧] and the right footswitch,
otherwise the right LED will pulse two times to indicate no storage medium is present. When storing the
recording is automatically assigned a filename recXXXXXX.wav and it can be found by using the “Select”
knob in the top right.
Presets and system settings
Knob settings can be stored along with the chosen sample. Additionally, the system menu settings are saved
as well. Just hold Shift [⇧] and the right footswitch for one second. This saves both the system settings and
the presets, as well as the currently used presets.
Important some seconds after startup and every time you plug in a USB stick, the ECR will search for
system settings data. If it finds it, it will immediately load the system settings and default presets. To inform
the user it will display a “READING USB..” popup, followed by “READ PRESET..” popup if system settings
& presets are found.
After having stored system settings, the chosen sample files will be accompanied by preset .ini files. In the
filechooser, these are highlighted in blue instead of white. To not only load the sample, but also the patch
data contained in the .ini file, press and hold the Select knob. A "READ PATCH..." popup will be shown and
the preset data will be loaded. This means the envelope, filter, mid-side, etc settings are loaded along with
the sample.
11
Note: system settings are saved to USB if available. Every time you plug in a USB stick
the Integral will load these system settings, and you will lose your current tweaks.
WARNING: DO NOT POWER OFF OR REMOVE STORAGE MEDIUM WHEN
STORING RECORDING OR PRESET. PLEASE WAIT A FEW SECONDS BEFORE
DOING SO. IF YOU DO NOT, DATA LOSS MAY OCCUR.
Tip: Both the system settings data file and the preset data files can be found on the
USB stick. You can easily remove and edit them on your computer, since they are just
ordinary text files.

System menu
Enter the system menu by holding down Shift [⇧] and pressing Select. Here you’ll find the following
- DIRECT SHI T This switches between press-and-hold or toggle functionality for the shift button. Often
beneficial, because it frees up one more hand for knob twisting.
- ILECHOOSER Toggle the file chooser screen on/off. Without the file chooser you can still browse. You’ll
see the waveforms immediately, but you won’t see the next or previous filenames, nor your position in the
list.
- AUTO EXIT Leave the file chooser after 4 seconds. Can speed up your workflow. When this is OFF you
will need to press the Select knob to leave the file chooser.
- PICKUPS Locks the knobs when they are not in the corresponding
position for the preset, and when switching between main and shift
functionality. A lock icon will be displayed along with the current setting
of the parameter, turn to this point to unlock the knob. This can be very
useful for live performance when you don’t want sudden jumps in your
parameters after loading a preset or switching between the convolvers.
- SCREENSAVER Screensaver time 0 seconds, 30 seconds, 2 minutes, or 5 minutes. After this time the
display will turn to black until a button or knob is touched.
- DRY MODE The Intergral has several dry modes
MIX: Regular dry and wet level knobs, in bypass the dry signal will be fed through normally.
DIRECT: Extra low latency and noise, but you give up the dry level control.
KILL: Eliminate the dry signal both when the effect is active and in bypass, this is especially useful
when hooking the Integral up to a mixer as a send/return effect.
- EXP MAP Assigns the expression pedal to either the A or B convolver, or both.
- EXP CONTROL Assigns the expression pedal to a parameter of the convolvers selected in EXP MAP.
POS Position
WET Wet level
X D Xfade
PIT Pitch
- WAVE CONTRAST: Adjusts the contrast of the impulse waveform visualization to compensate for lighting
conditions and display variance.
- EXIT Exit the menu.
These system settings will be saved when you hold down Shift [] and the right footswitch for one second.
This shortcut is available on any screen.
12
Tip: For global parameters like X D the EXP MAP setting is moot, as
they control both convolvers. And when EXP MAP is set to NONE, the
expression pedal will be unassigned completely.
Firmware updates via USB
1. Download the firmware zip file from our site https://www.tastychips.nl/ integral -
support-page/ Make sure this is the correct firmware for your hardware! The file will be named
“INTEGRAL_fw_x.y.z.zip”, depending on the firmware revision.
2. Copy the file to the root of the USB stick.
3. Safely eject the stick from your PC, and insert it into your Integral’s USB port. Wait a few seconds..
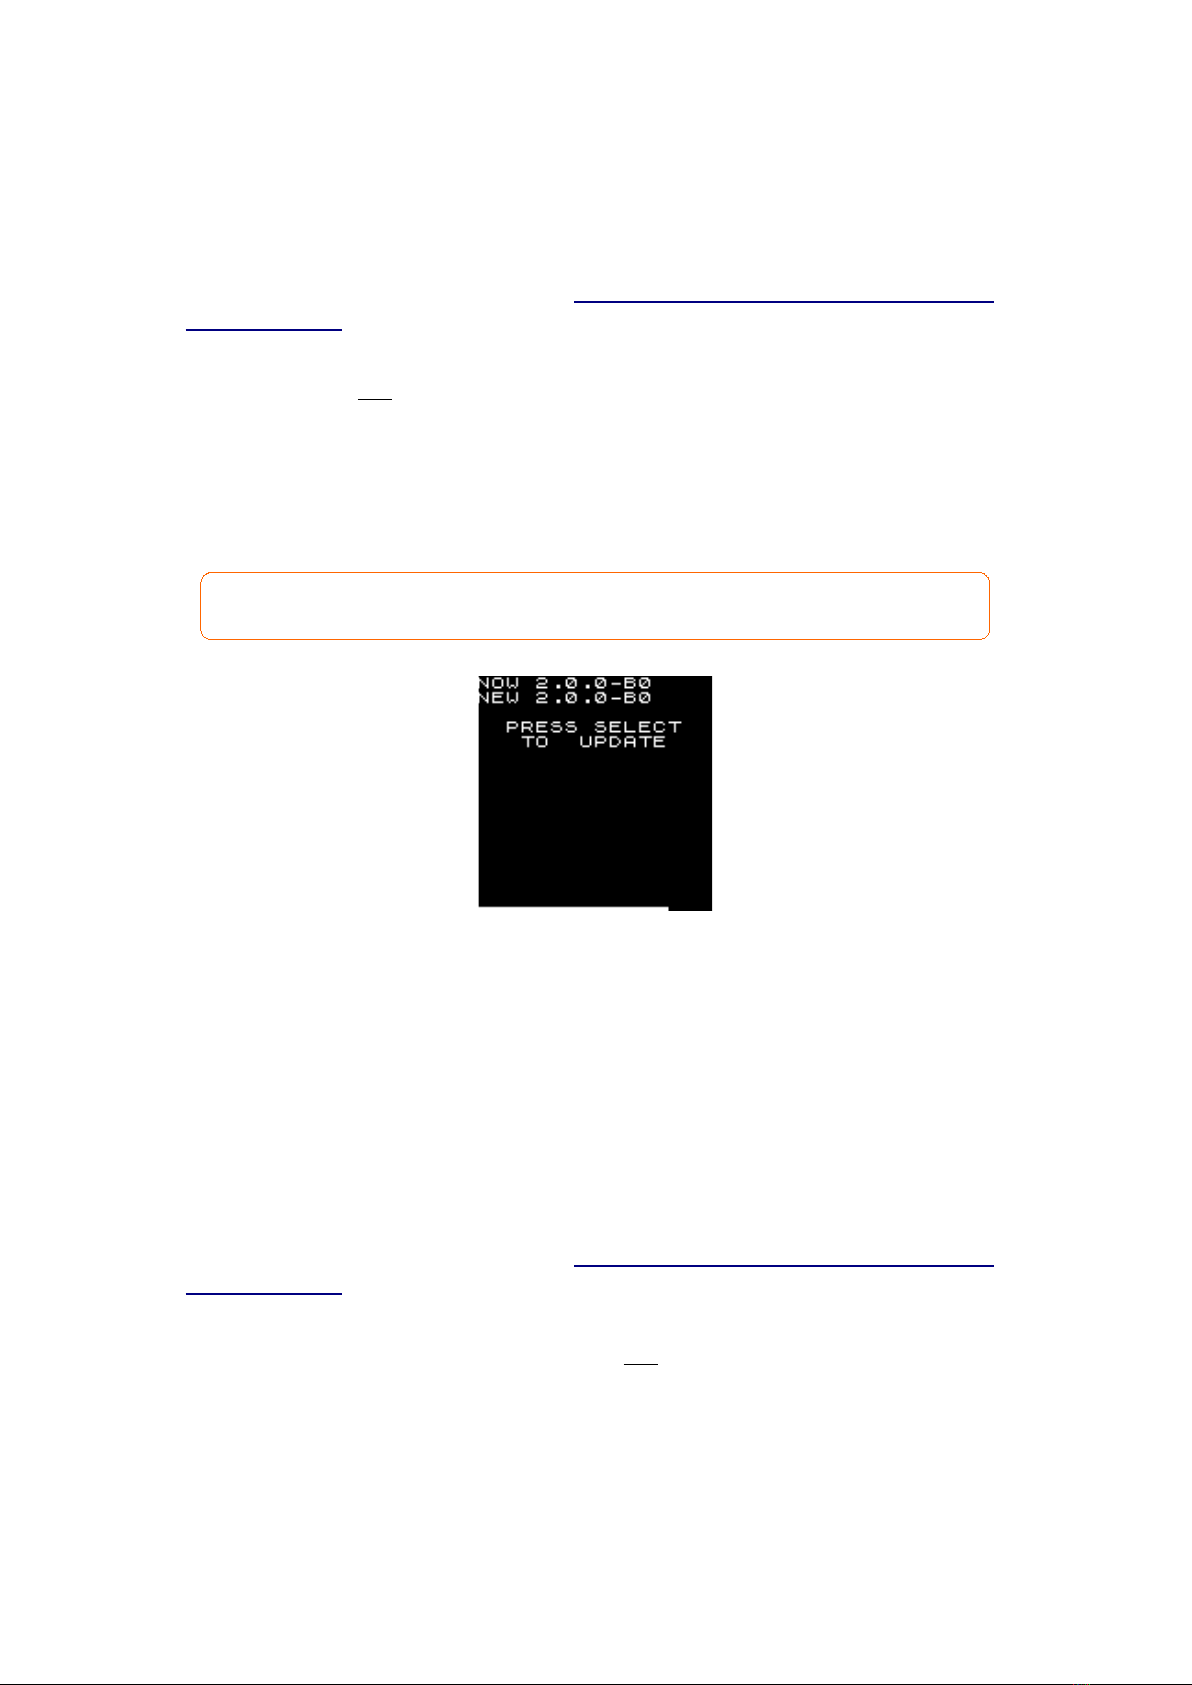
4. The Integral will now enter its update screen, waiting for you to press Select. If you don’t press it it,
will return to the main screen and resume normal operation after about 20 seconds.
5. The Integral will install and automatically restart. This shouldn’t take more than 2 seconds.
Firmware installation failsafe
By powering off during USB firmware update (even if this only lasts less than a second), it could be that the
firmware becomes corrupted. In this case the firmware employs a failsafe mechanism where it tries to first
start up the old firmware, and if that’s also corrupted, it will try and find an unzipped firmware on your USB
stick. Although we’ve never encountered such a situation, the failsafe mechanism has been tested. Should
you encounter this you can recognize it by the screen staying black, no matter which knobs you turn or which
buttons you push, and this persists after a cold restart (10 seconds power off).
1. Download the firmware zip file from our site https://www.tastychips.nl/ integral -
support-page/ Make sure this is the correct firmware for your hardware! The file will be named
“INTEGRAL_fw_x.y.z.zip”, depending on the firmware revision.
2. Unzip it and make sure all files are present in the root of your USB stick.
3. Also make sure the original firmware zip is still on the stick. The ECR will use it to try and install the
firmware again.
4. While the ECR is powered, insert the stick. It should now run the firmware from the USB stick.
5. Wait until you see the update screen and follow the instructions.
13
Note: the Integral will remove the zip file from the stick, to not get stuck in a loop.

Recommended Hardware
Integral is designed to work with a wide variety of power supplies and USB drives, however the exact
hardware can sometimes give unexpected results. We have compiled a list of devices that have been tested
and verified to work with Integral, if you have good results with other hardware, feel free to email us at
[email protected] to have them added to the list.
For all USB Sticks, they have to be formatted in FAT, ExFat, and Linux Ext filesystems.
USB Drives:
•Kingston DataTraveler Micro (Available From TastyChips)
•Kingston DataTraveler SE9
•SanDisk Ultra Fit
Power Supplies:
•Meanwell GST18A09 (Available From TastyChips)
•Boss PSA-230S
•Truetone TRT-02 1 SPOT
•Truetone 1 SPOT Pro CS7
14

Troubleshooting
The Integral receives a full functional test when leaving the factory. The firmware has been meticulously
tested for stability over a 24 hour period with all kinds of inputs and control changes. However, in the rare
case of a crash or hang, or any other strange glitch, please contact us at [email protected].
Things to keep in mind
•Always turn the unit off for at least 10 seconds before powering back up again. Otherwise it might
start up with unresponsive controls.
•Do not power off the Integral or remove the USB drive when storing a recording or preset. If you
don’t, you run the risk of losing data.
•The Integral can be quickly reset without powering down. Hold down the Play [►] button, the A, and
B footswitch for 4 seconds. The screen will black out for a while, but the main screen will quickly re-
appear.
Features
•Long true-stereo natural reverbs (23s max).
•Dual simultaneous reverbs (foreground and background), with their own presets.
•Multi-channel display with envelope and parameter-value overlays, and a clipping indicator.
•Mono or stereo in- and output, accepts line or instrument level.
•Switchable analog dry through.
•Attack-Release Envelope.
•Cross fade knob (cross fades between the foreground and background response)
•Predelay up to 2 seconds.
•Rotary encoder to quickly select responses (internal impulses and the ones present on USB/SD).
•High-pass (12 dB/oct) filter with adjustable cutoff.
•Real-time pitch adjustment of response (-2 to +2 octaves).
•Record and use responses from USB.
•Audition feature to quickly evaluate responses.
•48 kHz stereo input.
•1.3″ true color 128×128 pixel LCD.
•Saves samples as 32 bit float stereo WAV files.
•10 bit resolution and ~50 Hz refresh on potentiometer action.
•9 or 12v powered, 500mA minimum.
15

Credits
The internal samples are creative commons (CC BY-SA 3.0) https //creativecommons.org/licenses/by-sa/3.0/
licensed responses that were available from openairlib.net. They’re all resampled to the Integral’s
native sample rate of 48 kHz.
Falkland Palace Bottle Dungeon Dr. Damian T. Murphy
Falkland Palace Royal Tennis Court Dr. Damian T. Murphy
Hamilton Mausoleum Dr. Damian T. Murphy
R1 Nuclear Reactor Hall Audiolab, University of York, Dr. Damian T. Murphy
Terry’s Factory Warehouse Audiolab, University of York, Dr. Damian T. Murphy
York minster Audiolab, University of York, Damian T. Murphy
Lady Chapel, St Albans Cathedral Audiolab, University of York, Marcin Gorzel
Gavin Kearney
Aglaia Foteinou
Sorrel Hoare
Simon Shelley
1st Baptist Church, Adam Townsell
Xuan Liu
Mine Site2 _1way bformat , Andrew Chadwick
Simon Shelley
St Georges (close) (far) (medium) Adam Townsell
St Patrick Church (1), (2), (3) Audiolab, University of York, Aglaia Foteinou
Dr. Damian T. Murphy
Middle tunnel ? Author unknown, Please contact us!
Micro Small/Large/Gate/Reverse Joeri Braams
Tapedelay Long/Short Dark/Short Thin Joeri Braams
Everything else Copyright © Tasty Chips Electronics 2018-2023
Contact
16
Table of contents


