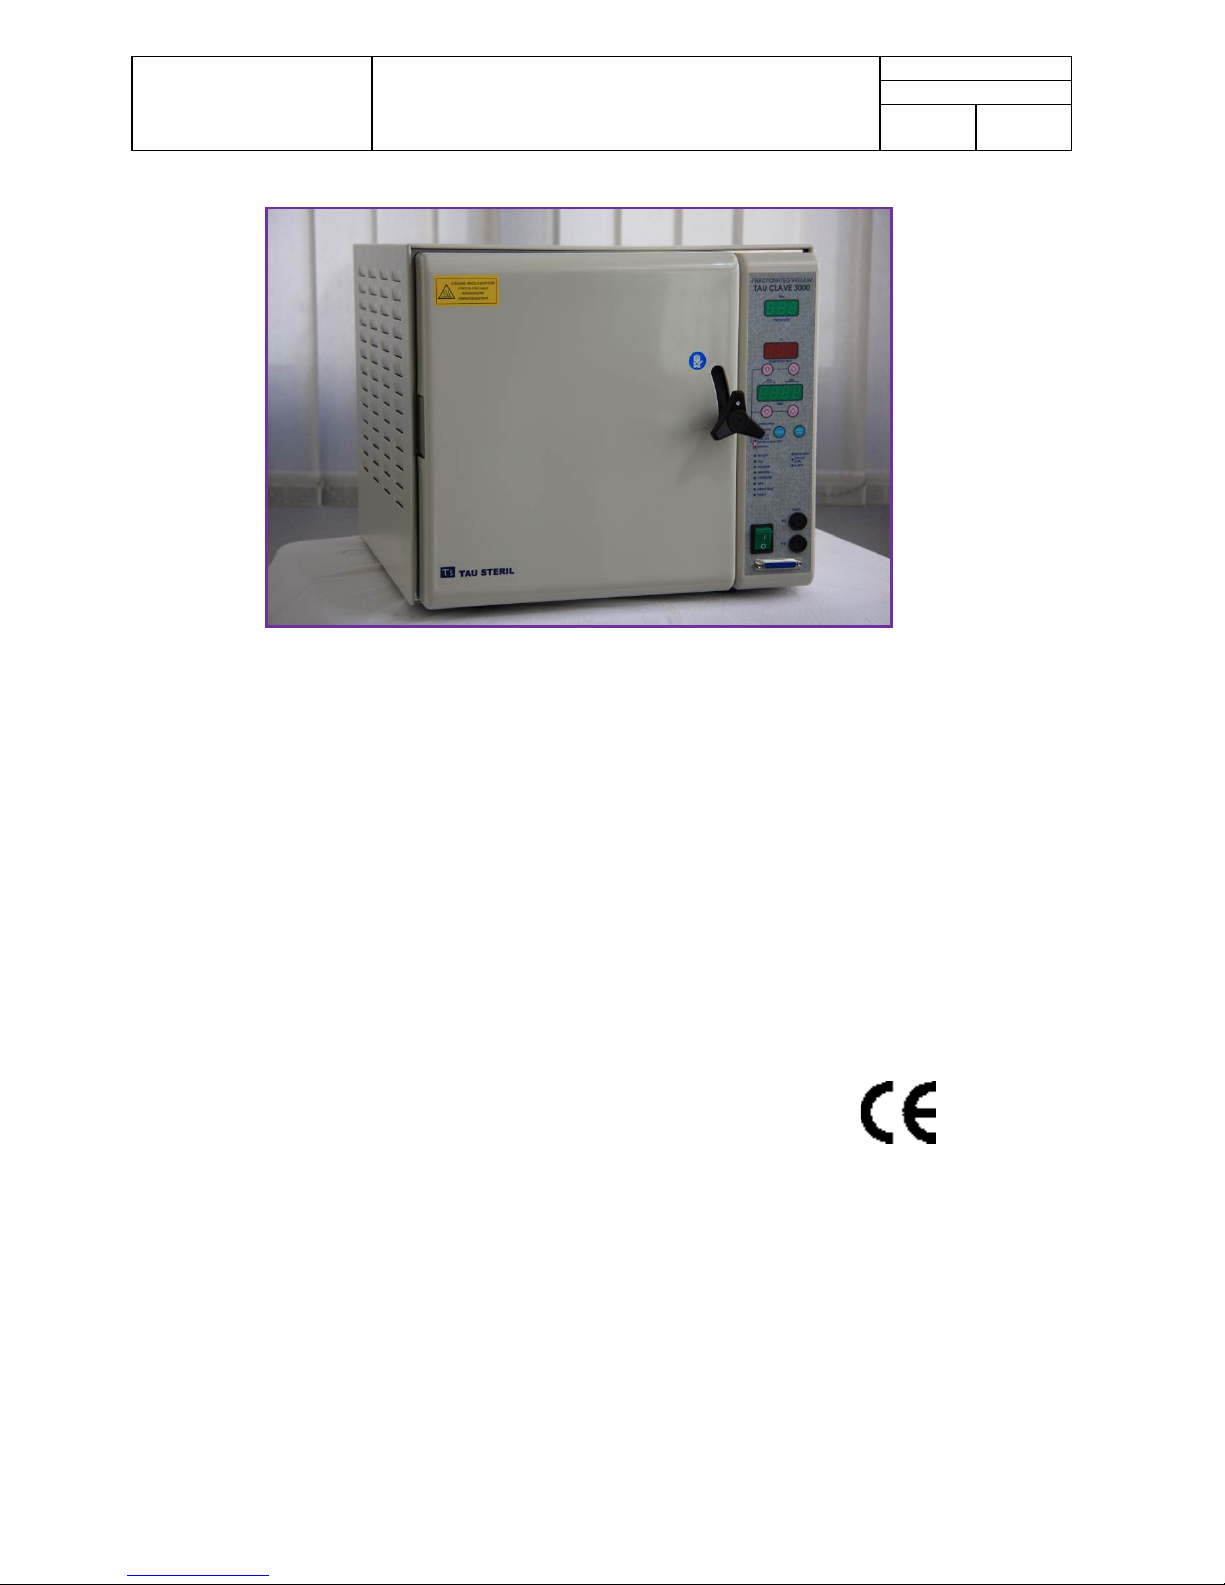
TAU STERIL Tau Clave 3000 User manual
TAU STERIL s.n.c
Via Gorizia, 6/a
Fino Mornasco ( CO )
Instructions for Use
TAU CLAVE 3000 Fractionated Vacuum
Data: 30.03.15
Pag. 1 di 14
Rev. 3
N° 1
1
This document may not be reproduced in partial form without the authorization of TAU STERIL.
Instructions for Use
Tau Clave 3000 Fractionated
Vacuum
0426
DIRECTIVE 93/42 EEC and S.M.I.
MEDICAL DEVICES

TAU STERIL s.n.c
Via Gorizia, 6/a
Fino Mornasco ( CO )
Instructions for Use
TAU CLAVE 3000 Fractionated Vacuum
Data: 30.03.15
Pag. 2 di 14
Rev. 3
N° 1
2
This document may not be reproduced in partial form without the authorization of TAU STERIL.
INDEX
Numero
Titolo
Pagina
1
warnings
3
2
Introduction 3
2.1
Normative requirements
3
2.2
Intended use materials to be sterilized 3
2.3
Responsibility of the manufacturer
3
2.4
Door opening and closure
4
3
Installation 5
4
Characteristics
6
4.1
Technical data 6
4.2
Environmental working conditions
6
4.3
Recommended times and characteristics of
programmes
6
5
Operating modes
7
5.1
General information
7
5.2
Visualizations
7
5.3
Alarms visualization modes 8
5.3.1
Alarms and corresponding summary codes
8
5.4
Operating instructions
9
5.5
Description of Tau Clave 3000 Fr.Vacuum cycle
9
6
Transport and storage conditions
10
7
Maintenance and cleaning 10
8
Wire diagram
12
9
Control panel
12
10
Safety rules and precautions
13
10.1
Decommissioning and scrapping of the appliance
13
10.2
Legend of symbols 14

TAU STERIL s.n.c
Via Gorizia, 6/a
Fino Mornasco ( CO )
Instructions for Use
TAU CLAVE 3000 Fractionated Vacuum
Data: 30.03.15
Pag. 3 di 14
Rev. 3
N° 1
3
This document may not be reproduced in partial form without the authorization of TAU STERIL.
1Warnings
Tau Clave 3000 Fractionated Vacuum is an Autoclave. Carefully clean the sterilization chamber and the instruments to
sterilize. USE ONLY DEMINERALIZED WATER.
2Introduction:
2.1 Normative References
The autoclave Tau Clave 3000 Fractionated Vacuum is conforming to the essential requirements of the Directives of the
Council: Medical devices 93/42/CEE and S.M.I., class II b it is conforming besides to the national norms that are translated in
the harmonized norms:
EN 13060 ( Class S )
EN 61010-1
EN 61010-2-040
EN 61326 – 1
IEC 62304
EN 60601-1-6
IEC 62366
UNI CEI EN ISO 14971
The autoclave Tau 3000 Fractionated Vacuum complies with RoHS 2011/65 / EU of the European Parliament and of the
Council of 8 June 2011 on the restriction of the use of certain hazardous substances in electrical and electronic equipment.
2.2 Expected use of materials to sterilize
The equipment is used to sterilize surgical instruments in the medical-paramedical sector. The materials to be sterilized must
withstandoperating temperatures ranging from 105°C to 134°C.
Do not load toxic materials into the autoclave. TAU STERIL shall not assume any responsibility in this respect.
2.3 Manufacturer’s Responsibility
The equipment is manufactured in compliance with European regulations.
The use of this equipment is restricted to the functions for which it was originally designed and manufactured. The user shall
be responsible in case of any possible risks and dangers caused by an improper use of the autoclave.
The product warranty is of twelve months starting from the date of purchase.

TAU STERIL s.n.c
Via Gorizia, 6/a
Fino Mornasco ( CO )
Instructions for Use
TAU CLAVE 3000 Fractionated Vacuum
Data: 30.03.15
Pag. 4 di 14
Rev. 3
N° 1
4
This document may not be reproduced in partial form without the authorization of TAU STERIL.
2.4 Door opening and closure
OPENING MOVEMENT CLOSING MOVEMENT
TAU STERIL s.n.c
Via Gorizia, 6/a
Fino Mornasco ( CO )
Instructions for Use
TAU CLAVE 3000 Fractionated Vacuum
Data: 30.03.15
Pag. 5 di 14
Rev. 3
N° 1
5
This document may not be reproduced in partial form without the authorization of TAU STERIL.
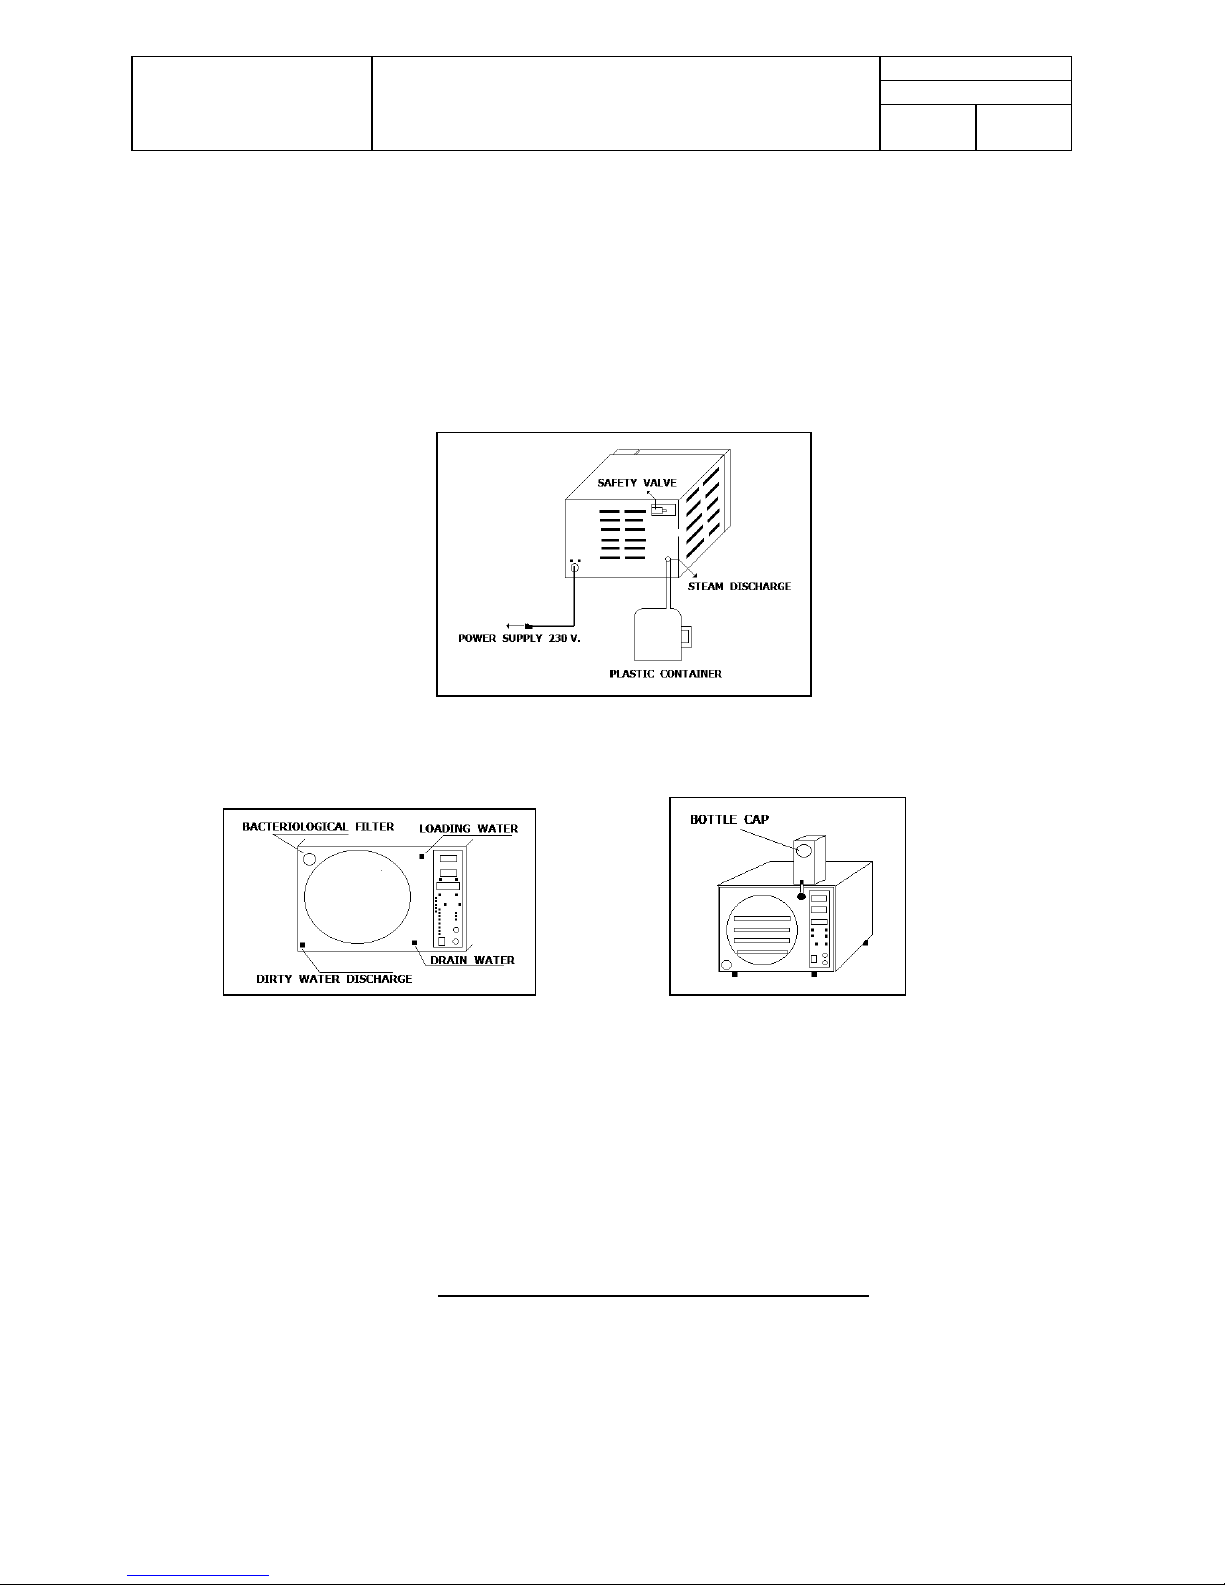
3Installation
Carefully remove the autoclave from its packing and make sure there are no signs of damage. Make sure earthing is correctly
made. Put the autoclave on a flat and horizontal surface, to facilitate aeration. Always respect a distance of at least 10 cm from
any wall or other equipment, to allow suitable ventilation.
Do not put objects or other items in the vicinity of the door, to prevent them from hindering opening of same.
To check that the tension of suitable feeding on the back label corresponds to that in hand in the place of installation
(maximum variation of the tension of net: ± 10%).
To insert the thorn in the attack of the electric net. To press the general interrupter bringing him/it in position “I” and to verify
the lighting of the same.
In case of missed observance of these dispositions TAU STERIL declines every liability.
Fig. 2
To give an inclination to the machine, it comes standard with two shims under the support legs front: it is important not to
touch the shims. On the rear side of the machine is located in a pipe for the steam to exit.
IMPORTANT: The tube must be positioned as shown in Figure 2.
Fig. 3 Fig. 4
-Fill the bottle with 2.5 liters of demineralized water, then close the bottle with the cap (see Fig. 4).
-Introduce the cannula orifice load autoclave. Unscrew the tap until the water begins to flow. The STOP appears on the
display time, followed by a beep, it indicates that the machine is fully charged.
-When you turn on the red LED Lew level H2O, followed by the code A 01 (shown on the display time), it means the lack
of water in the tank load.
-Fill the bottle with 1.5 l of demineralized water.
-Introduce the cannula orifice load the autoclave and unscrew the cap. The STOP appears on the display, which give you
the completion of the load (about 1.5 l of the alarm activation A 01).
-Tank drain recovery: Occurs alarm A 02 on the display of the time; It means that the machine must be emptied.
Without this procedure, the same remains in the alarm condition, and therefore unusable. It is advisable for a
better operation of the autoclave, the discharge of frequent recovery tank (dirty water).
-Caution: It is recommended before using the autoclave with load (first load water happened) of looping
"Unwrapped" (empty chamber without load) in order to sterilize the chamber.

TAU STERIL s.n.c
Via Gorizia, 6/a
Fino Mornasco ( CO )
Instructions for Use
TAU CLAVE 3000 Fractionated Vacuum
Data: 30.03.15
Pag. 6 di 14
Rev. 3
N° 1
6
This document may not be reproduced in partial form without the authorization of TAU STERIL.
4 Characteristics
4.1 Technical data
Weight: 45 Kg.
Outer dimensions: Width cm. 44 – Height cm. 38 – Depth cm. 43
Inner dimensions: Diameter of chamber cm. 24 – Depth cm 35.
Absorption: 1250 Watt
Power supply: 230 V. 50 Hz
4.2 Environmental Conditions of Work
-Temperature 5° - 40°
-Moisture (whit max T 31°) 80%
-Moisture ( whit max T 40°) 50%
4.3 Temperatures Times and Features programs
The autoclave is equipped with five sterilization programs, and a cycle of Bowie & Dick test.All programs have the void
before the sterilization step, and a step of vacuum during drying (DRY), alternating with phases of ventilation.To select the
cycle BOWIE & DICK TEST as follows:Place the program cycle HOLLOW: before viewing (5 sec.) Of the cycle has
finished, press the button decreases the time. Automatically displays the cycle 134 ° 3.5 'of BOWIE & DICK TEST.
PROGRAM
FRACTIONATED
VACUUM
STERILIZATION DRYING AND
VENTILATION
VACUUM
FINAL
UNWRAPPED
(Instruments unwrapped)
YES
134°
4Minutes
2.11 Bar
15 Minutes
YES
WRAPPED
(Tray wrapped)
YES
134°
18 Minutes
2.11 Bar
15 Minutes
YES
POROUS
(Synthetic fabrics)
YES
121°
7 Minutes
1.08 Bar
15 Minutes
YES
Bowie & Dick Test
YES
134°
3 Minutes
2.11 Bar
-
NO
HOLLOW
(Tools cables)
YES
121°
15 Minutes
1.08 Bar
15 Minutes
YES
SPECIAL
(suitable for delicate
materials)
YES
105°/135°
1 / 20 Minutes
0.20 / 2.25 Bar
15 Minutes
YES
WARNINGS: During the sterilization process TAU STERIL always recommended to insert in the sterilization chamber of the
autoclave (with the material to be sterilized) an indicator of detection of the sterilization process (in compliance with current
regulations).

TAU STERIL s.n.c
Via Gorizia, 6/a
Fino Mornasco ( CO )
Instructions for Use
TAU CLAVE 3000 Fractionated Vacuum
Data: 30.03.15
Pag. 7 di 14
Rev. 3
N° 1
7
This document may not be reproduced in partial form without the authorization of TAU STERIL.
5 Terms of Use
5.1 General information
The controls and displays are shown in the drawing on page. 10 they are:
Control buttons:
1
SELECT
to select the program of sterilization
2
START / STOP
to start / stop the sterilization cycle
3
TEMPERATURE DECREASE
to decrease the temperature of the sterilization program Special.
4
TEMPERATURE INCREASE
to increase the temperature of sterilization in the program Special.
5
DECREASE TIME
to decrease the time in the program Special.
6
INCREASE TIME
to increase the time in the program Special.
5.2 Views
1
PRESSURE
It indicates the pressure in bar.
2
TEMPERATURE
Shows the temperature of steam in the chamber, or by pressing the
right button (+ TEMP) shows the temperature of the heating element.
Also pressing the left button (-TEMP), you can see the selected
temperature cycle.
3
TIME
Indicating the sterilization time of the selected program. They also
bear the identification codes alarms, in addition to writing "FILL"
indicates that the entry of water into the sterilization chamber.
. LED Operation (green)
They indicate the progress of the program:
-LED off: being not yet executed
-Flashing LED: phase running
- LED on steady: phase completed
They are: READY = drying
FILL = filling (dose water)
VACUUM = vacuum
HEATING = heater
STERILIZE = sterilization
DRY = drying
END = end of the cycle
PRINT = print

TAU STERIL s.n.c
Via Gorizia, 6/a
Fino Mornasco ( CO )
Instructions for Use
TAU CLAVE 3000 Fractionated Vacuum
Data: 30.03.15
Pag. 8 di 14
Rev. 3
N° 1
8
This document may not be reproduced in partial form without the authorization of TAU STERIL.
. LED Alarm (red)
Report any anomalies:
they are: DOOR = door open
LOW H20 LEVEL = low level H2o
ALARM = generic alarm identified by the code on the display time
The front panel also has a cup connector (optional), suitable for the attachment of an external printer. It also has a switch with
fuses (2x10A. 6.3x32).
5.3 Display mode alarm
Each alarm is displayed in the machine in the following way:
-The time display shows the alarm code (ex: A01, A02 etc.).
-It has issued a long beep followed by 10 short, eventually silenced.
-In case of alarm A00 (door open) or A01 (insufficient water level) which are the most frequent, also they flash their
LEDS and DOOR LOW LEVEL H20.
-In other cases, the ALARM LED flashes and the cause of the alarm must be obtained from the code on the display, or if
present, from the printer that prints in detail the reason for alarm.
-The machine remains in this state until the occurrence of the condition of the termination / acknowledgment, specified
individually for each alarm.
- If this (alarm) occurs during the cycle, the latter is interrupted and the pressure discharged.
5.3.1 Alarms and codes Summary
CODE ALARM
INDICATIONS
A00
Door open: occurs if the start of the cycle, the door is open. Disappears by
pressing any key or by closing the door.
A01
Low water: occurs if at the start of the cycle, the water level in the cargo
tank is insufficient. Disappears by pressing any key or by resetting the
level. If during the refueling operations is peaked, the time display shows
"STOP" and the beeper sounds in the manner of an alarm. 2 ceased
beeper "STOP" disappears, and returns to its normal state.
A02
Tank full exhaust: occurs when the level of water in the recovery tank is
excessive. Disappears just emptying the tank.
A03
Black-Out: occurs in cases of abandoned cycle by Black-Out.
Disappears opening the door or pressing any key. *
A04-A05
Long time for the heating is energized with any key. *
A06
High pressure: it excites with any key. *
A07
High temperature: energizes with any key. *
A08
Abnormal pressure: energizes with any key. *
A09
Abnormal temperature: energizes with any key. *
A10
Stage vacuum not successful. *
A12
High temperature PTV: it disappears by pressing any push button *
A13
High temperature PTC: it disappears by pressing any push button *
* = Repeat cycle, the material to be sterilized is not sterile. If the problem persists, contact
manufacturer.
N.B: A00, A01, A02 do not cause (in the presence of printer) no print activity.
TAU STERIL s.n.c
Via Gorizia, 6/a
Fino Mornasco ( CO )
Instructions for Use
TAU CLAVE 3000 Fractionated Vacuum
Data: 30.03.15
Pag. 9 di 14
Rev. 3
N° 1
9
This document may not be reproduced in partial form without the authorization of TAU STERIL.
There are also other alarms that are related to the components of the electronic board; they are:
CODICE ALLARME
INDICAZIONI
A 20
Data loss *
A 21
Watchdog malfunction *
A 22
Defective sensors *
A 23
Batteries Clock *
A 24
Software*
* = Repeat cycle, the material to be sterilized is not sterile. If the problem persists, contact the manufacturer.
5.4 Instruction Manual
1Clean the material to be sterilized.
2Turn on the main switch.
3Load the cargo tank (capacity 2.5 machine completely empty), until the message "STOP" on the display time.
It occurs whenever the alarm Low H20 LEVEL add 1.5 liters of demineralized water. If you go over, it arises "STOP" that
is tank full load, then pull the tube out of the oil cargo.
4Whenever the alarm A02 occurs, download the recovery tank (better not wait for the alarm because nothing prevents you
download it at any time) with the appropriate tube.
5Load the media on the trays provided (without overlapping the pieces) and pull it into the sterilization chamber.
6Select the program: to do this press the select button
A single press of the button does not change the program, but it serves the display shows the temperature of the temperature
program: After five seconds the display temperature resumes its normal content. Within five seconds if the select button is
pressed again, the program is changed (indicated by LED). If the selected program is special, the contents of the display
temperature will flash to indicate that the sterilization temperature can be chosen between 105 ° - 134 ° with the + -
temperature. The same applies to the time with the + - time.
These variations can be carried out simultaneously in both the time for which the temperature
7Close the door after you have done so.
8Press Start: starts the selected cycle.
9Keep area within the opening of the door, to avoid (the opening of the door in hot machine) burns or other hazards:
WARNING: DURING USE USE GLOVES.
NOTE: At any time (ex: During sterilization or during DRY = dry) you can break the cycle by pressing the "STOP", a buzzer
will sound and the beeper in the presence of pressure will be downloaded automatically.
5.5 Description cycle TAU CLAVE 3000 Fractionated Vacuum
The phases of the cycle take place as follows:
At the start of the cycle we have the first vacuum phase (Cycle Unwrapped - Wrapped - Porous).
Follow the steps of fractionated vacuum with placing water cycle Hollow - Special).
This system is suitable for the sterilization of hollow bodies such as turbines, etc. autoclavable cannulas. etc.
The sterilization step takes place while maintaining the machine at a constant pressure. Then follows the drying phase is also
composed of different phases of vacuum and ventilation. A sterilization cycle completed (END appears on the display
"Temperature").
At this point part of the step of which consists in ventilation-condensation ventilate at intervals of 2 minutes (through the
pump-vacuum) the interior of the sterilization chamber of the autoclave until the temperature read on the display "temperature"
does not drop a degree below 70 degrees C °. This allows to obtain materials perfectly dry. The machine can still be open at
any time by opening the door (see movement opening - closing the door 2.1 p. 3).

TAU STERIL s.n.c
Via Gorizia, 6/a
Fino Mornasco ( CO )
Instructions for Use
TAU CLAVE 3000 Fractionated Vacuum
Data: 30.03.15
Pag. 10 di 14
Rev. 3
N° 1
10
This document may not be reproduced in partial form without the authorization of TAU STERIL.
6 Conditions for the Transport / Handling and Storage
The autoclave is supplied with packaging that requires the usual precautions for transport fragile materials, as indicated on the
packaging boxes himself. When returning for repair, use the original packaging. When storing, place the product in areas
without humidity to protect the electrical components.
The device is packed in the following manner:
Two caps of polyethylene (above and below) protected by a box around the volcano in triple wave.
Do not lift the machine with violent jerks and not flip.
The device and the packaging are delicate, handle with care. Carry no shock, impact. Store in a dry and protected. The
packaging should be stored. Using a different packaging, it could cause damage to the product during shipment.
The appliance must be extracted with the help of two people
- Remove the top cap.
- Extract the machine , taking care to keep it always in a horizontal position.
- Place the unit on the worktop.
- The device must be installed inside a laboratory accessible only to authorized personnel.
- Place the unit on a flat, horizontal surface.
- Leave a space of at least 20 cm around the apparatus for sufficient ventilation.
- Avoid placing the autoclave near sources of steam or splashing with water that may damage the internal electronics.
- Do not install in places with poor ventilation.
- Do not place it near heat sources.
7 Maintenance and Cleaning
Each type of maintenance must be carried out with power wire off, and the machine completely cold.
WARNING: Do not modify the equipment without the authorization of the manufacturer.
In case of malfunction, contact the manufacturer.
For repairs to make the sterilizer manufacturer in its original packaging.
Cleaning the sterilization chamber (to be repeated on a daily basis):
•A cold machine using a sponge with vinegar to remove limestone from the chamber
•Wash the sponge with demineralized water and clean the chamber itself (several times)
•Pass a clean cloth with some isopropyl alcohol (90%) within the sterilization chamber.
Maintenance of the bacterial filter:
•Replace the filter every 6 months
•If dirt (sucks outside air during the sterilization cycle) to replace the first.
A cold machine monthly check that the door seal is accurate in the hard (steel) that contains: if withdrawn replace with a new
one. We recommend replacing the gasket still every six months or after 200 sterilization cycles. Clean the seal on a daily basis
(the machine is cold) with alcohol repositioning it in its proper housing.
Check monthly (or even if you move the device) the electric power cable is intact and in good condition.
In case of malfunction contact the manufacturer.
For repairs, it is recommended to make the autoclave to the manufacturer, using the original packaging
TAU STERIL s.n.c
Via Gorizia, 6/a
Fino Mornasco ( CO )
Instructions for Use
TAU CLAVE 3000 Fractionated Vacuum
Data: 30.03.15
Pag. 11 di 14
Rev. 3
N° 1
11
This document may not be reproduced in partial form without the authorization of TAU STERIL.
It is always advisable to clean the instruments before putting it in the autoclave. Always clean the chamber (the machine is
cold) with vinegar, then rinse with water and alcohol.
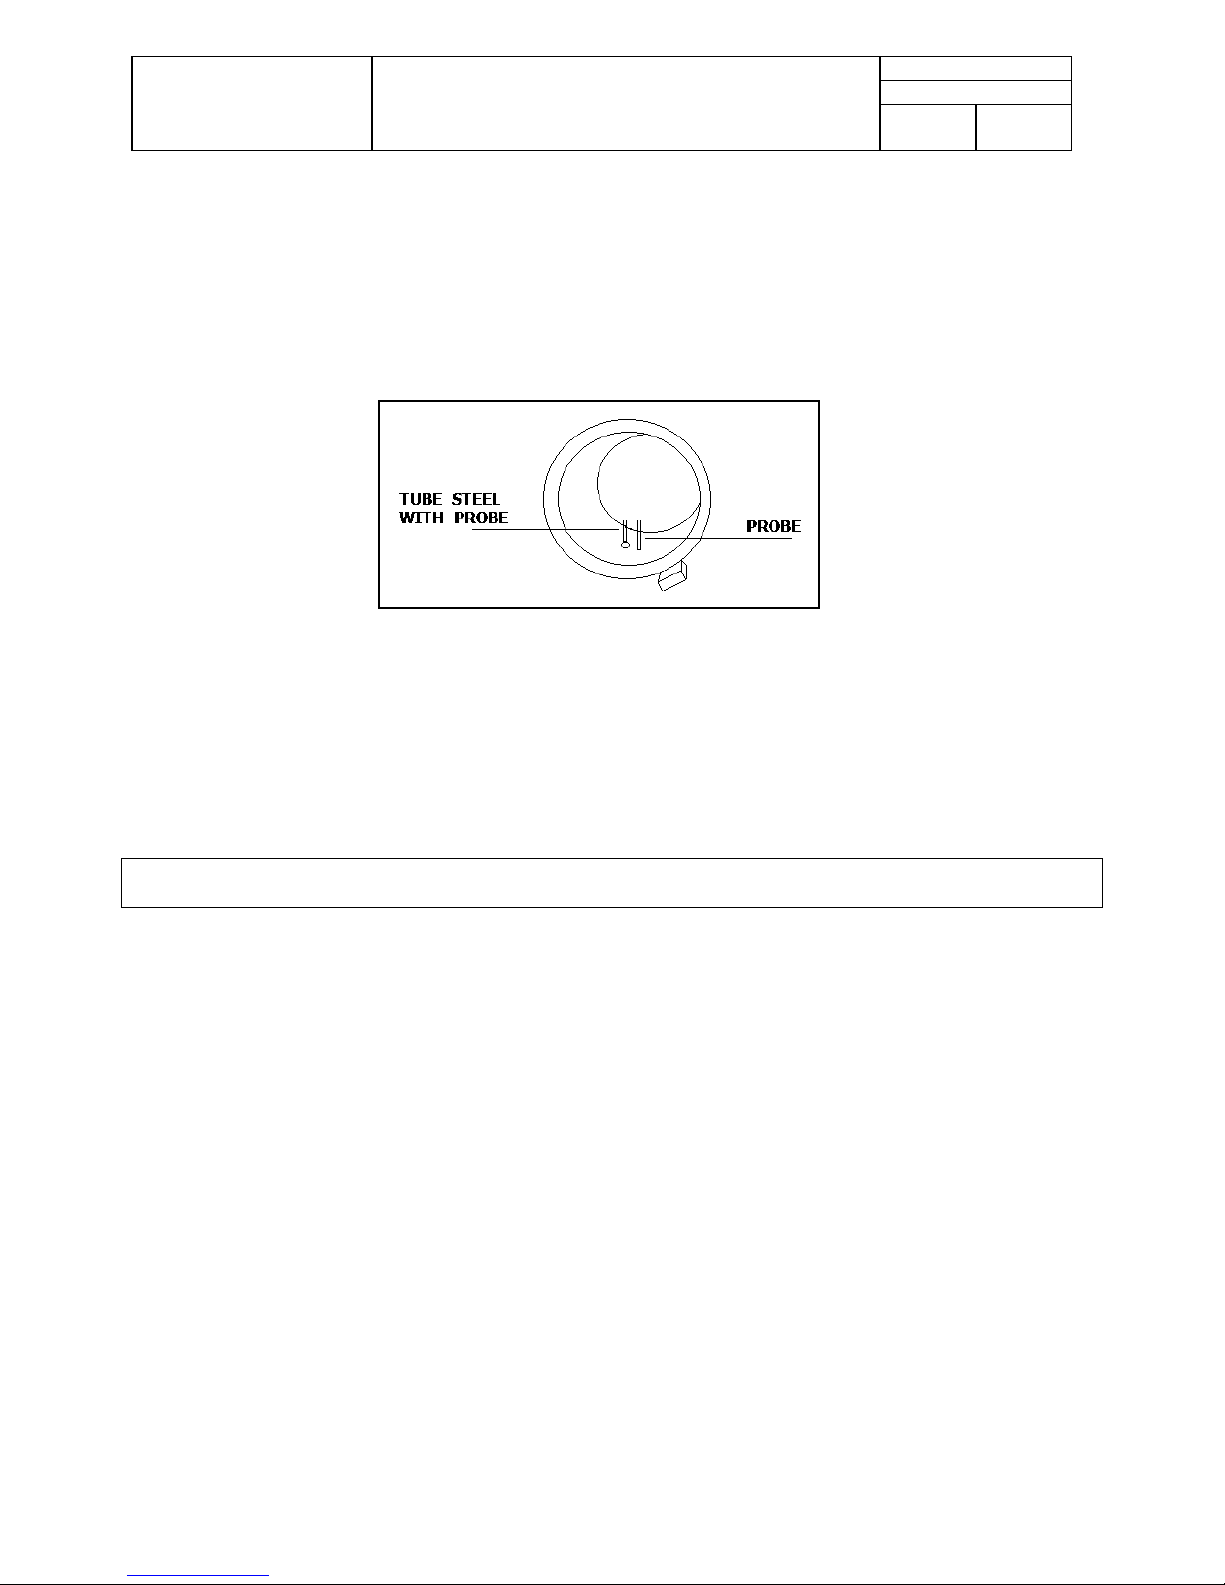
To safeguard against dirt components of the machine, it was put a small filter (unscrewable) on the tube at the side of the
probe inside the sterilization chamber (see fig. 5).
Fig. 5
Dismantling: With the cold machine, turn from left to right the steel tube (with the help of pliers if necessary), paying
attention to the probe closer. Remove the piece from the chamber, unscrew the filter, clean it with vinegar or if too dirty
replace it with a new one.
If you want you can avoid disassembling the tube with filter, pouring (machine cold) vinegar directly on the filter. To rinse
well with water.
Reassembly: repeat the contrary operations previously carried out, paying attention to the probe.
IMPORTANT: when you place the tube with the new filter, make sure that it is well established, keeping a distance
from the probe equal to 2.5 cm.
TAU STERIL s.n.c
Via Gorizia, 6/a
Fino Mornasco ( CO )
Instructions for Use
TAU CLAVE 3000 Fractionated Vacuum
Data: 30.03.15
Pag. 12 di 14
Rev. 3
N° 1
12
This document may not be reproduced in partial form without the authorization of TAU STERIL.
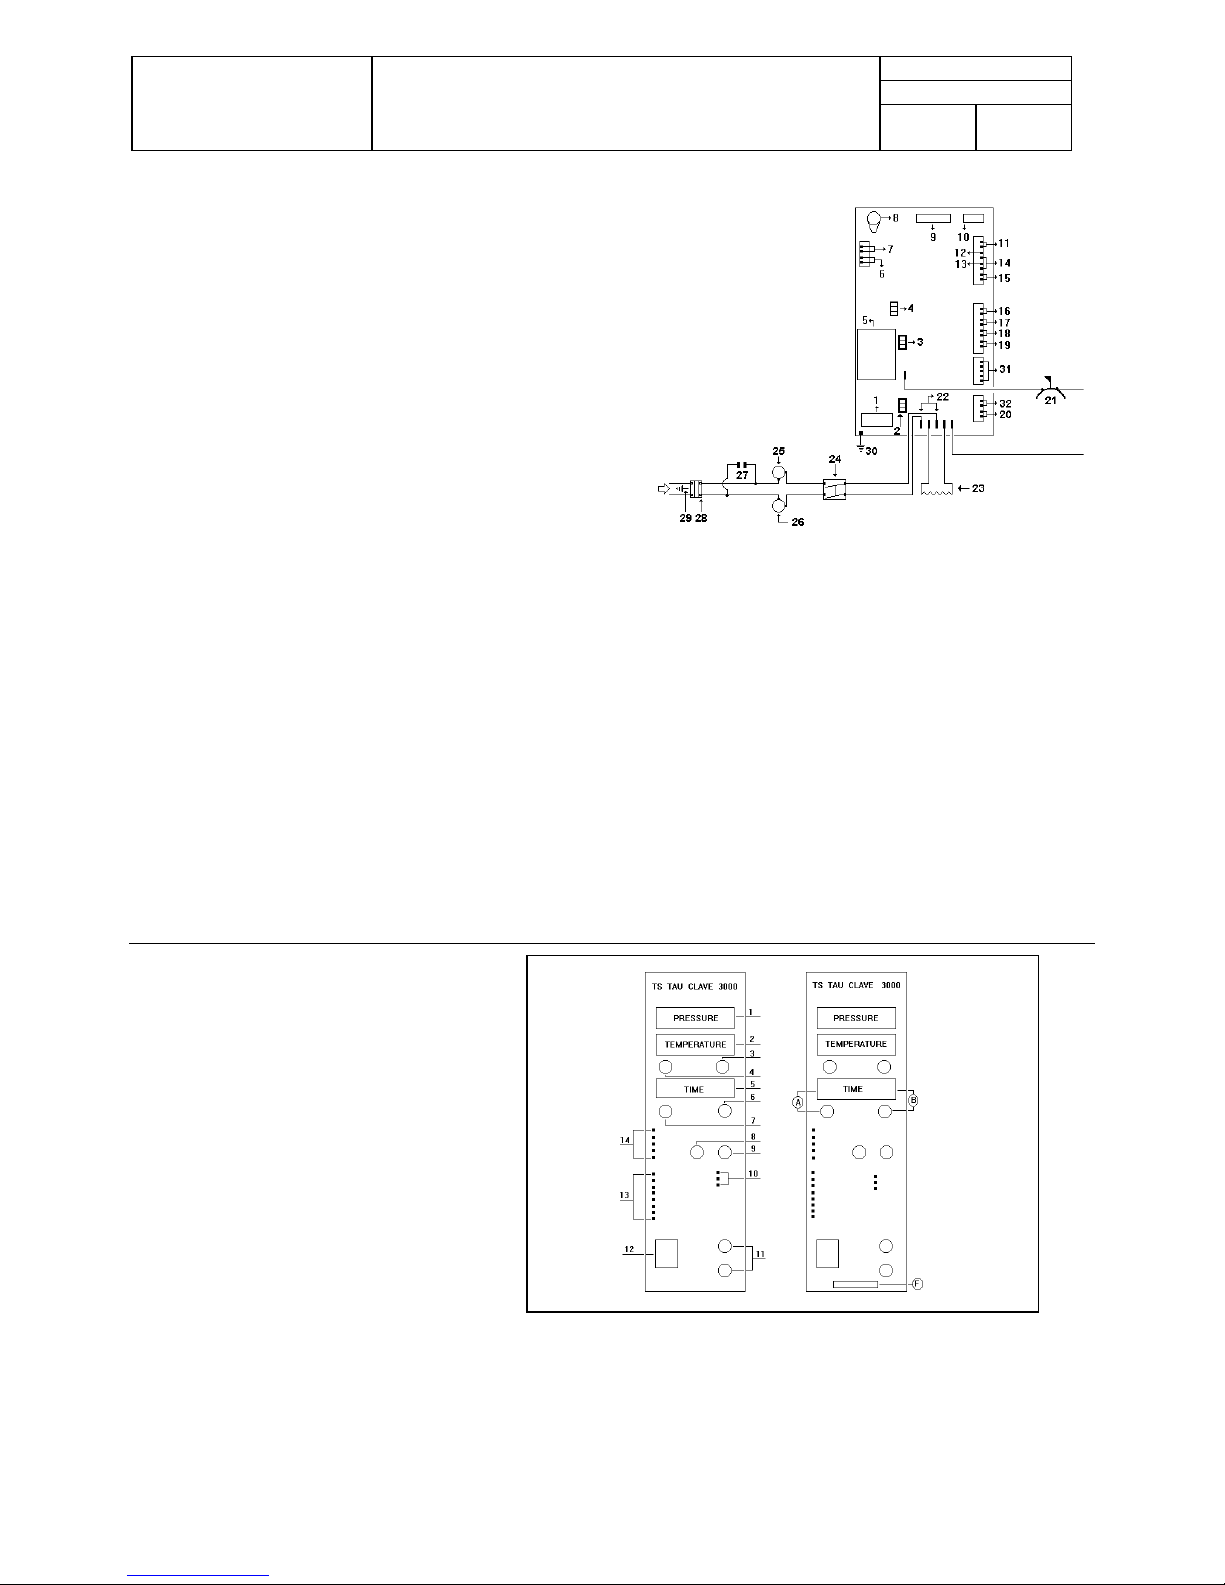
8 Wiring Diagram
LEGEND
1. Line Filter
2. Fuse 5x20 extrafast 4 A.
3. Fuse 5x20 semi-delayed 3.15 A.
4. Fuse 5x20 semi-delayed 1.6 A.
5. Transformer
6. P.T.100 internal probe (temperature steam)
7. Probe P.T.100 external (temperature resistance)
8. pressure
9. Attack printer connector
10. Attack display connector
11. Floating maximum discharge
12. Floating minimum load
13. Floating maximum load
14. Floating common load connection
15. Micro-switch door
16. Electric valve N.A. (Normally open) 2 Way 24V DC.
17. Output optional 24V. cc.
18. Electric valve N.C. 2 Way 24V DC.
19. Electric valve N.C. 2 Way 24V DC.
20. 230 V power supply (feeding t
he vacuum pump and the
electric valve nc 2 Vie)
21. Bimetallic security
22. Power supply 230 V 50 Hz.
23. Resistance 230V 1250 Watts.
24. switch
25. Fuse 6.3x32 quick 10 A.
26. Fuse 6.3x32 quick 10 A.
27. Capacitor 0.1 mF 250 VAC class x2
28. Cable clamp Power
29. Mass ground
30. Mass ground
31. Electric valve N.C. 2 Way 24V DC.
32. 230 V power supply (feeds the water pump)
9 Control Panel
- LEGEND
1 = Pressure Display
2 = temperature display
3 = + - Temperature
4 = Display time
5 = + - Time
6 = Selection Program
7 = START / STOP
8 = Led Alarms
9 = Fuses
10 = Switch General
11 = Led Operation
12 = Led Program

TAU STERIL s.n.c
Via Gorizia, 6/a
Fino Mornasco ( CO )
Instructions for Use
TAU CLAVE 3000 Fractionated Vacuum
Data: 30.03.15
Pag. 13 di 14
Rev. 3
N° 1
13
This document may not be reproduced in partial form without the authorization of TAU STERIL.
- For Changing Printer Settings
A = To change YEAR - MONTH - DAY - HOUR - MINUTES -
B = To move to the next parameter to be changed
F = Attack Printer
10 Rules and Safety Precautions
• During use, wear gloves, to avoid sunburn (on the outer jacket is labeled precautionary "WARNING DANGER BURNS).
The autoclave should be used only by authorized staff and informed about the techniques of "sterilization" of
materials that can be sterilized and times and temperatures to be used.
The equipment must be used exclusively for the use for which it was conceived: sterilization of surgical instruments in the
medical and paramedical staff.
It's essential to take all necessary precautions to prevent misuse by unauthorized persons. It ' s forbidden to modify or alter in
any way the security guards thermal and electrical equipment or put them out of order. It’ s forbidden the operator to carry out
repairs of any kind.
During cleaning and / or maintenance, it is absolutely essential to ensure that the equipment is disconnected from the power
supply, and it is completely cooled.
In the case of sterilization of surgical instruments (eg scalpel or pointed instruments), we recommend the use of safety shoes.
Periodically check that the power cord is not damaged in any way.
WARNING: There shall be no change in this unit.
In case of malfunction, contact the manufacturer.
For repairs to make the sterilizer manufacturer in its original packaging.
10.1 Decommissioning and scrapping Device
The autoclave Tau Clave 3000 Fractionated Vacuum is constructed of ferrous materials, electronic components and plastics. If
the appliance is no longer repairable and running, separate the various components according to the material of which they
consist, in order to simplify a possible re-use or disposal differentiated. When the unit is demolished there are no special
instructions to be executed.
Do not leave the unit in an unguarded. Entrust scrapping to disposal companies. Scrapping always refer to the laws in force in
the country of use

TAU STERIL s.n.c
Via Gorizia, 6/a
Fino Mornasco ( CO )
Instructions for Use
TAU CLAVE 3000 Fractionated Vacuum
Data: 30.03.15
Pag. 14 di 14
Rev. 3
N° 1
14
This document may not be reproduced in partial form without the authorization of TAU STERIL.
10.2 Explanation of Symbols
WARNING: READ THE INSTRUCTIONS
WARNING: DANGER BURNS
CAUTION: RISK OF ELECTRIC SHOCK
WARNING: USE GLOVES FOR HAND PROTECTION
PRODUCT NOT COMPARABLE TO MUNICIPAL WASTE.
FOLLOW THE RULES FOR MUNICIPAL DISPOSAL
Table of contents
Other TAU STERIL Laboratory Equipment manuals

Popular Laboratory Equipment manuals by other brands

Hettich
Hettich ZENTRIMIX 380 R operating manual

Labconco
Labconco FreeZone 7750000 user manual

Agilent Technologies
Agilent Technologies 1260 Infinity II user manual

ThermoFisher Scientific
ThermoFisher Scientific Thermo Scientific MicroClick instruction manual

WESCOR
WESCOR Vapro 5520 user manual

Yamato
Yamato IL603 instruction manual

Kartell
Kartell technotrate operating manual

Cuisinart
Cuisinart CS-7 SERIES Instruction booklet

Thermo Scientific
Thermo Scientific 75007202 instruction manual

Safelab
Safelab XP4 Operator's manual

BRIGHT
BRIGHT M3500 MICROTOME Operating, Maintenance and Spare Parts Manual

Live Photonic
Live Photonic Sequencer LPS-200H user manual


