manuals.online logo
Brands
  1. Home
  2. •
  3. Brands
  4. •
  5. Tavistock
  6. •
  7. Indoor Furnishing
  8. •
  9. Tavistock SL44AL Parts list manual

Tavistock SL44AL Parts list manual

SL44AL
Customer Services
Tavistock, Brassmill Lane Trading Estate, Bath, BA1 3JF
t. 01225 787 870 e. info@tavistock-bathrooms.co.uk w: www.tavistock-bathrooms.co.uk
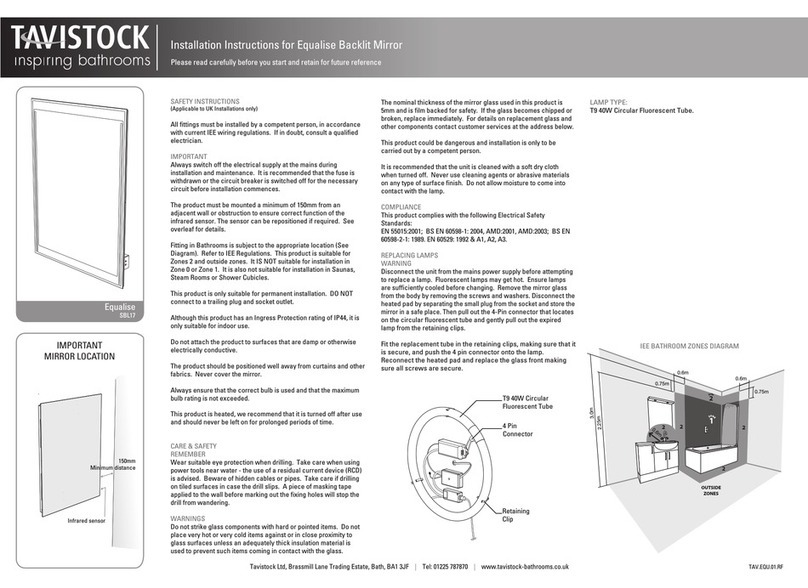
22
2
OUTSIDE
ZONES
2
ZONE
1
0.75m
2.25m
3.0m
0.6m
0.6m
0.75m
Bathroom Zones Diagram
Distances from a bath tub or shower tray
ELECTRICAL SAFETY INSTRUCTIONS
(Applicable to UK Installaons only)
All fings must be installed by a competent person, in accordance with current IEE
wiring regulaons. If in doubt consult a qualified electrician
IMPORTANT
Always switch off the electrical supply at the mains during installaon and
maintenance. It is recommended that the fuse is withdrawn or the circuit breaker is
switched off for the necessary circuit before installaon commences.
Fing in Bathrooms is subject to the appropriate zone in accordance with IEE
Regulaons. This product is suitable for zone 2 and outside zones. IT IS NOT suitable
for installaon in Zone 0 or Zone 1. It is also not suitable for installaon in saunas,
steam rooms or shower cubicles. This product is only suitable for permanent
installaon. DO NOT connect to a trailing plug and socket outlet. Although this
product has an Ingress Protecon rang of IP44 it is only suitable for indoor use. Do
not aach the product to surfaces that are damp or otherwise electrically conducve.
INSTALLATION CARE & SAFETY
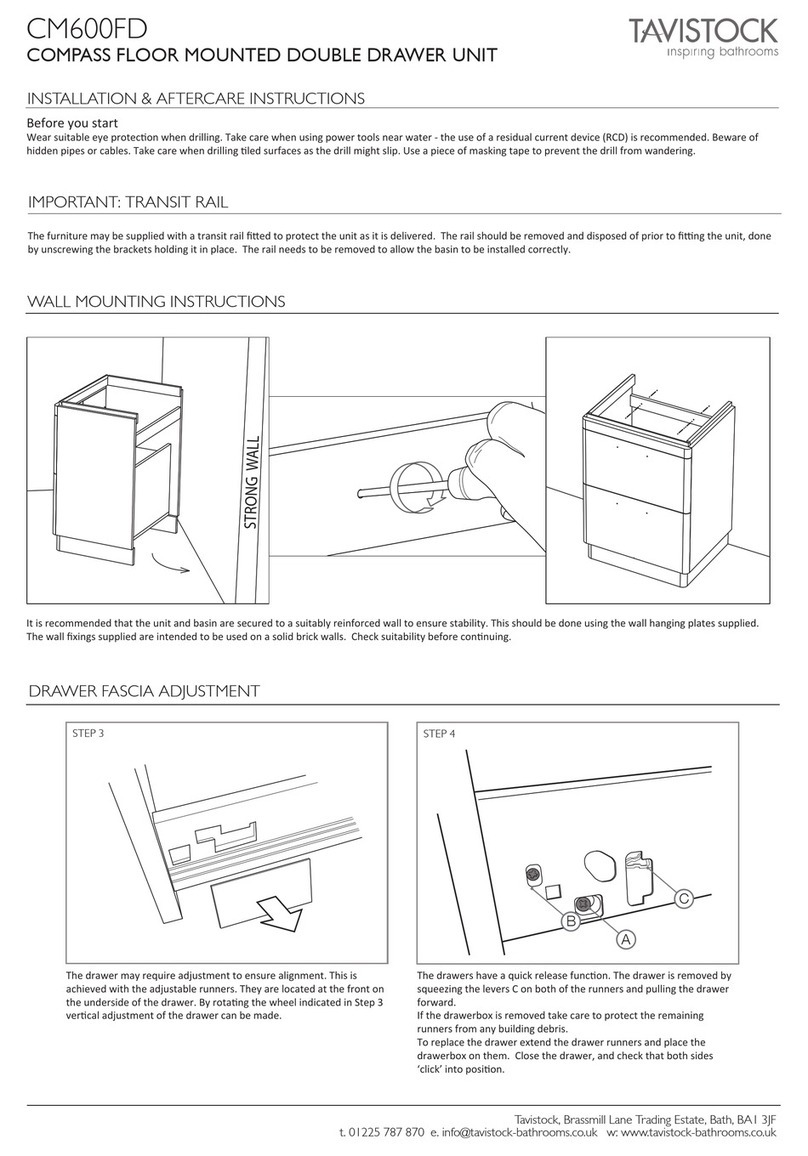
Wear suitable eye protecon when drilling. Take care when using power tools near
water - the use of a residual current device (RCD) is advised. Beware of hidden cables
or pipes. Take care if drilling on led surfaces in case the drill slips. A piece of masking
tape applied to the wall before marking out the fixing holes will stop the drill from
wandering.
DO NOT strike glass components with hard or pointed items. DO NOT place very hot
or very cold items against or in close proximity to glass surfaces unless an adequately
thick insulaon material is used to prevent such items coming in contact with the
glass.
The nominal thickness of the mirror glass used in this product is 3mm and is film
backed for safety. If the glass becomes chipped or broken replace immediately.
This product should be posioned well away from curtains and other fabrics. Never
cover the mirror. This product is heated, we recommend that it is turned off aer use
and should never be le on for prolonged periods of me
This product could be dangerous and is only to be installed by a competent person.
CLEANING
It is recommended that the unit is cleaned with a so, dry, non abrasive cloth when
turned off. Never use cleaning agents or abrasive materials on any type of surface
finish. Do not allow moisture to come into contact with the electrical components.
COMPLIANCE
This product complies with all relevant Brish and European safety standards.
WIRING
LIGHTS
12V LED Lamp
To obtain a replacement lamp if faulty or broken contact customer services (see details
at foot of page)
SL60AL
SLEEK ILLUMINATED CABINET
INSTALLATION & AFTERCARE INSTRUCTIONS
V1 / 11.15
Strip wires to a suitable
length. DO NOT connect
to a plug & socket outlet.
THIS PRODUCT IS MANUFACTURED TO CLASS I
CATEGORY AND MUST HAVE AN EARTH CONNECTION.
! IF IN DOUBT CONSULT YOUR ELECTRICIAN !
Colour Coding:
L - Live = Brown
N - Neutral = Blue
- Earth = Green & Yellow
Customer Services
Tavistock, Brassmill Lane Trading Estate, Bath, BA1 3JF
t. 01225 787 870 e. info@tavistock-bathrooms.co.uk w: www.tavistock-bathrooms.co.uk V1 / 11.15
SLEEK ILLUMINATED CABINET
INSTALLATION & AFTERCARE INSTRUCTIONS
Measure this distance for posion
of ends of wall brackets
HINGE ADJUSTMENT
WALL MOUNTING
A
B
Internal securing
screw (step 6)
D
C
1
1
2
2
To make adjustment 1
simply turn screw C
To make adjustment 2
simply turn screw D
1) Remove the packaging taking special care with the doors and separate shelves. Open the cabinet doors and ensuring you haven’t
connected the power remove the screws on the front edge and lower the cover. Take care not to lose the screws.
2) Using a spirit level, mark off a horizontal line approximately 50mm below where the top of the cabinet is to be. Posion the
bracket hole centres so that they are centred on the line, and ensure that the ends of the brackets are spaced to the width between
the inner edges of the vercal aluminium extrusions (see illustraon). Mark off the holes using a pencil.
3) Note: Wall plugs supplied are only suitable for solid stone / brick walls. For plasterboard walls use specialist wall plugs, available
from DIY or hardware stores. Seek advice from a specialist about the suitability of fixings to be used. Drill the required holes and
insert wall plugs.
4) Screw the brackets to the wall using the screws provided. Please ensure the screws are fully ght but take care not to overghten.
Two screws must be used in each bracket.
5) Before making any electrical connecons (or performing any maintenance) it is necessary to turn off the mains electricity supply.
This unit is provided with a supply cable already fied. This cable should be fied to the household lighng circuit or to a fused 3
AMP supply. Connecons should be made in accordance with the latest IEE regulaons. This cabinet is manufactured to CLASS 1 and
requires an earth connecon.
6) Hang the cabinet on the wall brackets. The claws on the cabinet hangers must be securely located on the wall brackets. Using a
spirit level adjust the angle of the cabinet by turning screw A with a cross head screwdriver. When the angle is properly adjusted,
screw through the lower secon of the cabinet backboard and mark the wall. Remove the cabinet from the wall, drill a suitable hole
in the marked locaon and fit a wall plug. Re-hang the cabinet making sure to ghten screw B on both hangers and secure the base
of the cabinet to the wall with the supplied screw and cover-cap. The cabinet should not be le unaended unl it is fully secure.
7) When the cabinet is fully secure the internal top cover should be closed and secured with the 3 small screws removed earlier.
When the cover is closed and secure restore the mains power and test the funcon of the lights and the shaver socket.
8) Fing the glass shelves. Firstly insert a shelf into the top two shelf support brackets then slide upwards so the grub screws on the
underside of the support brackets can be sufficiently ghtened to hold glass in place. Repeat for the boom shelf (NOTE: be careful
not to overghten). Shelves can be posioned accordingly by sliding the supports up or down (NOTE: Take care to use both hands
when sliding shelves and ensure that support brackets at both ends slide simultaneously). Once shelves are in their desired locaons
to secure in posion by ghtening screws. A spirit level should be used to ensure shelves are level.
9) If the doors are out of alignment first remove the so-close buffer (from the upper hinges) which clips into the main hinge plate.
The so-close hinges offer adjustment in 2 direcons via adjustment screws C and D (see diagram).

This manual suits for next models

1

Other Tavistock Indoor Furnishing manuals

Tavistock CM450F Parts list manual

Tavistock

Tavistock CM450F Parts list manual

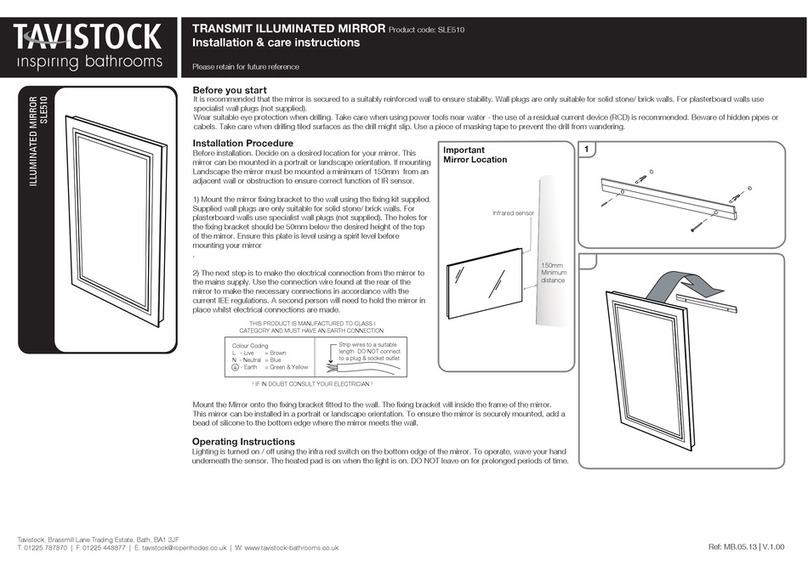
Tavistock SLE510 Installation guide

Tavistock

Tavistock SLE510 Installation guide

Tavistock Compass CM600FD Parts list manual

Tavistock

Tavistock Compass CM600FD Parts list manual

Tavistock Equalise Service manual

Tavistock

Tavistock Equalise Service manual

Tavistock AMBIENT Parts list manual

Tavistock

Tavistock AMBIENT Parts list manual

Tavistock CM800W Parts list manual

Tavistock

Tavistock CM800W Parts list manual

Tavistock PRIDE SLE570 Installation guide

Tavistock

Tavistock PRIDE SLE570 Installation guide

Tavistock KOBE 450 Installation guide

Tavistock

Tavistock KOBE 450 Installation guide

Popular Indoor Furnishing manuals by other brands

System Build 7532396COM manual

System Build

System Build 7532396COM manual

Amart Furniture 67933 Assembly instruction

Amart Furniture

Amart Furniture 67933 Assembly instruction

Monarch Specialties I 1344 Assembly instructions

Monarch Specialties

Monarch Specialties I 1344 Assembly instructions

DHP B34324109800 manual

DHP

DHP B34324109800 manual

LE MARQUIER BAP3585 instructions

LE MARQUIER

LE MARQUIER BAP3585 instructions

Chewy frisco 541462 instruction manual

Chewy

Chewy frisco 541462 instruction manual

Furniture of America YNJ-2092C35 Assembly instructions

Furniture of America

Furniture of America YNJ-2092C35 Assembly instructions

CB2 CENTRAL Assembly instructions

CB2

CB2 CENTRAL Assembly instructions

Whittier Wood Furniture McKenzie Media Center Assembly instructions

Whittier Wood Furniture

Whittier Wood Furniture McKenzie Media Center Assembly instructions

Habitat KITT-SR-AW19-A Assembly instructions

Habitat

Habitat KITT-SR-AW19-A Assembly instructions

Boraam FENTON 76024 Assembly instructions

Boraam

Boraam FENTON 76024 Assembly instructions

Furniture of America CM7695CK-VN Assembly instructions

Furniture of America

Furniture of America CM7695CK-VN Assembly instructions

VEELOK CT-03B quick start guide

VEELOK

VEELOK CT-03B quick start guide

Powell 533-477 Assembly instructions

Powell

Powell 533-477 Assembly instructions

Rauch MD989 Assembly instructions

Rauch

Rauch MD989 Assembly instructions

Gami HANGUN G36 manual

Gami

Gami HANGUN G36 manual

VIPACK SCGT200 Assembly instructions

VIPACK

VIPACK SCGT200 Assembly instructions

FourStar 11210915A Assembly instructions

FourStar

FourStar 11210915A Assembly instructions

manuals.online logo
manuals.online logoBrands
  • About & Mission
  • Contact us
  • Privacy Policy
  • Terms and Conditions

Copyright 2025 Manuals.Online. All Rights Reserved.