Taylor 1528 User manual

WeatherGuide™System with Remote Sensor
Instruction Manual
1
by
1528
MOON PHASE

Welcome to theTaylor®WeatherGuide System. Simple, reliable,
accurate…it allows you to monitor indoor or outdoor locations from
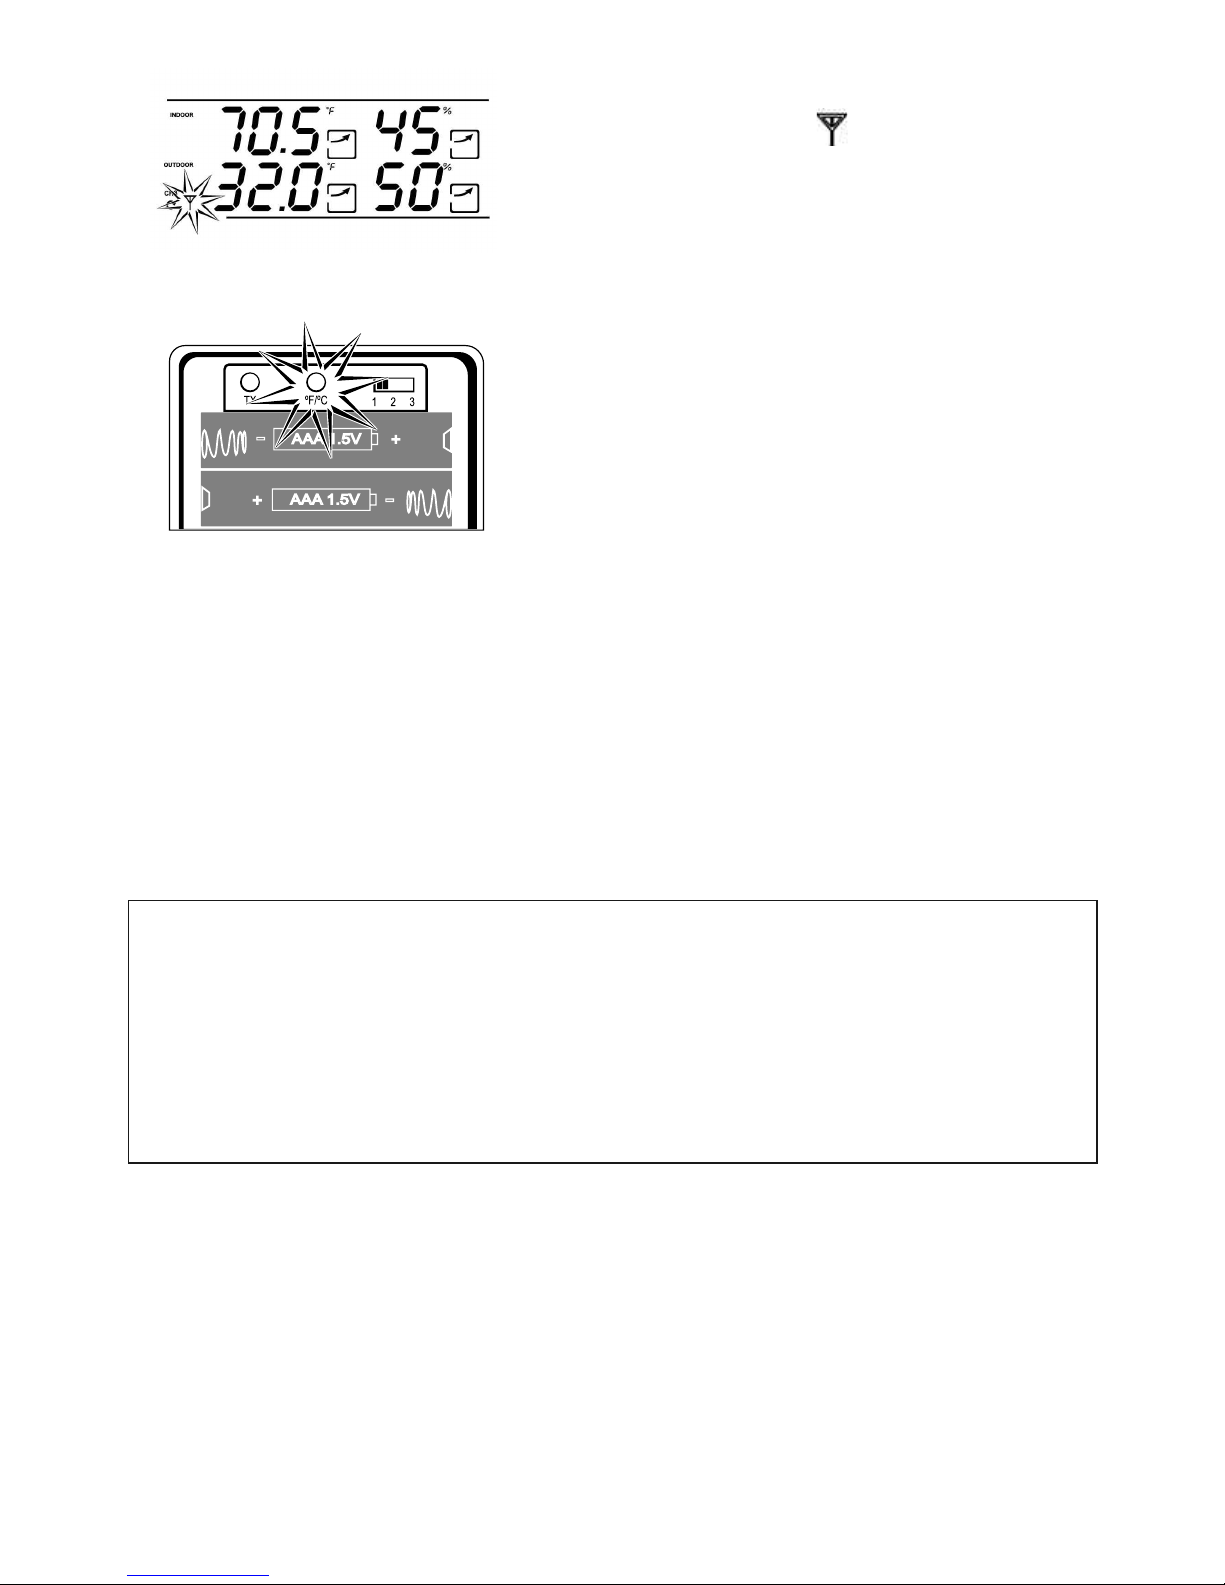
one room.The base unit reads indoor conditions, while the remote
sensor wirelessly reports outdoor weather conditions back to the base
unit for an all-in-one weather display.
Plan your work day, play day, every day. Now that’s smart!
Table of Contents
Powering the WeatherGuide™..................................................................3
ow to Set Up the WeatherGuide™ ......................................................3
ow to Display the WeatherGuide™ ......................................................5
Atomic Clock
Atomic Clock Setting ................................................................6
Manual Clock Setting..................................................................7
Alarm ............................................................................................8
Snooze ........................................................................................10
ow to Read the WeatherGuide™........................................................11
Temperature/ umidity Displays ............................................12
Minimum/Maximum Records ................................................13
Barometric Pressure ................................................................14
istory Records........................................................................14
Programming Altitude ..............................................................15
Comfort Level Readings..........................................................16
Temperature/ umidity Trends ..............................................16
Weather Forecast ....................................................................17
Moon Phase/Tide Levels..........................................................18
Backlight......................................................................................19
°F/°C Switch ..............................................................................19
Low Battery Display ................................................................19
TroubleShooting
Disconnected Signals................................................................20
Transmission Collision ............................................................21
Problem Solving ........................................................................22
2

To Power your WeatherGu de™
Base Unit
Your WeatherGuide™ base unit may be powered by either an AC
adaptor (included) or 2 AAA batteries (not included).
Adaptor power – insert the connector end of the adaptor into
the jack on the side of the base unit. Plug the other end into the
proper electrical outlet.
Battery Power – Remove the battery compartment cover on
the back of the unit. Install 2 AAA batteries. Replace the battery
compartment cover.
Important: Power the base unit before installing batteries in the re-
mote sensor, or the units’ transmissions may not properly connect.
Remote Sensor
Unscrew the 4 screws securing the remote sensor’s battery compart-
ment cover located on the back of the unit. Install 2 AAA batteries.
(Tip: Lithium batteries are recommended in extremely cold or hot lo-
cations.)
How to Set up Your WeatherGu de™System
First, power up the base unit, using either the AC adaptor or 2 AAA
batteries. Next, install 2 AAA batteries into the remote sensor.
Place the base unit as close as possible to the remote unit.
There is a Channel switch in the remote
sensor battery compartment. Move the
switch to Channel 1.
Press the “TX” button located inside the
remote sensor battery compartment.This
will send a transmission signal to the base
unit.The red LED Indicator light will flash
when a signal is transmitted.
3
Move channel switch
to Channel 1
Press the Tx button to send
transmission signal to base unit

If the transmission is successful, the remote
sensor readings and a “ ” icon will appear
on the base unit. If dashes are still displayed
on the receiver unit, press the Tx button
again.
To change the remote sensor’s tempera-
ture display to Celsius, press the “+C/F”
button inside the remote’s battery com-
partment.
Replace the remote’s battery compart-
ment cover.
The remote will automatically transmit readings to the base unit.
• The first remote registered will transmit every 53 seconds.
• If a second remote is registered, it will transmit every 56 seconds.
• If a third remote is registered, it will transmit every 59 seconds.
Note: A maximum of 3 remote sensor units can be registered.
Should you purchase one or two additional remote units (Model 1536,
sold separately) to expand your thermometer monitoring capabilities
to multiple locations, slide the C switch to Channel 2 to register the
second sensor and select Channel 3 to register the third sensor.The
Channel number assigned will appear on the remote’s LCD screen.
4
Transmission successful
Select °F or °C for remote

How to D splay your WeatherGu de™
Table top – use the Table Stand on the back of the base and remote
sensor units
Wall – use the keyhole on the back of the base and remote sensor units.
Base Unit emote Sensor
Base unit location –
Place the unit indoors in a well-ventilated location away from direct sunlight.
Remote sensor location –
The transmission range of the remote sensor is 100 feet.The effective
transmission range is vastly affected by obstacles such as walls, sheds,
trees, etc.Try various set ups for the best results. Shorten the distance
between receiver and remote units when necessary. Place indoor in a
well ventilated location away from direct sunlight. Place the sensor in
a dry, shaded area. Direct sunlight will heat the casing and inflate tem-
peratures readings.
Important: Though the remote unit is weather proof, it should be
placed away from direct sunlight, rain, snow and should never be sub-
merged in water.
A maximum of 3 remote sensor units can be registered. One
remote sensor is included.To purchase additional Remote
Sensors (Taylor model 1536), please visit www.partshelf.com.
5
Keyhole
Table Stand

Atom c Clock and Calendar
Your WeatherGuide™ has a radio-controlled clock/calendar that sets
itself to the radio signal transmitted by the U.S.Atomic Clock located
in Colorado.To synchronize the atomic clock:
1. Press and hold the “-PMCE/RCC”
button on the back of the base unit.The
unit will beep.The antenna icon will
flash on the screen.
Please note: reception may take
2-10 minutes.
2. When the icon is steady, the
Atomic Clock has been successfully
synchronized.
3. Choose your time zone by pressing the
“PMCE/RCC” button.
Please note: If the icon disappears, the Atomic time signal is not
available at the moment.Try another location later away from possible
sources of interference, such as mobile phones, appliances, computers,
refrigerators,TVs, etc. Daytime conditions such as sunlight and other
atmospheric interferences can affect synchronization; try setting the
clock during evening hours. Please note:if the signal is weak, it may take
up to 24 hours for the atomic clock to establish a connection. In the
meantime, the clock may be manually set. Once the atomic signal is
found, it will override the manually programmed time and date.
The Atomic Clock will have a daily synchronization at 2:05 am Pacific
Time every day. Each reception cycle is 2.5 minutes minimum and 10
minutes maximum.
6
Press and hold -PMCE/ CC to
synchronize atomic clock. elease
when unit beeps.
Press PMCE/ CC to choose
time zone.
Steady Icon = Atomic clock
synchronized
(may take up to 24 hours to
capture signal).

7
How to Set the Clock Manually
To manually set the clock:
1. Press and hold the “SET/AL” button.
The unit will beep.
2. Press “+C/F” or “-PMCE/RCC” to
set the seconds to zero. Press
“SET/AL” to enter.
3. Press “+C/F” or “-PMCE/RCC” to
change the hours. Press “SET/AL” to
enter.
4. Press “+C/F” or “-PMCE/RCC” to
change the minutes. Press “SET/AL”
to enter.
5. Press “+C/F” or “-PMCE/RCC” to
choose either the month/date or
day/month display. Press “SET/AL” to
enter.
6. Press “+C/F” or “-PMCE/RCC” to
change the year. Press “SET/AL” to
enter.
7. Press “+C/F” or “-PMCE/RCC” to
change the month or day. Press
“SET/AL” to enter.
8. Press “+C/F” or “-PMCE/RCC” to
change the date or month. Press
“SET/AL” to enter.
9. Press “+C/F” or “-PMCE/RCC” to
choose a language* display. Press
“SET/AL” to enter.
10. Press “+C/F” or “-PMCE/RCC” to
choose either the 12 or 24 hour
time display.Press“SET/AL” to enter.
11. The clock/calendar is now set.
(*language options are: EN (English), DA
(Danish), ES (Spanish), NE (Dutch), FR
(French), IT (Italian), GE (German).)
Press and hold SET/AL to start
clock setting
Press +C/F or -PMCE/ CC to
reset seconds.
Press SET/AL to enter seconds.
Press +C/F or -PMCE/ CC to
change minutes.
Press SET/AL to enter minutes.
Repeat to set rest of
clock/calendar settings.

Tip: old down the “+C/F” or
“-PMCE/RCC” buttons to advance the dig-
its quickly.
Daylight Savings Time – to turn DST
on, press “MODE” until “OFF” appears in
the clock digits. Press and hold the
“SET/AL” button until it switches to “ON”.
DST is now on. Press “MODE” to return
to the clock display.
How to Set the Alarm
Your WeatherGuide™ has 2 separate alarm settings.
To set one alarm:
1.Press the “MODE” button on the back of
the base unit.The unit will beep.The clock
time changes to the alarm time. “A1” ap-
pears next to the time.
8
Press Mode, then press and
hold SET/AL, then press Mode
to change DST.
Press SET/AL after choosing
12/24 hour time.
Clock is set
Press MODE to start alarm
setting
A1

2. Press and hold the “SET/AL” button.The
unit will beep and the alarm’s hour digits
will flash.
3. Press “+C/F” or “-PMCE/RCC” to
change the hours. Press “SET/AL” to enter.
The minutes will flash.
4. Press “+C/F” or “-PMCE/RCC” to
change the minutes. Press “SET/AL” to
enter.The unit will return to the clock dis-
play.
5. A icon above the time indicates
Alarm 1 is active.The unit will return to the
clock display after approximately 15 sec-
onds, or press “MODE” until the clock dis-
play returns.
To set two alarms:
Press the “MODE” button until A2 appears.
Repeat programming steps for A1.
A icon above the time indicates
Alarm 2 is active.
9
Press and hold SET/AL
Alarm 1 is active
Alarm 2 is active
Hour digits flash
Press +C/F or -PMCE/ CC to
change hours.
Press SET/AL to enter hours.
Minutes digits flash.
Repeat to set minutes.

To turn o the alarm:
Press “MODE” until the Alarm display ap-
pears. Press the “SET/AL” button. The
alarm icon will disappear. The alarm is
turned off.
Snooze eature
Press the “Snooze/Light” button on the top
of the base unit to silence the alarm for 5
minutes.
A icon will flash as long as the snooze is
active.The snooze will deactivate when the
alarm is turned off.
10
Press Snooze/Light to silence alarm
Press Mode then SET/AL to turn
off alarm
No alarm icon = alarm is off.

11
How to read your WeatherGu de™
The base unit displays indoor conditions from its location.
The remote unit will transmit weather readings from its location back
to the base unit.
Alternately, the remote sensor’s probe cord may be used. Plug the
probe cord into the rubber plug on the remote sensor.Allow the end
to hang where you wish to measure temperatures (out of a window,
aquariums, swimming pools, etc.)
If more than one remote sensor is in use,
press the “C ANNEL” button on the back
of the base unit to toggle between sensor
displays.
A Channel icon on the base unit indicates
which remote sensor readings are dis-
played.
MOON PHASE
Base unit – Indoor and Outdoor readings emote unit – outdoor readings
Press Channel to see different
remote sensor readings
Channel icon indicates which
channel is displayed.

12
Auto Scroll eature – the base unit can
be set to automatically scroll through read-
ings. To activate Auto Scroll, press the
“Channel” button on the back of the base
unit until the auto scroll symbol appears on
the LCD. The base unit will automatically
display base and remote readings for 10
seconds each.
Temperature/Hum d ty Read ngs
Temperatures display in the center left sec-
tion of the LCD.
Indoor temperature readings – these
are temperatures at the base unit’s loca-
tion.
Outdoor temperature readings –
these are temperatures that are measured
by the remote sensor.
umidity displays in the center right sec-
tion of the LCD.
Indoor humidity readings – these are
temperatures at the base unit’s location.
Outdoor humidity readings – these are
temperatures that are measured by the re-
mote sensor.
Auto scroll will toggle between
different remote sensor readings
Temperature displays
Humidity displays

To View Minimum/Maximum
temperature/humidity readings
Your WeatherGuide™ will store the last
recorded high and low temperatures and
humidity over a 24 hour period.The 24 hour
period starts when the batteries are in-
stalled.
1. Press the “Min/Max” button once to see
the highest temperature/humidity of the
day.
2. Press the “Min/Max” button again to see
the lowest temperature/humidity of the
day.
3.Press the “Min/Max” button a third time
to see current temperature/humidity again.
To Clear the minimum or maximum read-
ings, press and hold the “Min/Max” button
while those readings are on the screen.The
reading will reset to the current tempera-
ture.
13
Press and hold Max/Min to
reset high/low temperature &
humidity
Press MIN/MAX to see high
and low daily temperature &
humidity
Minimum or Maximum readings
Back to current readings
Minimum or Maximum readings
on screen
Min/Max readings are cleared.
Current readings

Barometric Pressure Readings
Barometric pressure refers to the pressure exerted by the atmosphere
at a given altitude. It may be expressed in either millibars
(mb)/hectopascals (hPa),or inches of mercury (in g). A rising or falling
barometric pressure reading indicates the likelihood of fair or poor
weather conditions.
- A high or rising barometric pressure indicates fair weather conditions.
- A low or falling barometric pressure indicates poor weather conditions.
Arrow icons above the barometric pres-
sure readings indicate if pressure is rising,
falling, or steady.
The bar graph illustrates the current baro-
metric pressure readings.
Barometric Pressure History
Press the “ istory” button on the back of
the unit to see the barometric pressure
readings for the past 12 hours. The
icon indicates which hour history is dis-
played (1 hour ago, 2 hours ago, etc.).
The bar graph illustrates the pressure his-
tory information.
To return to the current barometric pres-
sure readings, press “ istory” until the
hour icon is “0”.
Please note:until there are 12 hours of his-
tory readings, some history hours will
show dashes.
14
Barometric Pressure Graph
Barometric Pressure Trend
Press History to see Barometric
Pressure over last 12 hours
History Hour Icon
Press History until Hour Icon is
”0”. Current readings return.

1515
For the most accurate barometric pressure
readings, you should program your current
Altitude into your WeatherGuide™. If the
current altitude is unknown, one reference
for altitude maps in the US is:
http://www.ngdc.noaa.gov/mgg/topo/state.html.
To program altitude:
1. Press and hold the“ ISTORY” button.
The unit will beep.The “mb/hPa” and
“in g” icons flash.
2. Press “+C/F” or “-PMCR/RCC” to
choose either “mb/hPa or “in g” pres-
sure displays. Press “ ISTORY” to se-
lect. The altitude digits flash.
3. Press the “+C/F” or “-PMCR/RCC”
buttons to scroll through prepro-
grammed altitude options. Press “ IS-
TORY” to select.
4. The display will shortly return to the
Barometric Pressure display.
(Note: Both 'mb' and 'hPa' altitudes
will be expressed in meters, while
'in g' is expressed in feet.)
Press and hold History to start
altitude setting.
Altitude digits flash.
Press +C/F or -PMCE/ CC to
select pressure units.
Press History to select
Press +C/F or -PMCE/ CC to
scroll through altitudes units.
Press History to select.
Pressure units.
Altitude digits.
Altitude is set.

Comfort Level Read ngs
YourWeatherGuide™ combines temperature and humidity readings to
determine an indoor comfort level. If the display shows WET or DRY
conditions, you may wish to adjust indoor temperature or humidity
conditions to reach a comfortable reading.
One of these Comfort Level icons will appear above the clock display:
Comfortable level, ideal range for both
temperature & humidity
Air contains excess moisture
Air contains inadequate moisture
Temperature Trend Ind cators
Your WeatherGuide™ will indicate if temperatures are rising, falling,
or steady.
indicates Rising Temperatures readings
(temperatures have gone up more than 2
degrees in an hour)
indicates Steady Temperature readings
indicates Falling Temperatures (tempera-
tures have gone down more than 2 degrees
in an hour)
Temperature trending up
16
Comfort level icon

Hum d ty Trend Ind cators
Your WeatherGuide™ will indicate if humidity levels are rising, falling,
or steady.
indicates Rising umidity readings (humid-
ity has gone up more than 2 degrees in an
hour)
indicates Steady umidity readings
indicates Falling umidity (humidity has
gone down more than 2 degrees in an
hour)
Humidity trending up
12-24 Hour Weather Forecast
Your WeatherGuide™ will estimate weather conditions over the next
12 to 24 hours.These estimates are based on altitude and changes in
barometric pressure.
One of these weather icons will appear at the top of the display:
17
Sunny
Becoming Cloudy
Cloudy
Rain
Stormy
Snowy
Snowstorm
Weather Icons

Moon Phase and T de
The Moon phase will automatically display according to the current
calendar.Tide levels will display as igh, Medium or Low based on the
current Moon Phase.
New Moon - The Moon's dark side is facing the Earth.The
Moon is not visible (except during a solar eclipse).
Waxing Crescent - The Moon is partly lit by direct sunlight.
The moon’s visibility is increasing.
First Quarter - One-half of the Moon is lit.The moon’s visi-
bility is increasing.
Waxing Gibbous – The moon is more than half-lit. The
moon’s visibility is increasing.
Full Moon -The Moon's lit side is facing the Earth.The Moon
appears to be fully illuminated.
Waning Gibbous - The moon is more than half-lit. The
moon’s visibility is decreasing.
Last Quarter - One-half of the Moon is lit.The moon’s visi-
bility is decreasing.
Waning Crescent - The Moon is partly lit by direct sunlight.
The moon’s visibility is decreasing.
The cycle will repeat with a New Moon.
Moon phase Icons
18

Backl ght Feature
The base unit has a backlight for easy viewing of the screen. Press the
“Snooze/Light” button to turn the backlight on for 3 seconds.
Press SNOOZE/LIGHT for a 3 second backlight
To Sw tch Between °F and °C
Press the “+C/F” button to switch between
Fahrenheit and Celsius temperature dis-
plays.
Low Battery Ind cator
A on the LCD indicates the batteries are running low and should
soon be replaced.
- A by the indoor temperature display indicates the base unit bat-
teries are low.
- A by the outdoor temperature display or on the remote sensor
indicates the remote batteries are low.
Base unit batteries low emote sensor batteries low
emote sensor batteries low
Press +C/F to switch between °F&°C
Base Unit
Remote Sensor
19

Trouble-Shoot ng
Disconnected Signals
If the receiver unit does not receive a transmission from a remote chan-
nel for 1 hour, the display will show dashes.To correct this problem:
1. Check that the remote is properly positioned, within the appro-
priate transmission range. Transmissions are vastly affected by
building materials and where the receiver and remote units are
positioned.Try various set ups for the best results. Shorten the
distance between receiver and remote units when necessary.
2. Check to make sure the transmission path is clear of obstacles
and interference.
3. If new batteries are faulty on the initial installation, install fresh
batteries. If you did not notice the Low Battery icon warning and
the product performed correctly after initial set up, the batteries
have lost their charge. Replace batteries (see the Power Sources
section of this manual.)
4. Press the “Tx” button in the battery compartment of the remote
to send a transmission signal to the base unit.
5. Press and hold the “Channel” button on the back of the base unit.
This will clear the channel setting and the base unit will begin
searching for remote sensor transmissions. Press the“Tx” button
in the battery compartment of the remote to send a transmis-
sion signal to the base unit.
6. Please note that below 32ºF / 0ºC the LCD readout on the re-
mote unit may begin to fail display.When this happens the remote
will still transmit correct temperature readings to the receiver
unit but will not appear on the remote LCD.When the tempera-
ture rises above 32ºF / 0ºC the display will begin to function nor-
mally again.
20
Other manuals for 1528
1
Table of contents
Other Taylor Weather Station manuals

Taylor
Taylor 1507 User manual

Taylor
Taylor WeatherGuide 1525 User manual

Taylor
Taylor 2752N User manual

Taylor
Taylor WeatherGuide 1525 User manual

Taylor
Taylor Heritage 5262313 User manual

Taylor
Taylor 1527 User manual

Taylor
Taylor 1434 Instruction Manual

Taylor
Taylor 1524 User manual

Taylor
Taylor 2751 User manual

Taylor
Taylor 1528 User manual

Taylor
Taylor 2753 User manual

Taylor
Taylor 1732 User manual

Taylor
Taylor Leading the Way in Accuracy 1458 User manual

Taylor
Taylor 1380 User manual

Taylor
Taylor 1506 User manual

Taylor
Taylor 1383 User manual

Taylor
Taylor 1512 User manual

Taylor
Taylor 5287333 User manual

Taylor
Taylor 1381 User manual

Taylor
Taylor 1733 User manual