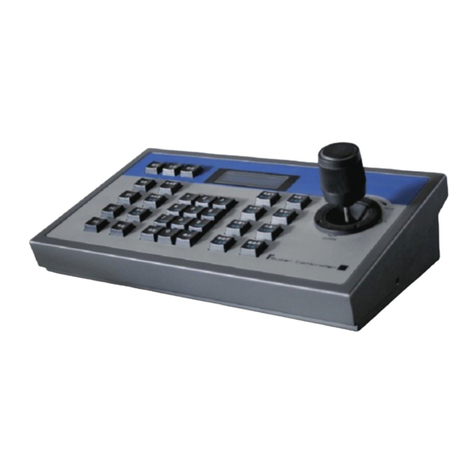
TBK vision MY-4101KT User manual

Before attempting to connect or operate this product,
Please read instructions cardfully and save this manual for future use.
Copyright(c)2008
Users Manual
Intelligent Keyboard Controller

PREFACE
Specification of function:
Specification of operation:
Specification of compatibility:
Specification of material:
1. It is compatible with all functions of HK’s DVR panel;
2. One Keyboard Controller control several embedded devices
with video signal switch function and truly realize the function
of digital video matrix.
3. Conveniently control high speed Dome and decoder, fill up
the deficiency of the embedded devices.
4. All devices controlled can be set to different protocol and
baud rate individually, strengthen the compatibility of system;
5. Updating software on line, its software can be updated to
match client’s special protocol via its RS485 port.
1. Operation, setup and query information can be displayed on
LCD Screen clearly;
2. Rota tion spe e d of high spe ed d ome can be controlled by
adjusting the range of joystick, and the range can be indicated
on LCD display;
3. Pa s s w o r d i s n e e d e d w h e n c h a n g e it s s e t u p pa r a me t e r,
strengthen its safety and reliability, prevent misoperation ;
4. One key to query, more convenient and safe, all setup can be
indicated on LCD display clearly, prevent misoperation;
1. Contain 12 kinds of high speed dome and decoder protocol
available for client’s choice, its protocol can be renewed
according to client’s requirement, and can be updated on line;
2. Can control 255 pieces of high speed dome/decoder, address
code is among 0-254;
3. Can control 31 pieces of embe dded DVR/PCDVR, address
code is among 1-31;
4. Support maximum 15 auxiliary keyboard controllers, keyboard
ID is among 0-15.
1. Imported joystick, accurate and reliable;
2. Each key can stand 5 millions times press, reliable, nice feel,
confirmation tone;
3. Big LCD display screen, adequate display space;
4. Standard RS485 Signal input and output port have lightning
pr o t e c t i o n f un c t i on , go o d a nt i - i n t e r f e re n c e a b i li t y,
communication distance can be up to 1200m;
5. Standard interface, make the communication more convenient,
quick and obvious.

1
1
2
1
1
1
1explain
EXPLAIN
Users Manual
Intelligent Keyboard Controller
DVR: Digital Video Recorder
P T Z : P a n / T i l t Z o o m ( m e a n s l e n s ’ s m a i n m o v e m e n t , r e f e r t o
decoder or high speed dome in general)
Please connect t h e ke y b oard controller corre c t l y as t h i s man u a l
requires.
L C D d i s p l a y c a n b e e a s i l y d a m a g e d . P l e a s e d o n ’ t p r e s s o r
e x p o s u re in su n s h i n e fo r a l o n g t i m e .
The joysti c k can b e e a s i l y da m aged. I f i t n e e d s t o be repaired,
please wrap and ship it by using original or safety packaging;
◇
◇
◇
Caution:
Abbreviation: (mentioned in this manual)
Keyboard controller parameter:
Item
Power
Temperature
Humidity
Communication
Baud rate
Interface
Display
Size
Parameter
DC12V±10%/50HZ
-10~55℃
≤90%RH(frostless)
RS485 half-duplex
1200bps,2400bps,4800bps,9600bps,19200bps
5PIN line
LCD screen
318(L)X180(W)X118(H)mm
Accessories
Name
Keyboard Controller
DC-12V Power
5pin Plug
《Users Manual》
Warranty
Qualification
Quantity Unit Note
pcs
pcs
pcs
pcs
pcs
pcs
Input:AC100-240V~50/60HZ

2
CONTENTS
CONTENTS
Users Manual
Intelligent Keyboard Controller
1. Introduction of front/rear panel . . . . . . . . . . . . . . . . . . . . . . . . . . . . . . 3
1.1 Front panel function buttons introduction. . . . . . . . . . . . . . . . . . . . . . . . . . . 3
1.1.1 Key button function introduction . . . . . . . . . . . . . . . . . . . . . . . . . . . . . 3
1.1.2 LCD Screen . . . . . . . . . . . . . . . . . . . . . . . . . . . . . . . . . . . . . . . . . . . . . . 5
1.1.3 Status indicator light . . . . . . . . . . . . . . . . . . . . . . . . . . . . . . . . . . . . . . 5
1.1.4 Joystick control function. . . . . . . . . . . . . . . . . . . . . . . . . . . . . . . . . . . . 5
1.2 Rear panel interface terminal introduction . . . . . . . . . . . . . . . . . . . . . . . . . . 6
2. Operation introduction .......................................7
2.1 PTZ control introduction . . . . . . . . . . . . . . . . . . . . . . . . . . . . . . . . . . . . . . . . 7
2.1.1 Select PTZ operation mode. . . . . . . . . . . . . . . . . . . . . . . . . . . . . . . . . . 7
2.1.2 Select PTZ address . . . . . . . . . . . . . . . . . . . . . . . . . . . . . . . . . . . . . . . . 7
2.1.3 Joystick & Keyboard controller control PTZ . . . . . . . . . . . . . . . . . . . . . 7
2.1.4 Set PTZ preset position. . . . . . . . . . . . . . . . . . . . . . . . . . . . . . . . . . . . . 8
2.1.5 Select PTZ preset position . . . . . . . . . . . . . . . . . . . . . . . . . . . . . . . . . . 8
2.2 DVR operation introduction . . . . . . . . . . . . . . . . . . . . . . . . . . . . . . . . . . . . . . 9
2.2.1 Select DVR operation mode . . . . . . . . . . . . . . . . . . . . . . . . . . . . . . . . . 9
2.2.2 Select DVR address. . . . . . . . . . . . . . . . . . . . . . . . . . . . . . . . . . . . . . . . 9
2.2.3 Joystick & Keyboard controller control DVR . . . . . . . . . . . . . . . . . . . . . 9
2.3 Query for Keyboard parameter . . . . . . . . . . . . . . . . . . . . . . . . . . . . . . . . . . 10
3. Installation introduction ....................................11
3.1 Keyboard controller control DVR . . . . . . . . . . . . . . . . . . . . . . . . . . . . . . . . . 11
3.2 Keyboard controller control PTZ . . . . . . . . . . . . . . . . . . . . . . . . . . . . . . . . . 12
3.3 DVR or Keyboard and DVR control PTZ synchronously . . . . . . . . . . . . . . . . 12
4. DVR and Keyboard controller connection and setup.................13
5. Other function setup.........................................14
5.1 Password setup . . . . . . . . . . . . . . . . . . . . . . . . . . . . . . . . . . . . . . . . . . . . . . 14
5.2 Default setup . . . . . . . . . . . . . . . . . . . . . . . . . . . . . . . . . . . . . . . . . . . . . . . . 14
5.3 Download updating on line . . . . . . . . . . . . . . . . . . . . . . . . . . . . . . . . . . . . . 14
5.4 Key button buzzer setup. . . . . . . . . . . . . . . . . . . . . . . . . . . . . . . . . . . . . . . . 14
5.5 Keyboard controller ID setup . . . . . . . . . . . . . . . . . . . . . . . . . . . . . . . . . . . . 15
5.6 Keyboard controller Lock ID setup. . . . . . . . . . . . . . . . . . . . . . . . . . . . . . . . 15
5.7 Keyboard controller parameter setup frame diagram . . . . . . . . . . . . . . . . . 15
contents

SHUT DOWN
PTZ
M/A
PREV
A
AUX
EDIT
MENU
REC
PLAY
F1
F2
F3
3
T h e r e a r e 31 pc s b u t t o n s , 1 p c L C D d i s p la y a n d 1 p c j o y s t i c k
d i s t r i b u ti n g in In t e l l i g e n t Ke y b o a r d C o n t ro l l e r fr o n t p a n e l .
1.1Front panel function button introduction
Users Manual
Intelligent Keyboard Controller
INTRODUCTION
Notes: Some buttons are multi-function bottons, PTZ control function
on the left of slash and DVR function on the right.
introduction
1.1.1 Key button introduction
【Esc】 Quit and back to up level menu
【Setup】 Press and hold for 3 seconds and enter into keyboard setup mode
【Search】 Press and hold for 1 second and check the original configuration
parameter of intelligent keyboard.
【Shitf】 Switch the control mode of PTZ or DVR: switch keyboard function
to DVR or PTZ control mode.
【F1】 Run Pattern scan button; Call the preset Pattern scan track number.
【F2】 Enter into cruise setup, press 1 time enter, press again to save and quit.
【F3】 Select cruise route number; select the preset cruise number.
【PRESET】 Set preset position key; Set the preset position of PTZ.
【SHOT/REC】 In PTZ control mode: select the speed dome preset position;
In DVR control mode: control Camera video function.
【AUTO/PLAY】In PTZ control mode: Control tripod head automatic rotation;
In DVR control mode: Control Camera video playback.

4
Users Manual
Intelligent Keyboard Controller INTRODUCTION
introduction
【Addr】 Select the address of decoder, high speed dome and DVR.
PTZ address code is among 0-254 and DVR address code
is among 1-14.
【Clear】 Clean current input content.
【0-9】 Number button:0,1,2,3,4,5,6,7,8,9.
【Enter】 Confirm current input content
【Focus+/A】 In PTZ control mode: set the lens focus near;
In DVR control mode: switch typewriting.
【Focus-/PREV】 In PTZ control mode: set the lens focus far;
In DVR control mode: preview single, four, nine, sixteen
frame switch key.
【ZOOM+/AUX】 In PTZ control mode: zoom out the lens;
In DVR control mode: undefinition.
【ZOOM-/M/A】 In PTZ control mode: zoom in the lens;
In DVR control mode: s wi tch Main port/Optional port
output.( Hold for 2 seconds)
【IRIS+/EDIT】 In PTZ control mode: open the lens iris;
In DVR control mode: edit inputs.
【IRIS- /PTZ】 In PTZ control mode: close the lens iris;
In DVR control mode: control tripod head.
【WIPER/MENU】 In PTZ control mode: open windshield wiper Relay;
In DVR control mode: select DVR setting menu.
【LIGHT/SHUT DOWN】 open light and close Relay;
In DVR control mode: control DVR Shutdown.

5
Users Manual
Intelligent Keyboard Controller
INTRODUCTION
introduction
1.1.2 LCD screen
All operation through buttons will be displayed on LCD correspondingly,
LCD will switch to power-save mode if the keyboard doesn’t receive
any input for more than 30 seconds.(switch to lowest brightness).
1.1.3 Status indicator light
[P W Power indicator light. It is still shown when keyboard is in work
status and its status is always on and red color.
[DVR]DVR control status indicator light. It is shown when press key
button in DVR control mode and its status is flickering and
green color.
[PTZ]PTZ control status indicator light. It is shown when press key
button in PTZ control mode and its status is flickering and
green color.
1.1.4 Joystick control
]
Joystick
Figure
Operation
Function
Up
down
left
right
Rotate
left
Rotate
right
In PTZ control mode: Control tripod head move up
In DVR control mode: Control record file speed up
In PTZ control mode: Control tripod head move down
In DVR control mode: Control record file speed down
In PTZ control mode: Control tripod head move left
In DVR control mode: Control record file back
In PTZ control mode: Control tripod head move right
In DVR control mode: Control record file go ahead
In PTZ control mode: zoom in the lens
In PTZ control mode: zoom out the lens

1
1 2 3456789
PTZ-CON
PTZ-AUX
Ground
PW
DC-12V
PTZ
DVR-AUX
DVR-CON
DVR
①②③④ ⑤ ⑥ ⑦ ⑧ ⑨
6
25PIN ports, 1 DC-12V port, 3 LED indicator Shown in the following
diagram:
1.2 Rear panel interface terminal introduction
Number Function introduction
Item Mark Interface Description
Control high
speed PTZ
output(Ta,Tb)
Control high
speed dome aux.
KB input
Ground line(G)
Control DVR aux.
KB input
Control DVR
Output
PTZ output
control indicator
DVR output
control indicator
Power indicator
Power input
Connect to RS485 port of
speed dome and decoder:
Ta to RS485+,Tb to RS485-
Connect to aux KB(control
speed dome) output:
Ra connect to aux KB Ta,
Rb connect to aux KB Tb
Signal Ground line
Connect to aux KB(control
DVR) output: Ra connect
to aux KB Ta, Rb connect
to aux KB Tb
Ta,Tb connect to RS232 485A,
485B port of convertor
respectively, connect
to DVR via convertor
Indicate output,flash,green
Indicate output,flash,green
When KB is working,
it is always on, red
DC 12V power input
Users Manual
Intelligent Keyboard Controller INTRODUCTION
introduction

7
Dvr-xxx Address:
Address: 128 Ptz-128
Ptz-xxx
Users Manual
Intelligent Keyboard Controller
operation
2.1 PTZ Control Operation introduction
2.1.1 Select PTZ operation mode
LCD display as right figure 1,means keyboard is in PTZ operation mode,
if shown as right figure 2, means keyboard is in DVR operation mode,
press【Shift】button to switch to PTZ operation mode.
2.1.2 Select PTZ address
In PTZ operation mode, press【Addr】button, key in PTZ
address code via number buttons, press【Enter】.
For example: need to set PTZ address as 128.
Operation: press【Addr】, LCD will show as figure 3;
Key in【1】,【2】, 【8】,LCD will show as figure 4,
Press【Enter】, LCD will display as figure 5.
figure 1 figure 2 figure 3
figure 4 figure 5
Control speed dome move up, LCD will display as figure 1.
Control speed dome move left, LCD will display as right figure 2.
Control speed dome move down, LCD will display as right figure 3.
Control speed dome move right, LCD will display as right figure 4.
Set the lens focus near, LCD will display as right figure 5.
Set the lens focus far, LCD will display as right figure 6.
Zoom out the lens, LCD will display as right figure 7.
Zoom in the lens, LCD will display as right figure 8.
Open the lens iris, LCD will display as right figure 9.
Close the lens iris, LCD will display as right figure 10.
Open or close the auxiliary switch, LCD will display as right figure 11.
Open or close the auxiliary switch, LCD will display as right figure 12.
PTZ rotate automatically, LCD will display as right figure 13.
【FOCUS+】
【FOCUS-】
【ZOOM+】
【ZOOM-】
【IRIS+】
【IRIS-】
【WIPER】
【LIGHT】
【AUTO】
2.1.3 Joystick Keyboard control PTZ&
(The next page)
OPERATION

Up <<<<<< Left <<<<<< Down <<<<<< Right <<<<<<
Ptz-xxx autoAUX OFF:
AUX ON:
Ptz: iris-closePtz: iris-openPtz: zoom-tele
Ptz: zoom-wide
8
Ptz-128 Set pRESET: Set pRESET: 1
Set pRESET: Ptz-128
SHOT PRESET:
Set pRESET: 2
SHOT PRESET: 1 SHOT PRESET:
2.1.4 Set PTZ preset position
In PTZ control mode, press 【PRESET button, fix relevant angle via
all function press buttons and joysticks, press relevant preset serial
numbe r button, and t he n press【Enter】button, a preset be set
completely; fix relevant angle via all function press buttons and joysticks
again, press relevant preset serial number button, and then press
【Enter】 button, another preset be set completely. Analogize like this.
For example, set number 1 and number 2 address code of PTZ with
address code 128.
press【Addr】,【1】,【2】,【8】,【Enter】button,LCD will display as
the following figure 1; press【PRESET】button, LCD will display as
the following figure 2; after fix relevant angle via all function press
buttons and joysticks, press【1】 button, LCD wil l display as the
following figure 3; Press【Enter】 button, LCD will dislay as thep
following figure 4; fix relevant angle via all function press buttons and
joysticks again, press【2】button, LCD will display as the following
figure 5; press【ESC】button and exit after setting completely.
】
2.1.5 Select PTZ preset position
In PTZ control mode, press button, press relevant preset
serial number button, press【Enter】.
For example, Select number 1 preset of PTZ with address code 128.
1. press【Addr】,【1】,【2】,【8】,【Enter】button, LCD will display
as the above figure 6;
2. press【SHOT】button, LCD will display as the right figure 7;
3. press 【1】button, LCD will display as the right figure 8;
4. press【Enter】button, LCD will display as the right figure 9;
5. press 【ESC】 button and exit after setting completed.
【SHOT】
2.1.3 Joystick and Keyboard control PTZ
(previous page)
Rtz: focus-near Ptz: focus-far
figure 4figure 1 figure 2 figure 3
figure 5 figure 6 figure 7
figure 8 figure 9 figure 10
figure 11 figure 12 figure 13
figure 1 figure 2 figure 3
figure 4 figure 5 figure 6
figure 7 figure 8 figure 9
Users Manual
Intelligent Keyboard Controller OPERATION
operation

9
Dvr-xxx Ptz-xxx Dvr:
Dvr: 12 Dvr-12
Users Manual
Intelligent Keyboard Controller
operation
OPERATION
2.2 DVR operation introduction
2.2.1 Select DVR operation mode
LCD display as the following figure 1, which indicate that intelligent
Keyboard controller is in DVR mode; If LCD display as the following
figure 2, which indicate that intelligent Keyboard controller is in PTZ
mode, please press【Shift】button to DVR control mode.
2.2.2 Select DVR Address
In DVR control mode, press【Addr】button; key in DVR address code
to be controlled via number buttons; press【Enter】.
For example, choose the DVR address code 12 which is to be controlled.
1. press【Addr】button, LCD will display as the following figure 3;
2. key in【1】,【2】button, LCD will display as the following figure 4;
3. press【Enter】button, LCD will display as the following figure 5;
【SHUT DOWN】
【REC】
【PLAY】
【A】
【PREV】
【AUX】
【M/A】
2.2.3 Joystick & Keyboard controller control PTZ
Page up DVR menu, LCD will display as figure 1
Page left DVR menu, LCD will display as figure 2
Page down DVR menu, LCD will display as figure 3
Page right DVR menu, LCD will display as figure 4
DVR off, LCD will display as figure 5
Control DVR record, LCD will display as figure 6
Control DVR forward play back and pause, LCD will display as figure 7
Change DVR word input method, LCD will display as figure 8
Switch the display channels of the previewed pictures 1,4,9,16,
LCD will display as figure 9
This function key hasn’t been defined, LCD display as figure 10
Switch HOST/AUX output function, LCD display as figure 11
(The next page)
figure 1 figure 2 figure 3
figure 4 figure 5

Dvr: PTZ
Dvr-12 prev
10
P:pelcod b:2400 > PTZ SEARCH
protocol
Baud Rate
PTZ SEARCH
KEYBOARD ID
SYSTEM SEARCH
ST
PTZ Address
SYS SN
MODEL
LOCK
SOUND
HD
Edit DVR inputting content, LCD display as right figure 12
Select DVR’s PTZ control function, LCD display as right figure 13
【FOCUS+】,【FOCUS-】,【ZOOM+】, 【ZOOM-】,【IRIS+】,【IRIS-】,
【WIPER】and【LIGHT】have relevant control function under this
condition. Please press 〔Esc〕and exit DVR’s PTZ control mode.
DVR setting menu appear, LCD will display as right figure 14
Dvr-12 up Dvr-12 left Dvr-12 down
Dvr-12 right Dvr-12 shut down Dvr-12 rec
Dvr-12 play Dvr: input switch
Dvr-12 Dvr-12 HOST/AUX Dvr-12 edit
Dvr: MENU
【EDIT】
【PTZ】
【MENU】
figure 1 figure 2 figure 3
figure 4 figure 5 figure 6
figure 7 figure 8 figure 9
figure 10 figure 11 figure 12
figure 13 figure 14
2.3 Query for Keyboard parameter
Press button, LCD display as right figure 15, it show current
protocol and baud rate, move joystick, LCD will display as right figure 16
The query framework is as following:
【Search】
figure 15 figure 16
Users Manual
Intelligent Keyboard Controller OPERATION
operation

11
1
1
3.1 Intelligent Keyboard controller control DVR
DVR
DVR
Users Manual
Intelligent Keyboard Controller
Function:
No need junction connection, common control line can be used, very
convenient.
Connection :
use 5PIN line to connect, DVR-CON port of Keyboard Controller connect
to Keyboard port of DVR,(DVR-CON's Ta match 3th core of Keyboard
port; DVR-CON's Tb match 4th core of Keyboard port); Device number :
01 and Device number :02 connect keyboard via standard control line.
Analogize like this.
CONNECTION DIAGRAM
connection
No.7 pin Ra of the main-keyboard
connect to No.9 pin Ta of the Sub-keyboard
No.8 pin Rb of the main-keyboard
connect to No.10 pin Tb of the Sub-keyboard.
DVR KB D + No.9 pin Tb of the
Main-keyboard (or No.3 pin of keyboard)
DVR KB D - No.10 pin Tb of the
Main-keyboard (or No.4 pin of keyboard)
No.1 DVR KB D + (or No.3 pin of keyboard)
parallel connection No.2 DVR KB D + (or No.3 pin of keyboard)
No.1 DVR KB D - (or No.4
pin of keyboard)parallel
connection No.2 DVR KB
D - (or No.4 pin of keyboard)
NOTE: please set the No. of the DVR from 1 to 31
Max can sub-connect 31 DVRs.
Auxiliary keyboard
host keyboard
Connect to ground

1
12
1
A B A B A B A B
1
RS485B
……
RS485A RS485B RS485A
3.2 Intelligent Keyboard controller control PTZ
Function:
Can set different protocol and baud rate in one 485 Bus. Host KB
can cascade connect 15 Aux.KB and manage them according to
their different levels.
3.3 Keyboard controller control DVR or Keyboard and DVR control
PTZ synchronously
Intelligent
Function:
Keyboard and DVR can control PTZ at the meantime, neglect
neither client program nor site simple operation.
Users Manual
Intelligent Keyboard Controller CONNECTION DIAGRAM
connection
Auxiliary keyboard
host keyboard
Auxiliary keyboard
No.3 pin Ra of the main-keyboard
connect to No.1 pin Ta of the Sub-keyboard
No.4 pin Rb of the main-keyboard
connect to No.2 pin Tb of the Sub-keyboard.
Can connect max.255 speed dome
Can connect max.255 speed dome
RS485A(or RX+) of speed dome
connect to the first port(Ta) of
keyboard
RS485B(or RX-) of speed dome
connect to the second port(Tb) of
keyboard
Connect to ground

Embedded Net DVR
88
X
1minute
PAL
X
3:1
1024*768/60Hz
2008-06-15
15:25:08
2008-06-15 15:25:08
admin
13
DVR AND KB CONNECTION AND SETTING
Users Manual
Intelligent Keyboard Controller
Operation procedure:
DVR’s Device number should be same as KB’s DVR address when
KB need to control DVR. The procedure of DVR device number
setting is as following:
1.Enter primary menu- Local show-Device number;
2.Change device number into the number needed;
Confirm Cancel
Host port
Device name :
Device number :
Use operation password :
Screen protection time :
Output system :
Use Zoom :
Brightness :
Menu background contrast ratio :
VGA Resolution :
Date :
Time :
Local show
Phenomena
Reason
Solution
Notes:
Device only has one User name admin originally, default password
is 12345, use this password when log on the first time.
Common problem:
KB can’t control via DVR
Kb’s DVR address don’t match with DVR’s
Device number; Line connect wrong
Enter DVR host menu and revise device number;
connect lines again(refer to frame of diagram)
dvr setting

14
> system setup Set password Oldpassword
New pw: Again pw: > system setup
> system setup Set password Factory setup
> system setup
Sure? Set password
> SOUND setup SOUND: ON
5.1 Password setup
Get into KB setup mode, move joystick to page down the LCD display
information to show as right figure 1,press【Enter】it will show as
right figure 2, press【Enter】again,it show as right figure 3,key in
four figure old password, press【Enter】, it show as right figure 4,
key in four figure new pas sword, pr es s【Enter】, it show as right
figure 5, key in the new password again, buzzer will emit a sound,
key in new password, press 【Enter】, it show as right figure 6, key in
the new password again, buzzer will em i t a sound f or 3 times to
indicate re-setup. After finish setup, press【ESC】for 2 times to back
to operation mode.
5.2 Default setup
Get into keyboard setup mode, move joystick to make LCD to display as
right figure 7,press【Enter】, it will show as right figure 8, move joystick
to page down, it will show as right figure 9, press【Enter】, it will show
as right figure 10, press【Enter】to confirm, press【ESC】to quit
default, after setup, press【ESC】for 2 times to back to operation mode.
5.3 Download updating on line
This function can change KB’s program, contact Technical Department
in our company when operate for getting instruction on line.
5.4 Key button buzzer setup
Get into setup mode, move joystick to make LCD to show as right
figure 11, press【Enter】, it will show as right figure 12, move joystick
to page down, it will show as right figure 13, press【Enter】, it will
show as right figure 14, please select “off” to turn off the buzzer sound.
Press【Enter】to complete setup, press【ESC】to quit.
Other function setup
Users Manual
Intelligent Keyboard Controller OTHER FUNCTION SETUP
figure 1 figure 2 figure 3
figure 4 figure 5 figure 6
figure 7 figure 8 figure 9
figure 10 figure 11 figure 12
figure 13 figure 14

Protocol
PTZ SETUP Baud Rate
Set Password
Load Default
SYSTEM SETUP
Keyboard Id Set
Address
Sound Setup
Lock Set
> SYSTEM SETUP Set password >KEYBOARD ID SET
>KEYBOARD ID: > SYSTEM SETUP SET PASSWORD
>LOCK SET LOCK OFF LOCK PW: - - - -
Password: - - - -
15
Users Manual
Intelligent Keyboard Controller
OTHER FUNCTION SETUP
5.5 Keyboard ID setup
Get into setup mode, move joystick to make the LCD to display as show
on right figure 1. Press【Enter】, it will show as right figure 2, move
joystick to page down, it will show as right figure 3, press【Enter】,
it will show as right figure 4, key in ke yboard ID from 0-15 , it can
connect max. 15 aux. keyboard, press【Enter】,complete setup,
press【ESC】, quit setup.
5.6 Keyboard lock setup
Get into setup mode, move joystick to make the LCD display as show
on right figure 5, press【Enter】, it will show as right figure 6, move
joystick to page down, it will show as right figure 7, press【Enter】,
it will show as right figure 8(default mode), open the keyboard lock,
please use joystick to select “on”, press【Enter】, it will show as right
figure 9, key in password, press【Enter】to complete setup, press
【ESC】to quit.
5.7 Keyboard parameter setup framework
Press【Setup】key for 3s, get into setup mode(LCD display as figure
10, default password:8888)
Other function setup
figure 1 figure 2 figure 3
figure 4 figure 5 figure 6
figure 7 figure 8 figure 9
figure 10

006.08.09-4101
Keyboard controller
Other manuals for MY-4101KT
1
Table of contents
Other TBK vision Controllers manuals
