tbs electronics PD-120 User manual

www.trianglebiomedical.com
INNOVATIONS FOR SCIENCE™
Be certain to read this manual thoroughly
before proceeding with unpacking and installation.
TRIANGLE BIOMEDICAL SCIENCES, INC.
3014 CROASDAILE DRIVE • DURHAM, NORTH CAROLINA 27705-2507 • USA • 919.384.9393 • FAX 919.384.9595 • E-MAIL: [email protected]
Paraffin Dispenser
Catalog # PD-120, PD-220
Operator’s Manual
Version 1.5, May 2006

www.trianglebiomedical.com
INNOVATIONS FOR SCIENCE™
TABLE OF CONTENTS
Topic Page
Warranty card Insert A
Introduction 1
Symbols and conventions 2
Overview and specifications 3
Instructions 5
Precautions and maintenance 8
Regulatory Compliance 8
Error codes 9
Troubleshooting 11
Contact information 12

1
INTRODUCTION
Congratulations on your decision to purchase a TBS®6.25-Gallon Paraffin Dispenser.
Your instrument is designed to meet the large volume requirements of today's histology
laboratory by offering the convenience of having 6.25 gallons of molten paraffin
available at all times. While one low-wattage heating element remains on continuously
to prevent clogging within the spout, two other higher wattage elements are
microprocessor-controlled to maintain 1°C temperature accuracy within the paraffin
reservoir. A sensor positioned on the outside cylinder wall detects temperature
changes precipitated by the introduction of solid paraffin pellets. A complex software
algorithm immediately responds by increasing the temperature of heaters at the bottom
of the cylinder and/or surrounding the cylinder wall. As the pellets melt and the
temperature approaches the set point, the software cycles both elements on or off as
required to maintain the set point. A safety overheat protector device (88°C) is
appropriately positioned to provide additional security.

2
SYMBOLS AND CONVENTIONS
Important Notice
Refer to documentation before operation
Hot Surface

3
OVERVIEW AND SPECIFICATIONS
TBS®Paraffin Dispenser (PD)
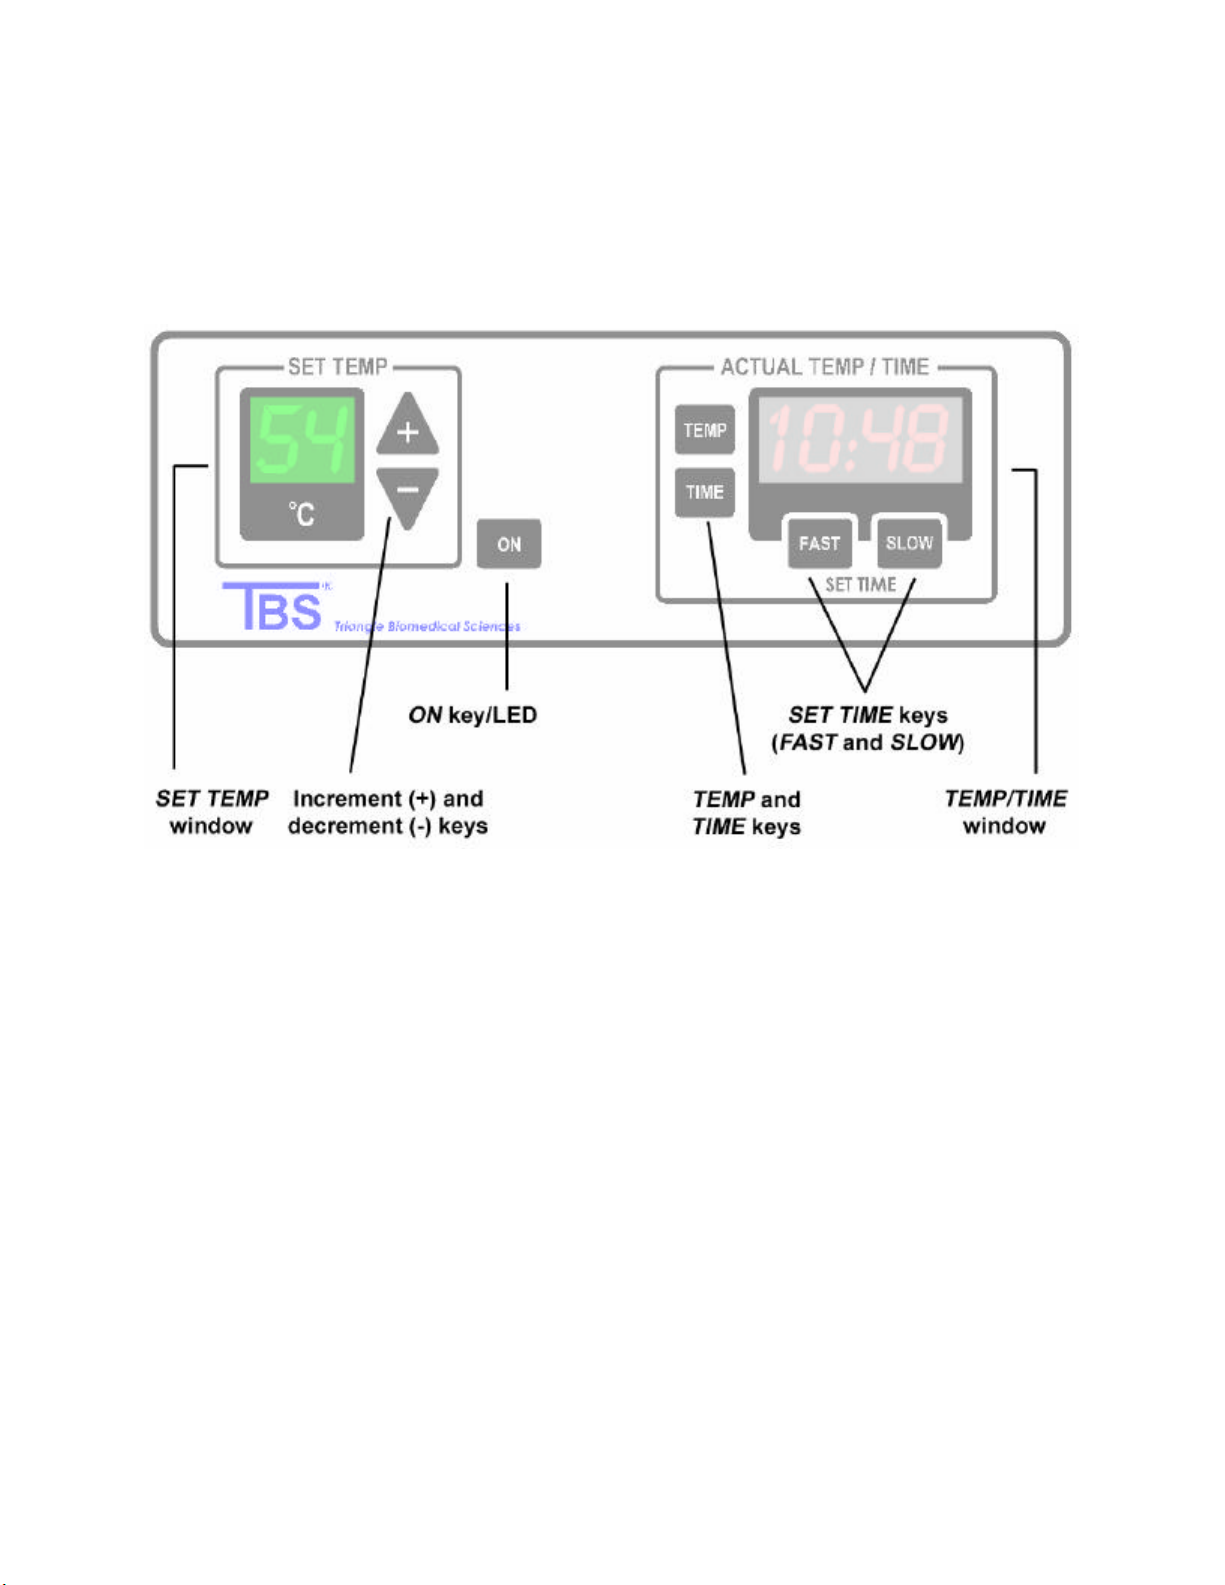
4
PD Control Panel
Specifications
Dimensions
Height 21.5" (546.1mm)
Width 14" (355.6mm)
Depth 16" (406.4mm)
Voltage
120V AC ±10% 50/60Hz single phase
Current
4.5 amps
Power
540 watts
Default temperature setting
55°C
Maximum temperature
60°C
Heat output
1885 BTU/hr (typical)
Weight
Unit 20.2 lbs (9.072 kg)
Shipping 28 lbs (12.7 kg)

5
INSTRUCTIONS
1. Remove the equipment from the shipping carton carefully. Save the shipping
carton and all packing material until proper operation of the equipment is
confirmed. Immediately notify the carrier if there is any visible damage to the
carton or its contents. Failure to do so may limit your ability to obtain
compensation for damage.
NOTE: The inner chamber of your instrument has been treated with an oil-based
protectant. Please clean the chamber thoroughly with alcohol before filling to avoid
the contamination of paraffin.
2. Connect the power cable to the unit and into a properly grounded 120V outlet.
NOTE: If your unit was shipped outside of the U.S., check the label on the rear of
the instrument for the electrical requirements.
3. Switch the ON/OFF switch at the rear of the unit to the ON position.
4. Immediately upon turning the unit on, the SET TEMP and TIME/TEMP windows
will display 8888 for approximately 4 seconds. The unit will then display PASS or
FAIL in the TEMP/TIME window for 4 seconds. If PASS appears, 06:00 will
appear in the red LED window and flash until set, while the SET TEMP window will
display the factory preset temperature of 55°C.
NOTE: If FAIL appears in the TEMP/TIME window, the SET TEMP LED will be
blank and the beeper will continue to sound. Press any switch to discontinue the
beeping. Although the water bath may appear to function normally, the FAIL
message indicates that the software has found a problem with the unit, and the
unit should be returned for service. Phone our customer service department
immediately for further instructions.
5. Press the ON key to initiate the paraffin reservoir heaters. The small red LED
indicator will light up.
6. You may now set the clock by pressing the SET TIME FAST or SET TIME SLOW
keys. Press the TEMP key to the left of the TEMP/TIME display if you prefer
continuous monitoring of the bath temperature.
7. To increase or decrease the preset reservoir temperature, press and hold the
increment (up arrow) key or the decrement (down arrow) key until the desired

6
temperature is displayed in the SET TEMP window. The maximum operating
temperature is 60°C.
8. Leave the TEMP/TIME display in the TIME mode for continuous monitoring as a
clock, or press the TEMP key to view the actual paraffin temperature. It is not
necessary to unplug the paraffin dispenser while not in use for short periods of
time, as this will cause any user-defined time clock and chamber temperature set
points to be lost.

7
PRECAUTIONS AND MAINTENANCE
•When initially melting a full reservoir of solid paraffin pellets, please allow
approximately 3 hours. For laboratories that are constantly replenishing large
amounts of paraffin, we recommend that you keep your unit set at 62°C to 65°C.
Your meltdown time will be significantly decreased.
•The Paraffin Dispenser is designed to run continuously to maintain large
volumes of molten paraffin; however, any power surge or disruption will activate
the safety cut-off switch, shutting the unit off. TBS recommends that the unit be
connected to a surge protector or some form of uninterrupted power source to
ensure against such disruptions.
•Occasionally check the filter located in the bottom of the paraffin well, as particle
buildup may interfere with the flow volume. The spigot can be removed and
cleaned in the event that clogging does occur. Simply loosen the knurled knob at
the front of the spigot (IMPORTANT: please ensure that the reservoir is empty)
and use forced air to clean the valve. Avoid probing the spigot valve with sharp
objects, as they may puncture the seal.
•A spare 6.3 amp fuse is provided in the fuse holder located in the power entry
module in the rear of the unit.

8
REGULATORY COMPLIANCE
The PD-120/220 has been tested by a registered independent body to rigorous
international quality and safety standards, and has been found to be in compliance with
the following regulations and specifications:
UL 61010A
CSA 1010-1
CE EN/IEC EN61010-1, Safety
EN61000-3-2, Harmonic Distortion
EN55011, Emissions
EN61326, Immunity
EN61000-3-3, Voltage Fluctuation/Flicker

9
ERROR CODES
An error condition exists when the beeper sounds an alarm and the SET TIME LED
display flashes an error code. The error code indicates one of the specific problems as
described below:
Error code Problem
E0 General system failure
E1 Sensor #1: Temperature over 70°C
E2 Sensor #2: Temperature over 72°C

10
TROUBLESHOOTING
Problem Probable cause Solution
Unit has no LED display. •No power from main.
•Blown fuse.
•P3 disconnected.
•Connect cord plug to main.
Switch unit on.
•Replace with correct fuse rating.
If problem persists, consult
qualified personnel.
•Reconnect P3.
No response or audible beep
when keypad is depressed.
•Defective keypad.
•Microprocessor lockup
(power surge).
•Replace keypad (call TBS).
•Switch unit off, wait 3 seconds,
switch back on.
Solid block of paraffin not
melting, but will dispense some
liquid paraffin.
•Set temp too low.
•Defective band heater.
•Defective solid state relay
(K2).
•Increase set temp to 65°C.
•Check resistance value for
approx. 55Ωat P4 pin 4 & 1.
•Replace heater (call TBS).
Paraffin not melting. No liquid
wax dispensing, no increase in
temperature.
•Keypad LED not lit.
•Disconnected P4.
•Defective controller board
and/or firmware.
•Press the ON switch.
•Reconnect P4.
•Replace controller board (call
TBS).
Paraffin completely melted.
Actual and set temp agree
but unit will not dispense wax.
•Defective spigot heater.
•Defective solid state relay
(K4).
•Check resistance value for
approximately 1200Ωat P3 pin
2 and P4 pin 6.
•Replace controller board relay
(call TBS).
Paraffin completely melted.
Actual and set temp agree
but unit will not dispense wax,
and spigot is hot to the touch.
•Foreign objects block spigot
or drain. •Remove foreign object.
Spigot leaks at the handle. •Defective seat cup. •Replace seat cup.
Spigot drips. •Foreign debris not allowing
closure.
•Seat cup not fully seated.
•Switch unit off and remove the
spigot handle to expose silicone
seat cup. Clean cup thoroughly
and reinstall.
•Remove seat cup and reinstall,
ensuring proper seal.
Slow or limited temperature
increase; spigot is hot to the
touch, but paraffin does not
flow.
•Defective bottom heater.
•Open safety over heat
protector (thermostat).
•Defective solid state relay(
K1).
•Check resistance value of the
bottom heater approx. 51Ωat
P4 pins 2 and 3.
•Replace thermostat.
•Replace relay.
E1 error code, temp display
reads HI but paraffin reservoir
not overheating.
•Defective bottom
temperature sensor.
•Sensor disconnected P2.
•Defective controller board.
•Replace sensor (call TBS).
•Reconnect P2.
•Replace controller (call TBS).

11
Problem Probable cause Solution
E1 error code; temp display
reads HI but there is an
indication of the paraffin
overheating.
•Defective K1 (solid state
relay) shorted.
•Defective temperature
sensor or sensor wiring.
•Defective controller board.
•Out of calibration.
•Call TBS for replacement.
•Call TBS for replacement.
•Call TBS for replacement.
•Call TBS for calibration
procedure.
E2 error code display reads HI
but there is no indication of
overheating.
•Defective band temperature
sensor.
•P2 disconnected.
•Controller board failure.
•Call TBS for replacement.
•Reconnect P2.
•Call TBS for replacement.
E2 error code display reads HI
but there are indications that
the paraffin is overheating.
•Defective band temperature
sensor.
•Solid state relay K2 shorted.
•Controller board defective.
•Out of calibration.
•Call TBS for replacement.
•Call TBS for replacement.
•Call TBS for replacement.
•Call TBS for calibration
procedure.

12
CONTACT INFORMATION
Customer service
(919) 384-9393
Fax
(919) 384-9595
Mailing address
Triangle Biomedical Sciences, Inc.
3014 Croasdaile Drive
Durham, NC 27705 U.S.A.
Sales and product information
Customer service questions
All other inquiries
Please visit us at
http://www.trianglebiomedical.com
This manual suits for next models
1
Table of contents
Popular Dispenser manuals by other brands


MARMON
MARMON Prince Castle Silver King SKMCD1P/C1 Operation manual

Brookstone
Brookstone Hands-Free Soap Dispenser instruction manual

Sanela
Sanela SLZN 59ES quick start guide

Gourmet Dispensing
Gourmet Dispensing D300 quick start guide
 2 FLAVOR installation manual")
Cornelius
Cornelius VIPER (E) 2 FLAVOR installation manual

ASI
ASI EZFILL 0391 Series Installation and maintenance guide


