6POLYTUNE 3 User Manual 7POLYTUNE 3 User Manual
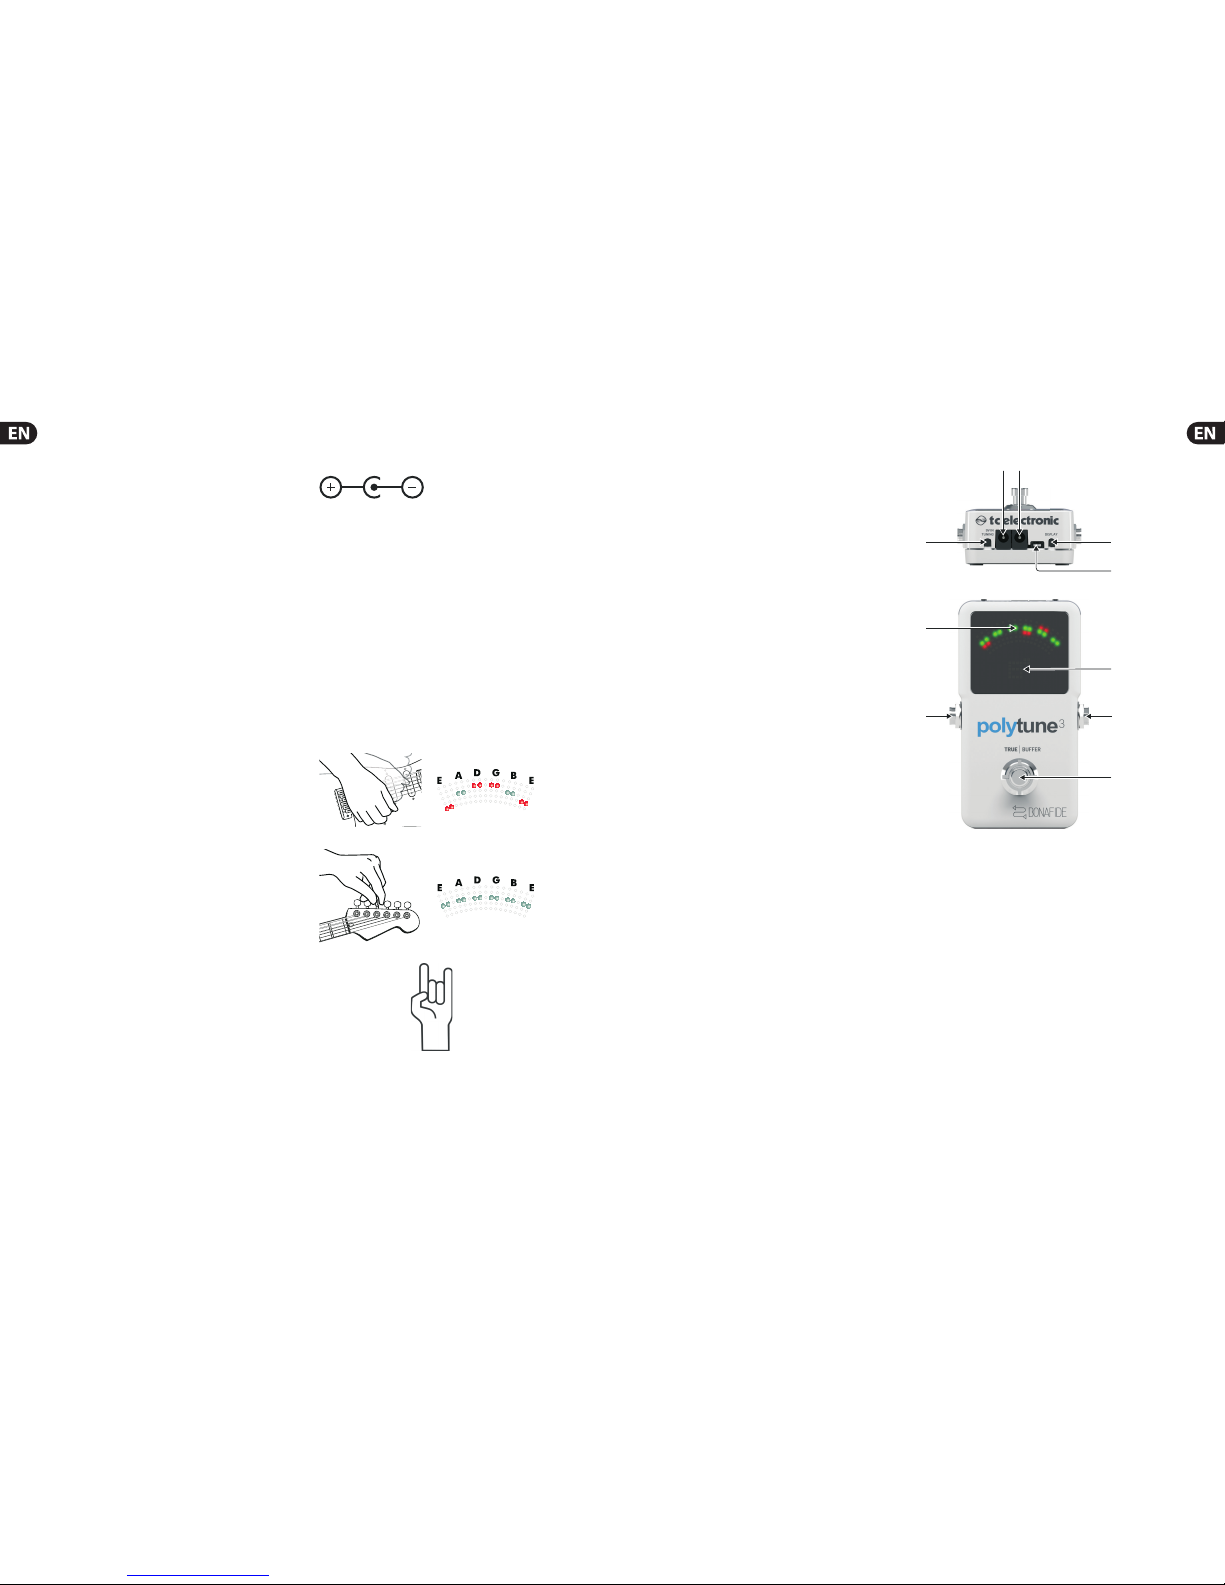
(5) DISPLAY MODE button Use the display mode button to switch between the
various display modes.
The various display modes are explained in the following section of this
manual (“How to use POLYTUNE 3”).
The selected display mode is stored and will be recalled when you power on
POLYTUNE 3 again.
(6) DISPLAY The LEDs of the POLYTUNE 3 display are extremelybright; ensuring
aclear readout even in broad daylight.
The various display modes are explained in the following section of this
manual (“How to use POLYTUNE 3”).
(7) AMBILIGHT sensor Inthe lower right corner of the display is an ambient
light sensor that detects the strength of the surrounding light and
automaticallyadjusts the display brightness accordingly. This ensures you
can see and correct your instrument’s tuning under all conditions. This
feature even extends battery life by reducing display brightness to what is
required in agiven situation.
(8) AUDIO INPUT Connect your instrument to the INjack on the right side
of the pedal.
The audio input of this pedal is astandard ¼"jack (mono/TS).
When you connect your instrument to the audio input, the following
information will be displayed:
•• Standard (“STD”)or Drop Dtuning mode
•• the currentlyselected display mode (Needle/Strobe, Guitar /Bass)
•• the currentlyselected tuning mode
•• the reference pitch.
For best results, place POLYTUNE 3 in your signal chain before your drive,
distortion and vibrato pedals. Adistorted or modulated signal is
harder to analyze.
Ifthe pedal runs on battery power, we recommend removing your
instrument from the audio input to preserve battery power when you
don’t play.
(9) AUDIO OUTPUT Connect the OUT jack of POLYTUNE 3 to the input jack of the
next device in the signal chain.
The audio output of this pedal is astandard ¼" jack (mono/TS).
(10) FOOTSWITCH Toturn the tuner on or o,just tap the footswitch.
Notes regarding tuning and signal output:
•• When the tuner is active, the output will automaticallybe muted for
silent tuning.
•• When the tuner is active and no signal is detected, four red LEDs will
light on the bottom of the display, indicating that POLYTUNE 3 is ready
for tuning.
•• POLYTUNE 3 features atrue bypass circuit that leaves your beloved tone
unaltered when the tuner is bypassed.
4. Operation – Tuning with
POLYTUNE 3
4.1 Chromatic vs. polyphonic tuning
Avery simpleguitar tuner will onlyallow you to tune open strings, one string at a
time – e.g., E-A-D-G-B-E for the standard tuning of aguitar.
POLYTUNE 3 is achromatic tuner – meaning it will detect and allow you to tune
all twelve notes of the scale.
But that’s not all.Other than atraditional tuner, POLYTUNE 3 allows you to play
all of your instrument’s string simultaneously when tuning. POLYTUNE 3 will
detect which strings need to be tuned and indicate those strings in its display.
This allows you to tune your instrument much faster.
Finally, you may have tuned one or all strings on your instrument dierentlyfrom
standard tuning, or you may be using acapo to change the playablelength
of the strings.
Inall of these situations, POLYTUNE 3 has you covered.
4.2 Display modes
Ifyou press the display mode button on the rear of POLYTUNE 3 once, the
currentlyselected display mode will be shown. Pressing the display mode button
repeatedlywill cyclethrough these modes:
•• Guitar / Needle mode (indicated by a“G” and the center LEDcolumn
lighting up).
•• Guitar / Strobe mode (indicated by a“G” and the middlerow of LEDs
lighting up).
•• Bass / Needle mode (indicated by a“B” and the center LEDcolumn
lighting up).
•• Bass / Strobe mode (indicated by a“B” and the middlerow of LEDs
lighting up).
4.3 Needle mode
InNeedle mode,when you tune asinglestring, pitch is indicated by acolumn
of ve LEDs in the upper part of the display, and the name of the target note is
displayed at the bottom of the display.
Ifthe string you are tuning is too low, LEDs to the left of the center column will
light up. Ifthe string is too high, LEDs to the right of the center column will
light up.
Tune the string until the middlecolumn and the middlerow of green LEDs lights
up. This means you are “on target”.
Needlemode – Astring in tune
4.4 Strobe mode
InStrobe mode, the dierence between the correct (target) frequency and the
actual detected frequency is displayed by two indicators simultaneously:
1. Red LEDs to the left (pitch too low) or to the right (pitch to high) of the center
LEDcolumn
2. Rotating segments in the display. The closer the detected frequency is to the
target frequency, the slower the rotation.
Tune the string until the rotating pattern has come to astop and onlythe middle
column of green LEDlights up.
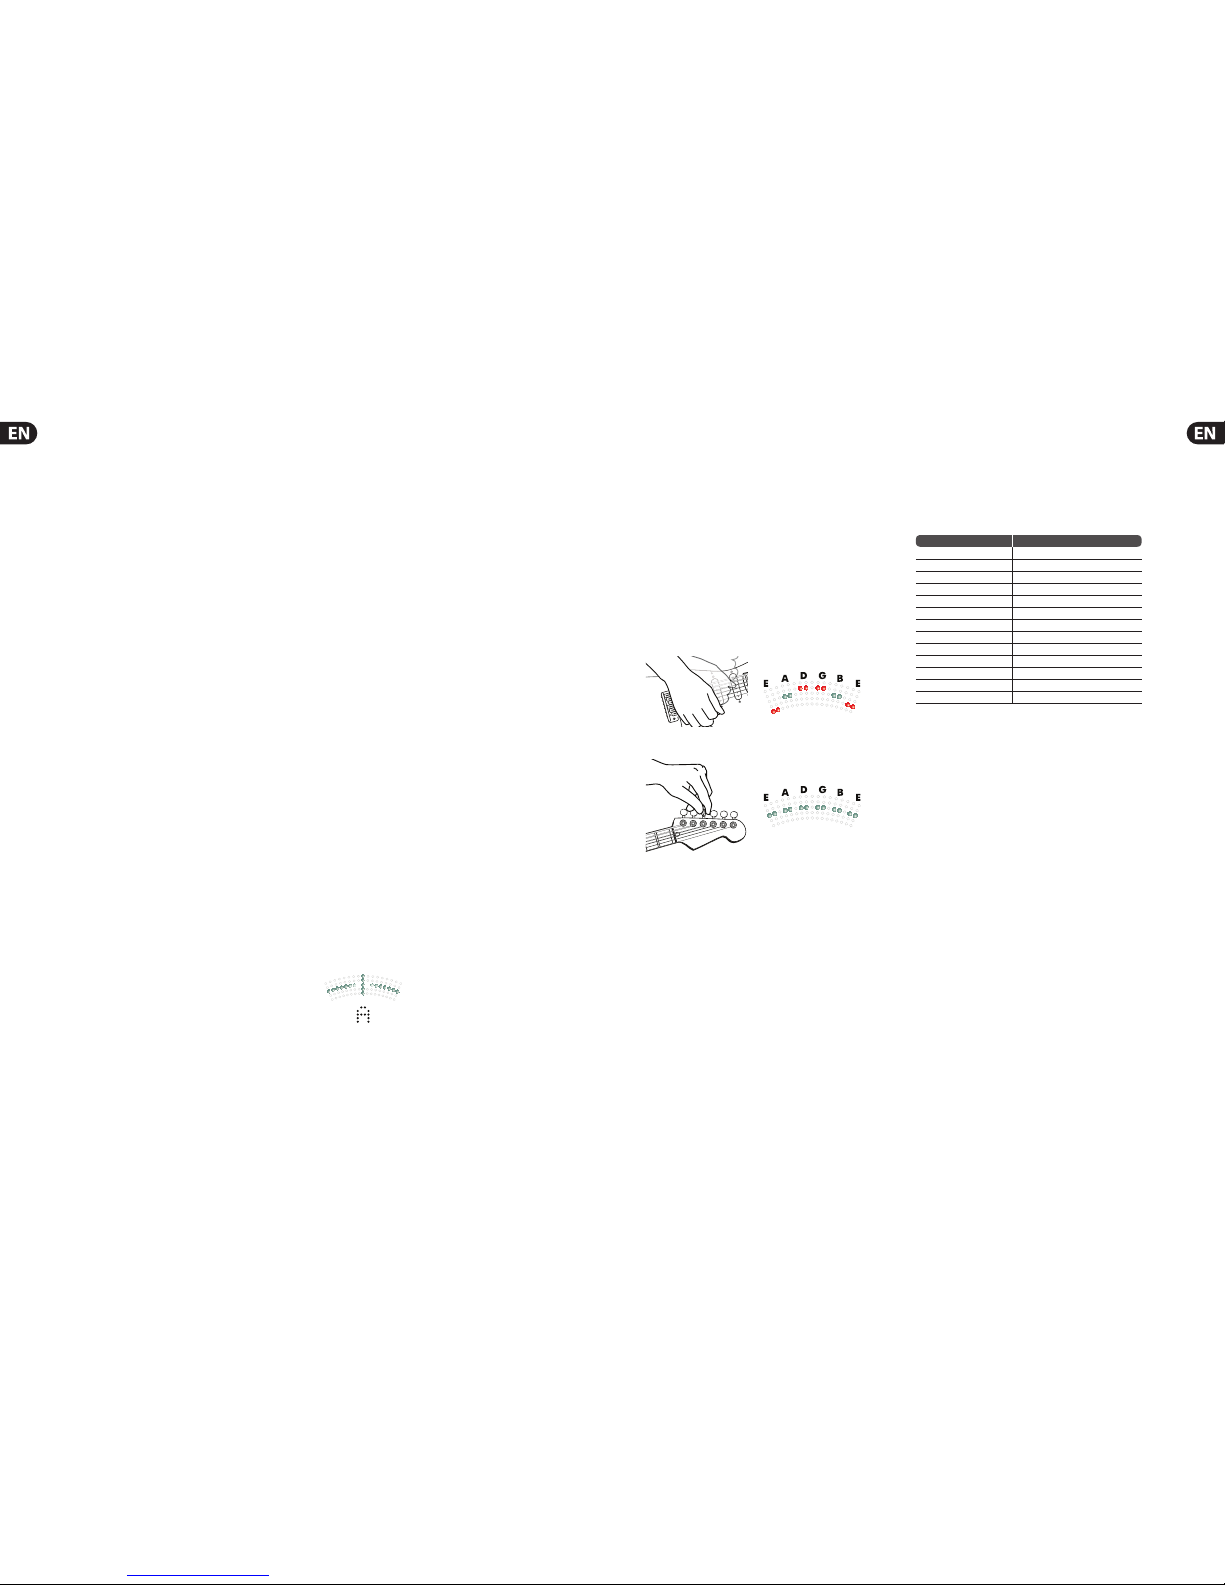
4.5 Polyphonic tuning
As you know by now, POLYTUNE 3 is apolyphonic tuner. You can strum your
instrument, and POLYTUNE 3 will analyze and display the tuning of all strings.
So how do you activate polyphonic tuning mode?
You don’t – it just works. Strum, tune, rock on!
Strum your guitar. Strings that are in tune will be represented by two green LEDs. Strings that need
tuning are represented by two red LEDs below (at) or above (sharp) the middlerow.
Tune your guitar and strum again. Your instrument is in tune when all strings are represented
by two green LEDs in the middlerow.
Of course, onlythe strings that are actuallypresent and played will be shown in
the display. So if you tune afour string bass, onlyfour LEDcolumns will light up.
4.6 Drop D tuning
“Drop D” is apopular tuning (also known as D-A-D-G-B-E)in which the lowest
string of aguitar is tuned down (“dropped”)from E to D.
Ifyou want to tune an instrument set to “Drop D”,follow these steps:
1. Press and holdthe POLYTUNE 3 footswitch for about three seconds.
2. The word “DROP” will be displayed briey, and the default“ready for tuning”
indicator at the bottom of the display will change from asmall
square to a“d”.
3.Ifyou want to switch POLYTUNE 3 back to standard tuning, press and hold
the footswitch for three seconds again.
4.“STD” will be displayed briey, and the “ready for tuning” indicator will go
back to asmall square.
4.7 Alternate tunings and capos
There’s more to life than standard E-A-D-G-B-E tuning! You may have tuned
all strings of your instruments down, or you may be using acapo. Inthat case,
tell POLYTUNE 3 about your instrument’s tuning by pressing the TUNING MODE
button.
Ifyou press the TUNING MODE button once, the current tuning will be displayed
(“-- E --” for Standard Tuning). Pressing the tune button repeatedlywill cycle
through the following tunings:
Display Mode
--- E --- Standard Tuning
EbAll strings tuned down 1semitone
DAll strings tuned down 2semitones
Db All strings tuned down 3 semitones
CAll strings tuned down 4 semitones
BAll strings tuned down 5 semitones
F 1Capoat rst fret
Gb 2 Capo at second fret
G3 Capo at third fret
Ab 4 Capo at fourth fret
A5 Capo at
fth fret
Bb 6 Capo at sixth fret
B7 Capo at seventh fret
Ifyou do not touch the TUNING MODE button for two seconds, the display will
blink twice, and the selected tuning will be used.
The selected tuning mode is stored and will be recalled when you power on
POLYTUNE 3 again.
4.8 Changing the reference pitch
Inmost cases, you may want to tune to standard pitch, where the Aabove the
middleChas afrequency of 440Hz. However, you and your band may prefer a
dierent pitch, or you may have to tune to an acoustic instrument that cannot
easilybe retuned.
Inthat case, you need to change the reference pitch.
Tochange the reference pitch, follow these steps:
1. Press the DISPLAY MODE button and the TUNING MODE button (3)
simultaneously.
2. The display will show the current reference pitch (e.g., “440” for 440Hz).
3.Toincrease the reference pitch in 1Hzsteps, press the TUNING MODE button.
4.Todecrease reference pitch in 1Hzsteps, press the DISPLAY MODE button.
5.Toaccept the currentlydisplayed reference pitch and return to normal
operation, do not press either button for two seconds.
The selected reference pitch is stored and will be recalled when you power on
POLYTUNE 3 again.