TCL LE32HDP21TA User manual

1
LED TV
User’s Guide
For use with models: LE32HDP21TA /
LE40FHDP21TA / LE46FHDP21TA
Need Assistance?
Please visit our website at www.tclusa.com
or call 1-877-300-8837.

2
Important Information
This symbol indicates that this product contains mercury. Special disposal of this product for environmental
reasons may be required under the laws applicable to your jurisdiction. For disposal or recycling information,
please contact your local authorities or the Electronic Industries Alliance: www.eiae.org.
Refer to thHLGHQWL¿FDWLRQUDWLQJODEHOORFDWHGRQWKHEDFNSDQHORI\RXUSURGXFWIRULWVSURSHURSHUDWLQJYROWDJH
)&&UHJXODWLRQVVWDWHWKDWXQDXWKRUL]HGFKDQJHVRUPRGL¿FDWLRQVWRWKLVHTXLSPHQWPD\YRLGWKHXVHU¶VDXWKRULW\WR
operate it.
Cable TV Installer: This reminder is provided to call your attention to Article 820-40 of the National Electrical Code
(Section 54 of the Canadian Electrical Code, Part 1) which provides guidelines for proper grounding and, in particular,
VSHFL¿HVWKDWWKHFDEOHJURXQGVKRXOGEHFRQQHFWHGWRWKHJURXQGLQJV\VWHPRIWKHEXLOGLQJDVFORVHWRWKHSRLQWRI
cable entry as practical.
Important: 7KLVWHOHYLVLRQLVDWDEOHPRGHODQGLVGHVLJQHGWRVLWRQD¿UPÀDWVXUIDFH'RQ¶WSODFHWKH79RQVRIW
FDUSHWLQJRUVLPLODUVXUIDFHEHFDXVHWKHYHQWLODWLRQVORWVRQWKHERWWRPRIWKHXQLWZLOOEHEORFNHGUHVXOWLQJLQUHGXFHG
lifetime from overheating. To assure adequate ventilation for this product, maintain a spacing of 4 inches from the top
DQGVLGHRIWKH79UHFHLYHUDQGLQFKHVIURPWKHUHDURIWKH79UHFHLYHUDQGRWKHUVXUIDFHV
$OVRPDNHVXUHWKHVWDQGRUEDVH\RXXVHLVRIDGHTXDWHVL]HDQGVWUHQJWKWRSUHYHQWWKH79IURPEHLQJDFFLGHQWDOO\
WLSSHGRYHUSXVKHGRIIRUSXOOHGRII7KLVFRXOGFDXVHSHUVRQDOLQMXU\DQGRUGDPDJHWRWKH795HIHUWRWKH
Important Safety Instructions on the next page.
7KH3RZHUEXWWRQIROORZHGE\WKHSRZHUV\PERORQWKLV79DQG\RXUUHPRWHFRQWUROSXWVWKH79LQWRDYHU\
low-power standby mode but will not completely turn the power off. In order to completely shut the power off, you will
QHHGWRGLVFRQQHFWWKHSRZHUFRUGIURPWKHRXWOHW7KHUHIRUH\RXVKRXOGHQVXUHWKDWWKH79LVLQVWDOOHGLQDPDQQHU
that allows you to disconnect the power cord when desired.
Product Registration
3OHDVHUHJLVWHU\RXU7&/SXUFKDVHRQOLQHDWZZZWFOXVDFRP,WZLOOPDNHLWHDVLHUWRFRQWDFW\RXVKRXOGLWHYHUEH
necessary. Registration is not required for warranty coverage.
Product Information
Keep your sales receipt to obtain warranty parts and service and for proof of purchase. Attach it here and record the
serial and model numbers in case you need them. These numbers are located on the product.
Model No. ______________________ Serial No._____________________________________
Purchase Date __________________ Dealer/Address/Phone___________________________
WARNING 7KHEDWWHULHVVKDOOQRWEHH[SRVHGWRH[FHVVLYHKHDWVXFKDVVXQVKLQH¿UHRUWKHOLNH
&DXWLRQ7RUHGXFHWKHULVNRIHOHFWULFVKRFNGRQRWUHPRYHFRYHURUEDFN1RXVHUVHUYLFHDEOHSDUWVLQVLGH
5HIHUVHUYLFLQJWRTXDOL¿HGVHUYLFHSHUVRQQHO
This symbol indicates “dangerous voltage”
LQVLGHWKHSURGXFWWKDWSUHVHQWVDULVNRI
HOHFWULFVKRFNRUSHUVRQDOLQMXU\
This symbol indicates important
instructions accompanying the product.
This symbol indicates that this product incorporates
double insulation between hazardous main voltage
and user accessible parts. When servicing, use only
identical replacement parts.
WARNING
7RUHGXFHWKHULVNRI¿UHRUHOHFWULFVKRFNGRQRW
expose this product to rain or moisture. This product
should not be exposed to dripping or splashing. No
REMHFWV¿OOHGZLWKOLTXLGVVXFKDVYDVHVVKRXOGEH
placed on the component.
7KH79LVXQVWDEOHLILWLVQRWSURSHUO\DWWDFKHGWR
the base or mounted to the wall. Please follow the
base or wall mounting instructions provided in the
8VHU¶V*XLGHWRHQVXUH\RXUVDIHW\
WARNING
CAUTION
RISK OF ELECTRIC SHOCK.
'212723(1

3
Important Safety Instructions
1. Read and follow all instructions.
2. Keep these instructions.
3. Heed all warnings.
'RQRWEORFNDQ\YHQWLODWLRQRSHQLQJV,QVWDOOLQDFFRUGDQFHZLWKWKHPDQXIDFWXUHU¶VLQVWUXFWLRQV
'RQRWLQVWDOOQHDUDQ\KHDWVRXUFHVVXFKDVUDGLDWRUVKHDWUHJLVWHUVVWRYHVRURWKHUDSSDUDWXV
LQFOXGLQJDPSOL¿HUVWKDWSURGXFHKHDW
'RQRWQHJDWHWKHVDIHW\SXUSRVHRIWKHSRODUL]HGRUJURXQGLQJW\SHSOXJ$SRODUL]HGSOXJKDV
two blades with one wider than the other. A grounding type plug has two blades and a third
grounding prong. The wide blade or the third prong is provided for your safety. If the provided plug
GRHVQRW¿W\RXURXWOHWFRQVXOWDQHOHFWULFLDQIRUUHSODFHPHQWRIWKHREVROHWHRXWOHW
3URWHFWWKHSRZHUFRUGIURPEHLQJZDONHGRQRUSLQFKHGSDUWLFXODUO\DWSOXJVUHFHSWDFOHVDQGWKH
point where it exits from the component.
'RQRWXVHWKLVFRPSRQHQWQHDUZDWHU
2QO\XVHWKHDWWDFKPHQWVDFFHVVRULHVVSHFL¿HGE\WKHPDQXIDFWXUHU
10. Clean only with dry cloth.
8VHRQO\ZLWKWKHFDUWVWDQGWULSRGEUDFNHWRUWDEOHVSHFL¿HGE\WKHPDQXIDFWXUHURUVROGZLWK
WKHFRPSRQHQW:KHQWKH79LVSODFHGRQDFDUWXVHFDXWLRQZKHQPRYLQJWKHFDUWWRDYRLGLQMXU\
from tip-over.
12. Unplug this component during lightning storms or when unused for long periods of time.
5HIHUDOOVHUYLFLQJWRTXDOL¿HGVHUYLFHSHUVRQQHO6HUYLFHLVUHTXLUHGZKHQWKHFRPSRQHQWLV
damaged in any way, such as power supply cord or plug damage, liquid spilled on or objects falling
onto the component, rain or moisture exposure, abnormal operation, or if the component has been
dropped.
14. If an outside antenna or cable system is connected to the product, be sure the antenna or
cable system is grounded so as to provide some protection against voltage surges and built-up
VWDWLFFKDUJHV6HFWLRQRIWKH1DWLRQDO(OHFWULFDO&RGH$16,1)3$1R6HFWLRQ
54 of Canadian Electrical Code, Part 1) provides information with respect to proper grounding of
the mast and supporting structure, grounding of the lead-in wire to an antenna-discharge unit, size
of grounding conductors, location of antenna-discharge unit, connection to grounding electrodes,
and requirements for the grounding electrode. See following example:
ANTENNA LEAD IN WIRE
GROUND CLAMP
GROUNDING CONDUCTORS
(NEC SECTION 810-21)
GROUND CLAMPS
POWER SERVICE GROUNDING
ELECTRODE SYSTEM
(NEC ART 250, PARTH)
ELECTRIC SERVICE
EQUIPMENT
ANTENNA DISCHARGE
UNIT(NEC SECTION 810-20)

4
Important Information ..............................2
Important Safety Instructions...................3
Chapter 1 - Connections and Setup
Before Initial Setup .................................5
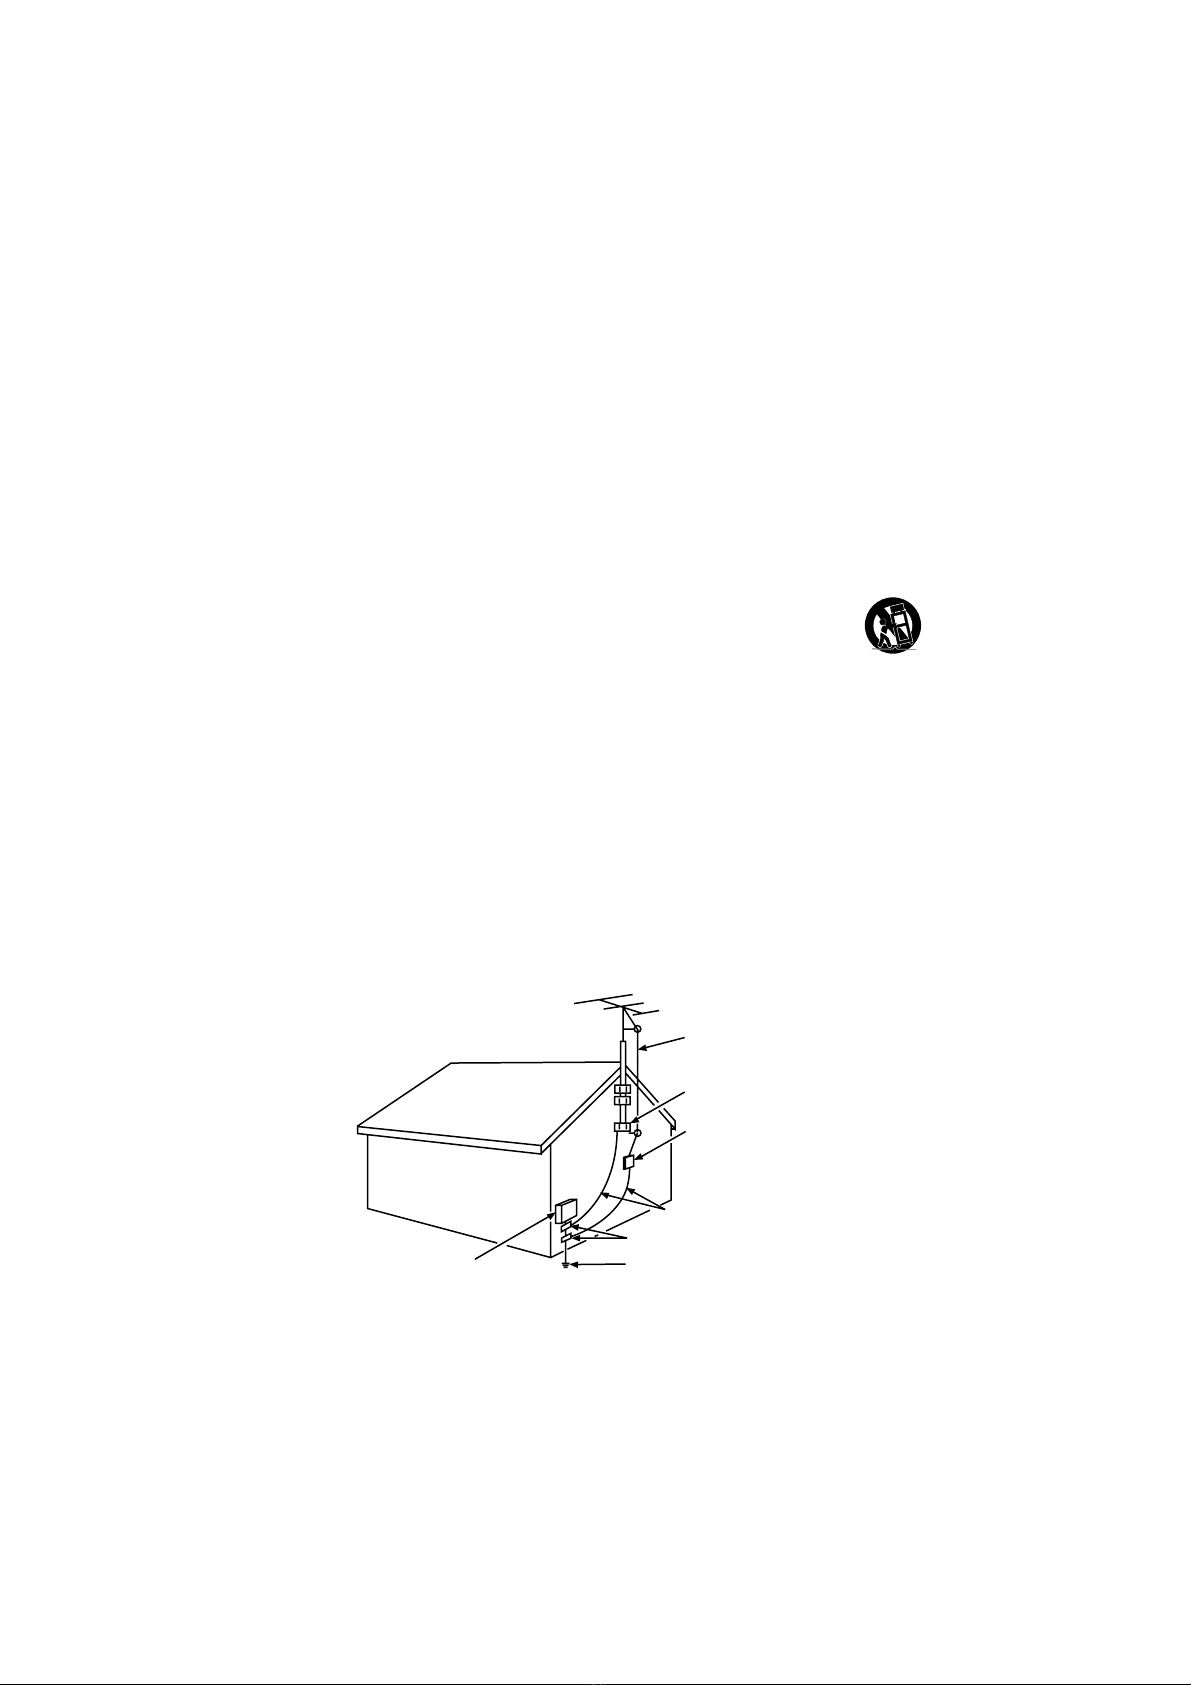
Protect Against Power Surges.............5
Safety Information ..............................5
Avoid Audio Interference ....................5
$YRLG'LUHFW/LJKW ................................5
&KHFN6XSSOLHG3DUWV..........................5
$WWDFKLQJ<RXU79WRWKH7DEOH6WDQG......... 6
0RXQWLQJ<RXU79WRWKH:DOO ..................7
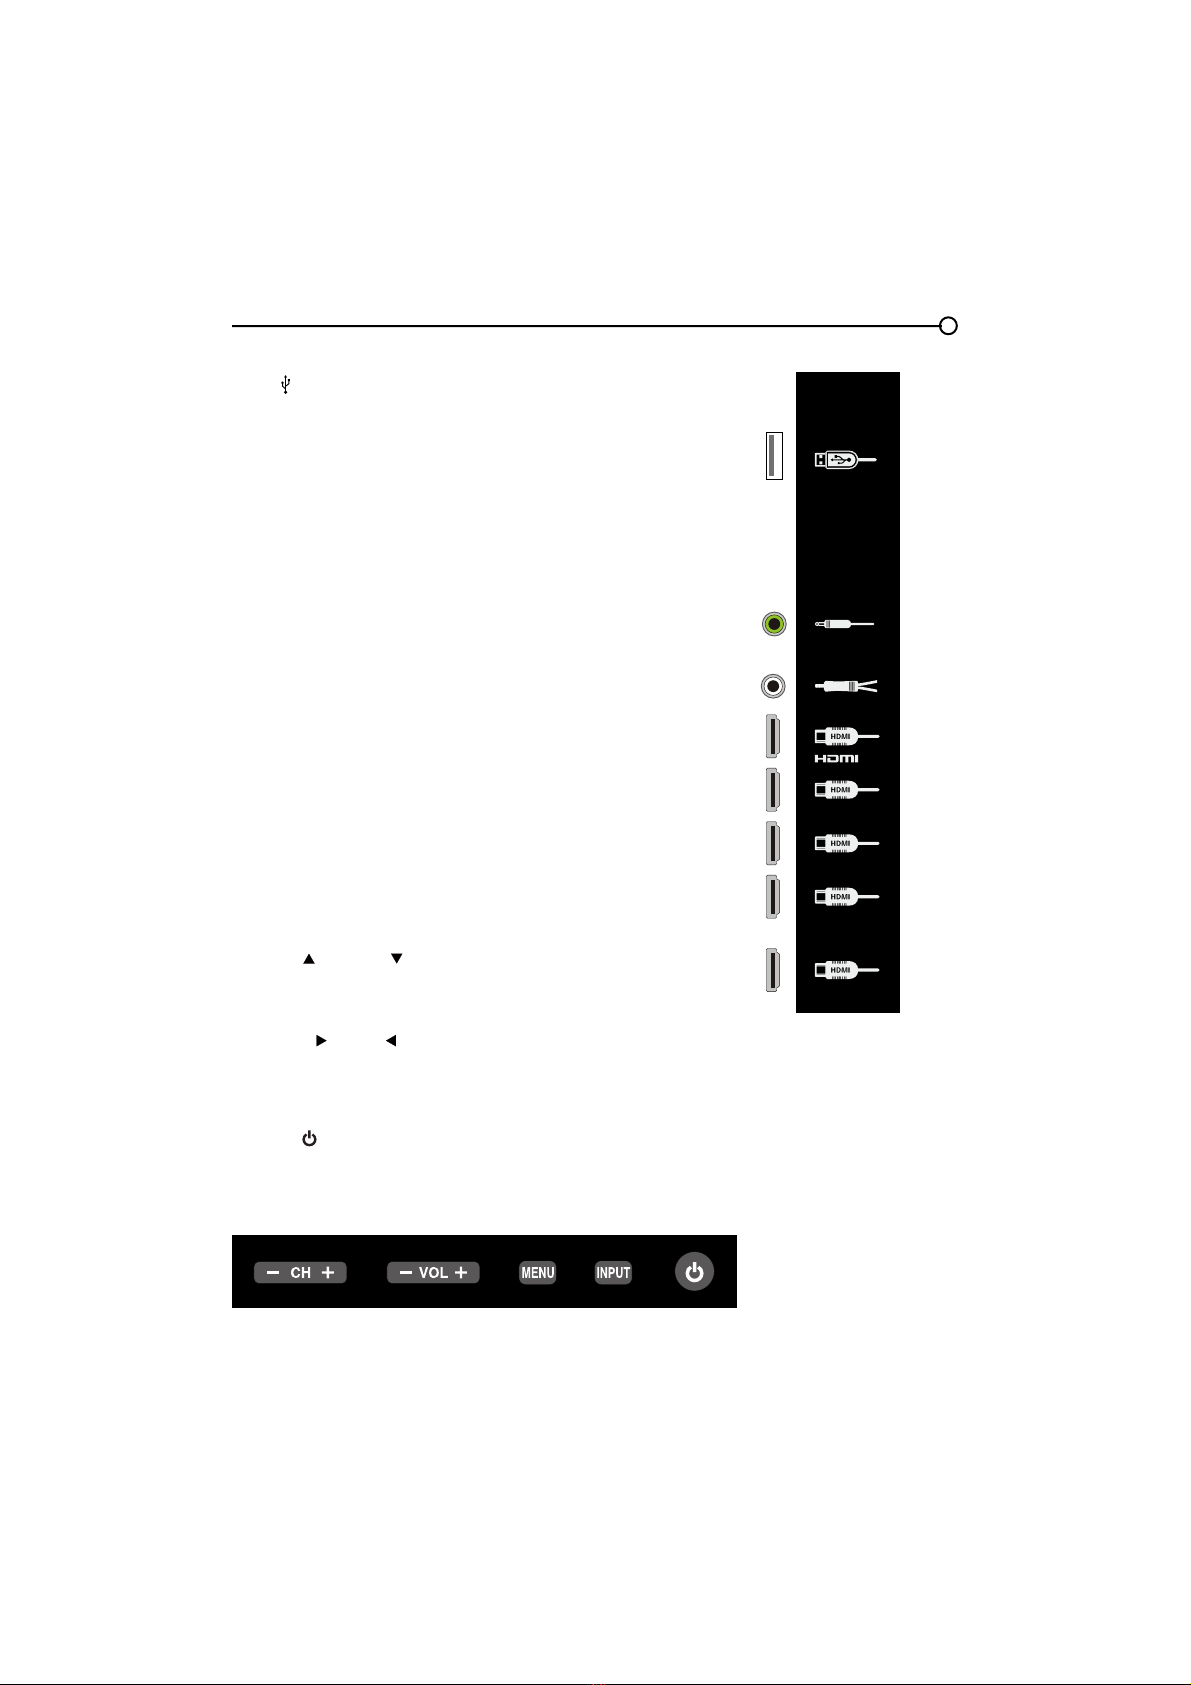
([SODQDWLRQRI-DFNVDQG%XWWRQVRQ79
....8
Rear Panel ...........................................8
6LGH,QSXW-DFNV...................................9
Side Panel Buttons...............................9
Obtain the Signal.....................................10
What You Need ....................................10
What You Need to Know ......................10
Choose Your Connections .......................11
&RPSRVLWH9LGHR&RQQHFWLRQ ..............12
&RPSRQHQW9LGHR&RQQHFWLRQ .............12
+'0,&RQQHFWLRQ.................................13
+'0,'9,&RQQHFWLRQ..........................14
PC Connection.....................................15
3OXJLQWKH79 ..........................................16
Put Batteries in the Remote.....................16
7XUQRQWKH79.........................................16
Using the Remote Control to Complete the
Initial Setup..............................................16
Complete the Initial Setup .......................17
Set the Menu Language.......................17
6HWWKH79/RFDWLRQ0RGH ...................17
Set the Time Zone................................17
Auto Channel Scan..............................18
6NLS6FDQ.............................................18
Chapter 2 - Understanding the Basics
7XUQLQJWKH792QDQG2II ......................19
6HOHFWLQJWKH9LGHR,QSXW6RXUFH ............19
Selecting a Channel ................................19
$GMXVWLQJ0XWLQJWKH9ROXPH ...................19
Screen Formats.......................................20
Channel Banner.......................................20
Chapter 3 - Using the Remote Control
Remote Control Buttons ..........................21
Chapter 4 - Using the TV Menu
Using the Menu System ..........................22
Picture Menu ...........................................22
Picture Settings....................................22
Expert Settings.....................................22
Advanced Settings...............................23
PC Settings..........................................23
Reset Picture Settings .........................23
Sound Menu ............................................24
Setup Menu .............................................25
Signal Type ..........................................25
Channel Scan ......................................25
&KDQQHO6NLS........................................26
Channel Edit ........................................26
,QSXW6NLS.............................................27
Input Labels .........................................27
Closed Caption ....................................28
Time Setup...........................................29
Reset All...............................................30
3DUHQWDO&RQWUROVDQG9&KLS ..................30
&UHDWH&KDQJH9&KLS3DVVZRUG ........30
5HVHW9&KLS3DVVZRUG .......................30
&KDQQHO%ORFN......................................31
%XWWRQ%ORFN.........................................31
9&KLS5DWLQJ(QDEOH...........................31
9&KLS5DWLQJ6FUHHQ ..........................32
869&KLS795DWLQJV .........................32
%ORFNLQJ6SHFL¿F&RQWHQW7KHPHV ......32
869&KLS0RYLH5DWLQJ/LPLW..............33
%ORFNLQJ&DQDGD9&KLS5DWLQJV.........33
2SHQ9&KLS ........................................34
%ORFNLQJ8QUDWHG([HPSW3URJUDPV....34
5HVHW'RZQORDGDEOH'DWD ...................34
,QSXW%ORFN ...........................................34
Language Menu.......................................34
USB Menu ...............................................35
USB Connection......................................35
Chapter 5 - Other Information
)UHTXHQWO\$VNHG4XHVWLRQV)$4V .......36
Troubleshooting.......................................37
Care and Cleaning...................................39
9&KLS5DWLQJ([SODQDWLRQV.....................40
869&KLS5DWLQJ6\VWHP....................40
&DQDGLDQ(QJOLVK9&KLS5DWLQJ6\VWHP ...
40
&DQDGLDQ)UHQFK9&KLS5DWLQJ6\VWHP....
41
7HOHYLVLRQ6SHFL¿FDWLRQV..........................41
Limited Warranty .....................................42
Table of Contents

5
Before Initial Setup
Protect Against Power Surges
Connect all components before you plug any power cords into the wall outlet or power strip.
1(9(5SOXJ\RXU79LQWRDQRXWOHWWKDWLVFRQWUROOHGE\DZDOOVZLWFK
7XUQRIIWKH79EHIRUH\RXFRQQHFWRUGLVFRQQHFWDQ\FDEOHV
0DNHVXUHDOODQWHQQDVDQGFDEOHVDUHSURSHUO\JURXQGHG5HIHUWRWKH,PSRUWDQW6DIHW\
Instructions.
Safety Information
3URWHFWFRPSRQHQWVIURPRYHUKHDWLQJ
'RQ¶WEORFNYHQWLODWLRQKROHVRQDQ\RIWKHFRPSRQHQWV$UUDQJHWKHFRPSRQHQWVVRWKDWDLUFDQ
circulate freely.
'RQ¶WVWDFNFRPSRQHQWV
,I\RXSODFHWKHFRPSRQHQWLQDVWDQGPDNHVXUH\RXDOORZDGHTXDWHYHQWLODWLRQ
,I\RXFRQQHFWDQDXGLRUHFHLYHURUDPSOL¿HUSODFHLWRQWKHWRSVKHOIVRWKHKHDWHGDLUIURPLWZRQ¶W
harm other components.
Avoid Audio Interference
3RVLWLRQFDEOHVSURSHUO\LQVHUWHDFKFDEOH¿UPO\LQWRWKHGHVLJQDWHGMDFN
,I\RXSODFHFRPSRQHQWVDERYHWKH79URXWHDOOFDEOHVGRZQRQHVLGHRIWKHEDFNRIWKH79LQVWHDG
of straight down the middle.
,I\RXUDQWHQQDXVHVRKPWZLQOHDGFDEOHVGRQRWFRLOWKHFDEOHV
.HHSWZLQOHDGFDEOHVDZD\IURPDXGLRYLGHRFDEOHV
Avoid Direct Light
'RQ¶WSODFHWKH79ZKHUHVXQOLJKWRUURRPOLJKWLQJLVGLUHFWHGWRZDUGWKHVFUHHQ8VHVRIWRULQGLUHFW
lighting.
Check Supplied Parts
&KHFNWKDWWKHIROORZLQJSDUWVZHUHSDFNHGZLWK\RXUSURGXFW
1 Remote Control and 2 AAA Batteries
,QVWUXFWLRQ%RRN
4XLFN6WDU*XLG
Table Stand
4 St-screws for assembling the table stand
$XLGR9LGHR$GDSWHUFDEOH
Auido Adapter cable
&RPSRQHQW9LGHR$GDSWHUFDEOH
Chapter 1 - Connections and Setup
*UDSKLFVFRQWDLQHGZLWKLQWKLVSXEOLFDWLRQDUHSUHVHQWDWLRQRQO\
Replacing your remote
If you need to replace your remote, visit www.tclusa.com. A shipping and handling fee, and the appropriate sales tax, will be charged
upon ordering. Have your Visa or MasterCard ready.

6
Attaching Your TV to the Table Stand
<RXU79FRPHVZLWKRXWWKHWDEOHVWDQGDWWDFKHGVRWKDW\RXFDQFKRRVHWRPRXQW\RXU79HLWKHUWR
LWVWDEOHVWDQGRUWRDZDOOZDOOPRXQWVROGVHSDUDWHO\,I\RXZDQWWRPRXQW\RXU79WRWKHZDOOGRQ¶W
DWWDFKWKHWDEOHVWDQG)ROORZWKH0RXQWLQJ<RXU79WRWKH:DOOLQVWUXFWLRQVRQSDJH
Option1 - Step 1
5HPRYHWKH79EDJDQGSODFHLWRQDODUJH
ÀDWVXUIDFHVXFKDVDWDEOHRUFRXQWHUWRS
5HPRYHWKH79IURPWKHFDUWRQDQGSODFHLW
IDFHGRZQRQWKH79EDJ%HVXUHWKDWWKH79
is face down to avoid scratching the screen.
Option1 - Step 1
<RXU79KDVEHHQSDFNHGXSVLGHGRZQLQ
the carton to facilitate the attachment of the
797DEOH6WDQGDVVHPEO\<RXMXVWQHHGWR
UHPRYHWKHEDJFRYHULQJWKH79DWWDFKWKH
7DEOH6WDQGWRWKH79EHIRUHUHPRYLQJWKH
79IURPWKHFDUWRQ
Option1 - Step 2
Attach the table stand to the bottom
RIWKH79FDELQHW7RGRWKLVXVH
a screwdriver to tighten three M6
screws.
Option1 - Step 2
Attach the table stand to the bottom
RIWKH79FDELQHW7RGRWKLVXVH
a screwdriver to tighten three M6
screws.

7
,I\RXDUHPRXQWLQJ\RXU79WRWKHZDOO¿UVWUHPRYHWKHWDEOHVWDQGDWWDFKHGWRWKHEDFNRIWKH796HH
Step 2 above).
0RXQWLQJ<RXU79WRWKH:DOO
7KH9(6$QXPEHULVWKHKRUL]RQWDODQGYHUWLFDOPHDVXUHPHQWRIWKHPRXQWLQJKROHV)RUH[DPSOH
400x400 refers to the fact that the mounting measurements are 400mm horizontally and 400mm
vertically.
Notes: Follow the directions included with the wall mount to mount the TV to the wall.
Caution: <RXUZDOOPRXQWPXVWEHDEOHWREHDUDPLQLPXPRI¿YHWLPHVWKH79¶VQHWZHLJKWWRDYRLGFDXVLQJGDPDJH
7RPRXQW\RXU79WRWKHZDOOSXUFKDVHD9(6$ZDOOPRXQW
0RGHO/(+'37$/()+'37$
/()+'37$ Purchase a VESA 400 x 400, M6 screw

8
ANTENNA/CABLE IN
Lets you connect a coaxial cable to receive the signal from your antenna, cable, or cable box.
AV IN adapter\RXPXVWFRQQHFWDQ$XGLR9LGHRDGSWHUFDEOHZLWKWKUHHFRORUMDFNVWRWKLVDGDSWHUMDFN
¿UVW<HOORZMDFNIRU9,'(2FRQQHFWLRQUHGDQGZKLWHMDFNVIRU5$8',2DQG/$8',2FRQQHFWLRQ
/HWV\RXFRQQHFWDFRPSRQHQWWKDWKDVFRPSRVLWHYLGHRMDFNVVXFKDVD9&5RU'9'SOD\HU
L AUDIO 3URYLGHVOHIWDXGLRFRQQHFWLRQZKHQXVLQJWKH9,'(2,1387MDFN7KHOHIWDXGLR
FRQQHFWRUVDUHXVXDOO\ZKLWH)RUPRQRDXGLRVRXUFHVEHVXUHWRXVHWKH/$8',2,1387
R AUDIO 3URYLGHVULJKWDXGLRFRQQHFWLRQZKHQXVLQJWKH9,'(2,1387MDFN7KHULJKWDXGLR
connector is usually red.
CMPT IN (Y Pb Pr) adapter
\RXPXVWFRQQHFWD&RPSRQHQW9LGHRDGSWHUFDEOHZLWKWKUHHFRORUMDFNV
WRWKLVDGDSWHUMDFN¿UVW*UHHQMDFNIRU<%OXHMDFNIRU3EDQG5HGMDFNIRU3U
/HWV\RXFRQQHFWDFRPSRQHQWWKDWKDVFRPSRQHQWYLGHRMDFNVVXFKDVD'9'SOD\HU
&037<3E3U&RPSRQHQW9LGHR Provides good picture quality because the video is separated
into three signals. Use three video-grade or component video cables for the connection.
CMPT AUDIO IN adapter
\RXPXVWFRQQHFWDQ$XGLRDGSWHUFDEOHZLWKWZRFRORUMDFNVWRWKLVDGDSWHU
MDFN¿UVWUHGDQGZKLWHMDFNVIRU5$8',2DQG/$8',2FRQQHFWLRQ
CMPT L AUDIO IN3URYLGHVOHIWDXGLRFRQQHFWLRQZKHQXVLQJWKH&0379,'(2LQSXWV7KHOHIW
DXGLRFRQQHFWRULVXVXDOO\ZKLWH)RUPRQRDXGLRVRXUFHVEHVXUHWRXVHWKHOHIW$8',2LQSXW
CMPT R AUDIO3URYLGHVULJKW$8',2FRQQHFWLRQZKHQXVLQJWKH&0379,'(2LQSXWV7KHULJKW
audioconnector is usually red.
SPDIF - DIGITAL AUDIO OUT (optical) 8VHDGLJLWDORSWLFDOFDEOHWRFRQQHFW\RXU79WRDFRPSDWLEOH
audio receiver.
PC IN VGA &RQQHFW\RXUFRPSXWHURURWKHUFRPSRQHQWZLWKD9*$RXWSXWWRWKLVMDFNXVLQJD
SLQ'VXEFDEOH
DVI/PC AUDIO IN adapter (used for DVI/PC only)
( (you must connect an Audio adpter cable with two
FRORUMDFNVWRWKLVDGDSWHUMDFN¿UVWUHGDQGZKLWHMDFNVIRU5$8',2DQG/$8',2FRQQHFWLRQ
3URYLGHVDXGLRFRQQHFWLRQZKHQXVLQJ+'0,'9,,1387MDFNIRU'9,RUZKHQXVLQJ3&,1 For
PRQRDXGLRVRXUFHVEHVXUHWRXVHWKHOHIW$8',2LQSXW
Note: If using a DVI component, remember to connect the audio cable because the DVI cable carries
only the picture signal, not the sound.
Rear Panel
Explanation of Jacks and Buttons on TV
7KLVVHFWLRQGHVFULEHVWKHMDFNVRQWKHEDFNSDQHORI\RXU79'9'7KHUHDUHVHYHUDOZD\VWRFRQQHFW
components.
SPDIF ANTENNA/
CABLE IN
CMPT IN
(Y Pb Pr)
adapter
CMPT
AUDIO IN
adapter
VGA DVI/PC
AUDIO IN
adapter
AV IN
adapter
PC IN

9
6LGH,QSXW-DFNV
USB ( )
Allows you to connect a compatible mass storage device
XVLQJD86%MDFN
HEADPHONE Allow you to connect headphones to listen to
WKHVRXQGFRPLQJIURPWKH79
AUDIO OUT Adapter
(you must connect an Audio adpter
FDEOHZLWKWZRFRORUMDFNVWRWKLVDGSDWHUMDFN¿UVWUHGDQG
ZKLWHMDFNVIRU5$8',2DQG/$8',2FRQQHFWLRQ
8VHDQ5&$DXGLRFDEOHWRFRQQHFW\RXU79WRDFRPSDWLEOH
audio receiver. (not availble in USB mode)
HDMI IN 2 / HDMI IN 3 / HDMI IN 4 / HDMI IN 5 Lets you
connect a component, such as a digital cable box, with an
+'0,RXWSXWIRUWKHEHVWSLFWXUHquality.
HDMI/DVI IN 1 +LJK'H¿QLWLRQ0XOWLPHGLD,QWHUIDFH
'LJLWDO9LVXDO,QWHUIDFH3URYLGHVDQXQFRPSUHVVHGGLJLWDO
connection that carries both video and audio data by way
RIDQLQWHJUDWHGPLQLSOXJFDEOH6LQFH+'0,WHFKQRORJ\LV
EDVHGRQ'LJLWDO9LVXDO,QWHUIDFH'9,WKHMDFNRQWKHEDFN
RI\RXU79LV alsoFRPSDWLEOHZLWK'9,FRPSRQHQWV
Side Panel Buttons
If you cannot locate your remote, you can use the side panel
buttonsRQ\RXU79WRRSHUDWHPDQ\79IHDWXUHV
CH+/-
Press CH+/- to select channels stored in the channel list or to
move up ( ) or down ( ) through the menu items.
VOL+/-
Press VOL +/- to increase or decrease the volume or to
move right ( ) or left ( ) through the menu items.
MENU
Press the MENUEXWWRQWREULQJXSWKH79¶V0DLQPHQX
POWER ( )
3UHVVWKH32:(5EXWWRQWRWXUQWKH79RQDQGRII
HDMI/DVI IN 1
HDMI IN 2
HDMI IN 3
HDMI IN 4
HDMI IN 5
USB
AUDIO OUT
adapter
HEADPHONE

10
Outdoor or indoor Antenna
Cable Box,
( Wall Outlet)
RF Coaxial
Wire
(75 ohm)
Or
Or
ANTENNA/
CABLE IN
Connect the RF coaxial cable on your home outlet to the ANTENNA/
CABLE INMDFNRIWKLVXQLW
Once all connections are complete, turn on the unit and begin the initial setup process, scanning for
channels in your area.
Obtain the Signal
7KH¿UVWVWHSLQFRQQHFWLQJ\RXU79LVREWDLQLQJWKHVLJQDO7KHEDFNSDQHORI\RXU79DOORZV\RXWR
UHFHLYHDQDORJDQGRUGLJLWDOFKDQQHOVE\XVLQJWKH$17(11$&$%/(,1387
%HIRUH\RXFRQQHFW\RXU79\RXKDYHWRGHWHUPLQHZKHWKHU\RXZLOOEHXVLQJDQDQWHQQDRUDFDEOH
service to obtain the signal.
What You Need
Antenna (Rabbit Ears) Or Outdoor Antenna with Coaxial Cable
Plug the antenna or coaxial cable from the wall outlet into the ANTENNA/CABLE INPUTRQWKHEDFN
of WKH79<RXDUHUHDG\WRUHFHLYHRIIDLUORFDOGLJLWDODQGDQDORJFKDQQHOV
Cable Service
Plug the coaxial cable from the wall outlet into the ANTENNA/CABLE INPUTRQWKHEDFNRIWKH79
You are ready to receive your cable channels.
Set-Top Box
If you have a set-top box, you may need to call your cable company or satellite service provider. They
may recommend special cables to allow you to view digital channels.
What You Need to Know
9LVLWwww.antennaweb.org for help in deciding what type of antenna to use in order to receive the
local digital channels available to you. Enter your location, and the program will list local analog
and digital stations available using your antenna.
:KHQ\RXZDWFK79WKHChannel Banner displays the type of channel currently viewed.

11
Choose Your Connections
7KHUHDUHVHYHUDOZD\VWRFRQQHFWFRPSRQHQWVVXFKDV'9'SOD\HUVDQGVHWWRSER[HVWR\RXU
793OHDVHXVHWKHIROORZLQJFKDUWWRGHWHUPLQHZKLFKFRQQHFWLRQVDUHEHVWIRU\RX3URFHHGWRWKH
appropriate pages to connect your components.
Note: No cables are supplied with this unit. Please purchase the necessary cables. A high-speed
+'0,FDEOHLVUHFRPPHQGHGIRUEHWWHUFRPSDWLELOLW\
$XGLR9LGHR
page 12
page 12
pages 13-14
page 15
&RPSRQHQW9LGHR Audio
Jacks Used Cable Needed Go to...
+'0,TM
+'0,'9,$GDSWHU+
OR
Audio
Audio
9*$
+'0,TM
+'0,WKH+'0,ORJRDQG+LJK'H¿QLWLRQ0XOWLPHGLD,QWHUIDFHDUHWUDGHPDUNVRUUHJLVWHUHG
WUDGHPDUNVRI+'0,/LFHQVLQJ//&
Input Signal Compatability
$QWHQQD&DEOH480i, 480p, 720p, 1080i (NTSC, ATSC, and QAM formats)
&RPSRVLWH9LGHR480i
&RPSRQHQW9LGHR 480i, 480p, 720p/60Hz, 1080i/60Hz, 1080p/60Hz
+'0, 480i, 480p, 720p/60Hz, 1080i/60Hz, 1080p/60Hz
PC VGA SVGA XGA
CMPT IN
(Y Pb Pr)
adapter
CMPT
AUDIO IN
adapter
YPb Pr L
AUDIO
R
AV IN
adapter
L
AUDIO
R
VIDEO
DVI/PC
AUDIO IN
adapter
L
AUDIO
R
VGA
HDMI/DVI IN 1
DVI/PC
AUDIO IN
adapter
L
AUDIO
R

12
Connecting a CompRQHQWZLWK&RPSRVLWH9LGHR*RRG
7RFRQQHFWDFRPSRQHQWZLWKDYLGHRRXWSXWMDFNVXFKDVD'9'SOD\HUIROORZWKHVHVWHSV
([DPSOH'9'3OD\HU
&RQQHFW\RXUFDEOHDQGRURIIDLUDQWHQQDDVGHVFULEHGRQSDJH
2.
&RQQHFWDQ$XGLR9LGHRDGSWHUFDEOHZLWKWKUHHFRORUMDFNVSOV¿QGWKHFDEOHLQWKHDFFHVVRU\EDJ
to the AV IN adpterRQWKHEDFNRIWKH79DVVKRZQ<HOORZMDFNIRUVIDEO connection, red and white
MDFNVIRU5$8',2DQG/$8',2FRQQHFWLRQ
3. Then connect the yellow video cable to the VIDEOMDFNRIWKHDGDSWHUFDEOHDQGWRWKHYLGHRRXWSXW
MDFNRQWKH'9'SOD\HU
&RQQHFWWKHUHGDQGZKLWHDXGLRFDEOHVWRWKHULJKWDQGOHIWDXGLRMDFNVRIWKHDGDSWHUFDEOHDQGWR
WKHDXGLRRXWSXWMDFNVRQWKH'9'SOD\HU
7XUQRQ\RXU79WKHQWXUQRQWKH'9'SOD\HU
6. Press the INPUT button on the remote control to open the Input list. Once open, press the INPUT
button repeatedly to select AV .
7KLVLVDQH[DPSOHRIDFRQQHFWLRQXVLQJWKHFRPSRVLWHYLGHRMDFN
&RQQHFWLQJD&RPSRQHQWZLWK&RPSRQHQW9LGHR%HWWHU
Component video connection offers better picture quality for video devices connected to the unit. To
FRQQHFWDFRPSRQHQWWKDWKDV<3E3UMDFNVVXFKDVD'9'SOD\HUIROORZWKHVHVWHSV
([DPSOH'9'3OD\HU
&RQQHFW\RXUFDEOHDQGRURIIDLUDQWHQQDDVGHVFULEHGRQSDJH
2.
&RQQHFWDQ&RPSRQHQW9LGHRDGSWHUFDEOHZLWKWKUHHFRORUMDFNVSOV¿QGWKHFDEOHLQWKHDFFHVVRU\
bag) to the CMPT (Y Pb Pr) IN adpterRQWKHEDFNRIWKH79DVVKRZQ*UHHQMDFNIRUY%OXHMDFNIRU
PbDQG5HGMDFNIRU Pr).
3.
Connect three video cables or special Y Pb Pr cables to the Y Pb Pr
MDFNVRIWKHDGDSWHUFDEOHDQGWR
WKH<3E3URXWSXWVRQWKH'9'SOD\HU
4.
&RQQHFWDQ$XGLRDGSWHUFDEOHZLWKWZRFRORUMDFNVSOV¿QGWKHFDEOHLQWKHDFFHVVRU\EDJ
to the CMPT AUDIO IN adpterRQWKHEDFNRIWKH79DVVKRZQUHGDQGZKLWHMDFNVIRU5$8',2DQG
/$8',2FRQQHFWLRQ
5. Connect your red and white audio cables to the R and L AUDIO jacks of the adapter cable and to
WKHDXGLRRXWSXWMDFNVRQWKH'9'SOD\HU
7XUQRQ\RXU79WKHQWXUQRQWKH'9'SOD\HU
7. Press the INPUT button on the remote control to open the Input list. Once open, press the INPUT
button repeatedly to select CMPT.
VIDEO LR
AUDIO
AUDIO/VIDEO OUT
AV IN
adapter
L
AUDIO
R
VIDEO

13
&RQQHFWLQJD&RPSRQHQWZLWK+'0,%HVW
+LJK'H¿QLWLRQ0XOWLPHGLD,QWHUIDFH+'0,WHFKQRORJ\LVDQXQFRPSUHVVHGGLJLWDOFRQQHFWLRQWKDW
carries both video and audio data by way of an integrated mini-plug cable.
([DPSOH&RPSRQHQWZLWK+'0,MDFN
&RQQHFWDQ+'0,FDEOHWRWKHHDMI IN 2 (or the HDMI/DVI IN 1MDFNHDMI IN 3/HDMI IN 4/HDMI
IN5MDFNRQWKHVLGHRIWKH79DQGWRWKH+'0,RXWSXWMDFNRQWKHFRPSRQHQW
7XUQRQ\RXU79WKHQWXUQRQWKHFRPSRQHQW
3. Press the INPUT button on the remote control to open the Input list. Once open, press the INPUT
button repeatedly to select HDMI 2 (or HDMI 1,HDMI 3, HDMI 4, HDMI 5).
L R Pr Pb Y
COMPONENT OUT
CMPT IN
(Y Pb Pr)
adapter
CMPT
AUDIO IN
adapter
YPb Pr L
AUDIO
R
7KLVLVDQH[DPSOHRIDFRQQHFWLRQXVLQJWKHFRPSRQHQWYLGHRMDFNV
HDMI OUT
HDMI IN 2 or HDMI/DVI IN 1
or HDMI IN 3 or HDMI IN 4
or HDMI IN 5
HDMI CABLE

14
+'0,'9,&RQQHFWLRQ
6LQFH+'0,WHFKQRORJ\LVEDVHGRQ'LJLWDO9LVXDO,QWHUIDFH'9,WKHMDFNRQWKHEDFNRI\RXU79LV
also compatiEOHZLWKFRPSRQHQWVWKDWKDYHD'9,RXWSXWMDFN
Example: Personal Computer (PC)
&RQQHFWDQ+'0,FDEOHWRWKHHDMI/DVI IN 1MDFNRQWKHEDFNRIWKH79
$WWDFKDQ+'0,'9,DGDSWHURQWKHRWKHUHQGRIWKH+'0,FDEOHWKHQFRQQHFWLWWRWKH'9,RXWSXW
MDFNRQWKH3&
3.
&RQQHFWDQ$XGLRDGSWHUFDEOHZLWKWZRFRORUMDFNVSOV¿QGWKHFDEOHLQWKHDFFHVVRU\EDJ
to the DVI/PC AUDIO IN adpterRQWKHEDFNRIWKH79DVVKRZQUHGDQGZKLWHMDFNVIRU5$8',2
DQG/$8',2FRQQHFWLRQ
6LQFH\RX¶UHXVLQJDQ+'0,'9,DGDSWHU\RXQHHGWRFRQQHFWDVHSDUDWHDXGLRFDEOHWRWKH
AUDIO IN MDFNRIWKH$GDWHUFDEOHDQGWKHDXGLRRXSXWMDFNRQWKH3&)RUPRQRDXGLRVRXUFH
\RXFDQMXVWXVHWKHOHIW$8',2LQSXWDVVKRZQEHORZ
7XUQRQ\RXU79WKHQWXUQRQWKH3&
6. Press the INPUT button on the remote control to open the Input list. Once open, press the INPUT
button repeatedly to select HDMI 1.
Don't forget:
If necessary, connect antenna or cable to get a picture. Go to page 10 for instructions.
To HDMI/DVI IN 1 only
HDMI-DVI
conversion cable
Audio cable
DVI
DVI/PC
AUDIO IN
adapter
L
AUDIO
R
Note: For mono audio source, you can just
use the left AUDIO input as shown below.

15
PC Connection
7RFRQQHFWDSHUVRQDOFRPSXWHUDQGXVH\RXU79DVDPRQLWRUIROORZWKHVHVWHSV
&RQQHFWRQHHQGRIDSLQPRQLWRUFDEOH9*$FDEOHWRWKHPC IN VGAMDFNRQWKH79DQGWKH
RWKHUHQGWRWKH3&¶VYLGHRRXWSXWMDFN
2.
&RQQHFWDQ$XGLRDGSWHUFDEOHZLWKWZRFRORUMDFNVSOV¿QGWKHFDEOHLQWKHDFFHVVRU\EDJ
to the DVI/PC AUDIO IN adpterRQWKHEDFNRIWKH79DVVKRZQUHGDQGZKLWHMDFNVIRU5$8',2
DQG/$8',2FRQQHFWLRQ
3. Connect an audio cable to the AUDIO IN MDFNRIWKH$GDWHUFDEOHDQGWKHDXGLRRXSXWMDFNRQWKH
3&)RUPRQRDXGLRVRXUFH\RXFDQMXVWXVHWKHOHIW$8',2LQSXWDVVKRZQEHORZ
7XUQRQ\RXU79WKHQWXUQRQWKH3&
5. Press the INPUT button on the remote control to open the Input list. Once open, press the INPUT
button repeatedly to select PC.
Note: For mono audio source, you can just
use the left AUDIO input as shown below.
Audio cable
DVI/PC
AUDIO IN
adapter
L
AUDIO
R
To PC VIDEO
IN (VGA)
VGA cable
VGA

16
Plug in the TV
3OXJWKHHQGRIWKHSRZHUFRUGRQWKHEDFNRIWKH79LQWRDQRXWOHW
LQVHUWLQJWKHSOXJFRPSOHWHO\'RQRWSOXJWKH79LQWRDQRXWOHW
controlled by a light switch.
Put Batteries in the Remote
5HPRYHWKHEDWWHU\FRPSDUWPHQWFRYHUIURPWKHEDFNRIWKHUHPRWHFRQWUROE\SXVKLQJWKHWDEDQG
lifting off the cover.
,QVHUW$$$EDWWHULHVPDNLQJVXUHWKHSRODULWLHVDQGDUHDOLJQHGFRUUHFWO\
5HSODFHWKHFRYHU
Turn on the TV
7XUQRQ\RXU79E\SUHVVLQJWKH EXWWRQRQWKHVLGHRIWKH79RUWKH button on the remote control.
Using the Remote Control to Complete the Initial Setup
<RXZLOOQHHGWRXVHWKHUHPRWHFRQWUROWRFRPSOHWHWKHVHWXSRI\RXU797KHUHPRWHFRQWURODOORZV
\RXWRQDYLJDWHWKURXJKDQGVHOHFWLWHPVWKDWDSSHDULQWKHRQVFUHHQPHQXV7KHSURFHVVZRUNVWKH
same on all menu screens: highlight your choice and select it.
To highlight an item in the menu list, press the up or down arrow ( ) to move up or down. Use the
left or right arrows ( ) to view other selections for the highlighted menu choice or to display a sub-
menu.
Note: Highlighted items stand out from other menu items on the list (appear darker, brighter, or a
different color).

17
Complete the Initial Setup
7KHPHQXV\VWHPLQ\RXU79DOORZVDOORIWKH79¶VIHDWXUHVWRZRUNSURSHUO\7KH¿UVWWLPH\RXWXUQ
RQ\RXU79WKH,QLWLDO6HWXS:L]DUGRSHQVZKLFKJXLGHV\RXWKURXJKWKHVHWXSSURFHVVLQFOXGLQJ
/DQJXDJH79/RFDWLRQ7LPH=RQH7XQHUDQG&KDQQHO6FDQ
Set the Menu Language
7KH¿UVWVWHSRIWKHVHWXSUHTXLUHV\RXWRVHOHFW\RXU
preferred language for the menu system. If English is
your preferred language, press the OK button on the
remote control. To select another language use the
down arrow button ( ) until that language is selected
then press OK or the right arrow button ( ) to proceed
to the next screen.
6HWWKH79/RFDWLRQ0RGH
$IWHUFKRRVLQJWKHODQJXDJHDPHQXVFUHHQDVNV\RXWR
VHWWKH79/RFDWLRQ
&KRRVLQJ³Home´IRUWKH79/RFDWLRQDVVLJQV
the optimal picture settings for most home
environments.
&KRRVLQJ³Retail,” which is not Energy Star
FRPSOLDQWVHWVWKHXQLWXSZLWKSUHGH¿QHG
settings for retail displays. In this setting, the power
consumption may exceed the requirements of the
(QHUJ\6WDUTXDOL¿FDWLRQ
Use the up or down arrow ( ) to select the desired
location setting (Home/RetailWKHQSUHVVWKHOK button
or right arrow ( ) to continue to the next screen.
Set the Time Zone
Use the up or down arrows ( ) to select the current
local time zone. Press the OK button or right arrow ( )
to continue to the next screen.
Initial Setup
Please select your language:
Language
Español
Français
English
Select OK Next
Initial Setup TV Location
TV Location
This mode is Energy Star compliant. Retail
Home
Back OK NextSelect
Initial Setup Time Zone
Please select your time zone:
Alaska
Pacific
Hawaii
Mountain
Central
Eastern
Atlantic
Newfoudland
Back OK Next
Select Exit
CLEAR
EASTERN

18
Auto Channel Scan
1. On the Tuner screen, select either Antenna or Cable.
Press the OK button or right arrow ( ) to continue to
the next screen.
Note: If you are using a satellite or cable set-top box,
you do not have to complete the Channel Search.
2. The Channel Scan screen is now displayed. The
default choice is to scan. Press the OK button or the
right arrow ( ) to begin the channel scan for available
FKDQQHOVWREHVWRUHGLQWKH79¶VPHPRU\
Note: If you do not want to scan for channels at this
time, press CLEAR to stop the scanning process.
3. The screen will change to show the progress of the
scanning process.
:KHQWKHVFDQQLQJLV¿QLVKHGWKHComplete screen
appears to inform you that the unit has completed the
Initial Setup.
5. Press CLEAR to exit the Wizard and begin watching
79
6NLS6FDQ
,I\RXHOHFWWRVNLSWKH$XWR6FDQQLQJSURFHVVE\FKRRVLQJ
Skip Scan or by pressing the CLEAR button, you will need
to follow this process the next time you decide to complete
this procedure.
1. Select the TV as input (using the INPUTNH\
*RWKURXJKWKHPHQXRSWLRQVWRVHOHFWWKHSignal Type,
which will display the option of scanning the channels
again.
3. If you are using a satellite or cable set-top box, you do
not have to complete the Channel Search.
Note: See the Setup Menu to:
6FDQFKDQQHOVDXWRPDWLFDOO\DJDLQSDJH
$GGGHVLUHGFKDQQHOVQRWPHPRUL]HGE\WKH&KDQQHO
Scan (page 26).
5HVHWWKHWLPH]RQHSDJH
See the Language Menu to:
&KDQJHWRDQRWKHUODQJXDJHSDJH
Initial Setup Tuner
Please select your tuner mode:
Cable
Antenna
Back OK NextSelect Exit
CLEAR
Initial Setup Channel Scan
Please connect antenna or cable.
Start Channel Scan now?
If you skip this step, the Channel
Scan can be performed by going to
the Setup menu later.
Skip Scan
Scan
Back OK NextSelect Exit
CLEAR
0%
Initial Setup Complete
Back
Congratulations!
The Initial Setup is complete.
Please press [OK] to exit the Initial
Setup Menu.
Exit
CLEAR

19
Selecting a Channel
1. Select the desired channel by using the CH+/- RUWKHQXPHULFNH\SDG
The CH+/- can select only memorized channels.
6HOHFWQRQPHPRUL]HGFKDQQHOVXVLQJWKHQXPHULFNH\SDG
7RXVHWKHQXPHULFNH\SDG
Analog TV Channels – When selecting an analog channel, such as channel 12, press the 1,
then the 2, then press OK.
DTV ±:KHQVHOHFWLQJGLJLWDOFKDQQHOVVXFKDVEHVXUHWRSUHVVWKHGRWLQWKH
appropriate place. So, for 12.3, you would press 1, then 2, then dot, then 3. Press OK to select.
3. Press GO BACK to return to the previously viewed channel.
What is a Sub-channel?
A sub-channel is a channel such as 12.3. By using high-compression technology, digital broadcasting
enables multiple signals to be sent simultaneously. Therefore, you can select more than one program
per main channel, since digital broadcasting technology can distinguish between multiple channels on
DVLQJOHQHWZRUN
Turning the TV On and Off
3OXJWKHSRZHUFRUGIURPWKH79LQWRDQ$&SRZHURXWOHW
2. Press WRWXUQRQWKH79
3. Press WRWXUQRIIWKH79:KHQ\RXWXUQWKH79RIILWDXWRPDWLFDOO\JRHVLQWR6WDQGE\0RGH
Note: When your TV is in Standby Mode, it is still receiving some power. To completely
disconnect the power, unplug the power cord.
Selecting the Video Input Source
7XUQRQWKH79WKHQSUHVV INPUT on the remote control.
The INPUT list appears.
2. To select an input source, press the INPUT button
repeatedly or use the up and down arrows ( ) to
highlight the video source and press OK to select.
Adjusting/Muting the Volume
1.
Use the VOL +/- to adjust the volume. The volume bar will be displayed at the bottom part of your
79VFUHHQZKHQ\RXDUHDGMXVWLQJWKHYROXPH7KHYROXPHEDUGLVDSSHDUVDIHZVHFRQGVDIWHU
you have completed the adjustment.
2. Press MUTEWRWXUQWKHVRXQGRQDQGRII7KH087(PDUNLVGLVSOD\HGRQWKH79VFUHHQIRUD
few seconds.
3. When you press MUTE again, the volume reverts to its previous level. Or you can press the
VOL + to cancel the mute function.
Chapter 2 - Understanding the Basics
Input
AV
CMPT No Label
PC No Label
HDMI1 No Label
HDMI2 No Label
TV
No Label
HDMI3
HDMI4
HDMI5
No
No
No
Label
Label
Label

20
Screen Formats
6FUHHQIRUPDWUHIHUVWRWKHZD\WKHSLFWXUHLVGLVSOD\HGRQ\RXU793UHVVWKHZoom+/- button on your
remote to see if a different format is available for the video you are viewing. The format changes as
you press the Zoom+/- button, and the format type is displayed at the top left of the screen.
$QDORJYLGHRLVVHQWLQDIRUPDWZKLFK\RXU79GLVSOD\VLQDIRUPDW0RVWGLJLWDOYLGHRLV
VHQWLQDIRUPDWZKLFK¿OOV\RXUVFUHHQEXWLWVRPHWLPHVLVVHQWLQZKLFKGRHVQRW¿OO\RXU
VFUHHQ,WGHSHQGVRQKRZWKHVWDWLRQRUFRPSRQHQWFRQQHFWHGWR\RXU79LVIRUPDWWLQJWKHYLGHR,I
there are bars on the screen, press the Zoom+/- button to try a different format that may eliminate the
EDUV6RPHEDUVFDQ¶WEHUHPRYHGEHFDXVHRIWKHZD\WKHIRUPDWLVVHQWE\WKHEURDGFDVWHU3UHVV
Zoom+/- repeatedly to cycle through the available display formats.
Examples of the different formats appear below. Each format is available for analog video, but it might
not be available for digital video.
Channel Banner
There are several indicators that may appear when you press the INFO button on the remote control.
This display is called the Channel Banner. The following list describes the items on the Channel
Banner screen.
1. Program Guide – The term “No program
details” is displayed when no program
guide is available.
2. Program Title
3. Rating Information – This displays the
rating of the current program.
4. Closed Captioning – This tells whether
or not Closed Captioning is available for
the current program.
5. Audio Language
6. Effective Scanning Lines ±'LVSOD\V
6FDQQLQJPRGHSDQGGLJLWDO79
IRUPDW+'
7. Current Time
8. Signal Type
9. Channel Name, if available
10. Channel Number
Normal
Cinerama
Full
Zoom
Note: For HD Video, press
Zoom+/- to choose from
Full, Expand, Normal and
Zoom. For HDMI and
CMPT inputs, there is also
a No Overscan format.
(No program details.)
(No program title.)
Not Rated 720p HD 12:35 PM
English Stereo
Cable
RFHF
2.1
1
2
3
56 7 8
9
10
cc
4
This manual suits for next models
3
Table of contents
Other TCL LCD TV manuals