TDS VSi Series Operating manual

VSi,VS,RF Series Maintenance Guide
Checking for Remaining Ink and Replacing Cartridges
Checking for Remaining Ink
Procedure
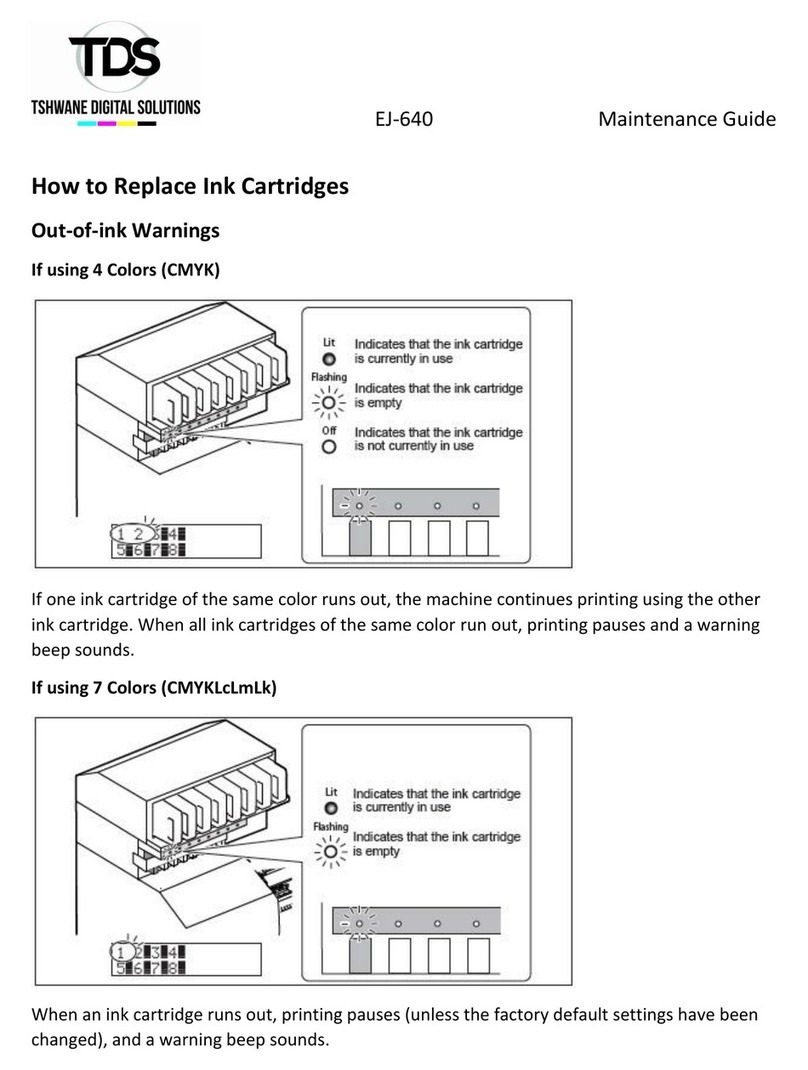
How to Replace Ink Cartridges
When ink runs out, a warning beep sounds and printing pauses (unless the default settings have
been changed). Pull out the empty cartridge and insert a new one. Printing resumes.

VSi,VS,RF Series Maintenance Guide
Note: Never store ink, cleaning liquid, or discharged fluid in any of the following locations.
-Any location exposed to open flame.
-Any location where high temperature may occur.
-Near bleach or any other such oxidizing agent or explosive material.
-Any location within reach of children.
Fire may be a danger. Accidental ingestion by children may pose a health hazard.

VSi,VS,RF Series Maintenance Guide
Maintenance that Should Be Performed Daily
Disposing of Discharged Fluid
Procedure

VSi,VS,RF Series Maintenance Guide
When You Cannot Check Discharged Fluid Level in Drain Bottle
Note: Due to the characteristics of SOL INK, splashes inside the drain bottle surface may not allow
you to easily check the amount of discharged fluid in the bottle. If the inner surface is not visible,
clean the drain bottle in the following way when disposing of the discharged fluid.
-Clean the inside of the bottle using the included cleaning stick
-If the method described above does not work well, try the following method.
Procedure
Note: Never place discharged fluid and ink near open flame.
Doing so may cause fire.
Note: To store discharged fluid temporarily, place it in the included drain bottle or in a durable
sealed container such as a metal can or polyethylene tank, and cap tightly.
Any spillage or vapor leakage may cause fire, odor, or physical distress.
Store discharged fluid in a location not exposed to direct sunlight.
When temporarily storing discharged fluid in the included drain bottle out of direct sunlight.
Otherwise the discharged fluid may harden, making the drain bottle unusable.
Dispose of discharged fluid properly, in accordance with the laws in effect in your locale.
Discharged fluid is flammable and contains toxic ingredients. Never attempt to incinerate
discharged fluid or discard it with ordinary trash. Also, do not dispose of it in sewer systems,
rivers, or streams. Doing so may have an adverse impact on the environment.
Cleaning

VSi,VS,RF Series Maintenance Guide
Note: Never use gasoline, alcohol, thinner, or any other flammable material.
Doing so may cause fire.
Note: Before attempting cleaning, switch off the sub power and wait until the platen and dryer
cool (approximately 30 minutes).
Wipe away any buildup of ink or grime on the media path and other locations as daily cleaning.
In particular, the pinch rollers, grit rollers, and platen are likely to get buildup of grime. Clean by
wiping with a cloth moistened by neutral detergent diluted with water then wrung dry.
Note: This machine is a precision device, and is sensitive to dust and dirt. Perform cleaning on a
daily basis. Never attempt to oil or lubricate the machine.

VSi,VS,RF Series Maintenance Guide
About care and Maintenance of Print Heads
Care of the print heads is essential to ensuring optimal printing at all times. There are daily care
and periodic care.
When using ECO-SOL MAX 2 Ink
When Normal Cleaning is Not Effective
Medium / Powerful Cleaning
When the problems such as dot drop-out are not cleared up by the “normal cleaning”, try the
more forceful “medium cleaning.” If the condition is not improved, try the even more forceful
“powerful cleaning.”
Note: Medium and powerful cleaning consumes more ink than normal cleaning, and too-
frequent use may damage the print head itself. Avoid using it more than necessary.
Procedure

VSi,VS,RF Series Maintenance Guide
When powerful cleaning is not effective
When the problems such as dot drop-out are not cleared up even by performing powerful
cleaning several times, perform “Manual Cleaning.”
When Uneven Color Issue Occurs
Light Choke Cleaning
Note: Light choke cleaning consumes a large quantity of ink. Frequently performing light choke
cleaning makes the print heads more likely to be damaged. Avoid using it more than necessary.
Perform the light choke cleaning when color is uneven and unstable, i.e. darkness or brightness
is different though the same data is printed with the same settings. To obtain stabilized color
output, stir the ink.
Procedure

VSi,VS,RF Series Maintenance Guide

VSi,VS,RF Series Maintenance Guide
Manual Cleaning
In order to maintain stable printing at all times, perform manual cleaning. Manual cleaning takes
approximately 10 minutes.
When Manual Cleaning Becomes Necessary
Time Frames for Periodic Cleaning
The time frame for periodic cleaning varies depending on the ink.
Ink
When maintenance is necessary
ECO-SOL MAX 2
If the message “TIME FOR MAINTENANCE” is
displayed (approximately once per week)
When the Following Symptoms Occur
It is recommended to perform the manual cleaning when any of the symptoms given below
occurs and it cannot be solved by the automatic cleaning functions such as the normal cleaning.

VSi,VS,RF Series Maintenance Guide
Manual Cleaning
Note: Be sure to perform operations as specified by the instructions above, and never touch any
area not specified in the instructions.
Sudden movement of the machine may cause injury.
1. Enter the Manual Cleaning menu.

VSi,VS,RF Series Maintenance Guide

VSi,VS,RF Series Maintenance Guide
2. Remove cover R.
3. Clean using the cleaning stick.

VSi,VS,RF Series Maintenance Guide
4. Reattach cover L, cover R, and quit the manual cleaning menu.

VSi,VS,RF Series Maintenance Guide
5. Perform a printing test to verify the results of the procedure.
Perform a printing test to check the results.
Perform a cleaning using the machines cleaning feature several times when necessary.

VSi,VS,RF Series Maintenance Guide
When Problems Such As Dot Drop-Out Are Not Cleared Up
When Problems Such as Dot Drop-Out Are Not Cleared Up
When flaws in the dot pattern such as dot drop-out are not cleared up even after performing
cleaning using the cleaning function (normal, medium, or powerful) or manual cleaning, perform
the operation described below.
Note: A large amount of ink will be discharged during this operation. Perform this operation only
when dot drop-out cannot be cleared up even after performing cleaning using the cleaning
function (normal, medium, or powerful) or manual cleaning.
Procedure

VSi,VS,RF Series Maintenance Guide
Note: Be sure to discard the Discharged fluid at this step. A large amount of ink will be discharged
during this operation. Be sure to discard the Discharged fluid at this step. If you do not discard
the discharged fluid at this step, the Discharged fluid overflows from the drain bottle during the
subsequent process.
Note: Before you detach the drain bottle, be sure to wait for the screen to display “EMPTY DRAIN
BOTTLE.” Failing to follow this procedure may cause discharged fluid to flow out of the tube and
spill, soiling your hands or the floor.
About [Ink Circulation] Menu
Procedure

VSi,VS,RF Series Maintenance Guide
Replacing Consumable Parts
Replacing the Wiper
The wipers are components that you us when cleaning the print heads. When the screen, displays
a message like the one shown, it means the item needs to be replaced. Replace with new items.
Note: be sure to perform operations as specified by the following instructions, and never touch
any area not specified in the instructions.
Sudden movement of the machine may cause injury.
1. Display the [REPLACE WIPER] menu.

VSi,VS,RF Series Maintenance Guide
2. Replace the wiper.

VSi,VS,RF Series Maintenance Guide
3. Reattach the cover R, and quit the wiper replacement menu.

VSi,VS,RF Series Maintenance Guide
4. Perform a printing test to verify the results of the procedure.
Perform a printing test to check the result.
Replacing the Felt Wiper
The felt wiper is the part used for cleaning of the print heads. When such the screen is displayed
on the display screen, it is time for replacement. Replace it with a new item.
1. Enter the felt wiper replacement menu.
This manual suits for next models
2
Table of contents
Other TDS Printer manuals
Popular Printer manuals by other brands
Printek
Printek Interceptor 800 Series Integrator's manual

Konica Minolta
Konica Minolta Magicolor 7440 installation guide
Canon
Canon imagePROGRAF TA-30 quick guide
Star Micronics
Star Micronics futurePRNT TSP100 Hardware manual
Aficio
Aficio SP 1200S Quick installation guide

Philips
Philips CRYSTAL 660 - NETWORK Installation guidelines
