Team Kalorik TKG BBA 2 User manual

Generated by Unregistered Batch DOC TO PDF Converter
2011.3.804.1511, please register!
Copies of the I/B. Please reproduce them without any
changes except under special instruction from Team
International BELGIUM. The pages must be reproduced
and folded in order to obtain a booklet A5 (+/- 148.5 mm
width x 210 mm height). When folding, make sure you
keep the good numbering when you turn the pages of
the I/B. Don’t change the page numbering. Keep the
language integrity.
Front cover page (first page)
Assembly page 1/44
Fax +32 2 359 95 50
I/B Version
080514
TKG BBA 2
220-240V~ 50Hz 1100-1300W
Bread maker
Machine à pain

Copies of the I/B. Please reproduce them without any
changes except under special instruction from Team
International BELGIUM. The pages must be reproduced
and folded in order to obtain a booklet A5 (+/- 148.5 mm
width x 210 mm height). When folding, make sure you
keep the good numbering when you turn the pages of
the I/B. Don’t change the page numbering. Keep the
language integrity.
2 TKG BBA 2 –080514
Assembly page 2/44
Fax +32 2 359 95 50

Copies of the I/B. Please reproduce them without any
changes except under special instruction from Team
International BELGIUM. The pages must be reproduced
and folded in order to obtain a booklet A5 (+/- 148.5 mm
width x 210 mm height). When folding, make sure you
keep the good numbering when you turn the pages of
the I/B. Don’t change the page numbering. Keep the
language integrity.
3 TKG BBA 2 –080514
Assembly page 3/44
Fax +32 2 359 95 50
GB
1. Control panel
2. Cooking compartment
3. Upper heating element
4. Lower heating element
5. Door
6. Handle
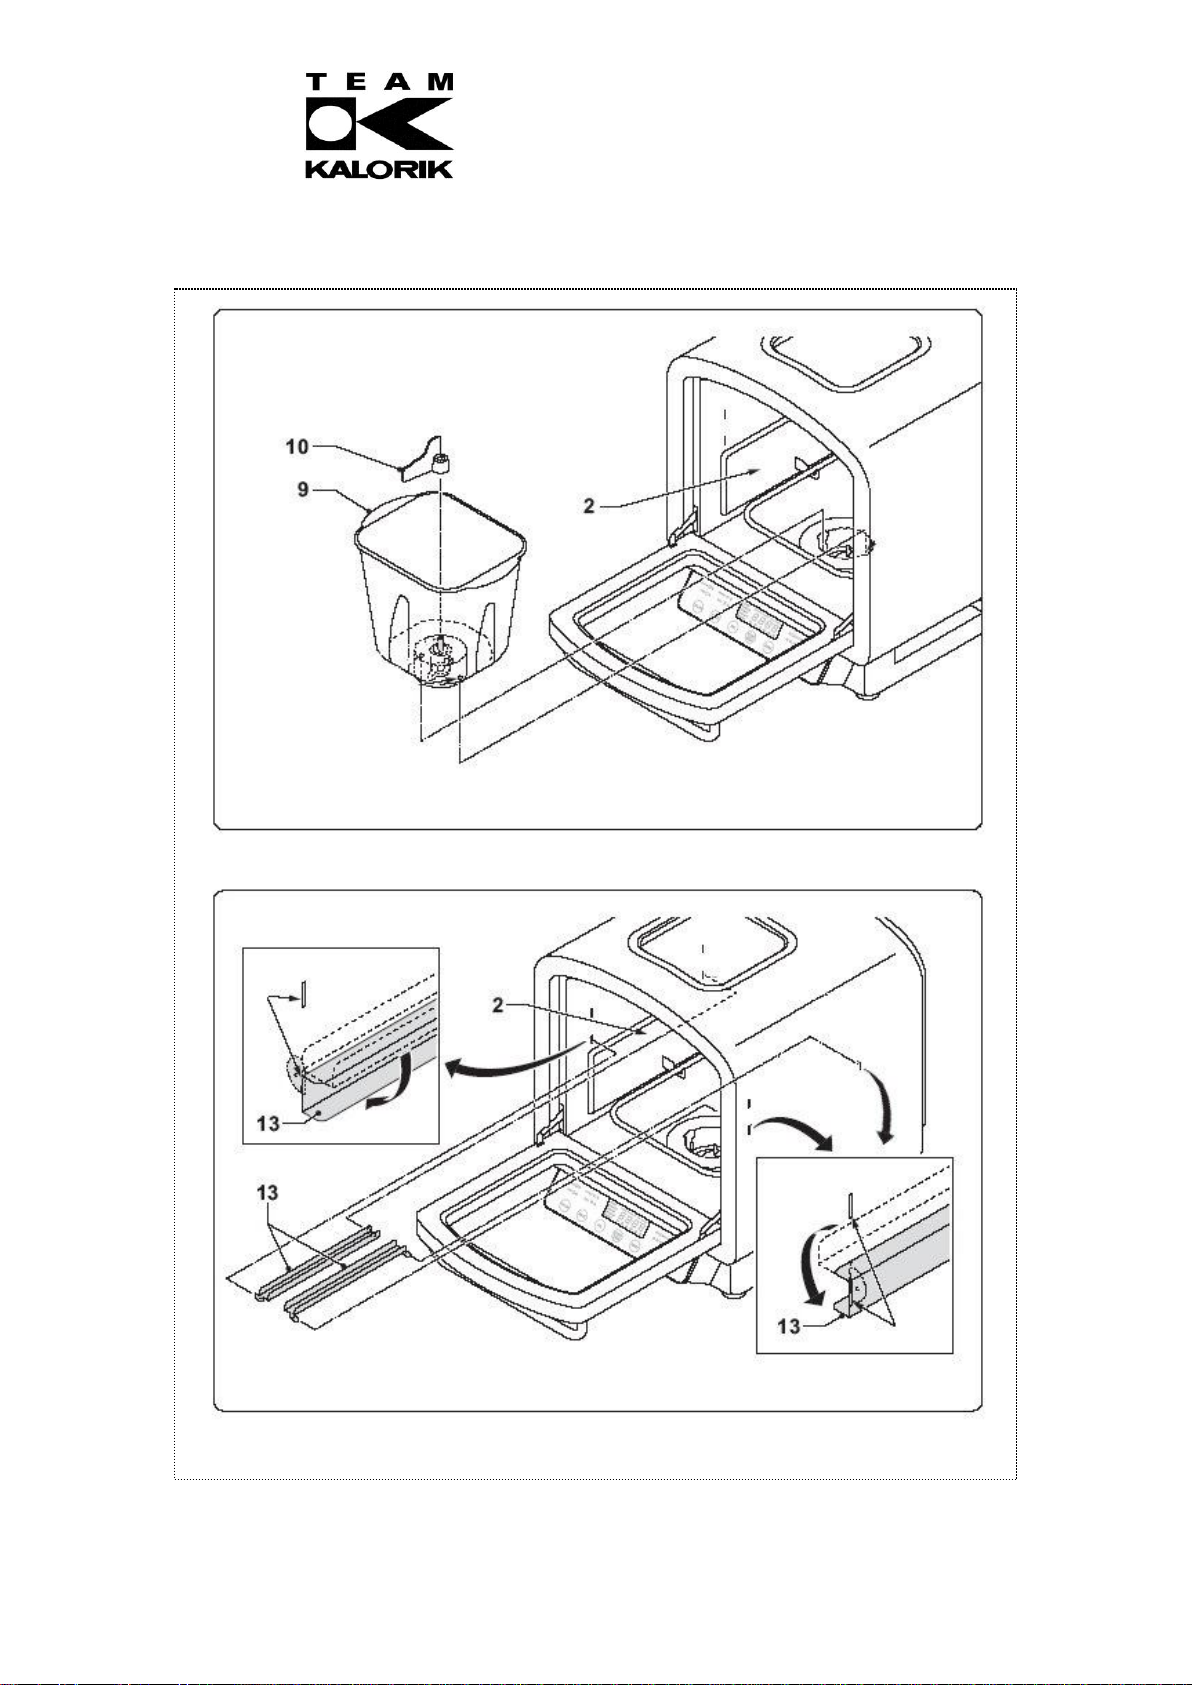
7. Viewing window
8. Water tank
9. Baking tin
10. Kneading blade
11. Measuring cup
12. Measuring spoon (a:teaspoon /
b:tablespoon)
13. Support rail
14. Drip tray
15. Baking plate
16. Grill rack
17. Pizza plate
18. Plate for 3 baguettes
FR
1. Panneau de commande
2. Zone de cuisson
3. Elément chauffant supérieur
4. Elément chauffant inférieur
5. Porte
6. Poignée
7. Fenêtre
8. Réservoir d’eau
9. Moule
10. Pétrisseur
11. Bol doseur
12. Cuillère de dosage (a:cuillère à café /
b:cuillère à soupe)
13. Latte de support
14. Plateau collecteur de graisse
15. Plateau de cuisson
16. Grille
17. Plateau à pizza
18. Plateau pour 3 baguettes
Copies of the I/B. Please reproduce them without any
changes except under special instruction from Team
International BELGIUM. The pages must be reproduced
and folded in order to obtain a booklet A5 (+/- 148.5 mm
width x 210 mm height). When folding, make sure you
keep the good numbering when you turn the pages of
the I/B. Don’t change the page numbering. Keep the
language integrity.
4 TKG BBA 2 –080514
Assembly page 4/44
Fax +32 2 359 95 50

Copies of the I/B. Please reproduce them without any
changes except under special instruction from Team
International BELGIUM. The pages must be reproduced
and folded in order to obtain a booklet A5 (+/- 148.5 mm
width x 210 mm height). When folding, make sure you
keep the good numbering when you turn the pages of
the I/B. Don’t change the page numbering. Keep the
language integrity.
5 TKG BBA 2 –080514
Assembly page 5/44
Fax +32 2 359 95 50

Copies of the I/B. Please reproduce them without any
changes except under special instruction from Team
International BELGIUM. The pages must be reproduced
and folded in order to obtain a booklet A5 (+/- 148.5 mm
width x 210 mm height). When folding, make sure you
keep the good numbering when you turn the pages of
the I/B. Don’t change the page numbering. Keep the
language integrity.
6 TKG BBA 2 –080514
Assembly page 6/44
Fax +32 2 359 95 50
IMPORTANT SAFEGUARDS
Please read these instructions carefully before using the appliance, and always follow the
safety and operating instructions.
Important: People (including children) who are not able to use the appliance in a safe way,
due to their physical, sensorial or mental capacity or their lack of experience or knowledge,
must never use the appliance except if they are supervised by a person responsible for their
safety or if they previously received instructions concerning the safe use of the appliance.
Close supervision is necessary to prevent children from using the appliance as a toy.
Check that your mains voltage corresponds to that stated on the appliance.
Never leave the appliance unsupervised when in use.
From time to time check the appliance and its cord for damages. Never use the
appliance if cord or appliance shows any signs of damage. All repairs should be made by
a competent qualified electrician(*).
Only use the appliance for domestic purposes and in the way indicated in these
instructions.
Never immerse the appliance in water or any other liquid for any reason whatsoever.
Never place it into the dishwasher.
Be very careful right after the baking process, as the appliance is very hot. Let it cool
down completely before storing or cleaning it.
Never use the appliance near hot surfaces.
Before cleaning or storing, always unplug the appliance from the power supply.
Never use the appliance outside and always place it in a dry environment.
Never use accessories, which are not recommended by the producer. They could constitute
a danger to the user and risk to damage the appliance.
Never move the appliance by pulling the cord. Make sure the cord cannot get caught in
any way. Do not wind the cord around the appliance and do not bend it.
Stand the appliance on a table or flat surface to prevent it from falling.
Make sure the cord never comes into contact with the hot parts of the appliance. Never
touch the hot parts of the appliance in order to avoid injuries.
Make sure the appliance never comes into contact with inflammable materials, such as
curtains, cloth, etc… when it is in use, as a fire might occur.
The temperature of the accessible surfaces may be very high when the appliance is in
use. Never touch those surfaces during use. Use oven mitts to handle the baking tin after
the baking process in order to avoid injuries. Should the symbol be indicated on a
certain surface, you need to be careful when handling the product. This symbol means
CAUTION, this surface may get very hot during use.
Be careful not to scratch the special coating of the baking tin and kneading blade, as this
would damage the non-stick coating.
Never exceed the amounts of flour and yeast that are recommended in recipes.
Otherwise, the dough might flow over the baking tin.
Never cover the appliance (e.g. with a cloth), as this would hinder the steam outlet.
Never put any object in the baking tin, as this could cause electric shocks or damage the
non-stick coating of the tin.
Your appliance must never be switched on through an external timer or any kind of
separate remote control system.
(*) Competent qualified electrician: after-sales department of the producer or importer or any
person who is qualified, approved and competent to perform this kind of repairs in order to
avoid all danger. In case of need you should return the appliance to this electrician.

Copies of the I/B. Please reproduce them without any
changes except under special instruction from Team
International BELGIUM. The pages must be reproduced
and folded in order to obtain a booklet A5 (+/- 148.5 mm
width x 210 mm height). When folding, make sure you
keep the good numbering when you turn the pages of
the I/B. Don’t change the page numbering. Keep the
language integrity.
7 TKG BBA 2 –080514
Assembly page 7/44
Fax +32 2 359 95 50
SHORT CORD INSTRUCTIONS
A relatively short power supply cable is provided to reduce the risk resulting from becoming
entangled in, or tripping over a longer cord. Extension cords may be used if care is exercised in
their use.
The electrical rating of the extension cord should be at least that of the appliance. If the
electrical rating of the extension cord is too low, it could overheat and burn.
The longer cord should be arranged so that it will not drape over the counter top or
tabletop where it can be pulled on by children or tripped over.
BEFORE THE FIRST OPERATION
Unpack the appliance and remove all packaging material. Clean the door, the accessories
and the baking tin with a soft damp cloth and dry these parts thoroughly. Assemble the parts
and let the appliance work empty for about 10 minutes. Plug in the appliance (:00 will appear
on the LCD display) and press the “FUNC” key 4 times, so that the TOP & BOTTOM pilot lamps
are on (220°C blinks on the LCD display). Press the Timer/TEMP button once (30:00 blinks on the
LCD display), press the «-» key until 10:00 appears on the display, then press the START/STOP
button. The oven will start to preheat. When the oven reaches the right temperature, 3 BEEPS
will sound and the oven will heat during 10 minutes (the time displayed on the LCD display will
count down). When the requested time has elapsed, 3 BEEPS will sound and the oven will
switch off automatically (:00 will appear on the LCD display). Let the appliance cool down,
clean and dry all parts and assemble them again. Your bread maker is now ready for use. The
quality of the bread can depend on many factors. Therefore, it is very important to know all
ingredients and their interaction. This will allow you to obtain satisfactory results.
CONTROL PANEL (1)
“START/STOP” key (20):
To start a programme, press this key.
Press and hold for about 3 seconds until you hear a beep to stop operation or cancel a timer
setting. (Note: it is not necessary to press the stop key when you open the door to check the
progress of your bread.)

Copies of the I/B. Please reproduce them without any
changes except under special instruction from Team
International BELGIUM. The pages must be reproduced
and folded in order to obtain a booklet A5 (+/- 148.5 mm
width x 210 mm height). When folding, make sure you
keep the good numbering when you turn the pages of
the I/B. Don’t change the page numbering. Keep the
language integrity.
8 TKG BBA 2 –080514
Assembly page 8/44
Fax +32 2 359 95 50
BREADMAKER
“COLOR”key (21):
Press this key to select the crust colour between medium, light and dark respectively (only in
LOAF mode).
“MODE”key (22):
Press this key to select the baking mode: LOAF, DOUGH + RISE, DOUGH, RISE.
LOAF: to bake a loaf of bread
DOUGH + RISE: to knead & rise the dough
DOUGH: to knead the dough
RISE: to rise the dough
“SEL”(selection) key (23):
Press this key to choose the type of bread.
On LOAF position, you can choose between 4 types: BASIC, FRENCH, SWEET or WHOLE WHEAT.
On DOUGH & RISE position, you can choose between 10 types: BASIC, FRENCH, SWEET, WHOLE
WHEAT, PIZZA, COOKIE, BAGUETTE, COUNTRY, CROISSANT & BRIOCHE.
Preset key/ TIME/TEMP switch key (24):
Allows you to preset the baking of bread.
Up (+) & Down (-) key (25):
Press “+” to increase the baking time or temperature.
Press “-”to decrease the baking time or temperature.
OVEN
“MENU”key (26):
Press this key to select the baking type. You can choose between 12 types: frozen snacks,
frozen pizzas, soup, potato, jam, defrost, bake pizza, bake cookies, bake baguettes, bake
country bread, bake croissants and bake brioches. The first six (frozen snacks, frozen pizzas,
soup, potato, jam, defrost) are represented in reverse order by the symbols under the cooking
time on the display.
“FUNC” (function) key (27):
Press this key to select the TOAST feature, the TOP feature, the BOTTOM feature, the
TOP+BOTTOM feature or the TOP+BOTTOM+STEAM feature.
PRESET KEY / TIME/TEMP switch key (24):
You can also use this key to switch from temperature setting to time setting for the TOP feature
and the BOTTOM feature.
Up (+) & Down (-) key (25):
Press “+” to increase the baking time or temperature.
Press “-” to decrease the baking time or temperature.
Copies of the I/B. Please reproduce them without any
changes except under special instruction from Team
International BELGIUM. The pages must be reproduced
and folded in order to obtain a booklet A5 (+/- 148.5 mm
width x 210 mm height). When folding, make sure you
keep the good numbering when you turn the pages of
the I/B. Don’t change the page numbering. Keep the
language integrity.
9 TKG BBA 2 –080514
Assembly page 9/44
Fax +32 2 359 95 50
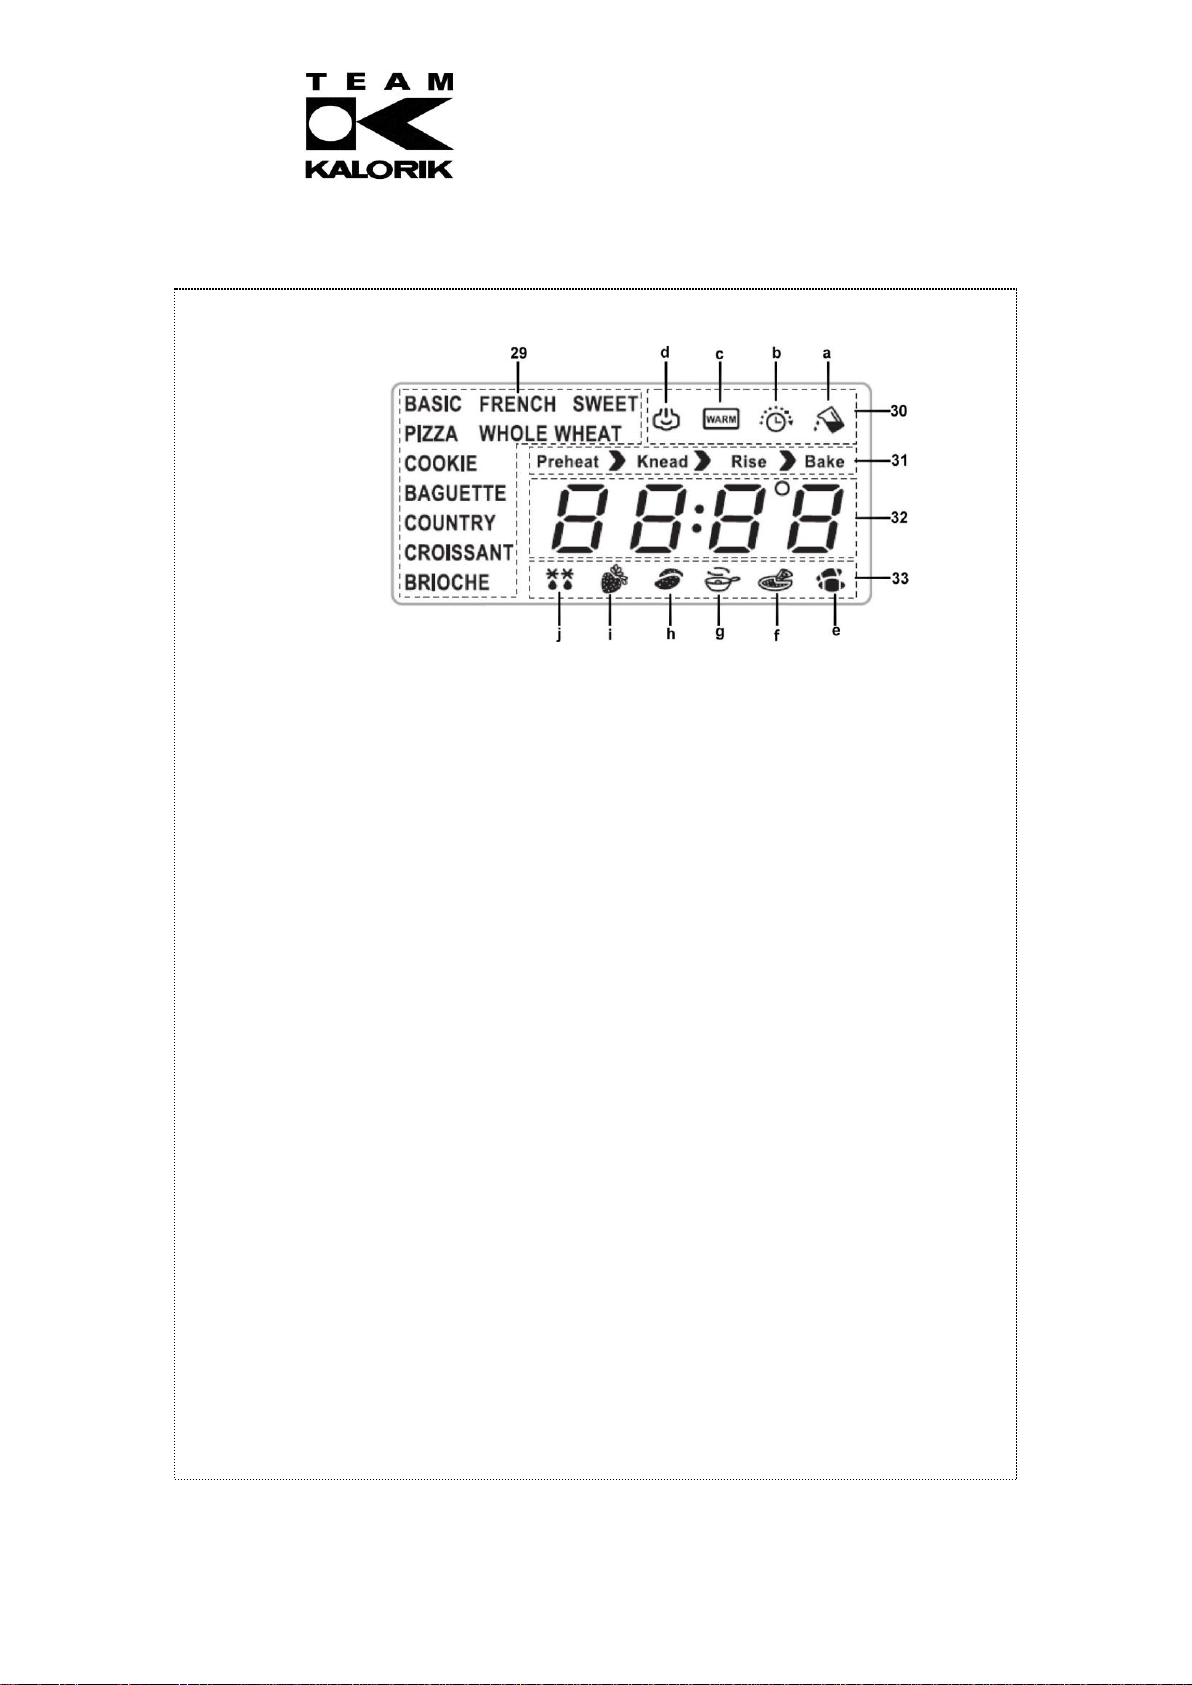
Display window (28):
Bread type indicator & Cooking Programme indicator (29)
BASIC: to bake normal bread
FRENCH: to bake French bread
SWEET: to bake sweet bread
WHOLE WHEAT: to bake wholewheat bread
PIZZA: to bake pizzas
COOKIE: to bake cookies
BAGUETTE: to bake baguettes
COUNTRY: to bake country bread
CROISSANT: to bake croissants
BRIOCHE: to bake brioches
Cooking function indicator (30)
a. Water tank must be filled with water
b. Delayed finish time function active
c. Heat preservation function active
d. Steam function active
Cooking process indicator (31)
Preheat : appliance is preheating
Knead : appliance is kneading dough
Rise : appliance is rising dough
Bake : appliance is baking bread
LCD display (32)
Displays time countdown
Displays the temperature
Displays an error (error warning codes "Err1", "Err2" and "Err3")
Cooking Programme indicator (33)
e. to prepare frozen snacks
f. to prepare frozen pizzas
g. to WARM UP soup
h. to prepare potatoes
i. to prepare jam
j. to defrost food
Copies of the I/B. Please reproduce them without any
changes except under special instruction from Team
International BELGIUM. The pages must be reproduced
and folded in order to obtain a booklet A5 (+/- 148.5 mm
width x 210 mm height). When folding, make sure you
keep the good numbering when you turn the pages of
the I/B. Don’t change the page numbering. Keep the
language integrity.
10 TKG BBA 2 –080514
Assembly page 10/44
Fax +32 2 359 95 50
WATER TANK (8)
Your appliance is equipped with a water tank of 200ml on the right-hand side. To fill the water
tank, pull it out of the appliance and unscrew its cap. Fill it with water but do not exceed the
maximum level indicated on the water tank (“FULL”). Screw the cap back on and put the
water tank back in the appliance.
You can only use the steam feature if there is a sufficient amount of water in the water tank.
USE AS A BREADMAKER
Temperature
All ingredients that you pour in the bread maker should be at an ambient temperature. The
room where you use the appliance should be at a temperature between 15°C and 34°C, and
ideally between 20 and 23°C. The room temperature has an influence on the loaf size.
Measuring the ingredients
Your appliance is equipped with a combined graduated spoon (small and large).
When talking about "cup" in this instruction manual, it refers to one measuring cup supplied
(250 ml).
On the combined graduated spoon, you'll see the following marks:
Tablespoon (tbs) = 15 ml
Teaspoon (tsp) = 5 ml
To measure liquid ingredients, fill the measuring cup and place it on a flat surface. The
liquid level line must be aligned to the mark of measurement. An approximate
measurement is not sufficient and could have a bad influence on the balance of the
recipe.
To measure the flour lightly spoon it into the measuring cup and once filled, level off with a
straight-edged utensil. Scooping or tapping a measuring cup will pack the flour and you
will end up with more than is required. This extra amount could affect the balance of the
recipe. Do not sift the flour. To measure small amounts, use the graduated spoon and
make sure it is level, not heaped. For some dry ingredients such as raisins or chocolate
chips, we advise you to use a kitchen scale.
Geographic situation
At altitude above 3,000 feet, flour tends to be drier and absorbs less liquid. Slightly more liquid
or less flour may be required.
Dough rises faster at higher altitude. Either sugar, yeast or liquid should be adjusted slightly to
prevent over-rising. See table below for guidelines.
ALTITUDE
Adjustment
3,000 ft
5,000 ft
7,000 ft
Reduce yeast: For each tsp in the recipe, decrease by
1/8 tsp
1/8 –1/4 tsp
+ 1/4 tsp
Reduce sugar: For each tbs in the recipe, decrease by
0-1 tsp
0-2 tsp
1- 2 tsp
Increase liquid: For each cup in the recipe, add
1 -2 tbs
2-4 tbs
3-4 tbs
Ingredients
One of the most important factors involved when making bread is the quality and freshness of
the ingredients. Moreover, it is absolutely necessary to follow the amounts prescribed
accurately.

Copies of the I/B. Please reproduce them without any
changes except under special instruction from Team
International BELGIUM. The pages must be reproduced
and folded in order to obtain a booklet A5 (+/- 148.5 mm
width x 210 mm height). When folding, make sure you
keep the good numbering when you turn the pages of
the I/B. Don’t change the page numbering. Keep the
language integrity.
11 TKG BBA 2 –080514
Assembly page 11/44
Fax +32 2 359 95 50
Water
It is recommended to use lukewarm drinking water. This gives the best results.
All-purpose flour
All-purpose flour is a blend of refined hard and soft wheat flours especially suited for making
breads and cakes. While this type of flour may give acceptable results from your bread maker,
we recommend using bread flour.
Bread flour
Bread flour is high gluten/protein flour that has been treated with conditioners that give dough
a greater tolerance during kneading. Bread flour typically has a higher gluten concentration
than all-purpose flour, however, depending on different milling practices this may vary. Bread
flour is recommended for use with this bread maker, but all-purpose flour will give acceptable
results.
Whole-wheat flour
Whole wheat flour is milled from the entire wheat kernel, which contains the bran and germ
and makes it heavier and richer in nutrients than all-purpose flour. Bread made with this flour is
usually smaller and heavier than white loaves. To overcome this, whole-wheat flour is usually
mixed with all-purpose flour, bread flour or gluten to produce taller, light-textured bread.
Rye flour
Rye flour is a high fibre flour similar to whole-wheat flour. Rye flour must always be mixed with a
high proportion of all-purpose flour, bread flour or gluten, as it does not contain enough gluten
to develop the structure for a tall, even-grained loaf.
Gluten
Gluten is the protein in the wheat that makes the dough elastic. Gluten is usually available at
most health food and bulk stores and is sometimes used in small portions with dense, low gluten
flours such as a whole-wheat to increase volume and lighten texture.
Cake flour
Cake flour is low gluten/protein flour and is specially designed for use in cake recipes. It is not
recommended for bread recipes.
Self-rising flour
Self-rising flours contain unnecessary leavening ingredients that will interfere with bread and
cake making. It is not recommended for use in your bread maker.
Bran
Bran (unprocessed) and wheat germ are the coarse outer portions of the wheat or rye grains
separated from the flour. They are often added in small quantities to bread for nutritional
enrichment, heartiness and flavour. They are also used to enhance the texture of bread.
Cornmeal and oatmeal
Cornmeal and oatmeal come from the coarsely ground white or yellow corn and from rolled
or steel-cut oats. They are used primarily to enhance the flavour and texture of bread.
Cracked wheat
Cracked wheat is very coarse in texture. It comes from wheat kernels cut into angular
fragments. It gives whole grain bread a nutty flavour and crunchy texture.
Seven-grain cereal blend
Seven-grain cereal blend is a blend of cracked wheat, oats, bran, rye, cornmeal, flax seeds
and hulled millet.

Copies of the I/B. Please reproduce them without any
changes except under special instruction from Team
International BELGIUM. The pages must be reproduced
and folded in order to obtain a booklet A5 (+/- 148.5 mm
width x 210 mm height). When folding, make sure you
keep the good numbering when you turn the pages of
the I/B. Don’t change the page numbering. Keep the
language integrity.
12 TKG BBA 2 –080514
Assembly page 12/44
Fax +32 2 359 95 50
Yeast
Yeast, through a fermentation process produces gas (carbon dioxide) necessary to make
bread rise. Yeast must be able to feed on sugar and flour carbohydrates in order to produce
this gas. Active dry granular yeast is used in all recipes that call for yeast. There are basically
four different types of yeast available; fresh, dry, quick-rising and bread machine. It is
recommended that traditional dry yeast be used, however, quick-rising yeast can also be used
in lesser amounts. Fresh or compressed cake yeast should never be used, as they will produce
poor results.
Yeast must always be stored in a refrigerator to keep it fresh. Too much heat will kill it. Ensure
that your yeast is opened, it is important that the remaining contents be immediately resealed
and refrigerated as soon as possible for future use. Often bread or dough, which fails to rise, is
due to stale yeast being used. The following test can be done to determine whether your yeast
is stale and inactive:
Place ½ cup of lukewarm water into a small bowl or cup.
Stir 1 tsp of sugar into the water then sprinkle 2 tsp of yeast over the surface.
Place the cup in a warm area and allow sitting for 10 minutes undisturbed.
The mixture should foam and produce a strong yeast aroma. If this does not occur,
fresh yeast should be purchased.
Sugar
Sugar is important for the colour and flavour of breads. It is also food for yeast as it supports the
fermentation process. Recipes that call for sugar require granulated sugar. Do not substitute
powdered sugar or brown sugar unless indicated. Artificial sweeteners cannot be used as a
substitute for sugar as yeast will not react properly with them.
Salt
Salt is necessary to balance the flavour of breads and cakes, as well as for the crust colour that
develops during baking. For dietary reasons, it may even be eliminated entirely, however, your
bread may over-proof and rise higher than normal.
Liquids/milk
Liquid such as milk or a combination of powdered milk and water can be used when making
bread. Milk will improve flavour, provide a velvety texture and soften the crust, while water
alone will produce a crispier crust. Use only powdered milk when using the delay timer. Some
recipes call for juice (orange, apple, etc.) to be added as a flavour enhancer.
Eggs
Eggs add richness and velvety texture to bread dough and cakes. Use only large-size eggs in
these recipes.
Butter, oil and margarine
Butter, oil and margarine shorten or tenderise the texture of yeast breads. However, breads
that call for butter stay fresh longer. If butter or margarine is used directly from the refrigerator,
it should be cut into small pieces for easier blending during the kneading cycle.
Baking powder
Baking powder is a leavening agent used in quick breads and cakes. This type of leavening
agent does not require rising time before baking as the chemical reaction works during baking
process.
Baking soda
Baking soda is another leavening agent not to be confused with nor substituted for baking
powder. It also does not require rising time before baking as the chemical reaction works
during baking process.

Copies of the I/B. Please reproduce them without any
changes except under special instruction from Team
International BELGIUM. The pages must be reproduced
and folded in order to obtain a booklet A5 (+/- 148.5 mm
width x 210 mm height). When folding, make sure you
keep the good numbering when you turn the pages of
the I/B. Don’t change the page numbering. Keep the
language integrity.
13 TKG BBA 2 –080514
Assembly page 13/44
Fax +32 2 359 95 50
Special glazes for yeast breads
Select one of the following glazes to enhance your bread:
Egg glaze: Beat 1 large egg and 1 tsp of water together, brush generously. Apply to dough
only, before baking in your regular oven.
Melted Butter Crust: Brush melted butter over just-baked bread for a softer, tender crust.
Milk Glaze: For a softer, shiny crust, brush just-baked bread with milk or cream.
Sweet icing glaze: Mix 1 cup sifted icing sugar with 1 to 2 tsp of milk to make a consistent glaze.
Drizzle over sweet breads.
Poppy/sesame/caraway seed/cornmeal/oatmeal:
Sprinkle your choice of these seeds generously over just-glazed bread.
BAKING BREAD
When you are going to use the appliance as a bread maker, always check that the water tank
is completely empty.
1. Open the door and remove the baking pan (make it turn lightly in an anticlockwise
direction, then lift it up). It is important to remove the baking pan from the unit. Do not add
ingredients to the baking pan while it is in the unit to avoid the risk of spilling ingredients
into the inner case.
Place your bread maker where it is level, stable and secure.
2. Attach the kneading blade onto the shaft inside the baking pan by lining up the flat side
of the blade with the flat side of the shaft. Push the blade firmly onto the shaft. Important:
Be sure to set the kneading blade firmly into place, otherwise the blade may come off
during operation. This will affect the kneading or mixing. Be sure the shaft is clean of any
particles to ensure the kneading blade will fully seat into place. It is recommended to fill
the hole of the kneading blade with heat-resistant margarine to prevent the dough from
sticking to the kneading blade.
3. Select a recipe. When following the recipe:
Measure the ingredients carefully and accurately. Refer to the section "Measuring the
ingredients".
Always add ingredients into the baking tin in the order they are listed.
Yeast is always added last. Be sure that the yeast does not touch the liquid
ingredients.
Usually, water or another liquid has to be put in first, then add sugar, salt and flour.
Finally, add yeast or baking powder.
To add the yeast, use your finger to make a small hole in the top of the flour. Put the
yeast in the hole and make sure it does not touch the liquid or salt.
4. Return the baking tin to the unit. Turn it lightly in a clockwise direction.
5. Close the door and connect the plug to the power outlet. A beep will sound and ": 0" will
appear on the display.
6. Press the MODE key once. The LOAF indicator will light up, “BASIC” and “Knead” will be
displayed, the default total cooking time “4:00” (4 hours) will start flashing on the display
and the indicator of the default crust colour “Medium” will light up.
7. If you want to change the colour, select the appropriate colour setting for your bread
crust by pressing the crust button (COLOR). Each time you press this key, the indication on
the display changes (LIGHT, MEDIUM or DARK).

Copies of the I/B. Please reproduce them without any
changes except under special instruction from Team
International BELGIUM. The pages must be reproduced
and folded in order to obtain a booklet A5 (+/- 148.5 mm
width x 210 mm height). When folding, make sure you
keep the good numbering when you turn the pages of
the I/B. Don’t change the page numbering. Keep the
language integrity.
14 TKG BBA 2 –080514
Assembly page 14/44
Fax +32 2 359 95 50
8. Press the SEL key to select the type of bread. You can choose between 4 types: BASIC,
FRENCH, SWEET or WHOLE WHEAT. Note: you can also select the type of bread first and
then choose the colour of the crust.
9. Press the START/STOP key to start the operation. The baking time in hours and minutes will
appear on the LCD display and the countdown will begin. When the time has counted
down to zero, the bread will be done. Note: if you want to stop the operation before the
end of the cooking time, press the START/STOP key for 3 seconds.
10. When the programme is completed, 3 beeps will sound and “0:00” will start flashing. If you
do not want to use the keep warm function, stop the appliance by pressing the
START/STOP button.
11. If you do not press the START/STOP key and leave the loaf inside the baking tin, the "keep
warm" function begins automatically when the baking time is done. The “WARM” indicator
(c) will light up for up to 60 minutes after baking is completed and the appliance will keep
the bread warm during that time. The display will show how long the bread has been kept
warm. At the end of the hour, the appliance will stop automatically and “: 0” will appear
on the display. You may remove the baking tin any time during the "keep warm" cycle. To
turn off the "keep warm" feature before the 60 minutes are up, simply press the START/STOP
key and hold it for 3 seconds. Unplug the unit when finished.
12. This bread maker has convenient viewing windows so that you may watch the progress of
the bread as it is mixed, kneaded and baked. Occasionally, some moisture may form on
the windows during processing. You may open the door to look inside during the mixing
and kneading stages, however, DO NOT OPEN THE DOOR DURING THE BAKING CYCLE
(approximately the last hour) as this may cause the bread to collapse.
13. Before taking out the baking pan with the bread, let them cool down for a while as they
are very hot. To remove the bread from the baking pan, use potholders or oven mitts and
take the pan. Turn the pan upside down and shake the bread out onto a wire cooling
rack or a clean cooking surface. The baking pan has a non-stick coated finish so that the
bread should come out easily. Do not use metal utensils to remove the bread as they may
scratch the non-stick coating. If needed, slide a flat rubber or plastic spatula along the
sides of the pan to loosen the loaf. If the kneading paddle remains in the bottom of your
loaf, use the end of a plastic spoon or other non-metal utensil to remove it. Do not use a
knife or other sharp metal object, as this will scratch the non-stick coating on the kneading
blade. Always check to see where the kneading blade is when removing a baked loaf of
bread. If it remains stuck to the bread, you may accidentally damage it by cutting into it
while slicing.
14. To avoid damaging the bread maker surface, do not put any object or the hot baking tin
on top of the unit.
15. Allow the bread to cool on a rack for at least 20 minutes before slicing, to release steam.
Use a good serrated bread knife or electric knife.
16. The bread or parts of the bread can be stored in a sealed plastic bag or receptacle for
about 3 days at room temperature, or up to 10 days if you put it in a refrigerator.
USING THE TIMER FOR DELAYED OPERATION
Use the timer when you wish to delay the completion of your bread. This feature allows you to
delay the baking time for up to 13 hours. For example, you can set the timer at 7 p.m. and
wake up to fresh bread by 8 a.m. the following morning.
To set the timer, follow the instructions below:
Note: Do not use the timer and delay function with recipes that call for fresh ingredients
that might spoil such as fruits, eggs, fresh milk, sour cream or cheese.
To set the timer, determine when you would like your bread to be ready and count the
number of hours until then. For example, if it is 8 p.m. when you place all your ingredients in
the baking tin and you would like to wake up to the aroma of fresh bread at 8 a.m. the
next morning, you need a total of 12 hours before your bread is complete. Once you have

Copies of the I/B. Please reproduce them without any
changes except under special instruction from Team
International BELGIUM. The pages must be reproduced
and folded in order to obtain a booklet A5 (+/- 148.5 mm
width x 210 mm height). When folding, make sure you
keep the good numbering when you turn the pages of
the I/B. Don’t change the page numbering. Keep the
language integrity.
15 TKG BBA 2 –080514
Assembly page 15/44
Fax +32 2 359 95 50
chosen the appropriate settings (menu, colour, loaf size) for your recipe, simply set the
timer for the total number of hours –in this case, 12 hours.
When you have pressed the MODE key once and chosen the colour of the crust with the
COLOR key and the type of bread with the SEL key, press the PRESET KEY on the control
panel and the time of delay will show in the display window. Press the up and down keys
(+ and -) to adjust the time. The preset indicator (clock symbol) will light up. You do not
need to mathematically calculate the difference between the setting time and the total
hours you want (12:00). The bread maker will automatically adjust to include the setting
time. Simply set the timer for your total hours (12).
Once you have set the time, press START/STOP. The timer will count down in one-minute
increments. When the display reaches 0:00, your bread is complete and 3 beeps will
sound.
If you make a mistake while setting the timer, press and hold the START/STOP key for 3
seconds. This will clear the display and you can set the timer again.
MAKING DOUGH AND LETTING IT RISE
You can use this programme to make dough and to let it rise automatically.
Plug in the appliance. “: 0” will appear on the display.
Press the MODE key twice. The DOUGH and RISE indicators will light up.
Press the SEL key to choose the type of dough. You can choose between 10 types: BASIC,
FRENCH, SWEET, PIZZA, WHOLE WHEAT, COOKIE, BAGUETTE, COUNTRY, CROISSANT and
BRIOCHE.
Press the START/STOP key to activate the operation. The countdown begins.
When the time has been counted down to zero, 3 beeps will sound and the unit will stop
working automatically. “: 0” will appear on the display.
You can use the risen dough to shape the bread of your desire.
Unplug the unit.
KNEADING DOUGH
You can use this programme to knead dough without letting it rise.
Plug in the appliance. “: 0” will appear on the display.
Press the MODE key three times. The DOUGH indicator will light up.
Adjust the kneading time by pressing the + and - keys. The maximum kneading time is 30
minutes. Please note that if the kneading time is too long, the rising stage will fail later.
Press the START/STOP key to activate the operation. The countdown begins.
When the time has been counted down to zero, 3 beeps will sound and the unit will stop
working automatically. “: 0” will appear on the display.
Unplug the unit.
LETTING THE DOUGH RISE
You can use this programme to let the dough rise.
Plug in the appliance. “: 0” will appear on the display.
Press the MODE key four times. The RISE indicator will light up. The default temperature is
35°C and this temperature cannot be adjusted.
Press the temperature-time switch key next to the FUNC’ key to turn to the time setting.
Adjust the rising time by pressing the + and - keys. The maximum rising time is 2 hours.
Press the START/STOP key to activate the operation. The countdown begins.
When the time has been counted down to zero, 3 beeps will sound and the unit will stop
working automatically. “: 0” will appear on the display.
Unplug the unit.

Copies of the I/B. Please reproduce them without any
changes except under special instruction from Team
International BELGIUM. The pages must be reproduced
and folded in order to obtain a booklet A5 (+/- 148.5 mm
width x 210 mm height). When folding, make sure you
keep the good numbering when you turn the pages of
the I/B. Don’t change the page numbering. Keep the
language integrity.
16 TKG BBA 2 –080514
Assembly page 16/44
Fax +32 2 359 95 50
RECIPES
1 cup of flour = 250ml = 165g / 1 teaspoon = 5ml / 1 tablespoon = 15ml
STANDARD BREAD (BASIC)
320 ml of water
2 tablespoons of margarine or butter
1.5 teaspoon of salt
1.5 tablespoon of powdered milk
2.5 tablespoons of sugar
450g of all-purpose flour or bread flour
1 teaspoon of quick-rise yeast
FRENCH BREAD
330 ml of water
1 tablespoon of margarine or butter
1.5 teaspoon of salt
395g of all-purpose flour or bread flour
55g of gluten-free flour
1 teaspoon of quick-rise yeast
SWEET BREAD
160 ml of water
1.75 tablespoons of butter or margarine
2 eggs
1 teaspoon of salt
1.5 tablespoon of powdered milk
5 tablespoons of sugar
400g of all-purpose flour or bread flour
1 teaspoon of quick-rise yeast
WHOLEWHEAT BREAD
340 ml of water
1.25 tablespoon of margarine or butter
1.5 teaspoon of salt
1.5 tablespoon of powdered milk
2.5 tablespoons of sugar
225g of all-purpose flour or bread flour
225g of wholewheat flour
1.5 teaspoon of quick-rise yeast
BAGUETTE
150 ml of water
1 teaspoon of salt
250g of all-purpose flour or bread flour
1.5 teaspoon of quick-rise yeast
CROISSANT
120 ml of water
4 tablespoons of margarine or butter
1 egg
0.5 teaspoon of salt
250g of all-purpose flour or bread flour
1.25 teaspoon of quick-rise yeast

Copies of the I/B. Please reproduce them without any
changes except under special instruction from Team
International BELGIUM. The pages must be reproduced
and folded in order to obtain a booklet A5 (+/- 148.5 mm
width x 210 mm height). When folding, make sure you
keep the good numbering when you turn the pages of
the I/B. Don’t change the page numbering. Keep the
language integrity.
17 TKG BBA 2 –080514
Assembly page 17/44
Fax +32 2 359 95 50
COUNTRY BREAD
150 ml of water
10 tablespoons of margarine or butter
280g of multi-grain flour
1 teaspoon of quick-rise yeast
BRIOCHE
100 ml of water
4 tablespoons of margarine or butter
1 egg
1.5 teaspoon of salt
3 tablespoons of powdered milk
5 tablespoons of sugar
250g of all-purpose flour or bread flour
50g of gluten-free flour
1.25 teaspoon of quick-rise yeast
MENU FUNCTIONS
You can use this programme to cook several kinds of preparation.
Plug in the appliance. “: 0” will appear on the display.
Press the MENU key to select the type of preparation. You can choose between 12 types:
frozen croissant, frozen pizza, soup, potato, jam, defrost, pizza dough, cookie, baguette,
country, croissant and brioche. The corresponding indicator will light up (for the first six in
the form of a symbol).
For some preparations (not for all) you can adjust the cooking time by pressing the + and –
keys but not the temperature.
Press the START/STOP key to activate the operation. The “Preheat” indicator will start
flashing.
When the preheating stage has ended, the “Preheat” indicator will no longer be
illuminated and the countdown begins.
When the time has been counted down to zero, 3 beeps will sound and the unit will stop
working automatically. “: 0” will appear on the display.
Unplug the unit.
Note: according to the type of preparation, you can use the pizza plate, the plate for
baguettes, the baking plate or the rack.
TOAST FEATURE
You can use this programme to toast bread.
Plug in the appliance. “: 0” will appear on the display.
Press the FUNC’ key once. The TOAST indicator will light up.
The default time is 5’10”. If you wish to set a different time, press the + and – keys. You can
choose between 5 levels: 2’30”, 3’10”, 4’30”, 5’10” and 6’30”.
Press the START/STOP key to activate the operation. The “Preheat” indicator will start
flashing. Note: the preheating time cannot be adjusted.
When the preheating stage has ended, the “Preheat” indicator will no longer be
illuminated and the countdown begins.
When the time has been counted down to zero, 3 beeps will sound and the unit will stop
working automatically. “: 0” will appear on the display.
Unplug the unit.
Note: you can use the rack.

Copies of the I/B. Please reproduce them without any
changes except under special instruction from Team
International BELGIUM. The pages must be reproduced
and folded in order to obtain a booklet A5 (+/- 148.5 mm
width x 210 mm height). When folding, make sure you
keep the good numbering when you turn the pages of
the I/B. Don’t change the page numbering. Keep the
language integrity.
18 TKG BBA 2 –080514
Assembly page 18/44
Fax +32 2 359 95 50
TOP FEATURE
You can use this programme to bake with the top heating element only.
Plug in the appliance. “: 0” will appear on the display.
Press the FUNC’ key twice. The TOP indicator will light up and the temperature will start
flashing on the display.
The default temperature is 130°C. If you wish to set a different temperature, press the +
and –keys. The minimum temperature is 100°C & the maximum temperature is 150°C.
Press the temperature-time switch key next to the FUNC’ key to turn to the time setting.
The default time is 30 minutes. If you wish to set a different time, press the + and –keys. The
minimum time is 5 minutes & the maximum time is 90 minutes.
Press the START/STOP key to activate the operation. The “Preheat” indicator will start
flashing.
When the cavity has reached the set temperature, the “Preheat” indicator will no longer
be illuminated and the countdown begins.
When the time has been counted down to zero, 3 beeps will sound and the unit will stop
working automatically. “: 0” will appear on the display.
Unplug the unit.
BOTTOM FEATURE
You can use this programme to bake with the bottom heating element only.
Plug in the appliance. “: 0” will appear on the display.
Press the FUNC’ key three times. The BOTTOM indicator will light up and the temperature
will start flashing on the display.
The default temperature is 150°C. If you wish to set a different temperature, press the +
and –keys. The minimum temperature is 100°C & the maximum temperature is 160°C.
Press the temperature-time switch key next to the FUNC’ key to turn to the time setting.
The default time is 30 minutes. If you wish to set a different time, press the + and –keys. The
minimum time is 5 minutes & the maximum time is 90 minutes.
Press the START/STOP key to activate the operation. The “Preheat” indicator will start
flashing.
When the cavity has reached the set temperature, the “Preheat” indicator will no longer
be illuminated and the countdown begins.
When the time has been counted down to zero, 3 beeps will sound and the unit will stop
working automatically. “: 0” will appear on the display.
Unplug the unit.
TOP + BOTTOM FEATURE
You can use this programme to bake with both the top and the bottom heating element.
Plug in the appliance. “: 0” will appear on the display.
Press the FUNC’ key four times. The TOP and BOTTOM indicators will light up.
The default temperature is 220°C. You can change it if necessary (min 150°C/ MAX 220°C).
Press the temperature-time switch key next to the FUNC’ key to turn to the time setting.
The default time is 30 minutes. If you wish to set a different time, press the + and –keys. The
minimum time is time is 5 minutes & the maximum time is 90 minutes.
Press the START/STOP key to activate the operation. The “Preheat” indicator will start
flashing.
When the cavity has reached the set temperature, the “Preheat” indicator will no longer
be illuminated and the countdown begins.
When the time has been counted down to zero, 3 beeps will sound and the unit will stop
working automatically. “: 0” will appear on the display.
Unplug the unit.

Copies of the I/B. Please reproduce them without any
changes except under special instruction from Team
International BELGIUM. The pages must be reproduced
and folded in order to obtain a booklet A5 (+/- 148.5 mm
width x 210 mm height). When folding, make sure you
keep the good numbering when you turn the pages of
the I/B. Don’t change the page numbering. Keep the
language integrity.
19 TKG BBA 2 –080514
Assembly page 19/44
Fax +32 2 359 95 50
TOP + BOTTOM + STEAM FEATURE
You can use this programme to bake with both the top and the bottom heating element while
using steam at the beginning and at the end of the operation.
Plug in the appliance. “: 0” will appear on the display.
Press the FUNC’ key five times. The TOP, BOTTOM and STEAM indicators will light up. The
default temperature is 220°C and cannot be changed.
Press the temperature-time switch key next to the FUNC’ key to turn to the time setting.
The default time is 30 minutes. If you wish to set a different time, press the + and –keys. The
minimum time is 5 minutes & the maximum time is 90 minutes.
Press the START/STOP key to activate the operation. The countdown begins.
When the time has been counted down to zero, 3 beeps will sound and the unit will stop
working automatically. “: 0” will appear on the display.
Unplug the unit.
Note: steam is being produced during the first 2-3 minutes and during the last 2-3 minutes of
the baking process. Make sure there is a sufficient amount of water in the water tank before
you use this programme (see section “WATER TANK”), otherwise the operation will not start and
“Err2” will appear on the display.
TROUBLESHOOTING GUIDE –OPERATION PROBLEMS
Problem
Solution
Smoke comes out of the side vents
during the baking process
This can be due to some oil on the heating element.
Unplug the appliance, remove the baking tin and
clean the heating element with a dry cloth. Be careful
not to get burned.
Flour spilled out of the bread tin into
the inner case
Unplug the unit and allow to cool, wipe out inner case
with a clean cloth. Be careful when cleaning around
the heating element.
The lower crust is too thick
This can happen if you leave the bread for a long
time in the baking tin. Try to remove the loaf earlier.
Bread did not bake properly
Ensure the kneading blades are properly seated on
the mounting shaft.
Avoid opening the appliance too frequently during
the programme.
You can hear the motor but the
dough is not being mixed
Check that the baking tin is locked properly and that
the kneading blades are properly installed.
“Err1” appears in the display window
The temperature inside the oven cavity is more than
35°C so that the rise feature cannot work.
“Err2” appears in the display window
There is not enough water in the water tank. Fill the
water tank.
“Err3” appears in the display window
The water tank is not inserted correctly or is missing.
The bread is too large and pushes the
cover
Reduce the amount of water, flour or yeast or lower
the temperature.
The bread is too small
There is not enough yeast or the water temperature is
too high, or the ambient temperature is too low. Add
yeast or increase the ambient temperature.
The dough overflows the baking tin
Reduce the amount of liquids or yeast.
The middle part of the bread
collapses
The temperature of the yeast is too high or you have
used too much water; use yeast at room temperature
or reduce the amount of water.

Copies of the I/B. Please reproduce them without any
changes except under special instruction from Team
International BELGIUM. The pages must be reproduced
and folded in order to obtain a booklet A5 (+/- 148.5 mm
width x 210 mm height). When folding, make sure you
keep the good numbering when you turn the pages of
the I/B. Don’t change the page numbering. Keep the
language integrity.
20 TKG BBA 2 –080514
Assembly page 20/44
Fax +32 2 359 95 50
The bread is too dense and weighs
too much
Too much flour or fruits or too little water or yeast.
Reduce the amount of flour or fruits or increase the
amount of water or yeast.
The middle part is hollow
Reduce the amount of water or yeast, reduce the
water temperature or add salt.
Dry powder on surface of the bread
Reduce the amount of sticky ingredients such as
butter or bananas, or add enough water.
The crust of cakes (or other
preparations with lots of sugar) is too
thick and the colour is too dark
Too much sugar causes the dark colour. Press
START/STOP 5 to 10 minutes before the end of the
baking time and keep the bread or cake in the
baking tin for about 20 minutes with the cover closed
before taking it out.
If the bread result is not satisfactory, please check the following points:
Caution: Try one solution at a time per loaf.
A) Measurement problems
Loaf rises then falls
Decrease the amount of water/milk by 2 tbs.
Increase the amount of salt by 1/4 tsp.
Decrease the amount of yeast by 1/4 tsp.
Loaf rises too much
Decrease the amount of flour by 2 tbs.
Decrease the amount of water/milk by 2 tbs.
Increase the amount of salt by 1/4 tsp.
Decrease the amount of sugar/honey by 1 tsp.
Decrease the amount of yeast by 1/4 tsp.
Loaf does not rise enough
Increase the amount of water/milk by 2 tbs.
Decrease the amount of salt by/4 tsp.
Increase the amount of sugar/honey by 1 tsp.
Increase the amount of yeast by 1/4 tsp.
Crust is too dark
Decrease the amount of sugar/honey by 1 tsp.
Loaf partially cooked
Decrease the amount of water/milk by 2 tbs.
Top of the loaf is not smooth
Decrease the amount of flour by 2 tbs.
Increase the amount of water/milk by 2 tbs.
Texture of the loaf is heavy or dense
Decrease the amount of flour by 2 tbs.
Increase the amount of sugar by 1 tsp.
Increase the amount of yeast by 1/4 tsp.
B) Ingredient problems
If the poor result is not due to measurement problems, it can also be due to the ingredients
themselves:
Loaf rises then falls
The flour is too fine.
Table of contents
Languages:
Other Team Kalorik Bread Maker manuals

Popular Bread Maker manuals by other brands


Silvercrest
Silvercrest 89209 operating instructions

Silvercrest
Silvercrest SBB 850 C1 operating instructions

Welbilt
Welbilt ABM4100T Instruction manual and recipe booklet

Silvercrest
Silvercrest SBB 850 EDS A1 operating instructions

Panasonic
Panasonic SD-206 Operating instructions and recipes

Scarlett
Scarlett SC-BM40002 instruction manual


