Teasi NAV-BIKTS User manual

User Manual
Teasi SPC
NAV-BIKTS
Manufacturer:Shenzhen Meilan Technology Co.,Ltd
Address:402 Yongkaili building, Xixiang road NO.: 7, Baoan, ShenZhen, China,
518102
Contact: Sheng Hou
Tel: +86 0755 23159119
E-mail: [email protected]om

I. ProductAppearance and Button Name
Teasi Core(BT name: Teasi Core)
1. USB charging interface/USB rubber stopper
2. Long press: power on/off; short press: backlight on/off;
3. Reset
4. Buzzer, Sound off in the menu only refers to steering notification tone and warning tone off, button tone
cannot be set off;
5. Auto backlight on/off induction window
6. Connected to HR bracket;
A/B/C shown in the figure above are only the functional buttons of this product, please see the table below
for their specific functions:
Buttons Normal mode Setting mode
Short press: change display mode;
Long press 1 sec: go into setting picture
Short press:
Select digital location, backward/left direction;
Long press 1 sec: exit the setting picture
Long press 1 sec: change to App working mode
Long press 2sec: go into pair sensor picture
Short press:
Change the digital/confirm Yes/No
ABC
1
3
5
4
2 6

Short press: start/pause recording
Long press: stop recording
Short press: select next digital location/right direction
Buttons Pairing sensors mode Connect with APP mode
Long press 1 sec: exit pair sensor picture Short press: Exit search smartphone
Short press:
Start search sensors/search next sensor/exit ___
Speed/Cadence sensor( BT name:Teasi SPC)
Wireless speed/cadence sensor Wheel magnet Pedals magnet
II. Installation
1. Installation of Teasi Core
Fix Teasi Core on HR bracket as shown in the figure below

2. Installation of speed/cadence sensor
A. Install pedals magnet (RPM) and wheel magnet (Speed) in corresponding positions as shown in the
figure below:
Tear the 3M adhesive on the back of pedals magnet off and stick pedals magnet inside the pedal
connecting arm, and then tie up the 2 nylon straps to fix it, and cut unnecessary part down.
Install the wheel magnet on wheel spoke and tighten it, so as to ensure that it will not slide when the
wheel is spinning at a high speed.

Fix Speed/cadence sensor on corresponding position of bike as shown in the figure, and then tighten it
with 2 nylon straps.
Then, fix it again with a rubber hand

Please note: the centers of pedals magnet and wheel magnet shall be aligned with corresponding
induction part of sensor and shall not be deviated from it too far; the magnets shall not be more than 2
cm from the induction part, since distance larger than 2 cm will make it fail to receive the wheel spinning
signal. Screws can be loosened with screwdriver to adjust the distance between the extendible arm of
inductor and spoke magnet.
III. Production Application
1. Speed/Cadence Sensor
Ⅰ. There is a CR2032 button cell inside the product to provide power and its service life is 4 months in
general. Teasi Core or Tuhuna will fail to detect sensors when sensor cell is dead or sensor is damaged.
Sensor cell can be replaced according to the figure below;
Please note: when you use this product for the first time, please remove the battery hatch to remove the
insulation film;
Ⅱ. This product can be connected to any equipment conforming to BLE4.2 standard protocol and
transmit data to it; however, equipment conforming to Bluetooth standard protocol or subject o access
name restrictions are not included;
Ⅲ. This product will get into sleep mode after wheels stop spinning for 5 min in order to save power; it
will also get into sleep mode when Tuhuna or Teasi disconnects with sensor. When it is used again, bike

wheels shall be made spun to activate sensor, so that the product can be searched by Tuhuna or Teasi
Core;
2. Teasi Core
This product is provided with a built-in battery that can be charged with a charger above DC 5V, 500
mA or PC USB interface when the battery is too low to supply power to Teasi Core;
This product is provided with a monochrome display screen, its backlight can be turned on manually at
night for better vision, and turned off at day to save power. You can also set backlight into auto on/off
mode in the settings menu.
Teasi Core has 2 working modes:
1. Stopwatch working mode: Teasi Core is only a bike stopwatch that is not connected to APP; in this
mode, speed/ cadence sensor and HR monitor shall pair with Teasi Core and connect to it;
2. App working mode: Teasi Core is only a display equipment that needs to pair and connect to APP,
and all its data is from App push; in this mode, speed/ cadence sensor and HR monitor shall pair
with Teasi Core and connect to it;
Ⅰ.APPWorkingMode
1. Connect to Tuhuna
This product will search to connect with Tuhuna automatically after it is started, as shown in the left of
the following figure. If you do not need to connect to Tuhuna or Tuhuna has stopped working, you can
press the far left button to EXIT;
Teasi Core starts to connect to Tahuna
Tahuna You can scan the QR code displayed on this equipment when it is started or the QR code
printed on the package to enter the website, and download and install it.

When APP detects a new version of Teasi Core to update to, there will be a dialogue box of update
prompt given on the APP. Users can click update button on APP to make Teasi Core update
automatically. The following update progress bar will be shown;
Notice: please make sure your phone and Teasi Core have enough power before updating, keep
Bluetooth connection smooth in updating process, and do not take you phone away from Teasi Core. If
update does not progress for a long time or power fails, or Bluetooth signal is lost in updating process,
Teasi Core will return to its old version and will update again when it is connected to the APP next time.
You need to turn the Bluetooth of your smartphone and the connect switch of Tuhuna on, so that Tuhuna
can seek to connection with Teasi Core. The main interface will be entered after their successful
connection and the successful connection symbol as shown in the figure below will be shown; at the
same time, you need to connect Tuhuna with speed/cadence sensor and HR sensor.
When all connections are finished, Teasi Core can start to work;
Successful Connection of Teasi and Tahuna

Please note: You need to make sure that Teasi Core or sensors are not connected to other Bluetooth equipment and
can be effectively connected to Tahuna;
The status bar displayed after Teasi Core is successfully connected to Tahuna.
Successful connection to Tahuna
Smartphone battery
Smartphone GPS on
Current time
Equipment battery
Maximum speed
Current speed
Accumulative mileage
After the equipment is connected to Tahuna, the 2 data
types can be changed on theAPP.
(Speedmeter picture)

2. Page Display of Teasi core
Display page of Teasi Core is divided into: speedmeter,2-4-6 segment display interface; navigation display
interface;
Including: users of the 2 data below speedmeter and navigation picture, and the data on 2-4-6 interface can
change the data type they want to display on the corresponding page of APP; data with red dots in this
document can be changed;
Users can select corresponding 2-4-6 segment display mode on APP-computer page according to their habits;
Navigation page will only be displayed after users set their destination on the APP and enable navigation
feature;
2-segment Display Page 4-segment Display Page
6-segment Display Page Navigation Display Page
This product also has notification feature, for example, phone, email, over speed and water notifications
which you can set on the APP. However, this feature can only be used when Teasi core is used together with APP.
Examples are as below:

Phone Water Over speed
This product will enter standby mode automatically after riding is stopped for 3 min, as shown in the figure below;
it will return to the previous interface automatically after riding starts again;
Ⅱ. Stopwatch Working Mode
This product will seek to connect with Tuhuna after it is started, as shown in the left of the figure below; if you do
not want to connect with Tuhuna or Tuhuna has stopped working, you can press the far left button to EXIT and
enter stopwatch working mode.
If Teasi Core has connected to Tahuna successfully and is in working mode currently, users should select
disconnect in the sensors page of Tahuna to return to the searching mode; then select EXIT to exit and enter the
independent working mode of stopwatch;
At this moment, it is needed to pair HR monitor and speed/ cadence sensor and connect them;
Pairing method for sensors and Teasi Core
Long press for 2 sec and then release it after hearing the buzzer sounds twice, then the Teasi Core will enter
the mode to pair and connect with sensor; after the following interface is shown, short press to search sensor;
when one sensor is searched, its name will be displayed and the equipment will connection to it automatically;
short press at this time to start searching the next sensor. After the 2 sensors are searched, short press

to exit sensor searching mode; if it only needs to connect to one sensor, long press for 1 sec after searching,
and then exit sensor pairing interface after hearing the buzzer sounds once. Then, this following connection status
symbol will be shown on the screen, showing that Teasi Core has been successfully connected to sensors, and the
stopwatch can start to work independently. However, the wheel size shall be set. See settings for wheel size setup.
Teasi core and sensors pairing interface Working interface entered after pairing is completed
S speed/cadence sensor had connect OK
H Heart rate sensor had connect OK
In stopwatch working mode, some data may not be displayed, for example, data is displayed ——, the reason is
that: 1. These data are all from APP, and APP is not connected when Teasi Core is working independently, so there
is no data source; 2. Speed/ cadence sensor and HR monitor are not paired and connected to each other, so there is
no data source;
When stopwatch is working, users can record and store sports data selectively. Short press to start record
and short press again to suspend recording; long press for 1 sec, and then release it after hearing the
Buzzer sounds once to stop recording; a new entry of record is generated. When the equipment is connected to
Tuhuna again, Tuhuna will acquire this data and calculate it;

Start and stop of riding
When Teasi Core is prepared for work, the prompt box as shown in the left figure will be displayed on the screen;
when riding is suspended, the prompt box as shown in the right figure will be displayed on the screen;
Menu setting
In normal working state, long press for 1 sec (release the button after hearing Buzzer sounds once) to enter
settings menu where corresponding parameters can be set; refer to button function list for button operation mode
and function list. Exit settings menu: long press for 1 sec (release the button after hearing Buzzer sounds
once) to exit settings menu.
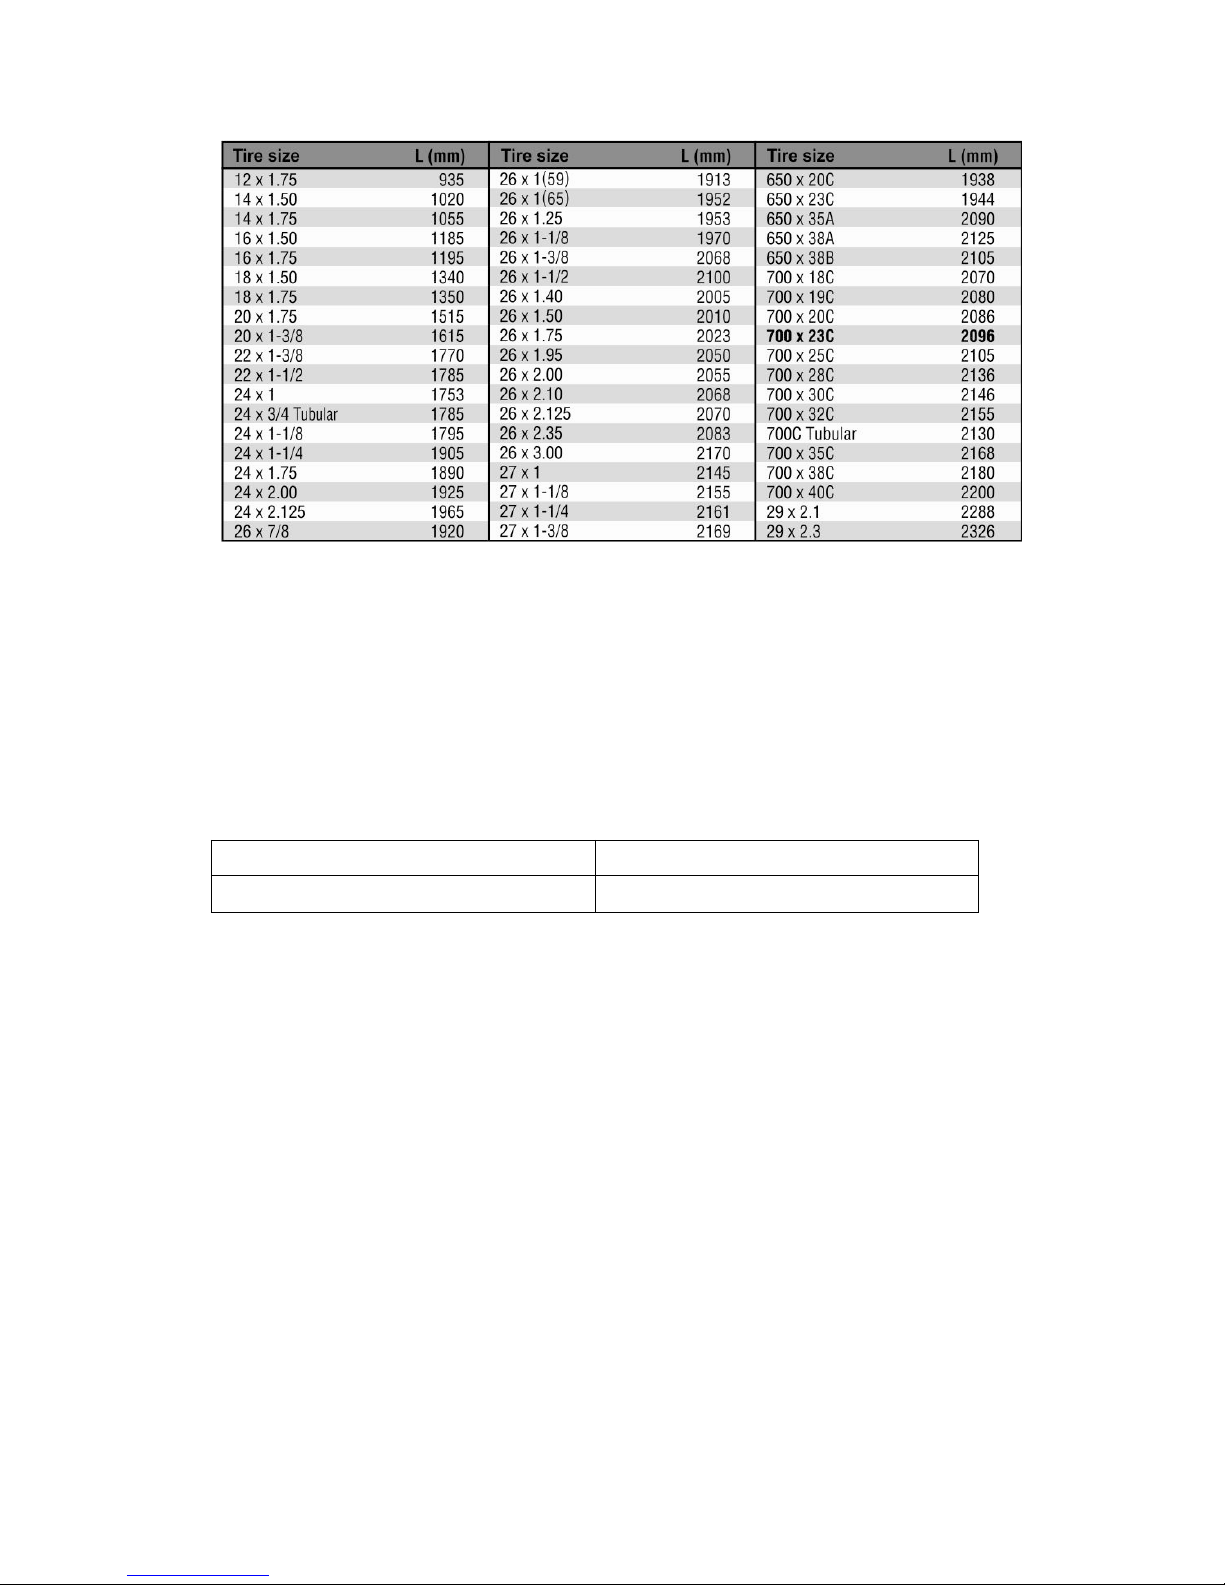
Wheel size setting
In the table below, you can find the wheel size (L) of your tire, or the actually measured wheel size (L) of your
bike.
How to measure wheel size (L): in order to obtain accurate measurement, you can make a tire roller. Place the
valve stem of the tire in normal pressure down, and mark on the ground. With the pedaling load of rider applied,
make the tire roll one circle (until the valve steam returns down on the ground) in a straight line. Then mark the
position of valve stem and measure the distance in millimeter dimension.
* The following table is for your reference.
Please note: No matter which working mode is in, stopwatch or APP mode, it is needed to set wheel size on
stopwatch or APP; otherwise, the data will not be accurate.
Language: Teasi Core supports 5 languages, EN, GE, FR, NL and CZ;
Sound: only steering notification tone and warning tone cane be turn off, button tone cannot be set off;
Backlight: users can select auto/metal backlight control in settings menu; when auto backlight is selected, the
backlight will be turned off automatically at day and be turned on at night;
Clear pair info: eliminate Bluetooth pairing information;
Clear sport data: eliminate all sports data except for ODO data;
Reset to default: ODO data will be cleared after resetting to default.
Maximum transmit power 0.00042W
Operating frequency 2402MHz-2480MHz
Bluetooth can bu used in Europe without restriction.
CE Statement
Hereby, Shenzhen Meilan Technology Co.,Ltd declares that this Teasi SPC,NAV-BIKTS is in compliance
with the essential requirements and other relevant provisions of Directive 2014/53/EU.
Use the Teasi SPC in the environment with the temperature between -20℃and 45℃.
Risk of explosion if battery is replaced by an incorrect type.
Dispose of used batteries according to the instructions.
The product shall only be connected to a USB interface of version USB2.0
Input: AC 100-240V 50/60Hz 0.5A Output: DC 5.0V, 0.5A
Which should meet the requirements of CE
Manufacture: Shenzhen Meilan Technology Co.,Ltd
Address: 402 Yongkaili building, Xixiang road NO.: 7,Baoan,ShenZhen, China, 518102
Contact: Sheng Hou
Tel: +86 0755 23159119
E-mail: [email protected]
Suggest use of the adapter:
To charge the battery, please use the above specifications adapter

FCC Statement
Changes or modifications not expressly approved by the party
responsible for compliance could void the user's authority to
operate the equipment.
This equipment has been tested and found to comply with the limits
for a Class B digital device, pursuant to Part 15 of the FCC
Rules. These limits are designed to provide reasonable protection
against harmful interference in a residential installation
This equipment generates uses and can radiate radio frequency
energy and, if not installed and used in accordance with the
instructions, may cause harmful interference to radio communications.
However, there is no guarantee that interference will
not occur in a particular installation. If this equipment does cause
harmful interference to radio or television reception, which
can be determined by turning the equipment off and on, the user
is encouraged to try to correct the interference by one or
more of the following measures:
-- Reorient or relocate the receiving antenna.
-- Increase the separation between the equipment and receiver.
-- Connect the equipment into an outlet on a circuit different from
that to which the receiver is connected.
-- Consult the dealer or an experienced radio/TV technician for help
This device complies with part 15 of the FCC rules. Operation is
subject to the following two conditions (1)this device may not
cause harmful interference, and (2) this device must accept any
interference received, including interference that may cause
undesired operation.
Table of contents
Other Teasi Bicycle Accessories manuals


