Tecdesk 4 User manual

User Manual | English
ENGLISH

1.0 INTRODUCTION ENGLISH
In order to make the best use of your Tecdesk Model 4 SIM desk phone, please read this manual carefully.This phone is designed for use with a valid SIM card from your
mobile network operator.
IMPORTANT NOTE
1. On installing your phone for the rst time, charge the battery between 12 and 16 hours.
3. If the phone is not going to be used for a long period of time, remove the battery.
4. If the battery has not been used for a long period of time or it is completely exhausted, it is likely that the phone screen will not turn on. Only once the battery has been
charging for a while will you be able to switch the phone back on to use it.
5. There is an increased risk of explosion if battery is replaced by an incorrect or unauthorised battery type. Dispose of used batteries according to the instructions.
Installation and Commissioning
These instructions are intended for the safe and effective use of your phone. Please follow these guidelines. Failure to do so might cause the product to malfunction, or
even a potential hazard to your health.
- Always read the safety instructions carefully.
- Keep this user manual for future reference.
- Keep the phone away from humidity.
- Place the phone on a reliable at surface before setting it up.
- If any of the following situations arise, have the unit checked by a service technician: exposure to moisture, dropped and damaged, obvious signs of breakage.
- Do not place the phone in a damp room at a distance of less than 1.5m from a water source. Keep the device away from water or any form of liquid.
- Do not use the device in environments where there are risks of explosions.
- Maintain the phone in an environmentally-friendly manner.

1.2 SIM CARD
For this device to function properly, please ensure your SIM card is activated and data is enabled.
Contact your Mobile Network Provider for your SIM plan details.
Removing the SIM Card
When removing the SIM card from your device, please follow the below steps: -
1. Power OFF the device.
2. Remove the battery.
3. Remove the SIM card.
1.3 BATTERY
On rst use, please charge your device (with battery inserted) for 15 hours before removing the power adaptor.
Once complete, you may repeat this step 3 times to get the best efciency from your battery. Please note that
charging from a at battery to full takes between 3 to 4 hours.
1.1 INSTALLATION
The box includes the following: -
1. Model 4 SIM desk phone (touch screen)
2. Stand
3. Receiver
4. Battery
5. Power Adaptor
6. Quick User Guide
To set up your device, follow the steps below: -
1. Connect the Receiver to the device.
2. Insert the SIM card carefully into the SIM tray located at the back of the device.
3. Insert the battery correctly into the back of the device.
4. Attach the stand to the device.
5. Connect the micro USB power adaptor to the device and plug into a power source.
6. Switch on the device.
SIM
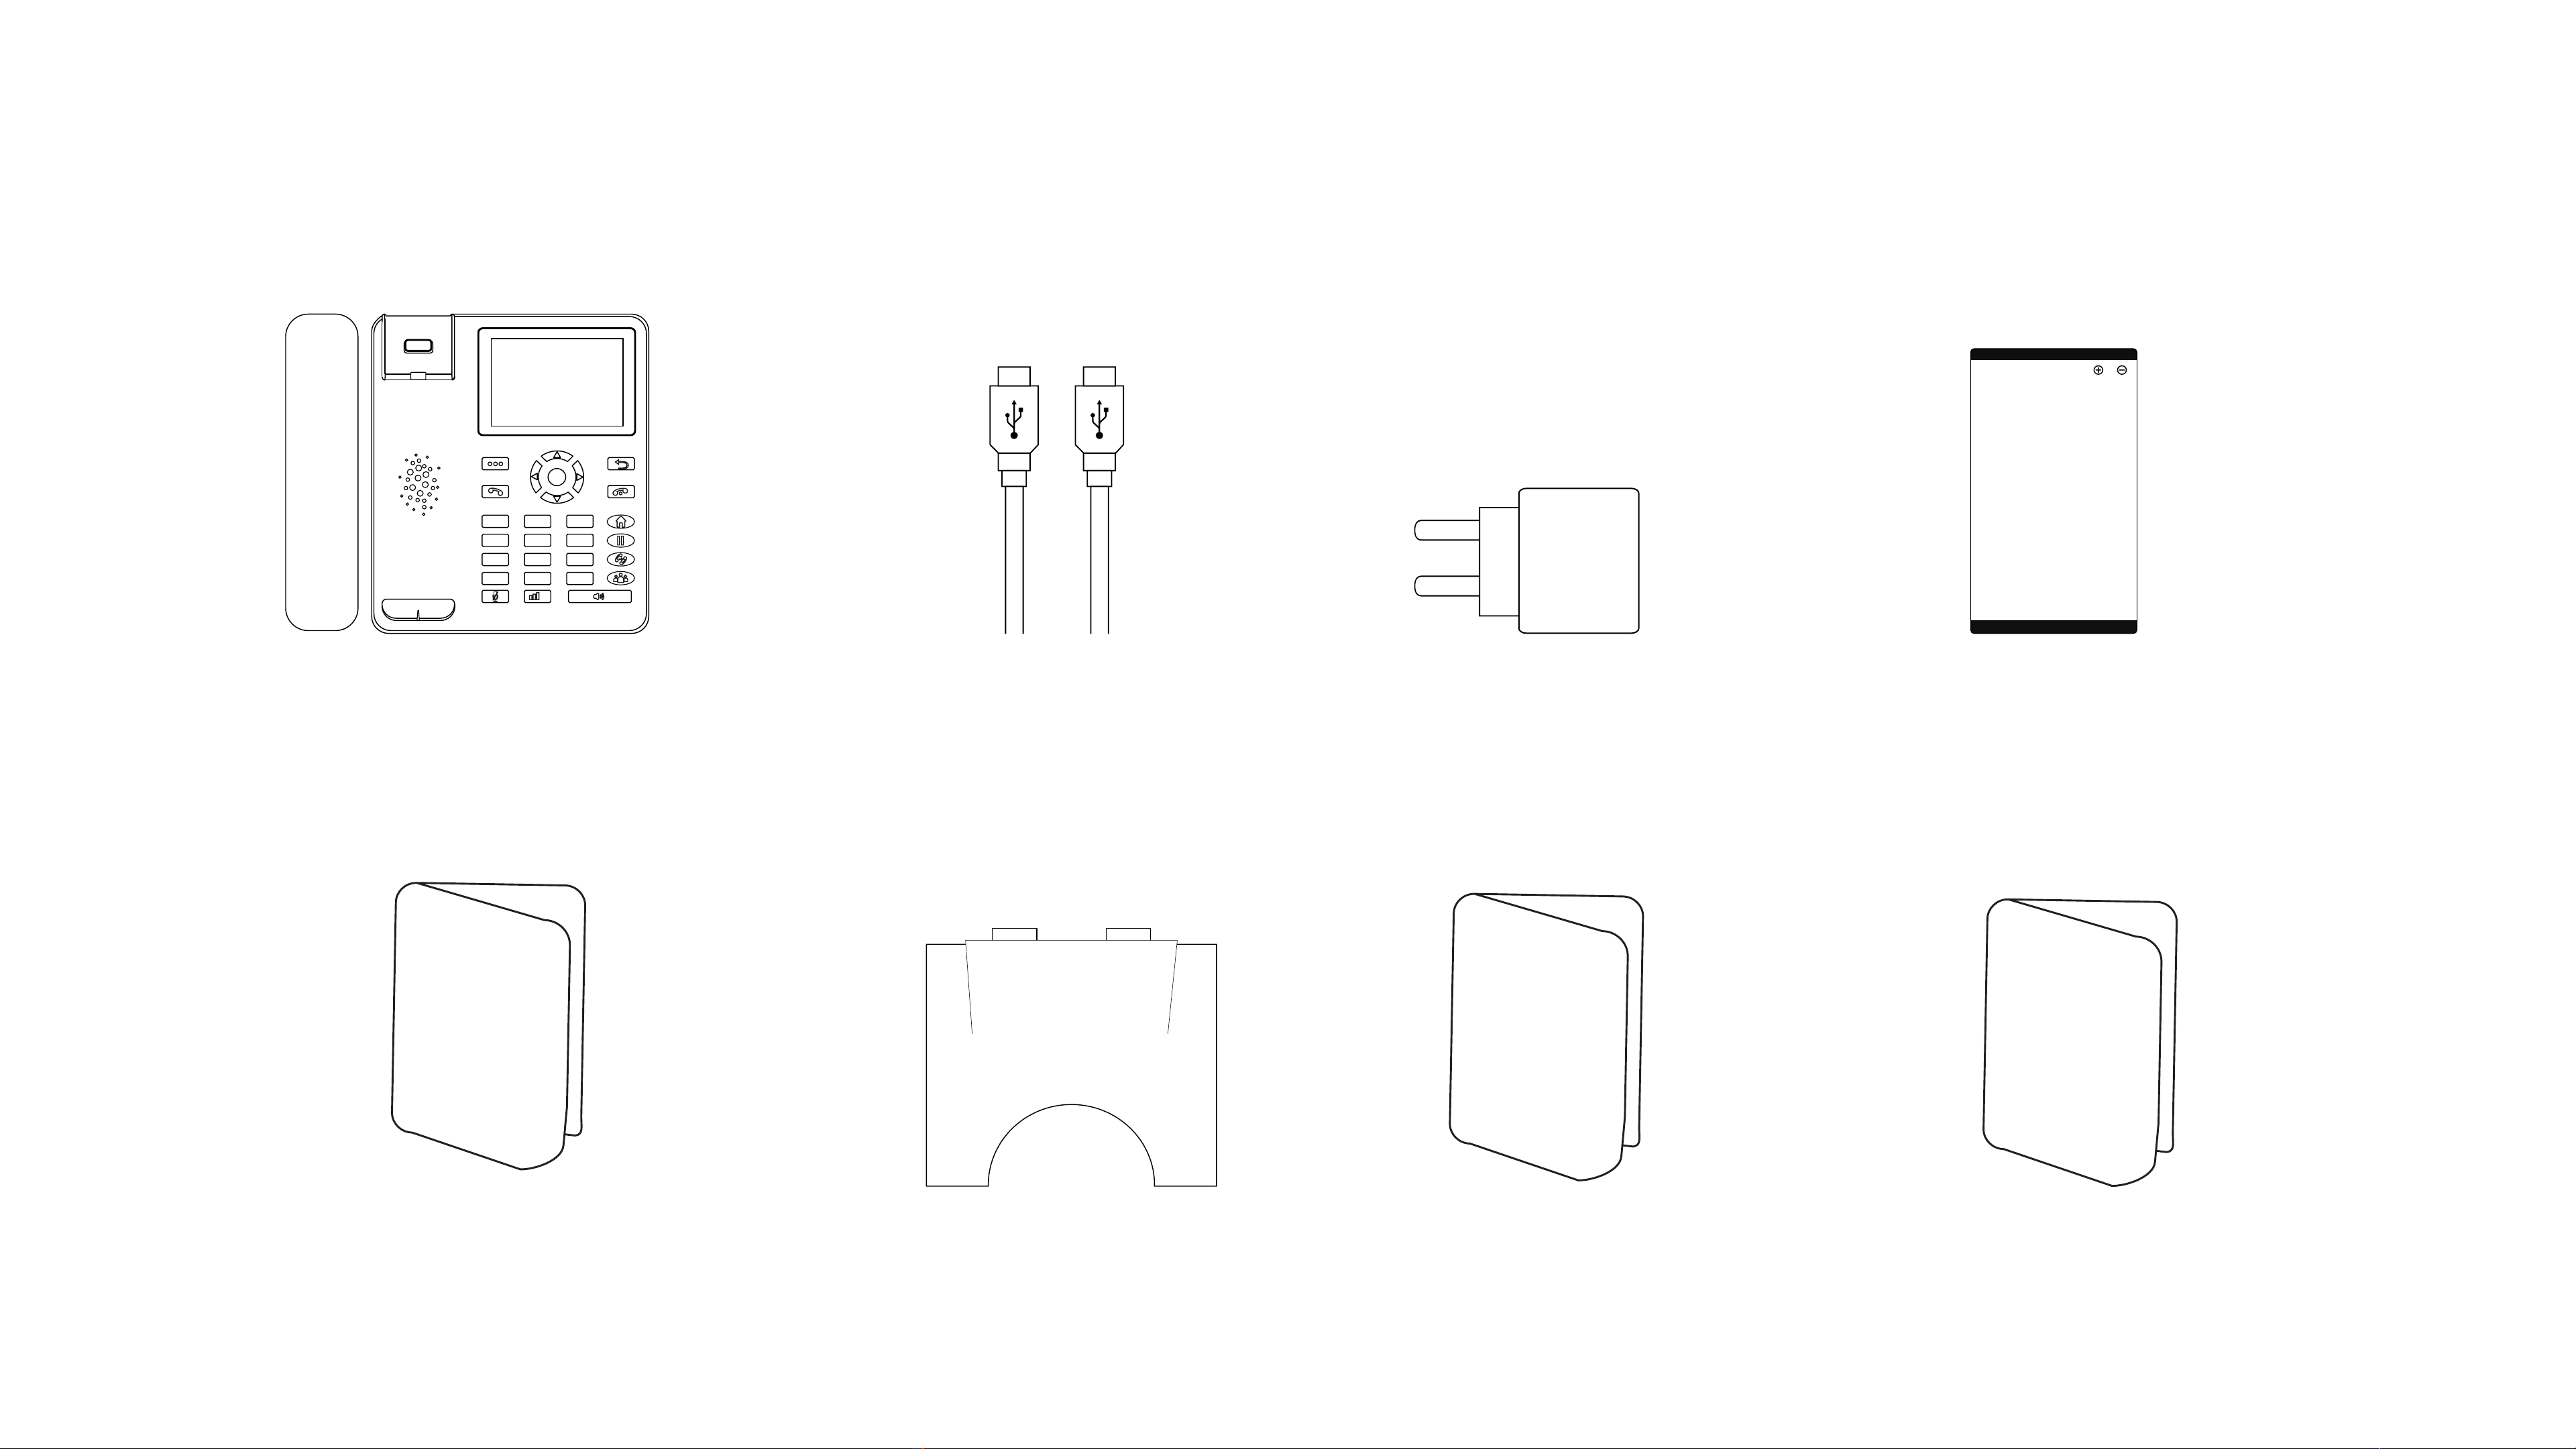
1.4 PACKAGE CONTENTS
Please check the box includes the following components. If there are any items missing please contact your supplier.
C. AC/DC power adaptor
B. Micro USB data cable
G. Desk stand
D. Li-ion Rechargeable Battery
A. Model 4
OK
+
-
1
4
7
2
5
8
0
3
6
9
*#
E. Health and Safety Document
Health and
Safety
Document
H. User manual
User Manual
I. Quick start-up guide
Quick
Start-Up Guide

2.1 HARD KEYS AND THEIR FUNCTIONALITY
You can use the touch screen to access
the full functionality of the device including
making calls, adding contacts, sending and
receiving text messages, making notes, setting alarms
and changing the settings of the device.
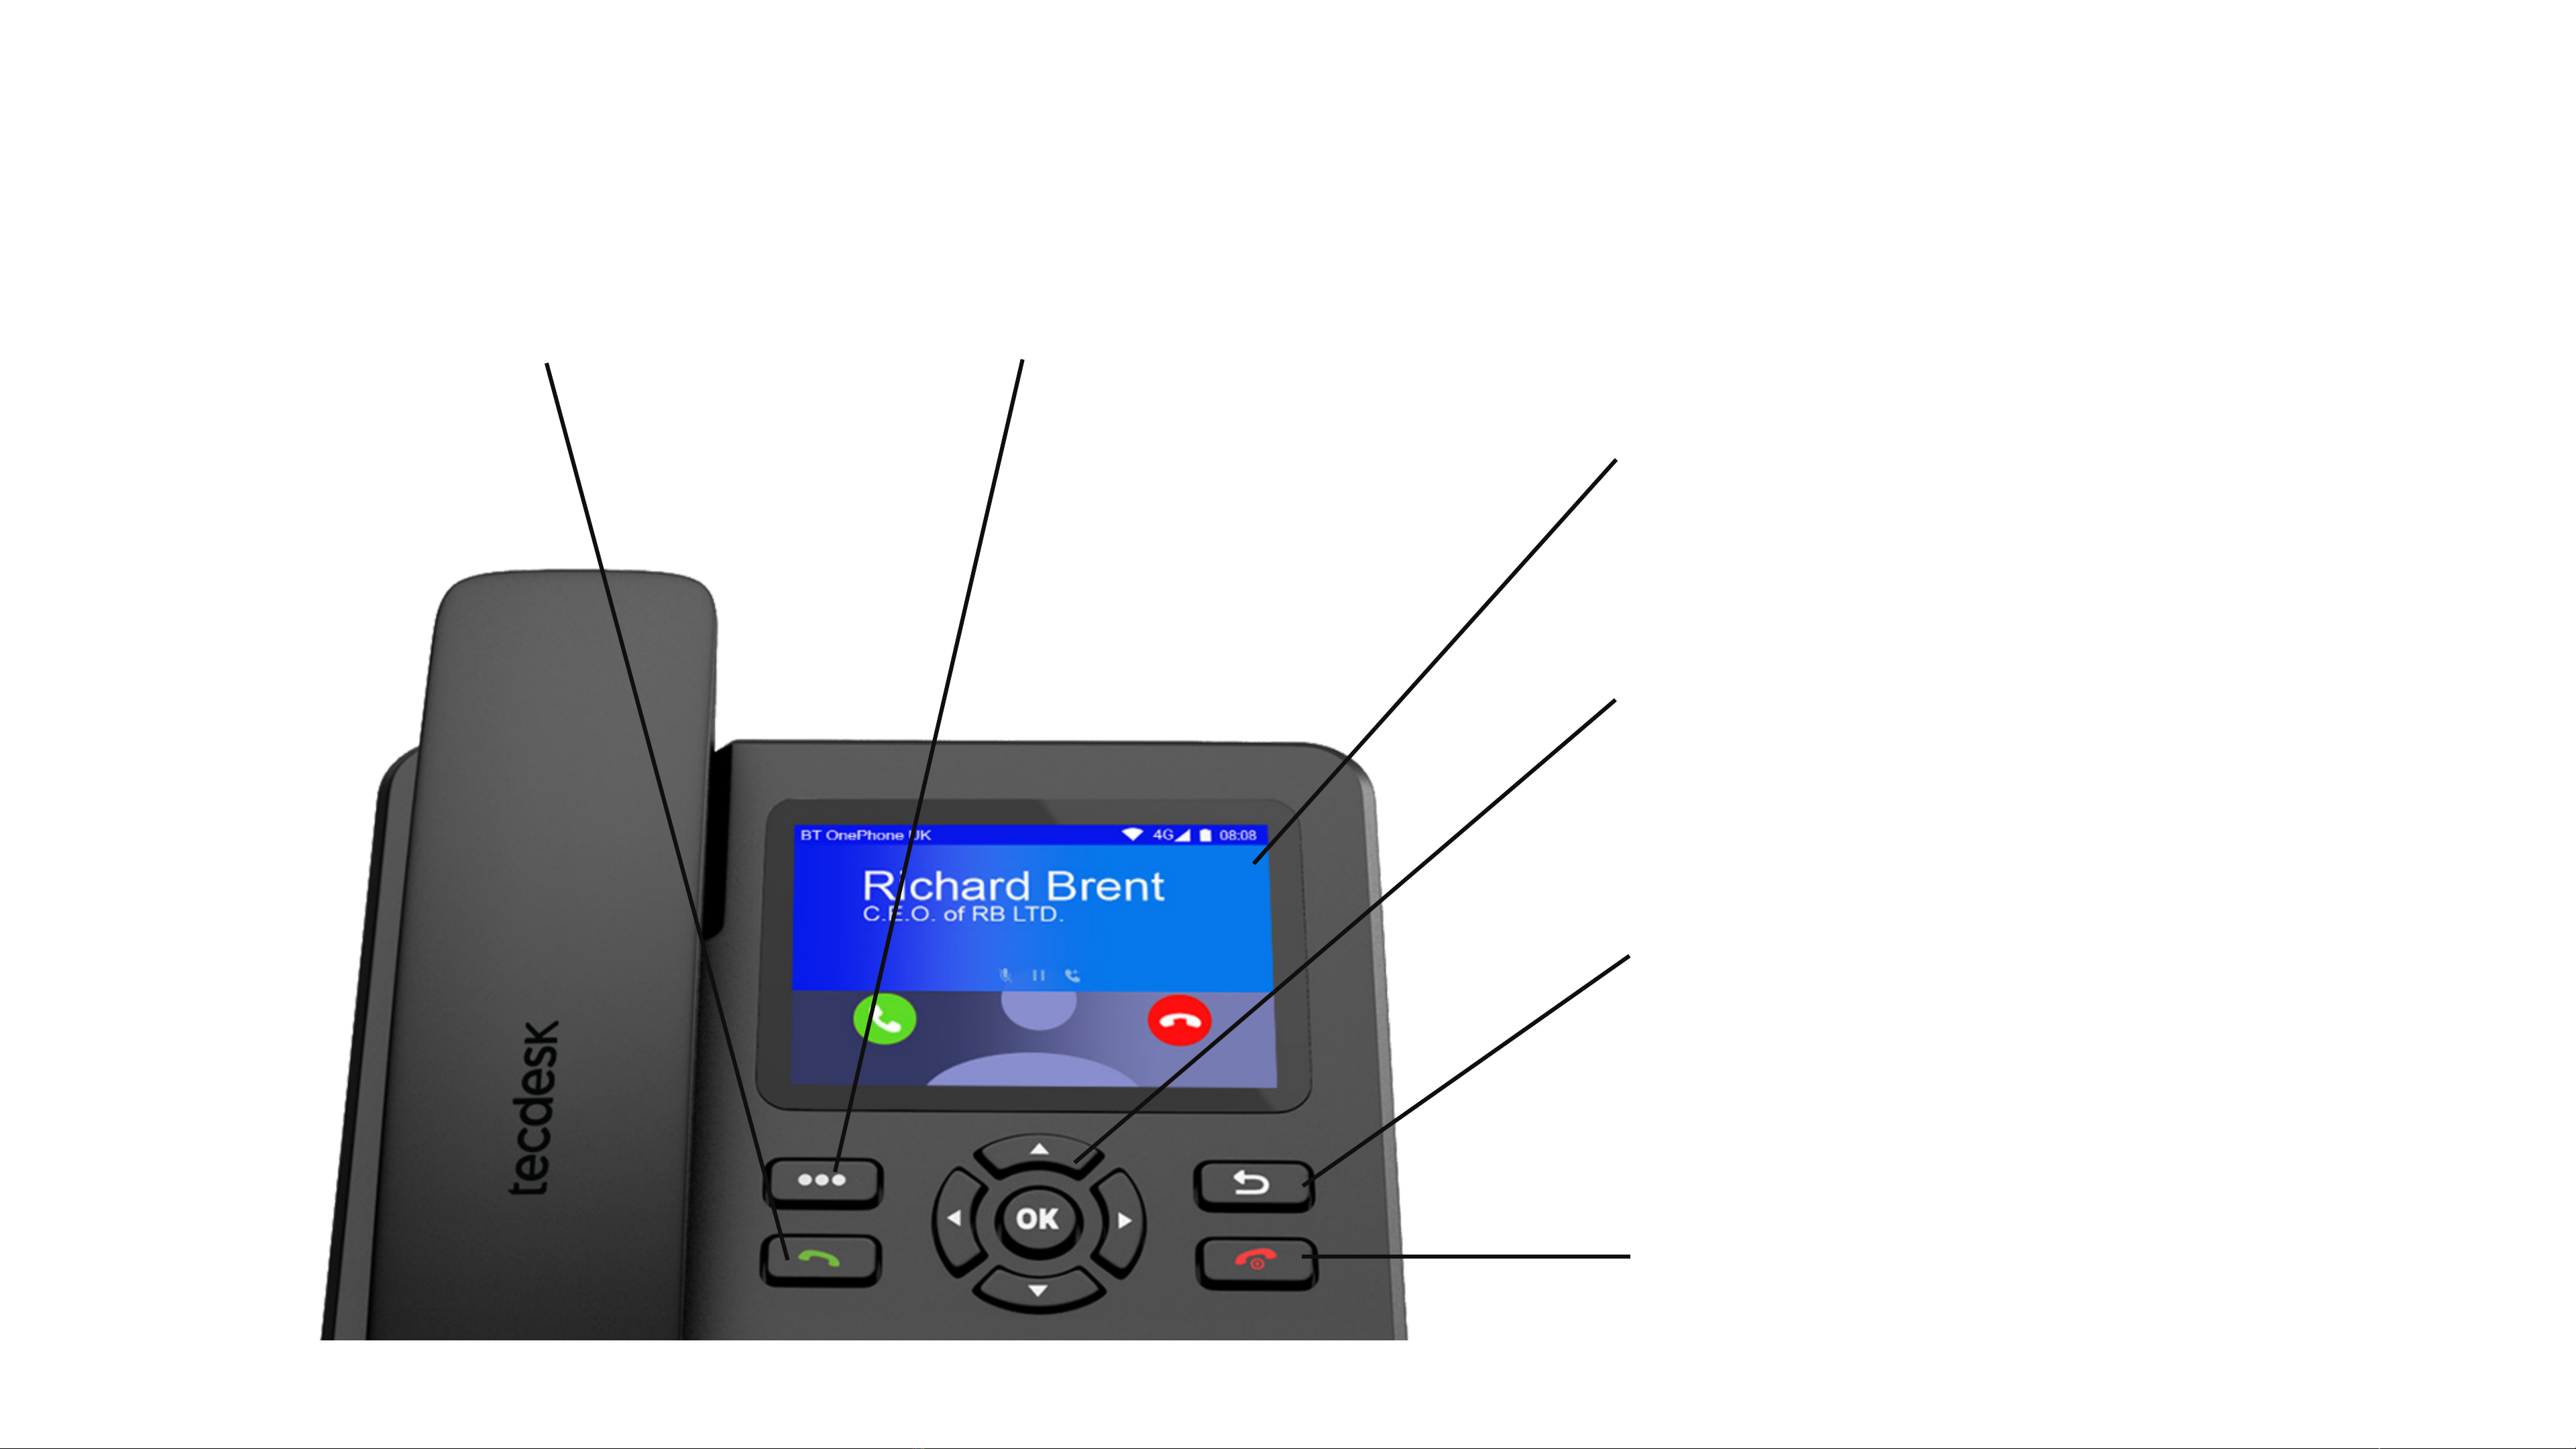
Press once to access the widgets,
shortcuts and settings.
Use these keys to navigate through apps on
the screen. Press the OK button to accept your
selection.
Use these keys to navigate through apps on the screen.
Press the OK button to accept your selection.
Press this key once to go back 1 step. Press it again to go
back another step. Repeat the process until you reach
the home screen on
the device.
Press this key to end a call. Long press this key to power on
the device. Long press this key to give you options to; power
off, reboot and select aeroplane mode. Aeroplane mode
disables on connections including your voice and data.
4. Screen Navigation Keys
5. Go Back
6. End Call & Power ON/ OFF
1. Touch Screen
2. Widgets / Shortcuts3. Answer Call & Open Dialler
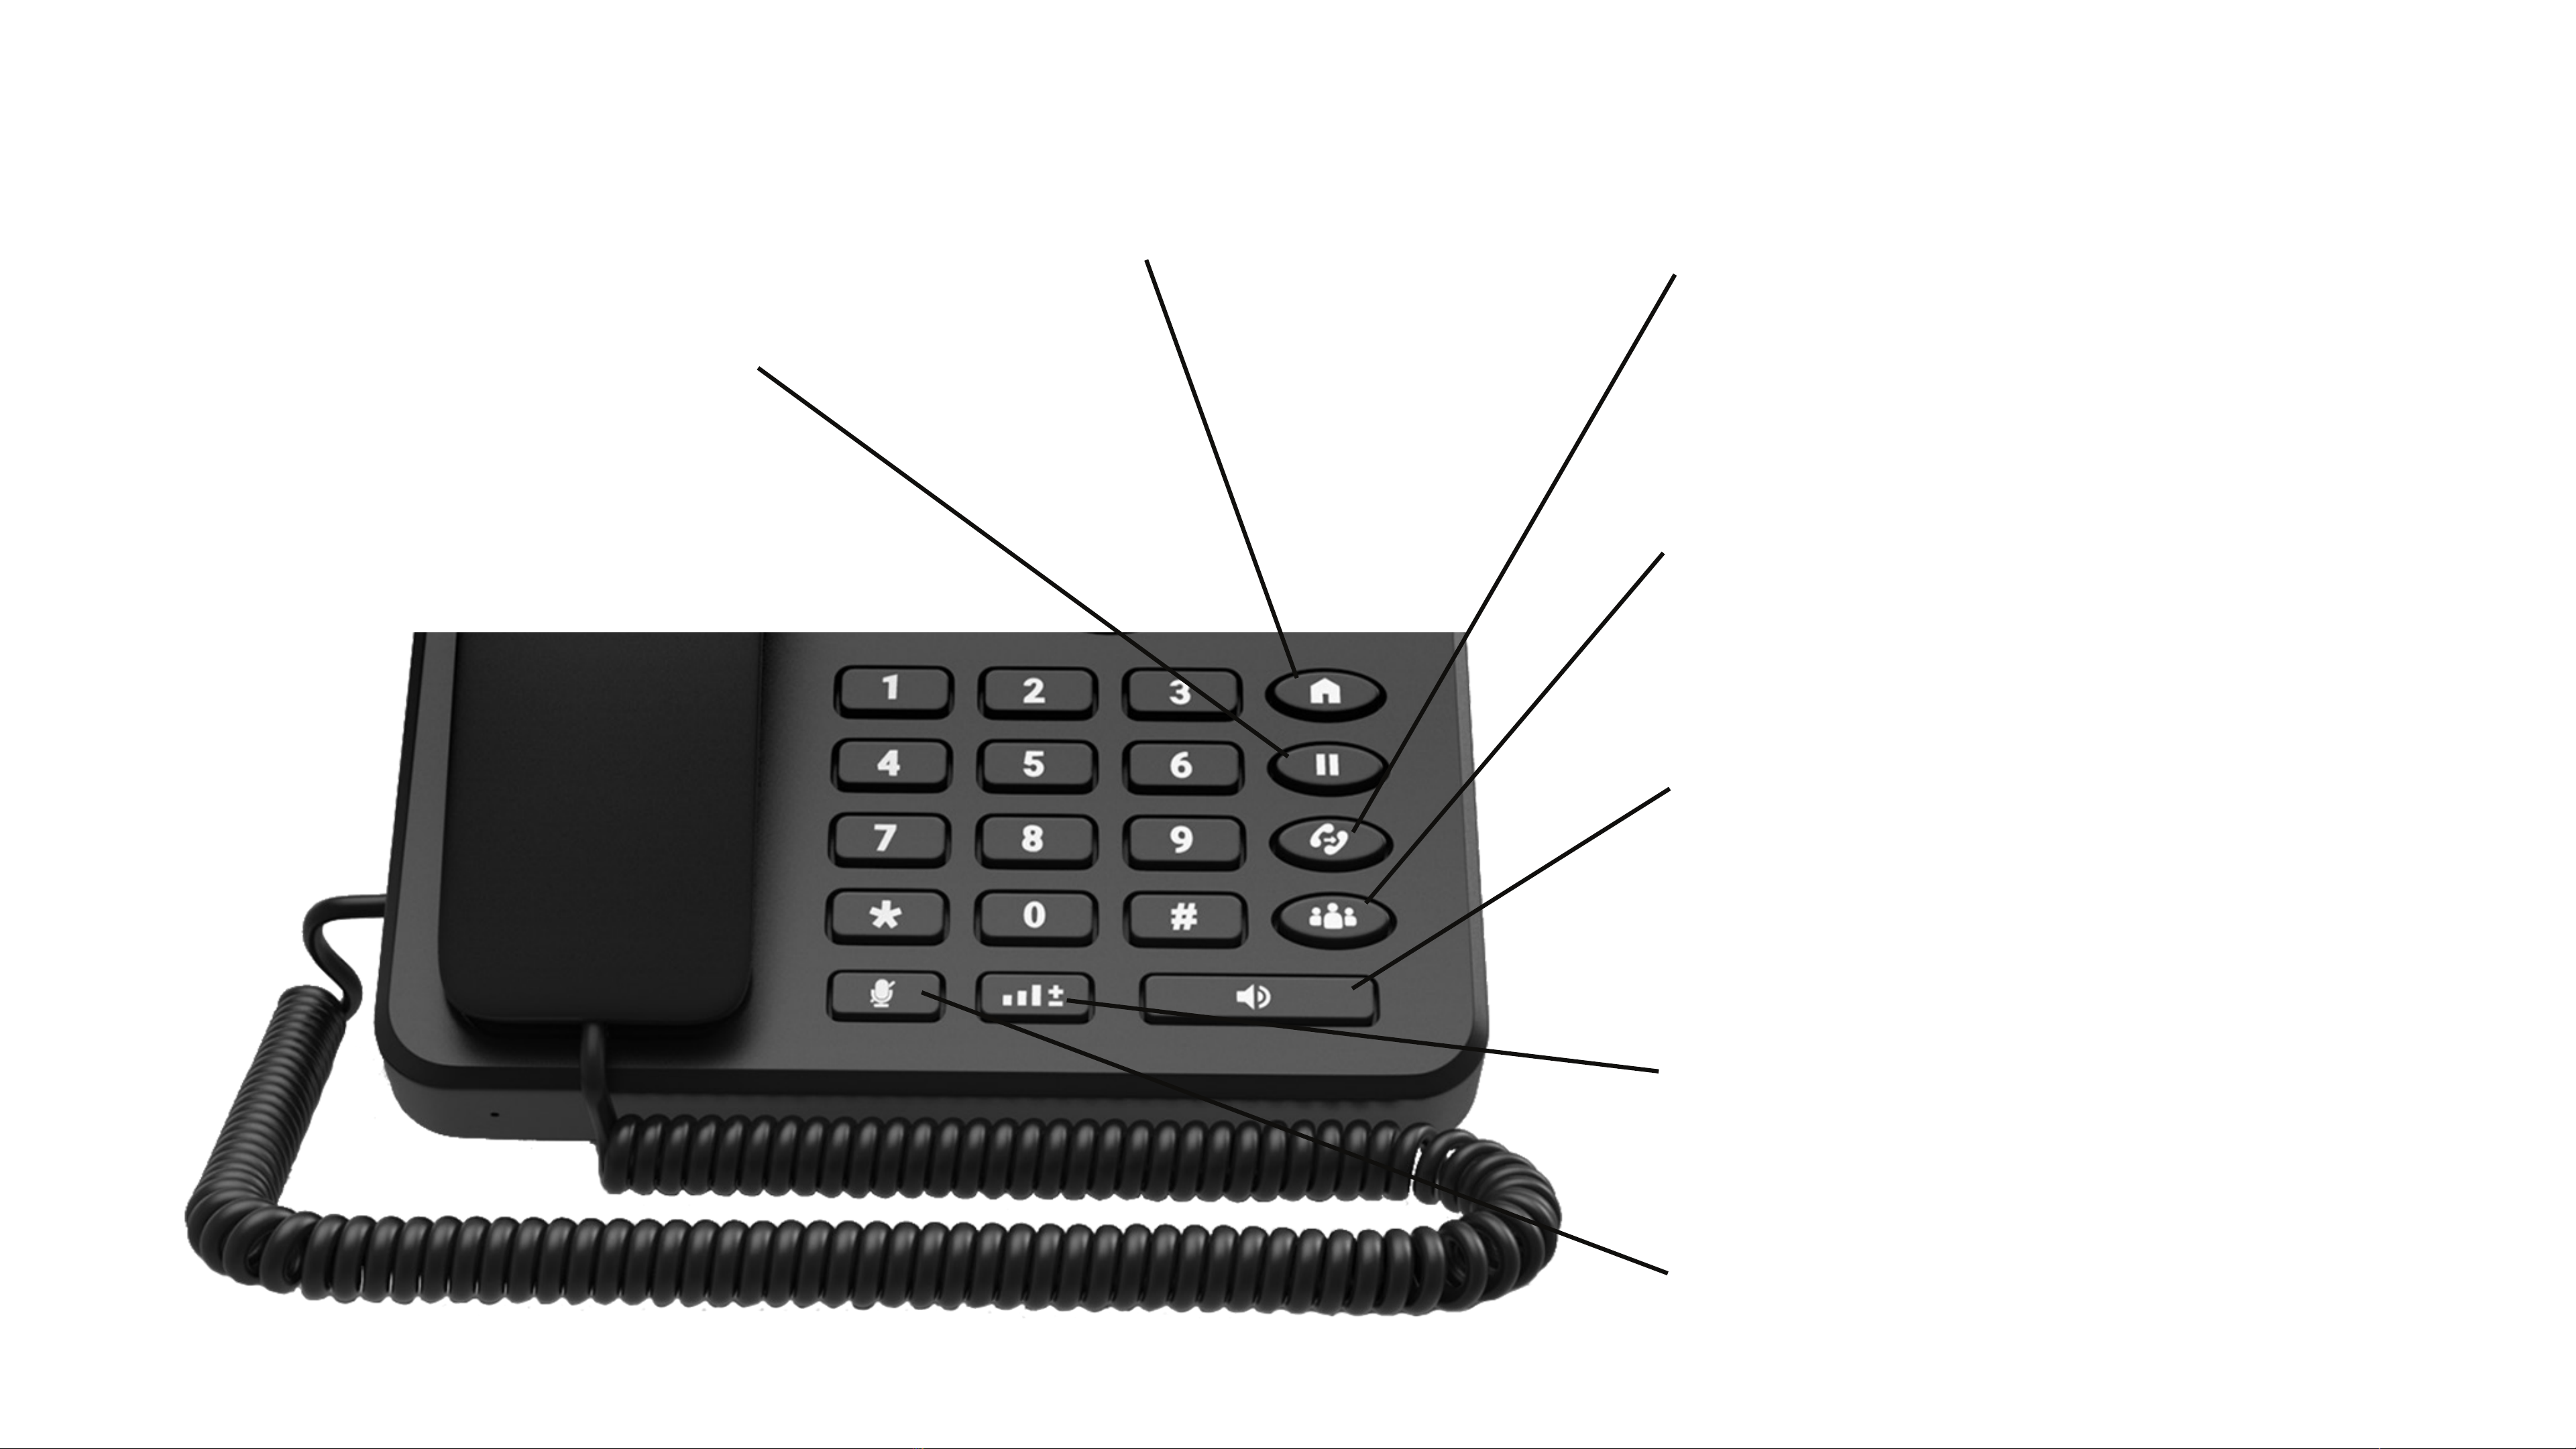
Press this key to mute an active call. Press this key
again to unmute the call.
Press this key to; open the dialler in loud speaker mode
or convert a call from the handset receiver to loud
speaker.
Press this key to increase and decrease the volume.
During a call, press this key to create a conference call.
Please note that these features are dependent on your
Mobile Network Provider.
During a call, press this key to transfer the call to an
internal or external number / telephone. Please note
that these features are dependent on your Mobile
Network Provide.
Press this key to take you back to the
home screen.
During a call, press this key to place the caller on hold.
From here, you can; add another call to the original call or
make a second call simultaneously while the original caller
is on hold. Please note that these features are dependent
on your Mobile Network Provider.
12. Mute Call
11. Loud Speaker
13. Volume
10. Conference Call
9. Transfer Call
7. Go to Home Screen
8. Hold Call

1. Make calls through numerical keys / keypad
Press phone numbers, and then press Dial key [ ] to call out. If needing to revise phone number, press right soft key to delete the existing numbers. When calling, the
screen will display the calling status, if the call is connected, the screen will display call status information. Press ON/OFF key to end the current call [ ].
2. Make calls through touch screen keys
Select call icon [ ] touch the right bottom corner, it will pop up dial number interface, input phone numbers, touch dial icon to call out [ ].
If the call is connected, the screen will display call status information. Touch ON/OFF icon to end the current call.
You can also use contact menu to search the saved contacts and call.
2.2 KEY PHONE FUNCTIONS
Insert SIM card into the phone, power on, if the signal strength icon showing [ ] at the right top corner on the screen, you could make calls and receive calls.
2.2.1 MAKE CALLS

2.2.2 ANSWER CALLS
In the normal status, when receiving calls, press Dial key or use touch screen slide the screen dial icon to answer the call [ ].
2.2.3 REJECT CALLS
2.2.4 END CALLS
When call incomes, press power ON/OFF key [ ] to reject the call, or slide the screen icon to reject call or reply by SMS.
There are two ways to end the ongoing call.
a. If you are speaking over handsfree/speaker, press the [ ] key to end the call.
b. If you are speaking using the receiver, simply putting down the receiver on dock will end the call.

2.2.5 CALL ON HOLD
2.2.6 TRANSFERRING THE CALL
2.2.7 CALL WAITING
2.2.8 CONFERENCE CALLS
2.2.9 HIDE THE CALLER ID
You can put a call on hold by pressing the [ ] key while engaged in a conversation.
You can also make a new call by pressing [ ] on the screen, then entering the new number and then pressing the [ ] key, or by touching the white part of the screen
to recall a number from the call log or phonebook. The original call, which was put on hold, is now visible at the bottom of the screen: you can press on it to resume it and
alternate between the two active calls.
You can transfer a received or dialed call to another number. To transfer the current call, press the [ ] key, press [ ] on the screen, enter the new number to which you
want the call to be transferred and press the [ ] key, or touch the white part of the screen to recall a number from the call log or from the phonebook. At this point, to
transfer the call directly, press the [ ] key as soon as the second call starts ringing, or wait until you have spoken with the other party and then press the [ ] key to
make a transfer with consultation.
The call waiting function allows you to be notied of a new call while another call is still in progress.
To activate call waiting . Press the phone icon [ ] on your screen, press the icon with the three dots [ ] at the top right, select "Settings" > scroll to "Call settings" > "Call
settings GSM " > "Other settings" > tick the" Call waiting" box. By checking the box you will receive notications of incoming calls during another call.
This service allows you to talk to multiple users simultaneously.
To make a conference call:
- Call the number of the rst participant in the conference call. (see section "Making a call")
- When answered, put the call on hold by pressing the [ ] key.
- Press [ ] on the screen, enter the new number to which the call is to be transferred and press the [ ] key, or touch the white part of the screen to recall a number
from the call log or from the phonebook.
- When the second participant answers, press the [ ] key.
- Hang up the handset to end the conference call.
This service allows you to hide your phone number / Caller ID. To activate the service on a single call, place the # 31 # code before the number to be called. To set the
number blackout for all calls, press the phone icon on your screen, press the icon with the three dots [ ] top right, select "settings" > scroll to "call settings" > "GSM call
settings" > "Other settings" > "Caller ID" > select "Hide Number".

2.3 MAIN MENU
2.3.1 PHONE/DIAL
Use the phone or dial icon to view you call history, view the contacts, access speed dial.
a. Speed Dial
Speed dial is an one touch dialing function for your favourite numbers or the contacts you call frequently.
To set up the speed dial, go to the setting by touching the three dot icon on the right end of the search bar, select General settings > Speed dial settings.
You can now assign your most frequently used phone numbers/contacts to the numeric keys (2-9).
b. Recents
Touch the option ‘Recents’ on your screen to access your recent call history. For more information, you can touch the number or name once and touch ‘Details’. You can
also call back the number by pressing ‘Call Back’ option displayed on the screen.
c. Contacts
Touch the option ‘Contacts’ to view your contact list.
You can also search for the saved contact or the number on your call history using the search section on your screen. Type a name or phone number on the search bar to
view the contact details or make a call.
Additionally, touch the three dot icon on the right end of the search bar to perform functions like access call history, import/export contacts, add new contact & manage
settings.
Settings include general settings and call settings.

GENERAL SETTINGS
On general settings, you can manage how you would like the contact names to display. You can also manage dialpad tones here by ticking the box on or off based on your
preference. Similarly, you can nd and manage quick responses (template) and speed dial settings here.
CALL SETTINGS
Call settings let you manage functions like Emergency call list, voicemail preferences, GSM Call settings like call forwarding and call barring including call waiting, Caller ID
management and so on as discussed on the section (2.2)
2.3.2 MESSAGES
Touch the icon [ ] on the screen to open message applicaton. Once you touch the icon, you can see the list of messages on your phone.
NEW MESSAGE
To create a new message, touch the [ + ] icon on the right bottom corner of the screen. Type the phone number or browse the contact from your contact list by touching
[ ]. Once you touch ‘Type message’, you can start typing the message using the keypad displayed on the screen. Once completed, touch ‘Send’. Alternatively, you can
press ‘Ok’ and touch the send icon.You can also insert a message from the template available. You can access the templates by touching [ ] on the top right corner.
RECEIVED MESSAGE
You will get a notication when you receive a new message. Tap the notication or go to message app. You can see the received messages and sent messages on the
same conversation window. You can also search the message using the search icon [ ] on the message main window.
DELETE, COPY, SHARE, FORWARD AND MORE...
- To delete a thread, open the message, long press the message for some seconds until get the delete option, then touch ‘delete’. You will also get an option to mark the
message as read/unread.
- To copy, open the message and tap to copy the text. You can also add the sender to your contacts list and make a call to the sender.
- To forward the message, select the text message and long press to get the option to forward or delete the message from a thread.
- From the options icon [ ] on the top right corner, you can lock, copy message to SIM card, view message details, share and/or resend the message.
Please note you can’t delete the locked message until it is unlocked.
- Using the share option, you can share the message through SMS, Bluetooth or any other available applications like Gmail, WhatsApp, and Skype.

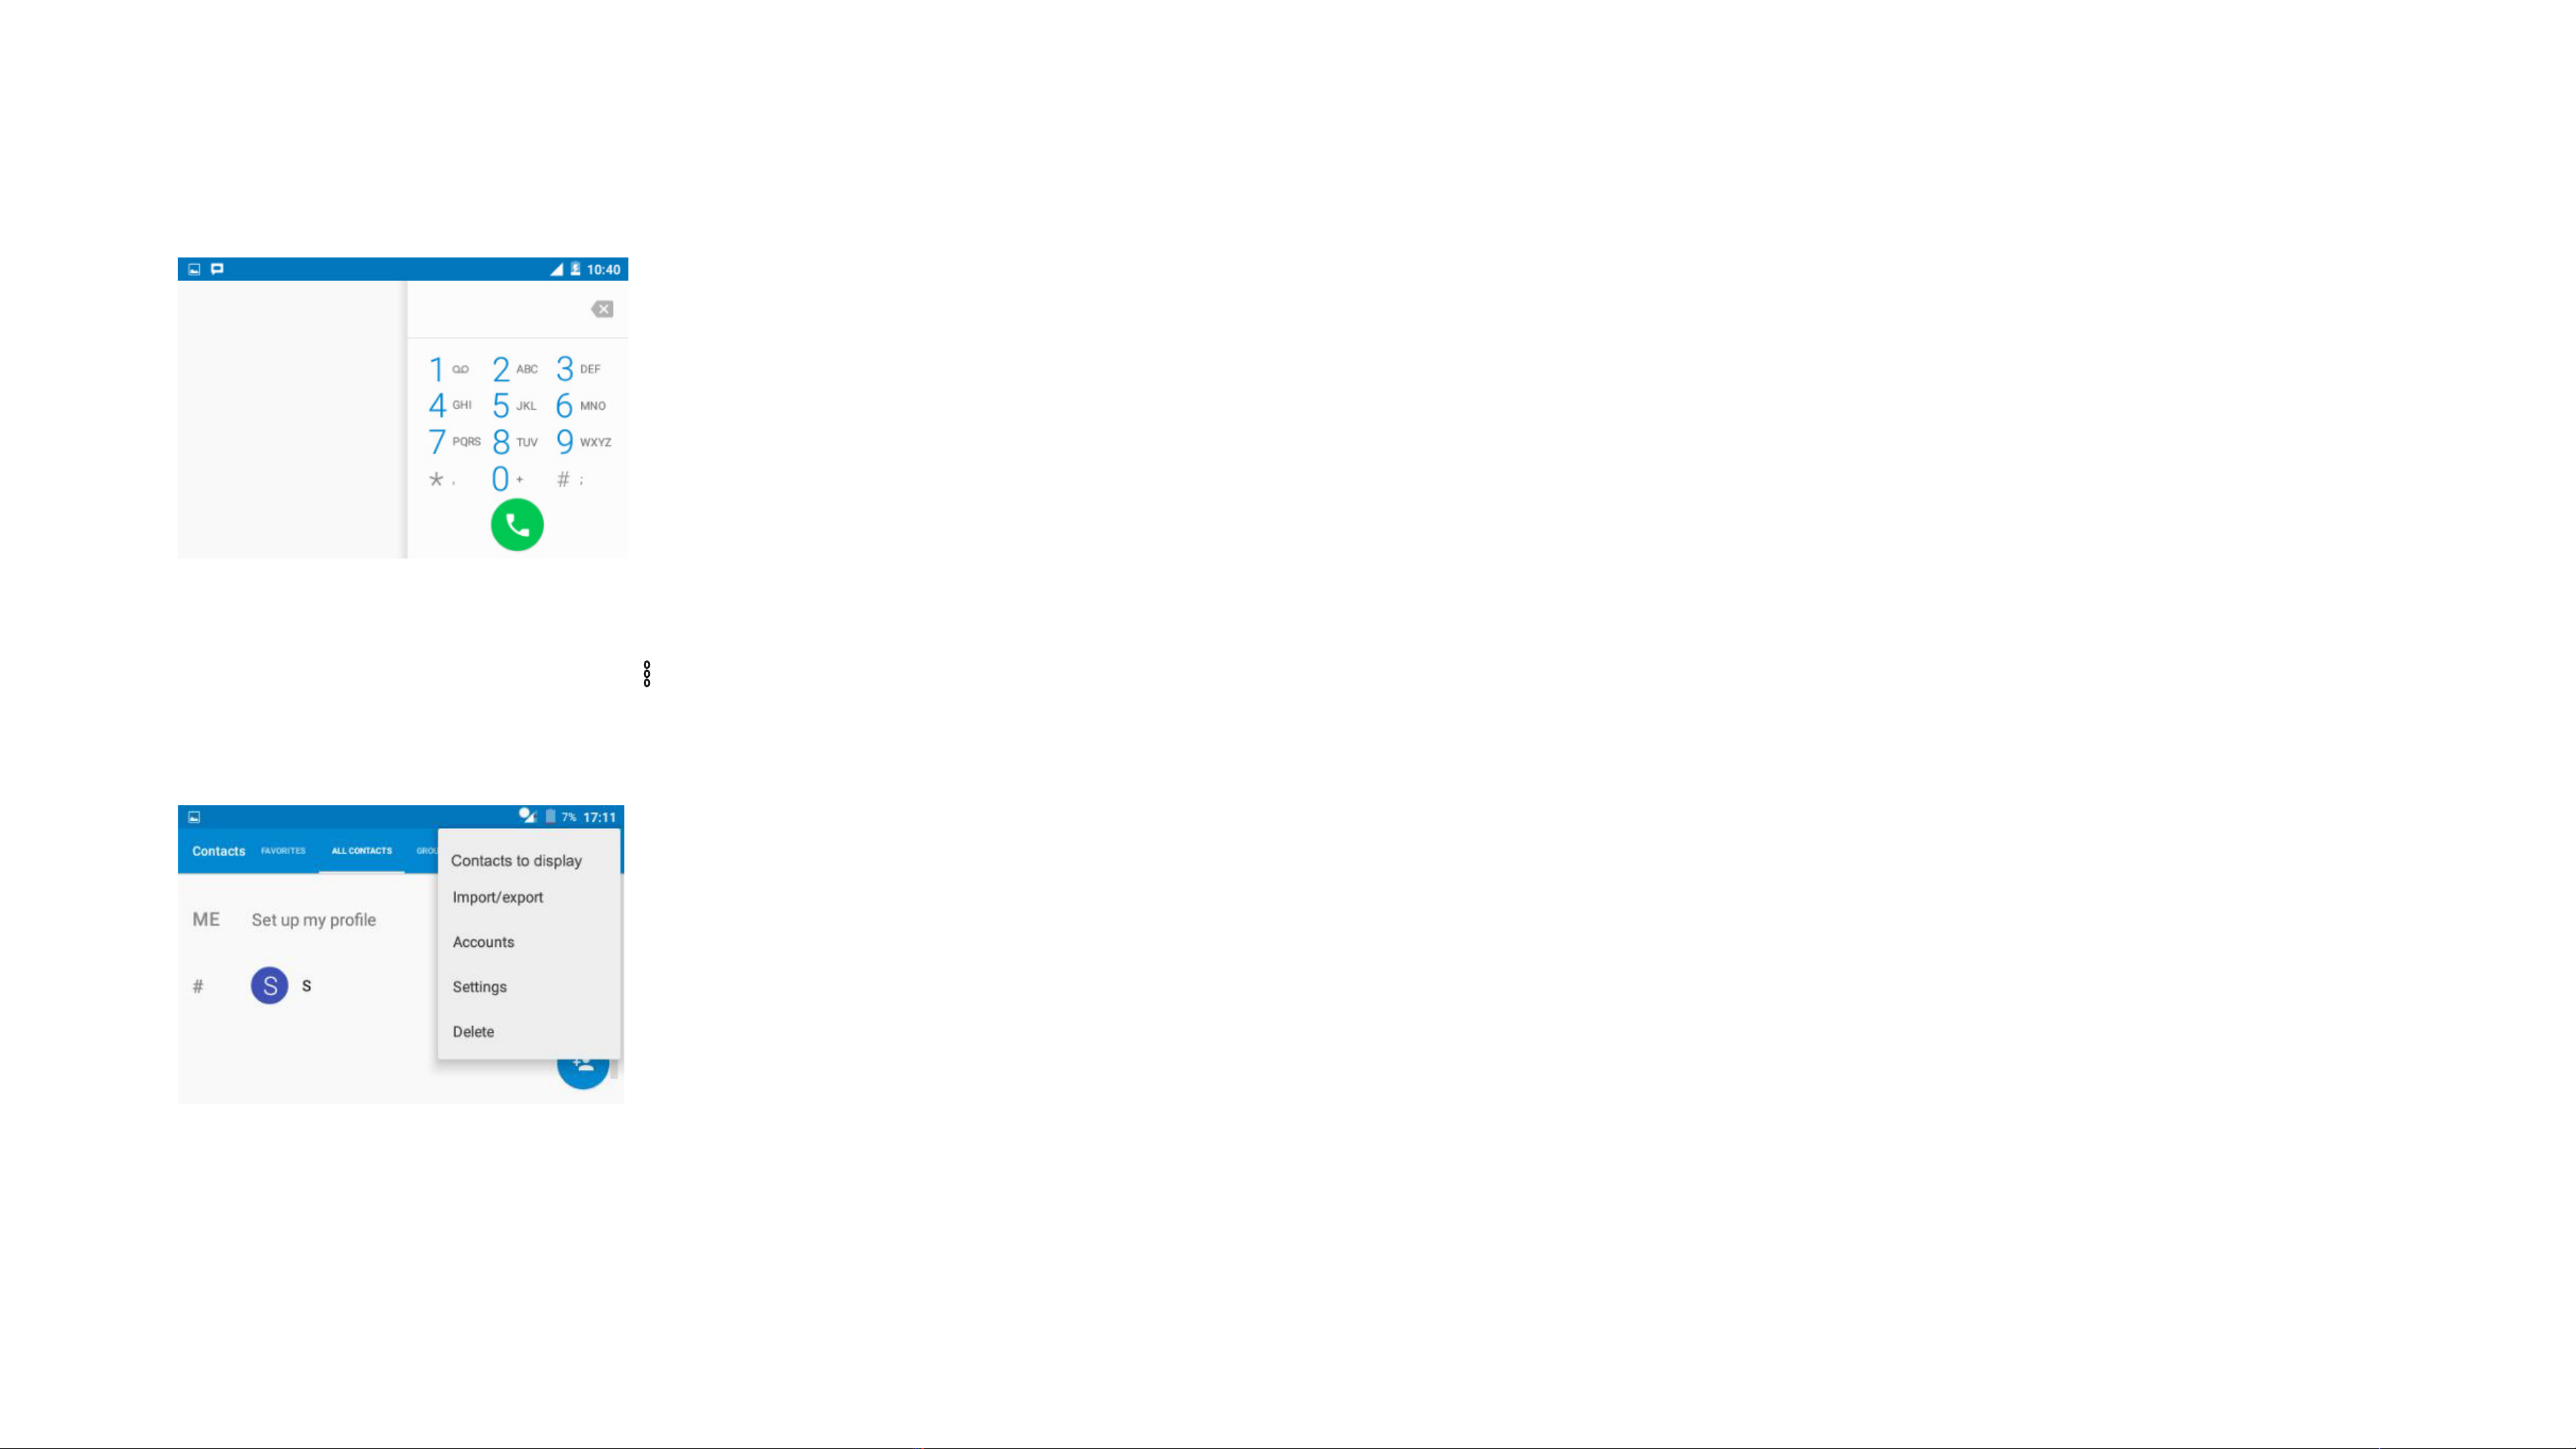
2.3.3 CONTACTS
Touch the contact icon on the home/touch screen.
Add new contact: Tap the [ ] icon on the bottom right to add a new contact. Insert the name, phone number and other details. Once done, tap ‘Add new contact’. You can
choose to save the new contact either on your phone or SIM.
Find contacts: Using the search icon [ ] on the top right corner, you can search for contact information.
Favourites: You can mark some of your contacts as favourites by selecting the contact and tapping the star icon [ ]. Contacts marked as favourites will be displayed on
your favourites list.
Groups: You can organize your contacts in different groups using this functon.
All contacts: By selecting ‘All contacts’, you can see all the contacts saved on your phone and the SIM card.
Press the three dot icon [ ] on the top right corner to import/export, delete contacts & manage message settings.
IMPORT/EXPORT: Using this option, you can manage your contact storage, move them from SIM card to the device or vice versa.
DELETE: Delete a single, multiple or all contacts using this option.
SETTINGS: Manage the message storage, text message limits, SMS delivery reports, message template and so on. You can also enable or disable SMS signature through
this option. To enable SMS notication simply tick the notication box. You can also change the notication ringtone by pressing ‘Sound’ and select the ringtone of your
choice.

3.0 ANDROID SCREENS AND THEIR FUNCTIONALITY
Access the following apps; Call, Contacts, All Apps, SMS and Settings. Also view notications at the top of the screen.
PRELOADED APPLICATIONS / APPS
Access: Home Screen > Press the ‘All Apps’ Icon
Press this Icon [ ] to Access all the pre-installed apps in your device.
WIDGETS AND SHORTCUTS
Access: Press Widget Key on the device
Press the Widgets key or long press the home screen to access the Widgets and Shortcuts app.

Access: Press Widget Key on the device
Press the Widgets key or long press the home screen to access the Widgets and Shortcuts app.
TASK MANAGER
CALL OPTIONS
Access: Press the Call key on the device
Type the name of your contacts or select; Speed Dial, Recents, Contacts or the blue dialler icon to type a number.
Access: Press the Call key on the device > dialler icon
Type a number and press the green dialler to start the call.
CALL DIALLER
CONTACTS SETTINGS
Access: Contacts App > three dots [ ]
When in All Contacts, press the three dots icon in the top right of the screen to access the call settings. Please note that some of the settings and parameters are
dependent on your Mobile Network Provider.
IMPORT/EXPORT
This feature allows you to; import from SIM card, import from storage, Export to SIM card, Export to storage and share visible contacts.
ACCOUNTS
This feature allows you to sync your contacts from your Google account.

NOTIFICATIONS
Access: Home Screen > Swipe down from top of screen
You will receive notications on your screen. To access these notications simply swipe down from the top of the screen.
Access: Home Screen > Swipe down from top of screen > Swipe down even further
Swiping further down the screen will give you access to connectivity settings which includes Wi-Fi/WLAN, Bluetooth, Data, Location and Airplane mode.
NOTIFICATION SETTINGS

Access: Home Screen > Settings
From here, you can access all the general settings for the device including Brightness, Wallpaper, Font size, Sound, Alarms and more.
DEVICE SETTINGS
SCREEN LOCK
Access: Home Screen > Settings > Security
Set a screen lock password so that only you can access your device via a password, pin or pattern.
Access: Home Screen > Play Store
See also: Android software development and Google Play.
Applications extend the functionality of device. Applications are available through Google Play either free of charge or at a cost. Downloading them using an application
store program that allows users to install, update, and remove applications from their devices.
ANDROID APPLICATIONS

Access: Home Screen > Settings > Wi-Fi
Search for available wireless networks and connect your device to the internet.
WIFI
Access: Home Screen > Settings > Bluetooth
Connect headsets, earphones and/or products to this device.
BLUETOOTH
4.0 CONNECTIVITY

Access: Home Screen > Settings > More > Tethering& Portable hotspot
The sim desk phone can be a public wireless (Wi-Fi) Internet access point with a range of about 50 meters. It allows to connect to their own desk phone via the Internet.
The essence is that anyone can use it with a suitable device, such as a laptop, PDA or dual-mode (Wi- + GSM) mobile phone. The use of the Internet is usually free, but it
may also be free of charge, or it may be used for local consumption.
WI-FI HOTSPOT
Access: Home Screen > Settings > Data usage
From here, you can turn your mobile data ON and OFF, monitor your mobile data usage and set mobile data limits.
DATA USAGE
Table of contents


