Techlink MODULAR AUDIO M1SWT User manual

Product Name: MODULAR AUDIO
USER GUIDE
Product Ref: M1SLO/M1SWT
Art number: 407442/407443
Thank you purchasing the Techlink Modular Audio
Modular Audio
M1SLO/M1SWT . This innovative AV furniture offers a
built in digital audio system for music, movies and general TV viewing. Connect your TV, Blu-ray player
and Satellite/Cable box or stream music wirelessly from any Bluetooth device.
Please read this manual carefully before using the System for a better understanding of
various features and functions.the

User Guide for connecting the Modular Audio Stand via:
Optical/Coaxial/2xRCA/3.5mm and Bluetooth for Audio
CONTENTS
1. SAFETY PRECAUTIONS ............................................................................................ 1
2. CONTROLS & CONNECTIONS................................................................................... 2
3. BASIC OPERATION .................................................................................................... 3
4. TECHNICAL INFORMATION ....................................................................................... 4
Accessories: (check if the following accessories are present).
1 X REMOTE CONTROL
1 X POWER CABLE
1 X INSTRUCTIONS
2 X SPEAKER CABLES
1 X OPTICAL CABLE
Note: Incorrect use of batteries can cause damage to the remote control.
Please observe the following:
1) Do not mix old and new batteries.
2) Do not mix different kinds of batteries together, different batteries may have different
voltages.
3) Make sure that the positive and negative ("+" and "-") terminals of each battery match to
the polarity markings inside the compartment.
4) If not using the remote control for more than one month, please remove the batteries.
5. SETTING UP YOUR SPEAKERS ................................................................................. 5

1. SAFETY PRECAUTIONS
INSTRUCTIONS BEFORE USE:
1) Power source: AC source of ~100-120V/60Hz and ~220-240V/50Hz
2) Temperature: The ideal operating temperature is over 5oC. Temperatures below this may
cause loss of function or damage. Keep away from heat source.
3) Protection: Protect the plug, cable and socket against strain or tension. Keep all cables tidy to
avoid risk of tripping.
4) Water and moisture: The unit should not be used near any source of water. Do not place
anything that may contain liquid such as drinks or vases on the unit.
5) If the system is not going to be used for a long period e.g. when going on holiday, be sure to
turn off and unplug the unit from the mains power supply.
6) Ventilation: Good ventilation is required. Distance from wall should be no less than 10cm.
7) Cleaning: Do not use aerosol type sprays near the unit. Do not use harsh chemicals or
chemically treated cloths to clean the unit as this could cause damage to the finish. Always
use a soft cloth to clean the unit.
8) Do not open the electronic enclosure of the unit. There are no user serviceable parts inside. If
the unit fails to operate, appears broken or is damaged, immediately unplug the power cord
and contact a qualified electrician.
WARNING:
To lessen the risk of electric shock, do not remove the electronic enclosure (or back) of the unit,
there are no user serviceable inside. Please send this unit to a professional for repair if required.
[The symbol of electricity with an arrow inside the triangle is to inform the user that there is a
dangerous voltage without insulation inside this unit, which is sufficient to cause an electric shock.]
[The exclamation mark inside the triangle is to inform the user that there is an important operation
and maintenance manual accompanying this unit.]
Note:
To avoid the risk of electric shock or damage to the unit, do not use with extension leads or
other multi plug adapters. Make sure all pins on the plug are fully inserted into the socket.
1

2. CONTROLS & CONNECTIONS.
1) Main Unit
Front view
Rear view
2) Remote Control
1. MUTE
2.
3.
4.
5.
6.
ON/STANDBY
7.
BLUETOOTH
PLAY/PAUSE
NEXT TRACK
PREVIOUS TRACK
8.
3.5mm INPUT
9.
RCA INPUT
10
COAXIAL INPUT
11
. RESET: DEFAULT VOLUME,
RESET BASS AND TREBLE
12
. OPTICAL INPUT
. BASS +/-
13
14
. VOLUME +/-
. TREBLE +/-
1. Bluetooth connection light indicator
2.
3. Short press for VOL-/Long press for channel standby
Power On LED = Green / Standby LED = Red
4.
5.
Remote receiving
Short press for VOL+/Long press for channel switch
1. RCA Input Socket
2. Channel output Terminals
(+ and -) for passive
speaker connection
3. 3.5mm Input Socket
4. Coaxial Input Socket
5. Optical Input Socket
6. Input Voltage selector
7. Power On/Off Switch
8. Power supply input
41 3 52
1 2 3 4 5 6
7
8
2

3. BASIC OPERATION.
1. POWER ON:
Insert the power lead into the rear of the main unit. Insert the plug into the electrical socket. Make
sure the socket on the wall is switched on and then set the power switch on the rear to on. The
standby light should illuminate on the front of the unit. Press the standby button on the remote
control to switch the unit on. All of the functional operations can now be accessed by pressing the
buttons on the remote control.
2. STANDBY:
Pressing the STANDBY button will turn the unit on or put the unit into standby mode.
3. CONNECTING A TV:
1) Optical Connection: Plug one end of the optical cable into the optical port on the rear of the tv
and the other into the optical port on the rear of the stand. Making sure both the tv and the
stand are switched on, select the optical input on the stand by pressing the optical button on
the remote control.
2) RCA Connection: Plug one end of the RCA cable into the RCA port on the rear of the tv and
the other into the RCA port on the rear of the stand. Making sure both the tv and the stand are
switched on, select the optical input on the stand by pressing the RCA button on the remote
control.
4. CONNECTING A MOBILE DEVICE:
1) 3.5mm Connection: Plug one end of the 3.5mm cable into the headphone port on the device
and the other into the 3.5mm port on the rear of the stand. Making sure both the device and
the stand are switched on, select the 3.5mm input on the stand by pressing the 3.5mm button
on the remote control.
2) Bluetooth Connection: This unit can connect to most Bluetooth mobile devices. The
receiving distance is up to 10 metres.
1) Press the Bluetooth button to enter Bluetooth mode. The Bluetooth connection light
indicator on the front panel will come on.
2) Turn on the Bluetooth mode on your mobile device and select search. The matching
Bluetooth name of the unit is ‘Techlink M1 Sound’. If you need to input a code, the default
code is “0000”. After you have successfully paired with the unit, open the stored audio files
on the device and press play. (The unit can only pair with one Bluetooth device at a time.)
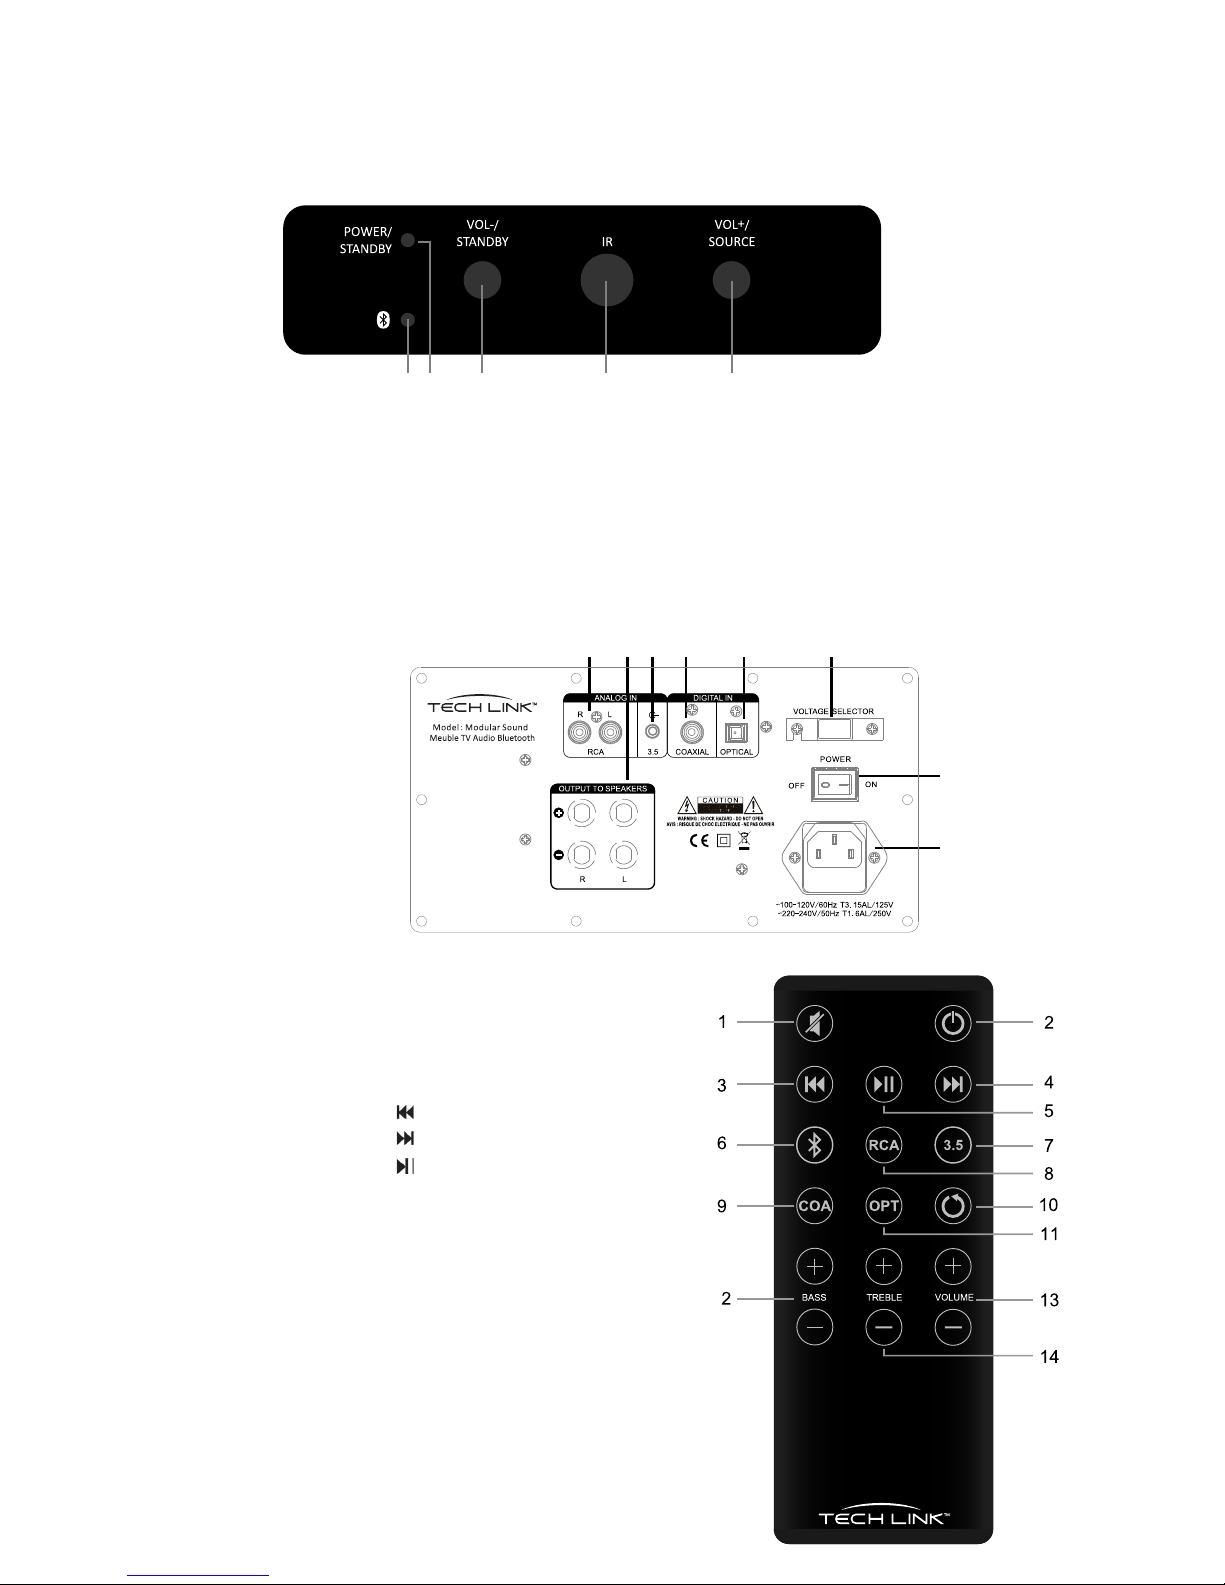
3) When the unit is playing, press or buttons to select the previous or next track.
Pressing button will play or pause the track.
Note 1. If you have a mobile phone connected via Bluetooth and you receive a call, the mobile will
switch to the calling mode automatically and the unit will stop playing. When the call is
finished the unit will resume playback.
2. Bluetooth transmission will be influenced by the environment, If there are obstacles which
absorb the wireless signal between the two matched devices, it will affect the maximum
distance of data transmission.
5. CONNECTING AV EQUIPMENT:
1) Coaxial Connection: Plug one end of the Coaxial cable into the Coax port on the rear of the
DVD/Bluray player and the other into the Coax port on the rear of the stand. Making sure both
the DVD/Bluray player and the stand are switched on, select the Coax input on the stand by
pressing the Coax button on the remote control.
3

6. SIGNAL SELECTION:
To change input between different connected devices press the Optical/Coaxial/RCA/3.5mm
or Bluetooth button on the remote control as required. The light indicators on the front of the unit
will indicate you have changed input.
Note To switch between Bluetooth devices first disconnect the device already paired to the
unit by going into your device settings and unpairing.
7. VOLUME
1) Pressing Vol - will reduce the volume and pressing Vol + will increase the volume.
2) Press the ‘MUTE’ button when the unit is playing to mute the sound. Press the ‘MUTE’ button
again and the sound will return.
3) Pressing Bass - will reduce the Bass and pressing Bass + will increase the Bass.
4) Pressing Treble - will reduce the Treble and pressing Treble + will increase the Treble.
4. TECHNICAL INFORMATION.
Mains supply.................................................................. ~100-120V/60Hz and ~220-240V/50Hz
Bluetooth
Bluetooth specification ...................................................................................... Bluetooth V4.0
HSP, A2DP, AVRCP, aptX
2x40W + 80W
2x6 + 4
Bluetooth support agreements........................................................
Wireless transmission range ............................................................................................ 10M
Output Power.........................................................................................................
Load impedance..........................................................................................................
Design and parameters may change without notice.
4

5. SETTING UP YOUR SPEAKERS
Insert the speaker components into the stand as shown in the instruction manual.
Connect the two speakers to the main unit as shown below. Connect the RED (+) and the BLACK (-)
terminals from the active speaker to the corresponding terminals on the passive speaker.
Ensure that the ON/OFF switch is in the OFF position and connect the power cable. Connect the AC
Power cord from the active speaker to your wall outlet. Make sure the wall socket is switched on and
turn the ON/OFF switch on the active speaker to the ON position.
Follow the guides on the previous pages to connect your devices to the Modular Sound.
WARNING
Modular Sound features a self powered speaker system. Do not connect the speaker terminals to
the speaker outputs on a stereo amplifier. Damage may occur.
5

A division of Tapehand Ltd
Units 7 & 8 Bat & Ball Enterprise Centre
Bat & Ball Road
Sevenoaks
Kent
TN14 5LJ
www.techlink.uk.com
Techlink support line: 0800 634 2699
This manual suits for next models
3
Table of contents
Other Techlink Indoor Furnishing manuals
Popular Indoor Furnishing manuals by other brands

DRAGONN
DRAGONN DN-CH-K02W instruction manual

GUIDO MARIA KRETSCHMER HOME&LIVING
GUIDO MARIA KRETSCHMER HOME&LIVING Como 476344 manual

ROOMS TO GO
ROOMS TO GO 7450 Assembly instructions

Kompernass
Kompernass Christmas Pyramid KH 4148 operating instructions

Babyletto
Babyletto Toco 11287 manual

Next
Next LOGAN 846268 Assembly instructions