Techniglass The Grinder User manual

Phone: 716.564.8888
www.techniglass.com
OPERATION MANUAL
STATE-OF-THE ART BREAKTHROUGH TECHNOLOGY
AND

Dear Artist,
Congratulations on owning the rst comprehensive glass
grinder with worldwide voltage capabilities!
THE GRINDER®and THE GRINDER2®’s features and
accessories have been compiled after thorough study of glass
artists’ needs. Thank you for purchasing the ultimate glass
grinding machine which we hope will make your studio time
the most pleasant experience.
Please take a few moments to read this manual and become
acquainted with your GRINDER, to get the best performance
from your machine. If you have any questions, please feel
free to visit our website, www.techniglass.com for
more information.
Be sure to register your GRINDER to activate its warranty
with the option to gain access to Techniglass Corporation
company updates, promotions, and news! Go to techniglass.
com and tell us about your new GRINDER experience – any
comments and feedback you may have – we would love to
hear from you!
On behalf of our entire team, thank you for choosing
Techniglass for all your glass grinding needs. Our designers
and engineers are dedicated to creating the most advanced
and innovative products, we are inspired by the ingenuity of all
glass artists.
Here’s to the instruments that help make inspiration a reality.
Cheers,
Mike Hacikyan
President | Techniglass Corporation
P.S. Find your serial number on the back of your machine.
For quick reference and convenience
write the number here: __________________________
If you experience any issues, don’t hesitate to call us at
716.564.8888 or contact us at info@techniglass.com so our
team can assist you.
Page 1.

•Always use eye protection while
operating this glass grinder
•Use only a properly grounded,
three-prong outlet
•Water from reservoir must not reach
electrical outlet
•Power off THE GRINDER®and
THE GRINDER2®when not in use
•Before grinding, ensure the water
reservoir is adequately lled
•Do not overll the water reservoir
•Always install the orange shaft water
seal on shaft when using upper platform
•When removing THE LUMISHIELD®
Arm, always cover slot with THE
LUMISHIELD Mount Cap
•Minimal noise
•Does not over heat
•Uses 24X less electricity
SAFETY PRECAUTIONS
NO FOOT
PEDAL NEEDED
Page 2.

ASSEMBLY FOR THE GRINDER®
BACK
FRONT
RIGHT
LEFT
1 2
34a
4b 4c
1 Insert the power cord into inlet
2 Remove the Lift Grid
3 Slide Quick Fit Bit®down shaft and lock into place
4a-c Install Aqua Flow System®and wet the brush bristles
Page 3.
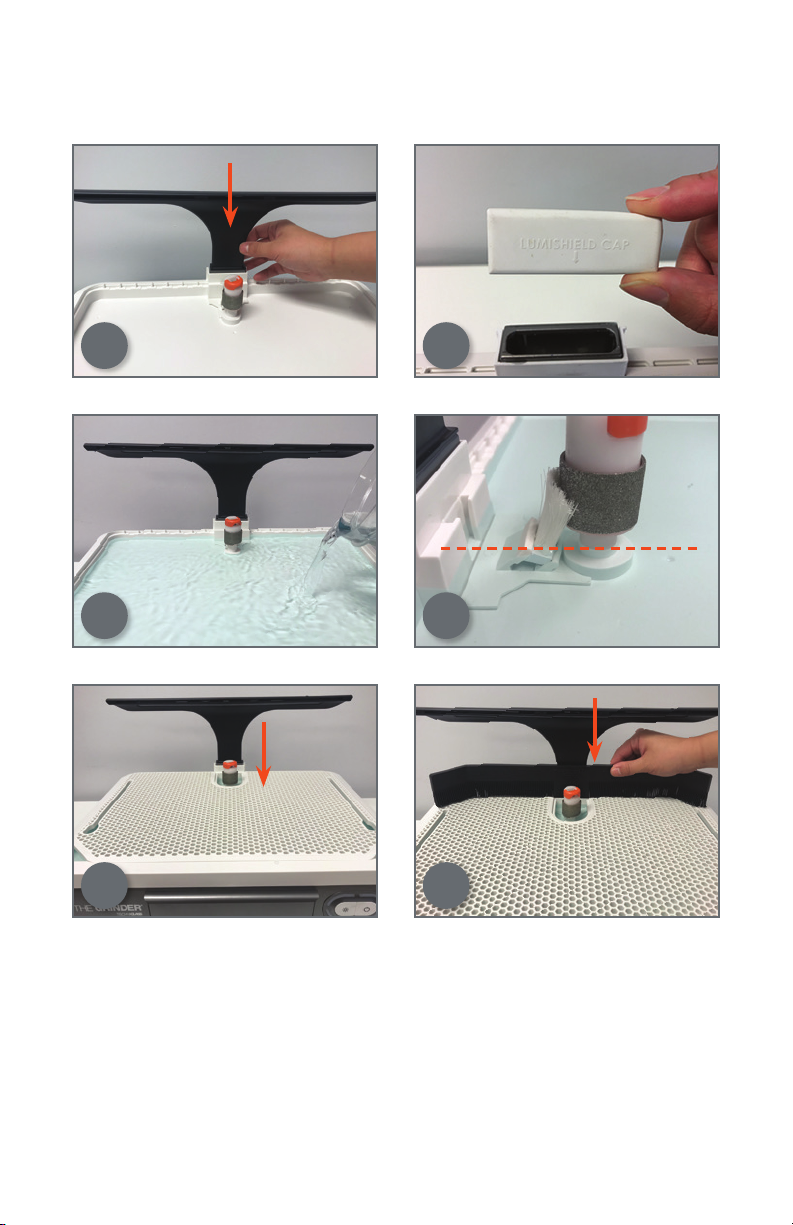
6 a-b Place THE LUMISHIELD®or LUMISHIELD Mount Cap
into slot
7 a-b Add water until it reaches base of Aqua Flow System®brush
8 Position Lift Grid
9 Install the THE GUARD into slot
7a 7b
8 9
WATER LEVEL
ASSEMBLY FOR THE GRINDER®CONTINUED
6b6a
Page 4.

10 11
13a 13b
10 Slide transparent lens into channel
11 Insert Everwear Bit Guard
12 Plug power cord into grounded 3-prong socket
13 a-b Press Light /Power Switch
ASSEMBLY FOR THE GRINDER®CONTINUED
Page 5.

BACK
FRONT
RIGHT
LEFT
12
34a
4b 4c
1 Insert the power cord into inlet
2 Remove the Lift Grid
3 Slide Quick Fit Bit®down shaft and lock into place
4a-c Install Aqua Flow System® and wet the brush bristles
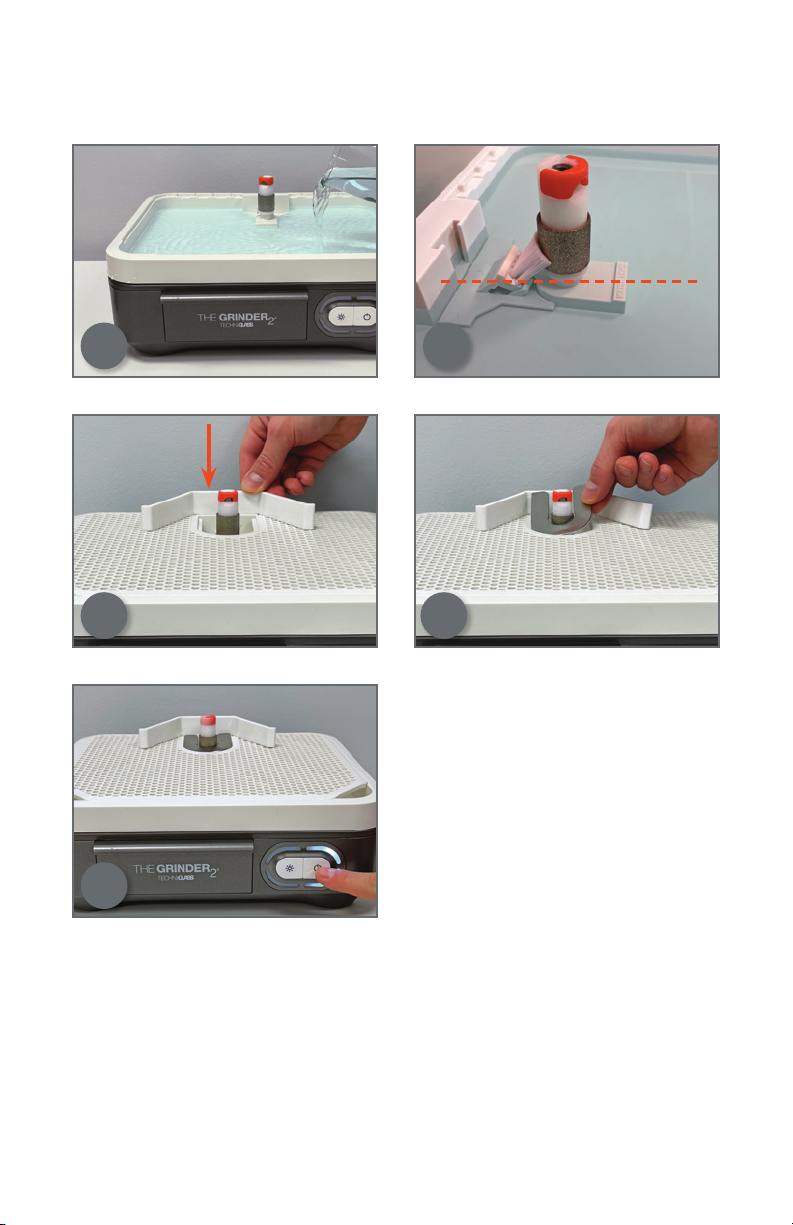
ASSEMBLY FOR THE GRINDER2®
Page 6.
6
ASSEMBLY FOR THE GRINDER2®CONTINUED
5a 5b
WATER LEVEL
5 a-b Add water until it reaches water level mark in reservoir or
base of Aqua Flow System®brush
6 Position The Lift Grid, and install The Guard into slot
7 Insert Everwear Bit Guard
8 Press Power Button on front to operate
7
8
Pa ge 7.

ASSEMBLY FOR THE GRINDER2®
OPTIONAL ACCESSORY – THE LUMISHIELD2®
1 Insert THE LUMISHIELD2into slot
2 Connect the cable to the port on the back of THE GRINDER2
3 Slide transparent lens into channel, securing in-place
4 Press Light Button on front to operate
1 2
34
Page 8.

ASSEMBLY FOR THE GRINDER2®
OPTIONAL ACCESSORY– THE GUARD2®
1 a-b Insert THE GUARD2into slot
1a 1b
The LUMISHIELD2®and THE GUARD2®are sold separately,
allowing THE GRINDER2®to be completely customizable.
Page 9.
Other manuals for The Grinder
1
This manual suits for next models
1
Table of contents
Other Techniglass Grinder manuals


