Toro SGR-6 22600 User manual
FormNo.3404-442RevA
SGR-6StumpGrinder
ModelNo.22600—SerialNo.316000001andUp
ModelNo.22600HD—SerialNo.316000001andUp
G025787
Registeratwww.Toro.com.
OriginalInstructions(EN)*3404-442*A

WARNING
CALIFORNIA
Proposition65Warning
Theengineexhaustfromthisproduct
containschemicalsknowntotheStateof
Californiatocausecancer,birthdefects,
orotherreproductiveharm.
DANGER
Theremaybeburiedpower,gas,and/ortelephone
linesintheworkarea.Shockorexplosionmay
occurifyoudigintothem.
Havethepropertyorworkareamarkedforburied
linesanddonotdiginmarkedareas.Contactyour
localmarkingserviceorutilitycompanytohavethe
propertymarked(forexample,intheUnitedStates,
call811forthenationwidemarkingservice).
ThissparkignitionsystemcomplieswithCanadianICES-002.
Becauseinsomeareastherearelocal,state,orfederal
regulationsrequiringthatasparkarresterbeusedonthe
engineofthismachine,asparkarresterisavailableas
anoption.Ifyourequireasparkarrester,contactyour
AuthorizedToroServiceDealer.
GenuineTorosparkarrestersareapprovedbytheUSDA
ForestryService.
ItisaviolationofCaliforniaPublicResourceCode
Section4442or4443touseoroperatetheengineonany
forest-covered,brush-covered,orgrass-coveredlandunless
theengineisequippedwithasparkarrester,asdenedin
Section4442,maintainedineffectiveworkingorderorthe
engineisconstructed,equipped,andmaintainedforthe
preventionofre.
Theenclosed
Engine Owner's Man ual
issuppliedfor
informationregardingtheUSEnvironmentalProtection
Agency(EPA)andtheCaliforniaEmissionControl
Regulationofemissionsystems,maintenance,and
warranty.Replacementsmaybeorderedthroughthe
enginemanufacturer.
Introduction
Thismachineisdesignedtogrindandremovetreestumps
andsurfaceroots.Itisnotintendedtocutrockoranyother
materialotherthanwoodandthesoilaroundastump.
Readthisinformationcarefullytolearnhowtooperateand
maintainyourproductproperlyandtoavoidinjuryand
productdamage.Youareresponsibleforoperatingthe
productproperlyandsafely.
YoumaycontactTorodirectlyatwww.Toro.comforproduct
safetyandoperationtrainingmaterials,accessoryinformation,
helpndingadealer,ortoregisteryourproduct.
Wheneveryouneedservice,genuineToroparts,oradditional
information,contactanAuthorizedServiceDealerorToro
CustomerServiceandhavethemodelandserialnumbersof
yourproductready.Figure1illustratesthelocationofthe
modelandserialnumbersontheproduct.Writethenumbers
inthespaceprovided.
G025788
Figure1
1.Modelandserialnumberplate
ModelNo.
SerialNo.
Thismanualidentiespotentialhazardsandhassafety
messagesidentiedbythesafety-alertsymbol(Figure2),
whichsignalsahazardthatmaycauseseriousinjuryordeath
ifyoudonotfollowtherecommendedprecautions.
©2016—TheToro®Company
8111LyndaleAvenueSouth
Bloomington,MN554202
Contactusatwww.Toro.com.
PrintedintheUSA
AllRightsReserved

Figure2
1.Safety-alertsymbol
Thismanualuses2wordstohighlightinformation.
Importantcallsattentiontospecialmechanicalinformation
andNoteemphasizesgeneralinformationworthyofspecial
attention.
Contents
Safety...........................................................................3
SafeOperatingPractices...........................................3
SafetyandInstructionalDecals.................................5
ProductOverview..........................................................7
Controls................................................................7
Specications.........................................................9
Attachments/Accessories.........................................9
Operation.....................................................................9
BeforeStarting........................................................9
AddingFuel...........................................................10
CheckingtheEngine-OilLevel.................................11
StartingandShuttingOfftheEngine.........................12
GrindingaStump...................................................12
Maintenance.................................................................14
RecommendedMaintenanceSchedule(s)......................14
EngineMaintenance..................................................14
ServicingtheAirCleaner.........................................14
ServicingtheEngineOil..........................................15
ServicingtheSparkPlug..........................................16
BeltMaintenance......................................................17
CheckingtheDriveBeltTension...............................17
AdjustingtheDriveBelt..........................................18
GrinderMaintenance..................................................18
ReplacingtheTeeth................................................18
Cleaning...................................................................19
RemovingDebrisfromtheMachine..........................19
Storage........................................................................20
StoringtheMachine................................................20
Troubleshooting...........................................................21
Safety
Improperuseormaintenancebytheoperatororownercan
resultininjury.Toreducethepotentialforinjury,comply
withthesesafetyinstructionsandalwayspayattentiontothe
safety-alertsymbol,whichmeans:Caution,Warning,or
Danger—personalsafetyinstruction.Failuretocomplywith
theinstructionmayresultinpersonalinjuryordeath.
SafeOperatingPractices
Thisproductiscapableofamputatinghandsandfeet.Always
followallsafetyinstructionstoavoidseriousinjuryordeath.
WARNING
Engineexhaustcontainscarbonmonoxide,an
odorless,deadlypoisonthatcankillyou.
Donotruntheengineindoorsorinanenclosed
area.
Training
•ReadtheOperator'sManualandothertrainingmaterial.If
theoperator(s)ormechanic(s)can’treadEnglish,itisthe
owner'sresponsibilitytoexplainthismaterialtothem.
•Becomefamiliarwiththesafeoperationoftheequipment,
operatorcontrols,andsafetysigns.
•Alloperatorsandmechanicsshouldbetrained.The
ownerisresponsiblefortrainingtheusers.
•Neverletchildrenoruntrainedpeopleoperateorservice
theequipment.Localregulationsmayrestricttheageof
theoperator.
•Theowner/usercanpreventandisresponsiblefor
accidentsorinjuriesoccurringtohimselforherself,other
peopleorproperty.
Preparation
•Evaluatetheterraintodeterminewhataccessoriesand
attachmentsareneededtoproperlyandsafelyperform
thejob.Onlyuseaccessoriesandattachmentsapproved
bythemanufacturer.
•Wearappropriateclothingincludinggloves,safetyglasses,
longpants,substantialslip-resistantfootwear,andhearing
protection.Tiebacklonghairanddonotwearjewelry.
•Inspecttheareawheretheequipmentistobeusedand
removeallobjectssuchasrocks,toys,andwirewhichcan
bethrownbythemachine.
•Useextracarewhenhandlinggasolineandotherfuels.
Theyareammableandvaporsareexplosive.
–Useonlyanapprovedcontainer
–Neverremovethefuelcaporaddfuelwiththeengine
running.Allowtheenginetocoolbeforerefueling.
Donotsmoke.
–Neverrefuelordrainthemachineindoors.
3

•Checkthattheoperatorpresencecontrols,safetyswitches,
andshieldsareattachedandfunctioningproperly.Donot
operateunlesstheyarefunctioningproperly.
•Checkthatthecuttingwheelhasstoppedrotatingwhen
youreducethethrottle.
Operation
•Neverrunanengineinanenclosedarea.
•Onlyoperateingoodlight,keepingawayfromholesand
hiddenhazards.
•Besurealldrivesareinneutralbeforestartingtheengine.
Onlystarttheenginefromtheoperator'sposition.
•Neveroperatewiththeguardsnotsecurelyinplace.Be
sureallinterlocksareattached,adjustedproperly,and
functioningproperly.
•Donotchangetheenginegovernorsettingoroverspeed
theengine.
•Stoponlevelground,lowerthegrinder,andshutoff
theenginebeforeleavingtheoperator'spositionforany
reason.
•Keephandsandfeetawayfromthemovinggrinderwheel
andteeth.
•Lookbehindanddownbeforebackinguptobesureof
aclearpath.
•Keeppetsandbystandersaway.
•Donotoperatethemachinewhileill,tired,orunderthe
inuenceofalcoholordrugs.
•Usecarewhenloadingorunloadingthemachineintoa
trailerortruck.
•Ensurethattheareaisclearofotherpeoplebefore
operatingthemachine.Stopthemachineifanyoneenters
thearea.
•Neverleavearunningmachineunattended.Alwaysshut
offtheengineandverifythecuttingwheelshasstopped
rotating.
•Neverjerkthecontrols;useasteadymotion.
•Watchfortrafcwhenoperatingnearorcrossing
roadways.
•Donottouchpartswhichmaybehotfromoperation.
Allowthemtocoolbeforeattemptingtomaintain,adjust,
orservice.
•Ensurethatyouoperatethemachineinareaswhere
therearenoobstaclesincloseproximitytotheoperator.
Failuretomaintainadequatedistancefromtrees,walls,
andotherbarriersmayresultininjuryasthemachine
backsupduringoperationiftheoperatorisnotattentive
tothesurroundings.Onlyoperatetheunitinareaswhere
thereissufcientclearancefortheoperatortosafely
maneuvertheproduct.
•Beforegrinding,havetheareamarkedforunderground
utilities,anddonotgrindinmarkedareas.
•Locatethepinchpointareasmarkedonthemachineand
keephandsandfeetawayfromtheseareas.
•Lightningcancausesevereinjuryordeath.Iflightning
isseenorthunderisheardinthearea,donotoperate
themachine;seekshelter.
MaintenanceandStorage
•Shutofftheengine.Waitforallmovementtostopbefore
adjusting,cleaning,orrepairing.
•Cleandebrisfromthegrinder,drives,mufers,andengine
tohelppreventres.Cleanupoilorfuelspillage.
•Lettheenginecoolbeforestoringanddonotstorenear
ame.
•Donotstorefuelnearamesordrainindoors.
•Parkthemachineonlevelground.Neverallowuntrained
personneltoservicethemachine.
•Carefullyreleasepressurefromcomponentswithstored
energy.
•Removethesparkplugwirebeforemakinganyrepairs.
•Keephandsandfeetawayfrommovingparts.Ifpossible,
donotmakeadjustmentswiththeenginerunning.
•Keepallpartsingoodworkingconditionandallhardware
tightened.Replaceallwornordamageddecals.
•Keepnutsandboltstight.Keepequipmentingood
condition.
•Nevertamperwithsafetydevices.
•Keepthemachinefreeofgrass,leaves,orotherdebris
build-up.Cleanupoilorfuelspillage.Allowthemachine
tocoolbeforestoring.
•Useextracarewhenhandlinggasolineandotherfuels.
Theyareammableandvaporsareexplosive.
–Useonlyanapprovedcontainer.
–Neverremovethefuelcaporaddfuelwhenthe
engineisrunning.Allowtheenginetocoolbefore
refueling.Donotsmoke.
–Neverrefuelthemachineindoors.
–Neverstorethemachineorfuelcontainerinside
wherethereisanopename,suchasnearawater
heaterorfurnace.
–Neverllacontainerwhileitisinsideavehicle,trunk,
pick-upbed,oranysurfaceotherthantheground.
–Keepcontainernozzleincontactwiththetankduring
lling.
•Stopandinspecttheequipmentifyoustrikeanobject.
Makeanynecessaryrepairsbeforerestarting.
•UseonlygenuineTororeplacementpartstoensurethat
originalstandardsaremaintained.
4

SafetyandInstructionalDecals
Safetydecalsandinstructionsareeasilyvisibletotheoperatorandarelocatednearanyareaofpotential
danger.Replaceanydecalthatisdamagedorlost.
117-2718
117-4979
1.Entanglementhazard,belt—stayawayfrommovingparts,
keepallguardsandshieldsinplace.
119-4690
1.Warning;cutting/dismembermenthazard,grinding
blade—keephandsandfeetawayfromallmovingparts,
keepallshieldsinplace;waitforallmovingpartstostop.
119-4691
1.Warning—readtheOperator'sManual;waitforgrinder
bladetostop,stoptheengineandfoldthehandle.
119-4692
1.Warning—stoptheengine;usebothhandholdstoliftthe
grinder.
119-4693
1.Thrownobjecthazard—keepbystandersasafedistance
fromthemachine.
119-4722
1.Engine—run
2.Grinderblade—engage
5

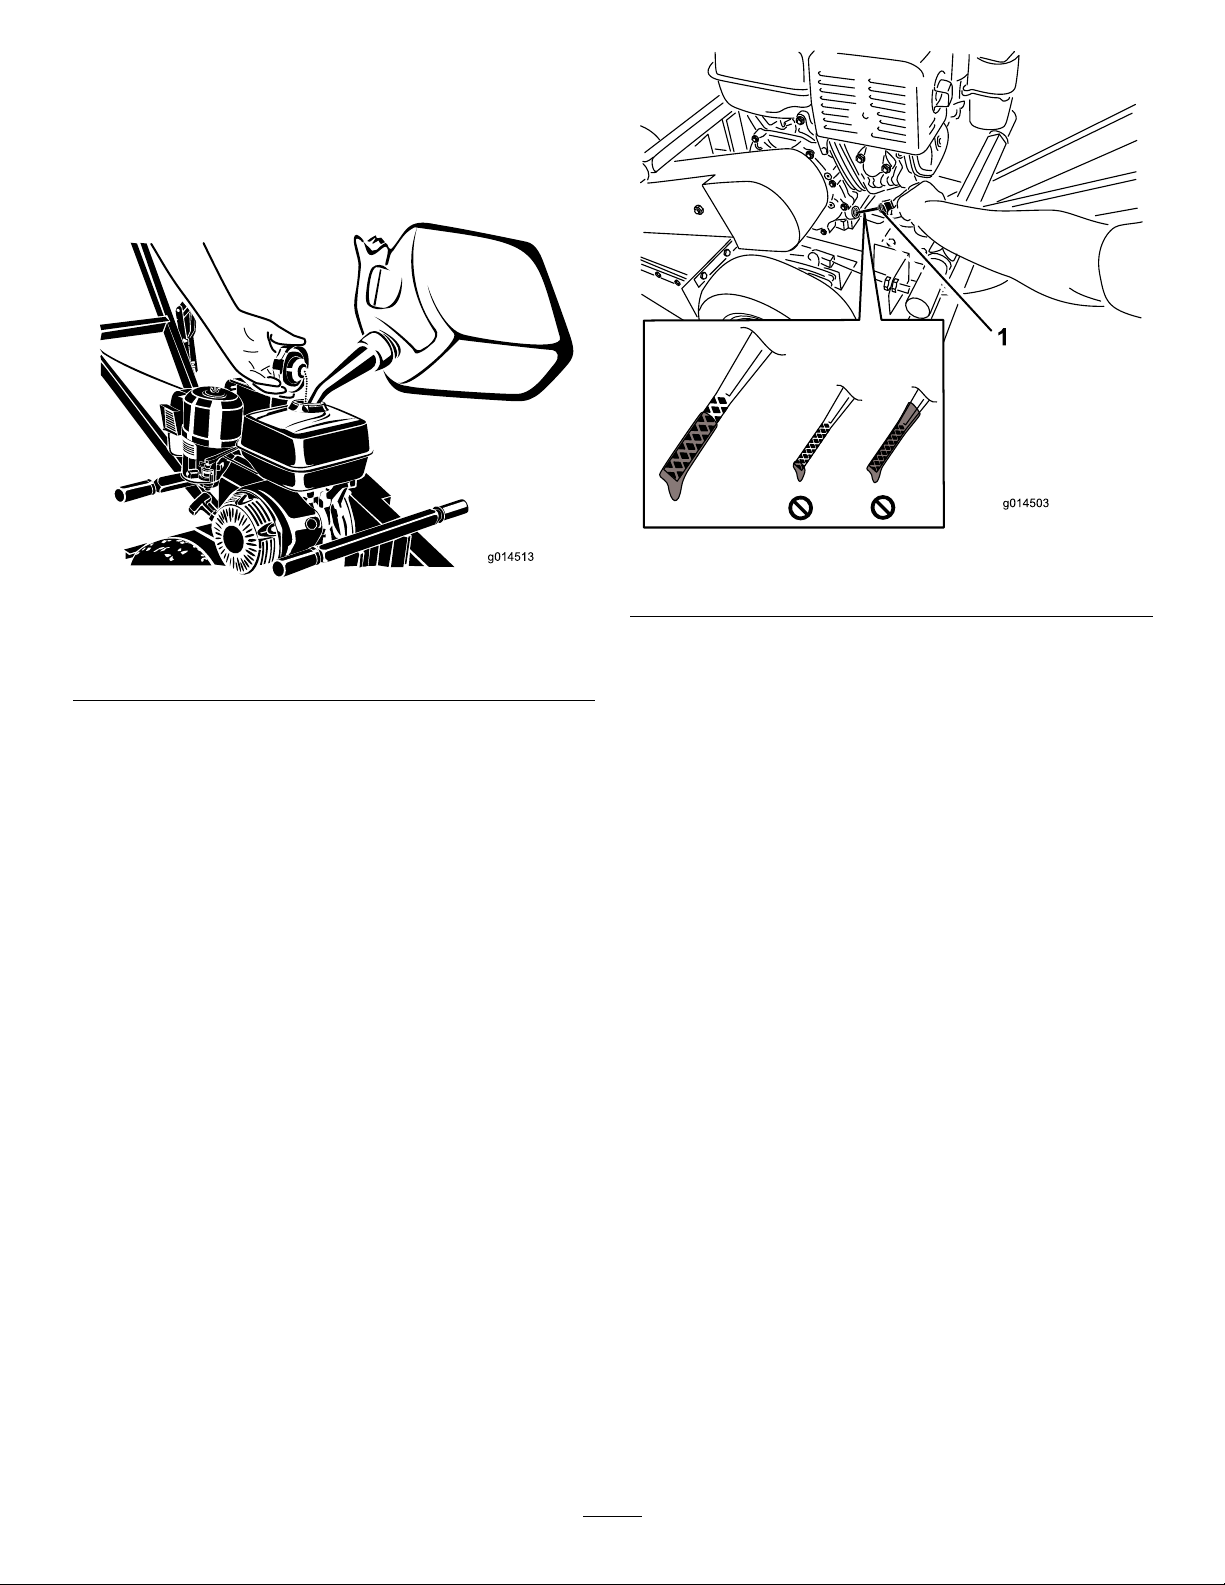
130-8322
1.Onlyusefuelwithan
alcoholcontentbyvolume
under10%.
3.Donotusefuelwithan
alcoholcontentbyvolume
greaterthan10%.
2.ReadtheOperator's
Manualformore
informationonfuel.
132-4004
1.Warning,cuttingwheel—toadjustthecuttingwheelteethbetweenjobs1)Loosenthenut;2)Pushthetoothdownandrotateit1/3
ofaturn;3)Tightenthenutto50ft-lbs;4)Proceedwithgrinding.
6

ProductOverview
G025789
1
2
3
4
5
6
7
8
9
10
11
12
13
Figure3
1.Handle8.Starter
2.Throttlelever9.Cuttingwheel
3.Handle-releaseknob10.Lift
4.Airlter11.Beltcover
5.Sedimentcup12.Fuelcap
6.Fuelvalve13.Safetybail
7.Choke
Controls
Becomefamiliarwithallthecontrols(Figure3andFigure6)
beforeyoustarttheengineandoperatethemachine.
Handle-ReleaseKnob
Thehandleonthismachinehasthecapabilitytobefolded
downforeasiertransport.Unscrewthehandle-releaseknob
fromthemachine(Figure4).
g014871
1
Figure4
1.Handle-releaseknob
Foldthehandledowntowardthemachineandscrewthe
knobbackontothehandle(Figure5).
g014870
Figure5
7
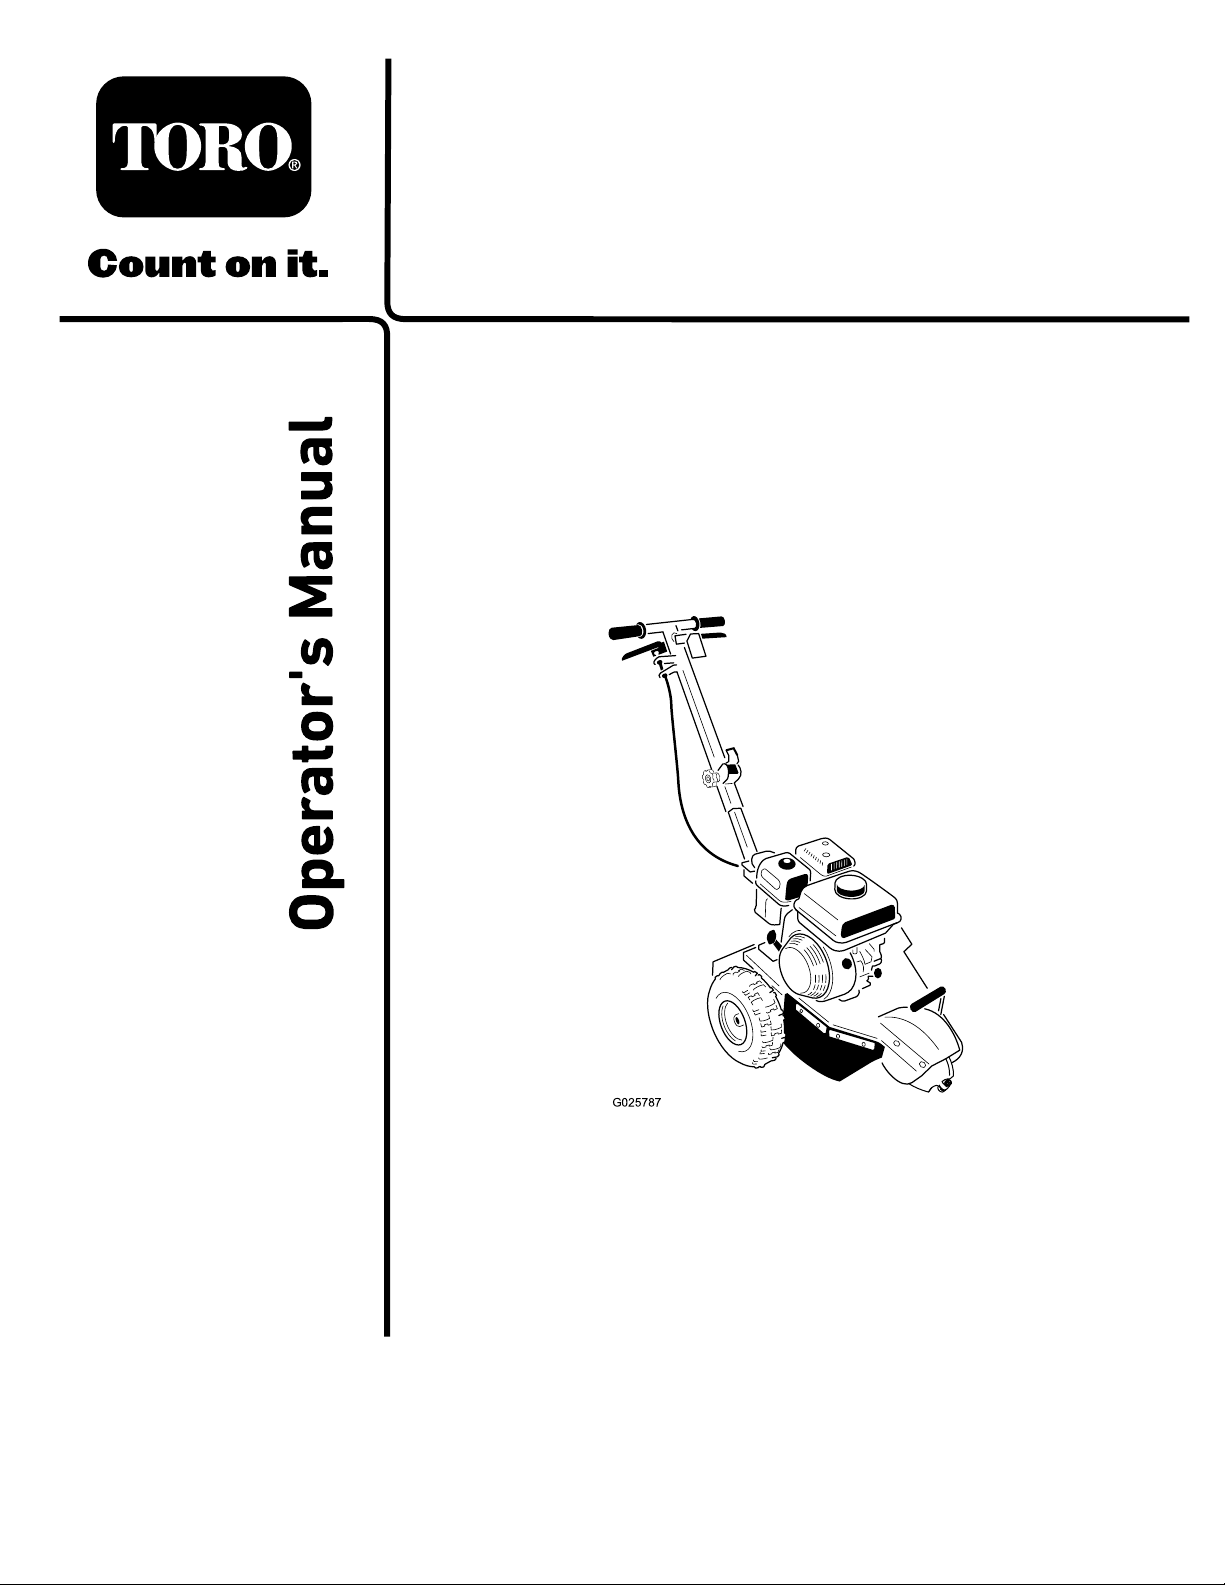
ThrottleLeverandSafetyBail
Thethrottlelevercontrolstheenginespeed.Withthelever
released,inthedisengagedposition,theenginerunsatidle.
Thisisalsothestartingposition.Whenyoupulltheleverto
thehandle,theenginespeedincreases,thecentrifugalclutch
engages,andthecuttingwheelrotates.
Thesafetybailcontrolstheengine.Holdthesafetybail
againstthehandletodeactivatetheenginekillswitchsothat
theenginestarts.Releasethesafetybailtoshutofftheengine.
g014874
2
1
Figure6
1.Throttlelever2.Safetybail
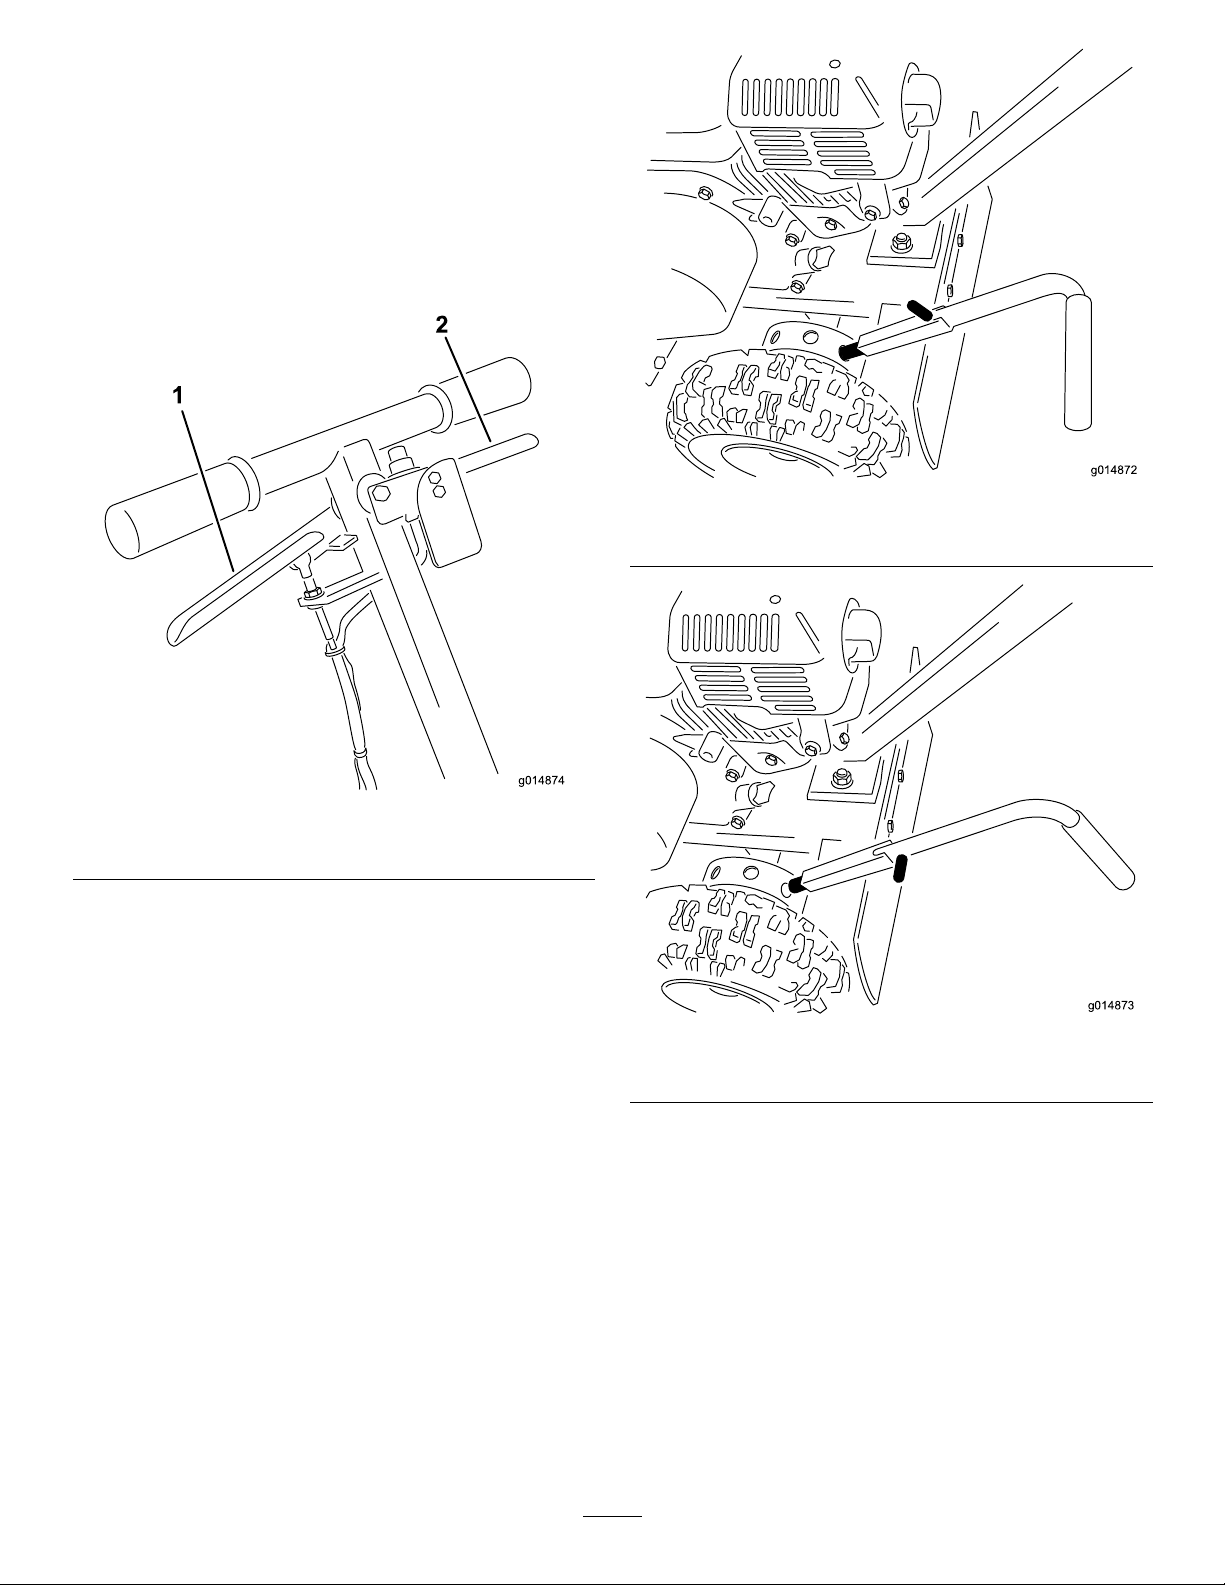
ParkingBrake
Theparkingbrake(Figure6andFigure7)holdstheleftwheel
fromturningtosecurethemachineandforeasymovement
ofthemachinefromsidetosidewhengrindingastump.
g014872
Figure7
1.Engagedbrake
g014873
Figure8
1.Disengagedbrake
8

Specications
Note:Specicationsanddesignaresubjecttochange
withoutnotice.
CuttingDepth30cm(12inches)
Length127cm(50inches)
Width56cm(22inches)
Height107cm(42inches)
Weight47kg(103lb)
Attachments/Accessories
AselectionofToroapprovedattachmentsandaccessoriesis
availableforusewiththemachinetoenhanceandexpand
itscapabilities.ContactyourAuthorizedServiceDealeror
Distributororgotowww.Toro.comforalistofallapproved
attachmentsandaccessories.
Operation
Note:Determinetheleftandrightsidesofthemachine
fromthenormaloperatingposition.
Important:Beforeoperating,checkthefuelandoil
level,andremovedebrisfromthemachine.Also,ensure
thattheareaisclearofpeopleanddebris.Youshould
alsoknowandhavemarkedthelocationsofallutility
lines.
BeforeStarting
•Digawaytheearthandremoveanystonesnearthetree
stumpthatmayinterferewithyourwork.Checkthatthe
groundisfreeofforeignobjects,suchaselectricalcables,
barbedwire,etc.
•Cutortrimthestumpusingapowersaw .
•Reviewallthesafetydecalsonthemachine.
•Useahard-hat,hearing,andeyeprotection.Amesh
visoralonedoesnotprovidesufcienteyeprotection;
supplementwithprotectiveglasses.
•Ensurethatyouarefamiliarwithsafetyregulationsand
shutdownproceduresdescribedinthismanual.
•Ensurethatallguardsareinplaceandingoodcondition.
•Ensurethatthebladesandcuttersareinplaceandin
goodcondition.
•Ensurethattheworkarea,cutter,andstumpinparticular
arefreefrommetallicobjectssuchaswire,nails,etc.that
couldbethrownoutandinjurepersonsinthevicinity
anddamagetheequipment.
•Ensurethateveryone,includingchildrenandanimals,
maintainadistanceofatleast15m(50feet)fromthe
machine.Debriscanbethrownoutandinjurepeople
andanimals.
9

AddingFuel
Useunleadedgasoline(87pumpoctaneminimum).Leaded,
regulargasolinemaybeusedifunleadedisnotavailable.
DANGER
Incertainconditions,gasolineisextremely
ammableandhighlyexplosive.Areorexplosion
fromgasolinecanburnyouandothersandcan
damageproperty.
•Fillthefueltankoutdoors,inanopenarea,
whentheengineiscold.Wipeupanygasoline
thatspills.
•Neverllthefueltankinsideanenclosedtrailer.
•Donotllthefueltankcompletelyfull.Add
gasolinetothefueltankuntilthelevelis1/4to
1/2inch(6to13mm)belowthebottomofthe
llerneck.Thisemptyspaceinthetankallows
gasolinetoexpand.
•Neversmokewhenhandlinggasoline,andstay
awayfromanopenameorwheregasoline
fumesmaybeignitedbyaspark.
•Storegasolineinanapprovedcontainerand
keepitoutofthereachofchildren.Neverbuy
morethana30-daysupplyofgasoline.
•Donotoperatewithoutentireexhaustsystemin
placeandinproperworkingcondition.
DANGER
Incertainconditionsduringfueling,static
electricitycanbereleasedcausingasparkwhich
canignitethegasolinevapors.Areorexplosion
fromgasolinecanburnyouandothersandcan
damageproperty.
•Alwaysplacegasolinecontainersontheground
awayfromyourvehiclebeforelling.
•Donotllgasolinecontainersinsideavehicleor
onatruckortrailerbedbecauseinteriorcarpets
orplastictruckbedlinersmayinsulatethe
containerandslowthelossofanystaticcharge.
•Whenpractical,removegas-poweredequipment
fromthetruckortrailerandrefueltheequipment
withitswheelsontheground.
•Ifthisisnotpossible,thenrefuelsuch
equipmentonatruckortrailerfromaportable
container,ratherthanfromagasolinedispenser
nozzle.
•Ifyoumustuseagasolinedispensernozzle,
keepthenozzleincontactwiththerimofthe
fueltankorcontaineropeningatalltimesuntil
fuelingiscomplete.
Important:Donotusemethanol,gasolinecontaining
methanol,orgasoholcontainingmorethan10%ethanol
becausethefuelsystemcouldbedamaged.Donotmix
oilwithgasoline.
UsingStabilizer/Conditioner
Useafuelstabilizer/conditionerinthemachinetoprovide
thefollowingbenets:
•Keepsgasolinefreshduringstorageof90daysorless.
Forlongerstorageitisrecommendedthatthefueltank
bedrained.
•Cleanstheenginewhileitruns.
•Eliminatesgum-likevarnishbuildupinthefuelsystem,
whichcauseshardstarting.
Important:Donotusefueladditivescontaining
methanolorethanol.
Addthecorrectamountofgasstabilizer/conditionertothe
gas.
Note:Afuelstabilizer/conditionerismosteffectivewhen
mixedwithfreshgasoline.Tominimizethechanceofvarnish
depositsinthefuelsystem,usefuelstabilizeratalltimes.
10
FillingtheFuelTank
1.Parkthemachineonalevelsurface,lowerthegrinder,
andshutofftheengine.
2.Allowtheenginetocool.
3.Cleanaroundthefueltankcapandremoveit(Figure9).
Figure9
Viewmayvarydependingonmodel
1.Fuel-tankcap
4.Addunleadedgasolinetothefueltank,untilthelevelis
6mmto13mm(1/4to1/2inch)belowthebottomof
thellerneck.
Important:Thisspaceinthetankallowsgasoline
toexpand.Donotllthefueltankcompletelyfull.
5.Installthefueltankcapsecurely.
6.Wipeupanygasolinethatmayhavespilled.
CheckingtheEngine-OilLevel
ServiceInterval:Beforeeachuseordaily
1.Tiltthemachinesotheengineislevel,andshutoff
theengine.
2.Allowtheenginetocool.
3.Cleanaroundtheoildipstick.
4.Removethedipstickandwipetheendclean.
5.Slidethedipstickfullyintothedipsticktubewithout
threadingitintothellerneck.
6.Pullthedipstickoutandlookattheend;theoilshould
betothetopoftheupperlimitrange(Figure10).
Figure10
1.Oildipstick
Important:Runningtheenginewithlowoillevel
cancauseenginedamage.Thistypeofdamageis
notcoveredbywarranty.
Theengineisequippedwithanoilalertsystem
thatwillautomaticallyshutofftheenginebefore
theoillevelfallsbelowthesafelimit.
7.Iftheoillevelislow,slowlypouronlyenoughoilinto
thecrankcasetoraisetheleveltotheupperlimit.
Important:Donotoverllthecrankcasewithoil
becausetheenginemaybedamaged.
8.Replacethedipstick.
11

StartingandShuttingOffthe
Engine
StartingtheEngine
1.MovethefuelvalvetotheOPENposition,alltheway
totheright(Figure11).
Figure11
1.Choke3.Starter
2.Fuelvalve
2.MovethechokeleverlefttotheONpositionifyou
arestartingacoldengine.
Note:Awarmorhotenginemaynotrequirechoking.
3.Holdthesafetybailagainstthehandleandpushthe
handledownenoughtoraisethecuttingwheeloffthe
ground.
4.Pullthestarterhandlelightlyuntilyoufeelresistance,
thenpullthehandlebriskly.Returnthestarterhandle
gently(Figure11).
5.Aftertheenginestarts,graduallymovethechokelever
backtotheOFFposition.
Note:Iftheenginestallsorhesitates,movethechoke
backtotheONpositionagainuntiltheenginewarms
up.ThenmoveittotheOFFposition.
6.Holdthethrottleleveragainstthehandletospinthe
cuttingwheel.
ShuttingOfftheEngine
1.Releaseyourhandfromthethrottlelever.
Note:Iftheenginehasbeenworkinghardorishot,
letitrunforaminutebeforereleasingthesafetybail.
Thishelpstocooltheenginebeforestopping.Inan
emergency,theenginemaybestoppedimmediately.
2.Releasethesafetybailtoshutofftheengine.
3.MovethefuelvalvetotheCLOSEDposition,allthe
waytotheleft.
GrindingaStump
DANGER
Themachinewillcutandamputatehandsandfeet.
•Stayintheoperator'spositionwhilethemachine
isrunningandkeepawayfromthecutting
wheel.
•Keepallbystandersasafedistancefromthe
machine.Stopthemachineimmediatelyifany
peopleoranimalsentertheworkarea.
•Neverleavearunningmachineunattended.
Alwaysshutofftheengineandverifythecutting
wheelhasstoppedrotating.
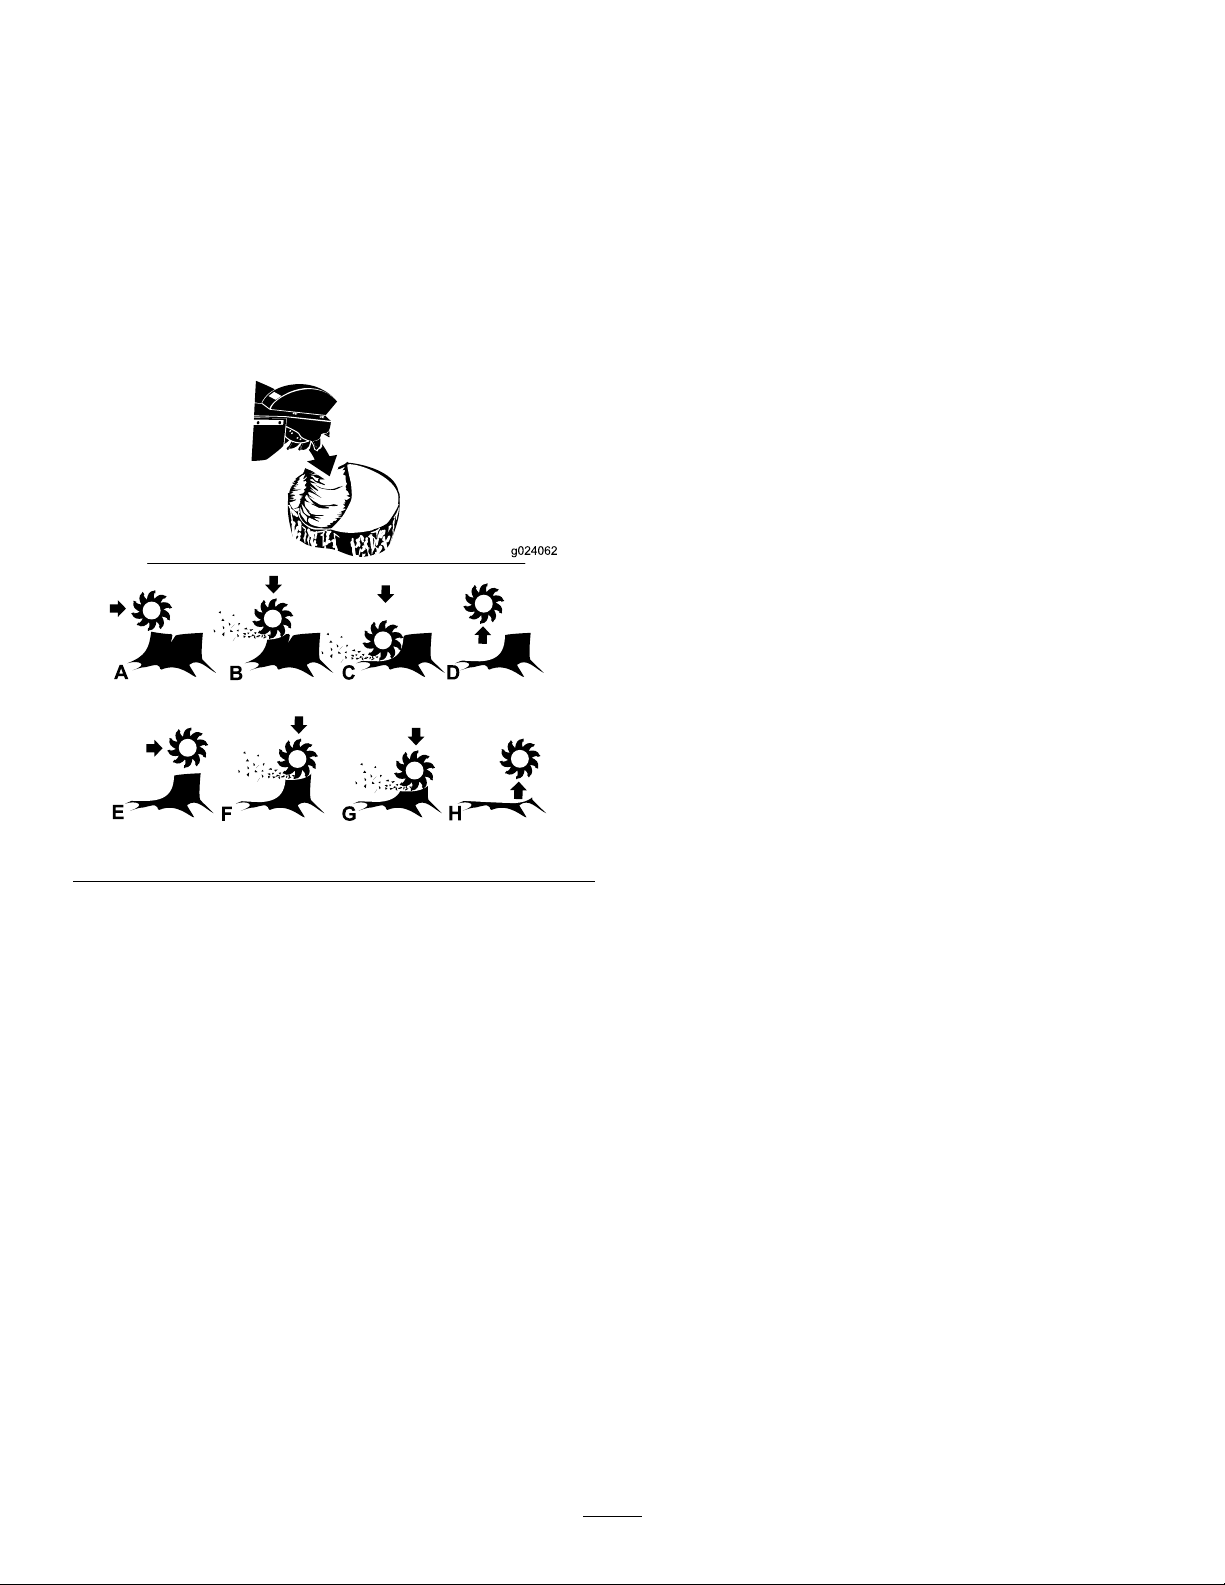
WARNING
Grindingastumpwillthrowwoodchips,soil,and
otherdebrisintotheairwhichcouldinjureyouor
bystanders.
•Alwaysweareyeprotectionandahardhatwhen
usingthemachine.
•Ensurethateveryone,includingchildrenand
animals,maintainadistanceofatleast15m(50
feet)fromthemachine.
1.SetthrottletotheDisengageposition,starttheengine,
andallowthemachinetowarmupfor2minutes.
2.Pushthehandledownenoughtoraisethecutting
wheelofftheground(Figure12).
2
G025887
1
Figure12
1.Pivotpoint2.Pivotpointwhenthe
parkingbrakeisengaged.
12
3.Movethemachinetothefrontofthestumpandset
theparkingbrake.
4.MovethrottleuptotheEngageposition.Thecutting
wheelwillbeginrotating.
5.Swingthecuttingwheeltooneside(Figure12),then
loweritapproximately13mmto25mm(1/2inchto
1inch)intothefront-topcornerofthestump.Swing
thecuttingwheelbackandforth,loweringthecutting
wheelapproximately13mmto25mm(1/2inchto1
inch)beforeeachsweep,untilyouhaveremovedthe
frontportionofthestumptogroundlevel(Athrough
DinFigure13).
Figure13
6.Raisethecuttingwheel,releasetheparkingbrake,and
movethemachineforwardafewcentimeters(inches).
Settheparkingbrake.
7.Repeatsteps5and6untilyouhavecompletely
removedthestump(EthroughHinFigure13).
8.MovethrottletotheDisengageposition,pushthe
handledownenoughtoraisethecuttingwheeloffthe
ground.Waitforthecuttingwheeltostoprotating
thenreleasetheparkingbrakeandpullthemachine
awayfromthestump.
Note:Donotletthefrontofthemachinetouchthe
grounduntilyouaresurethecuttingwheelhasstopped
turning.
9.Shutofftheengine;refertoShuttingOfftheEngine
(page12).
13
Maintenance
Note:Determinetheleftandrightsidesofthemachinefromthenormaloperatingposition.
Important:Youcantipthemachinebackwardoronitssidetocleanorserviceit,butnolongerthan2minutes.
Ifyouholdthemachinethispositionfortoolong,gasolinecandrainintothecrankcaseanddamagetheengine.
Shouldthishappen,performanextraoilchangeontheengine.Thenturntheengineoverafewrevolutionswiththe
starterhandlebeforestartingtheengineagain.
RecommendedMaintenanceSchedule(s)
MaintenanceService
IntervalMaintenanceProcedure
Aftertherst25hours•Changetheoil.
Beforeeachuseordaily
•Checktheengine-oillevel.
•Checktheairlter.
•Checktheconditionoftheteeth;rotateorreplaceanythatarewornordamaged
andtorquethenutsforallteeth.
•Removedebrisfromthemachine.
Every25hours•Checkthedrivebelttension.
Every50hours•Servicetheairlter.
Every100hours
•Changetheoil.
•Cleanthesedimentcup.
•Checkthesparkplugs.
Every200hours•Replacetheairlter.
Yearlyorbeforestorage•Changetheoil.
•Cleanthesedimentcup.
Important:Refertoyourengineowner’smanualforadditionalmaintenanceprocedures.
EngineMaintenance
ServicingtheAirCleaner
ServiceInterval:Beforeeachuseordaily
Thecycloneairltercollectsthelargestcontaminantparticles,
whichcollectinthecontainer.Whenyoucanseealayerof
dirtatthebottomofthecontainer,cleanthecyclonehousing,
airchannels,andairintakescreen.
ServicingtheCycloneAirFilter
ServiceInterval:Every50hours
1.Removethe3screwsholdingthecyclonehousing.
2.Removethehousingwiththeairintakescreenand
removetheairchannels.
Figure14
1.Cyclonehousing3.Airchannels
2.Screw4.Cyclonehousingwithair
intakescreen
Note:Theairchannelsmayremainintheupper
portionorfollowalongwiththehousingwhen
removed.
14

3.Cleanthecomponentswithwater,detergent,anda
brushthendrythecomponentscarefully.
4.Placetheairchannelsinthecyclonehousing.
5.Insertcyclonehousingintopositionandmakesureit
tsintheupperportion.
Note:Donotuseforce;alignitinplacebeforetting
thescrews.
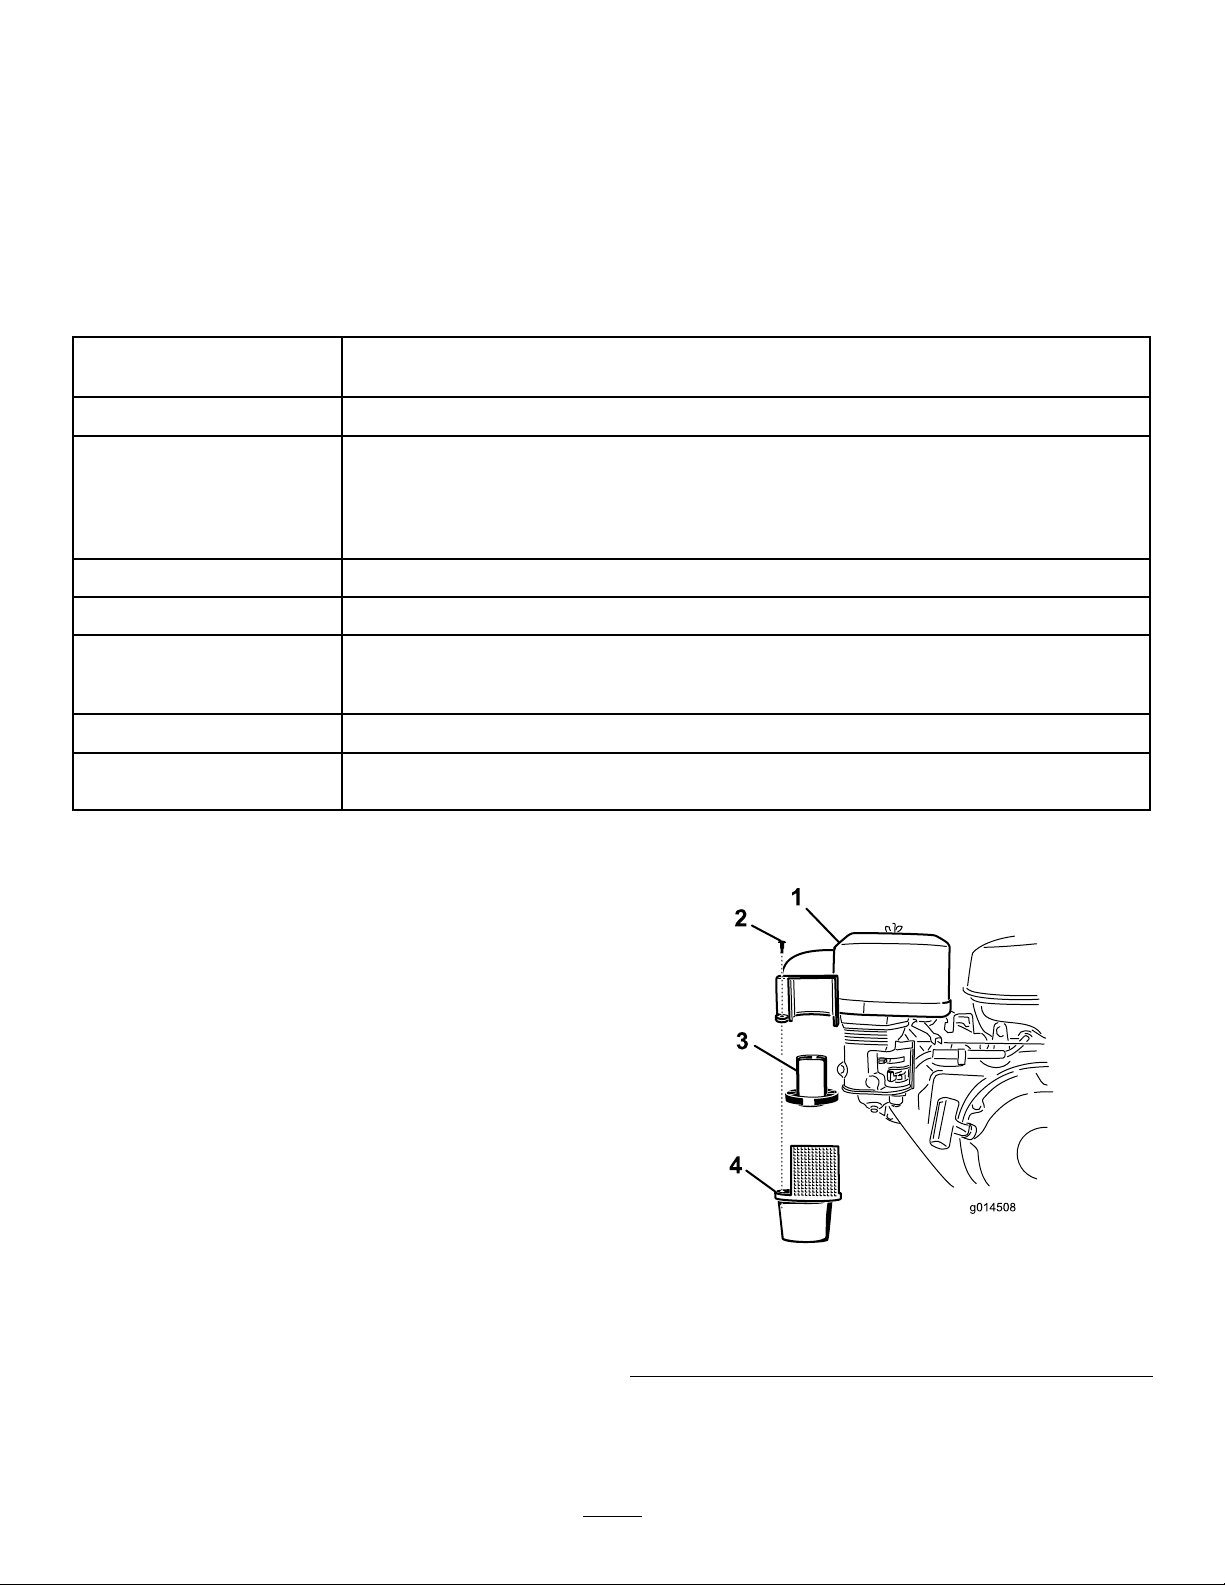
ReplacingtheAirFilter
ServiceInterval:Every200hours
Iftheengineislowonpower,producesblacksmokeorruns
unevenly,theairltermaybeclogged.
1.Removethewingnutandliftoffthecyclonelterwith
theair-ltercowling(Figure15).
Figure15
1.Wingnut4.Airlter
2.Cycloneairlter5.Stud
3.Foampre-lter
2.Removethefoampre-lterandcleanitasfollows
A.Washthepre-lterusingamilddetergentand
water.
B.Squeezeitdrywithacleancloth.
C.Soakitwithnewengineoil.
D.Gentlywindthelterinanabsorbentclothand
squeezeoutexcessoil.
3.Removethewingnutontopoftheairlterand
removethepaperlter.
4.Tapthepaperlteragainstaxedsurfacetoremove
dust.Ifthepaperlterisstilldirtyordamaged,replace
it.
Important:Donotusecompressedairtoblow
outthepaperelement,thiscandamageit.
5.Mountthepaperlterintheairlterhousingand
secureitwiththewingnut.
6.Positionthefoampre-lteroverthepaperlter.
7.Installthecyclonelterwiththeairltercoverand
secureitwiththewingnut.
ServicingtheEngineOil
Note:Changetheoilmorefrequentlywhentheoperating
conditionsareextremelydustyorsandy.
OilType:DetergentoilwithanAPIserviceofSJorhigher.
CrankcaseCapacity:0.6L(0.63qt)
Viscosity:SAE10W-30isrecommendedforgeneraluse.
ChangingtheEngineOil
ServiceInterval:Aftertherst25hours
Every100hours
Yearlyorbeforestorage
1.Starttheengineandletitrun5minutes.Thiswarms
theoilsoitdrainsbetter.
2.Parkthemachinesothatthedrainsideisslightlylower
thantheoppositesidetoensurethattheoildrains
completely.
3.Settheparkingbrakeandshutofftheengine.
4.Placeapanundertheoildrainhole.
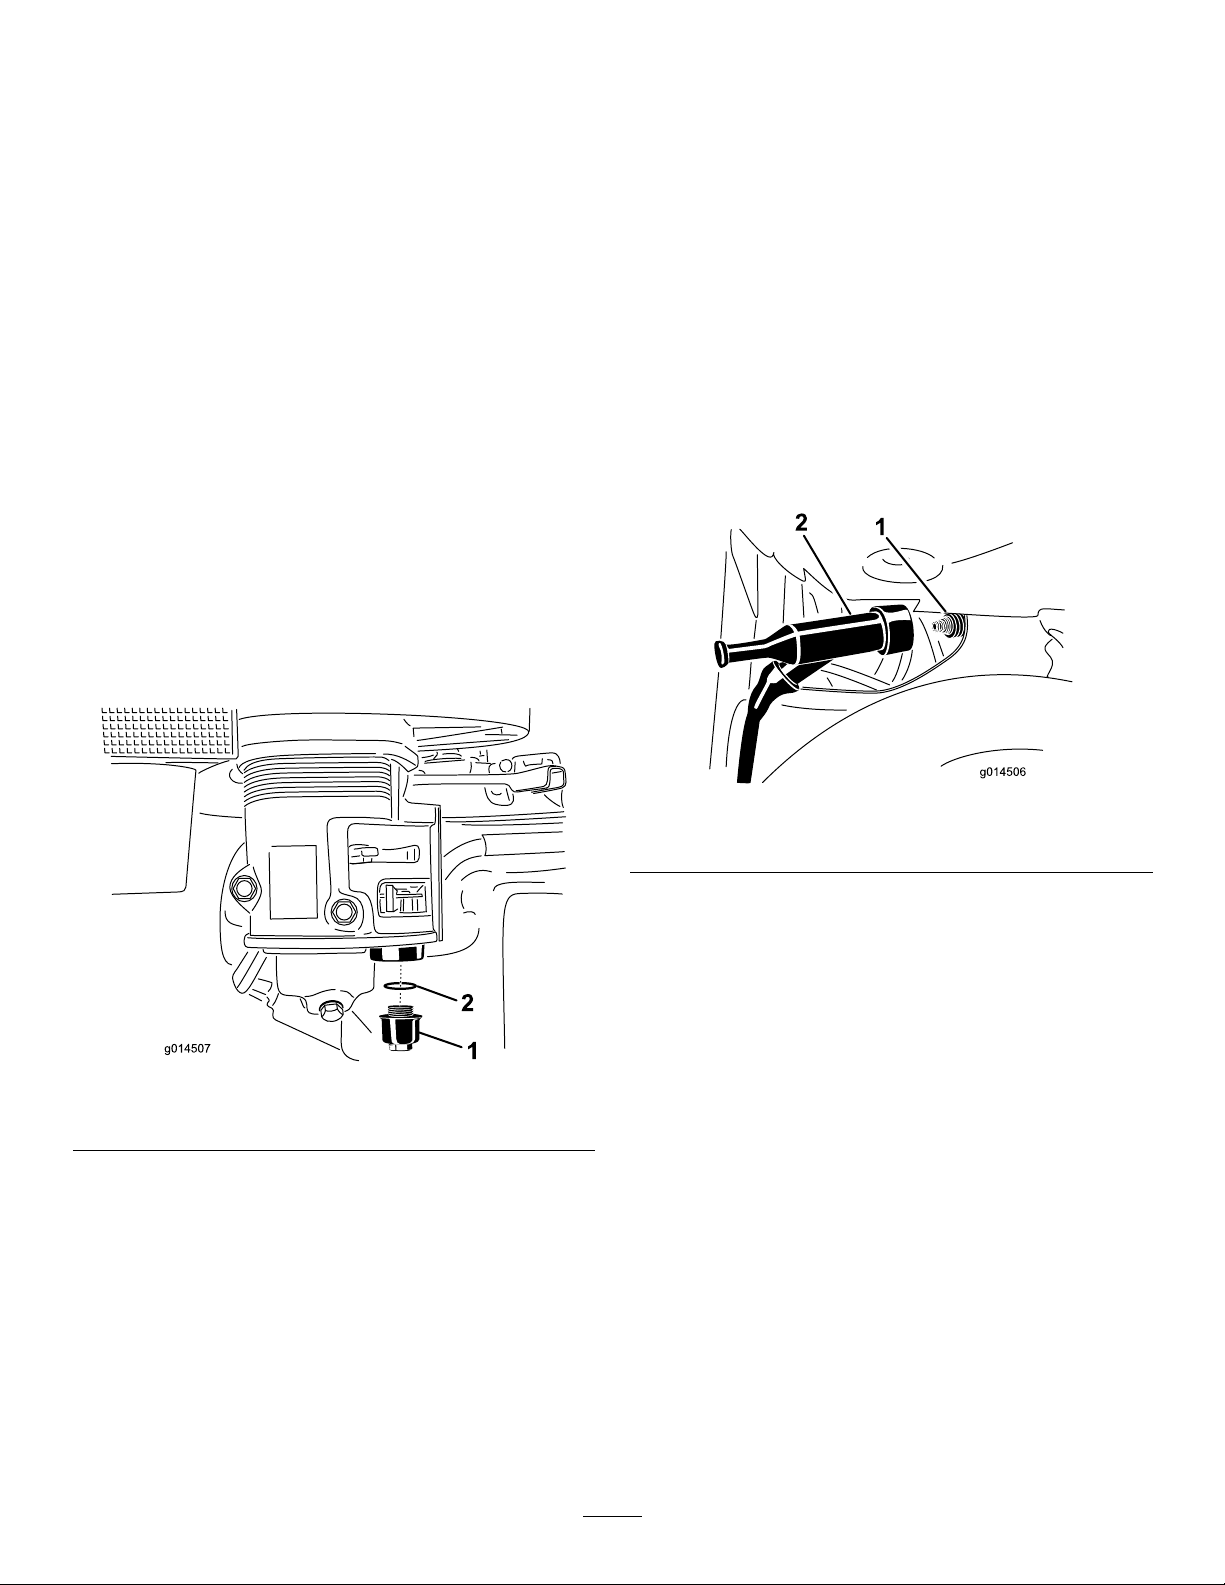
5.Removethedrainpluganddraintheoilthroughthe
holeslotintheframe(Figure16).
g014504
1
2
Figure16
1.Oildrainhole2.Oilllcap
15
6.Whentheoilhasdrainedcompletely,installtheplug
andwipeupanyspilledoil.
Note:Disposeoftheusedoilatacertiedrecycling
center.
7.Removetheoilllcapandslowlypourapproximately
80percentofthespeciedamountofoilintothe
engine(Figure16).
8.Slowlyaddadditionaloiltobringtheoilleveltothe
upperlimitmarkonthedipstick.RefertoCheckingthe
Engine-OilLevel(page11).
9.Installtheoilllcap.
CleaningtheSedimentCup
ServiceInterval:Every100hours
Yearlyorbeforestorage
Underneaththefuelvalveisasedimentcuptocatchdirtin
thefuel.
1.MovethefuelvalvetotheOFFposition,alltheway
totheleft.
2.Unscrewthesedimentcup.Makesurenottomisplace
theO-ring(Figure17).
Figure17
1.Sedimentcup2.O-ring
3.CleanthereservoirandtheO-ringusingacleaning
solventanddrycarefully.
Note:MakesurenottomisplacetheO-ring.
4.PuttheO-ringinplaceinthegrooveofthecupand
replacethesedimentcup.
5.TurnthefuelvalvetotheONposition,allthewayto
theright,andcheckforleaks.
Note:Ifitleaks,replacetheO-ring.
ServicingtheSparkPlug
ServiceInterval:Every100hours—Checkthesparkplugs.
Ensurethattheairgapbetweenthecenterandsideelectrodes
iscorrectbeforeinstallingthesparkplug.Useasparkplug
wrenchforremovingandinstallingthesparkpluganda
gappingtool/feelergaugetocheckandadjusttheairgap.
Installanewsparkplugifnecessary.
Type:BPR6ES(NKG)orequivalent
AirGap:0.70to0.80mm(0.28to0.031inch)
RemovingtheSparkPlug
1.Lowerthegrinderandshutoffthemachine;Referto
ShuttingOfftheEngine(page12).
2.Pullthewireoffthesparkplug(Figure18).
Figure18
1.Sparkplug2.Wire
3.Cleanaroundthesparkplug.
4.Removethesparkplugandthemetalwasher.
16
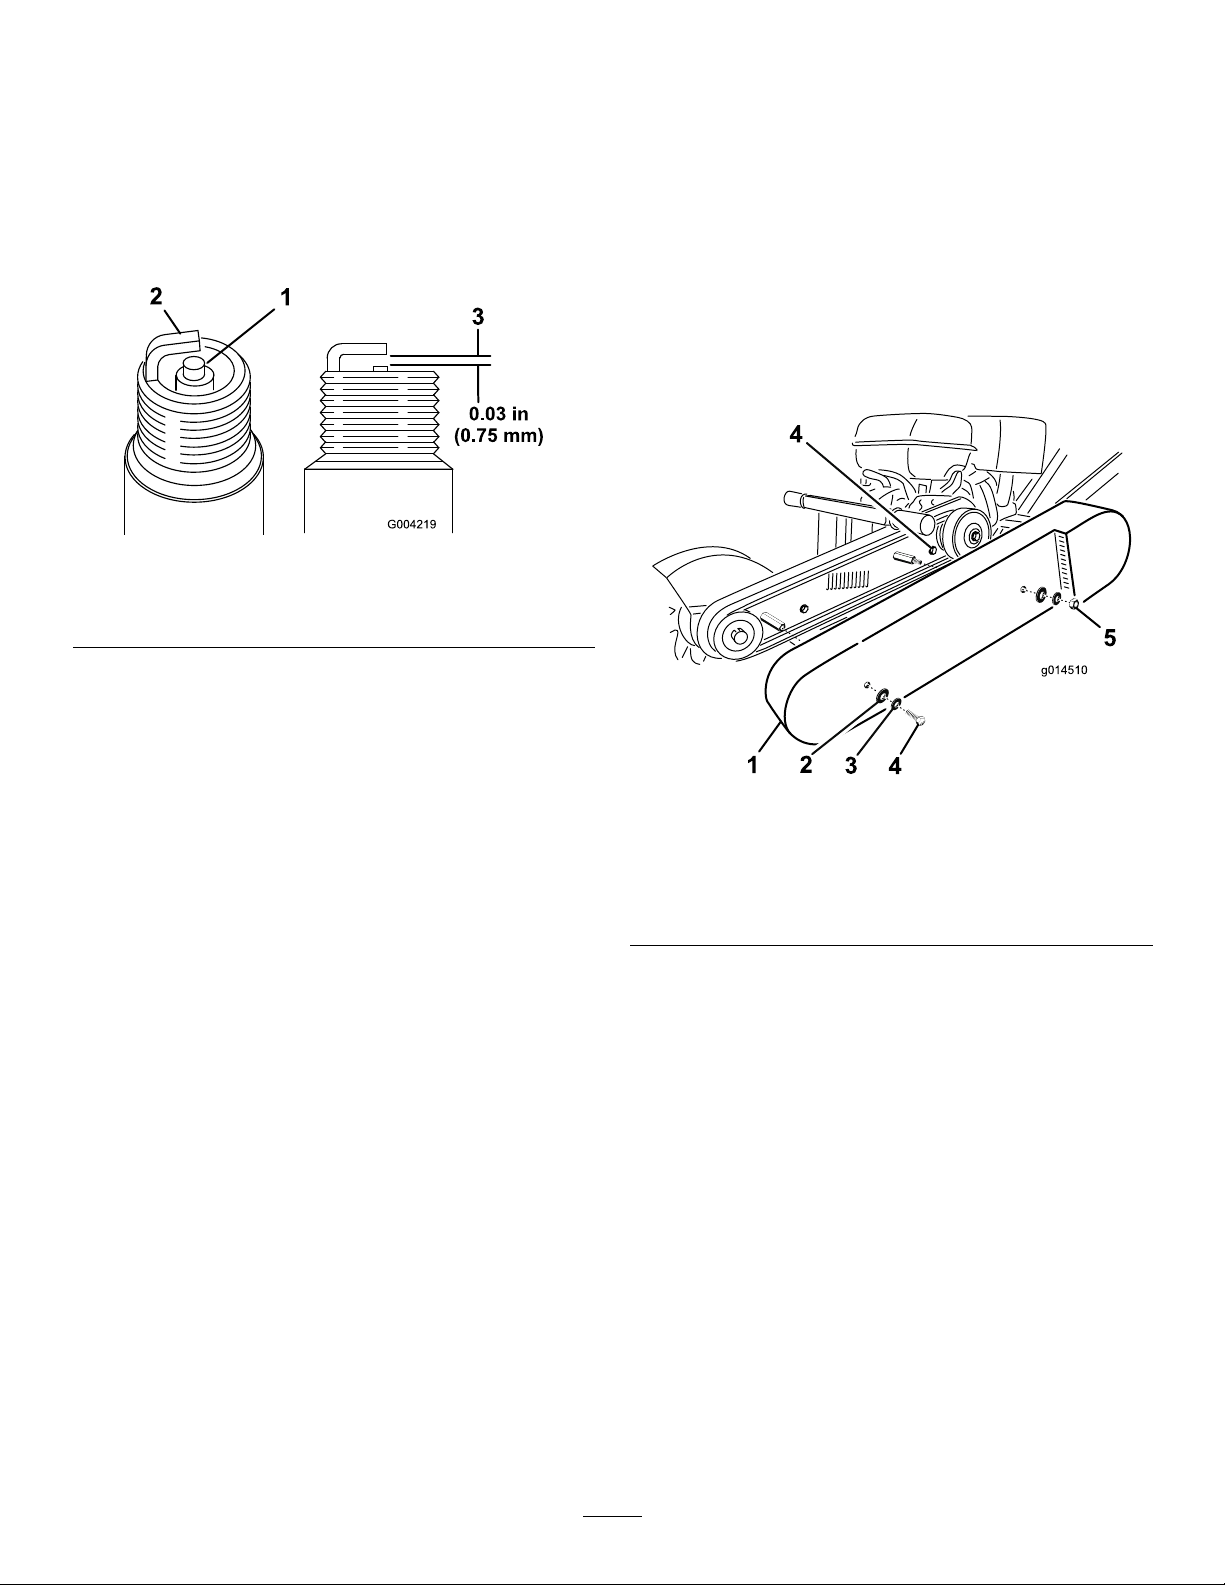
CheckingtheSparkPlug
1.Lookatthecenterofthesparkplug(Figure19).Ifyou
seelightbrownorgrayontheinsulator,theengineis
operatingproperly.Ablackcoatingontheinsulator
usuallymeansthattheaircleanerisdirty.
Important:Donotcleanthesparkplug.Always
replacethesparkplugwhenithasablackcoating,
wornelectrodes,anoilylm,orcracks.
Figure19
1.Centerelectrodeinsulator3.Airgap(nottoscale)
2.Sideelectrode
2.Checkthegapbetweenthecenterandsideelectrodes
(Figure19).Bendthesideelectrode(Figure19)ifthe
gapisnotcorrect.
InstallingtheSparkPlug
1.Threadthesparkplugintothesparkplughole.
2.Tightenthesparkplugto20ft-lb(27N-m).
3.Pushthewireontothesparkplug.
BeltMaintenance
CheckingtheDriveBelt
Tension
ServiceInterval:Every25hours
Note:Replacethebeltifitshowsanysignsofwear,cracks,
ordamage.
1.Shutofftheengineandwaitforallrotatingpartsto
stop.
2.Removebeltguardretainingscrews(Figure20).
g014510
1234
5
4
Figure20
Yourmodelmayvary
1.Beltguard4.Bolt
2.Lockwasher5.Nut
3.Washer
3.Tocheckbelttension,gentlysqueezethebeltspans
together.Youshouldbeabletopushthebeltdown
about6to10mm(1/4to3/8inch)fromtheoriginal
position.
Important:Toextendthebeltlife,propertensionmust
bemaintained.Aloosebeltwillcauseexcessivecutting
wheelslippageandearlybeltfailure.Abeltthatistoo
tightcancausebearingandshaftfailure,andrapidbelt
wear.
17
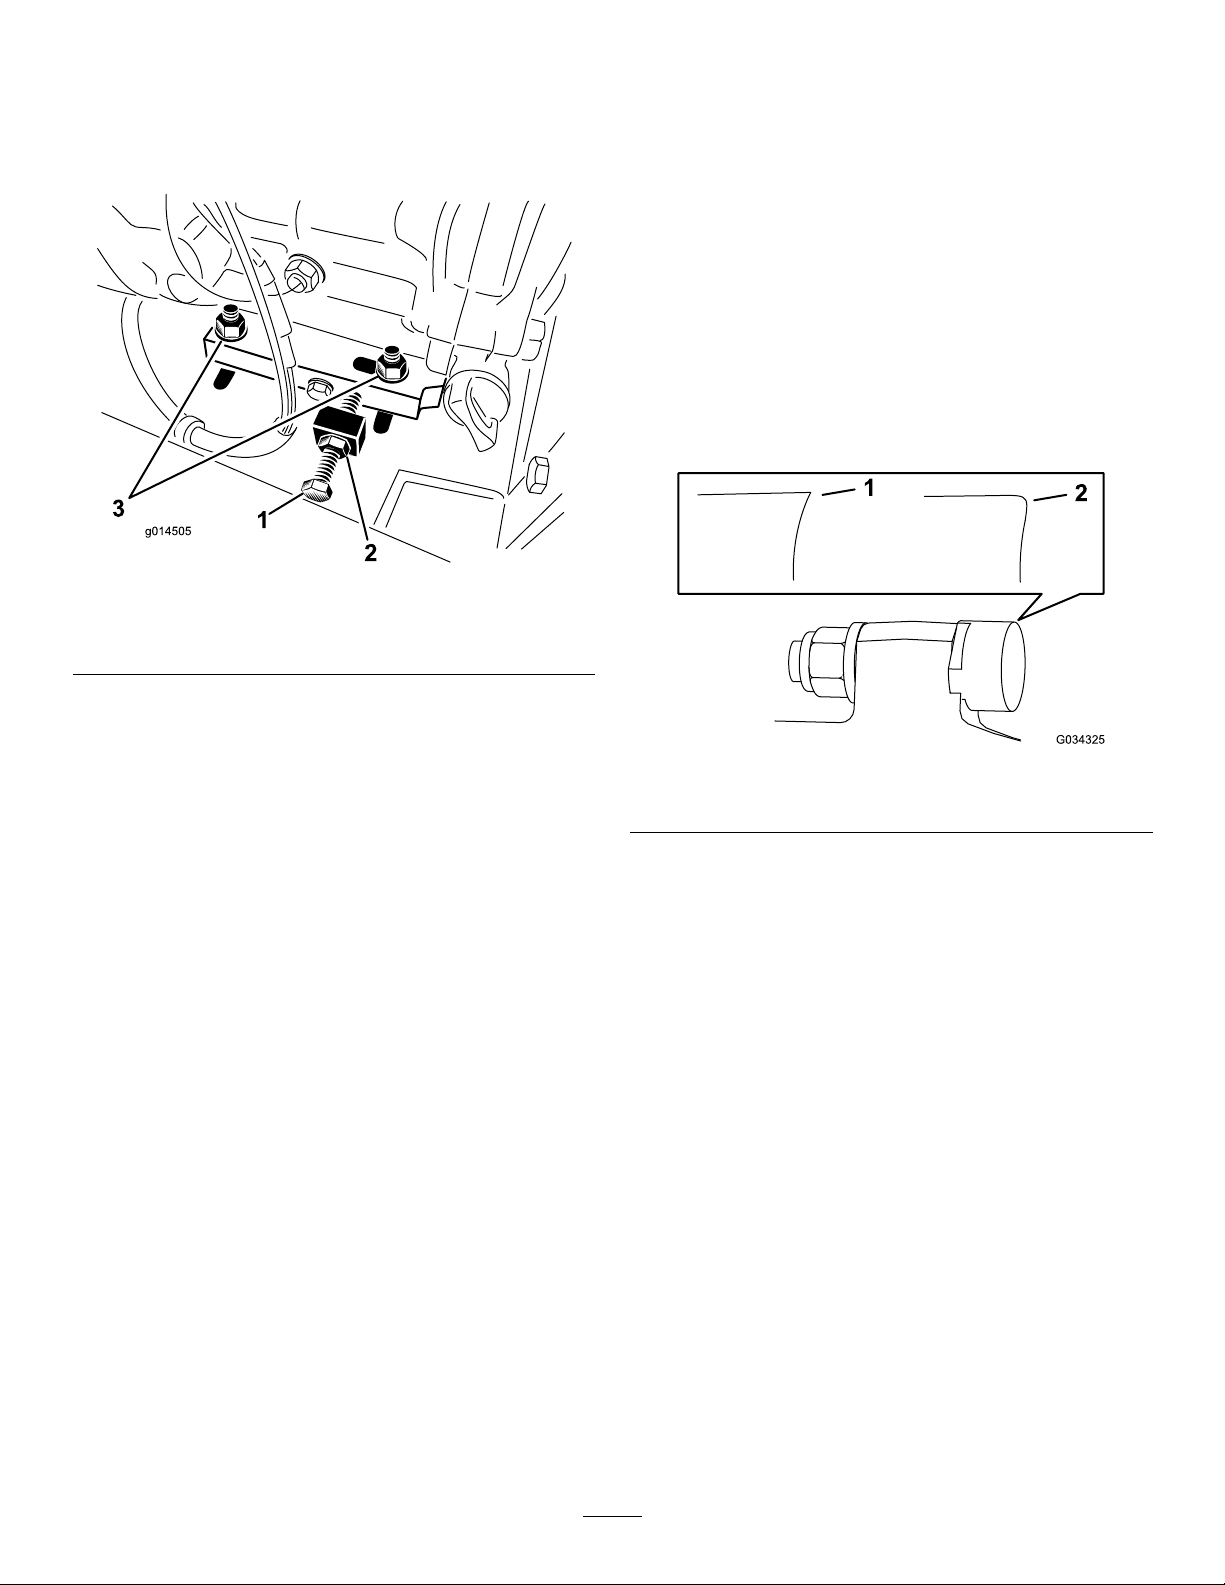
AdjustingtheDriveBelt
1.Removethebeltguard.
2.Loosenthe4enginemountingbolts,andjamnuts
holdingtheadjustmentbolt(Figure21).
Figure21
1.Bolt3.Enginemountbolt
2.JamNut
3.Turnthesquareheadadjustingboltontheframe
clockwisetotightenthebelt;turnitcounterclockwise
toloosenthebelt.
Important:Important:Makesuretotighten
allengineboltsafterproperbeltadjustmentis
achieved.
4.Installthebeltguardandsecurewithpreviously
removedhardware.
GrinderMaintenance
ReplacingtheTeeth
ServiceInterval:Beforeeachuseordaily—Checkthe
conditionoftheteeth;rotateorreplace
anythatarewornordamagedandtorque
thenutsforallteeth.
Duetothehighamountofwearplacedontheteeth,you
willneedtorotateandreplacethemperiodically(Figure22).
Beforeyourotateorreplacethem,inspecteachtoothholder
onthewheel,includingtheatlandsthatpreventtheteeth
fromrotating.Ifthetoothholderisdamaged,replacethe
wheel.Torquethenuts68N∙m(50ft-lb)foranyteeththat
youarenotrotatingorreplacing.
Figure22
1.Sharptooth2.Worntooth
Eachtoothisindexedwith3positionssoyoucanrotate
ittwice,exposinganewsharpedgebeforereplacingthe
tooth.Torotateatooth,loosenthenutsecuringthetooth
(Figure23).Pushthetoothforwardandrotateit1/3ofa
turn,bringinganunusededgetotheoutside.Torquethenut
securingthetoothto68N∙m(50ft-lb).
Toreplaceatooth,removethenutsecuringthetooth,then
installanewtooth,washer,andnutinthesameposition
(Figure23).Torquethenutsecuringthetoothto68N∙m
(50ft-lb).
18
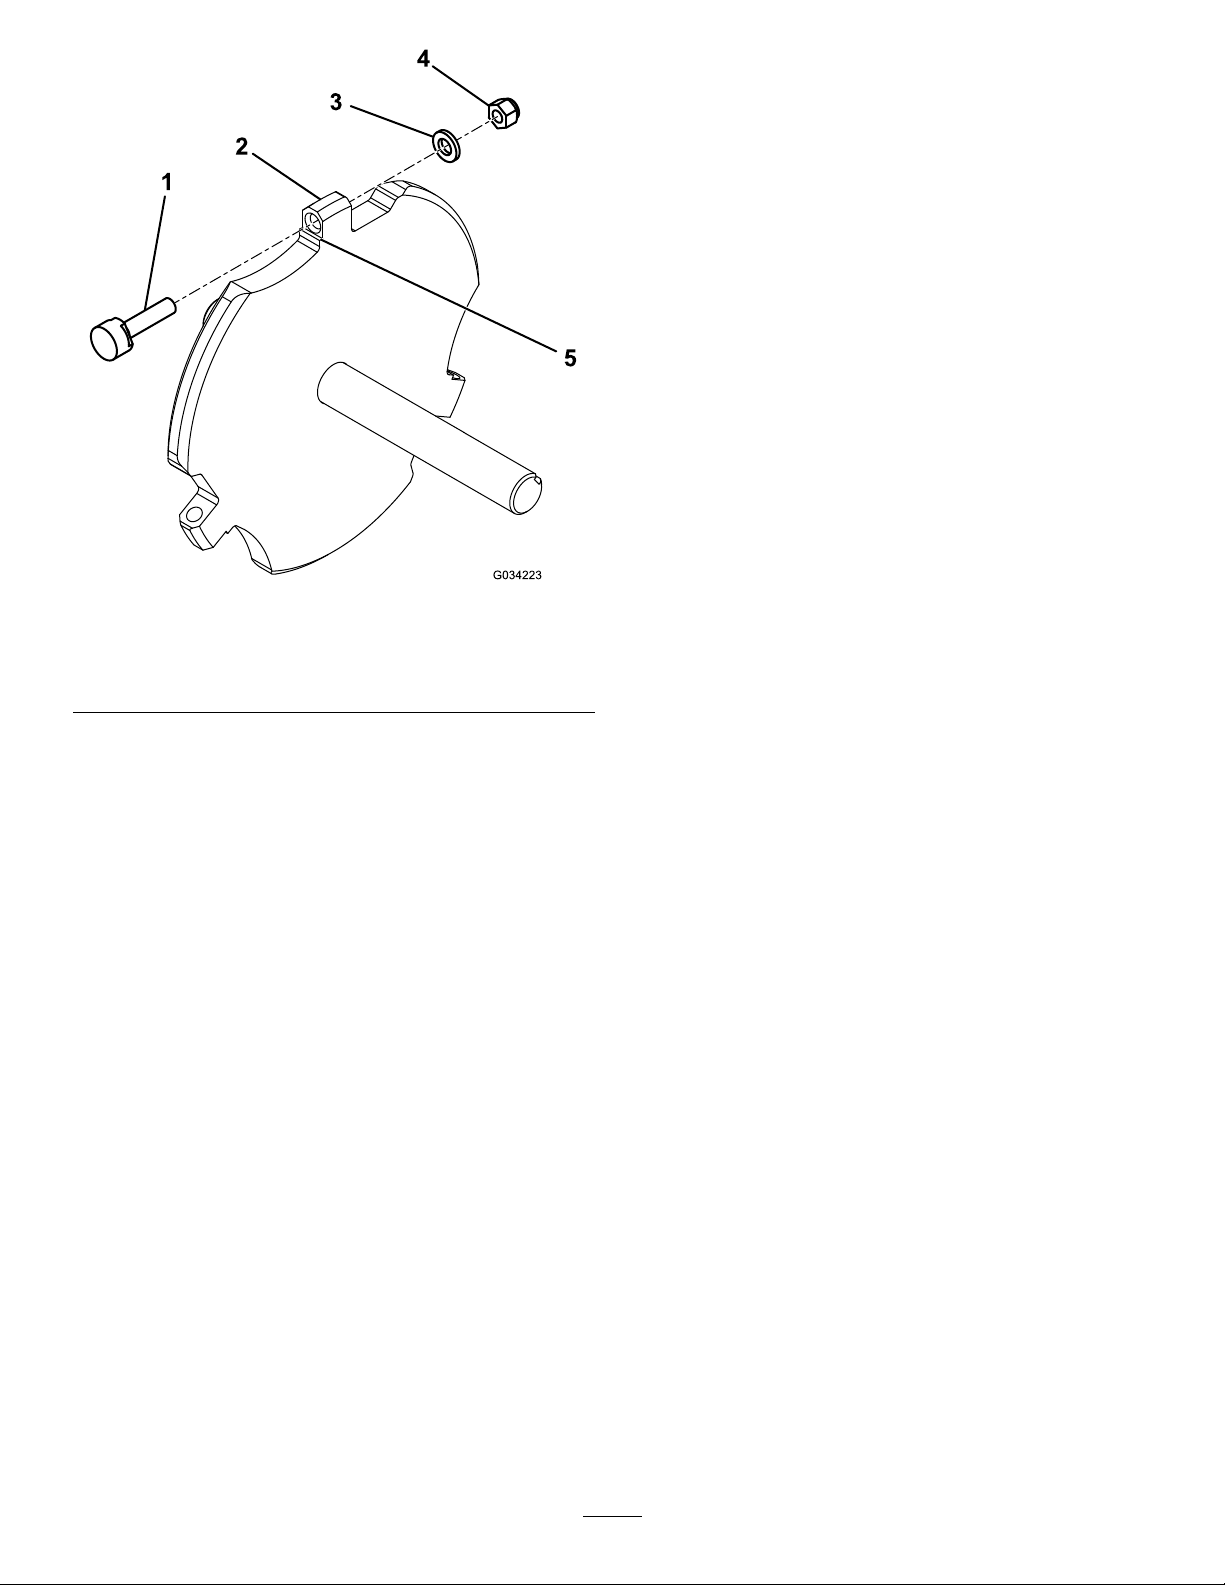
Figure23
1.Tooth4.Nut
2.Toothholder5.Flatland
3.Washer
Cleaning
RemovingDebrisfromthe
Machine
Regularcleaningandwashingwillincreasethelifespanof
themachine.Cleanthemachinedirectlyafteruse,beforethe
dirthardens.
Checkbeforecleaningthatthefueltankcapisproperlyin
placetoavoidgettingwaterinthetank.
Usecarewhenusingahigh-pressuresprayerbecauseitcan
damagewarningdecals,instructionsigns,andtheengine
Important:Lubricatethecuttingwheelbladebearings
aftercleaning.
19

Storage
StoringtheMachine
Forstorageover30days,preparetheunitasfollows:
1.Removedirtandgrimefromtheexternalpartsof
theentireunit,especiallytheengine.Cleandirtand
sawdustchipsfromtheoutsideoftheenginecylinder
headnsandblowerhousing.
Important:Youcanwashtheunitwithmild
detergentandwater.
2.Addapetroleumbasedstabilizer/conditionertofuel
inthetank.Followmixinginstructionsfromstabilizer
manufacturer.(7.8mlperLor1ozperUSgallon).
Donotuseanalcoholbasedstabilizer(ethanolor
methanol).
Note:Fuelstabilizer/conditionerismosteffective
whenmixedwithfreshgasolineandusedatalltimes.
Important:Donotstorestabilizer/conditioned
gasolineover90days.
3.Runtheenginetodistributeconditionedfuelthrough
thefuelsystem(5minutes).
4.Shutofftheengine,allowittocool,anddrainthe
fueltankusingapumptypesiphon.Disposeoffuel
properly;recycleasperlocalcodes.
5.Starttheengineandrunituntilitstops.
6.Choketheengine.
7.Startandruntheengineuntilitdoesnotstartagain.
8.Cleanthesedimentcup;refertoCleaningtheSediment
Cup(page16).
9.Servicetheaircleaner;refertoServicingtheAir
Cleaner(page14).
10.Changetheenginecrankcaseoil;refertoChangingthe
EngineOil(page15).
11.Removethesparkplugandcheckthecondition;refer
toServicingtheSparkPlug(page16).
12.Withthesparkplugremovedfromtheengine,pour2
tablespoonsofengineoilintothesparkplughole.
13.Pullthestarterslowlytocranktheengineanddistribute
theoilinsidethecylinder.
14.Installthesparkplug,butdonotinstallthewireon
thesparkplug.
15.Checkandtightenallbolts,nuts,andscrews.Repairor
replaceanypartthatisdamaged.
16.Paintallscratchedorbaremetalsurfaceswithpaint
availablefromyourAuthorizedServiceDealer.
17.Storetheunitinaclean,drygarageorstoragearea.
18.Covertheunittoprotectitandkeepitclean.
20
Other manuals for SGR-6 22600
1
This manual suits for next models
1
Table of contents
Other Toro Grinder manuals


Popular Grinder manuals by other brands


Heiniger
Heiniger CombiGrinder Translation of the original instructions

Makita
Makita GA7050 instruction manual

Silverline
Silverline DIY 650W manual

EINHELL ERGO TOOLS
EINHELL ERGO TOOLS E-WS 2200 Original operating instructions

Full Boar
Full Boar FBCG-14125 instruction manual

Hitachi
Hitachi G 12VA Handling instructions


