Cleaning
andMaintenance
Important:
Before
carryingoutmaintenanceontheoven,itmustalwaysbeswitchedoff.
Thestainlesssteelandenameledparts
will
keeptheir
finish
ifcleaned
with
wateror
using
specificproducts,
drying
them
thoroughly.
Avoid
usingproductsthatcontainchlorineor
diluted
chlorinesolutions,caustic
soda,
abrasivedetergents,hydrochloricacid,vinegarandotherproductsthatcanscratch.
Stains
left
onthebottomofthe oven
(sauces,
sugary
substances,
eggwhiteandfats)
are
caused
by
spatters
orspillageof
food.
Spatteringoccoursduringroastingandis
duetothetemperaturebeingtoo
high
whereas
spilling
isduetocontainersbeingtoo
small
orthe
food
increasinginvolumeduringcooking.
These
twoproblemscanbesolved byusinghigh-sidedcontainersorbyusingthe
dripping
pansupplied
with
the oven.Whencleaningthelowerpartoftheoven,you
areadvisedtoremoveanystains
while
the ovenis
still
warm-the longeryou
wait,
the
more
difficult
it
will
beremovethem.
Immediately
afteruse
while
theoven is
still
warmbutswitchedoff,youarealso
advisedtoplacea
cloth
soakedinammonia-a fewdrops are
sufficient-
onthebottom
of
theoven.Close the ovendoor,
wait
approximately10minutesandthendry
thoroughly.
Use
onlyNon
Causic
Ovencleaners
Technical
support
If
theoven
does
not
work
correctly,youareadvisedtocheckthe
following
before
calling
thetechnicalsupportservice:
*CHECK
THA
T THE
CIRCUIT
BREAKS
OR
FUSE
IS
INTACT.
*CHECK
THE
PROGRAMMING
OF THE
ELECTRONIC
PROGRAMMER.
If
the
cause
ofthe
fault
isnot
identified,
switch
theapplianceoff,donottamper
with
it
and
call
TechnicalSupportService,specifyingthe modelindicatedonthe
identification
plateatthe bottomofthe
front
oftheoven.
Theapplianceisprovided
with
a
guarantee
certificate
which
entitlesthe
user
tofreeuse
of
the
TECHNICAL
SUPPORT
SERVICE
fortwo
years
from
the
date
ofpurchase.The
guarantee
certificatemust be
filled
outandkeptsothatitcanbeshowntothe
TECHNICAL
SUPPORT
SERVICE
or
AGENT.
8
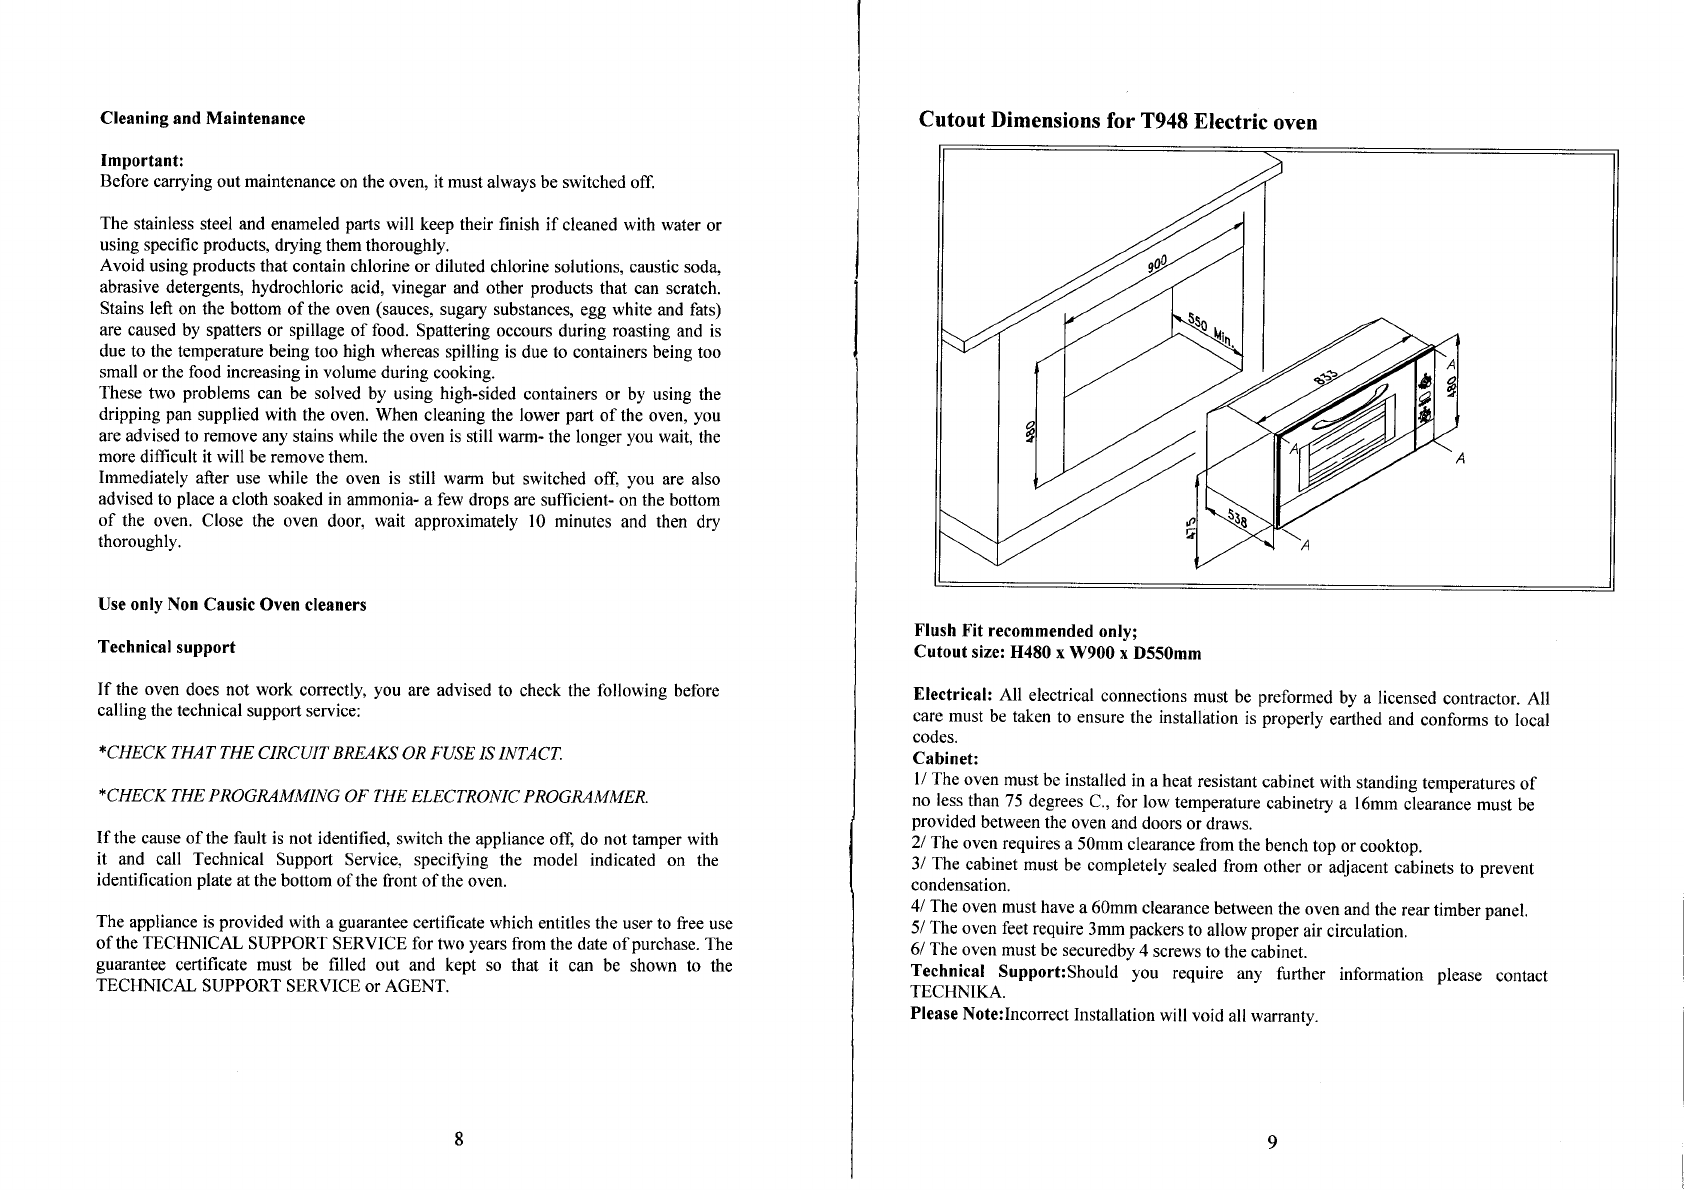
Cutout
Dimensionsfor
T948
Electric
oven
Flush
Fitrecommendedonly;
Cutout
size:H480x W900x D550mm
Electrical:
All
electricalconnectionsmustbepreformedbya licensedcontractor.All
care
mustbetakento
ensure
theinstallationisproperlyearthedandconformsto
local
codes.
Cabinet:
1/
Theovenmustbeinstalledina
heat
resistantcabinet
with
standingtemperaturesof
no
less
than75
degrees
C,forlowtemperaturecabinetrya 16mmclearancemustbe
provided
betweentheovenanddoorsordraws.
21
Theovenrequiresa 50mmclearance
from
thebenchtoporcooktop.
3/Thecabinetmustbecompletelysealed
from
otheroradjacentcabinetstoprevent
condensation.
4/
Theovenmust havea 60mmclearancebetweenthe ovenandthereartimberpanel.
5/Theovenfeetrequire3mmpackersto
allow
properair
circulation.
6/Theovenmustbesecuredby4 screwstothecabinet.
Technical
SupporUShouldyourequireanyfurther
information
please
contact
TECHNIKA.
PleaseNote:Incorrect
Installation
will
void
allwarranty.
9