Technika STBHDV2010 User manual

USER MANUAL
Digital TV Receiver
STBHDV2010
For assistance, please call our Tesco Electrical Helpline on 0845 4566767

English- 1-
Contents
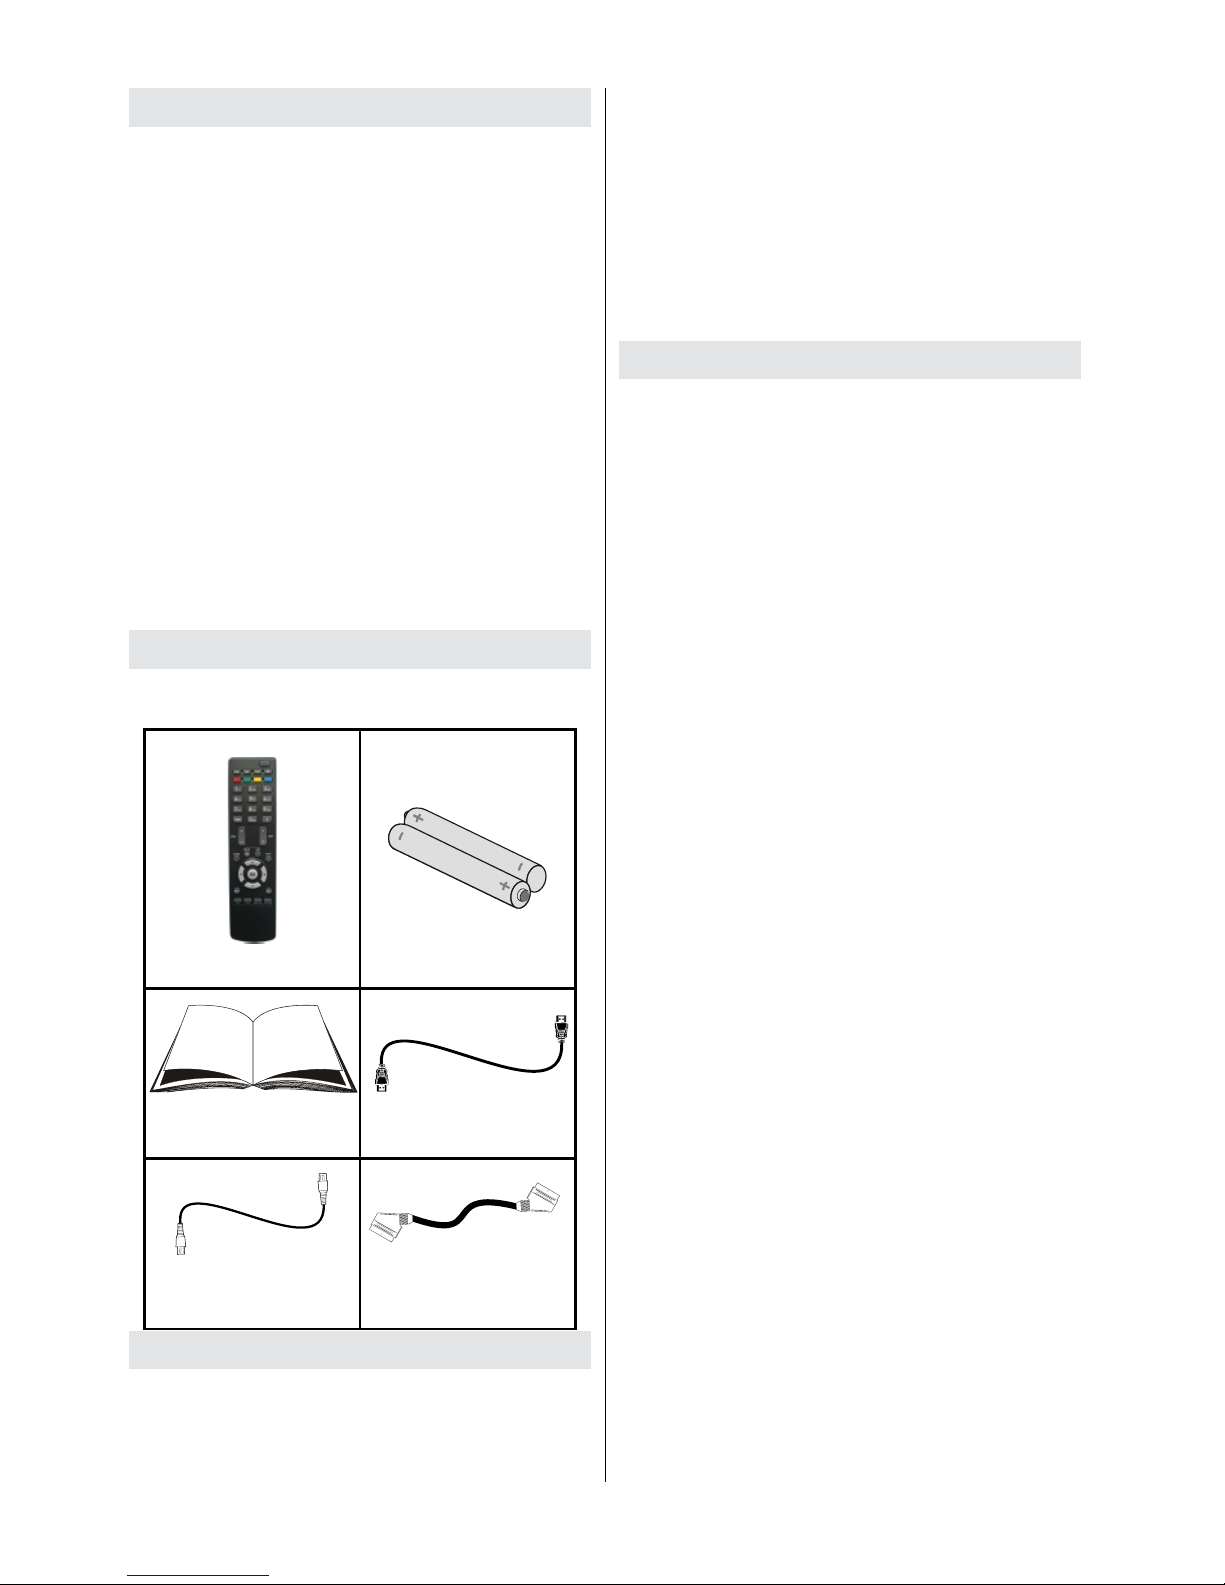
Accessories ............................................................2
Introduction.............................................................2
SafetyPrecautions.................................................2
Overview of theRemoteControl............................4
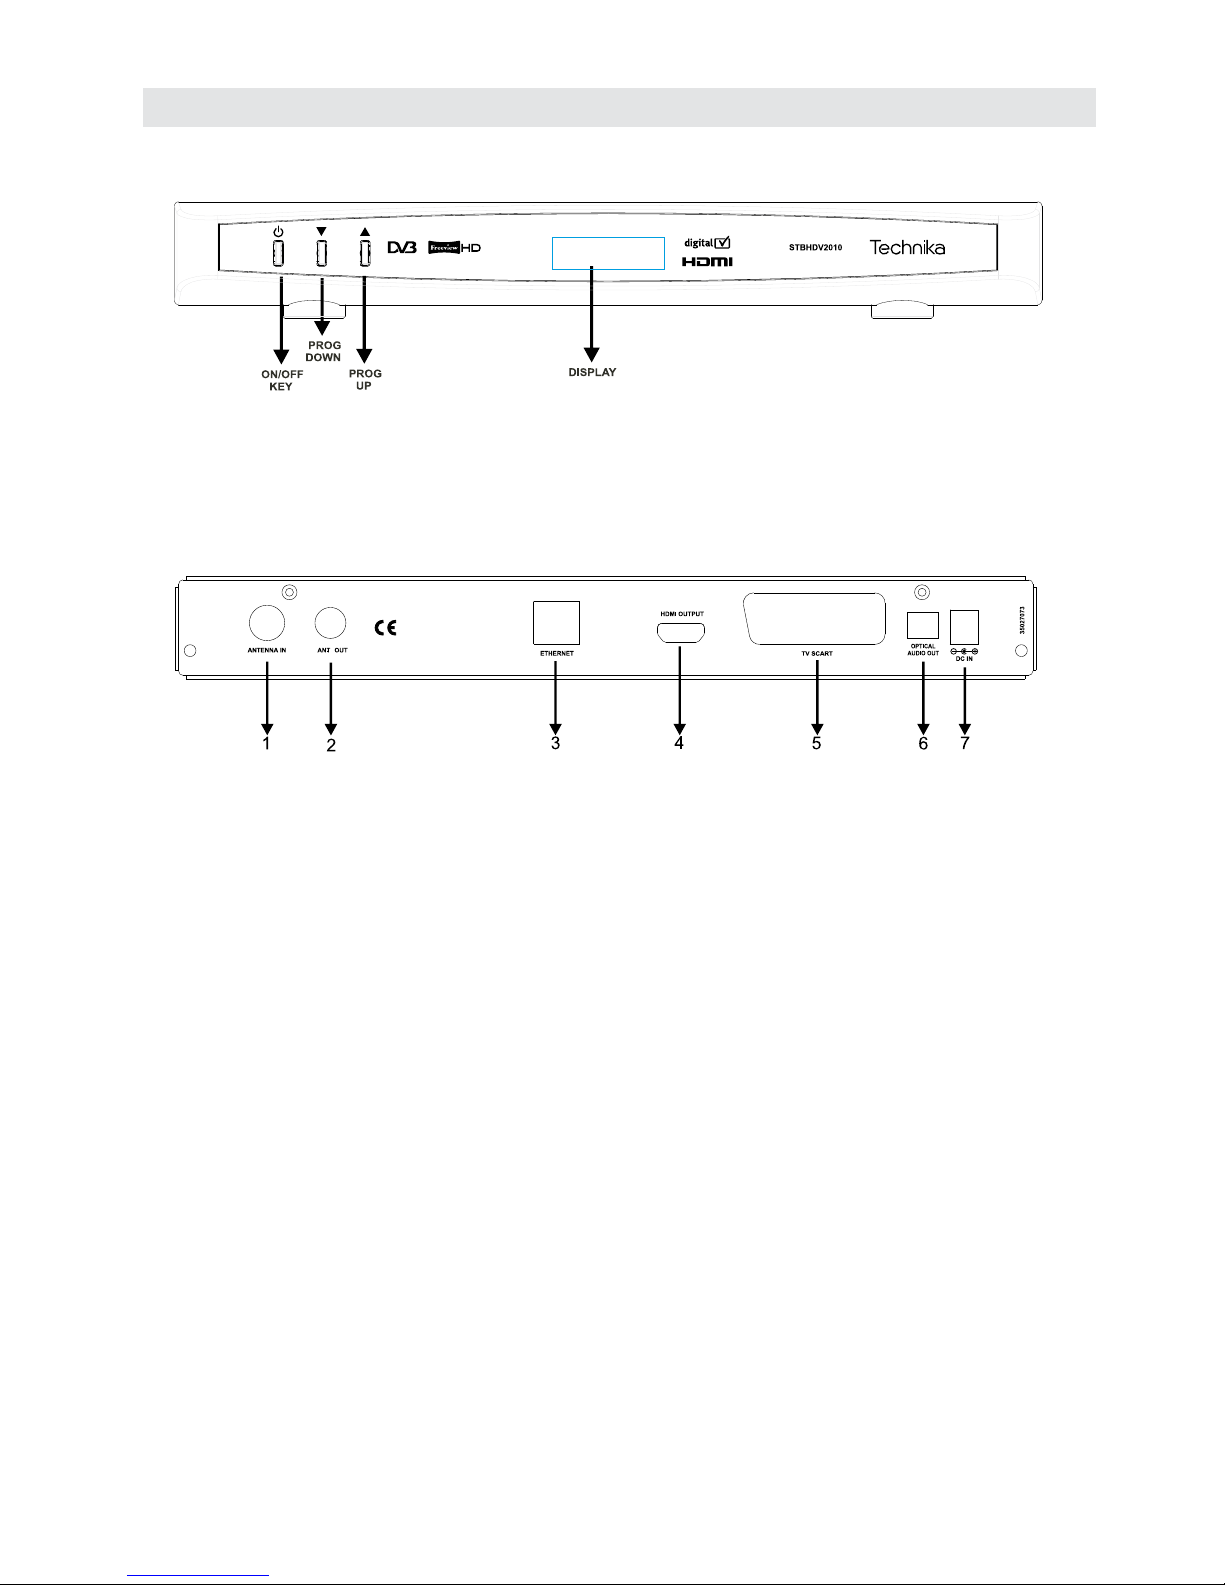
ViewingControlsandConnectionsof theSet-Top-
Box.........................................................................5
Front Panel.........................................................5
RearPanel..........................................................5
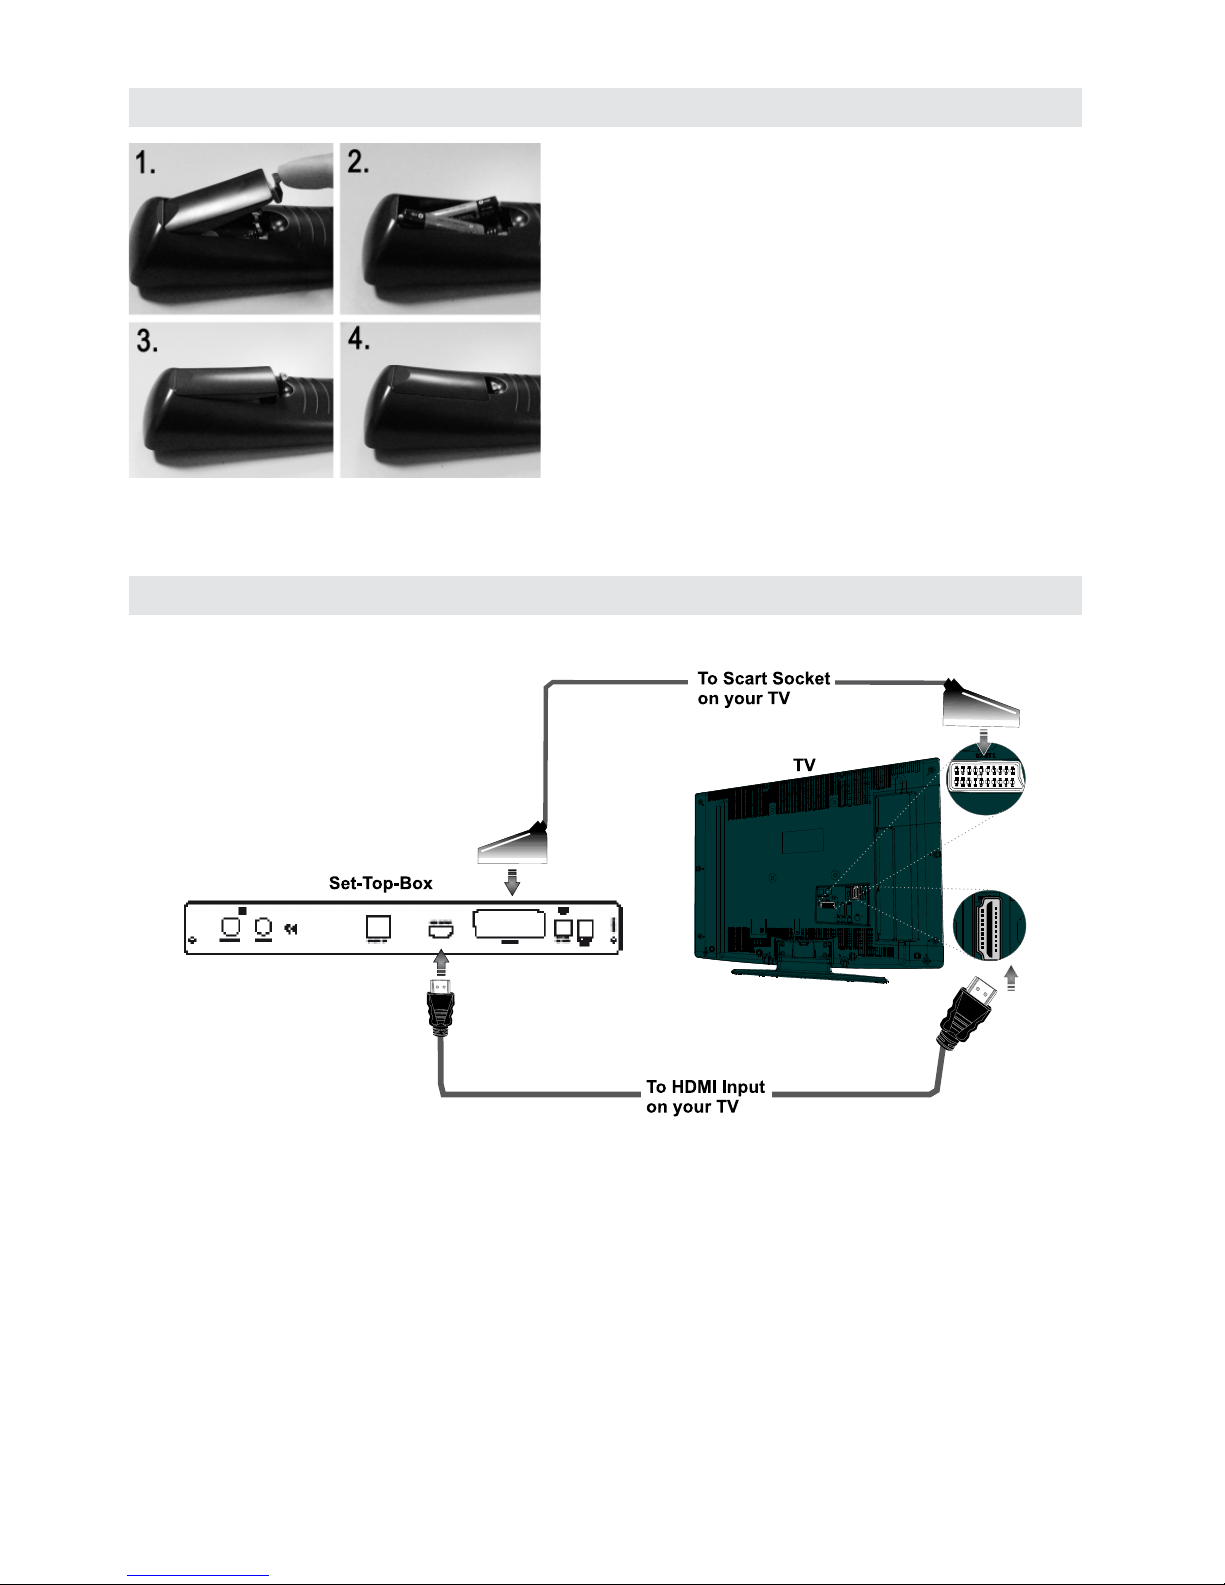
InsertingBatteriesintheRemoteControl...............6
ConnectingtheSet-TopBoxtoaTV Set................6
Antenna Connection...............................................7
Power On-Off..........................................................7
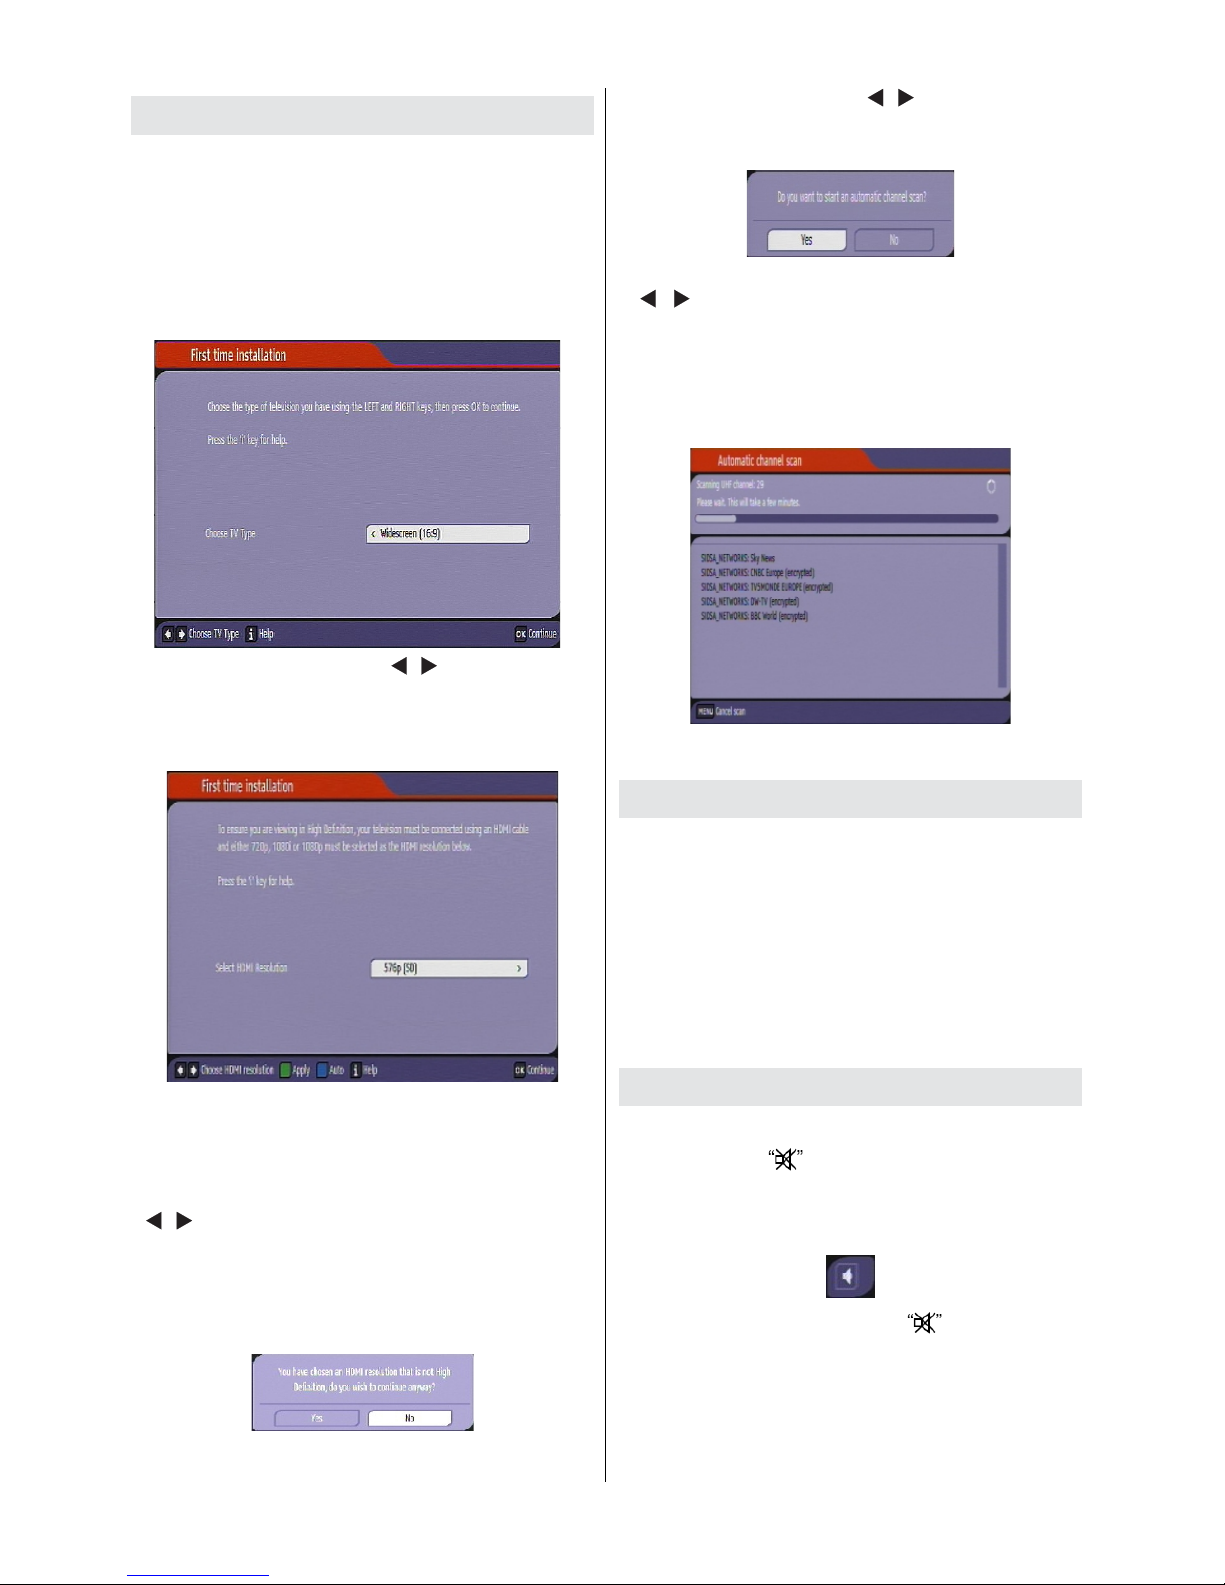
FirstTimeInstallation..............................................8
ChangingChannels................................................8
AdjustingtheVolume..............................................8
Mute....................................................................8
On-ScreenInformation...........................................9
Menu System..........................................................9
ViewingtheMainMenu ......................................9
InformationBanner.............................................9
SelectingaSpeci cChannel..............................9
Operating the ChannelList...............................10
Moving aChannel.............................................10
Deleting Channels ...........................................10
RenamingChannels........................................10
AddingLocks toChannels...............................10
SettingFavourites............................................10
EventOptions....................................................11
Select Channel& Exit....................................11
Con guration .....................................................11
Activechannels.............................................12
ScanEncrypted............................................12
OutputSettings.............................................12
TVType ..................................................12
TVOut....................................................12
AC3Audio..............................................12
SPDIF Delay...........................................12
DigitalAudio...........................................12
HDMI Resolution ....................................12
HDMI HDCP...........................................12
Receiver Upgrade.........................................13
ParentalSettings..........................................13
Menu Lock..............................................13
Guidance................................................13
Set Pin....................................................13
LowPower....................................................13
AudioDescription..........................................13
LowPower..............................................13
AudioDescription...................................13
AvailableLangs......................................13
PreferredLanguage(Optional)...............14
Relative Volume(Optional).....................14
AutoSleep....................................................14
Con guringLanguagePreferences..................14
Preferred.......................................................14
Current(*).....................................................14
IPSettings ........................................................14
Installation.........................................................14
AutomaticChannelScan..............................14
ManualChannelScan ..................................15
FirstTimeInstallation....................................15
OSD Warning Messages........................................15
NoSignal..........................................................15
NoChannelsHaveBeenAddedYet.................15
DisplayingText.....................................................15
GeneralCharacteristics........................................17
HardwareCon guration........................................17
DigitalCapabilities ...............................................17
RemoteControl....................................................17
Tuners..................................................................17
Front Panel...........................................................17
Audio....................................................................18
DigitalAudio..........................................................18
A/ V& DataIn/Out.............................................18
TvScart ..............................................................18

English- 2-
Features
•DVBand VBIteletext.
•200channel.s
•DVB7dayseventinformation(7-daysEPG).
•TVscart (withRGB andCVBSsupport).
•HDMI output.
•Automatictuning.
•Favouritelist.
•Parentallockoptions.
•DVB-T2compliant.
•Manualand automaticsearchoptions.
•On-Screen-Display.
•Automaticday lightsavingtimeupdating.
•Decoding&Video Out: PAL.
•Multi-format audiodecoder.
•Multi languageaudiosupport (upto10).
•Audiomuteandvolumecontrol.
Accessories
Pleasemakesurethat the followingitems areincluded
withyour device.
RemoteController
Batteries
2X AAA
InstructionBook HDMI lead
RF lead SCART lead
Introduction
•Thank you forchoosing thisproduct.Thismanual
willguide youfortheproperoperationofyourset-
top-box.
•Beforeoperatingthe set-top-box,pleaseread this
manual thoroughly.Please do keep thismanual
inasafeplace forfuturereferences.Readthe
correspondinginstructionsofthishandbook priorto
the rstusageofthedevice,even when theusage
of electronicdevices isfamiliar toyou.
•NoticeespeciallythechapterSAFETYPRECAUTIONS
andINFORMATION.Carefullykeep thehandbookas
futurereference. When sellingthedeviceorgivingit
away, absolutely give thesedirection for use.
Safety Precautions
POWER: The receivershouldbeplugged intoa220-
240V AC 50Hzsupplyonly.
LEADS: Ensurethepowersupplylead,andallother
leads, arepositionedsotheyarenot likelytobe
walked onorpinched bythings placedon oragainst
them. Pay particularattention to the powerlead, where
itentersthemains plug andwhereitcomes outofthe
receiver.Donotconnectoradjustleads when the
receiver ispluggedin.
TEMPERATUREAND MOISTURE: Donotleaveor
use the receiverin ahot,coldor humidarea.Donot
allowthereceivertogetwet-from dripsorsplashes
-asthismay be dangerous.Donotplacewater- lled
objectssuch as owervases, on top ofthereceiver.
VENTILATION: Slotsand openings in thereceiver’s
coverareforventilation.Donotcoverorblockthem
asthiscouldleadtooverheating.
CLEANING: Unplugthereceiverbeforeit iscleaned.
Usealightlydampened clothonly.Donotuse liquid
or aerosolcleaners.
HEATAND FLAMES: Thereceivershouldnotbe
placed neartonaked amesorsourcesofintense
heat, suchasanelectric re.Ensurethatno naked
amessources,suchaslighted candles,areplaced
ontopof theReceiver.
LIGHTNING: Beforeastormand lightningorwhen
going onholiday,disconnect theAC adapterand aerial
leadfromthewallsockets..
REPLACEMENTPARTS: Ifyourreceiverneedsa
replacementpart, ensurethe person undertaking
therepairusespartswhicharespeci ed bythe
manufacturerorhavethe samespeci cationsasthe
originalpart. Otherpartsmaycausea re,electric
shockor other hazards.
BATTERYDISPOSAL: Batteries, includingthose
whichareheavymetalfree,shouldnotbe disposed
ofwithhousehold waste.Please disposeofused
batteries in an environmentfriendlymanner.Find
outaboutthe legalregulations whichapplyinyour
area.

English- 3-
Mains supply
Mains lead
Symbols
Safeuseand careofyour equipment
Read
Protect themainslead.
Avoid harsh conditions
Never
To savepower,
Don't
Pull
Thisproduct isdesigned for domesticuseonly. Commercialor anyother use mayinvalidatethe
guaranteeandmight bedangerous.
Ventilation
Cleaning
ImportantSafetywarnings
To preventelectricshock,do notremoveany cover.
If anything goeswrong, don't tryandfix it yourself, get a qualified service agentto lookattheproduct.
Do not exposethis equipment to dripping orsplashing orplaceany objects filledwithliquids, suchas vases,
ontheequipment.
Neverputa naked flamesourcesuchas lightedcandles onornearthis equipment.
Smallparts. Do notlet young childrenplay withtheequipment.
ImportantSafetyinformation

English- 4-
Overview ofthe Remote Control

English- 5-
ViewingControls andConnectionsofthe Set-Top-Box
Front Panel
Rear Panel
1. ANTENNAIN : You can connect antenna to aerial input of the box.
2. TVOUT: You can useaerial TVout to connect aerial to yourTV.
3.ETHERNET: Usethis toconnectthe boxtoanactive LANconnection.
4. HDMIOUTPUT: You connect the box to yourTV’sHDMIinput(if
available)by using HDMIconnection cable.
5. TVSCART: If yourTVhas ascartconnector,you can connect the
box to yourTVusing a scart cable.
6. OPTICALAUDIO : You can use this connectorto output the digital
audio to an external device.See youraudiosysteminstruction book
forfurtherinformation.
7. POWER SUPPLY: DC IN (12V)powerconnection.
Makesurethatyouconnectallcablesandconnectionsbeforeyouplugtheunit intothemainssupply.Afteryou
connect theunit tothemainssupply,theLED light locatedon the frontpanelwillbered(Standbymode).

English- 6-
InsertingBatteries inthe Remote Control
•Removethebatterycoverlocatedonthe backofthe
remotecontrolbygentlypullingbackwardsfromthe
indicatedpart.
•Insert twoAAA/R3(2X1.5Volt)orequivalent type batteries
inside.Place the batteriesinthe rightdirectionsobserving
the polaritysymbols(+/-) andreplacethebatterycover.
•Whileusingtheremote control, you should directit
towardsthefrontpanelofthereceiver.Remoterangeis
approximately7m/23ft.
•Ifyourreceivernolongerrespondstotheremotecontrol.
itisprobablethatthe batteriesareexhausted.Ifso youcan
stillusethelocalbuttonsofthereceiver.You canreplace
batteriesaftertheyareexhausted.Pleaseuse onlytheleak
proof batteries.
Note:Removethebatteriesfromtheremotecontrol
whenitisnotto beusedforalongperiod.Otherwiseit canbedamagedduetoanyleakageof
batteries.
ConnectingtheSet-Top Box toaTVSet
Youcanconnectyour settopboxtoaTVbyusingthefollowingmethods:
1.HDMIconnection:IfyourTVhasanHDMIinput,you can simplyconnectthesettop box toyourTVby
usinganHDMIcablebetween theHDMIOUTconnectoronyourSet-Top Boxand theHDMIINPUTconnector
onyourTV. HDMIconnection providesabetter picture/soundquality.
2.SCART connection:Youcanalsoconnectthe settop boxtoyourTVby usingthescartsocket.Use a
scart cabletoconnect the set-top-boxtoyourTV.

English- 7-
PowerConnection
IMPORTANT:Theset-top boxis designed to operateon 12V DC.Forthis,an adaptoris used
whichsuppliesa12VDCvoltage.Connectthisadaptor toamainssocketthatsupplies
220-240VAC,50Hz.
•Afterunpacking,allowthe set-topboxtoreachtheambientroomtemperaturebeforeyouplugintothe
mainsfor the rst time.
Antenna Connection
Thisillustration showshow toconnectanantenna.
•Use ANTENNAIN toconnecttoanantenna system.
•Youcanalsouse TVOUT toconnectantennatoyourTVthrough theset-top-boxwithanappropriate
antennacable,
PowerOn-Off
•After plugging the set-top-box into themains supply, alight will beseen onthefront panel (Standby mode).
•Whenthe set-top-boxis rstpoweredup pleasewaituntiltheboxisinitialised.Thiswilltakeafew
seconds.
•Afterwards,youcanswitch onyourdigitalset-topboxbypressingthe standby button ontheremotecontrol.
Youwill see thatthelight on thefrontpanelwill go out(Poweronmode).

English- 8-
FirstTime Installation
IMPORTANT:Ensurethattheaerialisconnected
beforeswitchingonthesettop boxfor the rst
installation.
•When theset-top-box isoperatedforthe rst
time,installation wizardwillguideyou through the
process.First,TV Typeselectionon-screenmenu
will be displayed:
•Select theTV Typebyusing“ ”/“ ” buttons andpress
OK button tocontinue.
•Afterwards,HDMIresoulutionselection menuOSD
will be displayed:
•Ifyourdisplay isconnectedviaHDMIconnector,
you can use BLUE button tode ne HDMIresolution
automatically.
•You can selectthedesired resolutionby pressing“
”/“ ”button.
•Press GREEN buttontoapplychangesanduse OK
buttontocontinue.
•If you donotsetaresolution,the followingmessage
will be displayed:
•Select Yes or Nobyusing“ ”/“ ”button and press OK
tocontinueand the followingmessagewillbe displayed
on the screen:
•Tostartinstallationprocess, select Yesbyusing
“”/“ ” buttons and then press the OK button.
•Theboxwillstarttosearchavailablestations.The
progressbarwillmovealongtheline.You should
allowthe set-top-box to completethesearch to store
all availablestations.
Note:Youcanpress MENU buttontocancel.
ChangingChannels
•Youcanchangechannels with the following
methods.
•Youcanpressthe numericbuttons(0–9)todirectly
enterthechannelnumber.Youcanpressnumeric
buttons consecutivelytoenter twoor moredigits.
•Pressthe PR +/ PR - buttonstomove upordownto
the next availablechannel.
Note:You canpress OK button to display thechannel
list.
Adjustingthe Volume
Mute
•Youcanpress tomutethesoundofyourset-
top-box.Thesound will bemutedonce thisbutton
ispressed.
•Tocancel mute, youcanpress buttonagain or
use the V +/- buttons.

English- 9-
VolumeUp / Down
•Youcan increase ordecreasethevolumebyusing
V+/ V- buttons.
•The volumelevelselectedwill remain set, evenwhen
thereceiveris turnedoffandonagain, untilyouchange
volume again.
•The audiovolumeadjustmentforthereceiveris
independent of the volumecontrol onyourTV set.
IMPORTANT:Youshouldbecarefulthatbothvolume
controls arekept withinreasonable levels so that when
switchingon,orwhen rstturningon yourTVset, the
soundlevel isnot toohigh.
On-ScreenInformation
•You can press button to display on-screen
information. Details of the station and current
programme will be displayed on theinformation
screen.
•Particularly; current event name,nextevent
name,and startingandending time,durationbar,
programme mode, channelnumberand namewillbe
displayedonthe informationscreen(if available).
MenuSystem
Viewing theMain Menu
•Pressthe MENU buttontoviewmainmenu.
•Youcanmove betweenmenus by using the
navigation( / / / ) buttonsontheremote
control.
•You can enter,selectorcon rmamenuoptionby
using OK button.
•Insome sub-menus,you can use BACK buttonto
returntoapreviousmenu screen.
•Toexitfromamenuscreen,youcanpress MENU
button.
•Thefollowing items arelocatedinthe mainmenu
screen:
Information Banner
•Informationbannerwillbedisplayed atthebottom
of the menu screeninall menus.
•Availablefunctions thatcan beused inthecurrent
menu aredisplayed inthe informationbanner.
Managing Stations:Channel List
•Theset-top-boxsortsall storedstations in the
ChannelList.
• Youcaneditthischannellist,setfavouritesorsort
channelsbyusing theChannelListoptions.
•Press MENU button to view main menu. Select
Channel Listitembyusing“ ”/“ button.Press
OK toview menucontents.
Note:Youcan direclty pressOKbutton to view
channel list.
SelectingaSpeci cChannel
• Select optionshouldbehighlighted by using“ ”/“
” button.
•Towatchaspeci cchannel,you shouldhighlight
the desired channelusing“ ”/“ ”button andpress OK
button. Selected channelwillbe displayed.

English- 10-
•Ifthe selectedchannel is passwordprotected,parental
lock passwordwill be asked. If the correct codeis
entered, selected channel can be watched.
Operating theChannel List
•Press“ ”/“ ”button toselectthe channelthatwill
beprocessed.
•Press“ ”/“ ” button toselectafunctiononChannel
List menu.
•Use P+/P- buttonstomovepageupor down.
• Press BLUE button toview ltering options.
• Press MENU button toexit.
• Use INFO button toviewmore information.
Moving aChannel
•First selectthedesiredchanneltobemovedby
using“ ”/“ button.
•SelectMoveoptioninthechannellistbyusing“ ”/“
” button andpress OK button.
•Edit Numberscreenwill be displayed.Enterthe new
channelnumberbyusingthenumeric buttons on
the remotecontrol.
•Ifthereisapreviously stored channel on that number,
awarning screen will bedisplayed.Select Yes ifyou
wanttomove thechannelandpress OK.
•Press OK buttontoprocess.Selectedchannelis
nowmoved.
Note:Insomecountries,theorderofthechannels
isarranged automaticallybythebroadcaster.Thisis
calledlogicalchannelnumber(LCN). If theselected
countryhas LCN support,thechannelswillbe
enumeratedonebyone,beginningfromnumber
‘1’.You cannotmove anyprogrammetoaposition
afterthelastsavedone.Ifyoutrytodothis,both
programmeswillchange theirplaces.If LCN support
isnotavailable,you canmovethe channelsbetween
1-999.
Deleting Channels
•Select the channel thatyouwant todeleteandselect
Deleteoption using “ ”/“ ” button.Press OK button
tocontinue.
•Amessagewillbedisplayedtocon rmyourdecision.
Select YES todeletetheselectedchannel,select
NO tocancel. Press OK buttontocontinue.
•Selectedchannelwill be deleted ifyouselect YES.
The operationwillbecancelledifyouselect NO.
Renaming Channels
•Selectthe channelthatyouwanttorename and
selectEdit Nameoptionusing“ ”/“ ”button.Press
OK buttontocontinue.
•Pressing “ ”/“ ”button moves to the previous/
nextcharacter.Pressing “ ”/“ ”buttontoggles the
currentcharacter,i.e., ‘b’characterbecomes‘a’by
pressing“ ”and‘c’by pressing“ ”.
•Pressingthe numericbuttons‘0...9’replaces the
highlighted characterwith thecharactersprinted
above the buttononebyone as the button is
pressed.
•Press MENU tocancel editing.
•When nished,press OK buttontosave thenew
name.
Adding Locksto Channels
•Selectthechannel thatyouwanttolockandselect
Lock optionusing“ ”/“ ” button.Press OK button
tocontinue.
•Youwillbe askedtoenterparentalcontrolPIN code.
Default PIN isset as 0000.EnterthePIN number.
•Press OK button whenthedesiredchannelis
highlightedtolock/unlockthechannel. Locksymbol
willbedisplayednexttotheselectedchannel.You
canrepeat thesame operationtocancelthelock.
Note:DefaultPINcodeis0000 andit can be changed
usingthe Con gurationMenu.
Setting Favourites
•SelectFavouritestomanagefavouritelist.Use “
”/“ ” and OK buttonstoselectFavourites.
• Youcansetvariouschannelsasfavourites sothat
onlythefavouritechannelsarenavigated.
•Selectachannelbyusing ”/“ ”button.Press OK
button toadd selectedchannel to thefavourites
list.
• Ficon indicates thatthe selectedchannelisadded
tothe favourites list.
•You canpressOK buttonagain to removethe
selectedchannel fromthe list.
Button Functions:
• OK:Adds/removesastation.
• BLUE:Displays lteringoptions.

English- 11-
ViewingElectronic Programme
Guide (EPG)
Youcanviewthe electronicprogrammeguide (EPG)
toviewinformationaboutavailable programmes.
Select ProgrammeGuide fromthemainmenu by
using“ ”/“ ” buttons. Press OK to continue.
HINT: Youcanalsopress GUIDE buttonto viewthe
EPG menu.
• Press “ ”/“ ” buttons to navigatethrough channels.
•Press“ ”/“ ” buttonstonavigatethroughthe
programme list.
•EPGmenu displays available information on all
channels.
•Please note thatevent information is updated
automatically.If there areno event information
dataavailableforchannels,EPG will bedisplayed
withblanks.
Redbutton (Prev Day): Displaystheprogrammes
of previousday.
Greenbutton (Nextday): Displaystheprogrammes
of the next day.
Yellow button (Zoom):Expandsprogramme
information.
Bluebutton(Filter): Views lteringoptions.
INFO (Details): Displaystheprogrammesindetail.
Numericbuttons(Jump):Jumpstothepreferred
channel directlyvianumericbuttons.
OK(Options): Displays programmeoptionsincluding
“SelectChannel” option.
P<P: Scrollspageleft.
Fav: Scrollspageright.
Text (Search): Displays“GuideSearch” menu.
(Now) :Showsthecurrent programme.
Event Options
In EPGmenu,press the OK buttonto enterthe
“ProgrammeOptions” menu.
Select Channel& Exit
•Using thisoption,youcan switchtothe selected
programme orexit.
Con guringSettings:Setup Menu
•Detailedsettings canbe con guredtosuityour
personal preferences.
•SelectSetupfromthe mainmenu by using “ ”/“ ”
buttonsand press OK button todisplay Setup menu.
Con guration
•Youcan con guremainsettingsofyoursettopbox
usingcon guration screen.
•Select Con guration fromSetupmenuandpress
OK tocontinue.
•Youcanpress BACK buttontoexit

English- 12-
Activechannels
•You can selectbroadcaststobe listed inthe channel
list.Todisplayspeci ctypes ofbroadcast,you
shoulduse Activechannellistsetting.
•Select ActiveChannels by using “ ”/“ ” button.
•Youcanselectabroadcasttypeoptionfromthelist
byusing“ ”/“ ” button.Availablemodes are: TV
Only,RadioOnly,TextOnly,Favourites or Show
All (if available).
•Pressthe MENU button tosavetherecent changes
and exit.
ScanEncrypted
•Whenthissetting ison,search processwilllocate
the encrypted channelsaswell.IfitissetasOff,
encrypted channelswillnotbelocatedinautomatic
searchor manual search.
•Use“ ”/“ ” buttonstohighlight ScanEncrypted and
press “ ”/“ ”buttons toselect YES or NO.
Output Settings
TV Type
•Digitalterrestrial television channels can be
broadcastinawidescreenformatwhichmustbe
outputdifferentlyto normalandwidescreen TV
sets.
•Thisfunctiondefinesthescreenformatof the
connected TVtoenablebroadcasts’being displayed
correctly.
•Select 4:3 ifyouhave astandardTV setwith4:3
aspectratio.
•Select 16:9 if youhaveawidescreenTV.
•Ifyou select Auto,TVtype willbe setautomatically
accordingtothebroadcast.
Note:Thisfunctionalsoenables youtochangeTV
Type that you have previously selected during the
rsttimeinstallation.
TV Out
• The set-top-boxcanoutputRGB andCVBS signal
viathe TVSCART connectorlocatedon therear
panel.
•Although theRGB formatprovidesabetterpicture
quality, somedevicesmightnot support it.
AC3Audio
•HighlighttheAC3Audio item by pressing“ ”/“
”buttons.Usethe “ ”/“ ”buttonsto setthe AC3
Audio asOnor Off.
•If thechannelthatyouarewatching supportsAC3
Audio, you can turn thissetting on.
SPDIF Delay
YoucanusethissettingwhenthereisanSPDIF
synchronizationproblem inthereceived broadcast.
Pressthe“ ” or “ ” buttotochangethedelay.
DigitalAudio
• Use thissettingto de nedigitalaudiooutsignaltype.
•Use “ ”or“ ”buttons to set DigitalAudio as
Bitstream or PCM.
•If yourselected channel includes compressed sound
stream, youcanconnectyourset-topboxto an
externalequipmentbyusingdigitalaudiooutofyour
set-topboxforenablingthesound output.
•Ifyouhavenoexternalsoundequipment,please
selectDigitalAudioOutas PCM byusing “ ”or“
” button.
HDMI Resolution
•ThissettingenablesyoutochangeHDMIresolution
as576P,720P,1080ior 1080P.
•Use “ ”/ “ ”buttonontheremotecontroltochange
resolutionandpress GREEN buttontoapply.
HDMI HDCP
•Inthe Con gurationmenu, highlight theHDMIHDCP
itemby pressing“ ” or “ ” buttons.
•Usethe“ ”or“ ”buttontosetthe HDMIHDCP
asOnor Off.

English- 13-
ReceiverUpgrade
•Toensurethatyourset-top-box always has the most
updateinformation, you can use this setting. Inorder
fortheproperoperation,pleaseensurethatthe box
isset tostandbymode.
• TheSTB automaticallypowersupat3.00A.M.every
dayand searchesforany newsoftwarethatmay
bebroadcast. Iffound,theboxwilldownloadnew
softwareautomatically.Thisoperation willnormally
takeapproximately30minutes.
•Youcanenableordisableautomaticupgradeby
setting AutomaticScanning option.
•Youcanmanuallysearchfornew softwareby
selecting Scan for upgrade.
•ToupgradesoftwareviaUSB,youcanuse USB
Upgrade setting.
Parental Settings
•Thissettingcon guresparentalsettings.
• Select Parental Lockoption byusing “ ”/“ ” buttons.
• Press OK button toenter the menu.
•Todisplayparental lock menuoptions, PIN number
should be entered.FactorydefaultPINnumberis0000.
After codingthecorrect PIN number,parental settings
menuwill be displayed:
Menu Lock
•Menulocksettingenablesordisables themenu
access.Youcan disableaccesstothe installation
menu orthewholemenu system.
Guidance
•When set, thisoptiongetsthematurityinformation
fromthe broadcastand ifthis maturitylevel is
disabled,theTVwillnotdisplaytherelatedvideo-
audio.
SetPin
•Press OK to displaythe “SetPIN”window.Use
numeric buttonstoenterthe newpinnumber.You
willneedtoinputyournewpinasecondtimefor
veri cation purposes.
•Thefactorydefaultpinnumberis0000.Ifyouchange
the pinnumbermakesureyou writeitdownand
keep it safe.
LowPower
Ifyou enablelowpoweroption,lowpowermode willbe
activated.Inlowpowermodethepowerconsumption
isless then1W(instandby).
Ifyou disable lowpoweroptionthepowerconsumption
willbehigherthan 1Winstandbymodehoweverthe
openingtimewillbeshorter.
Audio Description
•Audiodescriptionreferstoanadditionalnarration
track for blindand visuallyimpaired viewersof visual
media, includingtelevisionandmovies.
•Thedescriptionnarratortalks throughthe
presentation,describing whatishappeningon the
screenduringthe naturalpauses in theaudio(and
sometimesduringdialogue,if deemed necessary).
•You can use thisfeature, only ifthe broadcaster
supportsthat additionalnarrationtrack.
LowPower
Ifyou enablelowpoweroption,lowpowermode willbe
activated.Inlowpowermodethepowerconsumption
isless then1W(instandby).
Ifyou disable lowpoweroption, the powerconsumption
willbehigherthan 1Winstandbymodehoweverthe
openingtimewillbeshorter.
Audio Description
Thisfunctionenables ordisables the audio description
feature by pressing the“ ” or “ ” buttons.
AvailableLangs.
Set available languageoptions(if available)

English- 14-
Preferred Language (Optional)
Bypressingthe“ ”or“ ”buttons, preferred audio
descriptionlanguage ischanged (if available).
Relative Volume (Optional)
Usingthisoption,AudioDescriptionvolume level can
beincreasedordecrasedrelatively,according to the
general volume.
Auto Sleep
•Press“ ”or“ ”buttontoselectAutoSleep.Use “
”or“ ”buttontosetthe AutoSleepto Active, Off
or setto acustomisedtimeperiod.
•You cansetthe timeoutvalueofautoofffeature.
After thetimeout valueisreached, thebox will
switch off.
Con guringLanguagePreferences
•Youcan operatethe TV’slanguagesettingsusing
thismenu.
•Select Language fromSetup menu and press OK
tocontinue.
Menu:shows the language of thesystem.
Preferred
These settings will be used if available. Otherwise current
settings will beused.
• Audio:Sets the preferred audio language.
• Subtitle:Sets the subtitle language. Selected language
will be seen in subtitles.
• Guide:Sets guide language.
Current (*)
(*)These settingscan bechanged if only the broadcaster
supports. Otherwise,settings will not be available to
bechanged.
•Audio:Changes theaudio languageforthe current
channel.
•Subtitle:Setsthesubtitlelanguage forthecurrent
channel.
IPSettings
•You can con gureyourreceiver’sIPsettings by using
thismenuscreen.
•Press YELLOW buttontosetstaticIPsettings.
• Use BLUE button tocon gure dynamicIPsettings.
•You can press RED buttonto disable IPcon guration.
•Inorderfortheethernethosttoworkcorrectlywith
yourinternetconnection it needs tohave aunique IP
address.Inmostcasesall oftheparameterscanbe
providedby the DHCPserverin theirrouter.Inthis
case you shoulduse the “Dynamic” option.
•Inthe unlikelyeventthatyoudounothaveaDHCP
serverinyourrouterorifyouprefertoassignyour
ownIPaddress,thenthe“Static”optioncanbe
used.YouwillneedtoenterauniqueIPaddress
along withthe defaultgateway and DNSserver.
In most domestic networks the defaultgateway
andDNS serverwillbothbe theIPaddress ofthe
router.
Installation
•Installation menuwill help youtoretune yourset-top-
boxinordertostorenew servicesor stations.
•Select Installation fromSetupmenu by using“ ”
or“ ”buttons andpress OK tocontinue.
• Installationmenu includes thefollowing items:
AutomaticChannelScan
•Select AutomaticChannelScan byusing“ ”or“
” buttonand press OK button.
•Thenthefollowingmessage will bedisplayed on
the screen:

English- 15-
•Highlight Yes or No byusing “ ”or“ ”buttonsand
press OK buttontocon rm.
•If Yes isselected,automaticsearchstarts.
•Selecting No cancels automaticsearch.
•Afterthe scanningiscompleted,yourset-top-box
will storeall theavailablechannels.
ManualChannel Scan
•This feature can beused fordirectbroadcastentry.
•Select ManualChannelScan byusing“ ”or“ ”
buttonandpress OK button.
•In manualchannelscan,thenumberof themultiplex is
entered manuallyand onlythat multiplexis searched for
the channels.
•Foreachvalid channel number,signallevel andsignalquality
areshown on the screen.
•In both manualand auto search,any existing channel
in the database is not re-stored to avoid duplicates of
that channel.
First TimeInstallation
•If you wanttoloaddefaultsettingsofyourset-top-
box, youcan perform rsttime installation.
•Select FirstTimeInstallation byusing “ ”or“ ”
buttonandpress OK button.
•Thefollowingmessage, asking youwhetherornotto
deleteallchannelsandsettings, willbedisplayed.
•Highlight No byusing“ ”or“ ”buttontocancel
installation.
• Highlight Yes byusing “ ”or“ ”buttonandpress
OK button to start rst timeinstallation.
•After you select Yes,factory settings will be loaded.
•Installationwizardwill guideyouthroughthe
installation process.Seethesection, “First
Time Installation”in previouschaptersformore
informationon thisprocess.
OSD WarningMessages
•Some warningmessages may appearon the screen
indicatingthatarelated function maynotbe working
properly.
NoSignal
•Whentheboxreceivesnosignal(e.g.the antenna
cableisdisconnected),“NO SIGNAL”messagewill
bedisplayedonthescreen.
NoChannelsHave BeenAddedYet
•When thereareno channelsstoredinthebox,
ChannelList menu will notbe displayed and channel
navigationwill notbeavailable.
•Insuchcases,thefollowingerrormessagewillbe
displayed.
DisplayingText
•Many digital terrestrialtelevisionchannels broadcast
pages of information on the programmes, the weather,
news and other topics.
•This digital teletext can be displayed by yourset-
top-box.Indeed,somechannelsbroadcastteletext
information entirely.
•When such achannel isselected,it will usually display
theopeningpageof information automatically,after a
short break, .
•Somechannelsmostlyhavedigital teletextpages
broadcast along with the televisionprogramme.
•Press TEXT button toactivate digitalteletext pages
(if available).
•You canmovethrough theinformation channelsby
usingnavigation (“ ”/“ ”/“ ”/“ ”), OK andcoloured
buttons.
• Press TEXT button again to exit teletext mode.

English- 16-
Information for UsersonDisposal of Old Equipment and Batteries
[EuropeanUnion only]
Thesesymbolsindicatethat equipmentwiththesesymbolsshouldnot
bedisposedofasgeneral householdwaste.If youwant todispose
of the productorbattery, pleaseconsiderthecollectionsystemsor
facilities for appropriaterecycling.
Notice: The signPbbelow the symbolfor batteriesindicatesthatthisbattery
containslead
Battery
Troubleshooting
Problem PossibleReasons WhatToDo
TheLEDindicatordoesnot
glow. PowerAdaptor is notconnected. Checkif themainscable is
pluggedintothepowersocket.
Nopictureor sound. Nosignalor weaksignal. Check the aerial andvideo
connections(scart/HDMI).
Changesinthesettingshavenot
takeneffect.
Theset-top-boxwas unplugged
without rstswitchingtostandby
mode.
Makesurethattheboxisin
standbymode beforeunplugging
itfrom themains.
Theremote control isnot
working.
•The set-top-boxisinstandby.
•Remotecontrolisoutofrange.
•Batteries areexhausted.
•PresstheSTANDBYbutton.
•Checkthat theremotecontrol
range isclear.
•Replacethebatterieswithnew
ones.
Passwordisforgotten. Contactthe Tesco Electrical
Helpdesk.

English- 17-
General Characteristics
SupplyVoltageforset-top box: 12V DC
SupplyVoltageforDC Adaptor: 220- 240V AC ~50Hz
InputFrequency470Mhz-862Mhz
MaximumPowerconsumption15W
TypicalPower consumption 8W
Standby LowPower Consumption<1W
USB(optional) Current Limit500mA
Operating temperature5ºC to+40ºC
Storagetemperature-20ºC to+70ºC
Humidity25to75%rel
Physicaldimensions295x170x40mm
Weight900g
Hardware Con guration
MainProcessorMPEG Decoder NEC EMMA3SL/HD
Flash Memory8MB NOR BGA
DDRRAM2x128MBDDR2(HD DecodingforHD Mpeg4Receiver)
Digital Capabilities
Transmission Standards: DVB-T,MPEG2MPEG4
DVB-T2,MPEG4
Demodulation:
•CombinedDVB-T2,DVB-Tdemodulator thatconformstotheETSI EN 302-755
(secondgeneration Terrestrial) and ETSI EN 300-744 (Terrestrial) standards.
•Symbol rate:COFDMwith2k, 4k,8k,16k, 32kFFTmode
•Modulation:16QAM,64QAM, 256QAMFEC for allDVBmodes(automaticallyfound)
VIDEO
•H.264(MPEG-4part 10) mainandhighpro lelevel 4.1/MPEG-2MP@HLvideo decoder.
•HD displaymulti formatcapable(1080p, 1080i, 720p,576p)
•Analogue SD output: RGB andCVBS
AUDIO
•MPEG-1layerI/II, MPEG-2layer II,MPEG-2AAC, MPEG-4AAC
•Samplingfrequenciessupportedare32,44.1&48kHz
RemoteControl
Operating Distance10mMax.
Batteries 2x1.5VMicro(R-03/AAA)
Tuners
1xRF InIEC-type,female(75Ohm)
1xRF Out (loopthrough)IEC-type,male(75Ohm)
FrontPanel
Display:7segment leddisplay
RemoteControlKeysStandby, PR+/ PR-

English- 18-
Audio
Output2Vrms,0dBfs/ Z= 10kohm
Digital Audio
OutputOptical SPDIF
A/ V& Data In/ Out
Scart TV scart
RGB VideoOutputTV scart
CVBS VideoOutputTV scart
AnalogAudioOutputTV scart
DigitalAudioOutputOptical output
HDMI OutputHDMI
USBInputUSB 2.0HighSpeed(Optional) (For serviceuseonly.)
NOTE: The USB port isusedforsoftwareupgradingonly.USBconnectordoesnothave any otherfunctions
such asplayingaudio orpictureles. It isonlyused for softwareupgrading.
Tv Scart
Video output :Compositevideo signal;1Vp-p±3dB/75 ohm
Audiooutput : 2Vrms/Z =10kW
Functionswitching : 12V / 6Vfor 4:3/ 16:9/ Z =10kW

Following information is only for EU-member states:
The use of the symbol indicates that this product may not be treated as
household waste. By ensuring this product is disposed of correctly, you will
help prevent potential negative consequences for the environment and
human health, which could otherwise be caused by inappropriate waste
handling of this product. For more detailed information about recycling of
this product, please contact your local city office, your household waste
disposal service or the shop where you purchased the product.
Table of contents
Other Technika TV Receiver manuals