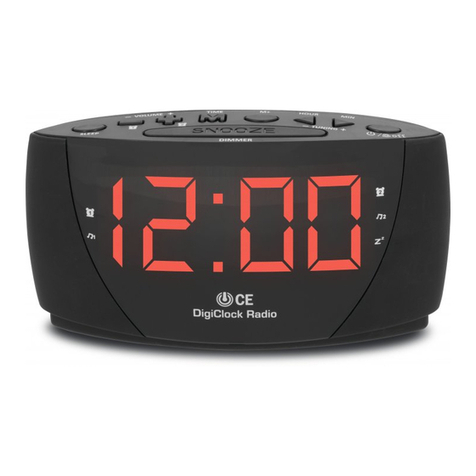
TechniSat DigiClock Radio User manual

PL
Instrukcja obsługi
DigiClock Radio
Radiobudzik z wyświetlaczem LED

Uwagi dotyczące recyklingu
Opakowanie tego radiobudzika jest w całości wykonane z materiałów nadających się
do ponownego przetworzenia. Prosimy o ich posortowanie i wrzucenie do odpowied-
nich pojemników na odpady recyklingowe. Po zakończeniu użytkowania tego odbior-
nika nie można wyrzucać go razem z normalnymi odpadami komunalnymi. Należy go
oddać do utylizacji do specjalnego punktu zbiórki zużytych urządzeń elektrycznych i
elektronicznych. W lokalnym urzędzie gminy uzyskają Państwo informacje o najbliż-
szych punktach utylizacji odpadów. Proszę pamiętać również, by nie wyrzucać zuży-
tych baterii z pilota razem z odpadami z gospodarstw domowych. Należy oddać je do
utylizacji do specjalnego punktu zbiórki odpadów niebezpiecznych.
DigiClock Radio posiada znak CE i spełnia wymagane przez UE normy.
TechniSat zastrzega sobie prawo do zmian i błędów w druku. Stan 08/2015
TechniSat i DigiClock Radio są zarejestrowanymi znakami
towarowymi TechniSat Digital GmbH
Radio
1. Proszę wcisnąć przycisk “ON/OFF” w celu włączenia lub wyłączenia urządzenia.
2. Dostosuj częstotliwość odbioru przy pomocy przycisków “TU+” i “TU-“.
3. Zmiana głośności jest realizowana poprzez przyciski “VOL +” i “VOL -.
4. W celu zapisania znalezionej radiostacji proszę wcisnąć przycisk “M+”. Na wy-
świetlaczu pojawi się “P01”, oznacza to, że radiostacja została zapisana na pozycji
nr.1 . Jeśli wyświetlone zostanie “P02”, oznacza to, że radiostacja została zapisa na
pozycji nr. 2.
5. W celu zapisania ustawionej radiostacji należy wcisnąć przycisk „PRESET/M+”
do momentu pojawienia się migającego komunikatu“P01”. Ponowne krótkie
wciśnięcie przycisku “PRESET/M+” spowoduje ustawienie radiostacji na pozycji
nr.1 “P01”przestanie migać w momencie kiedy stacja zostanie zapisana. W celu
ustawienia na listę ulubionych kolejnej stacji należy wcisnąć przycisk „PRESET/M+”
do momentu pojawienia się migającego komunikatu „P02” , ponowne wciśnięcie
tego samego przycisku spowoduje zapisanie stacji na pozycji nr. 2. Proszę powtó-
rzyć powyższe czynności w celu zapisania maksymalnie 10 stacji.
Ustawienie alarmu
1. W celu ustawienia alarmu należy wyłączyć radiobudzik.
2. Po wyłączeniu urządzenia proszę wcisnąć przycisk “ALARM 1” lub “ALARM 2”
do momentu kiedy na wyświetlaczu będzie migać ustawienie godziny.
3. Możecie Państwo wybrać czy urządzenie podczas trwania alarmu ma działać w try-
PL
bie: Radio lub Buzzera. LED o symbolu dzwonka to opcja z buzzerem.LED o sym-
bolu muzyki to opcja z radiem.Proszę wcisnać przycisk „ALARM1” w celu wybrania
żądanego trybu.
4. Jeśli wybraliście Państwo już tryb alarmu teraz możecie ustawić godzine alarmu.
Proszę wcisnąć “Hour” aby ustawić i “Minute” w celu ustawienia minut.
5. Proszę wcisnąć “ALARM 1”aby zapisać godzinę alarmu.
6. Proszę kierować się według powyższej instrukcji ustawiając Alarm 2.
Ustawienie zegara
1. Należy wyłączyć radio aby ustawić zegar.
2. Proszę wcisnąć i przytrzymać przycisk “TIME SET”do momentu kiedy wyświetlacz
będzie migał.
3. Proszę wciskać przyciski „Hour” i „Minute” aby ustawić poprawny czas.
4. Po poprawnym ustawieniu czasu należy wcisnąć ponownie przycisk“TIME SET” w
celu zapisania zmian.
Ustawienie timera wyłączenia
1. W celu ustawienia timera wyłączenia należy wyłączyć radio.
2. Wciskając przycisk “Sleep” macie Państwo możliwość zmiany czasu po jakim urzą-
dzenie automatycznie się ( 90, 80, 70, 60, 50, 40, 30, 20, 10 min lub OFF (wyłącze-
nie timera) ).
Drzemka I resetowanie timera
W celu włączenia drzemki, należy wcisnąć przycisk “SNOOZE” podczas brzmienia alar-
mu. Alarm zostanie chwilowo zatrzymany, ponownie zostanie wznowiony za 9 minut.
Wskazówki
1. Urządzenie nie powinno być narażone na kapanie lub rozlanie. Na urzadzeniu nie
wolno stawiać przedmiotów wypełnionych cieczami ( wazony, etc).
2. Aby całkowicie odłączyć urządzenie od zasilania należy wyciągnąć wtyczkę zasila-
nia z gniazda zasilania.
3. Wtyczka urządzenia nie powinna być zasłonięta i powinna być łatwo dostępna.
4. Baterie (brak w zestawie) nie powinny być narażone na nadmierne ciepło, takie jak
np. promienie słoneczne, ogień itp.
5. Do zapewnienia prawidłowej wentylacji należy zagwarantować 10 cm wolnej prze-
strzeni od urządzenia.
6. Wentylacja nie powinna być utrudniona. Otworów wentylacyjnych nie wolno zasła-
niać np. gazetami, obrusami itp.
7. Nie wolno stawiać na urządzeniu źródeł ciepła, np. zapalonych świec.
8. Zużytych baterii nie należy wyrzucać wraz z normalnymi odpadami gospodarstwa
domowego.
9. Urządzenie powinno być obsługiwane w klimacie umiarkowanym.

UWAGA: zasilanie z baterii służy tylko do podtrzymania pamięci urządzenia w przy-
padku braku prądu (m.in pamięć godziny)!
Specyfikacja
Zakres częstotliwości: FM 88 –108 MHz
Źródło zasilania: AC 230V ~ 50 Hz/60Hz, 3W
DC 3V (dla podtrzymania pamięci)
Moc wyjściowa: 400 mW
Kontakt:
Zgłoszenia serwisowe TechniSat
tel.: 071 310 40 411)
e-mail: ser[email protected]
Biuro Obsługi Klienta
tel.: 071 310 41 41 1)
e-mail: biuro@technisat.pl
1) Czynne od poniedziałku do piątku w godzinach: 8:00-16:00

EN
Operating manual
DigiClock Radio
FM Radioclock with LED display

Disposal of the appliance and standards
• Old appliances are not worthless rubbish. By recycling valuable raw materials can be
recovered. Check with your municipal or local government options for environmen-
tally - friendly disposal of the device.
• This appliance is marked according to the Directive 2002/96/EC on Waste Electrical
and Electronic Equipment ( WEEE).
• This product may not, at the end of his life be disposed via the normal household
waste, but should be taken to a collection point for recycling of electrical and elec-
tronic equipment.
• The symbol on the product, user manual or packaging indicates the recycling of the
product. The materials are recyclable according to their labeling. With the reuse,
recycling or other forms of utilizing old devices, you are making an important con-
tribution to protecting our environment.
DigiClock Radio meets guidelines and standards
- the Low Voltage Directive ( 2006/95/EC ),
- the EMC Directive (2004/108/EC ) and the
- CE Mark Directive.
Your unit carries the CE mark and complies with all relevant EU standards.
Subject to change for amendments and printing errors Version 08/2015
TechniSat and DigiClock Radio are registered trademarks
of TechniSat Digital GmbH
Radio
1. Press the “ON/OFF” button to turn the clock radio on or o.
2. Adjust the “TUNNING” buttons to select the desired station.
3. Press the “VOL +” or “VOL -“ button to adjust the volume.
4. Press the “PRE/M+” button to store your desired station. The display will show the
“P01” means your station will be saved on the rst pre-set. If it displays “P02” this
means the station is saved in the second pre-set.
5. To store the tuned station, press and hold the „PRE/M+” button until the display
shows ashing “P01”. Under this condition short press to conrm station to store
in this memory location. “P01” will stop to ash to feedback station is stored. Tuned
another station and long press „PRE/M+” button until the display shows „P02”
ashing then short press to conrm. Repeat this procedure until 10 memories are
stored.

EN
Please note you can only recall the preset station until you save all 10 stations.
Setting the Alarm
1. You must switch o the radio before you set the alarm time.
2. Press and hold the “ALARM 1” or “ALARM 2” button until the Hour display begins
to blink. The Alarm 1 / 2 buttons are marked with a alarm sign.
3. Now you can select to wake up by radio or buzzer. The LED with bell logo stands
for wake up
to buzzer. The LED with music note logo stands for wake up to radio. Press “ALARM
1” button
to select dierent wake up modes.
4. You can set the alarm time, after you select the wake up mode. Press the “HOUR”
to adjust the
hour and press “MIN” button to adjust the Minute.
5. Press the “ALARM 1” button now to x the alarm time.
6. Use the same method to set Alarm 2.
Canceling the Daily Alarm
Press the “ALARM OFF” (power o button) button to stop the alarm. The alarm will
operate 24 hours later as per alarm time set.
Cancelling the Alarm
Press the “ALARM 1” or “ALARM 2” buttons, until the buzzer and the alarm clock sym-
bol will not be illuminated. The alarm setting is cancelled now.
Setting the Clock
1. You must switch o the radio before you set the clock time.
2. Press and hold the “TIME” button until the display begins to blink, and then release
the button.
3. Press the Hour and Minute button to adjust the hour and minute.
4. Press the “TIME SET” button to save time
Setting the Sleep Time
1. You must switch o the radio before you set the sleep time.
2. Press the Sleep button repeatedly to set the sleep time ( 90, 80, 70, 60, 50, 40, 30,
20, 10 min or OFF ).
Snooze and Alarm Reset
To use the snooze, press the SNOOZE bar when the alarm is sounding. The alarm will
stop temporarily, but will resume sounding after 9 minutes.
Changing the brightness of the LED display
The device has the ability to change the display brightness. There are two modes:

bright and darker. In order to change the brightness, please press the snooze button.
If you press SNOOZE button again, display brightness returns to its previous state.
NOTES
1. The apparatus shall not be exposed to dripping or splashing and that no objects lled
with liquids, such as vases, shall be placed on apparatus.
2. To be completely disconnect the power input, the mains plug of apparatus shall be
disconnected from the mains. As the disconnect devices is the mains plug of apparatus.
3. The mains plug of apparatus should not be obstructed OR should be easily accessed
during intended use.
4. Battery shall not be exposed to excessive heat such as sunshine, re or the like.
5. Minimum distances 10cm around the apparatus for sucient ventilations.
6. The ventilation should not be impeded by covering the ventilation openings with
items such as newspapers, table-cloths, curtains etc.
7. No naked ame sources such as lighted candles should be placed on the apparatus.
8. Attention should be drawn to the environmental aspects of battery disposal.
9. The use of apparatus in moderate climates.
10. Unit housing must not be opened under any circumstances! Opening the product
cover may cause electric shock
11. All repairs should be performed by an authorized technician.
Power from the battery is used only for memory backup device
SPECIFICATIONS
Frequency Range: FM 87,5 –108 MHz
Power Source: AC 230V ~ 50 Hz/60Hz, 3W
DC 3V (For back-up)
Power Output: 400 mW
Service:
In case of a failure, please contact with your local distributor of TechniSat
products.
Other manuals for DigiClock Radio
1
Table of contents
Languages:
Other TechniSat Clock Radio manuals

TechniSat
TechniSat DIGITRADIO 52 User manual

TechniSat
TechniSat DIGITRADIO 51 User manual

TechniSat
TechniSat CE DIGICLOCK 2 User manual

TechniSat
TechniSat DigitRadio 50 User manual

TechniSat
TechniSat DIGITRADIO 51 User manual

TechniSat
TechniSat TECHNIRADIO 40 User manual

TechniSat
TechniSat DigiClock Radio User manual

TechniSat
TechniSat DIGITRADIO 52 CD User manual