Techome TVL-BT Original operating instructions

Bluetooth TV Lift (TVL-BT)
QUICK INSTALLATION AND
INSTRUCTION
MANUAL
www.techome.com.au
11
Disclaimers
Do not obstruct the TVlift
Do not put hands in the mechanism (i.e. make sure kids & animals stay clear)
Proof of Purchase
This warranty is only valid to the original purchaser and is not transferable. Please keep your
receipt for warranty purposes, please present your receipt when claiming warranty as proof of
purchase date.
Warranty
This product is warranted to be free from any defects for a period of 12 months (one year) from the
date of purchase, any defects that may occur will be repaired or replaced.
Warranty Procedure
Please return the faulty product with a valid proof of purchase to the original place of purchase.
The customer is responsible for freight, postage and packing costs when claiming warranty.
Exclusions
This warranty does not cover batteries, misuse, packaging, general wear and tear, power surges,
TV Mount Components
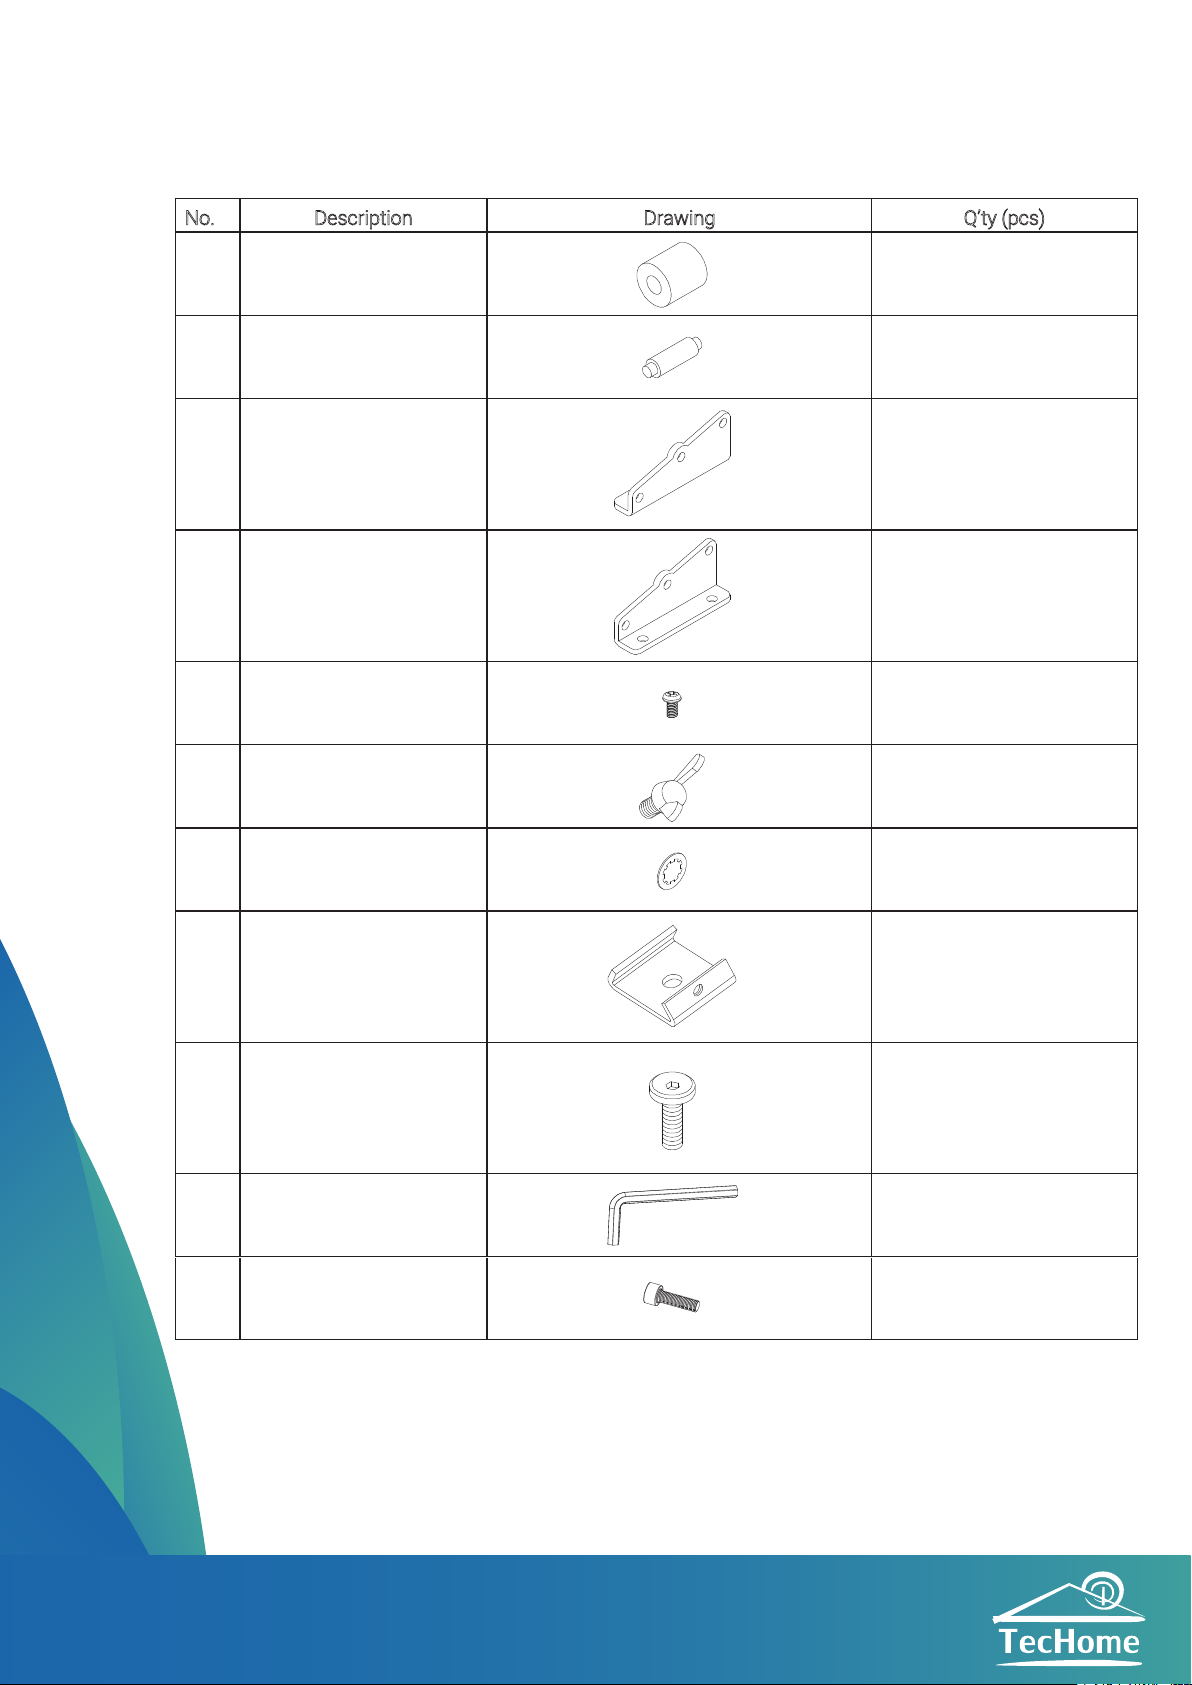
What’s in the Box?
No. Description Drawing Q’ty (pcs)
1 Wheel 3
2 Shaft 3
3 Shaft Holder 1
4 Shaft Holder 1
5 Screw (M5*8L) 4
6 Manual Screw (M5*10L) 1
7 Washer (M8) 8
8 Slider (40*14*3t) 4
9 Screw (M8*15L) 8
10 Allen Key 1
11 Screw (M6*24L) 4
TH717+ Lift
Motor Controller
Power Supply
(24v 5A)
TV Lift Remote
Control
TV Lift Mount
& Components
1 2
TV Mount Components
What’s in the Box?
No. Description Drawing Q’ty (pcs)
1 Wheel 3
2 Shaft 3
3 Shaft Holder 1
4 Shaft Holder 1
5 Screw (M5*8L) 4
6 Manual Screw (M5*10L) 1
7 Washer (M8) 8
8 Slider (40*14*3t) 4
9 Screw (M8*15L) 8
10 Allen Key 1
11 Screw (M6*24L) 4
TH717+ Lift
Motor Controller
Power Supply
(24v 5A)
TV Lift Remote
Control
TV Lift Mount
& Components
1 2
Mounting the TV
Important information:
Prior to installation onto the TVL3, remove the stand which is attached to your flat screen TV.
Carefully measure all dimensions of the television before proceeding with the installation.
Step 1: Secure the TV
Lean the TV onto its edge, preferably against a soft surface to prevent scratches and or damage.
Step 2: Install the Mounting Plates (Fig. 1 and 2)
Find the 4 mounting holes on the back of your TV and then choose the 4 screws from the component
package that work best for your TV. Install the included TV mounting plates (2) onto the back of the TV .
Step 3: Install the Mounting Brackets (Fig 3)
Fix the TV mounting brackets to the TV mounting plates.
Step 4: Mount the TV to the TVL3 (Fig 4)
Install the TV, using the newly installed brackets, to the TVL3. Screw tight on the top of the brackets.
Slowly release the TV to make sure it is installed securely. Plug in the TVL3 and raise it the full height so
that it’s fully extended.
1 2 3 4
5
6
7
7
9
8
9
11
23 4

TV Mount ComponentsWhat’s in the Box?
No. Description Drawing Q’ty (pcs)
1 Wheel 3
2 Shaft 3
3 Shaft Holder 1
4 Shaft Holder 1
5 Screw (M5*8L) 4
6 Manual Screw (M5*10L) 1
7 Washer (M8) 8
8 Slider (40*14*3t) 4
9 Screw (M8*15L) 8
10 Allen Key 1
11 Screw (M6*24L) 4
TH717+ Lift
Motor Controller
Power Supply
(24v 5A)
TV Lift Remote
Control
TV Lift Mount
& Components
1 2
Mounting the TV
Important information:
Prior to installation onto the TVL3, remove the stand which is attached to your flat screen TV.
Carefully measure all dimensions of the television before proceeding with the installation.
Step 1: Secure the TV
Lean the TV onto its edge, preferably against a soft surface to prevent scratches and or damage.
Step 2: Install the Mounting Plates (Fig. 1 and 2)
Find the 4 mounting holes on the back of your TV and then choose the 4 screws from the component
package that work best for your TV. Install the included TV mounting plates (2) onto the back of the TV .
Step 3: Install the Mounting Brackets (Fig 3)
Fix the TV mounting brackets to the TV mounting plates.
Step 4: Mount the TV to the TVL3 (Fig 4)
Install the TV, using the newly installed brackets, to the TVL3. Screw tight on the top of the brackets.
Slowly release the TV to make sure it is installed securely. Plug in the TVL3 and raise it the full height so
that it’s fully extended.
1 2 3 4
5
6
7
7
9
8
9
11
23 4
Installation of the Controller Using the TV Lift
TV Lift Control
(Channel 1)
123456
Short Press: Go to favourite position.
Long Press: Lower TV completely
5 6
1. Plug the TV lift into
“MOTOR 1” of the
TH717.
2. Plug the Power
Supply into the TH717.
3. Plug the Power
Supply into the wall &
turn on the power.
Select Channel
Lower TV
Raise TV
Channel Selected

Mounting the TV
Important information:
Prior to installation onto the TVL3, remove the stand which is attached to your flat screen TV.
Carefully measure all dimensions of the television before proceeding with the installation.
Step 1: Secure the TV
Lean the TV onto its edge, preferably against a soft surface to prevent scratches and or damage.
Step 2: Install the Mounting Plates (Fig. 1 and 2)
Find the 4 mounting holes on the back of your TV and then choose the 4 screws from the component
package that work best for your TV. Install the included TV mounting plates (2) onto the back of the TV .
Step 3: Install the Mounting Brackets (Fig 3)
Fix the TV mounting brackets to the TV mounting plates.
Step 4: Mount the TV to the TVL3 (Fig 4)
Install the TV, using the newly installed brackets, to the TVL3. Screw tight on the top of the brackets.
Slowly release the TV to make sure it is installed securely. Plug in the TVL3 and raise it the full height so
that it’s fully extended.
1 2 3 4
5
6
7
7
9
8
9
11
23 4
Installation of the Controller
Using the TV Lift
TV Lift Control
(Channel 1)
123456
Short Press: Go to favourite position.
Long Press: Lower TV completely
5 6
1. Plug the TV lift into
“MOTOR 1” of the
TH717.
2. Plug the Power
Supply into the TH717.
3. Plug the Power
Supply into the wall &
turn on the power.
Select Channel
Lower TV
Raise TV
Channel Selected
Setting Your Favourite Position
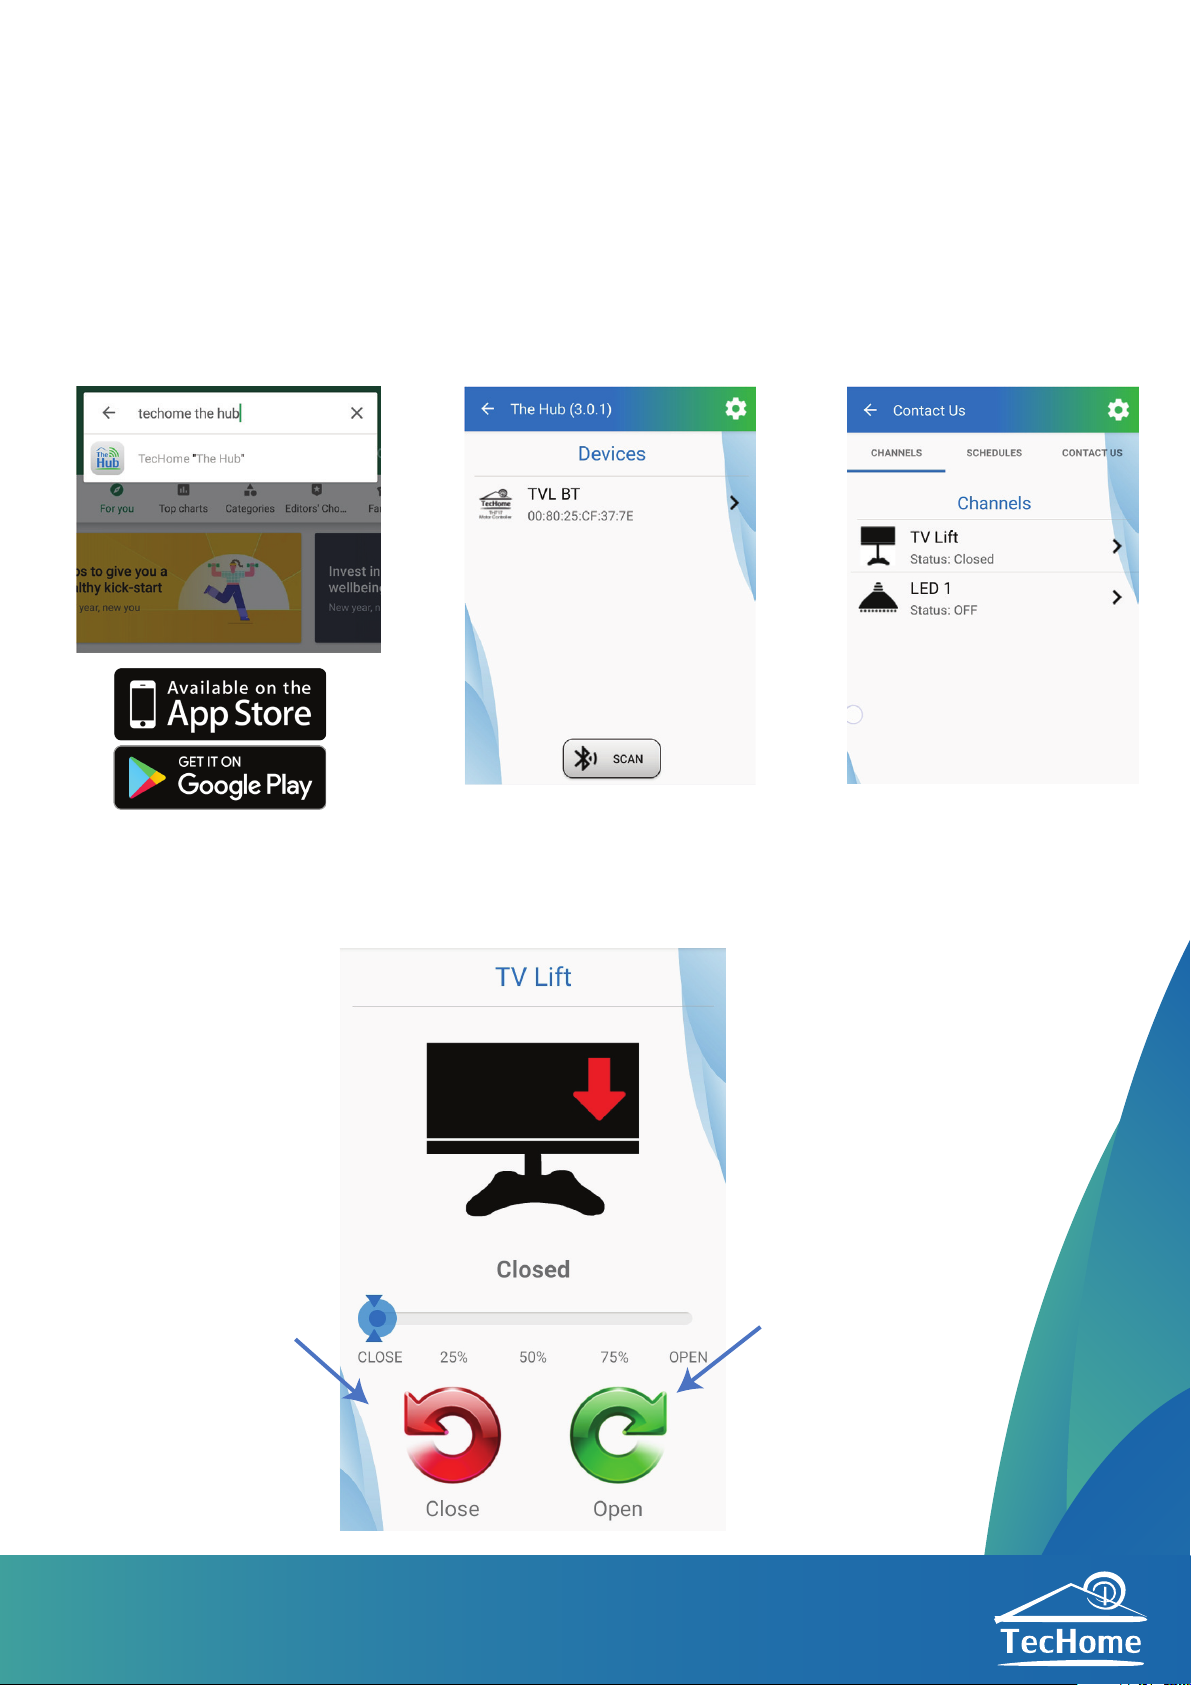
Download The Hub
Controlling the TV Lift Using The Hub
1. Install ‘The Hub’& open the
app (See page 7).
2. Enter“TVL BT” and press the
TV Lift Channel.
3. Press the settings ( ) icon
on the top right.
4. Scroll down to“Preset Bay 1”
and choose your favourite
position (in %).
Using ‘The Hub’ Bluetooth App
2. Open ‘The Hub’ on your
phone or smart device and
press the“SCAN”button and
select the “TVL BT” device.
1. Download & install TecHome
‘The Hub’from the‘Google Play’
or ‘Apple Store’.
3. Enter your PIN code (default
0000) & select the device you
would like to control.
7 8
Lower TV Raise TV
Note: No other settings on‘The Hub’are for use with the TV Lift.
Installation of the Controller Using the TV Lift
TV Lift Control
(Channel 1)
123456
Short Press: Go to favourite position.
Long Press: Lower TV completely
5 6
1. Plug the TV lift into
“MOTOR 1” of the
TH717.
2. Plug the Power
Supply into the TH717.
3. Plug the Power
Supply into the wall &
turn on the power.
Select Channel
Lower TV
Raise TV
Channel Selected
Setting Your Favourite Position
Download The Hub
Controlling the TV Lift Using The Hub
1. Install ‘The Hub’ & open the
app (See page 7).
2. Enter“TVL BT” and press the
TV Lift Channel.
3. Press the settings ( ) icon
on the top right.
4. Scroll down to“Preset Bay 1”
and choose your favourite
position (in %).
Using ‘The Hub’ Bluetooth App
2. Open ‘The Hub’ on your
phone or smart device and
press the“SCAN”button and
select the “TVL BT” device.
1. Download & install TecHome
‘The Hub’from the‘Google Play’
or ‘Apple Store’.
3. Enter your PIN code (default
0000) & select the device you
would like to control.
7 8
Lower TV Raise TV
Note: No other settings on‘The Hub’are for use with the TV Lift.
9 10
Dimensions & Ports
TV Lift Dimentions
ABD E FG H I
J
C
45mm
A
B
C
D
TV Lift
E
n/a
F
Remote learn/delete button
G
H
I
J
Power Supply
Learning a
New Remote
1. Using a paper clip, hold the front
red button (F) for 3 seconds.
2. A buzzer will beep every second with
a blue LED ashing every 2 seconds.
3. Any button can be pressed on the new remote to pair it
4. The buzzer will then beep 8 times to indicate successful pairing
Delete All Remotes
1. All RF remotes and BT pin can be deleted by pressing and
ŚŽůĚŝŶŐƚŚĞĨƌŽŶƚďƵƩŽŶ;&ͿĨŽƌϭϬƐĞĐŽŶĚƐ
2. dŚĞd,ϳϭϳǁŝůůƚŚĞŶďĞĞƉϰƟŵĞƐĂŶĚƚŚĞ>ǁŝůůŇĂƐŚ
between cyan and green.
ABD E FG H I
J
C
ABD E FG H I
J
C
Learn a New Remote using
‘The Hub’ App*
1. Open ‘The Hub’and connect to your device
2. Click “Settings”(or ) on the top right-hand corner
3. Press “RF Learn Mode” and the device will start beeping
4. Any button can be pressed on the new remote to pair it
5. The buzzer will then beep 8 times to indicate successful pairing
10 Secs
3 Secs
*See page 7 to download The Hub
n/a
n/a
n/a
n/a
n/a
n/a

Bluetooth TV Lift (TVL-BT)
QUICK INSTALLATION AND
INSTRUCTION
MANUAL
www.techome.com.au
11
Disclaimers
Do not obstruct the TVlift
Do not put hands in the mechanism (i.e. make sure kids & animals stay clear)
Proof of Purchase
This warranty is only valid to the original purchaser and is not transferable. Please keep your
receipt for warranty purposes, please present your receipt when claiming warranty as proof of
purchase date.
Warranty
This product is warranted to be free from any defects for a period of 12 months (one year) from the
date of purchase, any defects that may occur will be repaired or replaced.
Warranty Procedure
Please return the faulty product with a valid proof of purchase to the original place of purchase.
The customer is responsible for freight, postage and packing costs when claiming warranty.
Exclusions
This warranty does not cover batteries, misuse, packaging, general wear and tear, power surges,
Table of contents
Other Techome TV Mount manuals


Popular TV Mount manuals by other brands


Stell
Stell SHO 1020 Universal Mounting Instructions

Digital Watchdog
Digital Watchdog DWC-PV20CMW quick start guide

Focal
Focal PROFILE IW 908 - MOUNTING KIT installation guide

JWA
JWA NAXOS 70626 Assembly instructions

Mounting Dream
Mounting Dream MD2104-XL installation instructions

USX-MOUNT
USX-MOUNT XMS010-L-09 instruction manual