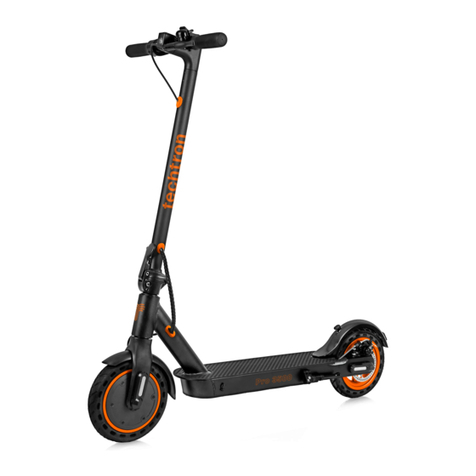
techtron Ultra 5000 User manual

Instruction Manual
Ultra 5000

2
Welcome to techtron®. By combining passion,
drive and intellect with market leading research
and cutting-edge technology, we innovate and deliver
premium quality products that excite, inspire and challenge
the sector. Striving for perfection, embracing new ideas
and investing in the future is our ethos.
Ethos
Future Tech. Today

3
Contents
Product and Accessories 4
Assembly 6
Features 8
Charging 10
Display Panel Function 11
techtron® Smart App 12
Maintenance and Warranty 14
Rider Guidance, Safety and Specications 17
Troubleshooting 18

4
Product and Accessories
AAccelerator
BMain display panel
CFront and rear brake levers
DFolding mechanism and lock
EFolding clasp
FBattery compartment
GMotor wheel
HCharger port
I Front and rear lights
JFront and rear brake discs
KKickstand
LFront and rear suspension
J
J
B
CC
K
L
L
A
D
G
H
E
I
I
F

5
M5 hex screws x6
Charging adaptor x1
Hex key set 8pc
Product and Accessories

6
Assembly
Using the M5 hex key,
fasten the crossbar
onto the standpipe
with the six M5 hex
screws.
Install the crossbar
onto the standpipe.
2
1
3Fold the scooter standpipe
to its upright position.
1
2

7
Assembly
4
Make sure the
brake levers are
installed in the
correct positions.
Use the M5 hex
key to loosen and
tighten the xings.
5
Insert and screw the
locking mechanism
tightly into place.

8
Features
Folding mechanism
The Ultra 5000 can be easily folded
for transporting. First unscrew the
locking bolt in gure 1, then collapse
the standpipe and hook onto the
folding clasp as shown in gure 2.
2
1

9
Features
Electronic bell
A much louder sound
comparable to a standard
car horn. To use the
electronic bell please
ensure the selector
switch is rst moved
to the ON position.
Mechanical bell
A traditional sounding
bicycle bell.
2
2
1
1

10
Charging
Charging time
Please allow 5-6 hours for the
eScooter’s battery to fully charge.
To charge simply open the rubber stopper
on the side of the base and plug into the
power supply. Replace the stopper after
charging to prevent water damage.
USB device charging
The Ultra 5000 has a
USB 2.0 port for charging
mobile devices.

11
Display Panel Function
Speed mode presets
The Ultra 5000 comes with three
pre-congured factory default speed
modes (These can be changed via the
techtron® smart app - see page 12).
Speed mode settings
Mode Default Maximum*
Eco 15km/h 25km/h
Drive (D) 20km/h 25km/h
Sport (S) 25km/h 40km/h
Sport mode (S) is actually capable of
a maximum speed of 40km/h, which can
only be achieved using the techtron®
smart app. Please note the UK speed
limit for electric scooters is currently
15.5mph (25Km/h) at the time of going
to print.*
The display can also be congured
to show speed in mph or km/h using
the smart app.
Display panel button
With a quick double click of the power
button, the user can toggle between
the device’s three-speed mode presets.
The eScooter’s main light can also be
turned ON/OFF by a single press of the
button. To turn the eScooter ON/OFF,
hold down the button for three seconds.
Battery level indicator
Five bars along the centre of the display
panel indicate the current charge
status. When only a single bar remains,
electricity is less than 10% and the
scooter will eventually slow to a natural
stop and must then be re-charged.
*Speed is adjustable by the techtron® smart app at individuals’ own liability. techtron®or Multibrands™International Ltd
will not be held responsible for accidents, injuries to any party, through misuse or illegal operation in anyway.
Power saving
When not in use
the techtron®
eScooter will
power down
automatically
after 15 minutes.
Cruise control
To activate
cruise control
mode, simply
maintain the
same speed
for 10 seconds,
the device will
beep when the
mode
is activated.
To turn OFF
cruise control
simply brake or
decelerate.
Diagnostics
Thermometer and spanner icons are
briey displayed on the control panel
at start-up, indicating the scooter’s
diagnostic check. These will only stay
on permanently if a problem
is detected.
Thermometer: Indicates there is a
problem with the motor temperature.
If the temperature of the motor is
more than 90˚C, the scooter will stop
working in order to protect the motor.
Spanner: Indicates an electrical fault,
which also displays a fault code.
Please consult the troubleshooting
guide (page 19) for further detail.

12
techtron® Smart App
Light: ON Settings
Speed mode 3
Unlocked Connection
t-664969
Trip Info Cruise: ON
0.0
km/h
71%
Settings
Unit: Metric
Cruise control
Riding mode
Cruise control speed 10Km/h
Mode 3 speed limit value 30Km/h
Speed Mode 3
Zero Start
OFF
ON
2
1
Google Play
Apple
App Store
Download to your smart device via
the Apple App Store or Google Play.
Your eScooter can be congured using the techtron® smart app.
Use it to set up your desired settings such as riding mode and speed
limiter. You can even lock the scooter to prevent unauthorised access.
Please note - the eScooter will remember all settings applied
in the techtron® smart app even when Bluetooth® is disconnected.

13
techtron® Smart App
Trip Info
Mileage for this journey 0.0Km
Total mileage 46.9Km
Scooter temperature 29.7˚C
Total driving time 6H 44M 42S
Current speed 0.0Km/h
Current 0.0A
Voltage 52.0V
Power 1.0W
Error code 0
Warning code 0
Electronic control version 80.f.1 (0610001d)
Bluetooth version 6.9.6 (1b)
App Version 1.1.7
Firmware upgrade
3
App store is a service mark of Apple Inc.
Android and the ‘Google Play’ logo are trademarks of Google Inc.
3
2
1Home screen
View the remaining range of your
eScooter, so you can plan your journey.
Light - Turn the main light On/O.
Settings - Access further controls.
Lock - Secure your eScooter against
unauthorised access.
Connection - Discover and pair your
eScooter to your smart device.
Riding mode - Toggle between riding
modes.
Trip info - View the latest trip information.
Cruise control - Quickly toggle this option
On/O.
Settings
Unit - Change the unit of measurement
used to display your speed from km/h
to mph.
Cruise control - Set a specic preferred
speed for longer journeys.
Riding mode - Choose your preferred
speed preset (options vary depending
on model).
Speed limiter - Control how fast the
scooter can go if being used in residential
area.
Zero start - Enable the option to start
your eScooter from stationery position
(enabling this option can reduce battery
range).
Trip info
View your eScooter’s latest trip
information, anything from total driving
time to voltage and power statistics.
The device rmware can also be upgraded
by the user from this menu (internet
connection required).

14
Maintenance and Warranty
Manually adjusting the brakes
To tighten the brakes, simply insert
the M5 hex key into the slot shown
in gure 2 and turn
counterclockwise to release the
pressure plate screw. Then return
the brake line to make the exposed
tail length slightly longer, then lock
the pressure plate screw.
If the brakes are too loose, release
the pressure plate screw again and
pull the brake cable to make the
exposed tail length slightly shorter,
then lock.
Fine tuning loose or tight brakes
The brakes can also be ne tuned
by hand, as shown in gure 1.
Turn the screw counterclockwise
to tighten the brakes and
clockwise to loosen.
1
2

15
Maintenance and Warranty
1
2
3
Inating the tyres
Having the ideal tyre pressure will result in
the best traction, control, mileage, speed and
ultimately the best ride! In addition, this will help
to reduce the chance of punctures.
Simply remove the valve cap on each tyre shown
in gure 3 and top up to the appropriate level.
The Ultra 5000 tyres are rated for a maximum
of 50psi. However, the optimum pressure will
ultimately depend on the weight of the rider.
Please consult the table for further details.
Recommended tyre pressures
Load Pressure
Under 70kg 36psi (2.5bar)
70 -10 0kg 44psi (3.0bar)
10 0 -120 kg 50psi (3.5bar)

16
Maintenance and Warranty
This marking indicates that this product should not be disposed with other household
wastes throughout the EU. To prevent possible harm to the environment or human
health from uncontrolled waste disposal, recycle it responsibly to promote the
sustainable reuse of material resources. To return your used device, please use the
return and collection systems or contact the retailer where the product was purchased.
They can take this product for environment safe recycling.
All product images shown in this instruction manual are for illustrative purposes only and may dier slightly from the actual product.
Cleaning and storage
Use a soft cloth dipped in a small amount of water to wipe the eScooter; for any dicult
to clean areas, you can use toothpaste and gently brush with a toothbrush, then use a
damp cloth to clean.
Do not use alcohol, petrol, kerosene, or other corrosive, volatile chemical cleaning
solvents, as this will seriously damage the appearance and internal structure of the body.
Do not use pressure washers to clean. Ensure that the charging cable has been unplugged
and the rubber stopper on the charging port is closed. Otherwise, there may be a chance
of electric shock or serious failure due to internal water intake.
Warranty policy
techtron® oers a one-year guarantee on rechargeable batteries. Two-year guarantee
against parts and/or manufacturing defects, Terms & Conditions/Exclusions apply,
please see website for further details.
Product registration
For exclusive oers, product support and information on the latest techtron® innovations,
register your product by completing the form on the website with your serial number and
details - www.techtron.co
Battery maintenance and disposal
Do not touch the battery contacts, and do not open or expose the shell. Avoid metal
objects touching the battery contacts, as this will cause a short circuit, damage to the
battery, or even personal injury.
Please refer to the model specications in this manual for your eScooter’s charging
requirements. Only use a charger with the correct voltage otherwise there will be a risk
of damage to components or re.
Ensure batteries are disposed of responsibly. Recharge the battery and store after use,
in order to preserve battery life. Do not place the battery in high temperatures higher than
50°C or below -20°C, or it may lead to battery failure, overheating, or even risk of re.
Always store in a cool dry place fully charged. A battery will be at optimum performance
at a standard room temperature. Warranty may be invalid if the battery is removed.

17
Rider Guidance, Safety and Specifications
Model specications
Any enquiries regarding maintenance,
accessories, security or warranty,
please visit the techtron website:
www.techtron.co
or email us:
Model Ultra 5000
Range 40km
Power 500W (Peak 1000W)
Top Speed 40 km/h*
Speed Modes 3
Hill Incline 20%
Rider Age 18+ years
Max. Load 120kg
Battery 48V 12Ah
Charger 54.6V / 2.0A
Storage Temp -20˚C to 45˚C
Working Temp -10˚C to 40˚C
Rider Height 150cm - 200cm
Frame Material Steel and Aluminium
Suspension Front and rear
Current Limit 21A
Motor Type Brushless DC
IP Rating IPX4
Foldable Yes
Tyre Size 10” Pn e u mat i c
Brakes Front and rear
Rules of the road and licensing guidance
For the latest up-to-date safety, licensing guidance and rules of the road for UK eScooter
users, please consult the UK Government website:
www.gov.uk/guidance/e-scooter-trials-guidance-for-users
Helmets and clothing
Wearing cycle helmets are recommended
when riding an eScooter, but they are not a
legal requirement. Always make sure that your
cycle helmet conforms to current regulations,
is the correct size, and is securely fastened.
Wear light-coloured or uorescent clothing so
that other road users can see you at night or
whenever visibility is poor.
As with any vehicle, the faster the user is
travelling, the more braking distance is
required. Please respect pedestrians’ right of
way when riding the techtron® eScooter.
Riding safely
Please check the eScooter before riding. Check
for loose parts and general tyre wear and tear.
Always start the eScooter by pushing o with
your foot rst, this reduces the start load on the
motor, ensuring a longer battery life.
The techtron® eScooter is designed to perform
best on smooth dry surfaces, therefore avoid
riding on uneven gravel, sand, grass, slick or
wet surfaces. Never ride over curbs or jump.
The eScooter is not designed for this type of
riding and any damage caused to the eScooter
while riding in this manner will void the warranty.
techtron® accepts no liability for any injuries
caused to rider or damage to property which
may arise while riding the eScooter. Never ride
the scooter with more than one person, as
this may lead to loss of control. It is the rider’s
responsibility to ensure they comply with all
local laws and regulations that may apply while
riding the eScooter.
*Speed is adjustable by the techtron® smart app at individuals’ own liability. techtron®or Multibrands™International Ltd
will not be held responsible for accidents, injuries to any party, through misuse or illegal operation in anyway.

18
Troubleshooting
Diagnostics and error codes
Thermometer and spanner icons are briey displayed on the control panel at start-
up, indicating the scooter’s diagnostic check. These will only stay on permanently
if a problem is detected. Maintenance of this kind should only be checked and
rectied by a qualied technician.
Product registration
For exclusive oers, product
support and information
on the latest techtron®
innovations, register your
product by completing the
form on the website with your
serial number and details -
www.techtron.co
Thermometer: Indicates there is a problem with the motor temperature.
If the temperature of the motor is more than 90˚C, the scooter will stop
working in order to protect the motor.
Spanner: Indicates an electrical fault,
which also displays a fault code.

19
Troubleshooting
Error code Description Solution
4Short circuit Check for a short circuit in the wiring/installation
or replace the controller to eliminate the fault.
9Sub-motor
communication failure
(dual drive models only)
Check the connection line between the sub-
controller and the main controller.
10 Dashboard
communication failure
First check whether the connection line between
the instrument panel and the controller assembly
line is normal or not. Then shut down and restart
the scooter, the re-plugging the assembly line
interface. If fault has not disappeared, instrument
or controller may need to be replaced to eliminate
the fault.
11 Abnormal sensor Check the line of the phase line of the controller
or motor.
14 Throttle hall abnormal Check whether the throttle is reset to zero,
whether the throttle cable and throttle are normal
or not. Unplug the throttle cable and restart the
scooter to troubleshoot the problem.
15 Brake hall abnormal Check whether the brake is reset to zero position
or not, check the brake line and the brake normal
or not. Try unplugging the electronic brake
wiring and restarting the scooter to eliminate the
problem.
16 Motor hall abnormal Check that the motor hall wiring is normal or not,
If problem occurs when braking, the motor
or controller will need to be replaced.
19 Auxiliary motor hall
abnormality (dual-drive
models only)
Check that the secondary motor hall wiring is
normal. Replace motor or controller to eliminate
the problem.
21 BMS/BMS
communication
abnormal
BMS/BMS communication abnormal
(non-communication battery is ignored).
50 Bus high voltage Check the battery voltage is normal, cycling failure.
Replace the battery or controller to eliminate the
problem.
53 System overload Shutdown and restart the scooter. If the error
code is still displayed, the controller needs to be
replaced.
55 Controller high
temperature alarm
If the temperature of the controller is too high,
allow the scooter to cool and then restart. If vehicle
fails to boot, the controller will need to be replaced.

For further information and advice you can find us at:
techtron® Unit 2, Jowett Street,
Bradford, BD1 2JX. UK.
t: 01274 307310
w: techtron.co
Research & Development 2100 Geng Road, Suite 210,
Palo Alto, California, 94303 USA.
e: info@techtroncalifornia.com w: techtroncalifornia.com
techtron® is a division of Multibrands International Ltd.
V 0 0 1 10 .11 . 2 0 2 1
Table of contents
Other techtron Scooter manuals
