TECHWOOD TFR-301SH User manual

ELECTRIC AIR FRYER
Instruction manual
1

IMPORTANT SAFEGUARDS
❑Please read these instructions carefully before use.
❑Keep present instructions for future references.
❑Check that your mains voltage corresponds to that stated on
the appliance.
❑Only use the appliance for domestic purposes and
household or similar applications such as:
-staff kitchen areas, in shops, offices and other working
environments;
-by clients in hotels, motels and other residential type
environments;
- Environment type like :
• Farm Houses • Bed and Breakfast.
❑Only use the appliance in the way indicated in these
instructions.
❑Never use this unit near bathtub, shower, wash-hand basins
or other containers with water.
❑Never use this apparatus near water projections.
❑Never use this apparatus with the wet hands.
❑If, unfortunately the apparatus is wet, immediately withdraw
the cord of the socket-outlet.
❑Inform potential users of these instructions.
❑Never leave the appliance unsupervised when in use.
❑The appliance must be used only for its intended purpose. No
responsibility can be taken for any possible damage caused
by incorrect use or improper handling.
❑Children and persons with disabilities are not always aware of
the danger posed by the use of appliances.
❑This device can be used by children aged 8 years and older
and adults, with reduced physical, sensory or mental
capabilities or lack of experience and knowledge, if they have
been given supervision or instruction concerning use of the
2

appliance in a safe way and understand the hazards
involved.
❑Cleaning and user maintenance shall not be made by
children unless they are older than 8 and supervised.
❑Keep the appliance and its cord out of reach of children aged
less than 8 years.
❑Children must not play with the appliance.
❑In order to ensure your children’s safety, please keep all
packaging (plastic bags, boxes, polystyrene etc.) out of their
reach.
❑Caution! Do not allow small children to play with the foil :
THERE IS A DANGER OF SUFFOCATION!
❑From time to time check the cord for damages. Never use the
appliance if cord or appliance shows any signs of damage.
❑Never immerse the appliance in water or any other liquid for
any reason whatsoever.
❑Never place it into the dishwasher.
❑Never use the appliance near hot surfaces.
❑Do not operate the appliance with a damaged cord or plug, or
after the appliance has been damaged in any manner.
❑If the supply cord is damaged, it must be replaced by the
manufacturer, its service agent or similarly qualified persons
in order to avoid a hazard.
❑Disconnect the power source cable before any operation of
cleaning of maintenance and accessories assembly.
❑Never use the appliance outside and always place it in a dry
environment.
❑Never use accessories, which are not recommended by the
producer. They could constitute a danger to the user and risk
to damage the appliance.
❑Never use any other connector than the one provided.
❑Never move the appliance by pulling the cord. Make sure the
cord cannot get caught in any way.
3

❑Never wind the cord around the appliance and do not bend it
❑Ensure that the power cord does not come into contact with
hot parts of this unit.
❑Make sure the appliance has cooled down before cleaning
and storing it.
❑The temperature of accessible surfaces may be very high
when the appliance is operating. Never touch these parts, of
apparatus, to avoid burning itself.
❑Make sure the appliance never comes into contact with
flammable materials, such as curtains, cloth, etc ... & the
power cord and plug do not come in contact with water.
❑Before cleaning, always unplug the appliance from the power
supply and let it cool down.
❑This appliance is not intended to be operated by means of an
external timer or separate remote-control system.
❑Always place the unit on a flat surface. Ensure, also, not to
cover the device and not to put anything on it.
❑Always remove the plug from the wall socket when the
appliance is not in use.
❑When using an extension lead always make sure that the
entire cable is unwound from the reel. Use solely CE
approved extension leads. Input power must be at least 16A,
250V, 3000W.
❑Incorrect operation and improper use can damage the
appliance and cause injury to the user.
❑This device, designed for home use, complies with standards
relating to this type of product.
❑The appliance must be used and rested on a table or flat &
stable surface.
❑The item must not be left unattended when it is connected to
main supply.
❑The item is not to be used, if it has been dropped or if there
are visible signs of damage or if it is leaking.
4

❑Regarding the instructions for cleaning, thanks to refer to the
below paragraph of the manual.
❑This appliance is only intended for household use.
WARNING: RISK OF BURNS.
During operation, the surface temperature of the device can be
very hot.
The heating parts remain hot long after stopping the machine.
GENERAL INFORMATION
The symbol "OPEN BOOK" means a recommendation
to read important things contained in the record.
The symbol "BIN" crossed out, abbreviation WEEE
(Waste of Electrical and Electronic Equipment) means
that at the end of life, it should not be discarded with
household waste, but filed to the sorting of the locality.
Waste recovery can help preserve our environment.
The symbol "CE" is the guarantee of compliance with
harmonized European standards, voluntary, reflecting
the essential requirements into technical
specifications. These standards are not mandatory
but are guarantees of compliance with essential
requirements.
The symbol ROHS (Restriction of use of some
Hazardous Substances) on the Environmental
Protection, certifies that for each of the five hazardous
substances • Lead • Mercury • (hexavalent) chromium •
products for protection against flames PBB and PBDE,
the peak concentration is equal to or less than 0.1% of
5

the weight of homogeneous material, and 0.01% for the
6th • cadmium.
6

The symbol "HOT WALL" warns the user that the walls
of the unit can become very hot, and to take
precautions as required.
The symbol "GLASS / FORK" means that the device is
compatible and can come into contact with foodstuffs.
The symbol "TRIMAN" indicates that the consumer is
invited to dispose the product as part of a separate
collection (eg recycling bin, waste, voluntary intake
point).
For more information : http://www.quefairedemesdechets.fr
TO KNOW IT’S UNIT
1. Food tray
2. Silicone rubber
3. Pot
4. Drawer handle
5. Top of the fryer with air inlet
6. Control panel
7. Temperature selector
8. Heating indicator light
9. Timer
Back of the deep fryer
11. Air outlet
12. Electric cord
7

INTRODUCTION
This brand-new fryer design is an easy and healthy way to prepare your favourite
dishes. By using the hot air circulation and a grill, it is possible to make many
different dishes.
The special feature of this new fryer is to distribute the heat in all directions, so
most ingredients heat up everywhere and do not need oil.
AUTOMATIC STOP
The unit is equipped with a built-in timer, it automatically turns off the device when
countdown reaches zero. The unit can be manually turned off by turning the timer
knob, counter clockwise, to zero.
FIRST USE
Before first use, remove the device and all accessories from the packaging.
• Clean the apparatus according to the instructions in "CLEANING AND
MAINTENANCE " paragraph.
• Place the machine on a suitable flat, stable surface.
Notes: It is not appropriate to fill the tank with oil or frying fat as the unit works with
hot air.
Never put anything on the device. This would disrupt the airflow and affect the
result of frying in hot air.
HOT AIR FRYING
1. Plug the power plug into a grounded wall outlet.
2. To preheat the fryer, turn the timer knob for 5 minutes.
Notes: The heat indicator lights up.
The timer starts counting down the programmed cooking time.
During the process of frying with hot air, the heating indicator lights up
and goes out from time to time. This indicates that the thermostat is
working to maintain the preset temperature.
3. When the fryer is hot and ready to use, program the required cooking time.
Notes: See the 'Settings' section in this chapter to determine the correct
temperature and the required preparation time according to the
ingredients.
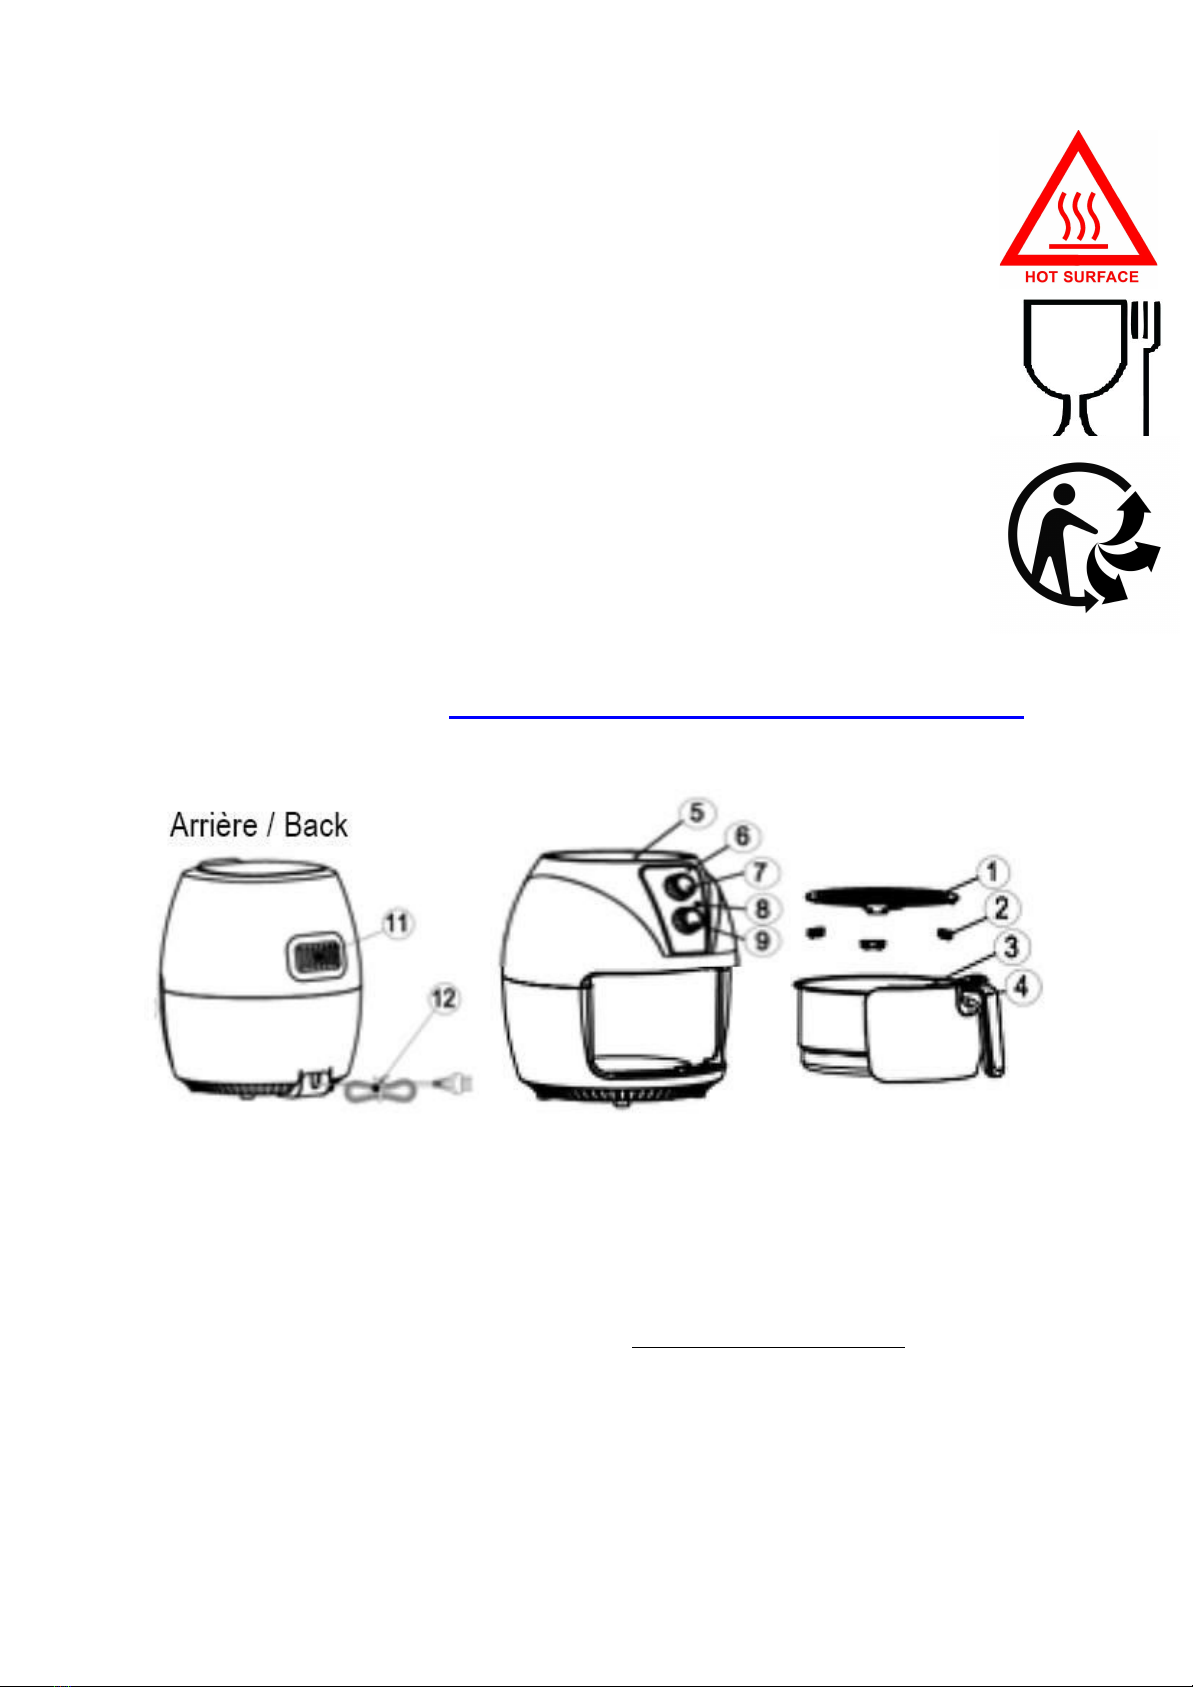
Always take the basket out of the fryer using the basket handle.
4. Place the ingredients in the basket.
Note: Never exceed the MAX indication as this may affect the quality of
the food.
5. Insert the drawer into the fryer.
6. Some ingredients should be shaken halfway through cooking.
8

To do this: pull the drawer out of the appliance, shake it and put the drawer back
into the fryer.
Tip: If you have to shake the ingredients, set the timer to half of the
preparation time. When the timer rings, shake the basket with the food,
reposition the basket in the fryer, and then set the timer again to the
remaining cooking time. (Second half of the time).
7. At the end of the programmed cooking, the timer sounds! Remove the drawer
from the appliance and check that the food is cooked properly. If it’s not ready yet,
simply put the basket back in the unit and set the timer to a few extra minutes.
If food is cooked, pour the ingredients into a heat-resistant dish.
Tip: To remove bulky or fragile ingredients, lift them from the basket with a flat
spatula or a pair of kitchen tongs.
COOKING GUIDE
The table below is used to select the basic settings for the most common foods.
Note: These parameters are only indications. Foods differ in size, shape, brand,
and origin, sometimes it's better to rely on your own experience. We cannot
guarantee the best setting for your ingredients.
9

Thanks to the "Rapid Air" technology, the air inside the device heats up instantly.
Briefly removing the basket from the appliance during cooking to check the
cooking does not disturb the process.
10

ADVICES
- Smaller ingredients or foods usually require shorter cooking times than larger
ones.
- Shake small foods half way, optimize the result and may help prevent fried
ingredients from burning.
- Add oil to fresh potatoes for a crispy result.
- Wait a few minutes, after adding the oil on food, that it is well soaked, to Fry the
ingredients in the fryer.
- Do not prepare extremely fatty ingredients such as sausages in the air fryer.
- The dishes that can be prepared in an oven can also be prepared in the air fryer.
- The optimal amount to prepare crispy fries is 500 grams.
- Use a commercial dough to prepare dishes (quiche or other preparation) to fill
quickly and easily.
- A pre-cooked dough requires a shorter cooking time than a homemade dough.
- Place a baking dish in the air fryer basket to put on a preparation such as quiche
or to fry fragile foods or stuffed preparations.
- Air fryer can also heat food. To do this: set the temperature to 150℃ and timer
on 5 to 10 minutes.
CLEANING AND MAINTENANCE
• Before cleaning, always switch off the appliance, disconnect
the apparatus and let it cool.
• Wait until the fryer is completely cool before starting cleaning.
Note: It is important to wait one to two hours after use to avoid
any risk of burns.
Remove remaining residues with paper towels before cleaning
the device.
• Never plunge the apparatus or the control board in water or all
other liquid!
• Clean the outside of the apparatus with a sponge or slightly
wet linen.
• The parts (removable) in contact with food like plate, bowl,
forks, Spatula etc. can be washed in hot water with sponge
and soft detergent or put in the dishwasher.
• Do not use abrasive cleaners, gritting, or metal brush or
another cutting object.
11

• Clean the inside of the appliance with hot water and a
non-abrasive sponge.
STORAGE
-Ensure the unit is completely cool and dry.
-Do not wrap the cord around the appliance, as this will cause damage.
-Keep the appliance in a cool, dry place and out of reach from children.
GUARANTEE
Before being delivered, all our products are subjected to a rigorous control.
This apparatus is guaranteed 24 months starting from the date of purchase, by
the consumer.
The documents in proof of guarantee are:
• The invoice and
• The filled and stamped warrantee plate (located on side or bottom of the gift
box). Without these documents in proof, no free replacement, nor no free repair,
can be carried out.
During the warranty period, we deal for free, the defects of the apparatus or the
accessories, rising from a defect of materials or manufacture by repair or,
replacement. The services within the framework of the guarantee do not involve
any extension of the warranty period and does not give right to a new guarantee!
In the event of recourse to the guarantee, bring back the complete apparatus to
your retailer, in its original packing, accompanied by the proofs of purchase.
The breakage of parts out of glass or plastic is, in all the cases, not warranted.
Defects on the accessories or the wearing parts (for example: coals of engines,
hooks, drive belts, remote control of replacement, teeth brushes of replacement,
webs etc) as well as cleaning, maintenance or it replacement of wearing parts
are not guaranteed and are thus to pay!
In the event of foreign intervention, the guarantee becomes null and void.
After flow of the warranty period, repairs can be carried out, against payment, by
a specialized trade or a repair service.
SPECIFICATIONS
Power supply 220-240V~ 50/60Hz
Power 1300W
Norm Class I
Capacity 3.0 L
Made in P.R.C
The characteristics can change without prior notice
12

13

This unit is equipped with an electrical outlet with earth and must be earthed in an
according plug.
Note: In the event of question concerning the earth or electric
connection, please consult a qualified personnel.
In the event of short-circuit, earthing reduces the risk of electric
shock while making possible the current to be evacuated by the wire
of ground.
CAUTION: In order to minimize the risks of electric shock, In the event of
breakdown, not to open the case but to call upon a qualified technician
for repairs.
This device complies with EC directives, it was controlled according to all current
European directives, applicable such as: electromagnetic compatibility (EMC) and
low voltage (LVD).
This device has been designed and manufactured in compliance with the latest
regulations and technical requirements for safety.
Imported by Sotech International
" LE PERIPOLE " N°A-107
33, Avenue du Marechal de Lattre de Tassigny
94120 Fontenay sous-bois – France
14

RECIPES
Asian Spicy French Fries
-Potato 4 pcs / 600g
-Oil 2 teaspoons
-Salt 1 teaspoon
-Pepper powder 1 teaspoon
-Scallion powder 1 teaspoon
-Chili pepper powder 1/2 teaspoon
-Garlic powder 1/2 teaspoon
Peel the potatoes and cut into strips.
Dip the strips of potato in salted water for at least 20 minutes, then dry with paper
towels.
Mix well shallot, salt, pepper, garlic powder, oil and chilli powder.
Stir in the potato strips into the mixture.
Set the temperature to 180° and the timer to 5 minutes for preheating.
Place the strips of potato in the frying basket.
Put the drawer in the appliance and set the timer for 15-20 minutes (depending
on the size of the fries) or until the fries turn golden brown.
Note : Shake the basket in the middle of the cooking process to return the fries
and obtain a better cooking result.
Golden chicken wings
-Chicken wings 500g
-AGarlic 2 cloves
-Powdered Ginger 2 teaspoons
- Ground cumin 1 teaspoon
-Powdered pepper 1 teaspoon
-Spicy sauce 100 mg
-Salt 1 teaspoon
15

Set the temperature to 200 and the timer to 5 minutes for preheating.
Mix garlic, ginger powder, ground cumin, black pepper, hot pepper sauce and
salt.
Coat chicken wings with this mixture.
Let macerate for 20 minutes.
Place evenly the chicken wings in the frying basket.
Put the drawer in the appliance and set the timer for 15-20 minutes or until
become golden brown.
Fried chicken nuggets
-Fresh chicken fillet 500g
-Eggs 3 pcs
- Wheat flour 1 cup
-Olive oil 1
tablespoon
-Powdered white powder 1 teaspoon
-Salt 1 pinch
Set the temperature to 200 and the timer to
5 minutes for preheating.
Tap the chicken for 5 minutes with a flat knife blade.
Mix eggs, flour, olive oil, white pepper and salt.
Cut the chicken fillets into pieces about 4 cm square.
Coat chicken pieces. Let stand 20 minutes for marinating.
Place the chicken nuggets in the frying basket evenly, put the drawer in the
appliance and set the timer for 15-20 minutes or until the nuggets turn a
golden-brown colour.
Roasted Lamb Chops
-Lamb chops 500g
(at room temperature)
-Brandy or Cognac 1 small glass
-Oil 2
tablespoons
-Powdered pepper 1 teaspoon
-Crushed black pepper 1 teaspoon
- Soy sauce 1 teaspoon
-Salt 1 good pinch
16

Set the temperature to 200 and the timer to 3 minutes for preheating.
Mix the brandy, the oil, the 2 peppers and the soy sauce.
Note : do not salt before cooking, it hardens the meat.
Mix the seasoning thoroughly and then completely coat the lamb chops with a
kitchen brush. Marinate for 20 minutes.
Place the chops in the frying basket evenly.
Put the drawer in the unit and set the timer for 10-12 minutes or until the chops
turn a golden-brown colour.
Take out the drawer and return the chops. Reduce the temperature to 150° and
cook another 5 minutes.
Fried Pork Chops
-Pork chops 500g
(at room temperature)
-Eggs (beaten) 2pcs
-Flour 1 cup
-Ginger powder 1/2
teaspoon
-Garlic 1 teaspoon
-Chicken soup powder 1/2 teaspoon
-Soy sauce 1/2 teaspoon
-Salt 1/2 teaspoon
-Oil 1 teaspoon
Set the temperature to 200 ° and the timer to 5 minutes for preheating.
Mix the seasoning well, then coat the pork chops with the mixture, marinate for
20 minutes.
Place the pork chops in the basket evenly.
Put the drawer in the device and set the timer for 10-12 minutes
Take out the drawer and return the pork chops. Reduce the temperature to 150 °
and bake for at least 10 minutes or until they turn golden brown.
Fried Squids
-Squid 500g
(fresh or thawed)
-Oil 2 tablespoons
-Salt 1 teaspoon
-Cumin powder 1 teaspoon
17

-Chicken soup powder 1/2 teaspoon
-Powdered pepper 1 teaspoon
-Flour 1 cup
Set the temperature to 200 and the timer to 5 minutes for preheating.
Mix all the ingredients of the seasoning, then smear the squid copiously, let stand
20 minutes;
Place the squid in the basket evenly.
Put the drawer in the appliance and set the timer for 10-12 minutes or until the
squid turns a golden colour.
Spicy prawns
-Use fresh raw shrimp
or Thaw raw shrimp 5/8 pcs p/p
-Oil 2 spoons
-Chopped garlic 1 to 2 cloves
-Crushed black pepper 1 teaspoon
-Sweet chili powder 1 teaspoon
-Powdered white powder 1 teaspoon
-Spicy sauce 10cl
Set the temperature to 200 and the timer to 5 minutes for preheating.
Rinse the shrimp and dry it.
Mix the oil, garlic, chilli, cracked black pepper.
Apply a thin layer of this preparation on shrimp.
Place the shrimp in the basket evenly,
Put the drawer in the appliance and set the timer for 5 to 8 minutes or until the
layer is crisp and golden.
Lightly heat the spicy sauce with salt and white pepper in a saucepan, serve
immediately.
Fried & Grilled corn
- Corn-cob 2 pcs / p
-Oil olive 1 teaspoon per
ear
-Salt
-Pepper
18

Set the temperature to 200 and the timer to 5 minutes for preheating.
Apply a thin layer of olive oil on all the corn.
Place the corncobs in the basket evenly.
Put the drawer in the appliance and set the timer for 10 minutes so that the ears
are crisp and golden.
19
This manual suits for next models
2
Table of contents
Other TECHWOOD Fryer manuals
Popular Fryer manuals by other brands

Silvercrest
Silvercrest SEF 2300 C3 operating instructions

STARFRIT
STARFRIT 024606 Instructions for use and care

Emeril Lagasse
Emeril Lagasse Pressure AirFryer Plus owner's manual

Electrolux
Electrolux WFGROFOOOO Specification sheet

Dean
Dean TC25 Installation & operation manual

Frymaster
Frymaster LOV quick reference