Tecnomac ChillTouch User manual

Low T°
APPARECCHIO
MULTIFUNZIONE
MULTI-FUNCTION EQUIPMENT
EQUIPEMENT MULTIFONCTION
MULTIFUNKTIONSGERÄTE
EN


INDEX
1 - MACHINE START-UP AND SHUT DOWN .................................................................................................................................2
1.1 - General information..................................................................................................................................................................2
1.2 - Entry and exit from Stand-by....................................................................................................................................................2
2 - INITIAL SETTINGS.....................................................................................................................................................................2
2.1 - Language .................................................................................................................................................................................2
2.2 - Unlocking the display ...............................................................................................................................................................3
2.3 - Date and time setting ...............................................................................................................................................................3
2.4 - Setting the 24-48-72 H cycle duration......................................................................................................................................4
3 - CHILLING/FREEZING CYCLES ................................................................................................................................................5
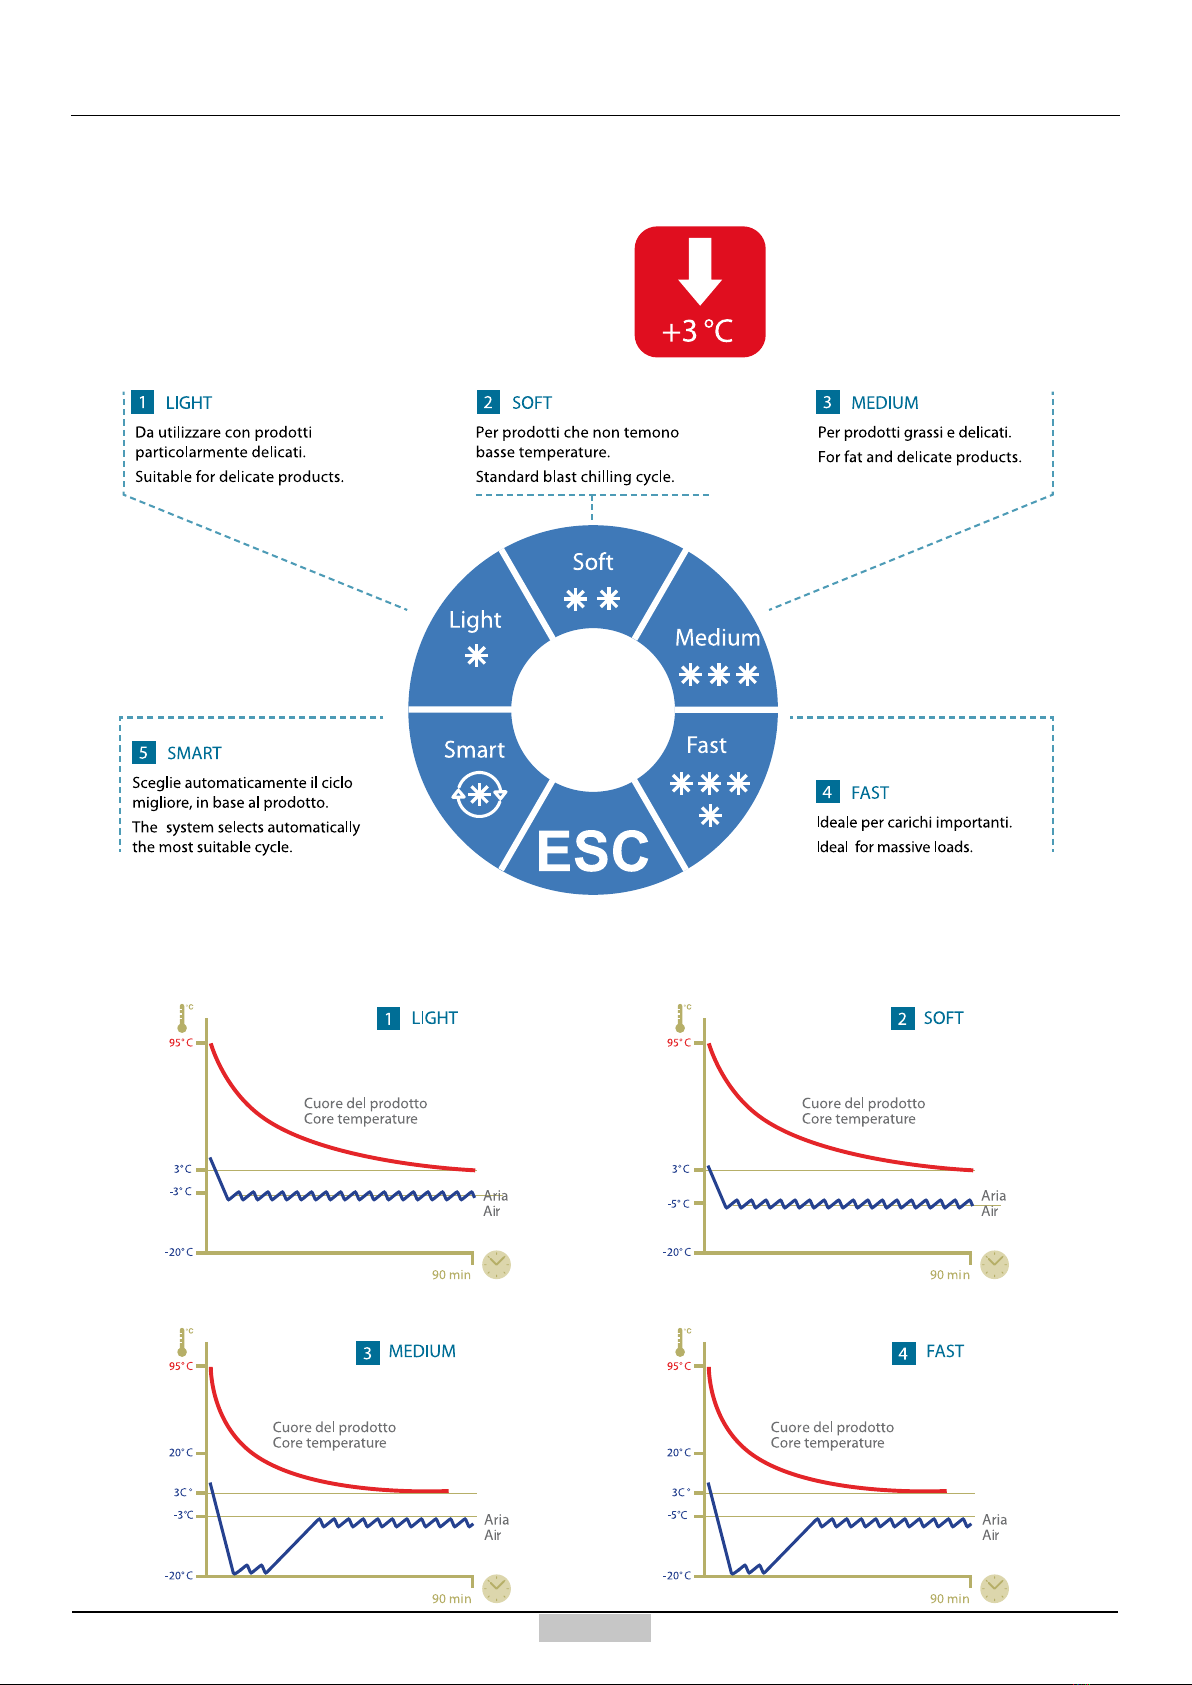
3.1 - Summary of Positive chilling cycles .........................................................................................................................................5
3.2 - Starting the MANUAL Positive Chilling.....................................................................................................................................6
3.3 - Summary of Negative chilling cycles........................................................................................................................................7
3.4 - Starting the MANUAL Negative Chilling ...................................................................................................................................8
3.5 - Saving the Positive / Negative chilling cycle ............................................................................................................................9
3.6 - Change the preservation cell set point.....................................................................................................................................9
4 - THAWING CYCLE ....................................................................................................................................................................10
4.1 - Manual THAWING..................................................................................................................................................................10
4.2 - Programmed THAWING.........................................................................................................................................................11
6 - ICE CREAM CYCLE.................................................................................................................................................................13
6.1 - Ice Cream MANUAL cycle......................................................................................................................................................13
7 - PRESERVATION CYCLE .........................................................................................................................................................14
7.1 - MANUAL preservation cycle ..................................................................................................................................................14
8 - PROGRAMME WRITING..........................................................................................................................................................15
8.1 - Access to programme set-up..................................................................................................................................................15
8.2 - Creation of a Chilling Programme ..........................................................................................................................................16
8.3 - Creation of a thawing programme..........................................................................................................................................17
8.7 - Creation of a preservation programme...................................................................................................................................19
9 - STARTING UP STORED PROGRAMMES...............................................................................................................................20
9.1 - Access to stored programmes................................................................................................................................................20
9.2 - Starting up from stored programmes......................................................................................................................................20
10 - STARTING THE UTILITY FUNCTIONS .................................................................................................................................21
10.1 - Access to UTILITY window...................................................................................................................................................21
10.2 - Display LOCK function .........................................................................................................................................................21
10.3 - List/Export of alarms.............................................................................................................................................................21
10.4 - Starting the manual defrosting .............................................................................................................................................22
10.5 - Starting the Drying cycle ......................................................................................................................................................22
10.6 - Starting the OZONO cycle (optional)....................................................................................................................................22
10.7 - Conguration of the main menu ...........................................................................................................................................23
11 - Alarm statuses.......................................................................................................................................................................24
11.1 - Alarm warnings.....................................................................................................................................................................24
11.2 - Warnings for SERIOUS alarms ............................................................................................................................................24
11.3 - Warnings for AVERAGE alarms............................................................................................................................................24
11.4 - Pre-alarm warnings ..............................................................................................................................................................24
11.5 - Machine information/data .....................................................................................................................................................24
11.6 Alarm list .................................................................................................................................................................................25

2 71504138-0-003
EN
1 - MACHINE START-UP AND SHUT DOWN
The Touch interface accepts only pressing
with the ngers, avoid using tools or other
mechanical devices which might damage
the interface
Upon the machine start-up, after a few seconds, the
screen represented above will appear.
In order to access the main screen, press the key
[1]. By pressing key [2], you can access the machine
information.
In order to return to the initial stand-by screen, just press
the key [3]
2 - INITIAL SETTINGS
2.1 - Language
In order to access the language setting from the main
menu, press the key [4]
Once the Utility window is accessed, press the key [5]
Select the preselected language by pressing the key
representing it with the ag [6]
5
6
Up to 40 programmes of various type can
be saved.
During all cycles, the humidification-
dehumidication will be used, it will be active
only if the cell temperature is higher than 3°C.
1.1 - General information
1.2 - Entry and exit from Stand-by
During the cooking cycles, the retarder proving
cycles and in general in all cases in which
high humidification values are used, it is
recommended removing the steel cap placed
on the internal back discharge.
Icons positioned in the top right
Identication of operation in progress
If the DFC logo appears, then the
Dynamic Frost Control algorithm is
active.
12
3
4

3
71504138-0-003 EN
5
2.2 - Unlocking the display
2.3 - Date and time setting
In order to set or change the date/time, access the Utility
page and press the key [7]
In order to change the date, press above the date eld
[10]
Once the window is opened, use the keys +/- to change
the hour and minutes and conrm using the OK key to
save the changes
Once the window opened, use the keys +/- to change
the day, month and year and conrm using the OK key
to save the changes
If the keyboard is blocked, type the password 1365 in
order to unlock it
Access the service area with the password 3621
8
9
10
In order to access the date and time setting, press the
key [8]
7
In order to change the time, press above the time eld [9]

4 71504138-0-003
EN
2.4 - Setting the 24-48-72 H cycle duration
All cycles that provide the programming of the cycle end date, adopt the following duration setting method, based on the
time ranges that fall within the 24, 48 or 72 hour ranges following the cycle start.
We present hereinafter a few examples that represent the setting logic.
1st example: 24H cycle ending at 10:00.
START
8:00
24:00 24:00
24:00
mercoledì giovedì
10:00
END
START
24:00 24:00
24:00
mercoledì giovedì
11:00
END
10:00
START
8:00
24:00 24:00
24:00
venerdì sabato
10:00
END
v
enerd
ì
domenica
24:00
10:00 10:00
saba
t
o
24:00
lunedì
START
24:00 24:00
24:00
venerdì sabato
11:00
END
nerd
ì
e
e
domenica
24:00
10:00 10:00
saba
t
o
24:00
lunedì
do
m
e
n
ica
10:00
2nd example: 72H cycle ending at 10:00.

5
71504138-0-003 EN
3 - CHILLING/FREEZING CYCLES .
The Positive chilling cycle is set to bring the temperature of a food item under 10°C, normally to +3°C. Hereinafter, we
list the available chilling programmes.
3.1 - Summary of Positive chilling cycles

6 71504138-0-003
EN
3.2 - Starting the MANUAL Positive Chilling
In order to start the Manual positive chilling cycle, press
the icon [10] from the main screen. In order to stop at
any time the chilling, just press the key STOP [11]
Upon the rst start-up, the blast chiller will execute a
SOFT temperature cycle and check, during the rst
two minutes, if the needle is inserted. If inserted, it will
continue to execute a temperature cycle or it will execute
a time cycle. During the insertion control, the needle will
ash. Afterwards, at any time, by pressing the symbols
[11a] and [11b], you can change the operation type (time
or temperature).
If the test is NOT exceeded, it will perform the execution
of a time cycle represented in the gure. If you want to
change the chilling time, just press above the countdown
value [12]
12
13
While, in the case of a temperature cycle, in order to
change the chilling end temperature set point, just press
above the value [13]
11
14
If you want to select another type of chilling cycle, just
press above the name of the execution cycle [14] and
a selection wheel will appear with the selectable cycles,
once the preselected cycle [15] is selected and ESC [16]
is pressed, the programme will acquire a new cycle.
15
16
Once the chilling time has elapsed or the chilling end
temperature is reached, the programme will pass
automatically to the preservation phase. In the centre,
the value read by the cell probe and in the lower part, the
summary of the performed chilling type and its duration,
used to set the dedicated chilling programmes, will be
displayed. In order to stop the cycle, press the key [11]
11
11a
11b
14
10

7
71504138-0-003 EN
The negative chilling cycle is set to bring the temperature of a food item under -18°C, in the shortest time possible.
Hereinafter, we list the available freezing programmes.
3.3 - Summary of Negative chilling cycles
-18

8 71504138-0-003
EN
3.4 - Starting the MANUAL Negative Chilling
In order to start the Manual negative chilling cycle, press
the icon [17] from the main screen. In order to stop at
any time the freezing, just press the key STOP [18]
Upon the rst start-up, the blast chiller will execute a
HARD temperature cycle and check, during the rst
two minutes, if the needle is inserted. If inserted, it will
continue to execute a temperature cycle or it will execute
a time cycle. During the insertion control, the needle will
ash. Afterwards, at any time, by pressing the symbols
[18a] and [18b], you can change the operation type (time
or temperature).
If the test is NOT exceeded, it will perform the execution
of a time cycle represented in the gure. If you want to
change the chilling time, just press above the countdown
value [19]
19
21
While, in the case of a temperature cycle, in order to
change the freezing end temperature set point, just press
above the value [21]
18
20
If you want to select another type of chilling cycle, just
press above the name of the execution cycle [20] and
a selection wheel will appear with the selectable cycles,
once the preselected cycle [22] is selected and ESC
[23] is pressed, the programme will acquire a new cycle.
22
23
Once the chilling time has elapsed or the chilling end
temperature is reached, the programme will pass
automatically to the preservation phase. In the centre,
the value read by the cell probe and in the lower part, the
summary of the performed chilling type and its duration,
used to set the dedicated chilling programmes, will be
displayed. In order to stop the cycle, press the key [24]
24
18a
18b
20
17

9
71504138-0-003 EN
If you want to save the just executed cycle, press the
key [A], then type the Name of the programme on the
keyboard [B] and nally conrm using the OK key [C].
Once the programme is saved, it will be found in the
programmes window.
3.5 - Saving the Positive / Negative chilling cycle
A
B
C
Both in the case of a chilling or a freezing, and possibly
during the preservation phase, change the cell set point,
it will be enough to press above the represented cell
temperature value [D], and a change window will appear.
At the end of the change, just conrm using the OK key
[E], if you do not want to change, just press the ESC key.
3.6 - Change the preservation cell set point
D
E

10 71504138-0-003
EN
4 - THAWING CYCLE
The defrost cycle has as its purpose to defrost a frozen
food item, guaranteeing health and therefore being
below the temperatures at which bacterial growth occurs
(above 10°C).
The cycle is composed of a rst pre-set time phase,
during which the cell temperature, the humidity and the
speed of the fans can be adjusted; and of a second
preservation phase with undetermined time.
In order to start the defrost cycle, press the key [25]
The following window will appear:
4.1 - Manual THAWING
In order to execute a manual cycle, press the bottom
key of the manual cycle [26], once pressed, the following
window will appear:
In order to change the set points, the window for
changing the value appears, it will be enough to press
above the displayed values. In order to change the cell
set point, just press above the value [27],,in order to
change the defrosting time, press above the value [28] .
You can also choose if the ventilation should be
continuous or discontinuous, just press the symbol
[31b] which will change the graphics with the following
meaning:
Once the time has elapsed, you will go to the preservation
phase (next window), where you can change the
cell temperature set point, ,by pressing above the
corresponding values
Non-continuous Continuous
The cycle is executed only according to the set time,
however if, by any chance, the product has the needle
probe inserted, by pressing the key [31], you can go
from the display of the cell probe to the display of the
needle probe or vice versa.
25
32
26
33
31
27
28
31
31b
At any moment, in order to stop the cycle, press the
key [33]
33

11
71504138-0-003 EN
The programmed defrost cycle consists of three phases:
a rst preservation phase, a second phase of defrosting
with a dened time, and a nal post-defrosting indenite
time preservation phase. The purpose of the cycle is to
obtain defrosting within a particular date and time set
by the user, keeping the food in the blast chiller before
the defrosting process. To obtain this, the user must in
any case know the time necessary to defrost the product
In order to start the Programmed defrost cycle, press
the key [34], the following window will appear:
In order to execute a cycle on a date, press the top key
[35], once pressed, the following window will appear:
38
4.2 - Programmed THAWING
Now you have to set the nal time by pressing above
the values of the hours and minutes [36], and select the
duration in days of the programme [37].
Should the duration of the programmed defrost cycle
be higher than the defrosting phase, if the set time and
duration in days which determines a period of time is
37
36
lower than the duration provided for defrosting, the
programme cannot be executed and the top left START
key [38] will have a grey background, and it will not
execute any programme. In order to enable it and making
it green, just change either the cycle end time or the
duration days.
In this page, the cycle can be started by pressing the key
[38], or you can continue changing the default parameters
of the 3 phases which compose the programme starting
from phase F1 (pre-defrosting preservation) which is
accessed by pressing the top right arrow [40]. In order
to change the values, it is enough to press above and
access again the change window.
Naturally, the rst phase does not have a time to set for
the duration, such value being obtained for the dierence
between the total time which is missing at the end and
the provided defrosting duration.
Phase F2 (Defrost) allows the setting or modifying of
this duration, together with the other variables that can
be set. It can be accessed by pressing on F2 [39] or on
the right arrow [40].
The phase F3 (preservation) allows setting the
parameters of this phase of indenite duration. It can be
accessed, by pressing the keys [41] or [42].
40
34
35
39 40
41 42

12 71504138-0-003
EN
At any time, you can start the cycle by pressing the
If you want to save the set programme, press the key
[47], and the following window will open to name the
programme. If you conrm the name with the key [48],
the programme will be found in the programmes window.
If you want to exit without saving, just press the key [49].
48
49
START key [38], and the following screen will appear:
On the left, the read elements are represented: cell
temperature, needle temperature.
The screen represents a scheduled defrosting cycle, the
coloured phase (e.g. F2) will be the one in progress. You
can access the temperature settings, by pressing above
the area of the phase you want to change.
If instead, the lower arrow [45] is pressed, you can
access the setting, for every single phase, of the
continuous ventilation (this can be performed even
during the setting phase of the cycle programme).
In order to set the continuous ventilation, just press in
the white boxes provided for each phase [46] until the
green ag appears. In order to stop at any time the cycle,
just press the key [44].
43 4343
44
47
- - -
45
46

13 71504138-0-003
EN
6 - ICE CREAM CYCLE
The Ice Cream cycle is a single phase cycle and of
indenite duration, during which the following elements
can be set: Cell temperature and the timer.
This cycle is aimed to quickly harden the surface of
an ice cream just made and as soon as it leaves the
whisker, or with a reverse process, softening it as it is
already frozen.
In order to access the ice cream cycle, press the key
[108] from the main menu:
The following window will appear, where the cell
6.1 - Ice Cream MANUAL cycle
temperature reading [109] and the ashing Timer value
are displayed [110]. The appliance will start to cool down
right away.
109 110
During this phase, but also subsequently, you can
change the initially set value of the timer by pressing
above the value [110] and the following value changing
window will appear:
111
112
Using the keys +/- [111], you can change the value,
afterwards, you can save the change by pressing the
OK key [112], or you can exit without saving using the
ESC key [113]. Similarly, by pressing above the cell
temperature [109], you can change the cell temperature
set point.
By simply opening and closing the cell, the countdown
will start, the following window will appear, in which the
value [114] indicates the remaining time.
113
114
Once the countdown ends, the following window appears
with the ashing message:
This message will notify you that you must remove the
hardened ice cream and you must insert a new bucket
of ice cream.
However, you can at any time restart the timer by
opening and closing the door.
To leave the cycle, just press the STOP button [115] at
any time.
115
108

14 71504138-0-003
EN
7 - PRESERVATION CYCLE
The preservation cycle is a single phase cycle and of
indenite duration, during which the following elements
can be set: Cell temperature, relative humidity and fan
speed.
This cycle aims to perform the preservation of food
items under optimum air temperature, humidity and
ow conditions.
In order to access the preservation cycle, press the key
[116] from the main menu:
7.1 - MANUAL preservation cycle
The following window will appear, in which, upon start-
up, only the reading of the set temperature is represented
[117]. The appliance will start to cool down right away,
if the conditions exist.
117
In order to change the set temperature, just press above
the temperature value [117] and the following window
for changing the temperature will appear, in which, using
the keys +/- [118] you can change the value and using
the OK key OK [119] you can conrm it.
118
119
If you want to save the new configuration as a
programme with a name, press the key [123]. You will
access the window which allows typing the name of the
programme and save it.
120
You can end at any time the preservation cycle, by
pressing the STOP key [124].
116
123
124

15
71504138-0-003 EN
8 - PROGRAMME WRITING
In addition to saving programmes from the selected
cycles, you can register a programme without starting
a cycle. In order to select a programme to store, press
the icon [125] from the main menu.
8.1 - Access to programme set-up
Which will allow accessing the following Utility window:
126
Now, by pressing the icon [126] you can access the
following library of created or to create programmes
To modify a programme already created, simply press
on the icon of the programme concerned. The icons of
the programmes created with the yellow circle at the top
right, are also visible in the User programme collection.
If instead you want to create a new programme, press
above the grey icon [132], afterwards, the following
circular menu will appear which allows selecting the type
of programme to create:
Upon pressing one of the represented symbols, a
specic programme setting will follow.
To exit, press ESC.
To scroll through the pages quickly, instead of using the
arrows in the top right, it is possible to recall the pages
by pressing the key [P].
The following screen will appear, in which the green
pages will be those that have at least one programme
set, the white ones will be the ones with no programme
set (wait a few seconds for the green pages to be
updated).
Pressing on a page will send to the screen containing
the programs of the selected page.
125
132
P
127
139
174
198

16 71504138-0-003
EN
Hereinafter, there is an example of selection with
TEMPERATURE chilling.
135
136
Now, if you want to save the set programme, press the
key [135], while if you want to delete or if you do not
want to save the new programme, press the key [136],
a message to conrm appears [137] or otherwise [138]
to delete.
137 138
134
If you select the icon of chilling cycles [127] from the
wheel, you will access the following window:
8.2 - Creation of a Chilling Programme
128
As a rst action, press in the programme name area
[128] and the following keyboard will appear for typing
the name of the programme to conrm using the OK
key [129]:
129
After saving the name and returning to the setting
window, dene the type of blast chilling by pressing
above one of the Chilling/Freezing symbols [130],
afterwards select one of the 4 modes [131], nally
select the mode, TIME or TEMPERATURE [132], and
afterwards change the value [133].
Up until this moment, the programme remains
visible during the collection of USER programmes.
In order to make it visible, ONLY in the CREATED
programmes window, you must disable the view by
pressing the ag [134].
130
131
132
133

17
71504138-0-003 EN
If you select the icon of defrosting cycles [139] from the
wheel, you will access the following window:
8.3 - Creation of a thawing programme
140
141
142
142
By pressing on the area of the programme name [140],
the usual keyboard will appear which will allow typing the
name of the desired programme. During this phase, you
can decide if you want that this programme be displayed
in the User programmes collection by pressing the ag
[141]. By pressing the OK key or the arrow [142], you
will go to the next setting window.
Now you have to set the nal time by pressing above the
values of the hours and minutes [143], and select the
duration in days (24-48 and 72h, see paragraph 2.4) of
the programme [144]. To continue in the settings, press
the arrow [145].
143
144
145
This is a phase the duration of which is obtained by
dierence and therefore, the time will not be set. You
can change the set temperatures [146]. Simply press
above the value you want to change, and the set point
changing window will open.
In order to perform the F2 phase setting, press one of
the icons [149] and the following window will appear:
In this case, besides the already mentioned elements
for the previous phase, it is possible to change and set
the duration of the F2 defrosting phase by pressing the
area [150a-b], the time changing and setting window
will appear (hours-minutes). Also in this case, to go to
phase F3, press one of the icons [151].
Also in phase F3, you can change the set points in the
same way as for phase F1. In any of the 3 phases,
you can access the EXPERT conguration which will
allow deciding if the ventilation in the phase should
be continuous or discontinuous. Just press the arrow
symbol [152] and the following pop-up window will
appear, you must enable or disable the continuous
ventilation using the ag for every single phase [155].
146
149
149
150a
151
151
150b
152

18 71504138-0-003
EN
153
154
155
At any moment or at the end of the programme
conguration, you can decide if you want to save the
programme by pressing the icon [153], or if you want to
delete it by pressing the icon [154]. In case of deletion, a
conrmation message is displayed, otherwise a deletion
one.
Table of contents
Other Tecnomac Chiller manuals
Popular Chiller manuals by other brands

Halsey Taylor
Halsey Taylor SJ8GRN Installation, Care and Use Manual

Riedel
Riedel P030 operating manual

Haier
Haier CA0035AANC Installation, operation and technical manual

Carrier
Carrier HERMETIC ABSORPTION LIQUID CHILLER 16JB installation instructions

Polar Refrigeration
Polar Refrigeration CB929 instruction manual

Serene
Serene SC112G user manual

KKT chillers
KKT chillers nBoxX 1.5 Operating instruction

Trane
Trane Flex II Series Installation operation & maintenance

Daikin
Daikin EWAD E-SS Series Installation, operation and maintenance manual

Daikin
Daikin EWAA011 016DAV3P Operation manual

York
York YCIV0177S/P manual

Adance
Adance ADE-2022-C Maintenance manual