TECO TD-12M1 User manual

DEHUMIDIFIER
User’s Manual
Model: TD-12M1
Please read these instructions carefully before using your dehumidier.
After reading, keep in a safe place for future reference.


1
FOREWORD
Thank you for purchasing our product and thank you for placing your confidence in us.
Read this manual carefully before using. Follow instructions and keep it for future reference.
Follow the operating instructions and safety notices in this manual.
If any problems persist, do not attempt to fix it yourself. Please contact TECO Australia Service or
an authorised service centre.
This dehumidifier is designed specifically and approved for use with non-flammable R134a
refrigerant.
The appliance is specifically constructed for domestic and light office use.
The appliance has not been designed or manufactured for professional use. Teco declines all
responsibility for damage deriving from improper use of the appliance. The dehumidifier has
undergone the necessary tests on the tightness of the refrigeration circuit and complies with the
safety regulations for electrical appliances.
WARNING ICON
This symbol indicates information concerning your personal safety
CAUTION ICON
This symbol indicates information on how to avoid damaging the appliance
CAUTION
WARNING

2
CONTENTS
Chapter Page No.
Safety Precautions .............................................................................................3 - 4
How does it work? ........................................................................................... .5
Positioning the Dehumidier ........................................................................5
Part Identication ..............................................................................................6
Control Panel .......................................................................................................7
Operating instructions .....................................................................................7
Drainage ...............................................................................................................8
Maintenance .......................................................................................................9
Troubleshooting ...............................................................................................10
Specications .....................................................................................................11

3
SAFETY PRECAUTIONS
WARNING
Do not start or stop the appliance by unplugging and plugging the power cord.
This may result in re and/or electric shock
Do not use any extension cords, or adapters to connect this appliance.
This can result in re and/or electric shock.
Do not damage or modify the power cord or plug. Do not tamper with, tie or twist the power cord. Do
not place heavy items on the power cord or subject the power cord to heat.
This can result in re and/or electric shock.
Do not put your ngers or any objects, into the air outlet and inlet. Please do not touch the swing
louvres.
The internal fan rotates at a high speed, and thus such an action may result in an injury or malfunction
Do not attempt to repair, take apart, or modify the appliance.
It may result in re and/or electric shock. Refer servicing to your dealer or Teco Service Centre.
Do not put the appliance near heat generating devices (such as stoves, fan heaters, etc.).
The plastic parts may melt causing re.
Wipe dust o the power plug and insert the plug rmly into the power outlet socket.
If the plug is not fully inserted in the power outlet socket, dust may gather on the connectors which in
turn may cause re and/or electric shock.
Use 220-240V AC power outlet sockets with a current rating shown on the rating plate attached to the
appliance.
Connecting to power points other than 220-240V AC may result in re and/or electric shock
Remove water that has collected in the water tank.
Accidental drinking of the water or using for other purposes may cause illness and/or unforeseen
accidents.
Should a malfunction occur (a smell of burning, etc.), switch o the appliance and unplug it from the
power outlet socket.
Continuing to operate a malfunctioning appliance may result in re, electric shock, and further
malfunction.
Contact your dealer or Teco Service Centre for consultation.
Do not cover the air inlet and the air outlet with clothes, curtains, etc.
This results in poor ventilation and may cause heat generation and re.
WARNING

4
Do not stand, sit or lean against the appliance.
The appliance which stands on castors may move and fall over, resulting in an injury.
Do not place any object on the dehumidier.
Do not put ower vases or any other objects lled with water on the dehumidier.
Water may leak into the appliance adversely aecting the electric insulation and cause electric shock and/
or re by short-circuiting.
Do not use the appliance where it may be exposed to direct sunlight or other weather conditions.
(This unit is for indoor use only).
This may cause overheating, electric shock and/or re by short circulating, or plastic discolouration.
Do not use the appliance in narrow, enclosed places such as inside closets, between pieces of
furniture, etc.
This results in poor ventilation and may cause heat generation and/or re.
Do not use the appliance in places where chemicals are used (such as hospitals, factories, laboratories
or beauty salons).
Chemicals and solvents evaporated in the air may harm the appliance and cause water in the tank to leak,
resulting in damage to property.
Do not use the appliance for special purposes, such as preservation of food, art works etc.
This may negatively aect the quality of the items stored.
Do not drain water continuously if there is a possibility that the temperature around the drainage
hose (eld supplied) could drop to freezing point.
Water inside the hose may freeze and prevent the water in the tank from owing out. The water may leak
from the appliance and damage surrounding objects.
Do not block the drainage outlet or continuous drainage hose (eld supplied).
If using the appliance after storage or xed drainage for a long time ensure the internal and external
drain is clear.
When using the appliance after it has been stored for a long period of time or when draining water
continuously for a long time with no assistance, check the unit periodically for foreign objects, etc. that
could clog the hose resulting in heat generation and/or a water leakage.
Do not use the appliance in places that may be subject to oil or ammable gas leakage.
Such a leakage around the appliance may cause combustion and re.
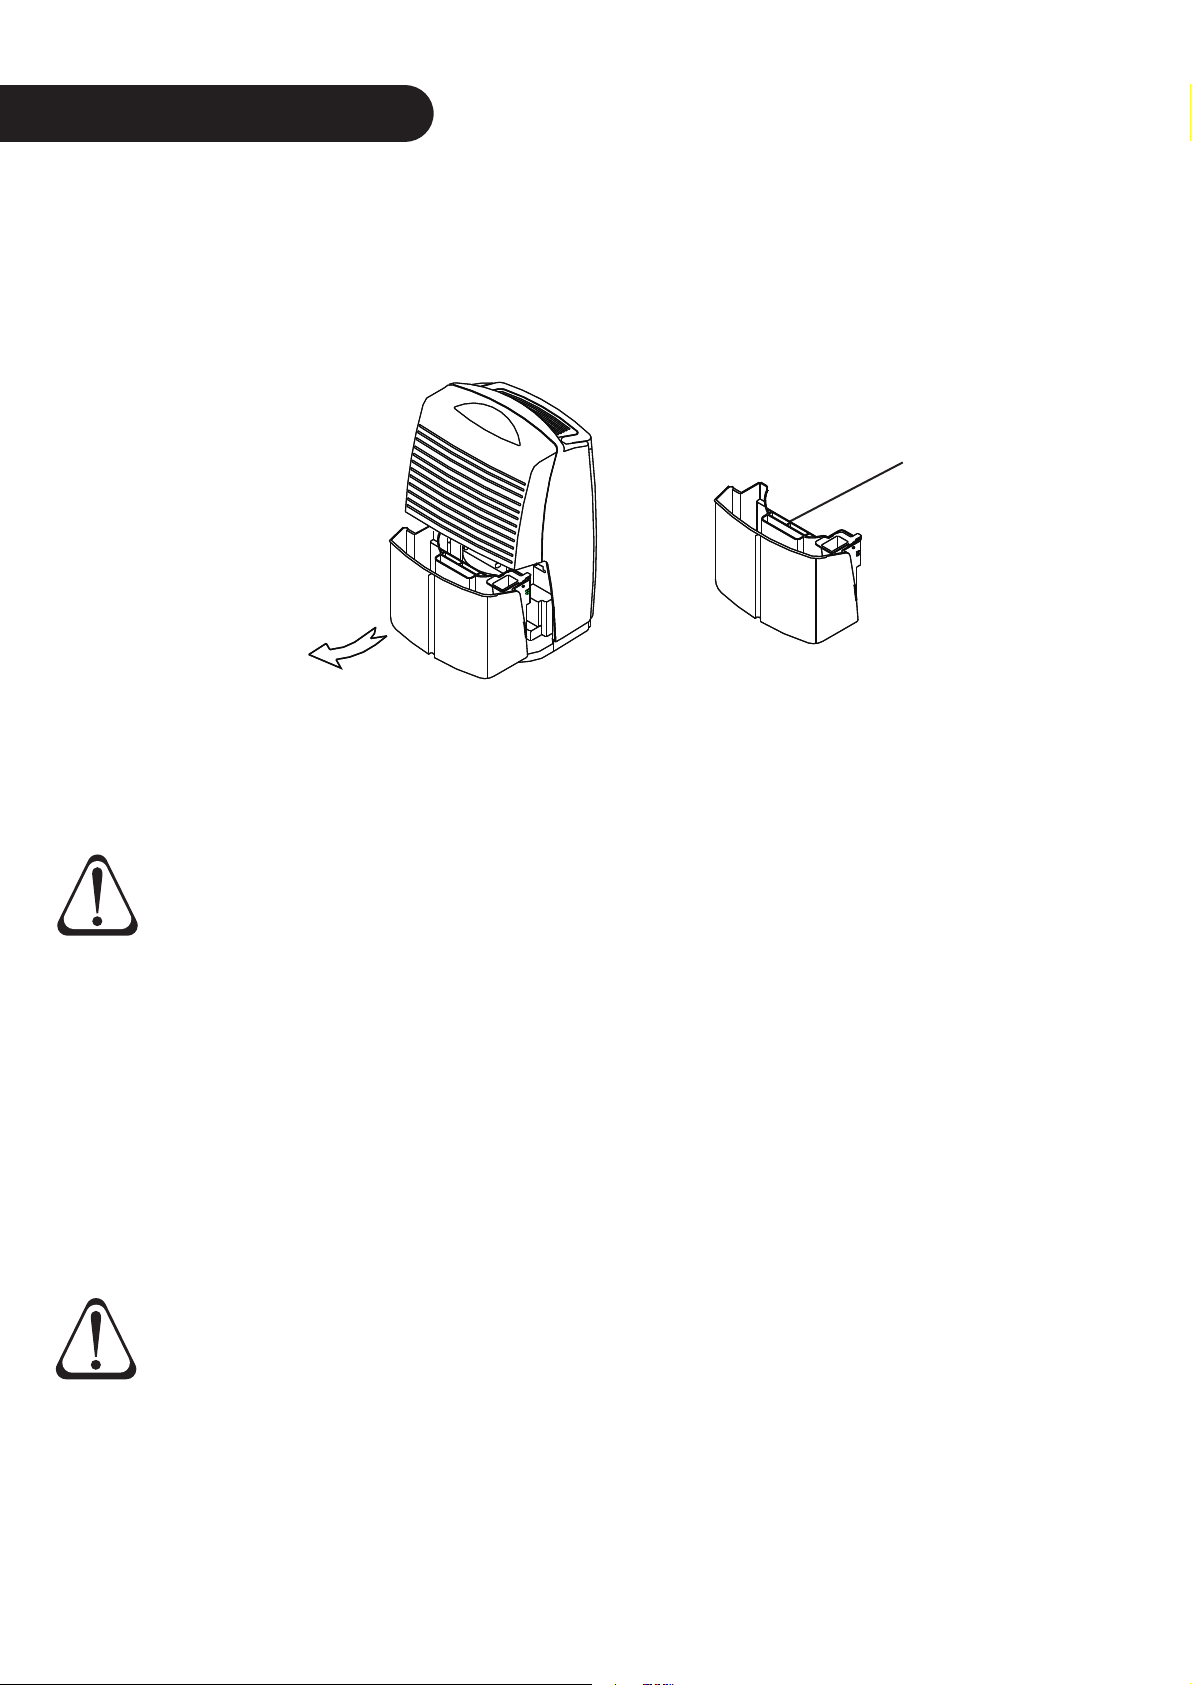
Do not remove the oat device from the water tank.
With the removal of the oat device, the appliance will not be able to detect a full water tank resulting
in water leakage, which may damage to surrounding objects or cause electric shock and/or leakage of
electricity.
Do not wash the appliance with water.
It may cause an electric shock.
Do not use the appliance where it is likely to come in contact with water.
Exposure to water may result in re or electric shock caused by a leak of electricity.

5
A dehumidier is not an air conditioner, but rather an appliance that is used to control relative humidity by
reducing the moisture in the ambient air. This is done by passing air through the dehumidier. When the air
passes through the cooling elements within the appliance, it causes the excess moisture to condensate and
safely drain into the water tank. The dry air is then passed through the condenser to warm slightly before
returning it into the ambient air.
Positioning The Dehumidier
Moisture travels through the air much the same way scents and smells do. Because moisture moves with air
ow, position the dehumidier in a location that can draw the most air. The eectiveness will be increased
when placed in a location where it is able to draw the most moisture from all directions and circulate the air
around the room.
If you have an area or location that is specically in need of dehumidifying, place the appliance in the
aected area until the humidity is reduced, then relocate the dehumidier to a more central location for
best air circulation.
When placing the dehumidier, ensure it is on a at and level surface. The dehumidier may vibrate or
operate less eciently if the surface is not level.
The dehumidier is tted with castors for mobility purposes. If you wish to move the dehumidier, ensure it
is rst switched o and the water tank is emptied.
It is not recommended to connect the appliance to an extension lead. Ensure to place the dehumidier near
to a xed power socket.
During operation, exterior doors and windows should be closed to ensure appliance eciency.
HOW DOES IT WORK?
Moist and
humid air
Fig. 1 Dry and
slightly
warmer air
Fig. 2
Minimum
clearance
distances.
Side and
back
clearance
≥40cm
Side and
front
clearance
≥40cm
Top clearance
≥60cm

6
PART IDENTIFICATION
Control
Panel
Air Inlet Grille
(Air lter located
behind grille)
Air Outlet
Handle
Fig. 3
Fig. 4
Continuous
Drainage
Outlet
Wheel
Electrical
Cord
Electrical
Cord
Holder
Water
Tank
Handle
Water
Tank
Full Tank
Float

7
CONTROL PANEL
FULL
DEFROST DEHUMIDIFYING CONT.
LOW HIGH
OFF
MED.
TD12M1
Fig. 5
Defrost LED (1)
Full LED (2)
Dehumidifying
LED (3)
Control
Knob (4)
Panel Function Description
Defrost LED (1)
To prevent damage to the dehumidier, it will automatically detect if defrosting is required. The
compressor will stop and the DEFROST light will be displayed. The defrost cycle will begin and
continue until the dehumidier is completely defrosted. The dehumidier will resume normal
operation after it completes defrosting.
Full LED (2)
When the water tank is full, the buzzer will sound and the FULL light will remain on. Remove
the water tank and dispose of the water. Replace the water tank and the dehumidier will resume
operating automatically once the tank is correctly inserted.
Dehumidifying LED (3)
The DEHUMIDIFYING LED indicates when the dehumidier is functioning and the compressor is
running. This light goes out when the appliance cycles o when the selected humidity level has been
met or the power is o.
Control Knob (4)
The Control Knob (4) is used to select a relative humidity level, to set continuous dehumidifying or to
turn o the appliance.
Operating Instructions
Note: Before use, ensure the Control Knob (4) is in the OFF position.
Plug in the power cord to a mains socket and switch on the power.
Turn the Control Knob (4) to the desired humidity level or to continuous mode (CONT.).
If the ambient relative humidity is lower than the selected humidity of the dehumidier, the
dehumidier will cycle o. Once the ambient relative humidity rises above the selected point, the
dehumidier will automatically cycle on and continue to retain the selected humidity level.
Turning o the dehumidier
Turn the Control Knob (4) to the OFF position.

8
Using the Water Tank
When using the water tank to drain water, once full, the dehumidier will stop. The FULL LED will be
displayed. Carefully remove the water tank and dispose of collected water.
CAUTION
Fig. 6
Removing
the water
tank.
Grasp sides
and pull
forward.
CAUTION
DRAINAGE
Note: When using the continuous drain feature, make sure the drain tube is laid at horizontally and
fastened in place; avoid overlapping or depressing, and make sure it lays lower than the drain hole.
Water tank
handle
NOTE: Drainage of collected water must comply with local council regulations.
Once the water tank is empty, replace and ensure it is securely back inside the dehumidier. The appliance
will resume operating.
Caution - The dehumidier can be damaged if the water tank is not replaced correctly or if it is
removed and replaced frequently. Only remove the water tank when full or when the dehumidier
is o.
Using Continuous Drainage
In situations of extremely high humidity or for convenience, you may nd connecting continuous
drainage more suitable. To connect continuous drainage, remove the water tank.
Carefully remove the continuous drainage outlet cover from the rear of the dehumidier (refer to page 6
Fig.4).
Insert a PVC pipe with a Ø14mm ID (eld supplied) into the drainage outlet. Ensure a tight t so that no
water leaks from the dehumidier.
Replace the water tank.
The dehumidier can now be operated with continuous drainage.
NOTE: Drainage of collected water must comply with local council regulations.
Do not drain water continuously if there is a possibility that temperature around the hose could
drop to freezing point. Water inside the hose may freeze and prevent the water in the drainage
tank from owing out. The water may leak from the unit and damage surrounding objects.

9
When using the appliance after it has been stored for a long period of time or when draining water
continuously for a long time with no assistance, check the appliance periodically for foreign objects, etc.
that could clog the pipes resulting in heat generation and/or a water leakage.
Before performing any maintenance or cleaning of the dehumidier, always switch o and unplug the
appliance.
Use a soft cloth when cleaning the appliance.
Do not spray the dehumidier with water.
Do not use harsh chemicals, gasoline, detergents, chemically treated clothes, or other cleansing solutions.
These items and chemicals may cause damage to the dehumidier cabinet.
Remove the water tank and ensure the drainage outlet is clear of obstructions.
If continuous drainage is used, check outlet hoses are free of kinks and obstructions.
Removing and cleaning the lter
Remove the water tank.
Locate the base of the lter and pull vertically down in the direction of the arrow on the lter (Fig.8).
To clean the lter, use a vacuum cleaner or tap the lter lightly to remove dust and dirt. If the lter is
unable to be cleaned by vacuum, use warm water with a small amount of medium strength detergent
Replace the lter into the space provided.
Note: Ensure the lter is replaced in the same manner as it is removed. The raised portion of the lter should
be facing the front of the dehumidier and the retaining clips hold it in place.
MAINTENANCE
Fig. 7
Storage
If the dehumidier will not be used for an extended period of time, turn the
appliance o and unplug from the main power source. Tidy the power cord.
Completely empty the water tank and wipe it clean. Cover the dehumidier and
store in a location not in direct sunlight.
Water tank
removal
Filter
Retaining
clips
Fig. 8

10
CAUTION
Symptom Solution(s)
The dehumidier does not operate Ensure the power is ON.
Check the power cord. Ensure it is securely
plugged in and switched on.
Check the power supply to the house. Ensure
the fuse has not blown or if the safety switch
has been activated.
Check the water tank is empty and correctly in
position.
The appliance is not reducing the
humidity
Check the lter is not dirty or contaminated.
Check the air inlet and outlet are not
obstructed.
Check the room humidity is above what the
dehumidier is set to.
Check that no doors or windows remain open.
Remove objects or devices that may be
producing or increasing the room’s humidity.
The dehumidier is too noisy Check that the dehumidier is placed on a at,
stable and secure surface.
The dehumidier is leaking Check that the dehumidier is in good
working order and the cabinet and water tank
is not cracked.
NOTE: If problems persist, switch o the dehumidier and unplug from the main power source.
Contact TECO Australia Service as soon as possible. Never attempt to repair the appliance.
It is hazardous for anyone altering, repairing or servicing the dehumidier.
Only an Authorised Service Person can carry out servicing or repairs to this appliance.
IF SERVICE IS REQUIRED:
If you have a problem, and the problem persists after you have made the checks mentioned above, contact:
TECO Australia’s Service on 1300 660 037 during business hours (8.30am – 5pm AEST).
For warranty details please visit www.teco.com.au
The dehumidier does not collect
water
The humidity is low.
The temperature is low.
TROUBLESHOOTING

11
SPECIFICATIONS
Model TD-12M1
Control Type Mechanical
Rated Voltage (V) 230
Rated Frequency (Hz) 50
Rated Power Input (W) 355
Rated Run Current (A) 1.8
Weight (Kg) 13.3
Rated dehumidifying capacity 12L / 24 Hr
@ 30oC DB 80% RH
Dimensions (mm) H: 561 W: 320 D:276
Operating temperature range 5oC ~ 35oC
Water tank capacity (L) 3.6
Note: Data shown in this table is subject to change without prior notice.

www.teco.com.au
HBB-PV
Table of contents
Other TECO Dehumidifier manuals