TECro PVCM-T1520TP User manual


COFFEE MAKER TECRO PVCM-T1520TP
APARAT ZA KAVU TECRO PVCM-T1520TP
USER MANUAL
UPUTE ZA UPORABU

Read this booklet thoroughly before using and save
it for future reference
IMPORTANT SAFEGUARDS
In the interest of your safety and to ensure the correct
use, before installing and first using the appliance, read
this user manual carefully, including its hints and
warnings. To avoid unnecessary mistakes and accidents,
it is important to ensure that all people using the
appliance are thoroughly familiar with its operation and
safety features. Save these instructions and make sure
that they remain with the appliance if it is moved or sold,
so that everyone using it through its life will be properly
informed on appliance use and safety. For the safety of
life and property keep the precautions of these user's
instructions as the manufacturer is not responsible for
damages caused by omission.
Before using the electrical appliance, the following basic
precautions should always be followed including the
following:
1. Read all instructions.
2. Before using check that the voltage of wall outlet
corresponds to rated voltage marked on the rating plate.
3. This appliance has been incorporated with a
grounded plug. Please ensure the wall outlet in your
house is well earthed.
4. To protect against fire, electric shock and injury to
persons do not immerse cord, plug, in water or other
liquid.
5. Remove plug from wall outlet before cleaning and
when not in use. Allow appliance cool down completely
before taking off, attaching components or before
USER MANUAL
EN
1

cleaning.
6. Do not operate any appliance with a damaged cord or
plug or after the appliance malfunctions, or is dropped or
damaged in any manner. Return appliance to the
nearest authorized service facility for examination, repair
or electrical or mechanical adjustment.
7. The use of accessory attachments not recommended
by the appliance manufacturer may result in fire, electric
shock or injury to persons.
8. Place appliance on flat surface or table, do not hang
power cord over the edge of table or counter.
9. Ensure the power cord do not touch hot surface of
appliance.
10. Do not place the coffee maker on hot surface or
beside fire in order to avoid to being damaged.
11. To disconnect, remove plug from wall outlet. Always
hold the plug. But never pull the cord.
12. Do not use appliance for other than intended use
and place it in a dry environment.
13. Close supervision is necessary when your appliance
is being used near children.
14. Be careful not to get burned by the steam.
15. Do not touch the hot surface of appliance (such as
steam wand, and the steel mesh just boiling). Use
handle or knobs.
16. Do not let the coffee maker operate without water.
17. Do not remove the metal funnel when appliance in
brewing coffee or making steam.
18. Connect plug to wall outlet before using and turn any
switch off before plug is removed from wall outlet.
19. This appliance is not intended for use by persons
(including children) with reduced physical, sensory or
mental capabilities, or lack of experience and
USER MANUAL
EN
2

knowledge,
unless they have been given supervision or instruction
concerning use of the appliances by a person
responsible for their safety.
20. Children should be supervised to ensure that they do
not play with the appliance.
21.This appliance can be used by children aged from 8
years and above and persons with reduced physical,
sensory, or mental capabilities or lack of experience and
knowledge if they have been given supervision or
instruction concerning use of the appliance in a safe way
and understand the hazards involved.
23. Keep the appliance and its cord out of reach of
children less than 8 years.
24. Cleaning and user maintenance shall not be made by
children without supervision.
25. This appliance is intended to be used in household
and similar applications such as:
–staff kitchen areas in shops, offices and other working
environments;
–farm houses;
–by clients in hotels, motels and other residential type
environments;
–bed and breakfast type environments.
26.Do not use outdoors.
27. Save these instructions.
28. If you do not use the product for a long time, you
need to turn on the power and then release steam for 3
minutes before leaving this product.
29.If you cut off power during steam release, residual
heat will make product continue to release steam for a
length of time, the product will stop releasing steam
immediately once you turn off steam knob.
USER MANUAL
EN
3

PRODUCT DESCRIPTION
A. Control panel(Power button 1-cup coffee button 2-cup
coffee button Steam button)
B.2 cups Steel mesh
C.Metal funnel
D.Funnel handle
E. Float cover
F. Removable cup shelf
G. Drip tray
H.Steam control knob
I. Water tank handle
J.Water tank cover
K.Water tank
L. Steam wand
M. Steam conduit handle
N. Froth nozzle
O. Measuring spoon
P.1cup Steel mesh
USER MANUAL
EN
4

BEFORE THE FIRST USE
To ensure the first cup of coffee tastes excellent, you should rinse the coffee maker with warm
water as follows:
1. Open water tank cover, fill water into water tank, water level should not exceed the “MAX”
mark
in water tank. Then replace the water tank cover.
Note: the appliance is supplied with a detachable water tank for easy cleaning, you can fill water
tank with water first, and then attach water tank into the appliance.
2. Set steel mesh into metal funnel (no coffee in steel mesh), make sure the tube on the
funnel aligns with groove in the appliance, then insert the funnel into the appliance from the
“” position, and fix them into coffee maker firmly by turning it anticlockwise until it is at
the “” position.
3. Place an jug on removable cup shelf. Make sure steam control knob is on the OFF
position.
4. Connect into power source, press power button, power indicator is illuminated white, The
indicators of 1- cup coffee button, 2-cup coffee button and steam button flash, the machine
begins preheating, after all indicators are solidly on, the preheating is completed
Note: if preheating is not completed yet, press 1-cup coffee button, 2-cup coffee button or
manual coffee button, the pump does not work;if you want to make steam,press the steam
button.
5. Press 2-cup coffee button, the unit will pump water for about 25s, pour out water in the cup
then clean them thoroughly, now the appliance is ready for making coffee.
Note: There may be noise when pumping water for the first time, it is normal that the appliance
is releasing the air inside. After about 20s, the noise will disappear.
Note:Before the first use,because there is no water in the boiler,the button indicator will flash to
alarm quickly.Press the button of the 2-cup coffee button until the pump stops working and the
product stops to alarm,and the coffee brewing operation can be started.
PREHEATING
To make a cup of good hot Espresso coffee, we recommend you should preheat the appliance
before making coffee, including metal funnel, steel mesh and cup, so that the coffee flavour can not
USER MANUAL
EN
5

be influenced by cold parts.
1. Remove detachable water tank and open water tank cover to fill it with desired water, the
water level should not exceed the “MAX” mark in the tank. Then replace water tank
2. Set steel mesh into metal funnel, make sure the tube on the funnel aligns with groove in the
appliance, then insert the funnel into the appliance from the “” position, and fix them
into coffee maker firmly by turning it anticlockwise until it is at the “” position.
3. Place an espresso cup on removable cup shelf.
4. Then connect appliance to power supply. Make sure steam control knob is on the OFF
position.
5. Press power button, power indicator is illuminated white, The indicators of 1- cup coffee
button, 2-cup coffee button flash, the machine begins preheating, after all indicators are
solidly on, it means that preheating is completed, press 2-cup coffee button, the machine
pumps water, when there is water flowing out, press this coffee button again to stop
pumping water immediately. The purpose of this step is to pump the water of water tank into
boiler.
6. When coffee button indicator is illuminated, it indicates the preheating is finished.
MAKE ESPRESSO
1. Remove funnel by turning it clockwise. Add ground coffee into steel mesh with measuring
spoon, a spoon of ground coffee powder can make about a cup of top-grade coffee, then
press ground coffee powder tightly with the tamper.
2. Set steel mesh into metal funnel, make sure the tube on the funnel aligns with groove in
the appliance, then insert the funnel into the appliance from the “” position, and fix
them into coffee maker firmly by turning it anticlockwise until it is at the “” position.
3. Place a cup on removable cup shelf.
4. After preheating is completed, press 1-cup or 2-cup coffee button, the product will start
brewing, working time for 1-cup coffee is 15 seconds and 25 seconds for 2-cup coffee. Working
time is Max 90s, unit will automatically stop working if no any operation within 90s.
USER MANUAL
EN
6

5. At the time corresponding coffee button indicator is to be illuminated, if it is extinguished, wait
for a moment, once it is illuminated again, press corresponding coffee button, wait for a moment,
there will be coffee flowing out.
CUP OF AMOUNT
Press and hold 1-cup button for 3 seconds, 1-cup button flashes, entering setting mode, press
1-cup button again to start dispensing coffee, when the specified time is reached, and press 1
cup button to complete setting which can be memorized by the unit. Working duration for 1-cup
coffee can be set up to 45s, if working duration for 1-cup coffee is set, working duration for 2-cup
coffee will be automatically updated to 2 times of that for 1-cup coffee; Working duration for
2-cup coffee can be set up to 90s, if working duration for 2cup coffee is set, working duration for
1-cup coffee will be automatically updated to half of that for 2-cup coffee
WARNING: Do not leave the coffee maker unattended during making coffee, as you need
operate manually sometimes!
1. After finish making coffee, take metal funnel out by turning it clockwise, then pour coffee
residue out with steel mesh pressed by press bar.
2. Let them cool down completely, then rinse under running water.
MAKE HOT WATER
When the preheating is finished, the coffee indicator lights up solidly. Then press the 2-cup coffee
button, and the water pump starts to pump water. Turn the knob to “ ” position and then hot
water will flow out of the steam pipe. To stop making hot water, press the coffee switch again and
Turn the knob to “ ” position . Hot water is used for warming cup, making tea or cooling down the
appliance.
Please refer to the operation described in the section of “Make ESPRESSO” when need to adjust
the working time for making hot water.
MAKE CAPPUCCINO/FROTHED MILK
You get a cup of cappuccino when you top up a cup of espresso with frothed milk.
USER MANUAL
EN
7

Method:
1. Prepare espresso first with container big enough according to the part “MAKE ESPRESSO
COFFEE”, make sure that the steam control knob is at the “o” position.
2. Press the steam switch selector, the lamp in the coffee switch will be illuminated, wait for
until the indicator in the steam switch selector is illuminated.
Note: During operation, the indicator in the steam selector will cycle on and off to maintain to
desired temperature.
3. Fill a jug with about 100 ml of milk for each cappuccino to be prepared, you are
recommended to use whole milk at refrigerator temperature (not hot!).
Note: In choosing the size of jug, it is recommend the diameter is not less than 70±5mm, and
bear in mind that the milk increases in volume by 2 times, make sure the height of jug is enough.
4. Turn the steam control knob slowly anti-clockwise, steam will come out from the frothing
device.
Note: Never turn the steam control button rapidly, as the steam will accumulate rapidly in short
time which may increase the potential of the risk of explosion.
5.Insert the frothing device into the milk about two centimetre, froth milk in the way moving
vessel round from up to down.
6. When the required purpose is reached, you can turn the steam control knob to “ ”
position.
Note: Clean steam outlet with wet sponge immediately after steam stops generating, but care
not to hurt!
7. Pour the frothed milk into the espresso prepared, now the cappuccino is ready. Sweeten to
taste and if desired, sprinkle the froth with a little cocoa powder.
8. Press the Power switch to cut the power source off. All indicators will be extinguished.
USER MANUAL
EN
8

WARNING: After finish the “Steam” function, press the coffee switch, if the coffee indicator and
steam indicator blink fast, it means that the temperature of the appliance is too high and the
appliance needs to be turned off and have a rest for more than 5 minutes, or you can activate
the “Hot water” function to cool down the appliance. And the water pump will stop pumping water
automatically if the temperature is normal. And the coffee will be burnt and there will be overflow
at the funnel if the appliance brew coffee directly without being cooled down.
AUTOMATIC POWER OFF FUNCTION
If there is no any operation within 25 minutes, the unit will power off automatically.
FACTORY RESET
After finish preheating, hold and press double cup coffee switch and steam switch for 3 seconds at
the same time, and their corresponding indicators will blink for 3 times, then the factory reset is
finished.
CLEANING AND MAINTENANCE:
1、 Cut off power source and let the coffee maker cool down completely before cleaning.
2、 Clean housing of coffee maker with moisture-proof sponge often and clean water tank, drip
tray and removable shelf regularly then dry them.
Note: Do not clean with alcohol or solvent cleanser. Never immerse the housing in water for
cleaning.
3、 Detach the metal funnel by turning it clockwise, get rid of coffee residue inside, then you
can clean it with cleanser, but at last you must rinse with clear water.
4、 Clean all the attachments in the water and dry thoroughly.
CLEANING MINERAL DEPOSITS
1. Fill the tank with water and descaler to the MAX level (the scale of water and descaler is 4:1, the
detail refers to the instruction of descaler. Please use “household descaler”, you can use the citric
USER MANUAL
EN
9

acid (obtainable from chemists or drug stores) instead of the descaler (the one hundred parts of
water and three parts of citric acid).
2. According to the program of pre-heating, put the metal funnel (no coffee powder in it) and jug in
place. Brewing water per “PRE-HEATING”.
3. Press the Power switch one time, its red lamp will be illuminated, you should press the pump
control switch, make sure the coffee/steam selector, when there is water flowing out and close the
pump, and wait for a moment, the coffee maker begins to be heated.
4. When the lamp in pump control switch is illuminated, it shows the heating is finished. Pressing
the pump control switch and make two cups coffee (about 2Oz). Then close the pump and wait for
5s.
5. Press the coffee/steam selector, the indicator in the pump control switch will be extinguished,
waiting for until the indicator in the coffee/steam selector is illuminated. Make steam for 2min by
turning the steam control knob, then turn the steam control knob to “o” position to stop making
steam. Press the Power switch for stop the unit immediately, make the descalers deposit in the unit
at least 15 minutes.
6. Restart the unit and repeat the steps of 4-6 at least 3 times.
7. Then press the coffee/steam selector, the lamp in pump control switch will be illuminated, then
press the pump control switch to brew until no descaler is left.
8. Then brew coffee (no coffee powder) with tap water in the MAX level, repeat the steps of 4-6 for 3
times (it is unnecessary to wait for 15 minutes in step of 6), then brew until no water is left in the
tank.
9. Repeat the step of 9 at least 3 times to make sure the piping is clean.
USER MANUAL
EN
10
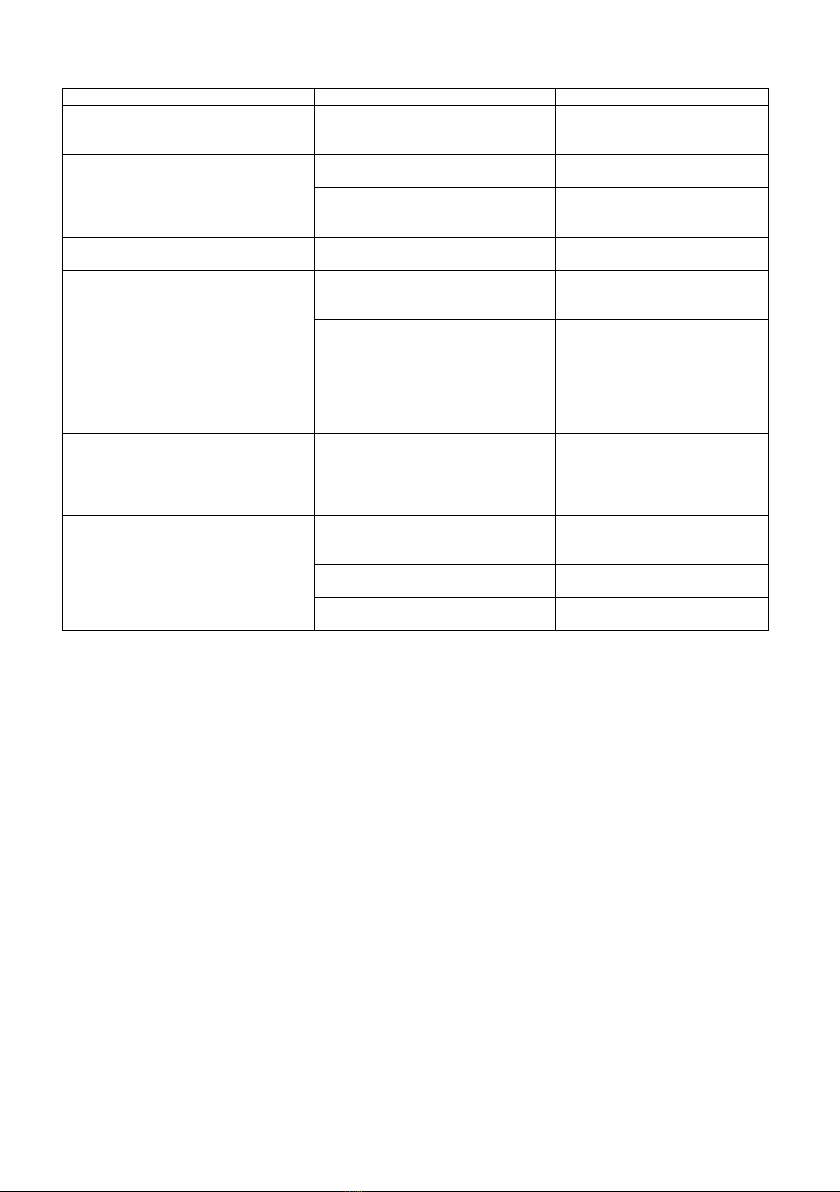
TROUBLE SHOOTING
Symptom
Cause
Corrections
The metal parts in the tank have
rust.
The descaler is not recommended
type. It may corrode the metal parts
in the tank.
Use the descaler
recommended by
manufacturer.
Water leaks from the bottom of
coffee maker.
There is much water in the drip
tray.
Please clean the drip tray.
The coffee maker is malfunction.
Please contact with the
authorized service facility for
repairing.
Water leaks out of outer side of filter.
There is some coffee powder on
filter edge.
Get rid of them.
Acid (vinegar) taste exists in
Espresso coffee.
No clean correctly after cleaning
mineral deposits.
Clean coffee maker per the
content in “before the first use”
for several times.
The coffee powder is stored in a
hot, wet place for a long time. The
coffee powder turns bad.
Please use fresh coffee
powder, or store unused coffee
powder in a cool, dry place.
After opening a package of
coffee powder, reseal it tightly
and store it in a refrigerator to
maintain its freshness.
The coffee maker cannot work
anymore.
The power outlet is not plugged
well.
Plug the power cord into a wall
outlet correctly, if the appliance
still does not work, please
co
ntact with the authorized
service facility for repairing.
The steam cannot froth.
The steam ready indicator is not
illuminated.
Only after the steam ready
indicator is illuminated, the
steam can be used to froth.
The container is too big or the
shape is not fit.
Use high and narrow cup.
You have used skimmed milk
Use whole milk or
half-skimmed milk
Do not take apart the appliance by yourself if the cause of failure is not found, you had
better contact certified serving centre.
USER MANUAL
EN
11

Environment
The symbol on the product or on its packaging indicates that this product may
not be treated as household waste. Instead it should be taken to the
appropriate collection point for the recycling of electrical and electronic
equipment. By ensuring this product is disposed of correctly, you will help
prevent potential negative consequences for the environment and human
health, which could otherwise be caused by inappropriate waste handling of
this product. For more detailed information about recycling of this product,
please contact your local council, your household waste disposal service or the
shop where you purchased the product.
PEVEX d.d. do not accept any liability for damages resulting from improper use
of the device or its improper repair. Specification, designs and dimensions are
subject to change without prior notice.
For more information’s please contact PEVEX d.d service centre:
Address: Ulica Velimira Škorpika 9, 10090 Zagreb
Telephone number: + 385 (0)1 55 40 373
Email address: servisni.cen[email protected]
USER MANUAL
EN
12

Prije uporabe temeljito pročitajte ovu knjižicu i
spremite je za buduću upotrebu
VAŽNE SIGURNOSNE MJERE
U interesu vaše sigurnosti i kako biste osigurali ispravnu
uporabu, prije postavljanja i prve uporabe uređaja,
pažljivo pročitajte ovaj korisnički priručnik, uključujući
njegove savjete i upozorenja. Kako biste izbjegli
nepotrebne pogreške i nezgode, važno je osigurati da su
sve osobe koje koriste uređaj temeljito upoznate s
njegovim radom i sigurnosnim značajkama. Sačuvajte
ove upute i pobrinite se da ostanu uz uređaj ako se
premjesti ili proda, kako bi svi koji ga koriste tijekom
njegovog vijeka trajanja bili pravilno informirani o
korištenju i sigurnosti uređaja. Radi sigurnosti života i
imovine pridržavajte se mjera opreza ovih korisničkih
uputa jer proizvođač nije odgovoran za štetu uzrokovanu
propustom.
Prije uporabe električnog uređaja uvijek se treba
pridržavati sljedećih osnovnih mjera opreza uključujući
sljedeće:
1. Pročitajte sve upute.
2.Prije uporabe provjerite odgovara li napon zidne
utičnice nazivnom naponu označenom na natpisnoj
pločici.
3. Ovaj uređaj ima uzemljeni utikač. Provjerite da li je
zidna utičnica u vašoj kući dobro uzemljena.
4. Radi zaštite od požara, strujnog udara i ozljeda osoba
ne uranjajte kabel, utikač, u vodu ili drugu tekućinu.
5. Izvucite utikač iz zidne utičnice prije čišćenja i kada
nije u upotrebi. Ostavite uređaj da se potpuno ohladi
prije skidanja, pričvršćivanja dijelova ili prije čišćenja.
6. Nemojte koristiti uređaj s oštećenim kabelom ili utikač
UPUTE ZA UPORABU
HR
2

ili nakon kvara uređaja, pada ili oštećenja na bilo koji
način. Vratite uređaj u najbliži ovlašteni servis radi
pregleda, popravka ili električnog ili mehaničkog
podešavanja.
7. Korištenje dodataka koje nije preporučio proizvođač
uređaja može uzrokovati požar, strujni udar ili ozljede
osoba.
8. Postavite uređaj na ravnu površinu ili stol, nemojte
vješati kabel za napajanje preko ruba stola ili pulta.
9. Pazite da kabel za napajanje ne dodiruje vruću
površinu uređaja.
10. Ne stavljajte uređaj na vruću površinu ili pored vatre
kako biste izbjegli oštećenje.
11. Za odspajanje, okrenite bilo koju kontrolu na “off”, a
zatim izvadite utikač iz zidne utičnice. Uvijek držite
utikač. Ali nikada ne povlačite kabel.
12. Nemojte koristiti uređaj za drugu namjenu osim za
predviđenu i stavite ga u suho okruženje.
13. Potreban je strogi nadzor kada vaš uređaj koriste
djeca ili u blizini djece.
14. Pazite da vas para ne opeče.
15. Ne dodirujte vruću površinu uređaja (kao što je cijev
za paru i čelična mreža koja tek ključa). Koristite ručku ili
gumbe.
16. Ne dopustite da uređaj radi bez vode.
17. Nemojte uklanjati metalni lijevak kada uređaj kuha
kavu ili paru.
18. Prije uporabe priključite utikač u zidnu utičnicu i
isključite sve prekidače prije nego što se utikač izvadi iz
zidne utičnice.
19. Ovaj uređaj nije namijenjen za korištenje od strane
osoba (uključujući djecu) sa smanjenim fizičkim,
osjetilnim ili mentalnim sposobnostima ili s nedostatkom
UPUTE ZA UPORABU
HR
3

iskustva i znanja, osim ako su pod nadzorom ili upute o
korištenju uređaja od strane osobe odgovorne za njihovu
sigurnost.
20. Djecu treba nadzirati kako bi se osiguralo da se ne
igraju s uređajem.
21. Ovaj uredaj mogu koristiti djeca u dobi od 8 i vise
godina te osobe sa smanjenim fizičkim, osjetilnim iii
mentalnim sposobnostima iii nedostatkom iskustva i
znanja ukoliko im je pruzen nadzor iii upute o koristenju
uredaja na siguran nacin te razumiju moguce opasnosti.
23. Ne dopustite uredaj i njegov kabel bude dostupan
djeci mlađoj od 8 godina.
24. Čišćenje i održavanje ne smiju raditi djeca bez
nadzora.
25. Ovaj je uređaj namijenjen uporabi u kućanstvu i:
–kuhinjama u kojim se služe djelatnici u uredima
–seoskim kućama
–hotelima i motelima.
26.Ne koristiti na otvorenom.
27.Spremite ove upute.
28.Ako proizvod ne upotrebljavate dulje vrijeme, morate
uključiti napajanje, a zatim pustiti paru 3 minute prije
nego što koristite uređaj.
29. Ako tijekom ispuštanja pare isključite električnu
energiju, zaostala toplina omogućiti će da uređaj dulje
vrijeme nastavlja ispuštati paru, proizvod će prestati
ispuštati paru odmah kad isključite ručicu za paru.
UPUTE ZA UPORABU
HR
4

OPIS PROIZVODA
A. Upravljačka ploča(Gumb za isključivanje/uključivanje gumb za 1 šalicu kave,gumb
za dvije šalice kave, gumb za paru)
B.Filter za dvije šalice
C. Metalni lijevak
D. Drška lijevka
E. Poklopac
F. Odvojiva rešetka za šalice
G. Pladanj
H.Gumb za kontrolu pare
I. Ručka spremnika za vodu
J.Poklopac spremnika za vodu
K.Spremnik za vodu
L. Cijev za paru
M. Ručka cijevi za paru
N. Mlaznica za pjenu
O. Mjerna žličica
P. Filter za jednu šalicu
UPUTE ZA UPORABU
HR
5

PRIJE PRVE UPORABE
Kako biste osigurali izvrstan okus prve šalice kave, trebate isprati uređaj toplom vodom na sljedeći
način:
1. Ulijte vodu u spremnik vode, razina vode ne smije prelaziti oznaku "MAX" u spremniku. Zatim
vratite poklopac spremnika za vodu.
Napomena: aparat je opremljen spremljivim spremnikom za jednostavno čišćenje, spremnik
možete prvo napuniti vodom, a zatim spremnik staviti u uređaj.
2. Postavite čeličnu mrežicu u metalni lijevak (bez kave u čeličnoj mrežici), provjerite da li je
cijev na lijevku poravnata s utorom u uređaju, a zatim umetnite lijevak u uređaj iz pozicije
“” , i čvrsto ih pričvrstite u apparat za kavu okrečući ga u smjeru suprotnom od kazaljke
na satu dok ne bude na poziciji “” .
3. Postavite vrč na uklonjivu policu. Provjerite je li gumb za kontrolu pare u položaju OFF.
4. Priključite uređaj na napajanje, pritisnite gumb za uključenje, indikator uključenja će svijetliti
bijelo, indikatori gumba jedne šalice, 2 šalice i gumba za paru će treperiti. Uređaj će početi
predgrijavanje. Nakon što su svi indikatori uključeni predgrijavanje je završeno.
Napomena: ako predgrijavanje nije završeno, pritisnite gumb za jednu šalicu kave, gumb za
dvije šalice kave ili ručni gumb za kavu, pumpa ne radi, ako želite napraviti paru, pritisnite gumb
za paru.
5. Pritisnite gumb za dvije šalice kave, uređaj će pumpati vodu oko 25 sekundi, izliti vodu u
šalicu, a zatim ih temeljito očistiti te je sad uređaj spreman za pripremu kave.
Napomena: Prilikom prvog pumpanja vode može se čuti buka, normalno je da uređaj ispušta
zrak iznutra. Nakon otprilike 20s, buka će nestati.
Napomena: Prije prve uporabe, budući da u spremniku vode nema vode, indikator tipke će brzo
treperiti kako bi se alarmirao. Pritisnite tipku gumba za 2 šalice kave dok pumpa ne prestane
raditi i proizvod prestane da se alarmira, te se može krenuti sa postupkom pripreme kave.
UPUTE ZA UPORABU
HR
6

PREDGRIJAVANJE
Da biste napravili šalicu dobre vruće Espresso kave, preporučujemo vam da prethodno pripremite
aparat prije pripreme kave, uključujući lijevak, filter i šalicu, kako hladni dijelovi ne mogu utjecati na
okus kave.
1. Uklonite odvojivi spremnik i otvorite poklopac spremnika da biste ga napunili željenom
vodom, a razina vode ne smije prelaziti oznaku "MAX" u spremniku. Zatim pravilno stavite
spremnik u uređaj.
2. Postavite metalni filter u mtalni lijevak, provjerite da li je cijev na lijevku poravnata s utorom
u uređaji, a zatim umetnite lijevak u uređaj u položaj“” , I učvrstite u aparat za kavu
okrečući ga u smjeru suprotnom od kazaljke na satu dok ne dođu u položaj “” .
3. Stavite šalicu za espresso na uklonjivu policu.
4. Spojite uređaj na napajanje. Provjerite da li je gumb za kontrolu pare u položaju “OFF”.
5. Pritisnite prekidač za uključivanje, indikator napajanja će treperiti bijelo, indikatori 1 šalice
kave, 2 šalice kave će treperiti, uređaj započinje sa predgrijavanjem,nakon što svi indikatori
prestanu treperiti, predgrijavanje je završeno., pritisnite gumb za dvije šalice kave, uređaj
će pumpati vodu, kada voda istječe, ponovno pritisnite ovaj gumb za kavu kako biste
odmah zaustavili pumpanje vode. Svrha ovog koraka je pumpanje vode iz spremnika za
vodu iz bojlera.
6. Kada indikator gumba za kavu svijetli, to znači da je predgrijavanje završeno.
PRIPREMA ESPRESSA
1. Uklonite lijevak okrećući ga u smjeru kazaljke na satu. Dodajte u mrežicu mljevenu kavu s
mjernom žlicom, žlica mljevene kave može napraviti šalicu vrhunske kave, a zatim kavu
čvrsto pritisnite potiskivačem.
2. Postavite čeličnu mrežicu u metalni lijevak, pazite da se cijev na lijevku poravna s utorom
u uređaju, a zatim umetnite lijevak u uređaj iz položaja “ ” ,i čvrsto učvrstiti u aparat za
kavu okrenite ga u smjeru suprotnom od kazaljke na satu sve dok nije u položaju “” .
3. U šalicu ulijte vruću vodu, nakon što se čaša ugrije, ispraznite je u šalici i osušite čašu, a
UPUTE ZA UPORABU
HR
7
Table of contents
Languages:
Other TECro Coffee Maker manuals

Popular Coffee Maker manuals by other brands

Bosch
Bosch Tassimo my way TAS60 Series instruction manual

Breville
Breville Cafe Roma ESP8XL Instruction booklet

Thermador
Thermador SAVOR BICM24CS use and care manual

Nespresso
Nespresso CitiZ D111 manual

Kalorik
Kalorik USK CCG 3 operating instructions

Black & Decker
Black & Decker BLACK DECKER HOME DE790B Use and care book


