TECro OCEAN WAVE PVUS-T735B User manual

USER MANUAL /
UPUTE ZA UPORABU
shhD>EZh^/^sWZa/E
Wsh^ͲdϳϯϱKEts
/ŵƉŽƌƚĞƌĨŽƌhhǀŽnjŶŝŬnjĂhWĞǀĞxĚĚ^ĂǀƐŬĂĐĞƐƚĂϴϰ
ϭϬϯϲϬ^ĞƐǀĞƚĞ,ƌǀĂƚƐŬĂĞŵĂŝůŝŶĨŽΛƉĞǀĞdžŚƌ

Safety directions:
1. When using the vacuum cleaner for the first time, it is advisable to read
the manual carefully and keep it in safe place for future use and
reference.
2. Before switching it on for the first time, make sure that the dust canister
(cup) or the dust filter (in some models) is properly installed.
3. NEVER use the machine without a motor protection FILTER fitted!
4. Only use the vacuum cleaner indoors on DRY surfaces.
5. Do not use this vacuum cleaner if it has been dropped, damaged or left
outdoors.
6. Do not push the vacuum cleaner over the power cord or use the
vacuum cleaner if the power cord or plug is damaged. Please contact the
supplier in this instance.
7. Do not touch the plug or use the vacuum cleaner with wet hands.
8. Do not pull or carry this vacuum cleaner by the power cord. Do not
use the power cord as a handle or pull the power cord around corners,
sharp edges or close a door over the power cord. Do not unplug the
vacuum cleaner by pulling on the power cord.
9. Do not vacuum up any flammable or combustible materials (lighter
fluid, petrol, kerosene, etc.) Do not use the vacuum cleaner in an area
with explosive vapors or liquid.
10.Do not vacuum up coals (hot or cold), cigarette butts, matches or
smoking hot burning items or use in an area where there may be
harmful fluids (chlorine, bleach, and ammonia drain cleaner).
11.Never use your vacuum cleaner for vacuuming the building material
(such as fine sand, lime, cement dust etc.). Absorbed building material
can damage your appliance.
12.Do not insert any object into the openings.
13.Keep the opening free from dust, hairs or other objects which might
reduce the cleaning power.
14.Keep your hair, loose clothes, fingers and any other body parts away
from openings or moving parts.
15.Do not attempt to remove any blockages with a sharp object as this
may cause damage to your vacuum cleaner.
16.Do not usethe vacuum cleaner with incorrect voltage as this may
result in damage or injury to the user. The correct voltage is listed on the
ratings label.
17.If there is an abnormal noise, smell, smoke or any other failure or
USER MANUAL
EN
1

breakage during the operation, you should turn off the switch and
unplug it. Then contact your service center for repairs. Do not attempt
to repair it yourself.
18.If the power supply cord is damaged, it must be replaced by the
manufacturer or a service agent or a similarly qualified person, in order
to avoid electric shock.
19.This appliance is not intended for use by persons (including children)
with reduced physical, sensory or mental capabilities, or lack of
experience and knowledge, unless they have been given supervision or
instruction concerning the use of the appliance by a person responsible
for their safety.
20.Ensure that children do not play with the appliance.
21.This appliance can be used by children aged from 8 years and above and
persons with reduced physical, sensory or mental capabilities or lack of
experience and knowledge if they have been given supervision or
instruction concerning use of the appliance in a safe way and
understand the hazards involved. Children shall not play with the
appliance. Cleaning and maintenance shall not be made by children
unless they are older than 8 and supervised.
22.The 3 prong power plug must be removed from the power socket
before any maintenance work or parts are replaced.
23.This appliance is intended for household use only. It is neither suitable
for commercial/industrial nor for outdoor use.
USER MANUAL
EN
2

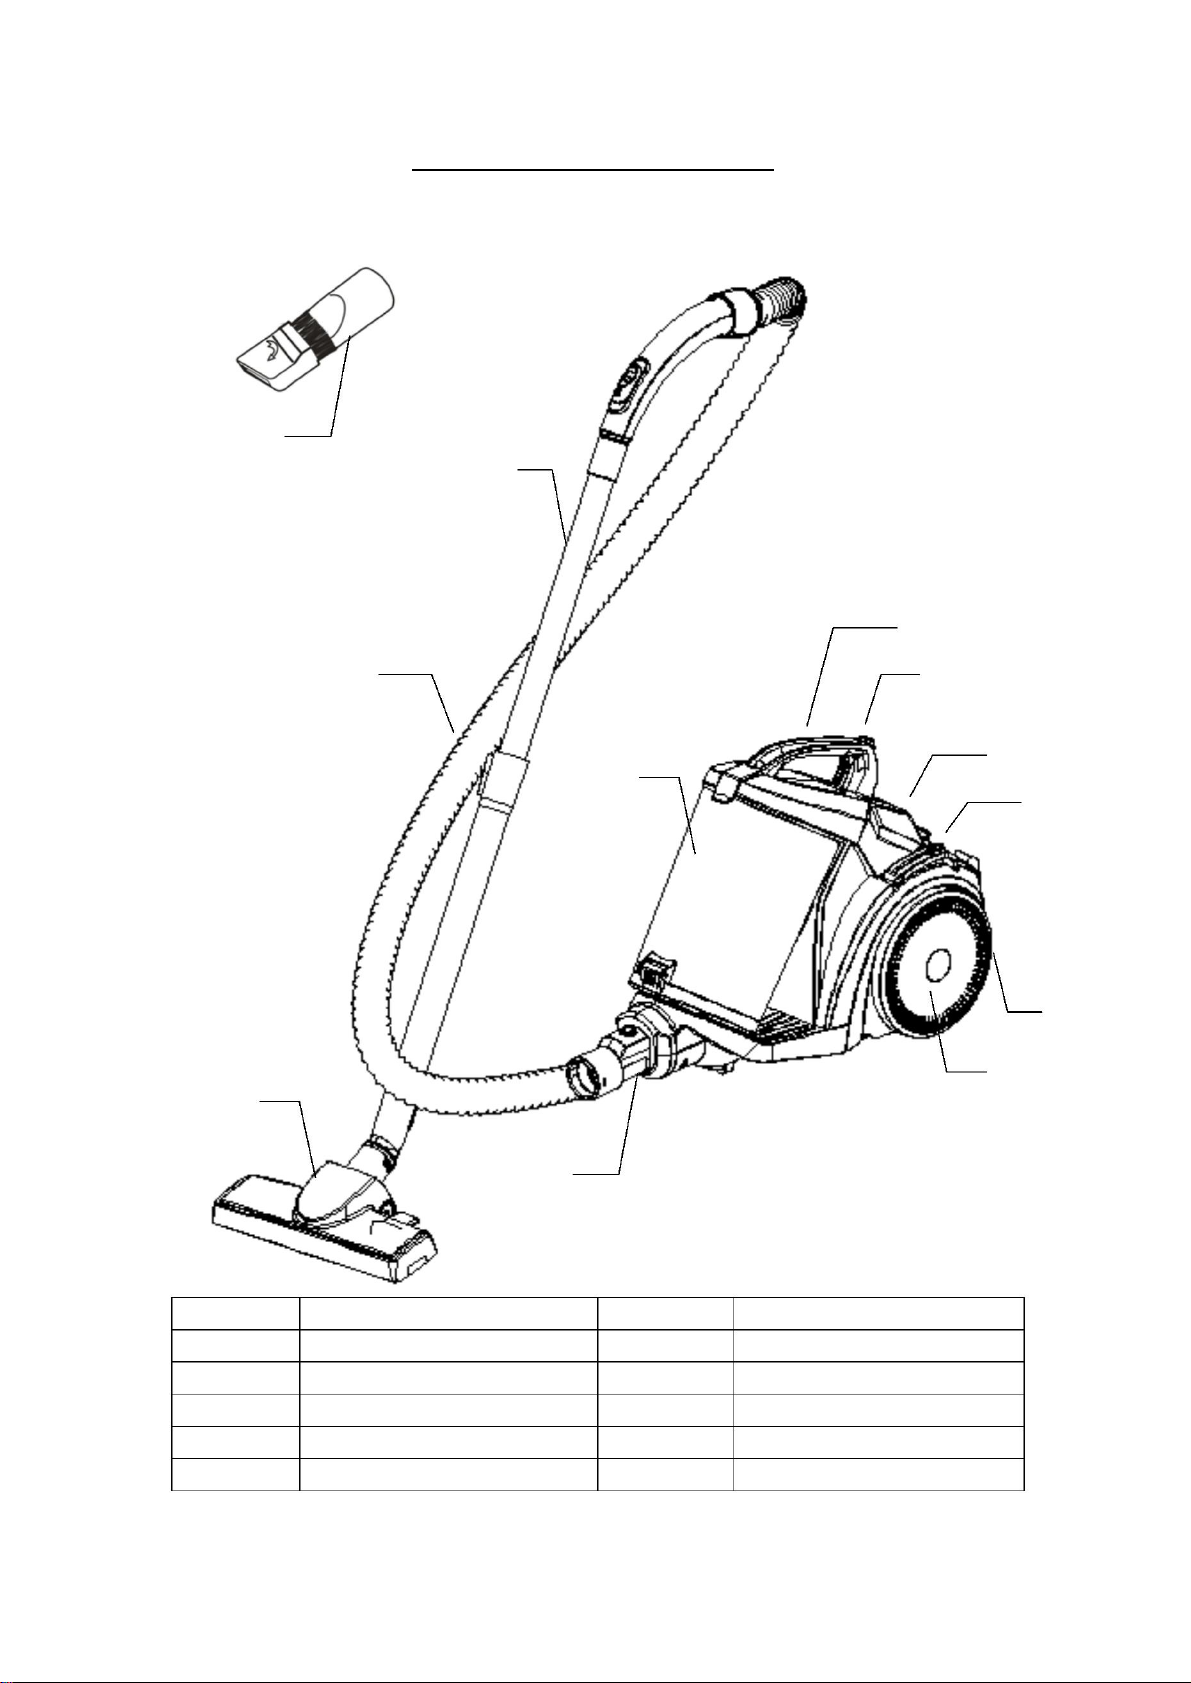
STRUCTURE OFTHE PRODUCT
12
11
1
10
2
3
7
4
5
6
9
8
1
Handle
7
8
9
10
11
12
Dust cup
2
3
4
5
6
Release button
Power button
Cord rewind
button
Rub
ber for big wheel
Big wheel
Hose connector
Brush tool
Hose
Extending
metal tube
Two in one brush
USER MANUAL
EN
3
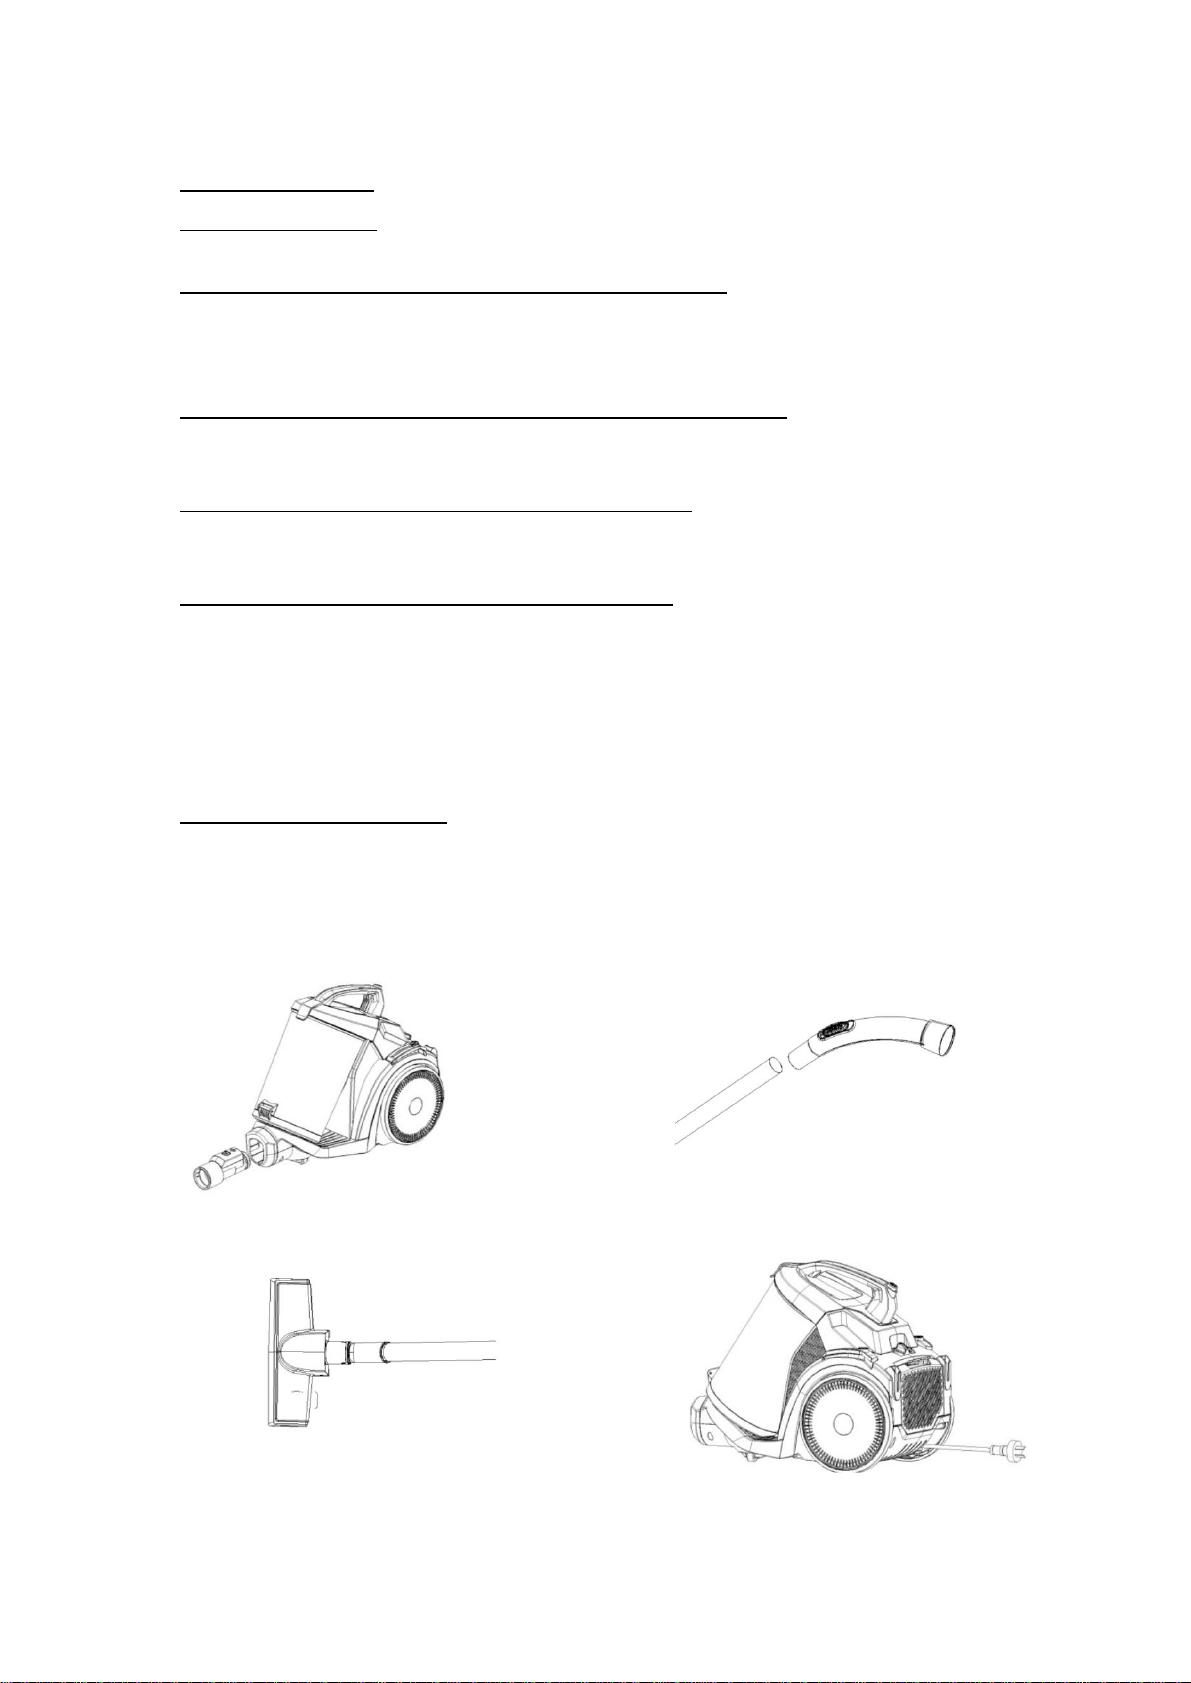
HOW TO USE
ASSEMBLY BEFORE USE
Fig.1 - Shows the connection of the hose to the vacuum cleaner:
Put the hose connector in front of the vacuum cleaner, then insert it into the inlet hole.
If you want to disassemble it, press the release button and then pull it out.
Fig.2 - Shows the connection of the hose and the extension metal tube:
Hold the flexible connector of the hose and insert into the bigger hole of the tube.
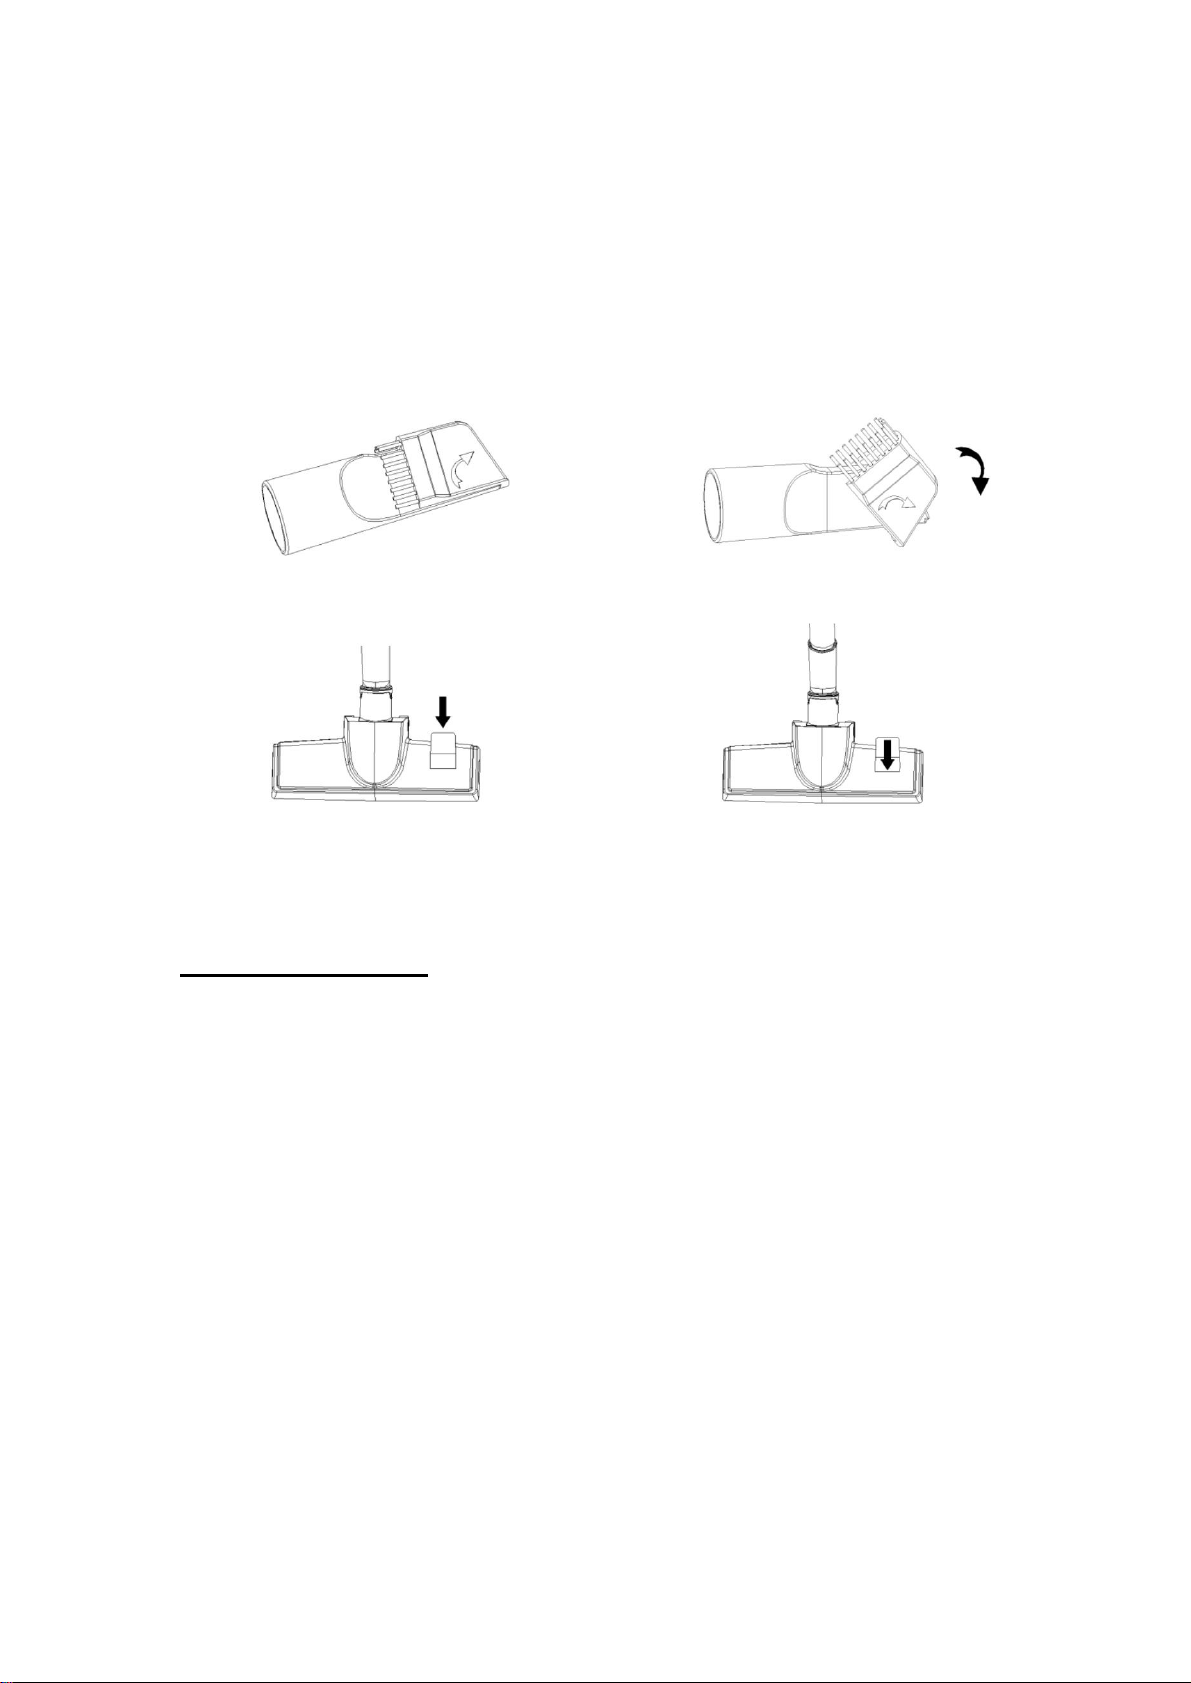
Fig.3 - Shows the connection of the tube and the brush tool:
Put the metal tube into the hole of the brush and rotate to fasten.
Fig.4 - Shows how to check the winding of the power cord.
Pull the power cord out of the machine and STOP when you see the yellow mark – indicating
MAXIMUM LENGTH!!!
Make sure you DO NOT PULL THE CARD PAST THE RED MARK!!!!
When
you are finished using the unit, turn off the power, pull the plug out of the socket, and then
push the winding device button until the cord is completely retracted into the machine.
Fig.5 - Shows the power button
Put the plug into the socket, push the power button to switch the machine ON or OFF.
Fig.1
Fig.2
.
Fig.3
Fig.4
USER MANUAL
EN
4
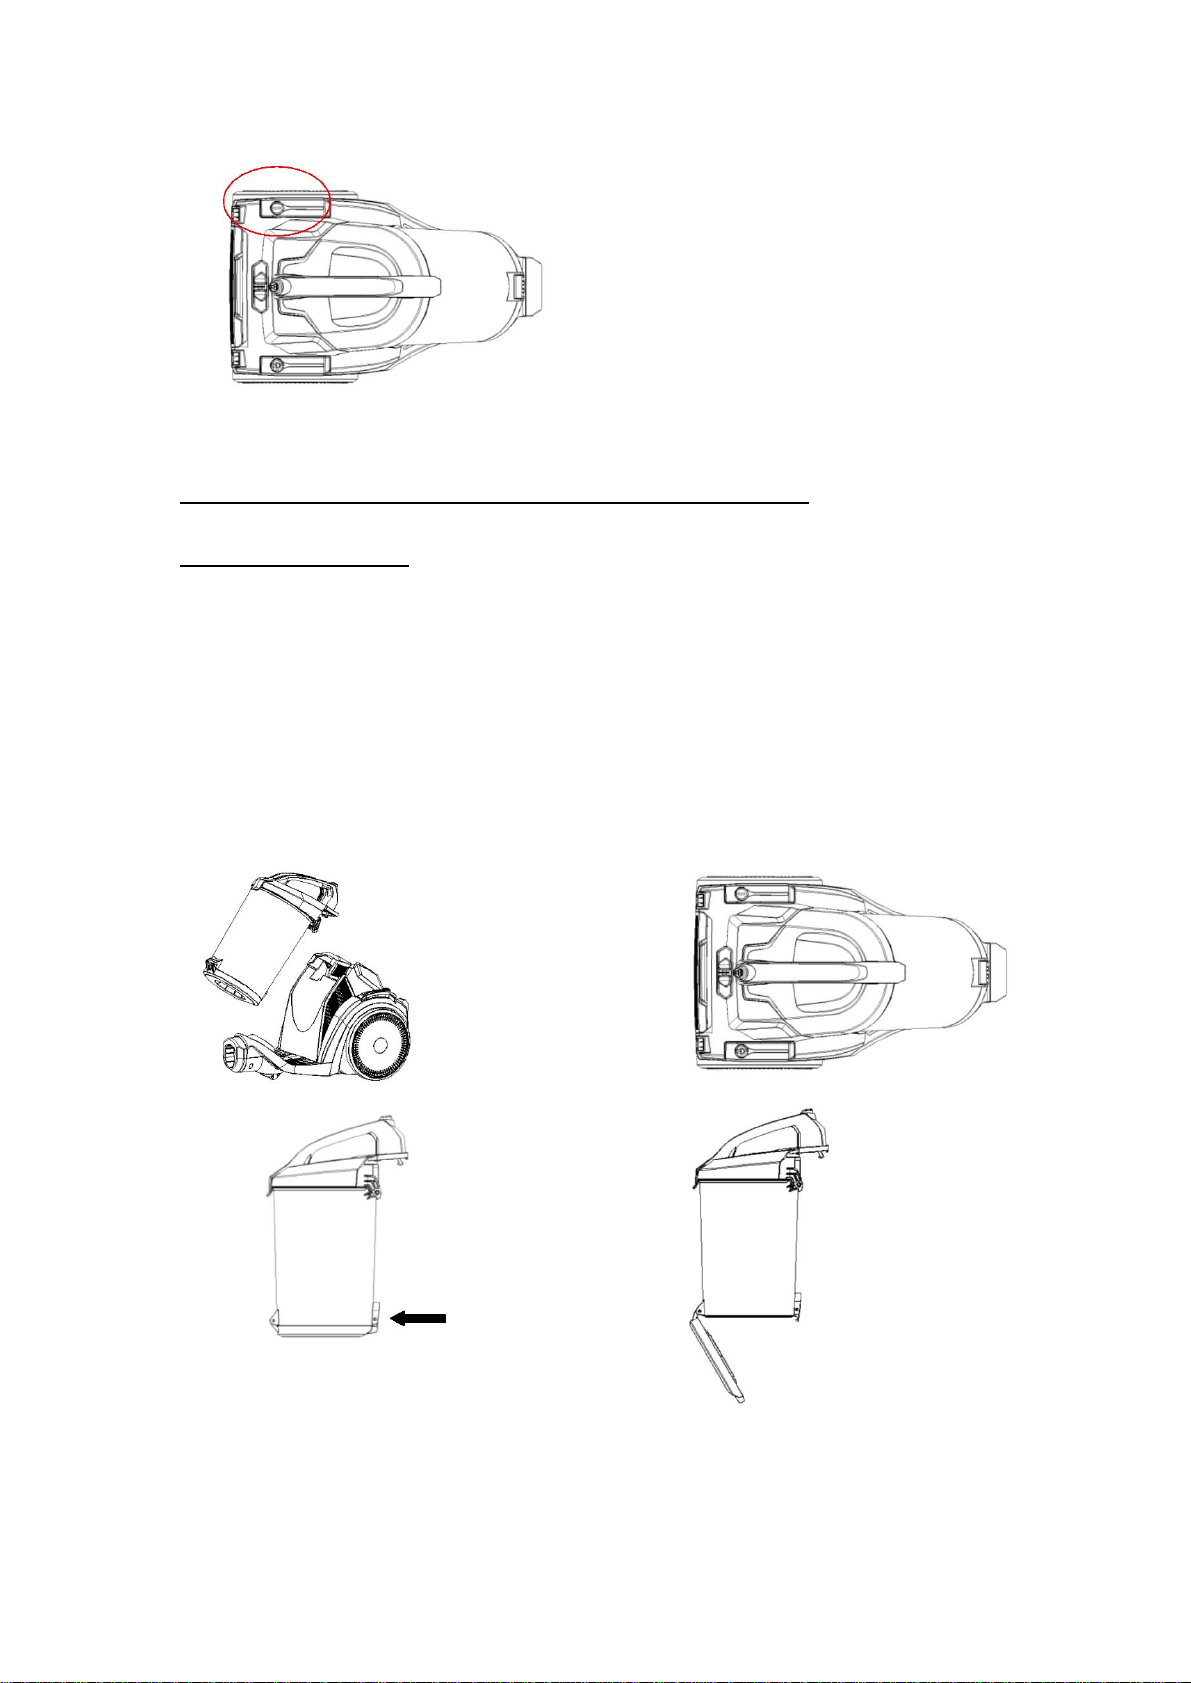
Fig.5
CLEANING OF THE DUST CUP – EXTREMELY
IMPORTANT!!!!
The steps for cleaning the dust cup:
1. Fig.6 - hold the dust cup and handle and push the release button at the top of the canister.
2. Fig.7 - take the dust cup out of the machine.
3.Fig.8 – place the dust cup over a rubbish bin, push the release button to open the bottom of the
dust cup to empty out the canister.
4. Fig.9 – close the dust cup after cleaning out the canister.
Fig.6
Fig.7
Fig.8
Fig.9
USER MANUAL
EN
5
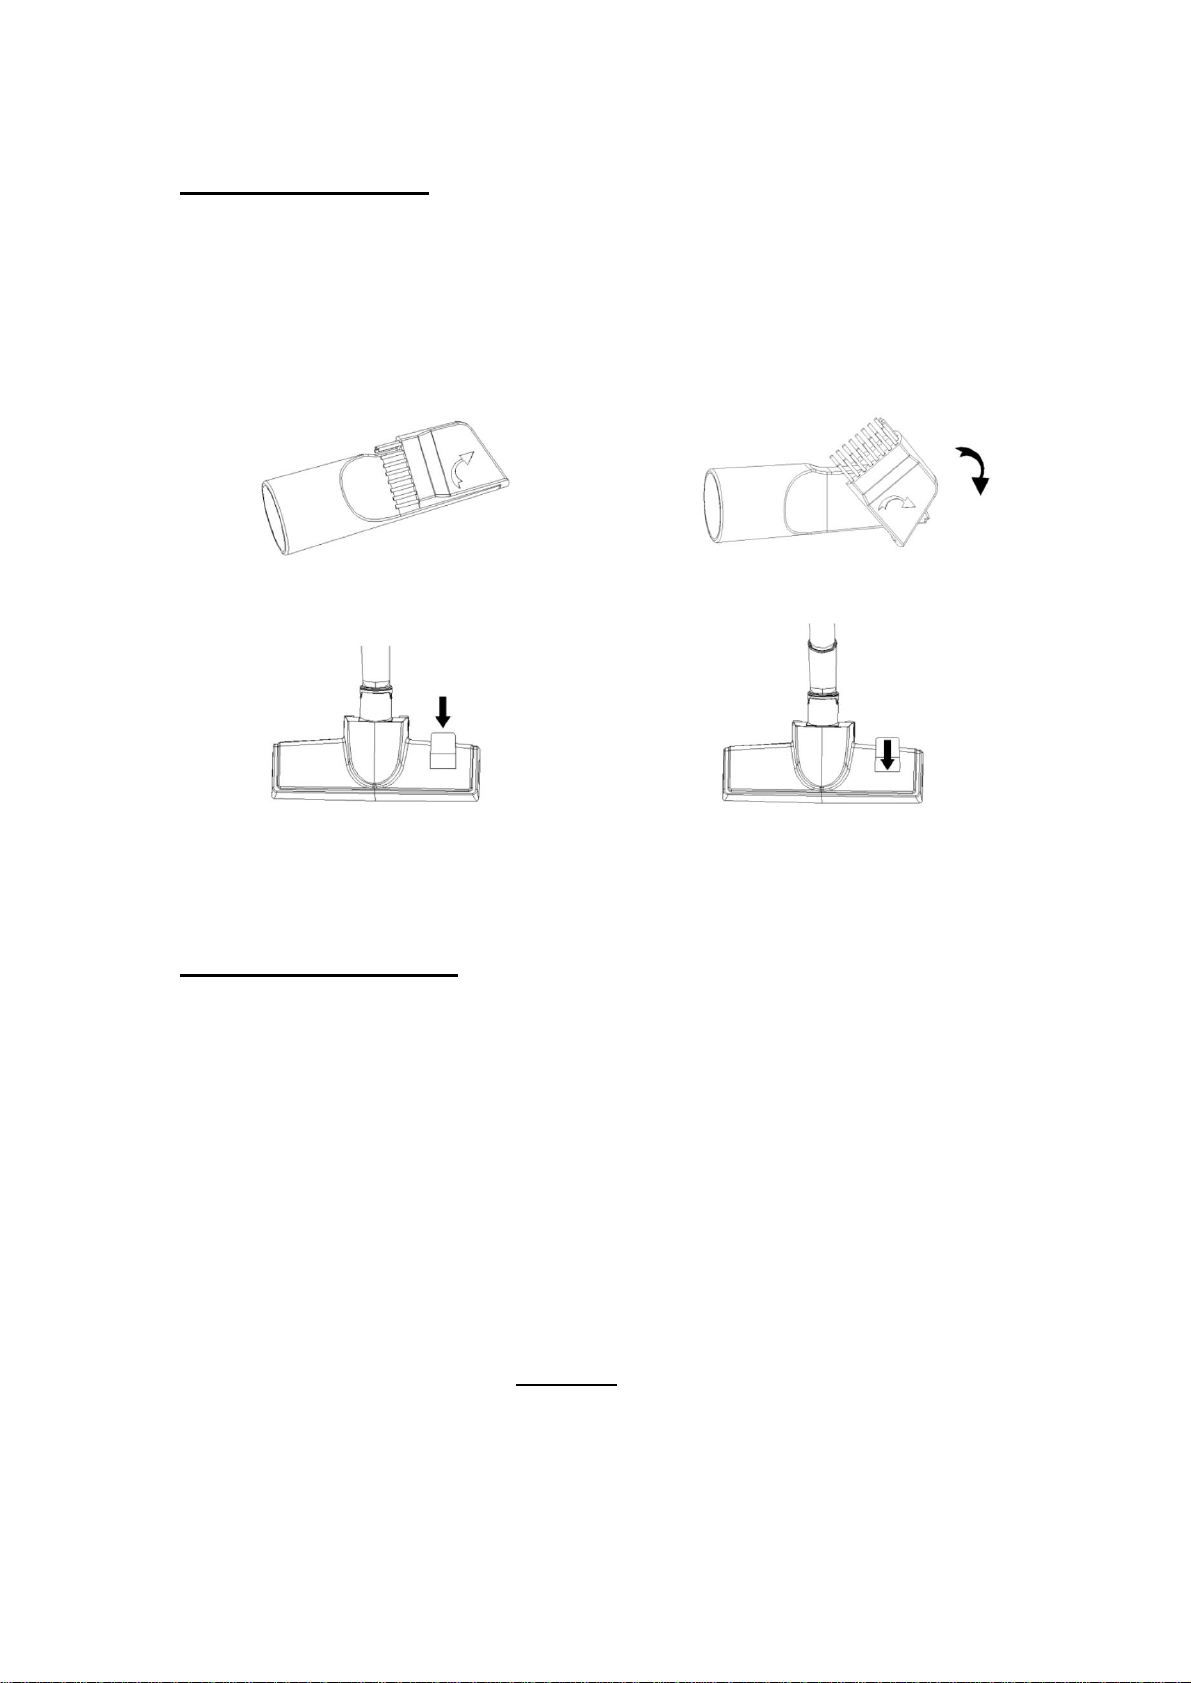
ATTACHMENTS
HOW TO USE THE ATTACHMENTS:
1. Fig.10 - you can use the two in one brush for cleaning in the corner.
2.
Fig.11 - open the other side with bristles to clean the sofa, curtains and ornaments.
3.
Fig.12 - tread on the pedal of the brush tool to expose the bristles for flat or smooth flooring.
4. Fig.13 - tread on the pedal of the brush tool again to retract the bristles for cleaning of carpets.
Fig.10
Fig.11
Fig.12
Fig.13
MAINTENANCE
HOW TO MAINTAIN
1. The filter should be cleaned regularly and also when there is obvious dirt on the filter.
2.
Ensure the filter is properly placed in position before running the vacuum cleaner.
3. The filter CANNOT be cleaned in the washing machine.
4. The suction power will be reduced and will damage the motor if you use a wet filter.
5. Steps for maintenance:
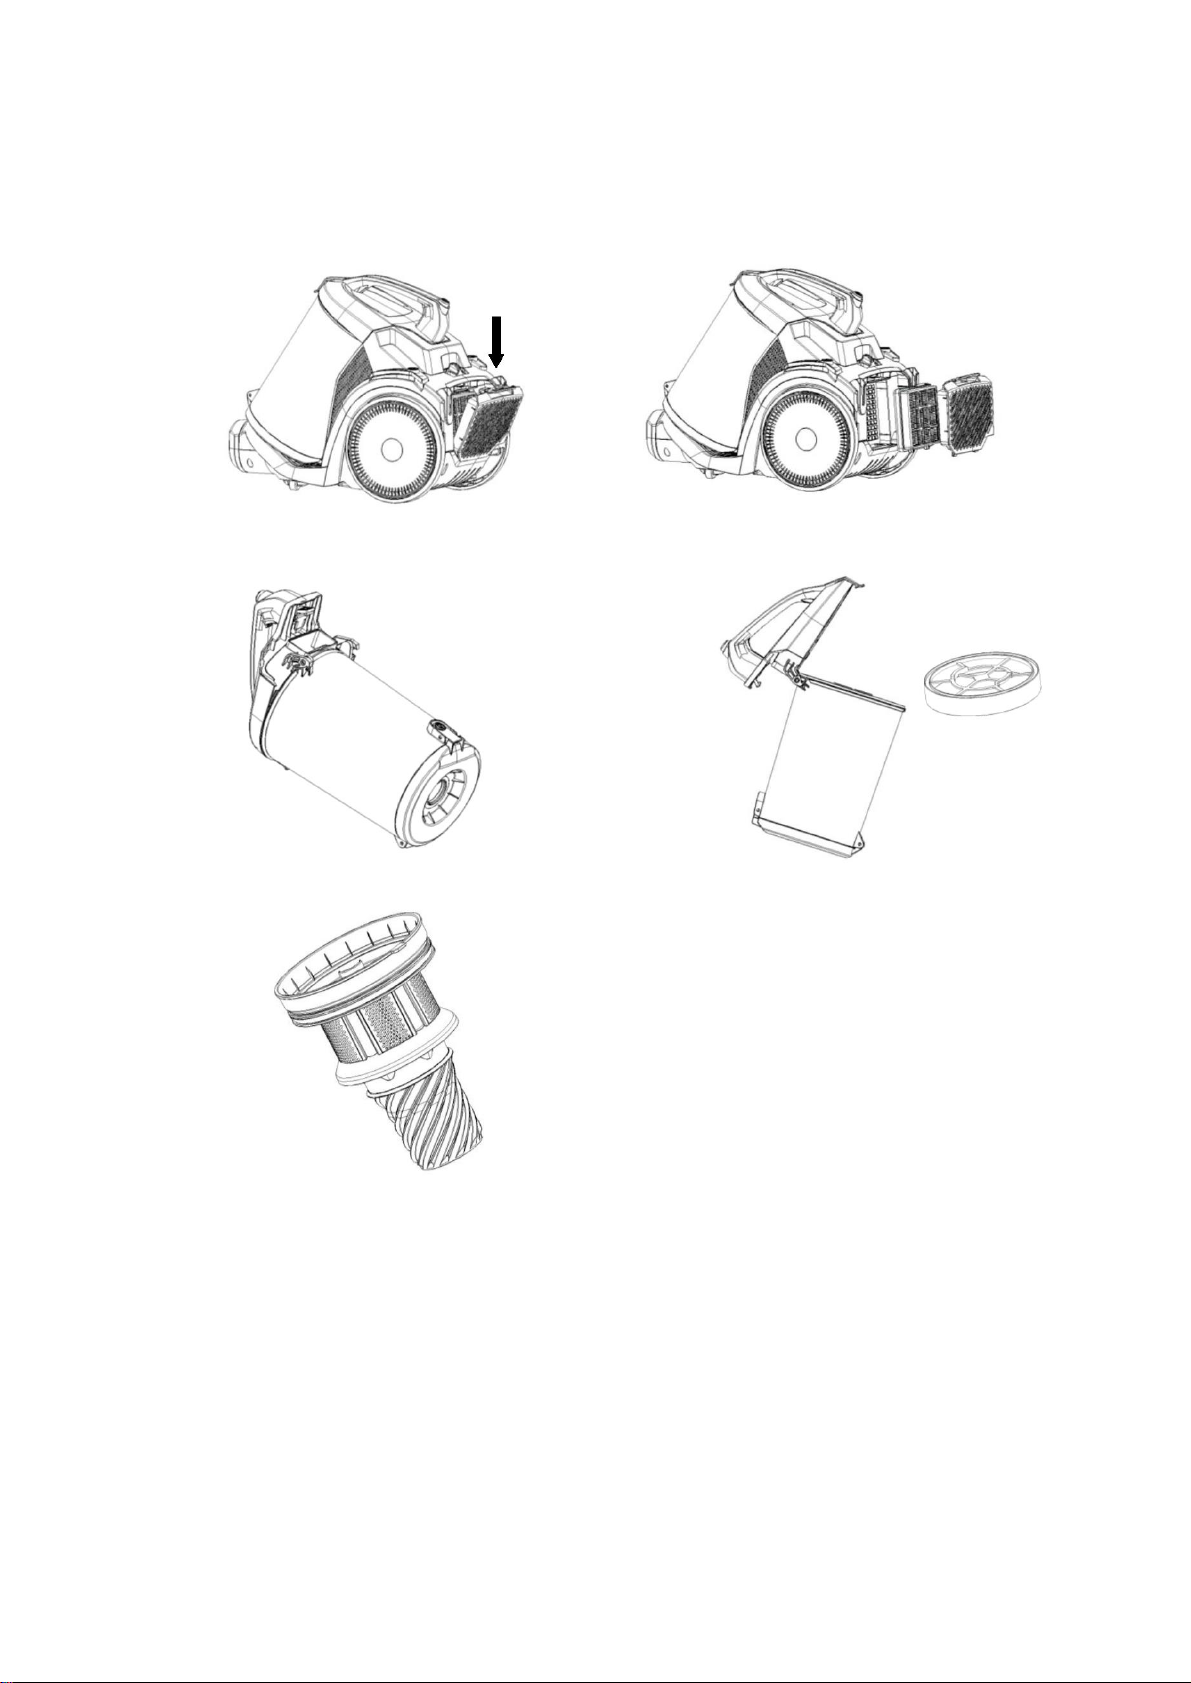
1) Fig.14 - press the outlet lock to open the outlet board.
2) Fig.15 - unclip the outlet filter.
3) Fig.16 - open the HEPA cover to separate it from the dust cup cover
4) Fig.17 – remove the HEPA and cyclone assembly.
5) Fg.18 - wash cyclone assembly under a running tape with warm water.
6)
Wash the HEPA, the HEPA assembly, the outlet HEPA and the dust chamber in the water
without detergent and dry them thoroughly for 24 hours, before use.
7)
Fix the HEPA assembly into the chamber cover and make sure that the three important cubes
are stuck in the grooves of the dust chamber.
8) Rotate the HEPA assembly in the direction of the arrow on the chamber cover.
9) Fit the chamber cover assembly and the dust chamber according to the arrows on the outside.
USER MANUAL
EN
6

10)
Put the dust chamber assembly into the machine. First place the chamber in the right
position
and then press the handle of the dust chamber until it clicks into place then the
operation
is successful.
Fig.14
Fig.15
Fig.16
Fig.17
Fig.18
USER MANUAL
EN
7

This marking indicates that this product should not be disposed with other household wastes
throughout the EU. To prevent possible harm to the environment or human health from
uncontrolled waste disposal, recycle it responsibly to promote the sustainable reuse of material
resources. To return your used device, please use the return and collection systems or contact the
retailer where the product was purchased. They can take this product for environmental safe
recycling.
Technical Specifications :
Wattage : 700W
Voltage: 220-240V~
Cannister capacit
y:3.5L
Cord length:
7 Meters
Weight: G.W 7.5KG
Pevexd.d. donot accept any liability for damages resulting from the improper use ofthe device or
its improper repair.
Specifications, designs and dimensions are subject to change without prior notice.
Correct Disposal of this product
USER MANUAL
EN
8

SIGURNOSNA UPOZORENJA
1. Prije prve uporabe, pročitajte pažljivo upute za uporabu, te
koristite uređaj sukladno uputama, sačuvajte ih za kasniju
uporabu.
2. Prije prve uporabe, provjerite da je spremnik prašine ili filter
prašine (kod pojedinih modela) pravilno instaliran.
3. Nikad ne koristite uređaji bez zaštitnog filtera motora.
4. Uređaj koristite u zatvorenim prostorima i suhim površinama.
5. Ne koristite uređaji ako je pao na tlo, koji je oštećen ili je
ostavljen na otvorenom prostoru ili je pao u vodu.
6. Ne povlačite uređaj preko kabela za napajanje, ne koristite
uređaji ako je kabel napajanja ili utikač oštećen. Molimo
kontaktirajte dobavljača ili ovlaštenog servisera.
7. Ne dirajte utikač i uređaji mokrim rukama.
8. Nemojte povlačiti uređaj za kabel napajanje. Nemojet koristi
kabel napajanja kao ručku, nemojte kabel napajanja povlačiti
preko oštrih rubova, vrućih dijelova i sličnih opasnosti. Nikad ne
isključujte uređaji tako da ga povlačite za kabel napajanja.
9. Ne usisavajte zapaljive materijale (kerozin, benzin itd). Ne
koristite usisavač na mjestima s eksplozivnim isparavanjima i
tekućinom.
10. Ne usisavajte ugljen (vrući ili hladni), opuške cigareta,
šibice,vrućeg pepela. Ne koristite uređaji na mjestima gdje se
nalaze štetne tekućine (klor, izbjeljivač, itd.).
11. Uređaj nemojte nikad koristiti za usisavanje građevinskog
materijala (kao što je fini pijesak, vapno, cementni prah, i
slično). Usisani građevinski materijal može prouzročiti oštećenja
na uređaji.
12. Ne stavljate nikakve predmete u otvore.
13. Na otvorima ne smije biti prašine, dlaka, ili čega drugog, što
bi moglo ometati protok zraka i smanjiti usisnu snagu.
14. Pazite da vam kosa, viseći dijelovi odjeće, prsti ili drugi
dijelovi tijela ne dođu u dodir s otvorenim ili pomičnim
UPUTE ZA UPORABU
HR
9

dijelovima uređaja.
15. Ne pokušavajte ukloniti bilo kakve blokade oštrim
predmetima jer može dovesti do oštećenja uređaja.
16. Nemojte koristiti uređaj sa krivim naponom jer može
dovesti do oštećenja aprata i Vaše ozljede. Informacije o
naponu nalaze se na uređaju.
17. Ako tijekom rada dođe do povećane razine buke, mirisa,
dima ili bilo kojeg drugog kvara i loma, isključite prekidač i
uređaji isključite iz napajanja. Zatim se obratite servisnom
centru za popravak. Ne pokušavajte uređaj popraviti sami.
18. Ako je kabel oštećen mora ga zamijeniti proizvođač ili
servise ili osoba sa sličnim kvalifikacijama kako bi se izbjegao
strujni udar.
19. Ovaj aparat nije namijenjen osobama (uključujući djecu)
sa smanjenim fizičkim ili mentalnim sposobnostima niti
osobama koje nemaju dovoljno iskustva i znanja, osim ako im je
osoba odgovorna za njihovu sigurnost dala dopuštenje ili ih
uputila u korištenje aparata. Malu djecu potrebno je nadzirati
kako se ne bi igrala s aparatom.
20. Ne ostavljajte usisivač dok je uključen u električnu struju.
Izvucite utikač iz mreže po uporabi ili u vrijeme dok mijenjate
dijelove.
21. Aparat smiju upotrebljavati djeca starija od 8 godina i
osobe s ograničenim fizičkim, osjetilnim ili mentalnim
sposobnostima te nedostatnim iskustvom i znanjem u vezi sa
sigurnom uporabom pećnice. U tom im slučaju treba omogućiti
razumijevanje potencijalnih opasnosti. Nadzirite djecu kako
biste osigurali da se ne igraju sa aparatom.
22. Usisavač koristite samo za kućnu uporabu, i u
zatvorenim prostorijama! Nije za profesionalnu uporabu.
UPUTE ZA UPORABU
HR
10
SASTAVNI DIJELOVI UREĐAJA
12
11
1
10
2
3
7
4
5
6
9
8
1
Ručka usisavača
7
8
9
10
11
12
Posuda za prašinu
2
3
4
5
6
Prekidač za regulaciju usisne snage
Prekidač za uključiti/isključiti
Gumb za namatanje kabela
Guma kotača
Kotač
Priključak za cijev
Četka
Crijevo
Teleskopska cijev
2 u 1 četkica
UPUTE ZA UPORABU
HR
11

SKLAPANJE UREĐAJA
Slika 1 – Prikazuje spajanje crijeva na usisavač
Stavite utikač crijeva ispred usisavača a zatim ga umetnite u ulazni otvor.
Ako ga želite rastavite, pritisnite gumb za otpuštanje, a zatim ga izvucite.
Slika 2 – Prikazuje povezivanje crijeva i teleskopske cijevi
Držite fleksibilni priključak crijeva i umetnite ga u veći otvor cijevi.
Slika 3 – Prikazuje povezivanje teleskopske cijevi i četke
Stavite metalnu cijev u rupu četke i zakrenite da se pričvrsti.
Slika 4 – Prikazuje kako koristiti kabel napajanja
Izvucite kabel napajanja iz uređaji i zaustavite kad vidite žutu oznaku koja označava MAKSIMALNU
DUŽINU!!
Pazite da prilikom izvlačenja ne pređete crvenu oznaku!!!!
Kad završite s korištenjem uređaj
a, isključite uređaj, izvucite utikač iz utičnice, i zatim pritisnite gumb
uređaja za namatanje kabela, sve dok se kabel potpuno ne uvuče u uređaji.
Slika 5 – Prikazuje prekidač za uključenje/isključenje
Stavite utikač u utičnicu pritisnite prekidač za uključivanje ili isključivanje uređaji.
Slika 1
Slika 2
.
Slika 3
Slika 4
6
UPUTE ZA UPORABU
HR
12

Slika 5
Čišćenje posude za prašinu – VAŽNO!!!
Koraci za čišćenje posude za prašinu:
1. Slika 6 – držite posudu za prašinu i ručku i pritisnite prekidač za otpuštanje
2. Slika 7 – izvadite posudu za prašinu iz uređaja
3. Slika 8 – postavite posudu za prašinu na kantu za smeće, pritisnite gumb za otpuštanje kako biste otvorili
dno posude za prašinu i ispraznili posudu.
4. Slika 9 – zatvorite posudu za prašinu nakon čišćenja
Slika 6
Slika 7
Slika 8
Slika 9
7
UPUTE ZA UPORABU
HR
13
KORIŠTENJE NASTAVAKA
1. Slika 10 – četkicu 2u1 možete koristiti za čišenje kuteva
2.
Slika 11 - četkicu 2u1 možete koristi i za čišćenje sofa, ukrasa.
3.
Slika 12 – Upotrijebite papučicu na četki za čišćenje glatkih površina.
4. Slika 13 - Upotrijebite papučicu na četki za čišćenje tepiha.
Slika 10
Slika 11
Slika 12
Slika 13
ODRŽAVANJE
1. Filter treba redoviti čistiti, a pogotovo kad je na njemu očigledna prljavština.
2.
Provjerite da li je filter dobro postavljen prije uporabe uređaja.
3. Filter se NE MOŽE prati u perilici.
4. Snaga usisavanja se smanjuje i oštećuje se motor ako koristite mokri filter.
5. Održavanje:
1) Slika 14 – Otvorite rešetku.
2) Slika 15 – Izvadite izlazni filter.
3) Slika 16 – Otvorite HEPA sklop poklopac kako biste ga odvojili od posude za prašinu.
4) Slika 17 – Uklonite filter.
5) Slika 18 - Operite filter toplom vodom.
6)
Operite HEPA sklop toplom vodom 24 sata prije uporabe.
7) Učvrstite HEPA sklop u poklopac posude za prašinu.
8) Zaokrenite HEPA filter u smjeru strelice na poklopcu posude.
9)
Prilagodite sklop poklopca i posude za prašinu prema strelicama koje se nalaze s vanjske strane.
UPUTE ZA UPORABU
HR
14
10)
Stavite sklop posude za prašinu u uređaj. Stavite je u pravilan položaj, a zatim pritisnite
ručicu posude
za prašinu dok ne čujete “klik”.
Slika 14
Slika 15
Slika 16
Slika 17
Slika 18
UPUTE ZA UPORABU
HR
15

Simbol prekrižene kante za otpad znači da je proizvod potrebno zbrinuti odvojeno od
otpada iz kućanstva. Proizvod je potrebno proslijediti na reciklažu u skladu s lokalnim
propisima o zaštiti okoliša za zbrinjavanje otpada. Odvajanjem označenog proizvoda od
otpada iz kućanstva pomoći ćete u smanjivanju količine otpada poslanog u spalionice ili na
deponije i minimizirati potencijalno negativan učinak na zdravlje ljudi i okoliš.
Tehničke specifikacije:
Snaga :700W
Napon:220-240V~
Kapacitet posude:3.5L
Dužina kabela: 7 metara
Bruto težina 7.5KG
Pevex d.d ne prihvaća nikakvu odgovornost za štete koje bi bile posljedica pogrešne uporabe
uređaja ili njegovih nestručnih popravaka. Pevex d.d pridržava pravo izmjene uređaja i/ili njegovih
karakteristika bez prethodne najave
UPUTE ZA UPORABU
HR
16
Table of contents
Other TECro Vacuum Cleaner manuals


