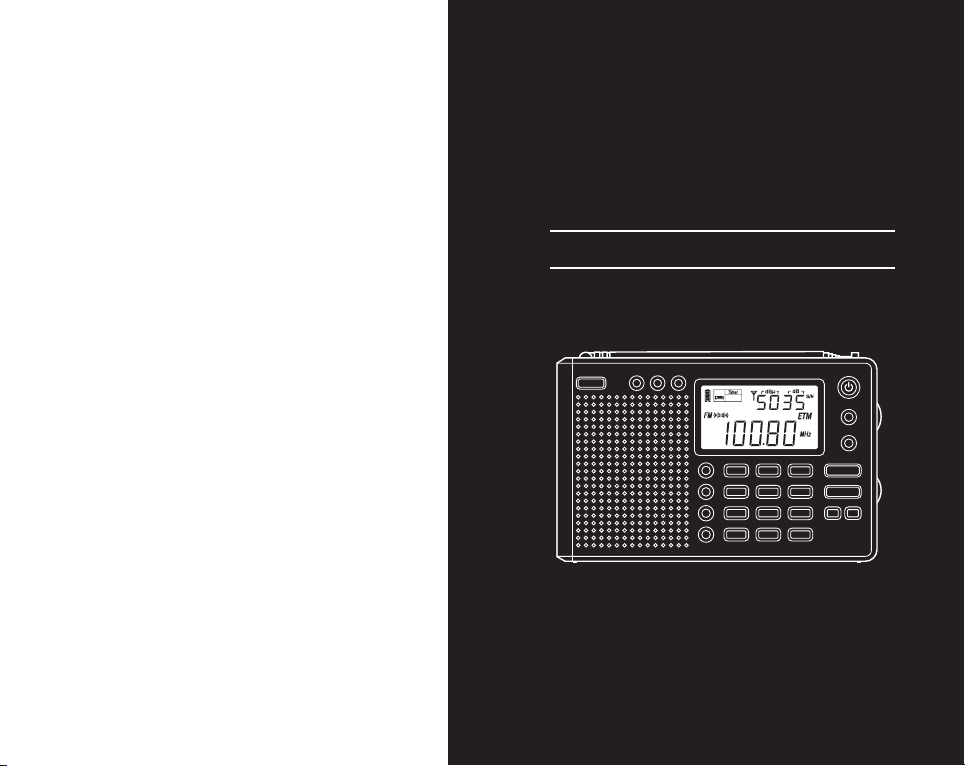
Tecsun PL-380 User manual
TECSUN TECSUN
TECSUN RADIO CO., LTD.
OPERATION MANUAL
PL-380
FM stereo / SW / MW / LW DSP RECEIVER
TECSUN RADIO CO., LTD.
FACTORY: 189 GuanChang Road, DongCheng District,
DongGuan, GuangDong, P.R.China
E-mail: [email protected]
Website: www.tecsun.com.cn
www.tecsun.b2s.com
TECSUN
FM/SW/MW/LW DSP RECEIVER
PL-380
SLEEP
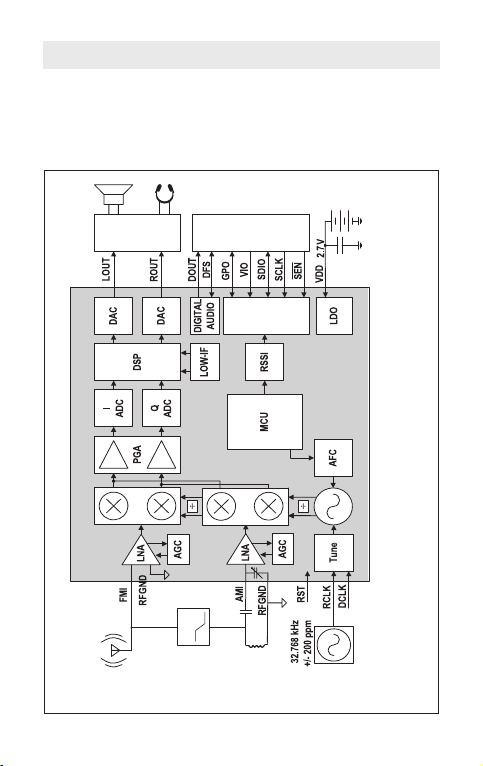
PL-380 Functional Block Diagram
PL-380 is using DSP si4734 Microchips (from Silicon Labs in
USA) to digitalize the analog AM/FM broadcasting signal base
on the modern software technology and radio principles. It can
highly improve on radio's sensitivity, selectivity, S/N ratio and
anti-interference.
AMPLIFIERCONTROLLER
CONTROL
INTERFACE
SW LPF
FM ANT
MW/LW
ANT
PL-380 Functional Block Diagram

TABLE OF CONTENTS
1
CONTROL LOCATIONS................................................... 2
LCD DISPLAY.....................................................................4
QUICK START GUIDE........................................................5
TURN THE RADIO ON OR OFF.........................................8
TUNE INTO STATIONS... ...................................................9
● ETM (Easy Tuning Mode)
● Manual tuning
● Auto scan stations
● Direct key-in frequency
WORKING WITH MEMORIES..........................................12
● ATS - Auto Tuning Storage
● Manually storing station
● Semi-auto storing station
DELETE MEMORY........................................................... 13
● Manual delete memory
● Semi auto-delete memory
● Delete all memory
SLEEP FUNCTION...........................................................14
CLOCK SETTING.............................................................15
SETTING THE ALARM TIME...........................................15
..........................................16
...................................................16
................................................................16
.....................................................16
.......................................17
....................................17
............................................................18
USING THE EXTERNAL ANTENNA................................20
......21
IMPORTANT MATTERS FOR USING BATTERIES.........22
TROUBLE SHOOTING.................................................... 23
"Bi" SOUND VIA FUNCTIONS........................................ 25
............................................................29
SNOOZE / LIGHT FUNCTION
TURN OFF THE ALARM
DISPLAY MODE
KEY LOCK FUNCTION
FM ST. (FM STEREO) BUTTON
AM BW (BANDWIDTH) BUTTON
SYSTEM SETTING
USING THE INTELLIGENT CHARGING FUNCTION
SPECIFICATIONS

CONTROL LOCATIONS
2
TECSUN
FM/MW LW DSP RECEIVERSW/ /
PL-380
LIGHT/SNOOZE
VF
VM
SW METER BAND
FM
MW/LW
ATS
POWER
TIME ALARM
DISPLAY
ATSA B
AM BW
ETM
SLEEP
FM SE T
2
13
564
8 97
0
M
12/24
9/10kHz
DEL ETE
FM ST.
SCAN
3
4
5
6
7
14 15
2
1
16 17
13 1112
DC-IN 5V
18
VOLUME TUNING
19
21
22
20
23
24
8910

Back stand
22
Multifunctional tuning knob
21
20 FM & SW telescopic antenna
USB 5V DC-IN jack
19
18 Earphone jack
ALARM On/Off & Setting
17
TIME Setting
16
15 LOCK button
VF (View Frequency) & SCAN button (Frequency)
12
VM (View Memory) & Scan button (Memory)
11
AM / BW button (AM IF bandwidth selector)
10
9 Memory button (Storing radio stations) / Batteries type selector
8
0-9 Numeric keys
7 ENTER / DEL ETE button
SW/ ATS button (SW meter band selector & Auto Tuning Storage)
6
MW / LW button ( MW / LW band selector & Auto Tuning Storage)
5
4 FM / ATS button (FM band selector and Auto Tuning Storage)
FM ST. button
3
2Display button
1Power on/off
14 LIGHT / SNOOZE
ETM (Easy Tuning Mode) button
13
3
Volume knob
23
Battery compartment
24
4
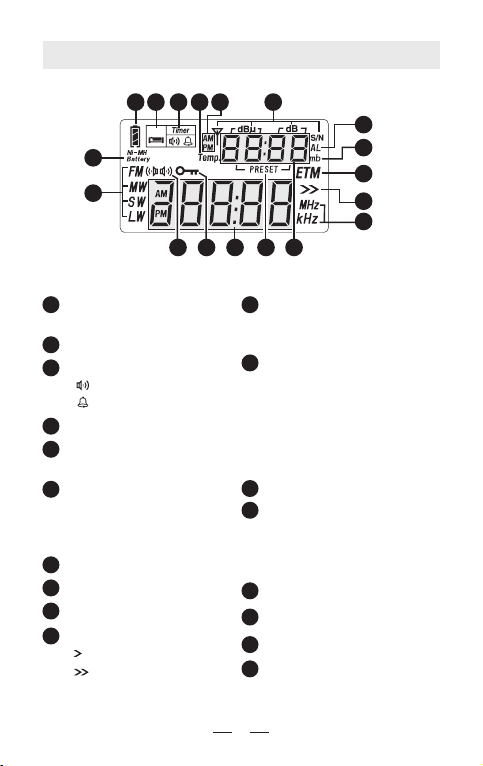
LCD DISPLAY
Battery consumption indicator /
Charging indicator
1
2Sleep timer indicator
3Alarm on/off indicator
" " alarm on by radio
" " alarm on by buzzer
6Signal indicators
dBu: signal strength unit
dB : Signal to Noise Ratio
(S/N) unit
7
8SW meter band indicator
9ETM indicator
4Temperature (Temp.)
5AM, PM indicator for 12-hour
format clock
Tuning speed:
" " Slow Tuning
" " Fast Tuning
10
11 kHz: frequency unit for MW,
LW & SW
MHz: frequency unit for FM
15 Key-lock indicator
Digital number display (4 Digits)
With radio off: world time, alarm
time, temperature
With radio on: word time, signal
strength / SNR, alarm time,
temperature, local time, memory
address, meter band.
12
14 Digital number display
With radio off: local time
With radio on: frequency display,
band display
FM stereo status indicator
16
Band indicator
17
Alarm time indicator
Preset memory address
13
Rechargeable batteries indicator
18
SLEEP
12 4 6
7
8
18
3
9
5
11
15 14 13
16
10
17
12

QUICK START GUIDE
5
TIME SETTING
1. Long press [TIME] button until "hour" is flashing in the
display. Rotate the [TUNING] knob to adjust the correct
"hour".
2. Short press [TIME] button again, rotate the [TUNING]
knob to adjust "minute".
3. Press the [TIME] button again to confirm your time
setting.
ALARM SETTING
1. Long press [ALARM] button. Rotate the [TUNING] knob
when "hour" is flashing in the display.
2. Short press [ALARM] button again. When the "minute"
is flashing. Rotate the [TUNING] knob to adjust the
"minute".
3. Short press [ALARM] button again, rotate the [TUNING]
knob to select 1 ~ 90 minutes of the Alarm's duration.
4. Finally, short press [ALARM] button again to confirm.
Note:
In ALARM section, [ ] means ALARM is set to radio-on;
[ ] means ALARM is set to buzzer, or if the display corner
remains blank, which means the alarm is off.
LISTEN TO THE RADIO
1. Short press [POWER] button to turn on your radio.
2. Select FM by pressing the [FM] button, MW and LW by
pressing the [MW/LW] button, SW by pressing the [ ] or
[ ] button sequentially until you have selected the
desired meter band (meter band number flashes in the
upper right corner of the display) .
3. Turn the TUNING knob to your desired radio station.
4. You can also direct key-in the frequency numbers by
pressing the numeric keys.
5. Adjust the volume level by rotating the VOLUME knob.
Note:
Be sure to fully extend the telescopic antenna when listening
to SW and FM.
6
ETM(Easy Tuning Mode) on FM, MW, LW, SW band
STORING FREQUENCIES INTO MEMORY
1. Turn on your radio, and tune into your favorite station.
2. Short press [M] button, with the memory address is
flashing in the display, press [M] button again to confirm.
LISTEN TO STATIONS IN THE MEMORY
1. Turn on the radio, press and release the [VM] button with
notice that the PRESET show in the display's upper right
corner.
2. Turn the [TUNING] knob to select stored stations.
flashing
1. Turn on the radio and select
your desired band by pressing
either the FM, MW/LW or SW
[ ] or [ ] button.
2. Short press the [ETM] button
with [ETM] shows on the display
to enter Easy Tuning Mode.
3. Long press the [ETM] button
until the frequency running to
auto scan the stations within
present band.
4. When the frequency stop running, turn around the
[TUNING] knob for those scanned stations.
5. Short press either the [VF] & [VM] button with frequency
flashing and the disappearance of ETM on the display to
exist ETM mode.
SLEEP
Station
Frequency
running
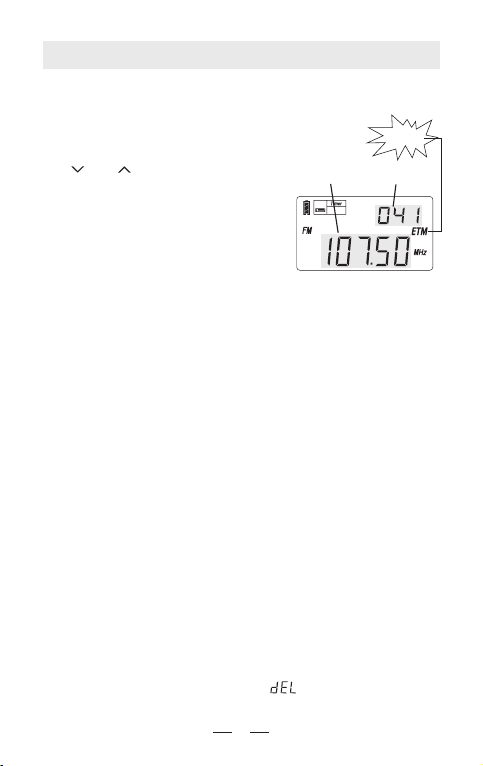
DELETE MEMORY
1. Turn on the radio and press the [VM] button, causing
PRESET to appear in the display's upper right corner.
2. Use the [TUNING] knob to select the memory that you
want to delete.
3. Long press [DELETE] button. " " is flashing in the
display, press [DELETE] button again to confirm it.
flashing
7
AUTO BROWSE MEMORY
the [VM] button with memory
page shows in the upper right
corner and disappears in 5
seconds.
2. Long press [VM] button with
" " flashing to scan
from one memory to another,
staying on each station
memory for about 5 seconds.
3. To stop auto search memory,
simply press the [VM] button.
1. Turn on the radio, short press
SLEEP
Auto-scan memory with
pre-listening
SLEEP
Auto-scan with pre-listening
moving
Frequency
running
AUTO BROWSE STATION
1. Turn on the radio and short
press the [VF] button with
the frequency flashing.
2. Long press the [VF] button
with [ ] moving to scan
from one station to another,
staying on each stations
for about 5 seconds.
3. To stop auto browse function,
simply press the [VF] button.

8
2. Short press on [POWER] button to turn the radio on or off.
TURN ON / OFF THE RADIO
1. Installing batteries
The battery compartment is located on the back of the
PL-380. To remove the battery compartment cover, apply
thumb pressure and slide it towards the bottom of the
radio. Install 3 AA alkaline batteries into the battery
compartment, observing the battery polarity diagram on
the back of the radio. Display screen would show battery
capacity, time, etc.
Note:
If the radio is not able to be turned on. Please check if the
batteries were installed correctly, battery capacity is
sufficient or the lock function had been applied with symbol
" " displayed on screen.
Short press

flashing
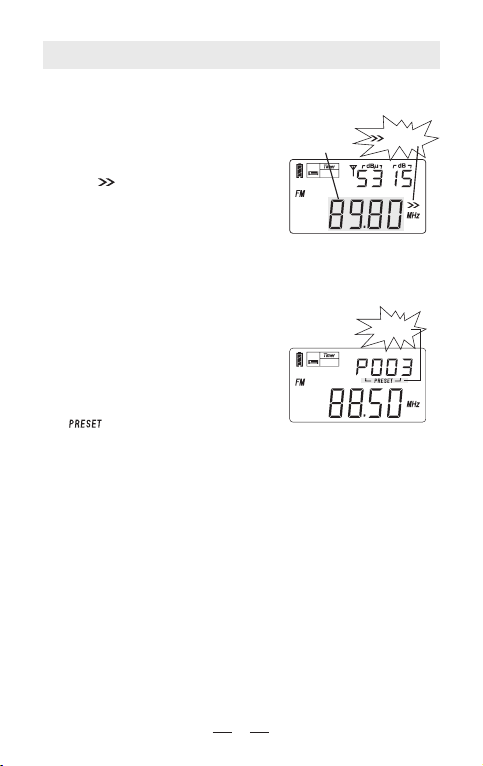
TUNE INTO STATIONS
9
Short press [POWER] button to turn on your radio, then
select your desired band by short pressing the [FM],[MW/
LW], SW [ ] or [ ] button. In case of receiving FM/SW
broadcasting, fully extend the telescopic antenna for a better
reception.
Now, you can turn into your favorite station with any of the
below tuning methods:
Method 1: ETM (Easy Tuning Mode)
The ETM function allows you to tune into stations easily
and temporally store them into the ETM storage; 100
stations for FM/MW/LW & 250 stations for SW.
Note: Scanned stations will not be stored in the regular
550 memories, but will remain in the ETM temporary
storage until next ETM scanning within each band.
HOW TO USE ETM
1. Turn on the radio and select
your desired band by pressing
either the FM, MW/LW or SW
[ ] or [ ] button.
2. Short press the [ETM] button
with [ETM] shows on the display
to enter Easy Tuning Mode.
3. Long press the [ETM] button
until the frequency running to
auto scan the stations within
present band.
4. When the frequency stop running, turn around the
[TUNING] knob for those scanned stations.
5. Short press either the [VF] & [VM] button with frequency
flashing and the disappearance of ETM on the display to
exist ETM mode.
SLEEP
Station
Notes:
FM station: When you are in a different city or country, you
should perform the ETM function again, because this will
not delete any of the stations already within the memory.
Frequency
running

SLEEP
Auto-scan with pre-listening
moving
Frequency
running
Method 3: AUTO BROWSE STATION
1. Turn on the radio and short
press the [VF] button with
the frequency flashing.
2. Long press the [VF] button
with [ ] moving to scan
from one station to another,
staying on each stations
for about 5 seconds.
3. To stop auto browse function,
simply press the [VF] button.
10
MW station: It is recommendable to perform the ETM
function during day time as well as night time, because
there usually are more stations that start broadcasting at
night
SW station: It is recommendable to perform the ETM
function in the morning, afternoon as well as night time,
because the transmitting signal of SW is very unstable and
there usually are more stations that start broadcasting in
the late afternoon.
Method 2: MANUAL TUNING
Turn on the radio, short press the [VF] button to switch into
frequency mode. Rotate the [TUNING] knob to select your
station.
FAST/SLOW tuning is shown in the chart below for each band.
0.01 MHz
1kHz
1 kHz
1 kHz
0.1 MHz
9 /10kHz
9 kHz
5 kHz
FM
MW
LW
SW
step
band
turning step
Slow tuning mode Fast tuning mode
turning step
Note: When the radio search & stop to a station, just
press [M] button once to store it.

11
Method 4: AUTO BROWSE MEMORY
1. Turn on the radio, short press
the [VM] button with memory
page shows in the upper right
corner and disappears in 5
seconds.
2. Long press [VM] button with
" " flashing to scan
from one memory to another,
staying on each station
memory for about 5 seconds.
3. To stop auto search memory,
simply press the [VM] button.
Note: Please first read [Working with Memory] in next
page before using this function.
Method 5: DIRECT KEY-IN FREQUENCY
Short press the [VF] button to enter the frequency mode,
press the numeric keys [0] - [9] to enter the station
frequency directly.
Note:
1. Ignore the decimal point for FM band when input the
frequency numbers.
For example, FM 89.0 MHz, Just ENTER 8 9 0 .
2. If the entered frequency rate is not within the covering
area, the display would display " " error symbol.
flashing
Auto-scan memory with
pre-listening
SLEEP

flashing
12
WORKING WITH MEMORIES
There are total 550 preset memories within PL-380. For
FM, MW, and LW, each band has 100 preset memories;
and 250 preset memories for SW.
Method 1:
number
ATS - Auto Tuning Storage
Turn on the radio and select the
band that you want to ATS to take
place in, either FM or MW/LW.
Long press the [FM] or [MW/LW]
button and notice that the " "
(P001) appears in the
display's upper right corner with the
presets to the right increasing as
the band is scanned and frequencies
are stored into memory.
There are two modes for SW ATS function:
Mode A: In SW band, long press the [A / ] button to ATS
the stations within all meter bands.
Mode B: In SW band, long press the [B / ] button to ATS
the stations within present meter band only.
Note:
During ATS process in FM, MW / LW or SW (mode A),
pre-stored radio stations will be replaced automatically by
the new searched stations.
With ATS in SW (mode B), those existing memories will
not be replaced; all the newly found radio stations would
be stored in the blank memories addresses.
Auto Tuning Storage
SLEEP

13
Method 2: MANUALLY STORING STATION
1. Tune to your desired station, press the [M] button once
and notice the PRESET number flashing in the upper
right corner of the display.
2. While it flashing, press the [M] button to store it into the
memory or wait for 3 seconds to store it automatically.
If you want to store it into another PRESET memory, just
rotate the tuning knob of your choice, and press the [M]
button to confirm.
Method 3: SEMI-AUTO STORING STATION
1. Short press the [VF] button to enter frequency status.
2. Long press [VF] button with [ ] moving to activate the
Auto-browse function.
3. While tuning to your favor station, you can direct store it
into the next available memory by pressing on the [M]
button with PRESET flashing. The Auto frequency
browsing keeps on going unless you short press the [VF]
button again.
DELETE MEMORY
Method 1: MANUAL DELETE MEMORY
1. Turn on the radio and press the [VM] button causing
PRESET stations appears in the display's upper right
corner.
2. Rotate the [TUNING] knob to select the memory that you
want to delete.
3. Long press [DELETE] button with "DEL" flashing in the
display, press the [DELETE] button again to confirm.
Note: If " " is flashing more than 3 seconds without
confirmation, it will exit the delete function automatically.

SLEEP FUNCTION
With sleep function, you can adjust the length of time for
the radio to turn off automatically.
The default setting for the auto-turn off time is 30 minutes if
the radio being turned on by short pressing the [POWER]
button.
To change the sleep timer, long press the [POWER] button
with [ON / 01~120] & [SLEEP] appear on the display, rotate
the [TUNING] knob to select sleep timer from 1 ~ 120
minutes or permanently " " Wait for 3 seconds until
" " symbol stops flashing to confirm.
Note: Short press the [POWER] button to directly turn on
the radio with previous preset sleep timer; long press it to
change the timer.
flashing
14
SLEEP
Timer
Delete all memories
Method 2:
Method 3:
SEMI AUTO-DELETE MEMORY
In VM mode, long press the [VM] button to activate the
Auto-Browse function of memory. Once previewing your
unwanted station, simply press the [DELETE] button with
" " shows for 2 seconds and then keep on browsing
other stations. To stop the browsing function, short press
the [VM] button to exist.
DELETE ALL MEMORY
Short press the [VM] button to
enter VM / Memory mode, long
press the [DELETE] button for
3 seconds with " " shows on
the upper right corner of the
display, press again the
[DELETE] button to remove all
memory.
Note: If " " is flashing more than 3 seconds without
confirmation, it will exit the delete function automatically.
SLEEP

15
SETTING THE CLOCK
1. Long press the [TIME] button until you see the hour
flashing. Rotate the [TUNING] knob to set the correct
hour, then short press the [TIME] button and notice the
minutes are flashing.
2. While it's flashing turn the [TUNING] knob to set the
correct minutes, then press [TIME].
SETTING THE ALARM TIME
1. Long press the [ALARM] button until both the HOUR &
AL flashing, rotate the [TUNING] knob to adjust the hour,
then short press [ALARM] with the minutes flashing.
2. Rotate the [TUNING] knob to adjust the minutes and
short press the [ALARM] button with the " " symbol
flashing.
3. Rotate the [TUNING] knob to select 1 ~ 90 minutes to set
the Auto Alarm Off Timer.
4. Short press the [ALARM] button to confirm and notice
" " shows on display to activate the alarm by buzzer
(BB sound). Short press twice with " " appears to set
the alarm by radio.
5. To turn off the alarm function, repeat short pressing the
[ALARM] button and notice both " " & " " disappear.
SLEEP
Note: You can also directly key-in the numeric key instead
of rotating the [TUNING] knob to set the correct clock.
PRESET ALARM STATION
1. Turn on the radio, then tune into your favorite alarm radio
station and adjust your desired alarm volume level.
2. Short press the [M] button to store the alarm station into
memory.
3. Repeat short pressing the [ALARM] button and notice
" " shows on the display to confirm the preset alarm
station.

After alarm was activated with buzzer or radio broadcasting,
press & release [LIGHT / SNOOZE] with a "B" sound. Then
the radio would be turned off temporary, it will start to alarm
again 5 minutes later.
For the LCD backlight function, short press the [LIGHT]
button to illuminates the LCD for 3 seconds. Long press it
for permanently illumination. Press again the [LIGHT/
SNOOZE] button to turn off the light.
SNOOZE / LIGHT FUNCTION
16
When the unit is alarmed by radio, press the [POWER]
button twice to turn off the alarm.
When the unit is alarmed by buzzer (BB sound), simply
press the [POWER] button once to turn off the alarm.
TURN OFF THE ALARM
With radio OFF: Short press the [DISPLAY] button to view
on Temperature, Alarm time.
With radio ON: Short press the [DISPLAY] button to view on
Alarm time, Temperature, Local time, signal strength/ SNR.
DISPLAY MODE
Long press the [ ] button with " " symbol appears in
the display to lock up all keys / buttons. Long press it again
with the symbol disappears to unlock the keys/buttons.
KEY LOCK FUNCTION

17
While listening to FM station via stereo earphones, short
press the [FM.ST] button with " " appears over the left
side of the frequency in the display to activate the STEREO
mode once it receives the FM stereo station.
FM ST. (FM STEREO) BUTTON
Short press the [AM BW] button to choose 6, 4, 3, 2, 1 kHz
AM IF bandwidth. This may help to reduce interference on
some frequencies. Using WIDE usually results in better
audio fidelity, while using narrow limits the audio fidelity is
somewhat dull in sound. You can use it in MW, LW and SW
band.
AM BW (BANDWIDTH) BUTTON
18
SYSTEM SETTING
Frequency range setting for FM
Turn off the radio, long press [FM SET] button, until 87.5-
108MHz, 64-108MHz, 76-108MHz, or 87-108MHz appears
in the display. Quickly keep pressing on the [FM SET]
button to select suitable frequency range for your local FM.
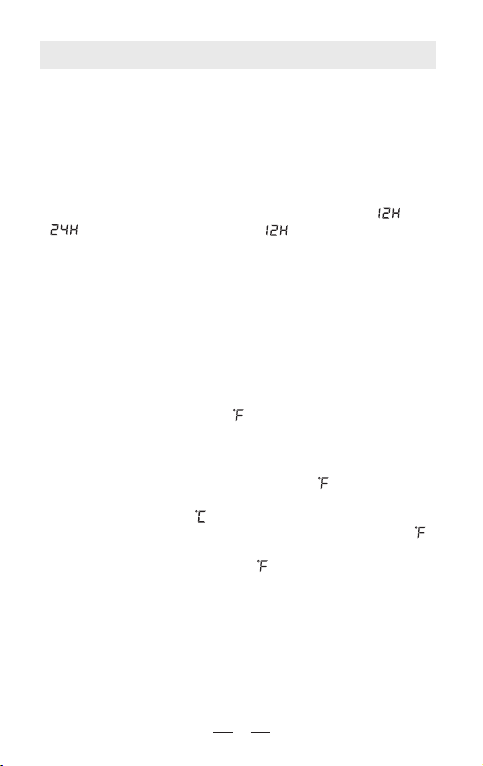
Changing the clock format
Turn off the radio, long press [12/24] button, until " "or
" " appears in the display. If " " appears in the
display, which means the clock system will be in the 12 hour
format.
MW(AM) step setting
Turn off the radio, long press [9/10kHz] button until "9kHz"
or "10kHz" appears in the display. By long pressing again,
the alternative band step would be shown. The temperature
is also shown on screen at the same time.
In general practice, the frequency step of 10kHz is to be
used for broadcasting MW(AM) as well as the temperature
in the degree of Fahrenheit ( ) to be used in the North
America.
In order to provide convenience to the end users, the
"10kHz" of frequency step is default to be displayed with
temperature in the degree of Fahrenheit ( ) together as
well as "9kHz" to be displayed with temperature in the
degree of Centigrade ( ) together.
If the display shows "10kHz" with degree of Fahrenheit ( ),
which means this radio is set to 10 kHz step for MW(AM)
with temperature in Fahrenheit ( ) which is for the North
America region.
LW on/off setting
Turn off the radio. Press and hold the [MW/LW] button until
"LW ON" or "LW OFF" appears in the display to turn ON or
OFF the LW respectively.
Other manuals for PL-380
2
Table of contents
Other Tecsun Radio manuals

Tecsun
Tecsun PL-880 User manual

Tecsun
Tecsun PL-990 User manual

Tecsun
Tecsun PL-880 Owner's manual

Tecsun
Tecsun DRM User manual

Tecsun
Tecsun PL-600 User manual

Tecsun
Tecsun WR-230SF User manual

Tecsun
Tecsun BCL-3000 User manual

Tecsun
Tecsun PL-300wt User manual

Tecsun
Tecsun PL-450 User manual

Tecsun
Tecsun DB-280C User manual


