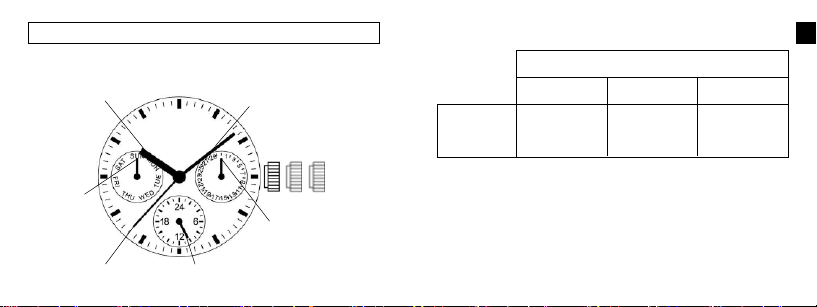
Ted Baker LONDON User manual

INSTRUCTION BOOKLET
EN - ES - FR - PT - I T - DE - NL - ZH - JA - RU - PL - SR - HR - EL

2 HAND 2
2 HAND SUBDIAL 4
3 HAND 6
3 HAND WITH DATE 10
MULTIFUNCTION 12
MULTIFUNCTION 14
MULTIFUNCTION 16
CHRONOGRAPH 18
GMT 22
AUTOMATIC 28
DIGITAL 30

2
3
2 HAND
→
Crown
N 1
Minute handHour hand
CROWN OPERATION
HOW TO SET TIME
(1) Pull the crown out to the 1st click position.
(2) Turn the crown to set the hour and minute hands.
- When setting the minute hand, advance it 4 to 5 minutes ahead of the
desired time and then turn it back to the exact time.
(3) Push the crown back to the normal position.
Crown position
Normal
Free Time setting
Crown
1 : 1st click
EN

4 5
2 HAND SUBDIAL
1st position
Minute hand
Normal crown
position
Small second
hand
Hour hand
SETTING THE TIME
1. Pull the crown out to the 1st position.
2. Turn the crown to set hour and minute hands.
3. When the crown is pushed back to the normal position,
small second hand begins to run.
EN

6 7
3 HAND
→
Crown
N 1
Minute handHour hand
Second hand
CROWN OPERATION
HOW TO SET TIME
(1) Pull the crown out to the 1st click position.
(2) Turn the crown to set the hour and minute hands.
- When setting the minute hand, advance it 4 to 5 minutes ahead of the
desired time and then turn it back to the exact time.
(3) Push the crown back to the normal position
Crown position
Normal
Free Time setting
Crown
1 : 1st click
EN

8
POWER DEPLETION WARNING FUNCTION
When the battery nears its end, the second hand moves at two-second
intervals instead of the normal one-second intervals. In that case, have
the battery replaced with a new one as soon as possible.
- The watch remains accurate while the second hand is moving at
two-second intervals.
Note : The availability of this function is different depending on the caliber.
EN

10 11
3 HAND WITH DATE
Crown
Calendar
Minute handHour hand
Second hand
CROWN OPERATION
Crown position
Free Instant date
change
Time setting /
Reset
Crown
Normal 1st click 2nd click
EN

12 13
Crown
Minute hand
Day hand
Hour hand
Second hand Date hand
→ →
0 1 2
MULTIFUNCTION CROWN OPERATION
Crown position
Free
Turn counter-
clockwise
for date change
Time setting
(Day change)
Crown
Normal 1st click 2nd click
* Do not set the day and date between 9:00 PM and 4:00 AM.
Otherwise, the day and date may not change properly.
EN

14 15
Crown
Minute hand
Day hand
Hour hand
Second hand 24 Hour hand
Date hand
→ →
0 1 2
MULTIFUNCTION CROWN OPERATION
Crown position
Free
Turn counter-
clockwise
for date change
Time setting
(Day change)
Crown
Normal 1st click 2nd click
EN

16 17
Crown
Minute hand
Date hand
Hour hand
Second hand
24 Hour hand Day hand
→ →
0 1 2
MULTIFUNCTION CROWN OPERATION
Crown position
Free
Turn counter-
clockwise
for date change
Time setting
(Day change)
Crown
Normal 1st click 2nd click
* Do not set the day and date between 9:00 PM and 4:00 AM.
Otherwise, the day and date may not change properly.
EN

18 19
Crown
Minute hand
2H button
Second chronograph hand
Hour hand
Second hand
Minute chronograph
hand
24 hour hand
4H button
→ →
0 1 2
CHRONOGRAPH CROWN OPERATION
Crown position
Free
Chronograph
Start/Stop
Restart
Chronograph
Start/Stop
Restart
Chronograph
Reset
Split
Split release
Chronograph
Reset
Split
Split release
Turn counter-
clockwise for date
change
Time setting
Chronograph
hands 0-setting
(clockwise)
Chronograph
hands 0-setting
(counterclockwise)
Crown
2H button
4H button
Normal 1st click 2nd click
EN

20 21
CHRONOGRAPH FUNCTION
Second chronograph hand is capable of timing 30 minutes. (60
seconds x 30 times). Minute chronograph hand is capable of timing
30 minutes.
• Standard measurement
• Accumulated elapsed time measurement
2H button
2H button
2H button
Start
Start
Start
2H button
2H button
4H button
2H button
2H button
Stop
Stop
Split
Restart and stop of the chronograph
can be repeated by pressing 2H button.
Measurement and release of sprit time
can be repeated by pressing 4H button.
Stop
Stop
4H button
2H button
4H button
4H button
4H button
Reset
Restart
Split release
Reset
Reset
• Split time measurement
• Measurement of two competitors
2H button
Start Reset
4H button 4H button
Finish time
of 1st competitor 2nd competitor
finishes Finish time
of 2nd competitor
2H button 4H button
EN

22 23
GMT
Hour hand
Rotating top ring
(24-hour format)
4th Center hand
Inner ring /
numerals
(24-hour format)
Second hand
Minute hand
Crown
1 2 3
3 TIME ZONE FUNCTION
Your watch has the ability to display three time zones:
1. Hour and Minute hands: Displays the time in a standard 12
hour format. Please note: The date displayed in the date window is
linked to the time displayed by these two hands.
2. 4th center hand and inner ring: Displays the time in a
24- hour format.
3. 4th center hand and case rotating top ring: Displays the time in
a 24-hour format.
4TH CENTER HAND ADJUSTMENT
To readjust a misaligned 4th center hand:
1. Pull the crown out to position 3.
2. 4th center hand should point to 12 o’clock. If within 5 seconds
of pulling the crown to position 3 the 4th center hand does not point
to 12 o’clock, press button A to move the hand clockwise until it
EN

24 25
points to 12 o’clock. Pressing and holding button A will make the
hand move at a fast rate.
3. Push crown in to position 1 when finished.
4TH CENTER HAND CALIBRATION
The 4th center hand is calibrated at the factory to refect the standard
minutes within the hour as defined by Universal Time Coordinated.
Globally a majority of locations use the standard minutes. If the
location you are using for the 2nd and 3rd time zone uses the
standard minutes, the 4th center hand does not require recalibration.
Only if you wish to have the second and third time zones to refect
locations that do not follow the standard minute, the instructions to
recalibrate the 4th center hand are as follows:
1. Pull the crown out to position 3. The 4th center hand will point
to 12 o’clock.
2. Rotate the crown to position the minute hand in the correct
position within the hour required for the location you are wishing to
use for the 2nd and 3rd time zones.
3. Push the crown in to position 2. The 4th center hand will point
to its currently calibrated position of the minutes within the hour.
4. Push button A to move the 4th center hand clockwise until it
aligns with the minute hand. Pressing and holding button A will make
the hand move at a fast rate.
5. Pull the crown out to position 3. The 4th center hand will point
to 12 o’clock.
6. Rotate the crown to position hour and minute hands to the
correct time.
7. Push crown in to position 1 when finished.
Please note: the 4th center hand will track the time using the current
calibration of the minutes within the hour. Time zones 2 and 3 both
utilize the 4th center hand and therefore the locations being tracked in
EN

26 27
time zones 2 and 3 must both utilize the same minutes within the hour
for these time zones to be displayed properly.
SETTING THE 4TH CENTER HAND (TIME ZONE II)
Note the current time in the location you wish to track as the 2nd
timezone. Press button A until the 4th center hand is pointing to that
time on the inner ring. (Please note: this scale is a 24-hour format).
The 4th center hand will advance 30 minutes each time button A is
pressed. Pressing and holding button A will make the hand move at a
fast rate. This will set the 2nd time zone on the watch.
SETTING THE CASE ROTATING TOP RING (TIME ZONE III)
The 3rd time zone is set by using the existing setting of the 4th center
hand and adjusting the case rotating top ring to the desired time of
the 3rd time zone. (Please note: this scale is a 24-hour format). The
top ring has 72 positions. To advance the top ring one hour you will
advance it three positions (3 “clicks”). Note the current time in the
location you wish to track as the 3rd time zone. Rotate the case top
ring counter clockwise to position the correct hour marker for that time
with the 4th center hand.
EN

28 29
AUTOMATIC
Minute hand
Date
2nd position
Normal crown
position
1st position
Hour hand
Second hand
SETTING THE TIME
1. Pull the crown out to the 2nd position.
2. Turn the crown to set hour and minute hands.
3. When the crown is pushed back to the normal position, second
hand begins to run.
SETTING THE DATE
1. Pull the crown out to the 1st position.
2. Turn the crown counter-clockwise to set the date.
* If the date is set between the hours of around 9:00 PM and 1:00
AM, the date may not change the following day.
3. After the date has been set, push the crown back to the normal
position.
EN

30 31
SET/RECALL
OR DONE
(To save changes
and exit setting)
MODE OR NEXT
(Proceed to
next step)
STOP/RESET OR –
(Decrease value. Hold
to decrease rapidly)
INDIGLO®Button
MINUTES
HOURS
1/100 SECONDS
SECONDS
WATER RESISTANT
SET/RECALL OR DONE
(To save changes and
exit setting)
STOP/RESET OR –
(Decrease value.
Hold to decrease rapidly)
MODE OR NEXT
(Proceed to next step)
INDIGLO®Button
FEATURES
Time and date (12/24-hour format) • Hourly chime • Daily alarm •
24-hour chronograph • INDIGLO®night-light.
BASIC OPERATION
SET TIME-DATE
1. Press MODE until Time display appears.
2. Press SET. Seconds will flash. Press START/STOP to set to 00.
3. Press MODE. Second digit of minutes will flash.
Press START/STOP to advance.
EN
4. Press MODE. First digit of minutes will flash.
Press START/STOP to advance.
5. Press MODE. Hour (with A/P) will flash. Press START/STOP to
advance. Press SPLIT/RESET to switch between 12- and 24-hour format.
6. Press MODE to continue setting month, date, day of week.
7. Press SET to exit at any time.
In Time display, press START/STOP to turn hourly chime on/off.
Colon will flash when on.
ALARM
1. Press MODE until “ALARM” appears in upper left of display.
Alarm time appears at top of display.
2. Press SET. Hour will flash. Press START/STOP to advance.
3. Press MODE. First digit of minutes will flash.
Press START/STOP to advance.
4. Press MODE. Second digit of minutes will flash.
Press START/STOP to advance.
5. Press SET to exit at any time. Alarm is automatically armed.
DIGITAL

32 33
When alarm is armed, appears here and in Time display.
In Alarm mode, press START/STOP to arm/disarm alarm.
When alarm sounds, press any button to silence. Alarm remains
armed and will continue to occur daily.
CHRONOGRAPH
1. Press MODE until “CHR” appears.
2. Press START/STOP to start chrono.
3. Press START/STOP to stop. Press again to continue.
4. When chrono is stopped, press SPLIT/RESET to reset chrono to zero.
TAKING SPLITS
While the chrono is running, you may freeze the display, to see your
time at a particular point. This is called “taking a split.” To take a
split, press SPLIT/ RESET while the chrono is running. “SPLIT” appears
and the display will freeze for ten seconds before showing the running
chrono again. You may skip the ten-second freeze by pressing MODE.
If you exit Chrono mode with the chrono running, it will continue to
run. In the Time display, “CHR” will flash.
INDIGLO®NIGHT-LIGHT/NIGHT MODE®FEATURE
Press INDIGLO®button to activate night-light. Electroluminescent
technology used in INDIGLO®night-light illuminates entire watch face
at night and in low light conditions. While the night-light is on pressing
any button keeps it on for three seconds. Press and hold INDIGLO®
button for 4 seconds to activate NIGHT-MODE®feature. Moon icon
will appear. Once activated, any button pushed will cause INDIGLO®
night-light to stay on for 3 seconds. NIGHT-MODE®feature will stay
activated for 8 hours or until deactivated by pressing and holding
INDIGLO®button again for 4 seconds.
EN
SECONDS
SET/RECALL
OR DONE
(To save changes
and exit setting)
MODE OR NEXT
(Proceed to
next step)
STOP/RESET OR –
(Decrease value. Hold
to decrease rapidly)
INDIGLO®Button
MINUTES
HOURS
1/100 SECONDS
SECONDS
WATER RESISTANT
MINUTES 1/100 SECONDS
HOURS

34 35
WATER AND SHOCK RESISTANCE
If your watch is water-resistant, meter marking or ( ) is indicated
*pounds per square inch absolute
WARNING: TO MAINTAIN WATER-RESISTANCE, DO NOT PRESS
ANY BUTTONS UNDER WATER.
1. Watch is water-resistant only as long as lens, push buttons and case
remain intact.
2. Watch is not a diver watch and should not be used for diving.
3. Rinse watch with fresh water after exposure to salt water.
Water-Resistance Depth p.s.i.a. * Water Pressure Below Surface
30m/98ft 60
50m/164ft 86
100m/328ft 160
BATTERY
Ted Baker strongly recommends that a retailer or jeweler replace
battery. If applicable, push reset button when replacing battery.
Battery type is indicated on caseback. Battery life esti-mates are
based on certain assumptions regarding usage; battery life may vary
depending on actual usage.
DO NOT DISPOSE OF BATTERY IN FIRE. DO NOT RECHARGE.
KEEP LOOSE BATTERIES AWAY FROM CHILDREN.
EN

36 37
Español
ES
Folleto de instrucciones
Table of contents
Popular Clock manuals by other brands

Mr. Nixie
Mr. Nixie Lars owner's manual

Simplex
Simplex Simplex Heritage Installation, operating and programming instructions

KADAMS
KADAMS K0007STH user manual

La Crosse Technology
La Crosse Technology WS-8007U-C instruction manual

Oregon Scientific
Oregon Scientific RM822 instruction manual

La Crosse Technology
La Crosse Technology KWS-8140U-IT instruction manual

La Crosse Technology
La Crosse Technology 513-1417 user manual

La Crosse Technology
La Crosse Technology WS-8120U Quick setup guide

PeopleStrategy
PeopleStrategy us10c Administrator's manual

TFA
TFA 60.2547 instruction manual

Valcom
Valcom VIP-MC quick start guide

La Crosse Technology
La Crosse Technology WT-8002U-B Faqs