TEGRAS Concept visionano User manual

Duct inspection system
user manual
concept
Duct inspection system
EN
visionano

visionano Duct inspection system page 2
introduction
Dear Client:
Thank you for placing your trust in a quality product from
TEINNOVA.
This product has been made using modern manufacturing
techniques and thorough quality assurance measures.
We strive to do everything we can to make sure you are satisfied with this
product and can work with it without problems.
Should you have any questions about this product, please contact your
dealer or contact the company directly.
Before starting up the machine, carefully read the
instructions for use of your equipment.
Treat this manual as part of the machine and always keep it handy for future
reference.
Our training services have been designed to
support our clients in achieving their goals and together
we will develop training programs that fit your
strategy.
We offer the option of providing companies with specif-
ic training in the use of our equipment and to educate their
operators so they provide the best service and thus contribute to the
successoftheirfinalcustomers.Aspectssuchasknowinghowtoprepareagood,
objective, quotation, to respond to specific problems that may arise, or to
offer a more professional and efficient service.
Because we manufacture our own cleaning equipment we can
continuously control the quality and performance of every machine we
make, and this is why we have very low repair ratios, and repairs
have always been solved by our in-house Technical Support Service,
managed by the same team as the factory, and to do it
quickly.
We have all kinds of spare parts for your equipment, as well as
related accessories.
This instruction manual is protected by copyright. We reserve all rights, especially the rights to produce,
translate and prepare it using electronic systems.
Training service
Technical service

Duct inspection system
visionano page 3
symbols used
safety warnings
know your equipment
operating instructions
4-21
5-21
6-21
8-21
18-21
maintenance and care
19-21
technical specifications
20-21
21-21
guarantee conditions
declaration of conformity
contents

visionano Duct inspection system page 4
symbols used
All the symbols used in this manual, as well as those on the equipment, are explained in this section. It is important to
read the text associated with these symbols carefully, since it is about personal safety and equipment safety.
DANGER!
This symbol warns you of a potentially dangerous situation which could result in
serious injury or even death if the instructions given are not followed properly.
Make sure you read all the instructions in the "Safety information" section.
WARNING!
This symbol warns you of a potentially dangerous situation that could
result in minor or moderate injury, or property damage resulting in injury to people
if proper instructions are not followed.
CAUTION!
This symbol warns you of a situation that may cause damage to
property, without causing injury, if the instructions given are not followed properly.
IMPORTANT!
This symbol alerts you to information about the best way to use the equipment
avoiding any possible improper operation.

Duct inspection system
visionano page 5
The VISIONANO equipment should NOT be used for anything other than the uses covered in this instruction
manual.
Make sure all the electrical connections are correct before starting the equipment.
Everybody who uses the VISIOMAX equipment must be properly trained.
Fasten the VISIONANO properly during transport.
In the event of a fault, contact the TEINNOVA Technical Assistance Service on +34 941 44 50 56.
safety warnings

visionano Duct inspection system page 6
know your equipment
Long-distance video-inspection system. You can use it to examine narrow locations and take video and pictures in
real time. It has an SD micro-recorder in order to edit and view your recordings on an external device.
Typical applications include the inspection of AC and VC systems, overhead cables, automotive inspection, etc.
The VISIOGRAS NANO system has been totally tested and calibrated. With appropriate use you will enjoy many
years of problem-free service.
Contents:
1. Body of the machine.
2. LCD monitor with 3,5’’ screen.
3. Adapted for monitor.
4. Adaptor cable.
5. Magnetic accessory / hook / mirror.
6. Cable and flexible camera.
7. 4 AA batteries.
DESCRIPTION AND CONTENT

Duct inspection system
visionano page 7
Characteristics:
1- 3,5” LCD-TFT monitor screen with high
resolution.
2- The optic head and cable are water-resistant
when the unit is fully assembled (the monitor
and camera are not water-resistant).
3- Wireless and wired connection.
4- The monitor records video and images
5- SD card capacity: 2GB
Description:
1. Output signal.
2. Power indicator.
3. On and Off.
4. Flexible shaft.
5. Camera with LEDs.
6. OK.
7. Up arrow.
8. Menu.
9. Down arrow.
10. On and off.
11. Power indicator.
12. USB plug.
13. Video output.
14. Slot for SD card.
15. Power supply socket.
16. Reset.
17. Input signal.
know your equipment

visionano Duct inspection system page 8
Installation:
First insert the batteries and attach the flexible shaft, then insert the SD micro card and, if necessary,
select the ideal accessory for the application to be undertaken. These steps are detailed in the
following sections.
Insertion of batteries:
operating instructions

Duct inspection system
visionano page 9
Connect the power cable to the monitor
Connect the adaptor cable to the monitor; the red display light should come on (or
the battery charge icon on the LCD screen will indicate it is charging and will turn off
once the charging is complete).
Connect the camera with the flexible shaft
Connect the camera’s flexible shaft to the main body of the equipment; make sure
the notches on either end are properly aligned. Once aligned, press the knurled
knob to fix the connection.
operating instructions
visionano Duct inspection system page 10
operating instructions
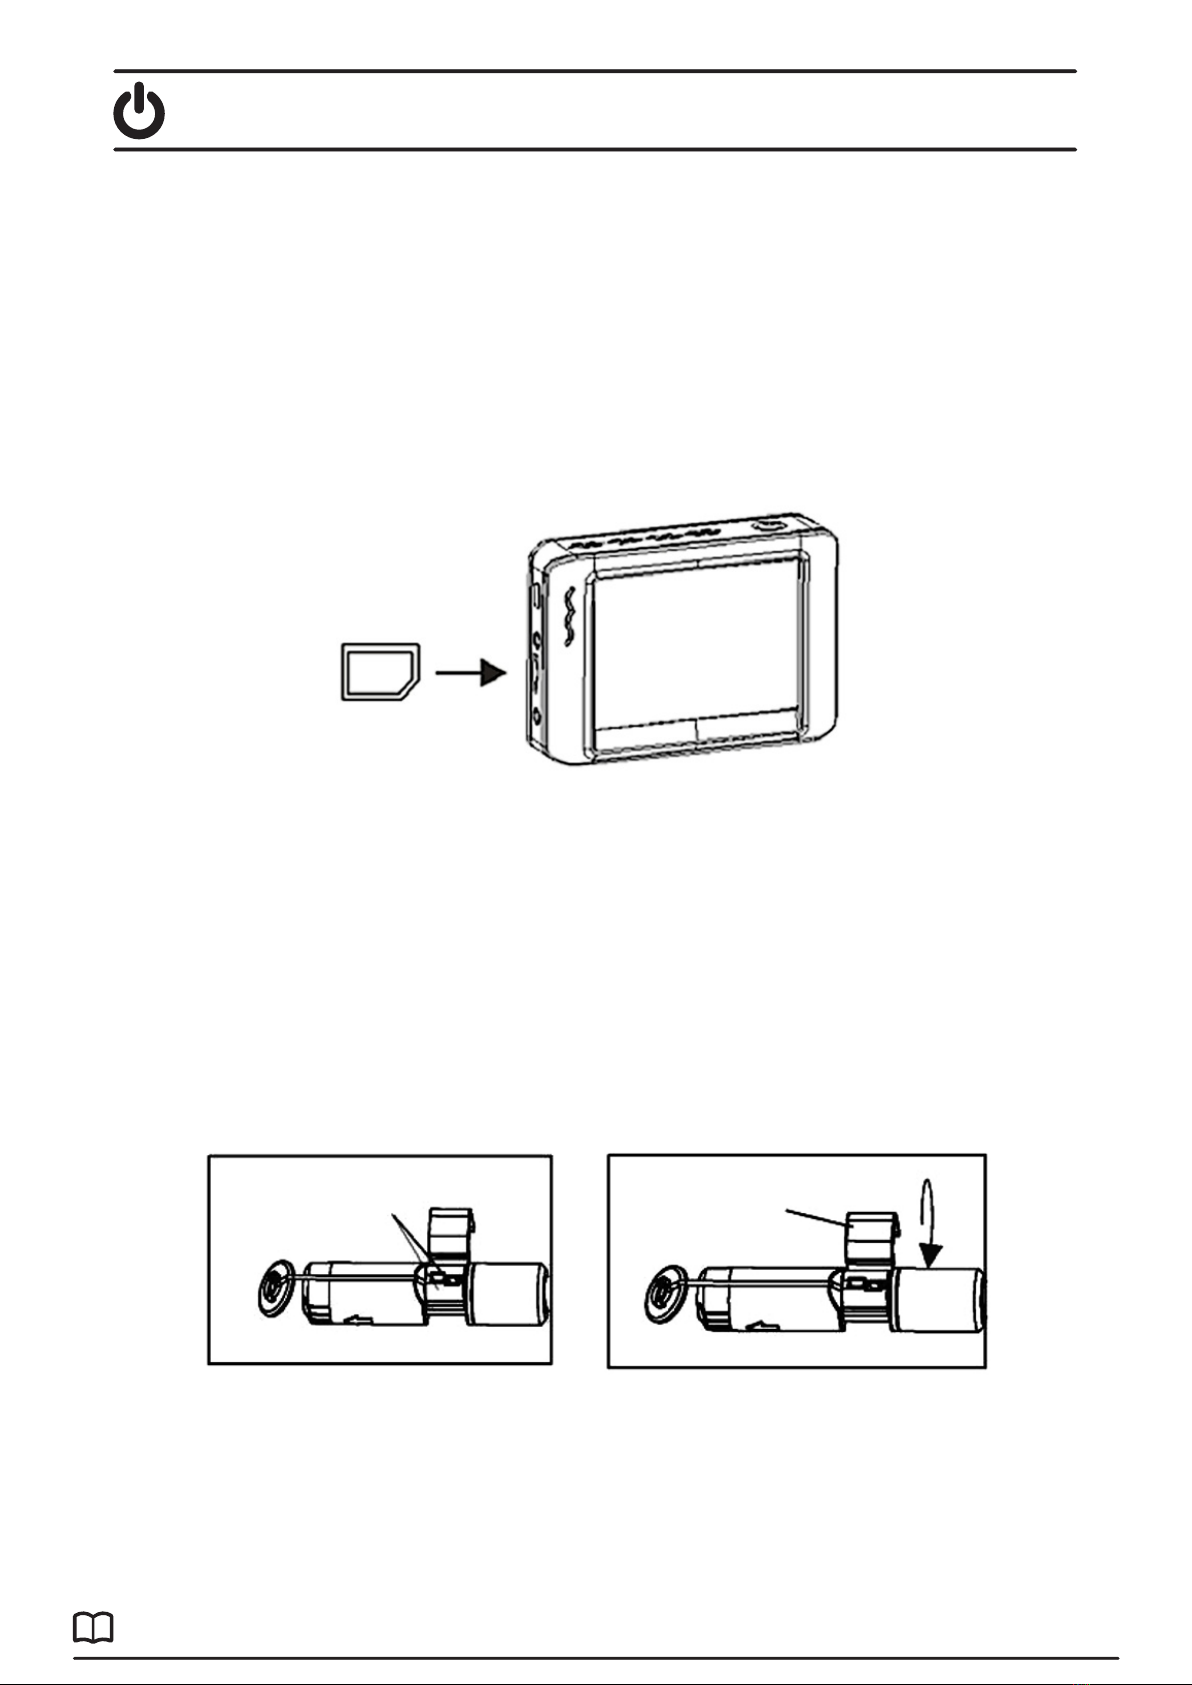
Insertion of SD micro card
Insert the card with the arrow pointing towards the slot; apply gentle pressue until the card slots in.
To remove the card, gently press the card and then release to remove it from the slot.
Installation of accessories
The accessories included (mirror, hook and magnet) all attach to the camera in the same manner.
Consult the following diagrams:

Duct inspection system
visionano page 11
Installation of the monitor for use with cable
operating instructions
Display
1. Charge level.
2. Mode.
3. Recording (REC).
4. Channel.
5. Date.
6. Time.
7. Remaining recording time.
8. SD card.

visionano Duct inspection system page 12
operating instructions
Guía de funcionamiento
Basic operation:
1. Turn the ON/Off switch to activate the camera; the power indicator will light up. The switch then acts as
controller for the LEDS on the end of the camera.
2. Press and hold the power switch for at least 2 seconds and the power indicator will light up green.
3. Before attaching the monitor to the body of the machine, press the arrow down button to select a channel, the
image will appear on the LCD screen.
4. Use arrow up to select video or photo mode.
5. Turn the ON/OFF switch to adjust the image.
6. You can easily manipulate the flexible shaft into the desired position.
7. Use the accessories supplied to help recover small items or view complex angles.
Taking a picture:
In photo mode, press OK to take a photo. The photo will be automatically saved on the SD card.
Video recording:
In video mode press OK to begin recording; consult the meaning of the icons on the screen in section 3.a “Display”.

Duct inspection system
visionano page 13
View a photo or video
1. In video mode, press the menu button to see a list of playback folders. The list will be in date order.
2. Use the keys to select the desired folder.
3. Press OK to open the selected folder and see a list of photo or video files.
Note: The files are ordered by time followed by VID” for photos or VID for videos.
4. Use the keys to select a file.
5. Press OK to view a photo or video.
For video files:
- Press OK to pause during playback.
- Press OK again to continue.
- Fast forward the video.
- Rewind the video.
- Press the Menu button to stop the video.
6. Press the Menu button to return to the menu.
7. Press Menu again to exit.
Note: The video will automatically save every 30 minutes. When the SD card is full the SD card’s capacity
icon will change to ‘F’.
operating instructions

visionano Duct inspection system page 14
operating instructions
Delete photo or video:
1. In video mode, press the menu button to view a list of playback folders ordered by date.
2. Use the keys to select the desired folder.
3. Press OK to open the selected folder and view a list of photo or video files.
Note: The files are ordered by time followed by VID” for photos or VID for videos.
4. Use the keys to select a file.
5. Press and hold the Menu button, the screen will indicate ‘DELETE THIS FILE?’.
6. Use the keys to select YES or NO.
7. Press OK to accept the selection.
8. Press the Menu button twice to exit the Delete screen.
Delete a folder:
To delete a folder, use the same instructions as for deleting a video.
If the folder is not empty it cannot be deleted. Delete all the videos in the folder prior to deleting the folder. If the
user tries to delete a folder that is not empty, the following message will appear: ‘FOLDER NOT EMPTY’

Duct inspection system
visionano page 15
operating instructions
Configuration of the equipment:
Press and hold the Menu button for at least two seconds and then release to enter configuration
mode.
Language configuration:
1. In configuration mode, use the arrows to select System Setting (green icon).
2. Press OK to call up the list of configuration icons.
3. Use the arrows to highlight the Language icon (globe).
4. Press OK to see the list of languages (flags).
5. Use the arrows to highlight the desired language.
6. Press OK to select language and exit.
Configuration of video system:
1. In configuration mode, use the arrows to select System Setting (green icon).
2. Press OK to call up the list of configuration icons.
3. Use the arrows to highlight the video system icon (yellow).
4. Press OK and to see video format options (NTSC, PAL).
5. Use the arrows to highlight the desired format.
6. Press OK to select format and exit.

visionano Duct inspection system page 16
operating instructions
Format and delete media:
1. In configuration mode, use the arrows to select System Setting (green icon).
2. Press OK to call up the list of configuration icons.
3. Use the arrows to highlight the FORMAT icon (blue).
4. Press OK to open the FORMAT selection screen (YES, NO).
5. Use the arrows to highlight the desired response.
6. Press OK to accept the selection and exit.
Reset the factory default setting:
1. In configuration mode, use the arrows to select System Setting (green icon).
2. Press OK to call up the list of configuration icons.
3. Use the arrows to highlight the DEFAULT icon (red).
4. Press OK to open the DEFAULT selection screen (YES, NO).
5. Use the arrows to highlight the desired response.
6. Press OK to accept the selection and exit.
View version:
1. In configuration mode, use the arrows to select System Setting (green icon).
2. Press OK to open the list of SYSTEM icons.
3. Use the arrows to highlight the VERSION icon (green).
4. Press OK to see the version.
5. Press OK again to exit.

Duct inspection system
visionano page 17
operating instructions
Adjust frames per second:
1. In configuration mode, use the arrows to select RECORDER SETTING (red icon).
2. Press OK to open RECORDER options.
3. Use the arrows to highlight the FPS icon (frames per second).
4. Press OK to open FPS parameters.
5. Use the arrows to select the frame rate.
6. Press OK to confirm.
Configuration of time ON OFF icon:
1. In configuration mode, use the arrows to select RECORDER SETTING (red icon).
2. Press OK to open RECORDER options.
3. Use the arrows to highlight the time icon (purple).
4. Press OK to open the parameter selected.
5. Use the arrows to select ON/OFF.
6. Press OK to confirm.
Date/Time Setting:
1. In configuration mode, use the arrows to select TIME/DATE (yellow icon).
2. Press OK to open the date and time screen.
3. Use OK to alternate between fields.
4. Use the arrows to change the value of the field.
5. Press the Menu button to exit.

visionano Duct inspection system page 18
maintenance and care
protect the environment
The materials used in the packaging are recyclable. Do not
throw the packaging out in the household waste, take it to offi-
cial recycling collection points.
Old equipment contains valuable materials for recycling and
later re-use. Do not throw the packaging out in the household
waste, take it to official recycling collection points.
Keep the equipment free of dust and dirt. Keep the equipment in a place protected from the weather.
Keep the equipment in good condition, avoid knocking it or overloading it.
Do not expose the machine to humidity.
Turn the machine off when not in use.
Remove the batteries prior to cleaning the equipment.
Replace all batteries simultaneously.
TEINNOVA has spares for all the equipment parts.
If you need any spare part or consumable, please contact TEINNOVA Customer Service
at +34 941 44 50 56.
Spare Parts:

Duct inspection system
visionano page 19
technical specifications
VISIONANO Specifications
Camera resolution
Screen resolution
Power source
Water-resistant (camera only)
LCD screen
External power source
Charging time
Duration of battery
Dimensions (mm)
Length of flexible shaft
Weight
704 x 576 (PAL)
640 x 480
4 AA batteries
IP-67
3,5’’ TFT-LCD
5 V
3 hours
2 hours
256 x 95 x 153 (without flexible shaft)
1 m (Extendible up to 4 m)
530 g

visionano Duct inspection system page 20
TEINNOVA reserves the right to make changes to the equipment without prior notice.
TECAI INNOVA S.L.
C/ Las Balsas 16-B, Pol. Ind. Cantabria.
26006 LOGROÑO (La Rioja), España.
guarantee conditions
1. “TEINNOVA” guarantees its products for a period of
15 days as regards aesthetic defects or faults which are
noticeable with the naked eye. In terms of all other manu-
facturing defects and faults in the products, the guarantee
is of 1 year.
The “Buyer” must notify “TEINNOVA” of the existence
of any defects as soon as they are observed and in any
case within a maximum deadline of 5 days from when
they become apparent. Notification thereof outside of
said deadline shall lead to the non-application of the
guarantee.
“TEINNOVA” reserves the right to request that the pro-
ducts be sent to the factory or the closest official Technical
Support Service for their due inspection and the deli-
very costs are payable by the “Buyer”. Said costs shall
be reimbursed if the product is proven to be effectively
non-conforming.
“TEINNOVA” will pick up and send the products to the
factory or to the nearest official Technical Assistance Ser-
vice for proper inspection. At that time, it will be deter-
mined whether the warranty will apply or it is within the
warranty exclusions. If the guarantee is applicable, the
transport, both collection at the customer’s facilities and
return of the product, will be borne by TEINNOVA. If it
is excluded from guarantee (point 2), the transport, both
collection at the customer’s facilities and return of the pro-
duct, will be borne by the customer.
“TEINNOVA” reserves the right to overrule the applica-
tion of the guarantee when there is no evidence of the
product’s non-conformity and it shall not apply said gua-
rantee until coverage has been expressly proven.
In the case that the product is covered, “TEINNOVA” can
replace it or determine the necessary repair method.
All repair works that are carried out under the product
guarantee must be carried out in “TEINNOVA” facili-
ties or in those of the party it designates.
The guarantee covers the materials and labour requi-
red to repair or replace the parts or elements conside-
red as defective from origin. The maximum guaranteed
amount or value shall be the maximum price of the sale
of the product to the “Buyer”.
Any claims made under the coverage of the guarantee
shall not grant the right to delay and/or withhold pay-
ment of the corresponding invoice and/or any other
pending invoices.
2. Guarantee Exclusions: the following are excluded
from the guarantee: actions, alterations or manipula-
tions of the product that are carried out without the
prior express authorisation of the “Seller”; indirect and/
or consequential damage; damage caused by negli-
gence, by improper use or by usage that does not con-
form to the instructions and intentional damage; faults
due to adaptations made to the products or the use of
parts that were not previously and expressly certified
or authorised by the Seller; costs for detection of the
fault; costs for collection or replacement (the latter two
are unless the non-conformity is proven and within the
limits established in section 1).
Año Year
Table of contents
Other TEGRAS Concept Analytical Instrument manuals

Popular Analytical Instrument manuals by other brands


YATO
YATO YT-73124 manual

ATIM
ATIM Cloud Wireless LVL Series user guide

Bühler technologies
Bühler technologies GAS 222.35 Ex1 Installation and operation instruction

Maxtec
Maxtec MaxO2 Plus Operating manual & instructions for use

Gradient Lens
Gradient Lens Hawkeye Pro MicroFlex quick start guide

Smith-Root
Smith-Root eDNA Citizen Scientist Assembly and use instructions


