Teguar TM-5900-24 User manual

2022
Version 1.0
Medical Panel PC System
TM-5900-24
USER MANUAL


I
All Rights Reserved Manual Version 1.0
Copyright 2022
The information contained in this document is subject to change without notice.
We make no warranty of any kind with regard to this material, including, but not
limited to, the implied warranties of merchantability and fitness for a particular
purpose. We shall not be liable for errors contained herein or for incidental or
consequential damages in connection with the furnishing, performance, or use of this
material.
This document contains proprietary information that is protected by copyright. All
rights are reserved. No part of this document may be photocopied, reproduced or
translated to another language without the prior written consent of the manufacturer.
TRADEMARK
Intel® , Pentium® and MMX are registered trademarks of Intel® Corporation.
Microsoft® and Windows® are registered trademarks of Microsoft Corporation.
Other trademarks mentioned herein are the property of their respective owners.

II
Safety
IMPORTANT SAFETY INSTRUCTIONS
1) To disconnect the machine from the electrical power supply, turn off the power switch and
remove the power cord plug from the wall socket. The wall socket must be easily
accessible and in close proximity to the machine.
2) Read these instructions carefully. Save these instructions for future reference.
3) Follow all warnings and instructions marked on the product.
4) Do not use this product near water.
5) Do not place this product on an unstable cart, stand, or table. The product may fall, causing
serious damage to the product.
6) Slots and openings in the cabinet and the back or bottom are provided for ventilation to
ensure reliable operation of the product and to protect it from overheating. These openings
must not be blocked or covered. The openings should never be blocked by placing the
product on a bed, sofa, rug, or other similar surface. This product should never be placed
near or over a radiator or heat register or in a built-in installation unless proper ventilation
is provided.
7) This product should be operated from the type of power indicated on the marking label. If
you are not sure of the type of power available, consult your dealer or local power
company.
8) Do not allow anything to rest on the power cord. Do not locate this product where persons
will walk on the cord.
9) Never push objects of any kind into this product through cabinet slots as they may touch
dangerous voltage points or short out parts that could result in a fire or electric shock.
Never spill liquid of any kind on the product.
10) To avoid the risk of electric shock, this equipment must only be connected to a supply
mains with protective earth.
11) No modification of this equipment is allowed.
12) Power supply is specified as part of medical equipment.
13) The medical PC can be cleaned in accordance with normal clinical cleaning practices,
including wiping with water or medical grade wipes, provided no substance containing
acids or cleaning alkali liquids is used.
14) Medical grade wipes must not contain more than 75% alcohol content measured against
the total content of the wipe.
15) Operator shall not contact patient simultaneously when in use with the medical computer.

III
Sécurité
INSTRUCTIONS IMPORTANTES RELATIVES À LA SECURITE
1. Pour débrancher la machine de l’alimentation électrique, éteignez l’interrupteur
d’alimentation et retirez le cordon d’alimentation de la prise murale. La prise murale doit
être facilement accessible et à proximité de la machine.
2. Lisez attentivement ces instructions. Conservez ces instructions pour une référence
future .
3. Suivez tous les avertissements et les instructions indiquées sur le produit.
4. Ne pas utiliser ce produit à proximité de l’eau.
5. Ne pas placer ce produit sur un chariot, un support ou une table. Le produit peut
tomber,causant de graves dommages à l’appareil.
6. Les fentes et les ouvertures dans le boîtier, l’arrière ou le fond sont prévues pour la
ventilation afin d’assurer un fonctionnement fiable du produit et le protéger de la
surchauffe. Ces ouvertures ne doivent pas être obstruées ou couvertes. Les ouvertures ne
doivent jamais être bloquées en plaçant l’appareil sur un lit, un canapé, un tapis ou autre
surface similaire. Ce produit ne doit jamais être placé : à proximité ou sur un radiateur, sur
un registre de chaleur ou dans une installation intégrée à moins qu’une ventilation
adéquate soit prévue.
7. Ce produit doit être utilisé avec le type d’alimentation indiqué sur l’étiquette.Si vous n’êtes
pas sûr du type d’alimentation disponible, consultez votre revendeur ou représentant local
de l’entreprise.
8. Ne laissez rien reposer sur le cordon d’alimentation. Ne placez pas ce produit là oùdes
personnes peuvent marcher sur le cordon.
9. N’introduisez jamais d’objets d’aucune sorte dans ce produit à travers les fentes du coffret
car ils pourraient entrer en contact avec des points sous tension dangereux ou court-
circuiter des pièces. Ne renversez jamais de liquide d’aucune sorte sur le produit.
10. Pour éviter tout risque de choc électrique, cet équipement ne doit être branché que sur une
prise secteur avec terre.
11. Aucune modification de cet équipement n’est autorisée.
12. L’alimentation est spécifiée comme faisant partie du matériel médical.
13. L’ordinateur médical peut être nettoyé conformément aux pratiques de nettoyage cliniques
habituelles, notamment en essuyant avec de l'eau ou des lingettes de qualité médicale, à
condition qu'aucune substance contenant des acides ou des liquides de nettoyage alcalins
ne soient utilisés.
14. Les lingettes de qualité médicale ne doivent pas contenir plus de 75% d'alcool par rapport
au contenu total de la lingette.
15. L’opérateur ne doit pas toucher le patient lorsqu’il utilise l’ordinateur médical.

IV
FCC
This device complies with part 15 of the FCC rules. Operation is subject to the
following two conditions:
a) This device may not cause harmful interference.
b) This device must accept any interference received, including interference that
may cause undesired operation.
CE MARK
This device complies with the requirements of the EEC directive 2014/30/EU with
regard to “Electromagnetic compatibility” and 2014/35/EU “Low Voltage Directive”.
EU legislation
UK legislation
Electromagnetic Compatibility - Directive
2014/30/EU
Electromagnetic Compatibility Regulations 2016
Low Voltage Directive 2014/35
Electrical Equipment (Safety) Regulations 2016
Radio equipment - Directive 2014/53/EU
Radio Equipment Regulations 2017
CAUTION ON LITHIUM BATTERIES
There is a danger of explosion if the battery is replaced incorrectly. Replace only
with the same or equivalent type recommended by the manufacturer. Discard used
batteries according to the manufacturer’s instructions.
Battery Caution
Risk of explosion if battery is replaced by an incorrectly type. Dispose of used
battery according to the local disposal instructions.

V
LEGISLATION AND WEEE SYMBOL
2012/19/EU Waste Electrical and Electronic Equipment Directive on the treatment,
collection, recycling and disposal of electric and electronic devices and their
components.
The crossed dust bin symbol on the device means that it should not be disposed of
with other household wastes at the end of its working life. Instead, the device
should be taken to the waste collection centers for activation of the treatment,
collection, recycling and disposal procedure.
To prevent possible harm to the environment or human health from uncontrolled
waste disposal, please separate this from other types of wastes and recycle it
responsibly to promote the sustainable reuse of material resources.
Household users should contact either the retailer where they purchased this
product, or their local government office, for details of where and how they can
take this item for environmentally safe recycling.
Business users should contact their supplier and check the terms and conditions of
the purchase contract.
This product should not be mixed with other commercial wastes for disposal.
IEC standards
Accessory equipment connected to the analog and digital interfaces must be in
compliance with the respective nationally harmonized IEC standards (i.e. IEC 60950
for data processing equipment, IEC 60065 for video equipment, IEC 61010-1 for
laboratory equipment, and IEC 60601-1 for medical equipment.)
Furthermore, all configurations shall comply with the system standard IEC 606 01-
1. Anyone who connects additional equipment to the signal input part or signal
output part is configuring a medical system, and is therefore, responsible that the
system complies with the requirements of the system standard IEC 60601-1.
The unit is for exclusive interconnection with IEC 60601-1 certified equipment in the
patient environment and IEC 60XXX certified equipment outside of the patient
environment. If in doubt, consult the technical services department or your local
representative.
VI
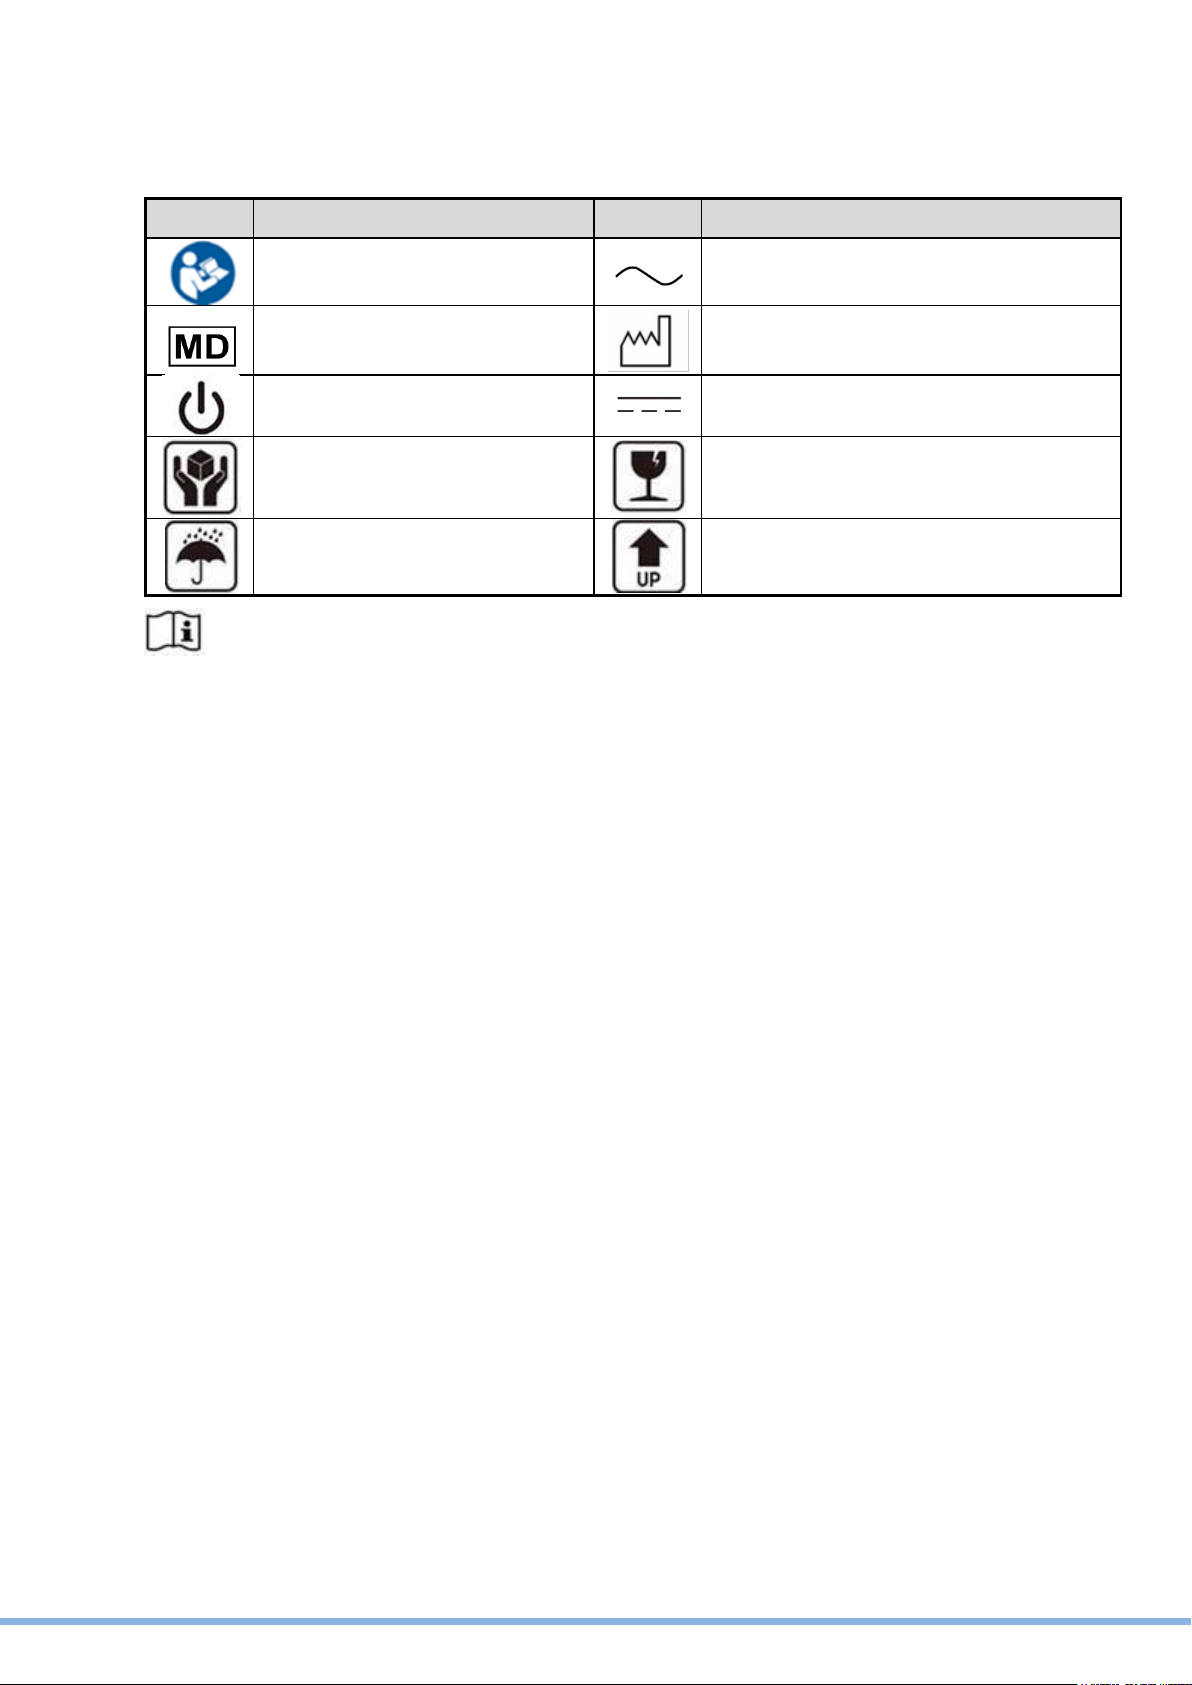
Symbol Definition
Symbol
Definition
Symbol
Definition
ISO 7010 - M002:
Instructions for use
IEC 60417 - 5032:
Alternating Current
ISO 15223-1: 2021:
Medical Device
ISO 7000 –2497:
Data of manufacture
IEC 60417 - 5009: STAND-BY
IEC 60417 - 5031: Direct Current
Handle with care
Fragile
Keep away from rain
This side up
Consult instructions for use or consult electronic instructions for use

VII
Troubleshooting
For your own safety and that of your equipment, always take the following
precautions. Disconnect the power plug (by pulling the plug, not the cord), from
your computer if any of the following conditions exists:
1) You suspect that your computer needs service or repair.
2) You want to clean the computer or screen.
3) Your computer has been dropped or damaged.
4) The power cord or plug becomes frayed or otherwise damaged.
5) You spill something into the system.
Repair of the device may only be carried out by the manufacture.
We that a service contract be obtained with supplier and that all repairs also be
carried out by them. Otherwise the correct functioning of the device may be
compromised.
1) Please use suitable mounting apparatus to avoid risk of injury. It shall be
mounted by trained and authorized personnel on adequate allowances for
quality of materials used to make the connection.
2) In case of serious incident that has occurred, please contact the
manufacturer and local authorities immediately.
3) To prevent unauthorized access, it is recommended to install suitable anti-
virus software or do not connect to unsafe external networks.
4) It is recommended to install the appropriate software, if have any question,
please contact the manufacturer for further assistance.

VIII
Revision History
Changes to the original user manual are listed below:
Revision
Description
Date
1.0
•
Initial release
June,2022

IX
Table of Contents
1Instructions for use...............................................................................1
2Packing List...........................................................................................2
2.1 Standard Items..................................................................................................2
2.2 Optional Items...................................................................................................3
3System View ..........................................................................................4
3.1 Front & Side View.............................................................................................4
3.2 Rear & Bottom View..........................................................................................5
3.3 I/O View ............................................................................................................6
3.4 Dimension.........................................................................................................7
4Basic Operation.....................................................................................8
4.1 Powering ON &OFF..........................................................................................8
4.2 Charging the Battery.........................................................................................9
4.3 Battery Level Indication.....................................................................................9
5System Assembly................................................................................10
5.1 Opening the Cable Cover ...............................................................................10
5.2 Replacing the Battery......................................................................................10
5.3Replacing the HDD .........................................................................................10
6Specification........................................................................................13
7BIOS Introduction................................................................................15
7.1 General BIOS Update.....................................................................................15
7.1.1 Updating BIOS under UEFI Shell Environment................................15
7.1.2 Updating BIOS under Windows Environment...................................16
7.1.3 Updating BIOS under Linux Environment.........................................16
7.2 Intel ME Firmware Update ..............................................................................17
7.2.1 Updating Intel ME Firmware under UEFI Shell Environment............17
7.2.2 Updating Intel ME Firmware under Windows Environment..............17
7.2.3 Updating Intel ME Firmware under Linux Environment....................18
7.3 Enter BIOS Setup Utility and Basic BIOS Operation.......................................18
7.4 Save Changes ................................................................................................18
7.5 Setting Date & Time........................................................................................19

X
7.6 Set BIOS password.........................................................................................19
7.7 Set Up Power-on Self & Timed Power On ......................................................20
7.8 Set Up Fan Control & Hardware Monitoring....................................................20
7.9 Set Up Chassis Open Detection .....................................................................20
7.10 Instructions for the Display Settings................................................................21
7.11 Setting Boot Order of Startup Disk..................................................................21
7.12 Setting PXE Boot............................................................................................21
7.13 Description of the BIOS Options.....................................................................23
7.13.1 Main .................................................................................................23
7.13.2 Advanced.........................................................................................24
7.14 Chipset............................................................................................................40
7.14.1 System Agent (SA) Configuration ....................................................41
7.14.2 PCH-IO Configuration ......................................................................47
7.15 Security...........................................................................................................51
7.16 Boot ................................................................................................................52
7.17 Save& Exit ......................................................................................................53

1
TM-5900-24 User Manual_V1.0
1 Instructions for use
The Medical Computer is a computing device capable of storing, retrieving and sending data
electronically. This Medical Computer, including its user interface, RTC battery, PCB and
power supply, the device can be attached with VESA wall mount in medical care
environment. wall mount in medical care environment.
This Medical Computer Hardware System is intended to be used in a professional medical
setting, by authorized doctors, nurses or patients only...
Application:
1) Access to patient records
2) Hospital administration system
3) Bed management.
Cleaning
method
1) Turn off the system and disconnect the power cord and remove batteries before
cleaning the system.
2) monitor can be cleaned by wiping external surface of enclosure with ethanol solution,
as needed between uses.
3) The monitor can be cleaned by wiping external surface of enclosure with ethanol (not
morethan75%) solution, 2 times a week.
4) Spread the cleaning liquid on to a sponge or cloth and then wipe the touch screen
gently.
5) When wiping, avoid any openings and gaps and be careful not to allow liquid to seep
into the place.

TM-5900-24 User Manual_V1.0
2
2 Packing List
2.1 Standard Items
A. System
B. Power adapter
C. Power cord
Note: Power cord will be supplied differently according to various region or country.

3
TM-5900-24 User Manual_V1.0
2.2 Optional Items
A. Removable Backup Battery
DR-202-GA / RRC-2020
B. Speaker Box

TM-5900-24 User Manual_V1.0
4
3 System View
3.1 Front & Side View
Item No.
Description
1
Front Camera (5M)
2
RFID
3
23.8” true flat PCAP multi-touch
4
Function keys:
•Brightness up
•Brightness down
•Volume up
•Volume down
Touch Lock
5
LED Indicator Light:
•Batteries status
•Power status
6
Power button

5
TM-5900-24 User Manual_V1.0
3.2 Rear & Bottom View
Item No.
Description
1
75 x 75 VESA mounting holes
2
100 x 100 VESA mounting holes
3
Cable door
4
LED Indicator Light
5
Camera Privacy Latch

TM-5900-24 User Manual_V1.0
6
3.3 I/O View
Item No.
Description
1
Battery Cover / Battery slot
2
DC input
3
USB 2.0(x2)
4
USB 3.0(x2)
5
Serial port 1
6
USB 2.0(x2)
7
HDMI USB 3.0(x2)
8
USB 3.0(x2)
9
LAN1
10
LAN 2
11
Speaker BOX
12
Power button
13
HDD Cover / 2.5” HDD Slot

7
TM-5900-24 User Manual_V1.0
3.4 Dimension
Dimensions(W x D x H) : 581 x 351 x 44 mm

TM-5900-24 User Manual_V1.0
8
4 Basic Operation
This device is only intended to be used as SIP/SOP facing downward.
4.1 Powering ON &OFF
To activate the system, push and quickly release the power button and the display will
come on in a few seconds.
NOTE: The system must be plugged into power adapter or battery charged before
turning on for the first time.
To turn off the system, power off the device safely using software “function that “shuts
down computer” provide 12din the operating system.
Table of contents
Other Teguar Medical Equipment manuals

Popular Medical Equipment manuals by other brands

Nasco Healthcare
Nasco Healthcare Canine IV Leg instruction manual

Dynatronics
Dynatronics DYNATRON SmarTRAC Operator's manual

Abbott
Abbott i-STAT Alinity Quick reference guide

Medela
Medela Invia Series Instructions for use

Air Techniques
Air Techniques F3700T instruction manual

BÜHLMANN
BÜHLMANN Quantum Blue Reader user manual

Shenzhen Mindray Bio-Medical Electronics
Shenzhen Mindray Bio-Medical Electronics BeneHeart D6 Operator's manual

Tektronix
Tektronix Trimode TDP7700 Series Technical reference

EDAN INSTRUMENTS
EDAN INSTRUMENTS SE-3 user manual

Drive
Drive MEDQUIP MQ3200 user manual

Braun
Braun Aesculap Metha manual

Bard Peripheral Vascular
Bard Peripheral Vascular True Instructions for use


