Tek Nek Toys International Rockin' Rider User manual
4
GROW-WITH-ME UNICORN MANUAL
WARNING
1
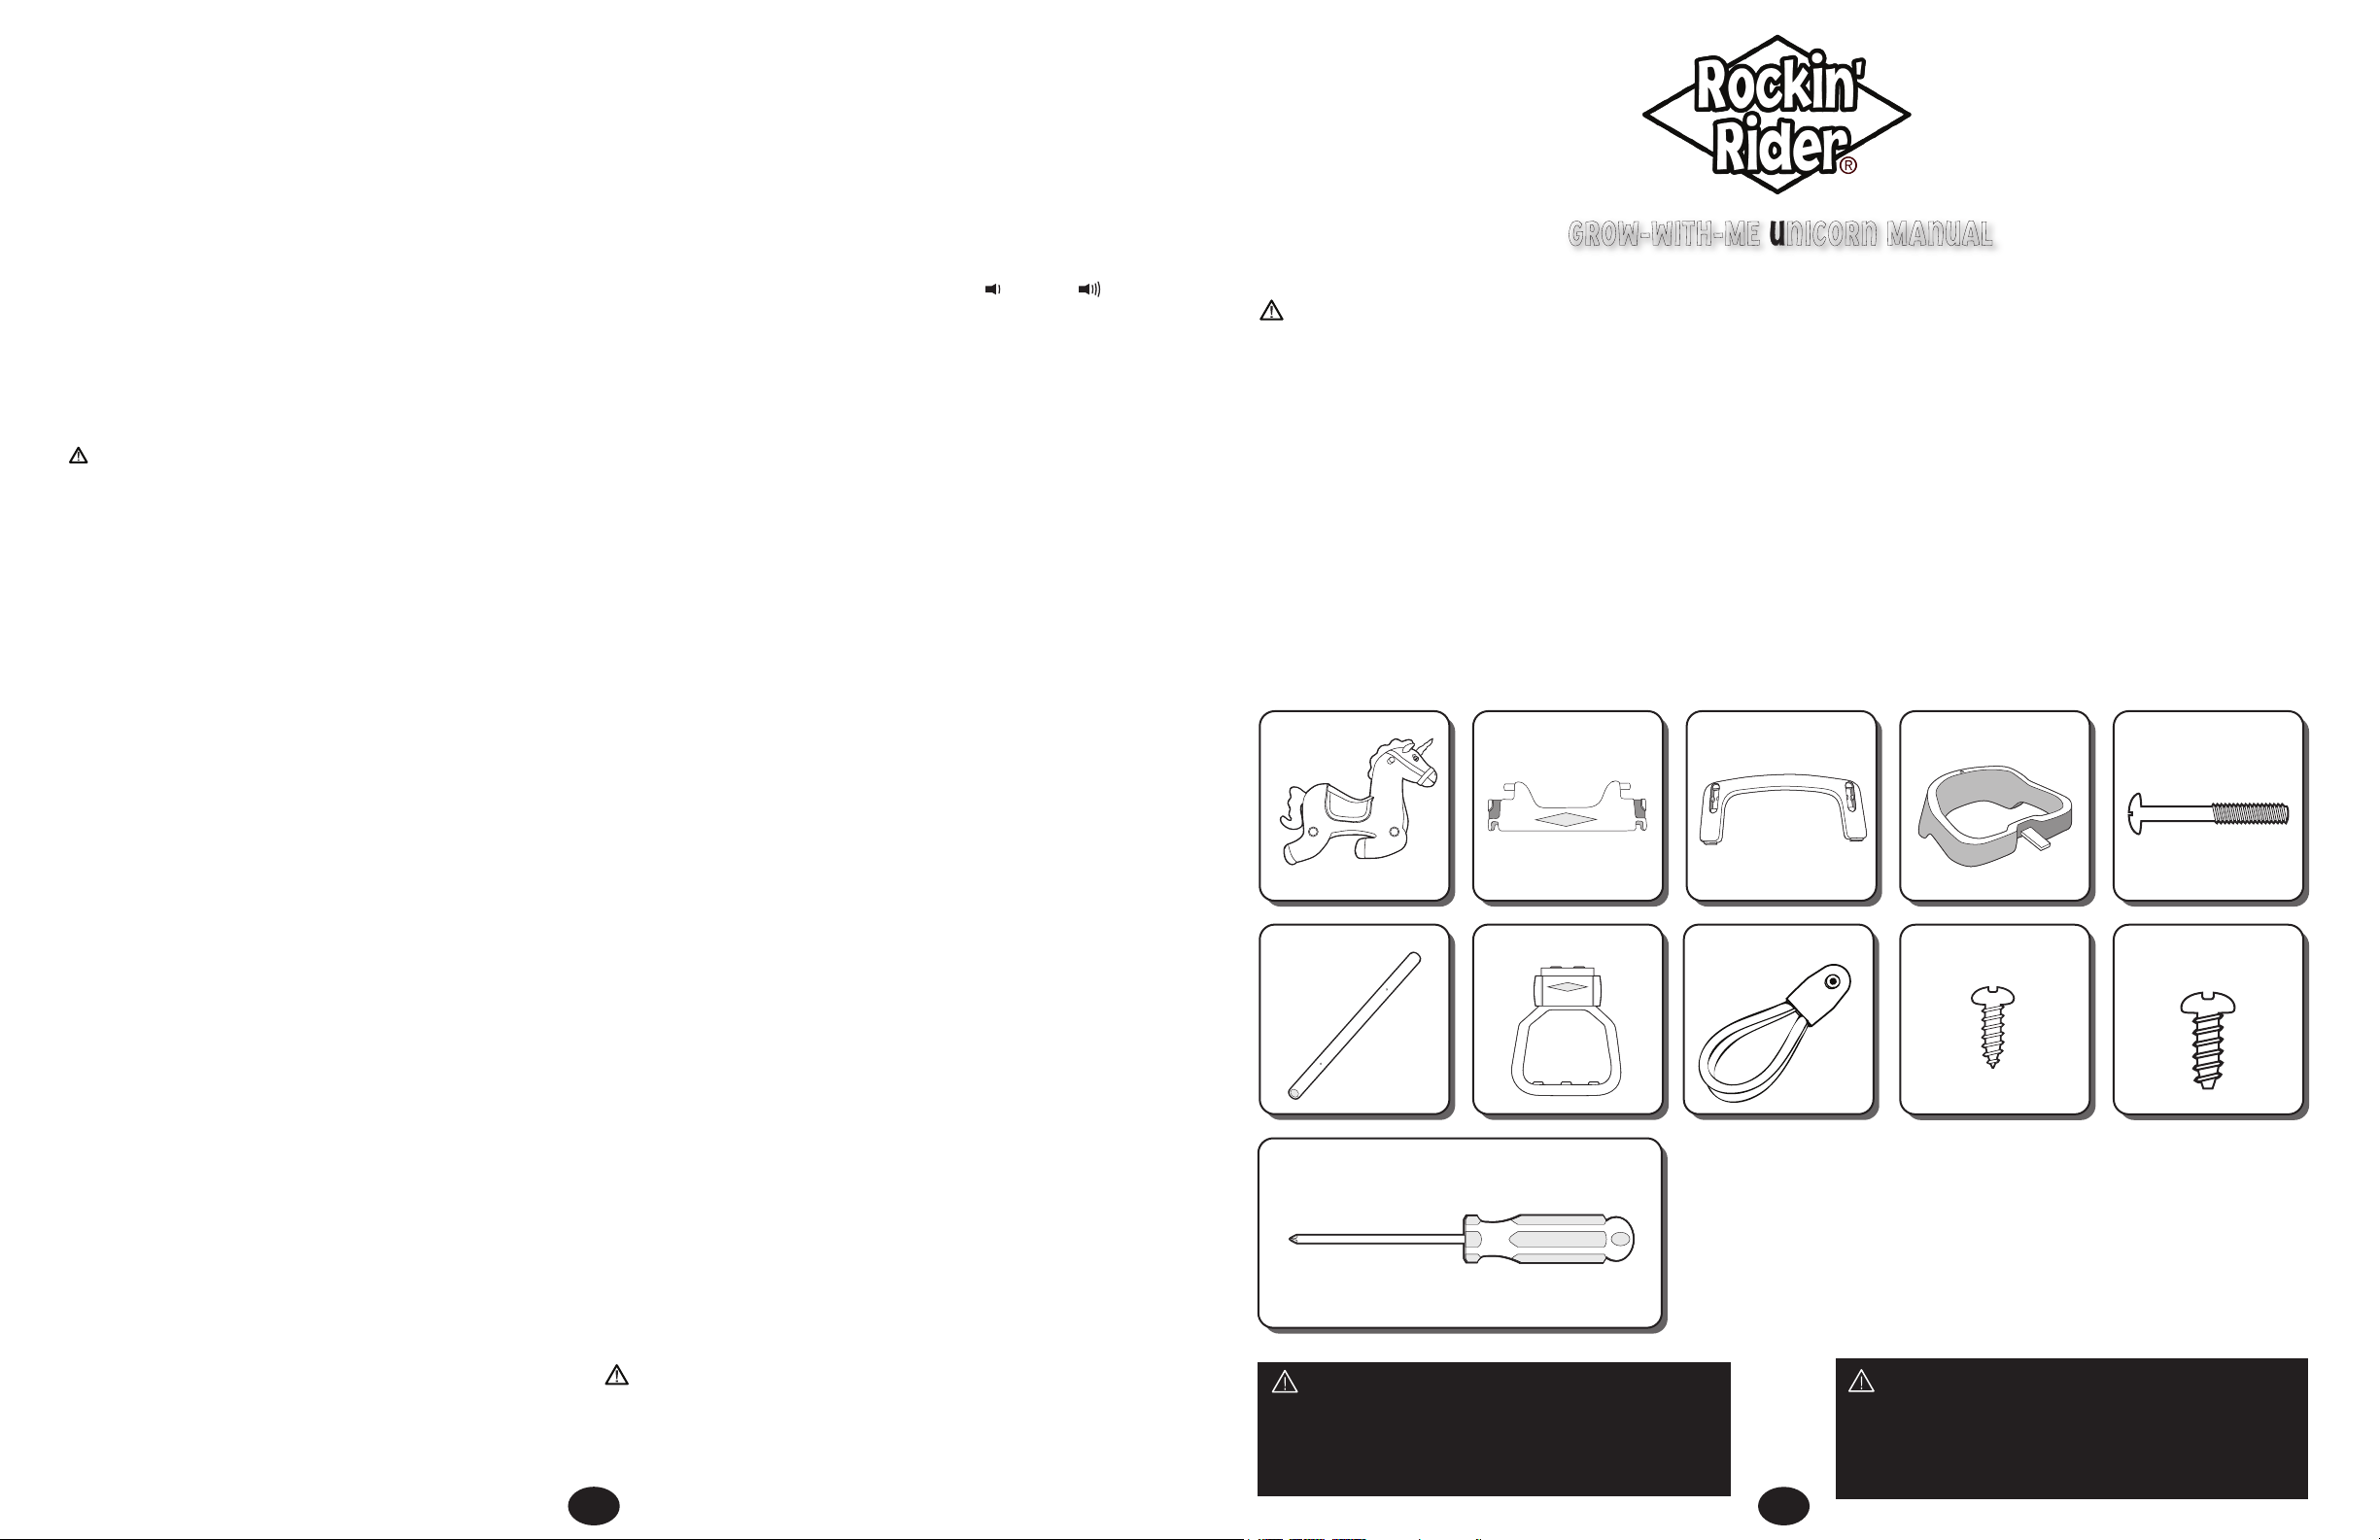
1) Body
x1 x2 x2 x1 x1
x2 x2 x4 x4 x4
2) Frame Ends 3) Frame Sides 4) Safety Seat 5) Safety Seat
Screw
6) Dowels 7) Stirrups 8) Elastic Bands 9) Dowel Screws
10) Elastic Band
Screws
Tools Required for Assembly (not included)
PARTS AND TOOLS LIST
• PARENTS: MONITOR YOUR CHILD’S PLAY ACTIVITY
TO ENSURE PROPER AND SAFE USE OF THIS
PRODUCT.
• REMOVE ALL PACKAGING, CLIPS, STAPLES, TIES AND
SIMILAR ATTACHMENTS BEFORE GIVING THIS TOY
TO A CHILD, AS THESE ATTACHMENTS POSE A
POTENTIAL CHOKING HAZARD AND ARE NOT PART
OF THE TOY.
• ADULT ASSEMBLY IS REQUIRED.
• PARENTAL SUPERVISION IS REQUIRED.
•This product is designed for a child at least 9 months old
and weight not exceeding 50 lbs (22.7 kgs).
•Allow only one child on the product at a time.
•Never allow the child to play with the product near
roadways, streets, swimming pools, hills, sloped driveways,
ramps, steep inclines, or stairs. Use only on a level surface.
•Always wear shoes while riding.
•Do not allow another child to push the product when a child
is sitting on it.
•Do not allow the child to stand on the product.
•The child should always sit in the forward facing position.
•The child’s feet should remain in the stirrups at all times
while riding the toy.
•Inspect toy periodically for loose or damaged components.
ANY RUBBER BANDS, PLASTIC SECURING BANDS, WIRE
TIES AND TAGS, USED IN THIS PACKAGING ARE NOT PART
OF THIS PRODUCT AND SHOULD BE REMOVED FOR YOUR
CHILDS SAFETY. ANY CONTACT WITH MOISTURE OR
LIQUID WILL DAMAGE THE ELECTRONICS. COLORS AND
DECORATIONS MAY VARY.
ADULT SUPERVISION REQUIRED.
THIS PACKAGE CONTAINS SMALL PARTS WHICH HAVE
HAZARDOUS SHARP POINTS IN THE UNASSEMBLED
STATE. FOR ADULT ASSEMBLY ONLY. CARE SHOULD BE
TAKEN IN THE UNPACKING AND ASSEMBLY OF THIS TOY.
WARNING :
WARNING :
ELECTRONIC FEATURES
Please note: For best performance of electronic features, we recommend replacing the batteries that came with this
product with brand new alkaline batteries.
SOUND EFFECTS AND MOVING MOUTH
The sound effects and moving mouth features are activated by squeezing either of the horse’s ears. If the sound
becomes distorted or the mouth stops working please replace the batteries as outlined in the Battery Replacement
section of this manual.
VOLUME CONTROL
You can adjust the sound effect volume by sliding the switch on the battery compartment to either low or high .
Please see the Battery Replacement section of this manual for the location of the battery compartment.
BATTERY REPLACEMENT
The battery compartment is located under a Velcro strip on the left side of the horse’s mane. You will need a small
Phillips screwdriver to open the compartment. When you are finished replacing the batteries, securely fasten battery
cover and screw, stick the battery box back into the pouch, and re-seal the Velcro strip.
WARNING
1) Only an adult should replace batteries.
2) Remove exhausted batteries and dispose of properly.
3) This toy uses 3 AA batteries.
4) Install batteries correctly observing the polarity (+,-) signs.
5) We recommend use of alkaline batteries for optimal performance of electronic features.
6) Do not mix old and new batteries.
7) Do not mix alkaline, standard (Carbon-Zinc), and rechargeable (Ni-Cad) batteries. Only batteries of the same or
equivalent type as recommended are to be used.
8) Remove the batteries if the toy will not be in use for an extended period of time.
CARE AND MAINTENANCE
• Check all nuts and screws prior to use and periodically thereafter. Tighten or replace as necessary.
• Product may be cleaned with a mild household detergent and warm water.
• Scratches on metal parts may be touched up with a non-lead based paint.
• Do not place near stairways, wall heaters, fireplace or any source of extreme heat.
• Check all plastic and metal parts for cracks, cuts and/or excessive wear. Replace as necessary.
• Any contact with moisture or liquid may damage the electronics.
• Occasionally check to see that all screws are tight and secure.
• If the sound is not operating correctly, replace the batteries.
• Make sure all hardware is tightened and securely in place before the child rides the toy.
• Please note: all elastic bands, stirrups, and screws are contained inside the small box within the package for
shipping purposes.
This product conforms to ASTM-F963. Standard Consumer Safety Specifications on Toy Safety. This instruction
manual contains assembly instructions, safety and maintenance tips.
PLEASE KEEP THIS MANUAL FOR FUTURE REFERENCE
Tek Nek Toys International, Inc.
Colleyville, TX 76034 USA
Made in Dongguan, China.
Pat. No. US 6,524,156/6,780,076
www.myrockinrider.com
WARNING
WHEN CHANGING THE BATTERIES, THE SCREW THAT
SECURES THE BATTERY COMPARTMENT SHOULD BE KEPT
AWAY FROM CHILDREN AS IT POSES A POTENTIAL
CHOKING OR INHALATION HAZARD.

2
4
5
3
3
Step 1:
Insert the two dowels (6) into
the holes on the pony’s (1)
side, lining up the holes on
the dowels with the holes on
the pony. Screw in all four
dowel screws (9).
Starting with the front dowel
add the stirrup (7), then the
elastic band (8). Secure in
place using elastic band
screws (10). Repeat for other
side of dowel.
On the rear dowel (6) place
the elastic band (8) on the
end and secure in place using
elastic band screw (10).
Repeat for other side.
Step 2:
Slip the elastic band (8) over
the pegs on the frame ends
(2). Repeat for all four elastic
bands.
Step 4:
To create the bouncer and rocker base,
have the frame side (3) legs faced up with
the smooth side facing outward. Connect
the frame ends (2) to the frame sides (3) by
sliding in and then going down until you
hear a “click” sound. Repeat on opposite
end.
Step 5:
To create the spring horse base, have the frame
side (3) legs faced down with the smooth side
facing outward. Connect the frame ends (2) to
the frame sides (3) by sliding in and then going
down until you hear a “click” sound. Repeat on
oppsite end.
Step 3:
To attach the safety seat (4), insert the front
piece into the back of the pony’s (1) neck
and secure with the safety seat screw (5).
(2)
(4)
(5)
(2)
(3)
(2)
(3)
1
2
Other Tek Nek Toys International Toy manuals


Popular Toy manuals by other brands

FUTABA
FUTABA GY470 instruction manual

LEGO
LEGO 41116 manual

Fisher-Price
Fisher-Price ColorMe Flowerz Bouquet Maker P9692 instruction sheet

Little Tikes
Little Tikes LITTLE HANDIWORKER 0920 Assembly instructions

Eduard
Eduard EF-2000 Two-seater exterior Assembly instructions

USA Trains
USA Trains EXTENDED VISION CABOOSE instructions


