Teka TBBQ 4100 G SS User manual

EN ES PT FR
User Manual
TBBQ 4100 G SS
teka.com

4 BURNER GAS BBQ GRILL
MANUAL MUST BE READ BEFORE OPERATING!
Should you have any questions, please contact us. Contact information can be found on our website teka.com.

WARNINGS
Improper installation, adjustment, alteration, use, or maintenance can cause bodily injury and/or property damage.
Read this instruction manual thoroughly before installing or using this appliance.
1. Do not store or use gasoline or other flammable liquids or vapors in the vicinity of this or any other appliance.
2. A propane/butane gas tank not connected for use should not be stored in the vicinity of this or any other appliance.
DANGER
If you smell gas:
1. Immediately shut off gas to the appliance.
2. Extinguish any open flame.
3. Open the lid.
4. If the odour continues, keep away from the appliance and immediately call your gas supplier or fire department.
Before using your appliance for the first time, please carefully read the installation and maintenance
instructions included.
Depending on the model, the accessories and features included in your appliance may vary from those
shown in the pictures.
CONTACT US
Should you have any questions, please contact us. Contact information can be found on our website teka.com.
Our address:
TEKA Industrial S.A.
C/Cajo 17, 39011 Santander

EN-4
TABLE OF CONTENTS
INTENDED USE...................................................................................................................................EN-5
SAFETY INFORMATION ......................................................................................................................EN-5
UNPACKING THE GRILL
PARTS LIST ............................................................................................................................................................... EN-11
PREPARATION.......................................................................................................................................................... EN-12
ASSEMBLY INSTRUCTIONS
CONNECTING TO GAS SUPPLY
GAS TANK CONNECTION.......................................................................................................................................... EN-19
GAS REQUIREMENTS............................................................................................................................................... EN-20
SAFE GRILLING ENVIRONMENT............................................................................................................................... EN-20
OPERATING INSTRUCTIONS
FIRST USE – PRIMING THE GRILL............................................................................................................................. EN-21
PREHEATING............................................................................................................................................................ EN-21
COOKING TIPS ......................................................................................................................................................... EN-21
ELECTRONIC LIGHTING INSTRUCTIONS................................................................................................................... EN-21
REPLACING THE BATTERY ........................................................................................................................................ EN-22
LID POSITIONING – OPEN OR CLOSE ....................................................................................................................... EN-22
TESTING FOR GAS LEAKS ......................................................................................................................................... EN-22
MAINTENANCE AND CLEANING
CLEANING THE BURNERS ........................................................................................................................................ EN-23
CLEANING THE IGNITION HEAD............................................................................................................................... EN-24
CLEANING THE DRIP TRAY ....................................................................................................................................... EN-24
MAINTAINING BARBECUE SURFACES AND LIDS ...................................................................................................... EN-24
GAS SAFETY ............................................................................................................................................................. EN-25
CARE AND MAINTENANCE TIME TABLE................................................................................................................... EN-26
REPLACING THE MAIN BURNER.......................................................................................................EN-27
TROUBLESHOOTING ........................................................................................................................EN-28
REPLACEMENT PARTS......................................................................................................................EN-29
WASTE DISPOSAL.............................................................................................................................EN-31
DECLARATION OF CONFORMITY......................................................................................................EN-31

EN-5
INTENDED USE
This gas grill is intended for heating up, cooking and grilling different kinds of foodstuff in well-ventilated outdoor areas.
The appliance must be operated with low pressure butane or propane gas. It may not be supplied with natural gas.
This product is intended for private use only and may not be used for any commercial or industrial purposes.
This appliance must only be used as described in this user manual. Any other use will be considered improper and may
cause property damage and personal injury.
The manufacturer is not liable for any damage resulting from improper use.
SAFETY INFORMATION
SAFETY SYMBOLS
Danger! (High risk)
Failure to observe this precaution can result in fatal injuries.
Warning! (Medium risk)
Failure to observe this precaution can result in property damage.
Caution! (Low risk)
Precaution that should be taken into account when handling the appliance.
General safety information
GENERAL SAFETY INSTRUCTIONS
These safety instructions must be observed during every use.
–Use outdoors only!
–Read the instructions before using the appliance.
–WARNING! Accessible parts may be very hot. Keep young children away.
–This appliance must be kept away from flammable materials during use.
–Do not move the appliance during use!
–Turn off the gas supply at the gas cylinder after use.
–Do not modify the appliance.
GENERAL BARBECUE WARNINGS
1. WARNING! Danger of carbon monoxide poisoning! Never operate the appliance in enclosed areas such as garages or sheds, as
this leads to a carbon monoxide build-up resulting in personal injury or death.
2. WARNING! Danger of explosion! Never operate the appliance in enclosed areas such as garages or sheds, as this leads to gas
accumulation in case of a leakage which may result in an explosion.
3. Always lock the wheels with their brakes (if available) prior to use.
4. Do not attempt to move the appliance while it is in use.
5. Do not attempt to modify the appliance in any way. Only use attachments and accessories recommended by the manufacturer.
Any alterations made to the appliance, improper use, or non-compliance with the instructions lead to danger.
6. Do not use the appliance in the immediate presence of aerosol cans, flammable liquids, volatile gases, or other flammable
substances. Keep open flames such as candles or torches away from the appliance.
7. Do not store any flammable liquids or volatile gases near the appliance.

EN-6
8. Do not leave the appliance unattended during use.
9. Do not use liquid fuels with this appliance.
10. Never lean over the cooking surface while igniting the appliance or during cooking.
GAS BARBECUE WARNINGS
1. This appliance is configured to work with low-pressure butane or propane gas. Do not use natural gas supply.
2. Open the cover before igniting the appliance.
3. Use caution when opening the cover when the appliance is being used. Hot steam could collect inside the cover and may be
ejected quickly when opened. Do not open the cover too quickly.
4. Do not touch hot surfaces. Use the handle only for lifting the cover.
5. Cover the appliance only when it has completely cooled down completely.
6. Never use charcoal or other solid fuels in this appliance.
7. It is recommended minimum clearances of the grill to any combustible materials must be 1 m.
8. Do not place anything on the top for the cover while the appliance is in use!
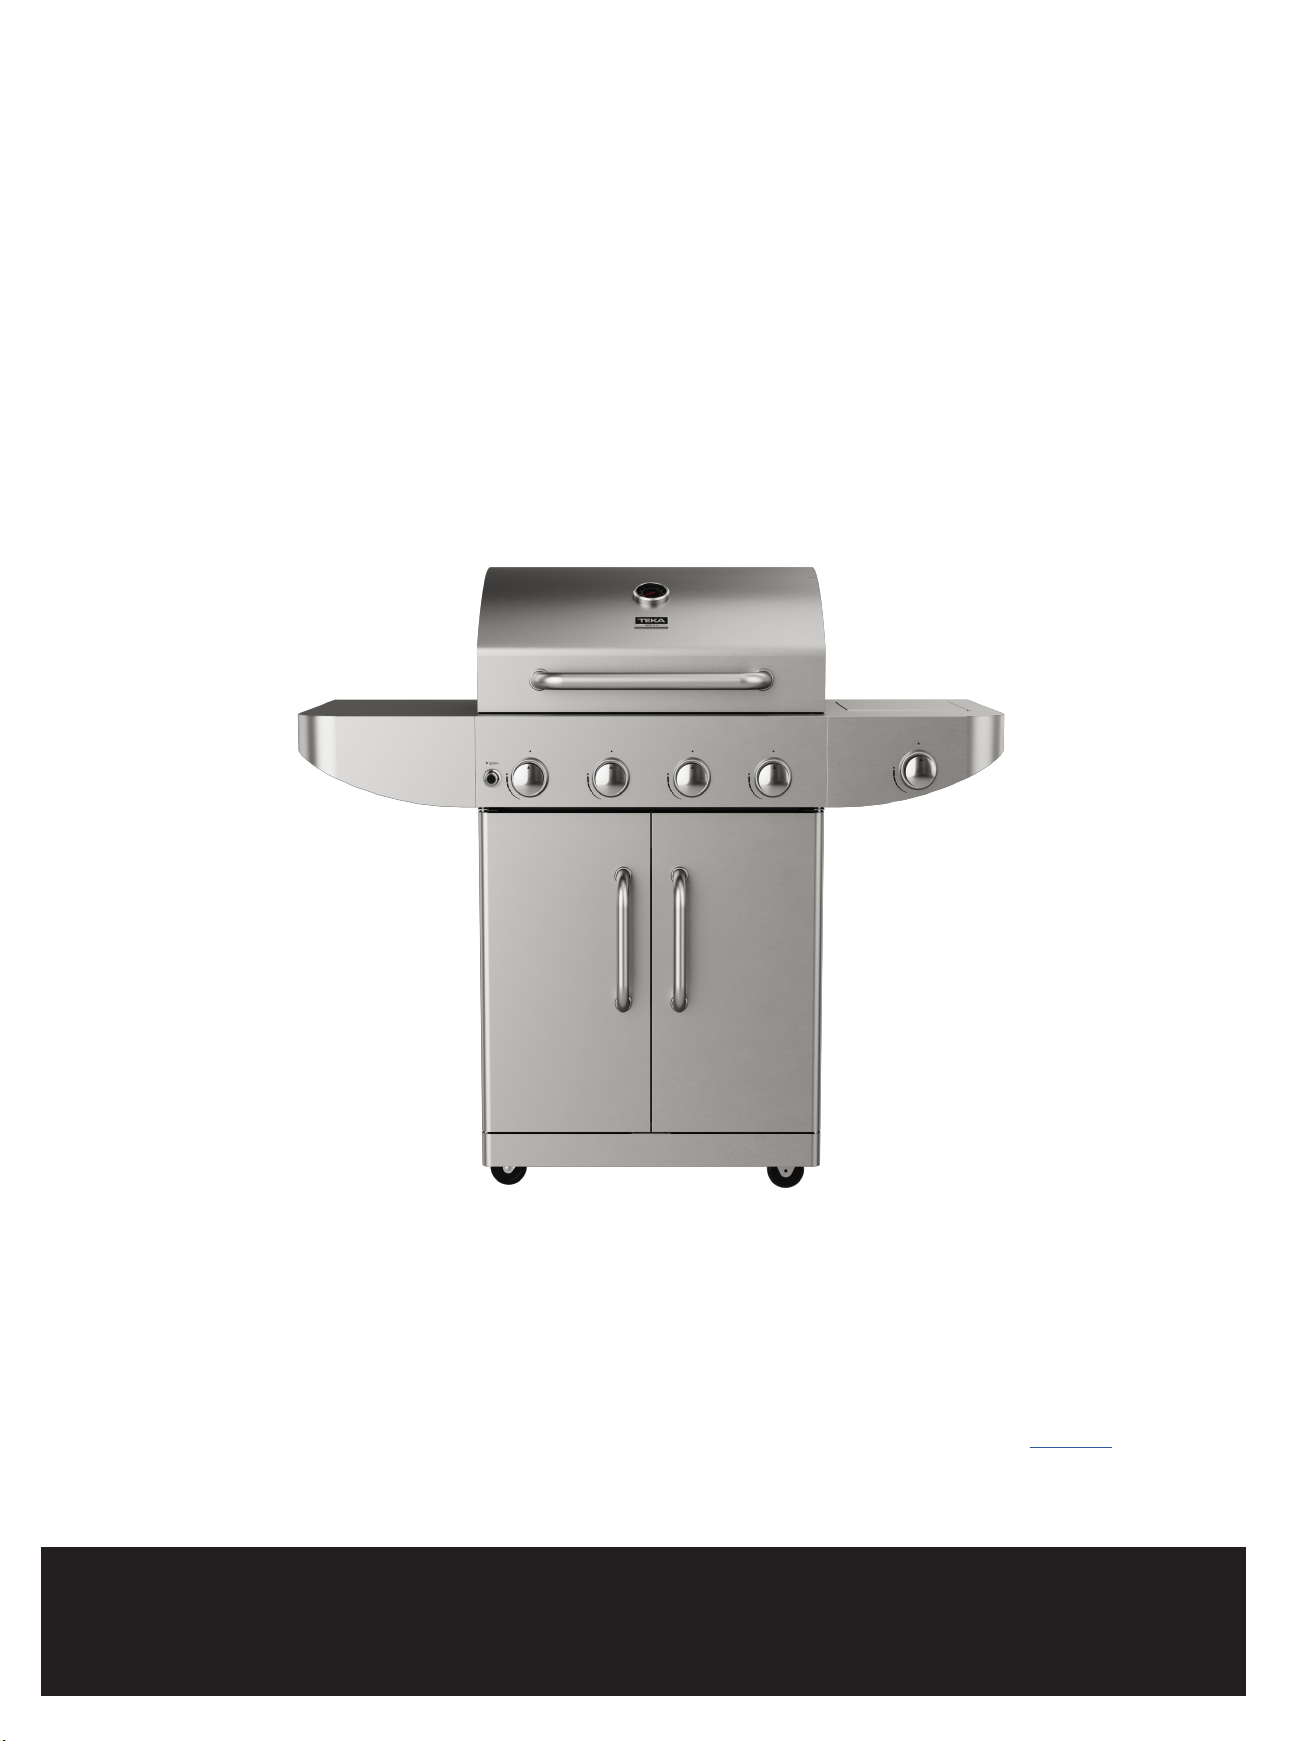
9. Minimum and maximum dimentions of pot or pan to use on the side burner: 203.2 mm - 254 mm.
GAS CONNECTIONS / GAS CYLINDER / PRESSURE REGULATOR WARNINGS
1. Check the appliance and all connections regularly and each time the gas cylinder is replaced for possible gas leaks.
2. Never check for gas leaks using a match or any other open flame.
3. Never alter or modify the pressure regulator or gas supply assembly.
4. Always turn the gas supply off on the gas cylinder or the pressure regulator and disconnect the gas hose after use.
5. Never store gas cylinders indoors or close to heat sources.
6. Always store gas cylinders in the upright position, never in a horizontal position which could cause the gas cylinder to leak or
the gas to leak into the gas hose.
7. Never use the appliance without the pressure regulator.
8. Only use pressure regulators approved for liquid petroleum gas (LPG) and complying with national regulations.
GAS HOSE WARNINGS
1. Inspect the gas hose(s) prior to and after each use: look for any cuts, cracks, excessive wear, or other damage. The gas hose(s)
shall be replaced every one to two years by a qualified technician or the retailer only. Replace brittle gas hoses and their
connections. If in doubt, ask a local specialist.
2. Protect the gas hose(s) against damages. Do not let it / them hang over sharp edges. Do not twist, squeeze or bend it / them.
Keep the gas hose(s) away from hot surfaces and ensure that nobody can trip over it / them.
3. Only use gas hoses approved for liquid petroleum gas (LPG) and complying with national regulations.
4. Every kind of work or replacement of the hoses is to be conducted according to the manufacturer’s instructions by qualified
personnel or specialists.
5. The LP Gas hose must be replaced if damaged and when national conditions require it.
6. Make sure there is no debris, spiders, small insects, or webs inside the hose before any connection is made. They can obstruct
the gas flow, which could result in a fire in and around the burner tube.
The maximum length of the hose shall not exceed 1.5 m.
IF YOU SMELL GAS
1. Never light the appliance if you smell gas.
2. Immediately turn the gas supply off on the appliance as well as on the gas cylinder and / or the pressure regulator.
3. Extinguish all open flames near the appliance such as candles and torches. Switch off all electrical appliances in the
surroundings.
4. Make sure the area is well ventilated with fresh air.
5. Open the cover of the appliance in order to let the gas escape. Should you still smell gas, do not use the appliance any longer
and have it repaired by an authorized professional only.

EN-7
SAFETY INSTRUCTIONS
Danger! Risk of fire!
The grill parts become very hot during use and can cause fire.
- Always have a ready-to-use fire extinguisher and a first aid kit at hand in the event of an accident or fire.
- Place the grill on a secure, non-flammable, flat, level, stable, heat-resistant and clean surface away from any heat source prior
to use.
- Ensure that the grill is set up at least 1 m away from highly combustible materials such as awnings, wooden terraces or
furniture.
- Do not move the grill during use.
- Some foods produce flammable fats and juices. Clean the grill on a regular basis, preferably after each use.
- Do not leave the operating grill unattended.
Danger! Risk of fire!
Never attempt to switch on/light the grill with the lid closed.
- Only operate the gas grill with the lid closed at a low flame.
Danger! Risk of burns and accidents!
This appliance is not intended for use by persons (including children) with reduced physical, sensory or mental
capabilities, or lack of experience and/or knowledge.
- This group of people must be informed about the dangers associated with the use of the appliance and must be supervised by
a person responsible for their safety.
- Supervise children at all times to ensure that they do not play with the appliance.
- Any modifications to the product may be extremely hazardous and are therefore prohibited. Do not attempt to make
unauthorized modifications to the appliance. In the event of damage, repairs or other problems with the grill, please contact
our service center or a local dealer.
- Keep the appliance away from children and pets.
Do not touch the grill, flame burner and food being grilled during use as they become extremely hot and can cause severe burns.
- Keep sufficient distance from hot parts since any contact can cause severe burns.
- Always wear grill or oven gloves (e.g. Category II heat-resistant gloves rated according to DIN-EN 407) when grilling.
- Use only long-handled grill utensils with heat-resistant grips.
- Do not wear clothing with wide sleeves.
- Allow the grill to cool down completely before cleaning it or stowing it away.
Danger! Risk of deflagration!
When poured into the flames, flammable liquids create flashes or deflagrations.
- Never use flammable fluids such as gasoline or spirit.
Danger! Risk of poisoning!
Gas is odorless and can be deadly in enclosed spaces!
- The grill is intended for outdoor use only.
Danger! Health risk!
Do not use paint solvents or thinners to remove stains. These substances are hazardous to health and must not come
into contact with food.:
Danger! Risks to children!
Children playing with the packaging film can get caught in it, which can result in suffocation.
- Do not let children play with the packaging film.
- Do not let children put small assembly parts into their mouths as these present a choking hazard. The parts can cause choking
if swallowed.

EN-8
Danger! Risk of injury!
Both the grill and individual parts have some sharp edges.
- Individual parts of the grill must be handled with care to prevent accidents or injuries during assembly and use. Wear safety
gloves where necessary.
- Do not set up the grill near entryways or high-traffic zones.
- Utmost care must be exercised when grilling. You may lose control of the appliance if distracted.
- Always be attentive to and aware of what you are doing. Do not use this product if you are unfocused or tired, or if you are
under the influence of drugs, alcohol, or medicines. Just one moment of carelessness during use of the product can cause
serious injuries.
Warning! Risk of damage!
During use, the screws can loosen slowly and impair the grill's stability.
- Check the tightness of screws before each use. If necessary, re-tighten all screws to ensure the grill stands stable at all times.
Warning! Risk of damage!
Do not use any strong or abrasive solvents or scouring pads as these can damage the surfaces and leave scuff marks.
Danger! Risk of burns and accidents!
Caution! If you smell gas:
- Immediately shut off gas to the appliance.
- Extinguish any open flame.
- Open the lid.
- If odour continues, keep away from the appliance and immediately call your gas supplier or fire department.
Danger! Risk of burns and accidents!
The grill must be stored away from fuels (e.g. gasoline) or other flammable liquids or gases.
- Gas cylinders must be stored separately from the gas grill.
- Gas cylinders must be stored away from the gas grill.
- Do not place gas cylinders directly under the gas grill.
Danger! Risk of fire!
This appliance must be kept away from flammable materials during use.
- Changing the gas cylinder must be carried out away from any source of ignition.
- Gas cylinders must never be stored at temperatures exceeding 50 °C. On extremely hot days, efforts should be made to keep
the cylinders in the shade.

EN-9
BATTERY SAFETY INFORMATION
1. WARNING: KEEP BATTERY OUT OF REACH OF CHILDREN. Swallowing can lead to chemical burns, perforation of soft
tissue, and death. Severe burns can occur within two hours of ingestion. Seek medical attention immediately.
2. If you think the battery might have been swallowed or placed inside any part of the body, seek immediate medical
attention.
3. Do not allow children to replace the battery without adult supervision.
4. Exhausted batteries should be immediately removed from the equipment and properly disposed of.
5. Do not dispose of the batteries in fire. Do not expose batteries to heat or fire. Avoid storage in direct sunlight.
6. If the battery should leak, remove it with a cloth from the battery compartment. Dispose of battery according to
regulations. If battery acid has leaked, avoid contact to skin, eyes, and mucous membranes. Rinse affected areas
immediately after contact with the acid and wash with plenty of clean water. Visit a physician.
7. Do not encapsulate and/or modify batteries.
8. Before you discard the appliance, dispose of batteries in an environmentally safe manner.
9. Always insert batteries correctly with regard to polarity (+ and –) marked on the battery and in the battery
compartment. When batteries are inserted in reverse they might be short-circuited or charged. This can cause
overheating, leakage, venting, rupture, explosion, fire, and personal injury.
10. Only use the battery type indicated in this manual.
11. Do not short-circuit batteries. When the positive (+) and negative (–) terminals of a battery are in electrical contact
with each other, the battery becomes short-circuited. For example, loose batteries in a pocket with keys or coins can be
short-circuited. This can result in venting, leakage, explosion, fire, and personal injury.
12. Do not charge alkaline batteries. Attempting to charge a non-rechargeable (primary) battery can cause internal gas
and/or heat generation resulting in leakage, venting, explosion, fire, and personal injury.
13. Do not subject batteries to mechanical shock.
14. Do not dismantle, open or shred batteries.
15. WARNING: Used batteries must not be disposed of in the household rubbish. Take them to a designated disposal/
collection site.

EN-10
UNPACKING THE GRILL
$
%
&'
(
)
*
+,
-
.
2
1
/0
3
4
5
6
:
=
$
<
;
9
8
7
%
&
'
(

EN-11
PARTS LIST
PART DESCRIPTION QTY PART DESCRIPTION QTY
A Firebox Assembly 1 S Grease Tray 1
B Left Side Shelf 1 T Cart Side Panel, Right 1
C Left Side Shelf Facia 1 U Knob 1
D Bracket D 1 V Side Burner Knob Bezel 1
E Cart Side Panel, Left 1 W Side Burner 1
F Left Door 1 X Bracket X 1
G Door Hanle Bezel 4 Y Right Side Shelf Facia 1
H Door Handle 2 Z Right Side Shelf 1
I Door Handle Grommet 4 A1 Flame Tamer 4
J Bracket J 1 B1 Cooking Grid 2
K Locking Caster 2 C1 Warming Rack 1
L Cart Front Brace 1 D1 Cart Rear Panel 1
M Bracket M 1 E1 Firebox Rear Cover 1
N Cart Bottom Panel 1 AA 5/32"x10mm Screw 10
O Door Stopper 1 BB 1/4"x8mm Screw 6
P Straight Caster 2 CC 1/4"x10mm Screw 23
Q Right Door 1 DD 1/4"x12mm Screw 26
R Grease Box 1 EE 1/4" Flat Washer 22

EN-12
PREPARATION
Before beginning assembly of product, make sure all parts are present. Compare parts with package contents list and
hardware contents list. If any part is missing or damaged, do not attempt to assemble the product.
Contact the dealer from whom you purchased the appliance if you find that parts are missing or show damage.
Do not use the appliance unless missing parts have been delivered or defective parts have been replaced. Using an
incomplete or damaged appliance leads to personal injury and property damage.
Remove and safely discard any packaging material or promotional labels attached to the set.
Tools required for assembly: Phillips screwdriver (not included).
ASSEMBLY INSTRUCTIONS
Danger! Risk of injury!
Follow all assembly instructions listed here. Failure to follow these instructions can lead to problems and
risks while using the grill.
1. Assemble the appliance completely and make all required adjustments prior to operation.
2. Follow the assembly and operation instructions closely. Use the figures as a visual guide.
3. Pay attention to small parts such as screws and nuts that are loosened or removed for assembly or during
adjustments. Keep them safe in order to avoid losing them.
4. The appliance is large. It is recommended to assemble by two people.
WARNING!
Use the appliance only after it has been completely assembled and adjusted!
IMPORTANT: Parts sealed by the manufacturer or the manufacturer's agent shall not be manipulated by the user.
NOTE: For all of the following steps, do not tighten any screws completely until all screws for that step have been
installed. Once all screws have been installed, then tighten them securely.
Step 1 Installing the casters
N
P
K
DD
EE
Use 16pcs of screw DD and 16pcs of flat washer EE to
install the casters P and K onto the bottom panel N.
Step 2 Installing the door stopper
N
O
AA
Use 2pcs of screw AA to install the door stopper O onto
the bottom panel.

EN-13
Step 3 Installing the side panels
CC
E
T
N
Use 6pcs of screw CC to install the side panels E and T
onto the bottom panel.
Step 4 Installing the rear panel
T
E
N
D1
CC
Use 7pcs of screw CC to install the rear panel D1 onto the
bottom panel.
Step 5 Installing the front brace
T
E
L
CC
Use 4pcs of screw CC to install the front brace L onto the
side panels.
Step 6 Installing the brackets
T
E
J
M
AA
Use 4pcs of screw AA to install the bracket J and bracket
M onto the front brace and side panel.

EN-14
Step 7 Mounting the firebox
Put the firebox assembly A on the cart as shown above.
Step 8 Securing the firebox to the cart
T
E
A
DD
Use 4cps of screw DD to secure the firebox assembly.
Step 9 Installing the grease tray
A
S
Remove the pre-assembled screw on grease tray S, then
install the grease tray to the firebox and tighten the
screw.
Step 10 Installing the grease box
R
S
Install the grease box R as shown above.

EN-15
Step 11 Installing the rear cover
E1
CC
T
E
A
D1
Use 6pcs of screw CC to fasten the firebox rear cover E1.
Step 12 Assembling the door handles
H
G
I
F
Remove the pre-assembled screw on the door handle H,
and install the handle and bezel G to the door as shown
above. Then install the handle grommet I.
Apply the same installation method for the other door.
Step 13 Installing the cart doors
A
F
N
Q
Install the 2pcs of doors to the cart as shown above.
Step 14 Assembling the side shelf
BB
AA
B
C
D
Use 3pcs of screw BB to install the left side shelf facia C
onto the left side shelf B.
Use 2pcs of screw AA to install the bracket D onto the left
side shelf B.

EN-16
Step 15 Assembling the side burner shelf
AA
BB
X
Y
Z
Use 3pcs of screw BB to install the left side shelf facia Y
onto the side burner shelf Z.
Use 2pcs of screw AA to install the bracket X onto the
side burner shelf Z.
Step 16 Loosening the right side screws
a
b
c
Loosen screws a and c, and remove screw b on the right
side of the firebox.
Step 17 Attaching the right side shelf
a
b
c
Attach the right side shelf to screws a and c, then tighten
screw b.
Step 18 Securing the right side shelf
DD EE
Use 3pcs of screw DD and 3pcs of flat washer EE to
fasten the side burner shelf from inside of the firebox.
Then tighten screws a and c.
Apply the same installation method for left side shelf.

EN-17
Step 19 Loosening the left side screws
a
b
c
Loosen screws a and c, and remove screw b on the left
side of the firebox.
Step 20 Attaching the left side shelf
a
b
c
Attach the left side shelf to screws a and c, then tighten
screw b.
Step 21 Securing the left side shelf
EE
DD
Use 3pcs of screw DD and 3pcs of flat washer EE to
fasten the left side shelf from inside of the firebox. Then
tighten screws a and c.
Step 22 Connecting the side burner valve
V
W
Remove the pre-assembled screws (2pcs) on the side
valve, then attach the bezel V to the valve with the holes
aligned. Tighten the screws.

EN-18
Step 23 Installing the side burner
W
Remove the nut on the side burner W, and align the end
of side burner to the nozzle as shown in step 22. Install
the side burner by tightening the nut.
Step 24 Installing the side burner knob
U
Install the side burner knob U.
Step 25 Connecting electrode wire
Connect the side burner electrode wire.
Step 26 Installing the cooking components
C1
B1
A1
Attach the flame tamer A1, cooking grid B1 and warming
rack C1 onto the grill.

EN-19
CONNECTING TO GAS SUPPLY
WARNING! Be aware of flashbacks!
Make sure there is no debris, spiders, small insects, or webs inside the head of the gas cylinder, pressure regulator,
burner(s), burner tube(s), or hose before any connection is made. They can obstruct the gas flow, which could result in
a fire in and around the burner tube. This kind of fire is known as “flashback” and can cause serious damages. Check
and clean (refer to "MAINTENANCE AND CLEANING" on page EN-23.) all the parts of the appliance before assembling it,
to reduce the chance of its occurrence.
GAS TANK CONNECTION
Warning! Risk of damage!
Do not use any strong or abrasive solvents or scouring pads as these can damage the surfaces and leave
scuff marks.
SAFEGUARD 1 - HAND ASSEMBLY
1. Make certain the tank valve and all the appliance valves are in the “OFF” position.
2. When connecting the regulator/burner valve assembly to the tank valve, turn the large plastic nut clockwise
until it stops.
3. Gas will not flow unless the plastic nut is completely connected.
4. HAND TIGHTEN ONLY.
SAFEGUARD 2 - HAND DISASSEMBLY
1. Make certain the tank valve and all the appliance valves are in the “OFF” position.
2. Turn the large plastic nut counterclockwise until it is disassembled.
3. HAND TIGHTEN ONLY.
SAFEGUARD 3 - EXCESS FLOW CONTROL
The regulator assembly incorporates an excess flow device designed to supply the grill with sufficient gas flow under
normal conditions yet control excess gas flow. Rapid changes in pressure can trigger the excess flow device providing
a low flame and low temperature. If the tank valve is turned open to allow gas flow while a burner valve is open, the
surge of pressure will cause the device to activate. The device will remain closed until the pressure is equalized. This
should occur within 5 seconds.
To ensure this does not cause difficulty in lighting the grill, follow these instructions:
1. Make sure all burner valves are ”OFF.”
2. Open the tank valve and wait 5 seconds.
IMPORTANT: Before using a fresh tank of gas, please check leakage around the connection system to make sure there
is no leakage or vapor accumulation in the cabinet. Make sure all openings around side walls are not blocked.
IMPORTANT: Place dust cap on cylinder valve outlet whenever the cylinder is not in use. Only use the type of dust
cap on the cylinder valve outlet that is provided with the cylinder valve. Other types of caps or plugs may result in
leakage.

EN-20
GAS REQUIREMENTS
CAUTION: It is important to inspect the full length of the gas hose. If it is evident there is excessive abrasion or wear,
or the hose is cut, the hose must be replaced before using this appliance.
NEVER use an unregulated gas supply.
Refer to the following table for supported gas type:
Cat I3+(28-30/37) I3B/P(30) I3B/P(37) I3B/P(50)
Nozzle Size Main Burner: 0.88mm
Side Burner: 0.92mm
Main Burner: 0.88mm
Side Burner: 0.92mm
Main Burner: 0.85mm
Side Burner: 0.89mm
Main Burner: 0.76mm
Side Burner: 0.81mm
Country code
BE, CH, CY, CZ, ES, FR,
GB, GR, IE, IT, LT, LU, LV,
PT, SK and SI.
AL, CY, DK, EE, FR, FI,
HU, IT, LT, NL, NO, SE,
SI, SK, RO, HR, TR, BG,
IS, LU, MT and CZ.
PL AT, CH, CZ, DE and SK
Gas Type and Pressure
G30 Butane at 28-
30mbar and G31
Propane at 37mbar
G30 Butane and G31
Propane at 30mbar
G30 Butane and G31
Propane at 37mbar
G30 Butane and G31
Propane at 50mbar
Nominal heat input Qn= 3.22 kW
Total Heat Input ∑Qn=16.39 (1193g/h) kW
SAFE GRILLING ENVIRONMENT
This gas appliance is designed and certified for outdoor use only. Do not operate the grill inside a building, garage,
recreation vehicle, screened porch or any enclosed area. Keep the grill away from windy areas but keep the grill in a
well-ventilated area. Do not obstruct the flow of the combustion and ventilation air around the grill.
• CLEARANCE TO COMBUSTIBLE CONSTRUCTION
A minimum clearance of 1 m from the sides of the grill and a minimum clearance of 1 m from the back of the grill
to adjacent vertical combustible constructions must be maintained. We strongly recommend a 1 m clearance of the
grill to any combustible constructions.
• CLEARANCE TO NON-COMBUSTIBLE CONSTRUCTION
A minimum clearance of 1 m from the back of the grill above the cooking surface to noncombustible constructions
is required to allow the grill hood to open completely. A minimum of 1 m clearance to the sides of the grill above
the cooking surface to noncombustible constructions is recommended. The grill can be installed directly next to
noncombustible construction below the cooking surface.
Warning: Do not place the grill under overhead, unprotected combustible surfaces.
Other manuals for TBBQ 4100 G SS
1
Table of contents
Languages:
Other Teka Grill manuals
Popular Grill manuals by other brands

Weber
Weber Master-Touch Premium E-5770 Assembly guide

Nexgrill
Nexgrill 296469 instruction manual

Modular
Modular EM70/40 GRACQE Series Installation - use - maintenance

Char-Broil
Char-Broil 463246909 Product guide

Outback
Outback RC4341PC Assembly and operating instructions

Fiesta
Fiesta Dynasty ET34540 Use and care instructions