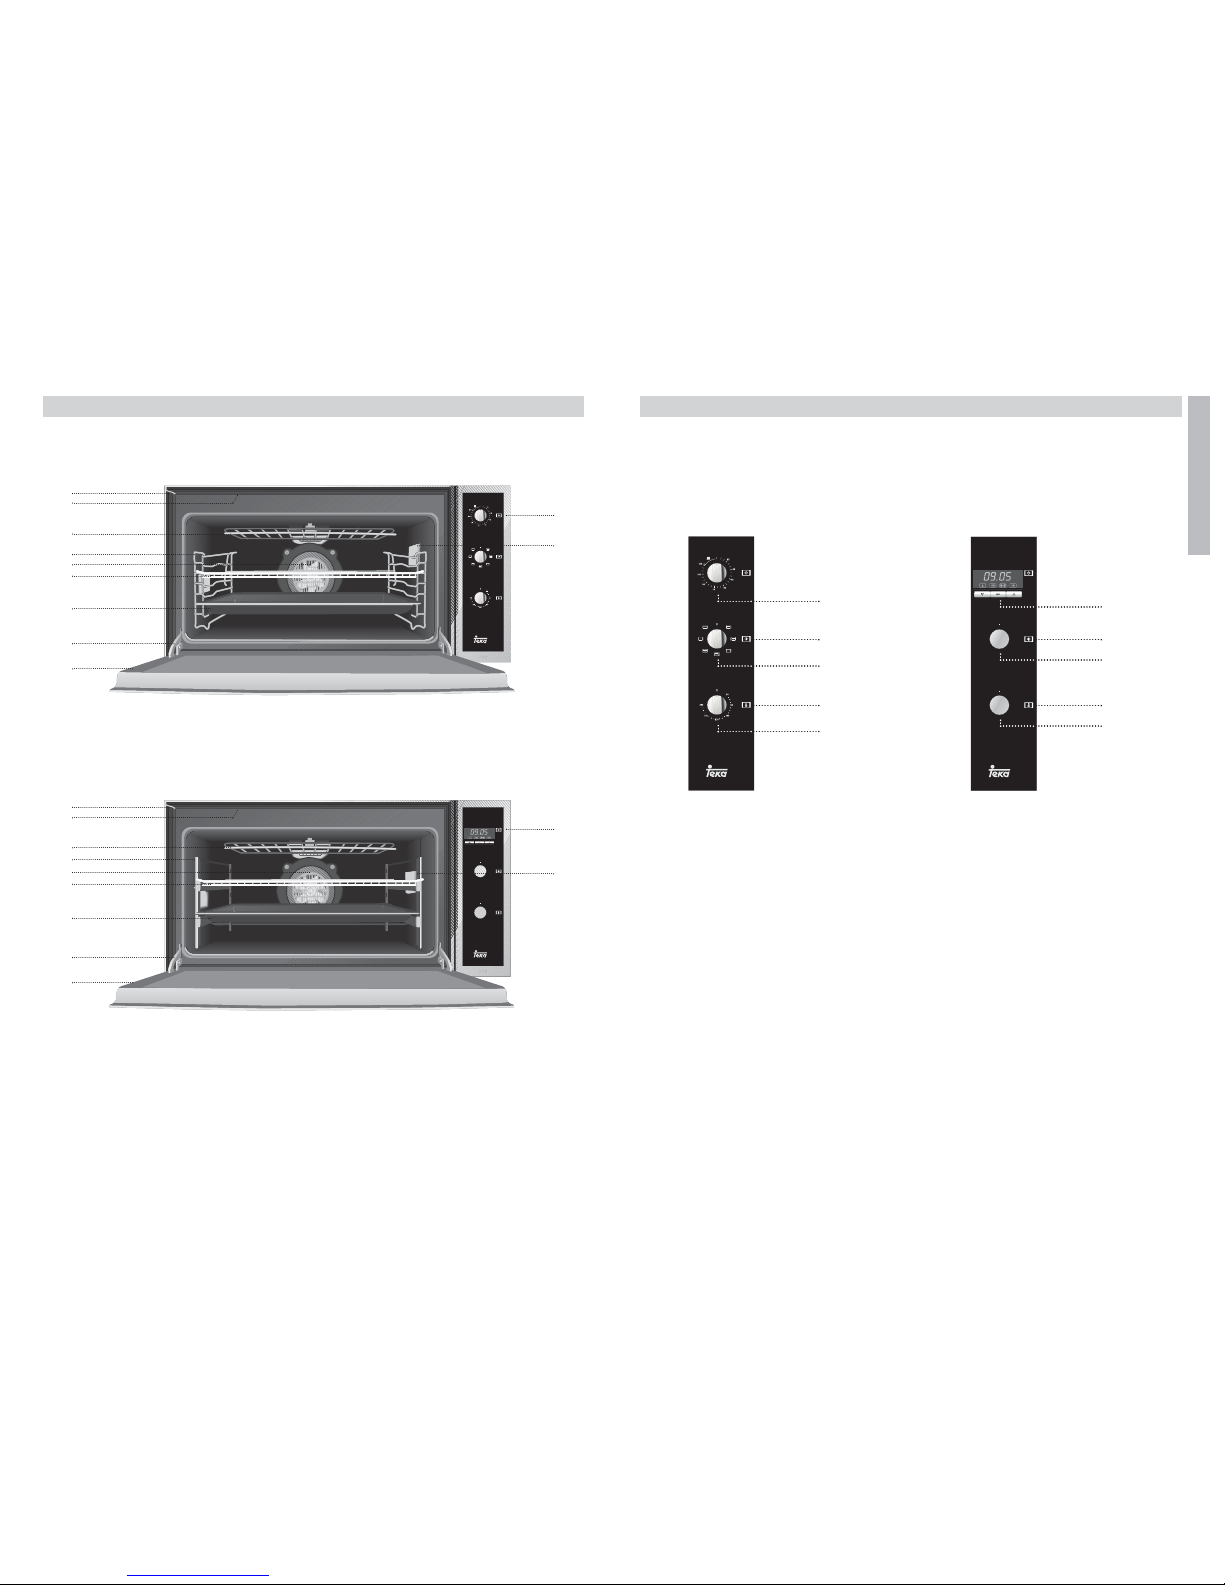
Teka HA-900 User manual

Hoja de Características
Folha de Caracteristicas
Feature List
Feuille de Caractéristiques
Datenblatt
HA-900/HA-935
HI 900
Nuestra aportación a la protección del medio-ambiente: utilizamos papel reciclado.
A nossa contribução para a protecção do ambiente: utilizamos papel reciclado.
Our contribution to enviromental protection: we use recycled paper.
Notre contribution à la protection de l’environnement : nous utilisons du papier recyclé.
Unser Beitrag zum Umweltschutz: wir verwenden umweltfreundliches Papier.
Cod.: 83172116/3172116-001
116
Clase de
eficiencia
energética,
en una escala
que abarca
de A (más
eficiente)
a G (menos
eficiente).
Función de
calentamiento.
Calentamiento
convencional.
Convección
forzada.
Consumo
de energía.
Calentamiento
convencional.
Convección
forzada.
Volumen neto
(litros).
Tipo:Pequeño
Medio
Grande
Tiempo de
cocción con
carga normal.
Calentamiento
convencional.
Convección
forzada.
Superficie de
cocción.
Ruido (dB (A)
re 1 pW).
Classe de efi-
ciência ener-
gética, numa
escala de A
(eficiente) a G
(ineficiente).
Função de
aquecimento.
Convencional.
Convecção
forçada de ar.
Consumo
de energia.
Convencional.
Convecção
forçada de ar.
Volume útil
(litros).
Tipo:Pequeno
Médio
Grande
Tempo de
cozedura da
carga-padrão.
Convencional.
Convecção
forçada de ar.
Zona de
cozedura.
Nível de ruído
dB(A) re 1 pW.
Energy
efficiency
class on a
scale of A
(more efficient)
to G (less
efficient).
Heating
function.
Conventional.
Forced air
convection.
Energy
consumption.
Conventional.
Forced air
convection.
Usable volume
(litres).
Size:Small
Medium
Large
Time to cook
standard load.
Conventional.
Forced air
convection.
Baking area.
Noise (dB (A)
re 1 pW).
Classement
selon son
efficacité
énergétique
sur une
échelle
allant de A
(économe) à G
(peu économe).
Fonction
chauffage.
Classique.
Convection
forcée.
Consommation
d´énergie.
Classique.
Convection
forcée.
Volume utile
(litres).
Type:
Faible volume
Volume moyen
Grand volume
Temps de
cuisson en
charge normale.
Classique.
Convection
forcée.
Surface de
cuisson.
Bruit (dB (A) re
1 pW).
Energieeffizienz-
klasse auf
einer Skala
von A
(niedriger
Verbrauch)
bis G (hoher
Verbrauch).
Beheizung.
Konventionelle
Beheizung.
Umluft /
Heißluft.
Energiever-
brauch.
Konventionelle
Beheizung.
Umluft /
Heißluft.
Netto-volumen
(liter).
Typ: Klein
Mittel
Groß
Kochzeit bei
Standardbela-
dung.
Konventionelle
Beheizung.
Umluft /
Heißluft.
Backfläche
Geräusch (dB
(A) re 1 pW).
B
1,15
Kwh
1,10
Kwh
69
43 min.
43 min.
1860 cm2
47
B
1,15
Kwh
1,13
Kwh
69
43 min.
46 min.
1860 cm2
47
FICHA / FICHA / BROCHURE / FICHE / DATENBLATT
Fabricante Fabricante Manufacturer Fabricant Hersteller TEKA TEKA
Modelo Modelo Model Modèle Modell
HA-900 HA-935

2
HA 935
HA 900
3
ESPAÑOL
Modelo HA-900 Modelo HA-935
Frontal de Mandos
12
4
6
4
6
3
5
3
5
1Mando temporizador minutero.
2Programador electrónico.
3Piloto conexión horno.
4Selector de funciones.
5Piloto de calentamiento. Indica la transmi-
sión de calor al alimento y se apaga al
alcanzar la temperatura seleccionada.
6Selector de temperaturas.
Descripción del Horno
HI 900
4056-01
4056-01
HI 900
Modelo HA-900
Modelo HA-935
1Fijación al mueble
2Salida de aire
de refrigeración
3Resistencia de Grill
Doble Abatible
4Soportes Bandejas/
Guías Telescópicas
5Turbina
6Parrilla
7Bandeja de Asados
8Bisagra
9Puerta
10 Frontal de mandos
11 Lámparas
1
4
5
5
6
7
8
9
3
210
11
1
4
6
7
8
9
3
210
11

5
ESPAÑOL
4
Funciones del Horno
Modelo HA-900
/ / / /
/ /
Modelo HA-935
/ / / /
/ / / /
Desconexión del horno
Convencional
Se usa en bizcochos y tartas en los que el
calor recibido debe ser uniforme y para que
consigan una textura esponjosa.
Convencional con Turbina
Adecuado para asados y pastelería. El ventila-
dor reparte de forma uniforme el calor en el
interior del horno, reduciendo el tiempo y la
temperatura de cocinado.
Grill
Gratinado y asado superficial. Permite el dora-
do de la capa exterior sin afectar al interior del
alimento. Indicado para piezas planas como
bistec, costillas, pescado, tostadas.
MaxiGrill
Permite el gratinado en mayores superficies
que en Grill, así como una mayor potencia de
gratinado, obteniendo un dorado del alimento
de forma más rápida.
MaxiGrill con Turbina
Permite el asado uniforme al mismo tiempo
que dora superficialmente. Ideal para parrilla-
das. Especial para piezas con gran volumen
como aves, caza,... Se recomienda colocar la
pieza de carne sobre la parrilla del horno y la
bandeja por debajo, para el escurrido de jugos
o grasa.
Atención
Durante el uso de la función Grill, MaxiGrill o
MaxiGrill con Turbina la puerta debe mante-
nerse cerrada.
Turbo
La turbina reparte el calor que proviene de
una resistencia situada en la parte trasera del
horno. Por la uniformidad de la temperatura
que se produce, permite cocinar en 2 alturas
al mismo tiempo.
Esta función también permite descongelar ali-
mentos, colocando el selector de temperatu-
ras en posición .
Solera
Calor sólo desde la parte inferior. Apropiado
para calentar platos o levantar masas de
repostería y afines.
Solera con Turbina
Distribuye el calor que proviene de la parte
inferior del horno. Ideal para pasteles con
relleno de mermelada o fruta, los cuales sólo
requieren un aporte de calor inferior. Siempre
es necesario un precalentamiento anterior.
Grill y Solera
Especial para asados. Puede usarse para
cualquier pieza, independiente de su tamaño.
Nota
La lámpara permanece encendida en cual-
quier función de cocinado.
Modelo HA-900
Funcionamiento Manual del Horno
1Gire el mando del temporizador hacia la
izquierda hasta la posición .
2Seleccione una temperatura y una función
de cocinado.
3Ponga los mandos en posición para apa-
gar el horno.
Funcionamiento Temporizado del Horno
Permite cocinar durante un tiempo previamen-
te seleccionado. Para ello:
1Elija la función y la temperatura de cocinado.
2Gire el mando del temporizador, en el senti-
do de las agujas del reloj, hasta la posición
“120” minutos y después gírelo en sentido
inverso para seleccionar el tiempo de coc-
ción deseado.
3Transcurrido el tiempo programado, sonará
una señal acústica y el horno dejará de
calentar.
4Ponga los mandos en posición para apa-
gar el horno.
Modelo HA-935
Puesta en Hora del Reloj Electrónico
Al conectar su horno, observará que en el reloj
aparece parpadeando la indicación 00:00.
Pulsando las teclas ó pondrá el reloj en
hora; a continuación escuchará 2 beep segui-
dos como confirmación de la hora elegida.
Si desea modificar la hora, pulse las teclas ó
hasta que parpadee la hora actual. A conti-
nuación pulse la tecla OK. Pulsando las teclas
ó podrá modificar la hora. Finalmente
escuchará 2 beep seguidos como confirmación
del cambio realizado.
Funcionamiento Manual
Tras poner el reloj en hora, su horno está listo
para cocinar. Seleccione una función de coci-
nado y una temperatura.
Durante el cocinado observará que el símbolo
se ilumina para indicar la transmisión de
calor al alimento. Este símbolo se apaga cuan-
do se alcanza la temperatura seleccionada.
Para apagar el horno, ponga los mandos en
posición .
Funciones del Reloj Electrónico
Avisador: Genera una señal acústica al cabo
del tiempo, para ello no es necesario que el
horno esté cocinando.
Duración del Cocinado: Permite cocinar duran-
te un tiempo seleccionado, a continuación el
horno se apagará de forma automática.
Hora de Finalización del Cocinado: Permite
cocinar hasta una hora establecida, a conti-
nuación el horno se apagará de forma auto-
mática.
Duración y Fin del Cocinado: Permite progra-
mar la duración y la hora de finalización del
cocinado. Con esta función el horno se pondrá
en marcha de forma automática a la hora
necesaria para cocinar durante el tiempo
seleccionado (Duración) y finalizando de forma
automática a la hora que le hayamos indicado
(Fin del Cocinado).
Programación del Avisador
1Pulse la tecla hasta que el símbolo
se ilumine. A continuación pulse la tecla OK.
2Seleccione el tiempo tras el cual desea que
el reloj avise, pulsando las teclas ó .
Manejo del Horno

7
ESPAÑOL
6
3Posteriormente sonarán 2 beep seguidos,
se mostrará el tiempo restante hasta que el
reloj avise y el símbolo permanecerá par-
padeando.
Si desea modificar el tiempo seleccionado, pulse
la tecla OK de forma prolongada durante varios
segundos hasta que aparezca la hora actual.
Pulse la tecla hasta que el símbolo se ilu-
mine, pulse la tecla OK, por último pulsando las
teclas ó podrá modificarlo.
4Transcurrido el tiempo, sonará una señal
acústica y el símbolo empezará a parpa-
dear más deprisa.
5Pulse cualquier tecla para detener la señal
acústica.
Programación de la Duración del Cocinado
1Pulse las teclas ó hasta que el sím-
bolo se ilumine. A continuación pulse
la tecla .
2Seleccione la duración, pulsando las teclas
ó.
3Posteriormente sonarán 2 beep seguidos,
se mostrará el tiempo restante hasta la fina-
lización del cocinado y el símbolo per-
manecerá iluminado
Si desea modificar el tiempo seleccionado,
pulse las teclas ó hasta que aparezca
la hora actual y el símbolo parpadee. A
continuación pulse la tecla OK, por último pul-
sando las teclas ó podrá modificarlo.
4Seleccione una función y una temperatura
de cocinado.
5Transcurrido el tiempo sonará una señal
acústica, aparecerá End en la pantalla y el
símbolo parpadeará.
6Pulse cualquier tecla para detener la señal
acústica, encendiéndose el horno de nuevo.
7Ponga los mandos en posición para apa-
gar el horno.
Programación de la Hora de Finalización del
Cocinado
1Pulse las teclas ó hasta que el símbo-
lo se ilumine. A continuación pulse la
tecla OK.
2Seleccione la hora de finalización del coci-
nado, pulsando las teclas ó .
3Posteriormente sonarán 2 beep seguidos,
se mostrará el tiempo restante hasta la fina-
lización del cocinado y el símbolo per-
manecerá iluminado.
Si desea modificar el tiempo seleccionado,
pulse las teclas ó hasta que aparezca
la hora actual y el símbolo parpadee. A
continuación pulse la tecla OK, por último pul-
sando las teclas ó podrá modificarlo.
4Seleccione una función y una temperatura
de cocinado.
5Transcurrido el tiempo sonará una señal
acústica, aparecerá End en la pantalla y el
símbolo parpadeará.
6Pulse cualquier tecla para detener la señal
acústica, encendiéndose el horno de nuevo.
7Ponga los mandos en posición para apa-
gar el horno.
Programación de la Duración y Fin del
Cocinado
1Pulse las teclas ó hasta que el
símbolo se ilumine. A continuación
pulse la tecla OK.
2Seleccione la duración, pulsando las
teclas ó .
3Posteriormente sonarán 2 beep seguidos,
se mostrará el tiempo restante hasta la
finalización del cocinado y el símbolo
permanecerá iluminado.
4Pulse las teclas ó hasta que el
símbolo se ilumine. A continuación
pulse la tecla OK.
5Seleccione la hora de finalización del coci-
nado, pulsando las teclas ó .
6Posteriormente sonarán 2 beep seguidos,
aparecerá Auto en la pantalla y los símbo-
los y permanecerán iluminados.
Su reloj está programado, quedando el
horno desconectado.
Si desea modificar la duración, pulse las
teclas ó hasta que aparezca la hora
actual y el símbolo parpadee. Si desea
modificar la hora de finalización, pulse las
teclas ó hasta que aparezca la hora
actual y el símbolo parpadee.
A continuación pulse la tecla OK, por último
pulsando las teclas ó podrá modificar el
valor seleccionado.
7Seleccione una función y una temperatura
de cocinado.
8Cuando se alcance la hora de comienzo, el
horno se pondrá en marcha y realizará el
cocinado, mostrando el tiempo restante en
la pantalla.
9Alcanzada la hora de finalización, el horno
se desconectará, sonará una señal acústi-
ca, aparecerá End en la pantalla y los sím-
bolos y parpadearán.
10 Pulse cualquier tecla para detener la señal
acústica, encendiéndose su horno de
nuevo.
11 Ponga los mandos en posición para
apagar el horno.
Atención
En caso de un corte de suministro eléctrico,
se borrará toda la programación de su reloj
electrónico y aparecerá parpadeando la indica-
ción 00:00 en el reloj. Deberá ponerlo en hora
y programarlo de nuevo.

9
PORTUGUÉS
8
HA 935
HA 900
Modelo HA-900 Modelo HA-935
Painel de Comandos
12
4
6
4
6
3
5
3
5
1Comando temporizador de minutos.
2Relógio electrónico.
3Piloto de funcionamento do forno.
4Selector de funções.
5Piloto de aquecimento. Indica a transmis-
são de calor ao alimento e desliga-se quan-
do o forno alcança a temperatura seleccio-
nada.
6Selector de temperatura.
Descriçao do Aparelho
HI 900
4056-01
4056-01
HI 900
Modelo HA-900
Modelo HA-935
1Fixação ao Móvel
2Saída de ar
da Refrigeração
3Resistência do Grill
4Suporte Cromado/
Guía Telescópica
5Turbina
6Grelha
7Bandeja para Assados
8Dobradiça
9Porta
10 Painel de Comandos
11 Lâmpadas
1
4
5
5
6
7
8
9
3
210
11
1
4
6
7
8
9
3
210
11

11
PORTUGUÉS
10
Funções do Forno
Modelo HA-900
/ / / /
/ /
Modelo HA-935
/ / / /
/ / / /
Desconexão do forno
Convencional
Usado em bolos e tartes nos quais o calor
recebido deve ser uniforme para que adquiram
uma textura esponjosa.
Convencional com Turbina
Adequado para assados e pastelaria. O venti-
lador reparte de forma uniforme o calor no
interior do forno.
Grill
Gratina e assa superficialmente. Permite alou-
rar a camada exterior sem afectar o interior
do alimento. Indicado para pedaços planos
como filetes, costelas, peixe, tostas.
MaxiGrill
Permite gratinar superfícies maiores que com
o Grill, bem como gratinar com maior potência,
alourando assim o alimento de forma mais
rápida.
MaxiGrill com Turbina
Permite assar de modo uniforme ao mesmo
tempo que aloura superficialmente. Ideal para
churrascos. Especial para pedaços com grande
volume como aves, caça,... Recomenda-se
colocar a porção de carne sobre a grelha do
forno com a bandeja por baixo, para recolher
os molhos ou gorduras.
Atenção
Durante o uso da função Grill, MaxiGrill ou
MaxiGrill com Turbina deve-se manter a porta
fechada.
Turbo
A turbina reparte o calor que provém de uma
resistência situada na parte de atrás do
forno. Devido à uniformidade da temperatura
produzida permite cozinhar em 2 alturas ao
mesmo tempo.
Esta função permite a descongelação leve do
alimentos. Para sua utilização coloque o
selector de temperatura na posição .
Resistência Inferior
Calor somente na parte inferior. Apropriado
para aquecer pratos ou levantar massas de
confeitaria e semelhantes.
Resistência Inferior com Turbina
Distribui o calor que provém da parte inferior
do forno. Ideal para pastéis com recheio de
geleia ou fruta, os quais só necessitam de
calor na parte inferior. É sempre necessario
realizar um pré-aquecimento.
Grill e Resistência Inferior
Especial para assados. Pode ser usado para
qualquer porção, independente do seu tamanho.
Nota
A lâmpada permanece acesa em qualquer
função de cozinhado.
Modelo HA-900
Funcionamento Manual do Forno
1Rode o comando do temporizador para a
esquerda até à posição .
2Seleccione uma temperatura e uma função
de cozinhado.
3Coloque os comandos na posição para
desligar o forno.
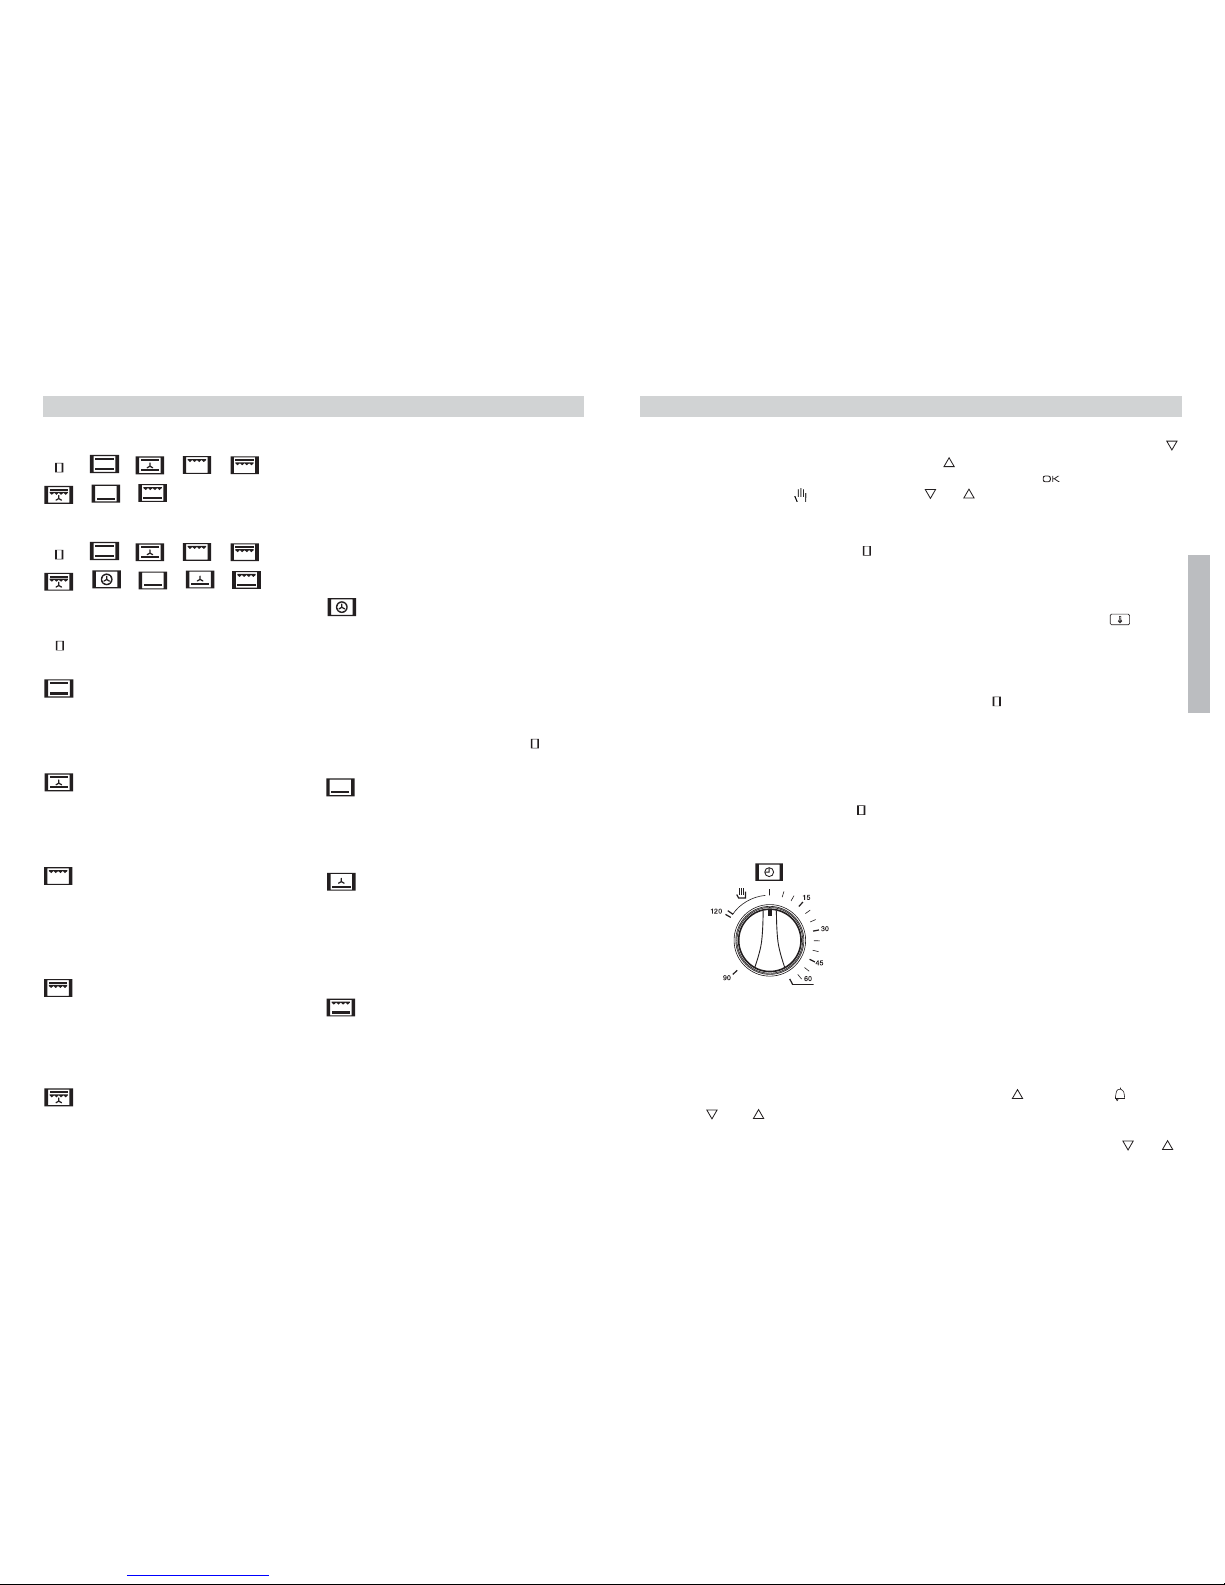
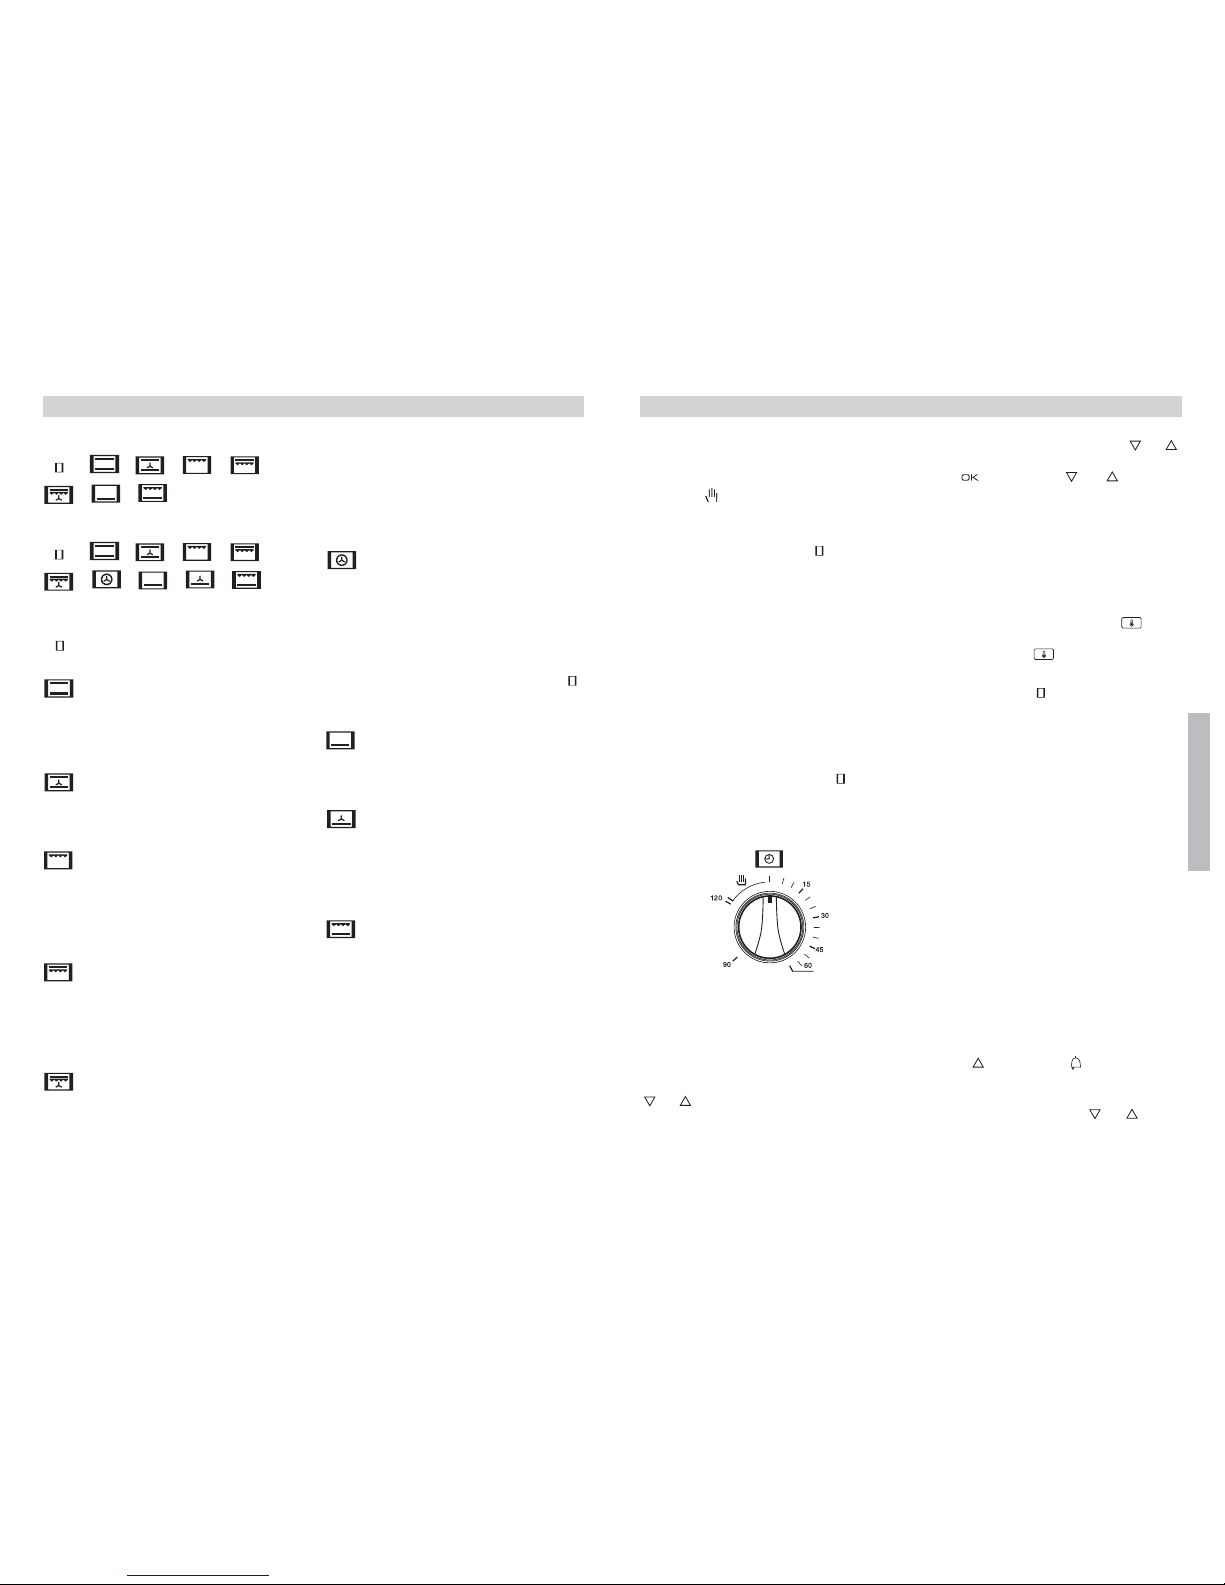
Funcionamento Temporizado do Forno
Permite cozinhar durante um tempo previa-
mente seleccionado. Para tal:
1Escolha a função e a temperatura de cozin-
hado.
2Rode o comando do temporizador no sentido
dos ponteiros do relógio, até à posição
“120” minutos e depois rode-o no sentido
inverso para seleccionar o tempo de cozin-
hado pretendido.
3Decorrido o tempo programado, ouvir-se-á
um sinal acústico e o forno deixará de
aquecer.
4Coloque os comandos na posição para
desligar o forno.
Modelo HA-935
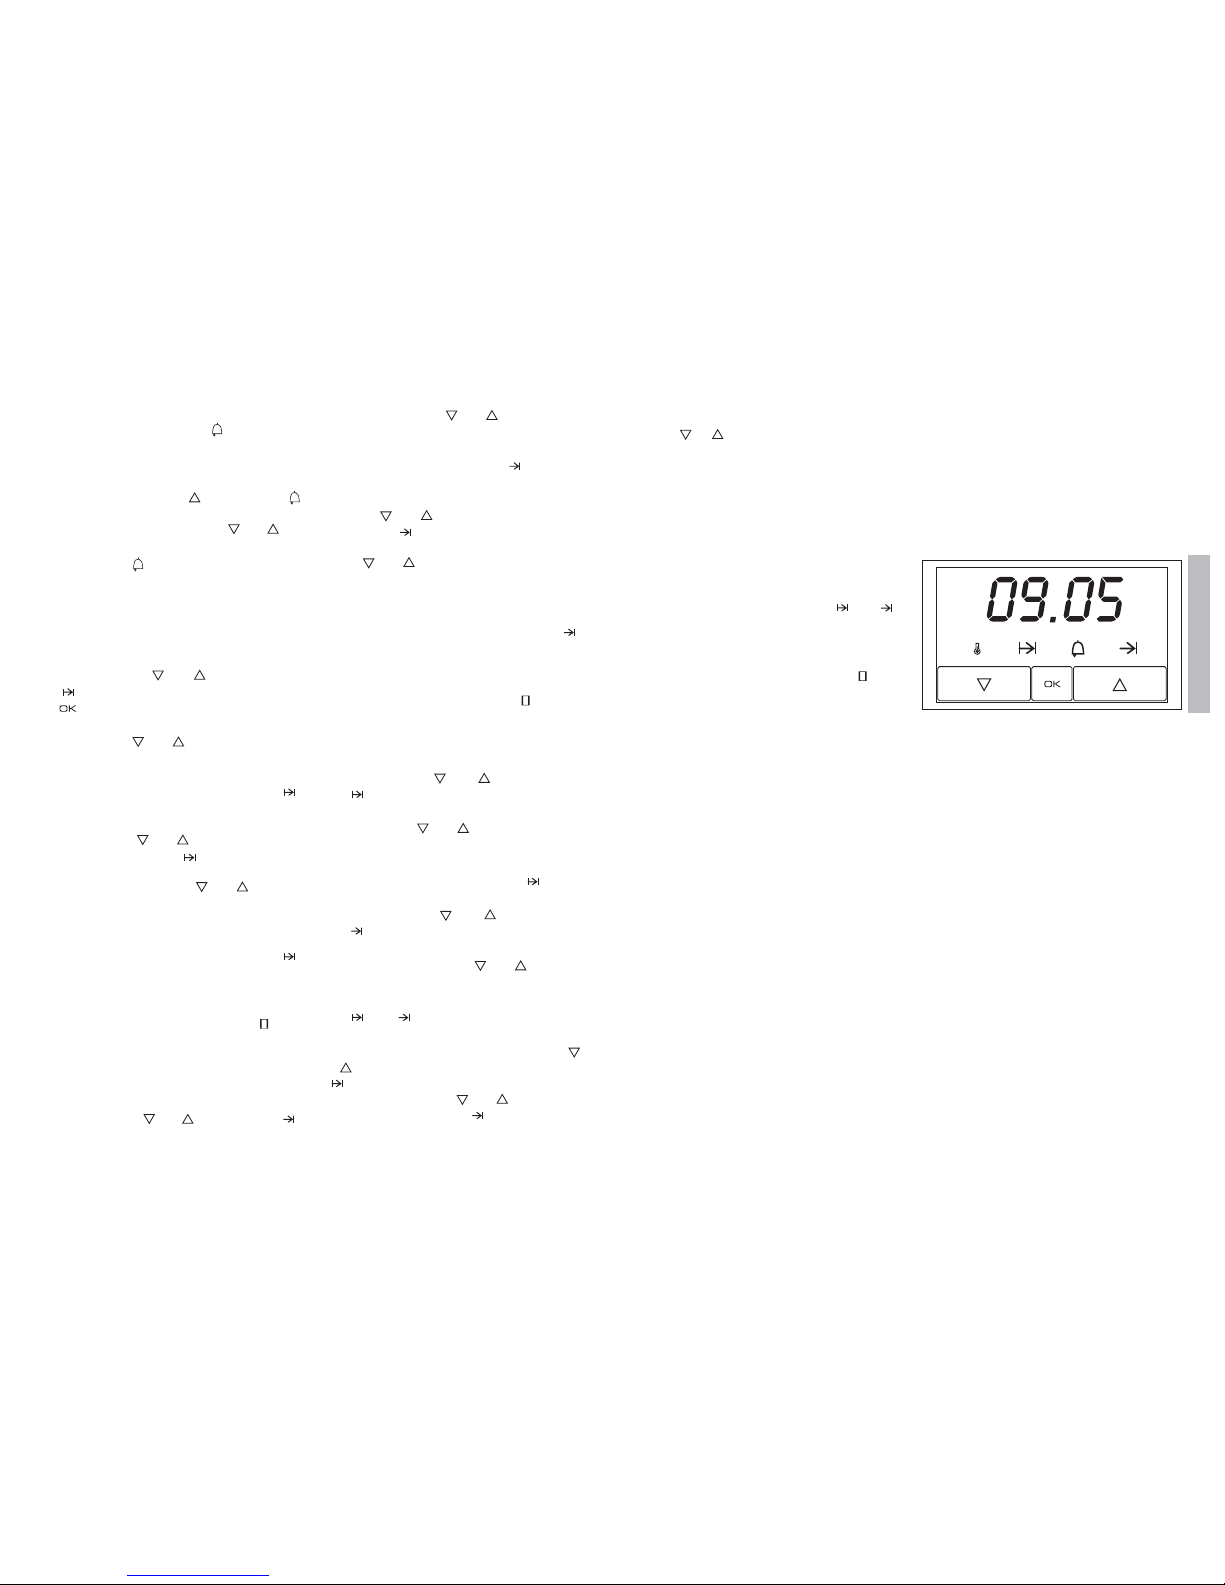
Acerto do Relógio Electrónico
Ao ligar o forno, observará que, no relógio,
aparece a piscar a indicação 00:00. Premindo
as teclas ou acertará o relógio; a
seguir ouvirá 2 beeps seguidos como confir-
mação da hora seleccionada.
Se desejar alterar a hora, prima as teclas
ou até a hora actual começar a piscar. A
seguir prima a tecla . Premindo as teclas
ou poderá modificar a hora. Finalmente,
ouvirá 2 beeps seguidos como confirmação da
alteração realizada.
Funcionamento Manual
Depois de acertar o relógio, o forno está pron-
to para cozinhar. Seleccione uma função de
cozinhado e uma temperatura.
Durante o cozinhado, o símbolo ilumina-
se indicando que o forno está a transmitir
calor ao alimento, e desliga-se quando é atin-
gida a temperatura seleccionada.
Para desligar o forno, coloque os comandos
na posição .
Funções do Relógio Electrónico
Avisador: Gera um sinal acústico ao fim de
algum tempo, para tal, não é necessário que o
forno esteja a cozinhar.
Duração do Cozinhado: Permite cozinhar
durante um tempo seleccionado; de seguida,
o forno desligar-se-á de forma automática.
Hora de Finalização do Cozinhado: Permite
cozinhar até a uma hora estabelecida, de
seguida, o forno desligar-se-á de forma auto-
mática.
Duração e Fim do Cozinhado: Permite progra-
mar a duração e a hora de finalização do cozin-
hado. Com esta função, o forno colocar-se-á
em funcionamento de forma automática à
hora necessária para cozinhar durante o
tempo seleccionado (Duração), finalizando de
forma automática à hora anteriormente indica-
da. (Fim do Cozinhado).
Programação do avisador
1Prima a tecla até o símbolo se ilumi-
nar. De seguida, prima a tecla OK.
2Seleccione o tempo após o qual deseja que o
relógio avise, premindo as teclas ou .
Uso do Forno

13
PORTUGUÉS
12
3Posteriormente ouvirá 2 beeps consecuti-
vos, e será mostrado o tempo restante para
o relógio avisar, o símbolo permanecerá
a piscar.
Se desejar alterar o tempo seleccionado, prima a
tecla OK de forma prolongada até aparecer a
hora actual. Prima a tecla até o símbolo
se iluminar e prima a tecla OK; finalmente, pode-
rá modificá-lo premindo as teclas ou .
4Decorrido o tempo, soará um sinal acústico
e o símbolo começará a piscar rapida-
mente.
5Prima qualquer tecla para cessar o sinal
acústico.
Programação da Duração do Cozinhado
1Prima as teclas ou até o símbolo
se iluminar. De seguida, prima a tecla
.
2Seleccione a duração do cozinhado, premin-
do as teclas ou .
3Posteriormente ouvirá 2 beeps consecuti-
vos, será mostrado o tempo restante até à
finalização do cozinhado e o símbolo
permanecerá iluminado.
Se desejar alterar o tempo seleccionado,
prima as teclas ou até que apareça a
hora actual e o símbolo pisque. De segui-
da, prima a tecla OK; finalmente, poderá modi-
ficá-lo premindo as teclas ou .
4Seleccione uma função e uma temperatura
de cozinhado.
5Decorrido o tempo soará um sinal acústico,
aparecerá End no display e o símbolo
piscará.
6Prima qualquer tecla para cessar o sinal
acústico, o forno liga novamente.
7Coloque os comandos na posição para
desligar o forno.
Programação da Hora de Finalização do
Cozinhado
1Prima as teclas ou até o símbolo
se iluminar. De seguida, prima a tecla OK.
2Seleccione a hora de finalização do cozinhado,
premindo as teclas ou .
3Posteriormente ouvirá 2 beeps consecutivos,
será mostrado o tempo restante até à finaliza-
ção do cozinhado e o símbolo permane-
cerá iluminado.
Se desejar alterar o tempo seleccionado, prima
as teclas ou até aparecer a hora actual
e o símbolo piscar. A seguir prima a tecla
OK; finalmente, poderá modificá-lo premindo as
teclas ou .
4Seleccione uma função e uma temperatura de
cozinhado.
5Decorrido o tempo soará um sinal acústico,
aparecerá End no display e o símbolo
piscará.
6Prima qualquer tecla para cessar o sinal acús-
tico, o forno liga novamente.
7Coloque os comandos na posição para des-
ligar o forno.
Programação da Duração e Fim do Cozinhado
1Prima as teclas ou até o símbolo
se iluminar. A seguir prima a tecla OK.
2Seleccione a duração do cozinhado, premin-
do as teclas ou .
3Posteriormente ouvirá 2 beeps seguidos,
será mostrado o tempo restante até à finali-
zação do cozinhado e o símbolo perma-
necerá iluminado.
4Prima as teclas ou até o símbolo
se iluminar. A seguir prima a tecla OK.
5Seleccione a hora de finalização do cozinha-
do, premindo as teclas ou .
6Posteriormente ouvirá 2 beeps seguidos,
aparecerá Auto no display e os símbolos
e permanecerão iluminados. O
relógio está programado e o forno desliga.
Se desejar alterar a duração, prima as teclas
ou até aparecer a hora actual e o símbolo
piscar. Se desejar modificar a hora de fina-
lização, prima as teclas ou até aparecer
a hora actual e o símbolo piscar.
A seguir prima a tecla OK; por último, poderá
modificar o valor seleccionado premindo as
teclas ou .
7Seleccione uma função e uma temperatura
de cozinhado.
8Quando se atinge a hora de início, o forno
entrará em funcionamento e efectuará o
cozinhado, mostrando o tempo restante no
display.
9Atingida a hora de finalização, o forno desli-
gar-se-á, soará um sinal acústico, aparecerá
End no display e os símbolos e
piscarão.
10 Prima qualquer tecla para cessar o sinal
acústico, o forno liga novamente.
11 Coloque os comandos na posição para
desligar o forno.
Atenção
No caso de um corte de fornecimento eléctri-
co, será eliminada toda a programação do
relógio electrónico e aparecerá a indicação
00:00 a piscar no relógio. Deverá acertá-lo e
programá-lo de novo.

15
ENGLISH
14
HA 935
HA 900
Model HA-900 Model HA-935
Control Panel
12
4
6
4
6
3
5
3
5
1Minute timing switch.
2Electronic timer.
3Oven pilot light.
4Function selector.
5Heating indicator light. Indicates that heat is
being passed to the food and it goes out
when the set temperature is reached.
6Temperature selector.
Oven Description
HI 900
4056-01
4056-01
HI 900
Model HA-900
Model HA-935
1Fixing to Unit
2Air Outlet
3Fold-down Grill element
4Chromed Support/
Telescopic Guide
5Fan
6Grid
7Roasting Tray
8Hinge
9Door
10 Control Panel
11 Light
1
4
5
5
6
7
8
9
3
210
11
1
4
6
7
8
9
3
210
11

17
ENGLISH
16
Oven Functions
Model HA-900
/ / / /
/ /
Model HA-935
/ / / /
/ / / /
Switch off oven
Conventional
It is used for sponges and cakes where the
heat received must be uniform to achieve a
spongy texture.
Conventional with fan
Appropriate for roasts and cakes. The fan
spreads the heat uniformly inside the oven.
Grill
For preparing dishes with superficial roasting.
It allows the outer layer to be browned without
affecting the inside of the food. Ideal for flat
food, such as steaks, ribs, fish, toast.
MaxiGrill
Allows greater surfaces to be prepared, than
with the grill, together with higher power
reducing the time required for browning of the
food.
MaxiGrill with fan
Allows uniform roasting at the same time as
surface browning. Ideal for grills. Special for
large volume pieces, such as poultry, game etc.
It is recommended to put the item on a rack with
a tray beneath to collect the stock and juices.
Caution
While using the Grill, MaxiGrill or MaxiGrill with
fan, the door must be kept closed.
Turbo
The fan distributes the heat produced by an
element located at the rear of the oven. Due
to the uniform heat distribution, it allows
roasting and baking to take place at two
heights at the same time.
This cooking mode allows defrosting of food.
To do this, set the temperature selector to
position.
Lower element
Heats only from beneath. Suitable for heating
dishes and raising pastry and similar.
Lower element with fan
It distributes the heat from the lower part of
the oven and is ideal for cakes with jam or
fruit filling, which only require heating from
beneath. Pre-heating is always necessary.
Grill and Lower element
Special for roasts. It can be used for any
piece, whatever its size.
Note
The pilot light remains on in any cooking
function.
Model HA-900
Manual use of the oven
1Turn the timing switch to the left to the
position .
2Select a temperature and a cooking
function.
3Set the controls in position to switch off
the oven.
Using the timer switch
Allows cooking during a pre-established time.
To do this,
1Select the function and the cooking
temperature.
2Turn the timer control clockwise as far as
the position “120 minutes” and then turn it
backwards to the required cooking period.
3When the time has finished, there will be an
acoustic signal and the oven will stop
heating.
4Set the controls to the position to switch
off the oven.
Model HA-935
Setting the time on the Electronic Clock
When the oven is connected to the power supply,
the indication 00:00 flash on the display. Press
or to set the time on the clock. The clock
beeps twice to confirm the selected time.
If you wish to modify the time, press or
until the current time flash on the screen.
Press . Then press or to modify
the time. The clock beeps twice to confirm the
modification.
Manual Operation
The oven is ready to be used when the clock
has been set. Select a cooking function and a
temperature.
When you begin cooking, symbol lights
up to indicate that the oven is heating the con-
tents; the symbol goes out when the
selected temperature is reached.
Set the controls to to turn the oven off.
Functions of the Electronic Clock
Alarm: Creates an alarm signal when the peri-
od of time finishes; the oven does not need to
be in use in order to use this function.
Cooking Time: To cook for a selected length of
time; the oven turns itself off automatically
when the time finishes.
End Cooking Time: To cook until a set time;
the oven turns itself off automatically when
the time finishes.
Cooking time and End Cooking Time: To cook
for a selected length of time and end at a set
time. When this function is set, the oven
comes on automatically at the time required in
order to cook for the set length of time
(Cooking time) and end automatically at the
indicated time (End Cooking Time).
Programming the Alarm
1Press until symbol lights up. Press
OK.
2Set the period of time after which you wish the
alarm to sound by pressing or .
Use of the Oven

19
ENGLISH
18
3The clock beeps twice, the countdown to the
alarm is displayed and symbol flashes.
If you wish to modify the time set, press OK
and keep it pressing in until the current time
appears. Press until symbol lights up
permanently and press OK. Then use and
to change the set time.
4When the set period of time comes to an end,
the alarm sounds and symbol starts to
flash faster.
5Press any button to turn the alarm off.
Setting the Cooking Time
1Press or until symbol lights up.
Press .
2Select the period of time you wish to cook for
by pressing or .
3The clock beeps twice, the countdown to the
end of the cooking time is displayed and
symbol lights up permanently.
If you wish to modify the time set, press or
until the current time appears and symbol
starts to flash. Press OK. The time can
then be adjusted by pressing or .
4Select a cooking function and a temperature.
5When the cooking time comes to an end, the
alarm sounds, End is displayed on the screen
and symbol starts to flash.
6Press any button to stop the alarm. The oven
turns itself back on again.
7Set the controls to to turn the oven off.
Setting the End Cooking Time
1Press or until symbol lights up.
Press .
2Select the time you wish the cooking process
to finish at by pressing or .
3The clock beeps twice, the countdown to the
end of the cooking time is displayed and
symbol lights up permanently.
If you wish to modify the time set, press or
until the current time appears and symbol
starts to flash. Press OK. The time can
then be adjusted by pressing or .
4Select a cooking function and a temperature.
5When the cooking time comes to an end, the
alarm sounds, End is displayed on the scre-
en and symbol starts to flash.
6Press any button to stop the alarm. The oven
turns itself back on again.
7Set the controls to to turn the oven off.
Setting the Cooking Time and the End
Cooking Time
1Press or until symbol lights up.
Press OK.
2Select the period of time you wish to cook for
by pressing or .
3The clock beeps twice, the countdown to the
end of the cooking time is displayed and
symbol lights up permanently.
4Press or until symbol lights up.
Press OK.
5Select the time you wish the cooking process
to finish at by pressing or .
6The clock beeps twice, Auto is displayed on
the screen and symbols and light
up permanently. The clock is set and the
oven remains off.
If you wish to modify the cooking time, press
or until the current time appears and symbol
starts to flash. If you wish to modify the end
cooking time, press or until the current
time appears and symbol starts to flash.
Press OK. The time selected can then be adjus-
ted by pressing or .
7Select a cooking function and a temperature.
8When the time to start cooking is reached,
the oven starts up and the remaining time is
displayed on the screen.
9When the time to end cooking is reached,
the oven turns itself off, the alarm sounds,
End is displayed on the screen and symbols
and start to flash.
10 Press any button to stop the alarm. The oven
turns itself back on again.
11 Set the controls to to turn the oven off.
Important
In the event of a power cut, all the electronic
clock settings are deleted and the indication
00:00 flashes on the display. It is necessary
to set the time and programme the clock
again.

21
FRANÇAIS
20
HA 935
HA 900
Modèle HA-900 Modèle HA-935
Panneau Frontal de Commande
12
4
6
4
6
3
5
3
5
1Commande de la minuterie.
2Horloge électronique.
3Voyant lumineux de connection du four.
4Sélecteur de fonctions.
5Voyant lumineux de chauffage. Il indique
que la chaleur est transmise à l'aliment et
s'éteint quand la température choisie est
atteinte.
6Sélecteur de température.
Description de L’Appareil
HI 900
4056-01
4056-01
HI 900
Modèle HA-900
Modèle HA-935
1Fixation au Meuble
2Sortie de l’air
de Réfrigération
3Résistance du Grill
Abattable
4Support Chromé/
Guide Télescopique
5Turbine
6Grille
7Plateau pour Rôtis
8Charnière
9Porte
10 Panneau Frontal de
Commande
11 Lampe
1
4
5
5
6
7
8
9
3
210
11
1
4
6
7
8
9
3
210
11

23
FRANÇAIS
22
Fonctions du Four
Modèle HA-900
/ / / /
/ /
Modèle HA-935
/ / / /
/ / / /
Arrêt du four
Conventionnel
Utiliser pour les gâteaux et les tartes qui
doivent recevoir une chaleur uniforme et pour
obtenir une texture moelleuse.
Conventionnel avec turbine
Recommandé pour les rôtis et la pâtisserie. Le
ventilateur répartit la chaleur de façon
uniforme à l'intérieur du four.
Grill
Pour gratiner et rôtir superficiellement. Permet
de dorer la couche extérieure sans affecter
l'intérieur de l'aliment. Indiqué pour les pièces
plates telles que les beefsteaks, les côtelettes,
les poissons, les toasts.
MaxiGrill
Permet de gratiner des surfaces plus grandes
qu'avec le Grill avec une puissance pour
gratiner supérieure, qui permet ainsi de dorer
l'aliment de façon plus rapide.
MaxiGrill avec turbine
Permet en même temps de rôtir de façon
uniforme et de dorer superficiellement. Idéal
pour les grillades. Spécial pour les pièces
volumineuses telles que les volailles, le gibier.
Il est recommandé de placer la pièce de
viande sur la grille du four et la lèchefrite en-
dessous pour recueillir les jus de cuisson ou
la graisse.
Attention
Quand on utilise la fonction Grill, MaxiGrill ou
MaxiGrill avec Turbine, la porte doit rester
fermée.
Turbo
La turbine répartit la chaleur qui provient
d’une résistance située à la partie arrière du
four. Grâce à l’uniformité de la chaleur
produite, on peut cuisiner à 2 hauteurs en
même temps.
Cette function permet de décongeler
doucement des mets. Pour l’utilisation, réglez
le sélecteur des temperatures sur la
position .
Résistance inférieure
La chaleur provient seulement de la partie
inférieure. Approprié pour réchauffer des plats
ou faire lever des pâtes pour pâtisseries et
analogues.
Résistance inférieure avec Turbine
Elle distribue la chaleur qui provient de la
partie inférieure du four. Idéal pour les
gâteaux fourrés avec de la confiture ou des
fruits, qui requièrent seulement un apport de
chaleur inférieur. Il est toujours nécessaire de
préchauffer.
Grill et résistance inférieure
Spécial pour les rôtis. Peut être utilisé pour
toutes sortes de pièces, indépendamment de
leur volume.
Attention
La lampe reste allumée pendant toutes les
fonctions de cuisson.
Modèle HA-900
Fonctionnement Manuel du Four
1Tourner la commande de la minuterie vers la
gauche jusqu'à la position .
2Sélectionner une température et une
fonction de cuisson.
3Mettre les commandes sur la position
pour éteindre le four.
Fonctionnement temporisé du four
Cela permet de cuisiner pendant un temps
préalablement sélectionné. Pour cela:
1Choisir la fonction et la température de
cuisson.
2Tourner la commande de la minuterie dans
le sens des aiguilles d'une montre jusqu'à
la position "120" minutes et la tourner
ensuite en sens inverse pour sélectionner
le temps de cuisson désiré.
3Une fois passé le temps programmé, un
signal acoustique se fera entendre et le
four arrêtera de chauffer.
4Mettre les commandes sur la position
pour éteindre le four.
Modèle HA-935
Mise à l’heure de l’horloge électronique
Lorsque vous branchez votre four, vous obser-
vez que l’indication 00:00 clignotent dans
l’horloge. Mettez l’horloge à l’heure à l’aide
des touches ou . Vous entendrez 2 bips
consécutifs comme confirmation de la mise à
l’heure.
Si vous souhaitez modifier l’heure, appuyez
sur les touches ou jusqu’à ce que
l’heure actuelle se mettent à clignoter.
Appuyez ensuite sur la touche . À l’aide
des touches ou , vous pouvez alors
modifier l’heure. Vous entendrez 2 bips consé-
cutifs comme confirmation de la modification
réalisée.
Fonctionnement manuel
Une fois l’horloge mise à l’heure, votre four
est prêt à fonctionner. Sélectionnez une fonc-
tion de cuisson et une température.
Lors de la cuisson, le symbole s´allume
indiquant que le four est en train de transmettre
de la chaleur à l’aliment et s´éteint lorsque la
température sélectionnée est atteinte.
Pour éteindre le four, mettez les commandes
sur la position .
Fonctions de l’horloge électronique
Avertisseur: génère un signal acoustique à un
moment donné; pour ce faire, il n’est pas
nécessaire que le four soit allumé.
Durée de cuisson: permet de cuire pendant
une durée sélectionnée, le four s’éteignant de
façon automatique.
Heure de fin de cuisson: permet de cuire jus-
qu’à une heure définie, le four s’éteignant de
façon automatique.
Durée et fin de cuisson: permet de program-
mer la durée et l’heure de fin de cuisson. Avec
cette fonction, le four se mettra en marche de
façon automatique à l’heure indiquée pour
cuire pendant la durée sélectionnée (Durée) et
s’éteindre de façon automatique à l’heure indi-
quée (Fin de cuisson).
Programmation de l'avertisseur
1Appuyez sur la touche jusqu'à ce que le
symbole s'éclaire. Ensuite appuyez sur
la touche OK.
2Sélectionnez le temps au terme duquel vous
souhaitez que l'horloge avertisse, en appu-
yant sur les touches ou .
Maniement du Four

25
FRANÇAIS
24
3Postérieurement, 2 beep de suite sonne-
ront, le temps restant jusqu'à ce que l'hor-
loge avertisse apparaîtra et le symbole
clignotera.
Si vous souhaitez modifier le temps sélection-
né, appuyez sur la touche OK de façon prolon-
gée jusqu'à ce que l’heure actuelle apparais-
se. Appuyez sur la touche jusqu'à ce que
le symbole s'éclaire et
appuyez sur la touche OK, finalement en appu-
yant sur les touches ou vous pourrez
le modifier.
4Une fois le temps écoulé, un signal acousti-
que sonnera et le symbole commencera
à clignoter plus vite.
5Appuyez sur n'importe quelle touche pour
arrêter le signal acoustique.
Programmation de la Durée de la Cuisson
1Appuyez sur les touches ou jusqu'à
ce que le symbole s'allume. Appuyez
sur la touche .
2Sélectionnez la durée de la cuisson, en
appuyant sur les touches ou .
3Postérieurement, 2 beep de suite sonneront,
le temps restant jusqu'à la fin de la cuisson
apparaîtra et le symbole restera allumé.
Si vous souhaitez modifier le temps sélection-
né, appuyez sur les touches ou jusqu'à
ce que l’heure actuelle apparaisse et que le
symbole clignote. Ensuite appuyez sur la
touche OK, et finalement en appuyant sur les
touches ou vous pourrez le modifier.
4Sélectionnez une fonction et une températu-
re de cuisson.
5Une fois le temps écoulé, un signal acousti-
que sonnera, End apparaîtra sur l'écran et le
symbole clignotera.
6Appuyez sur n'importe quelle touche pour
arrêter le signal acoustique, le four s'allu-
mant alors à nouveau.
7Mettez les commandes sur la position
pour éteindre le four.
Programmation de l'Heure de Finalisation de
la Cuisson
1Appuyez sur les touches ou jusqu'à
ce que le symbole s'allume. Ensuite
appuyez sur la touche OK.
2Sélectionnez l'heure de finalisation de la cuis-
son, en appuyant sur les touches ou .
3Postérieurement, 2 beep de suite sonne-
ront, le temps restant jusqu'à la finalisation
de la cuisson apparaîtra et le symbole
restera allumé.
Si vous souhaitez modifier le temps sélection-
né, appuyez sur les touches ou jusqu'à
ce que l’heure actuelle apparaisse et que le
symbole clignote. Ensuite appuyez sur la
touche OK, et finalement en appuyant sur les
touches ou vous pourrez le modifier.
4Sélectionnez une fonction et une températu-
re de cuisson.
5Une fois le temps écoulé, un signal acousti-
que sonnera, End apparaîtra sur l'écran et le
symbole clignotera.
6Appuyez sur n'importe quelle touche pour
arrêter le signal acoustique, le four s’allu-
mant alors à nouveau.
7Mettez les commandes sur la position
pour éteindre le four.
Programmation de la Durée et Fin de la
Cuisson
1Appuyez sur les touches ou jusqu'à
ce que le symbole s'allume. Ensuite
appuyez sur la touche OK.
2Sélectionnez la durée de la cuisson, en
appuyant sur les touches ou .
3Postérieurement, 2 beep de suite sonne-
ront, le temps restant jusqu'à la fin de la
cuisson apparaîtra et le symbole res-
tera allumé.
4Appuyez sur les touches ou jusqu'à
ce que le symbole s'allume. Ensuite
appuyez sur la touche OK.
5Sélectionnez l'heure de finalisation de la
cuisson, en appuyant sur les touches
ou .
6Postérieurement 2 beep de suite sonne-
ront, Auto apparaîtra sur l'écran et les
symboles et resteront allumés.
Votre horloge est programmée, le four
étant alors déconnecté.
Si vous souhaitez modifier la durée, appuyez
sur les touches ou jusqu'à ce que l’heu-
re actuelle apparaisse et que le symbole
clignote. Si vous souhaitez modifier l'heure de
finalisation, appuyez sur les touches ou
jusqu'à ce que l’heure actuelle apparaisse et
que le symbole clignote.
Ensuite appuyez sur la touche OK, et finale-
ment en appuyant sur les touches ou
vous pourrez modifier la valeur sélectionnée.
7Sélectionnez une fonction et une tempéra-
ture de cuisson.
8Quand l'heure de commencement sera
atteinte, le four se mettra en marche et
réalisera la cuisson, en montrant le temps
restant sur l'écran.
9Une fois atteinte l'heure de finalisation, le
four se déconnectera, un signal acoustique
sonnera, End apparaîtra sur l'écran et les
symboles et clignoteront.
10 Appuyez sur n'importe quelle touche pour
arrêter le signal acoustique, le four s'allu-
mant alors à nouveau.
11 Mettez les commandes sur la position
pour éteindre le four.
Attention
En cas de coupure de l’alimentation électrique,
toute la programmation de votre horloge élec-
tronique sera effacée et l’indication 00:00 cli-
gnotera dans l’horloge. Vous devrez la mettre à
l’heure et la programmer à nouveau.

27
DEUTSCH
26
HA 935
HA 900
Modell HA-900 Modell HA-935
Bedienfeld
12
4
6
4
6
3
5
3
5
1Bedienknopf der Zeitschaltuhr.
2Elektronische Schaltuhr.
3Kontrolleuchte Einschaltung Herd.
4Funktionswahl.
5Kontrolleuchte Heizen zeigt die Einschaltung
der Heizelemente an und verlischt, wenn die
eingestellte Temperatur erreicht ist.
6Temperaturregler.
Beschreibung des Gerätes
HI 900
4056-01
4056-01
HI 900
Modell HA-900
Modell HA-935
1Befestigung am
Küchenmöbel
2Kühlluftaustritt
3Schwenkbaren Grill
4Verchromte Halterung/
Ausziehbare Führungen
5Lüfter
6Rost
7Fettpfane
8Scharnier
9Tür
10 Bedienfeld
11 Beleuchtung
1
4
5
5
6
7
8
9
3
210
11
1
4
6
7
8
9
3
210
11

29
DEUTSCH
28
Funktionen des Herds
Modell HA-900
/ / / /
/ /
Modell HA-935
/ / / /
/ / / /
Ausschalten des Herds
Normal
Verwendung für Kuchen und Tortenböden, bei
denen die Wärmeeinwirkung gleichmäßig sein
muß, damit diese gut aufgehen.
Normal mit Umluft
Geeignet zum Braten und für Gebäck. Der
Lüfter verteilt die Wärme gleichmäßig im Herd.
Grill
Gratinieren und Anbräunen. Gestattet das
Anbräunen der Außenschicht, ohne das Innere
der Nahrungsmittel zu beeinflussen. Geeignet
für flache Stücke wie Beefsteak, Rippchen,
Fisch, Toastbrot.
MaxiGrill
Grillen auf größerer Oberfläche und mit
größerer Leistung als mit dem Grill, hierdurch
erfolgt ein schnelleres Bräunen der Speisen.
MaxiGrill mit Umluft
Gestattet gleichzeitig ein gleichmäßiges Garen
und Anbräunen der Oberfläche. Ideal zum
Grillen. Besonders für große Stücke wie
Geflügel, Wild usw. Es wird empfohlen, das
Stück auf den Rost zu legen und die
Auffangschale darunter einzusetzen, um
Bratensaft und Fett aufzufangen.
Achtung
Bei Benutzung der Funktionen Grill, MaxiGrill
oder MaxiGrill mit Umluft muß die Herdtür
geschlossen sein.
Turbo
Der Lüfter verteilt die von einem an der
Rückseite des Herds angeordneten
Heizwiderstand erzeugte Wärme. Auf Grund
der erzeugten gleichmäßigen Temperatur
verteilung ist ein Garen in 2 Etagen
gleichzeitig möglich.
Wenn Sie den Temperaturregler auf null
stellen, können Sie mit dieser Funktion die
Nahrungsmittel auftauen.
Unterhitze
Es wird nur von der Unterseite Wärme
zugeführt. Geeignet zum Anwärmen von
Tellern, zum Aufgehen von Teigmassen oder
für ähnliche Anwendungen.
Unterhitze mit Umluft
Verteilt die im Unterteil des Herds erzeugte
Wärme. Ideal für Gebäck mit Marmeladen-
oder Obstfüllung, bei denen eine Erwärmung
von unten erfolgen muß. Der Herd muß immer
vorgeheizt werden.
Grill und Unterhitze
Besonders geeignet zum Braten. Kann für
Stücke mit beliebiger Größe eingesetzt werden.
Achtung
Die Beleuchtung ist bei allen Kochfunktionen
eingeschaltet.
Modell HA-900
Manueller Betrieb des Herds
1Drehen Sie den Drehknopf der Schaltuhr in
die Stellung .
2Wählen Sie eine Kochfunktion aus und
stellen Sie die gewünschte Temperatur ein.
3Zum Abschalten des Herds bringen Sie alle
Bedienelemente in Stellung .
Betrieb des Herds mit Schaltuhr
Ermöglicht das Garen während einer vorher
eingestellten Dauer. Hierzu gehen Sie bitte wie
folgt vor:
1Wählen Sie eine Funktion aus und stellen
Sie die gewünschte Temperatur ein.
2Drehen Sie den Bedienknopf der Schaltuhr
in Uhrzeigerrichtung bis auf die Stellung
"120 Minuten" und anschließend in
entgegengesetzter Richtung bis zum
Erreichen der gewünschten Garzeit.
3Nach Ablauf der eingestellten Zeit ertönt ein
akustisches Signal und der Herd wird
abgeschaltet.
4Zum Abschalten des Herds bringen Sie alle
Bedienelemente in Stellung .
Modell HA-935
Stellen der elektronischen Schaltuhr
Nach dem Einschalten des Herds zeigt die
elektronische Schaltuhr 00.00 an. Durch
Betätigen der Tasten oder wird die Uhr
gestellt; anschließend werden zwei kurze
Signaltöne zur Bestätigung der eingestellten
Uhrzeit abgegeben.
Zur Veränderung der eingestellten Uhrzeit
betätigen Sie die Taste oder so oft, bis
die aktuelle Uhrzeit blinken. Drücken Sie
anschließend die Taste . Jetzt können Sie
die Uhrzeit mit den Tasten oder
einstellen. Nach Abschluss der Einstellung
werden die Änderungen mit zwei kurzen
Signaltönen bestätigt.
Manueller Betrieb
Nach dem Stellen der Uhr ist der Herd
betriebsbereit. Wählen Sie Garfunktion
aus und stellen Sie die gewünschte
Temperatur ein.
Zum Abschalten des Herds bringen Sie alle
Bedienelemente in Stellung .
Funktionen der elektronischen Schaltuhr
Signalgeber: Sendet ein akustisches Signal
nach Ablauf der eingestellten Zeit aus, der
Herd muss hierzu nicht eingeschaltet sein.
Dauer des Garvorgangs: Gestattet das Garen
während der eingestellten Zeit, anschließend
wird der Herd automatisch abgeschaltet.
Endzeit des Garvorgangs: Gestattet das
Garen bis zu der eingestellten Zeit,
anschließend wird der Herd automatisch
abgeschaltet.
Dauer und Ende des Garvorgangs: Mit Hilfe
dieser Funktion können Sie die Dauer des
Garvorgangs und die Uhrzeit einstellen, zu
welcher dieser abgeschlossen sein soll. Mit
dieser Funktion wird der Herd zum
erforderlichen Zeitpunkt automatisch
eingeschaltet, bleibt für die gewählte Dauer in
Betrieb und schaltet sich automatisch zu der
gewählten Endzeit aus (Ende des Garvorgangs).
Programmierung des Signalgebers
1Betätigen Sie die Taste bis das Symbol
aufleuchtet. Drücken Sie anschließend
OK.
2Stellen Sie mit den Tasten oder die
Zeit ein, nach der die Schaltuhr das Signal
abgeben soll.
Bedienung des Herds

31
DEUTSCH
30
3Anschließend hören Sie zwei kurze Signaltöne,
es wird die Restzeit bis zum Ertönen des akus-
tischen Signals angezeigt und das Symbol
blinkt.
Wenn Sie die eingestellte Zeit verändern
möchten, drücken Sie die Taste OK etwas län-
ger, bis die aktuelle Zeit angezeigt wird.
Betätigen Sie die Taste bis das Symbol
aufleuchtet und drücken Sie dann OK, jetzt
können Sie die eingestellte Zeit mit den Tasten
oder verändern.
4Nach Ablauf der eingestellten Zeit ertönt ein
akustisches Signal und das Symbol
blinkt schneller.
5Durch Betätigen einer beliebigen Taste wird
das Signal abgestellt.
Programmierung der Garzeiten
1Betätigen Sie die Taste oder bis das
Symbol aufleuchtet. Drücken Sie ans-
chließend .
2Stellen Sie mit den Tasten oder die
gewünschte Garzeit ein.
3Anschließend werden zwei kurze Signaltöne
abgegeben, es wird die Restzeit bis zum
Ablauf der Garzeit angezeigt und das Symbol
leuchtet ständig.
Drücken Sie Zur Einstellung der Zeit die Taste
oder so oft, bis die aktuelle Zeit ange-
zeigt wird und das Symbol blinkt. Bestätigen
Sie mit der Taste OK, mit oder können
Sie die Zeit einstellen.
4Wählen Sie eine Garfunktion aus und stellen
Sie die gewünschte Temperatur ein.
5Nach Ablauf der eingestellten Zeit ertönt ein
akustisches Signal, auf dem Display wird
End angezeigt und das Symbol blinkt.
6Betätigen Sie eine beliebige Taste zum
Abstellen des Signaltons, hierdurch wird der
Herd erneut eingeschaltet.
7Zum Abschalten des Herds bringen Sie alle
Bedienelemente in Stellung .
Programmierung der Uhrzeit für das Ende des
Garvorgangs
1Betätigen Sie die Taste oder bis das
Symbol aufleuchtet. Drücken Sie ans-
chließend OK.
2Stellen Sie die gewünschte Uhrzeit für die
Beendigung des Garvorgangs mit den Tasten
und ein.
3Anschließend werden zwei kurze Signaltöne
abgegeben, es wird die Restzeit bis zum Ablauf
der Garzeit angezeigt und das Symbol
leuchtet ständig.
Drücken Sie zur Einstellung der Zeit die Taste
oder so oft, bis die aktuelle Zeit angezeigt
wird und das Symbol blinkt. Bestätigen Sie
mit der Taste OK, mit oder können Sie
jetzt die Zeit einstellen.
4Wählen Sie eine Garfunktion aus und stellen
Sie die gewünschte Temperatur ein.
5Nach Ablauf der eingestellten Zeit ertönt ein
akustisches Signal, auf dem Display wird End
angezeigt und das Symbol blinkt.
6Betätigen Sie eine beliebige Taste zum
Abstellen des Signaltons, hierdurch wird der
Herd erneut eingeschaltet.
7Zum Abschalten des Herds bringen Sie alle
Bedienelemente in Stellung .
Programmierung der Dauer der Garzeit und
der Uhrzeit für dessen Beendigung.
1Betätigen Sie die Taste oder bis
das Symbol aufleuchtet. Drücken Sie
anschließend OK.
2Stellen Sie mit den Tasten oder die
gewünschte Garzeit ein.
3Anschließend werden zwei kurze
Signaltöne abgegeben, es wird die Restzeit
bis zum Ablauf der Garzeit angezeigt und
das Symbol leuchtet ständig.
4Betätigen Sie die Taste oder bis
das Symbol aufleuchtet. Drücken Sie
anschließend OK.
5Stellen Sie die gewünschte Uhrzeit für die
Beendigung des Garvorgangs mit den
Tasten und ein.
6Anschließend werden zwei kurze
Signaltöne abgegeben, auf dem Display
erscheint Auto und die Symbole und
leuchten. Damit ist die Uhr program-
miert, der Herd ist ausgeschaltet.
Drücken Sie Zur Einstellung der Garzeit die
Taste oder so oft, bis die aktuelle Zeit
angezeigt wird und das Symbol blinkt.
Drücken Sie Zur Einstellung der Endzeit die
Taste oder so oft, bis die aktuelle Zeit
angezeigt wird und das Symbol blinkt.
Bestätigen Sie mit der Taste OK, mit
oder können Sie die Zeit einstellen.
7Wählen Sie eine Garfunktion aus und ste-
llen Sie die gewünschte Temperatur ein.
8Bei Erreichen der Uhrzeit für den Beginn
des Garvorgangs schaltet sich der Herd
ein und führt den Garvorgang während der
eingestellten Zeitdauer aus, auf dem
Display wird die Restzeit angezeigt.
9Bei Erreichen der Endzeit schaltet sich der
Herd ab, es ertönt ein akustisches Signal,
auf dem Display wird End angezeigt und die
Symbole und blinken.
10 Betätigen Sie eine beliebige Taste zum
Abstellen des Signaltons, hierdurch wird
der Herd erneut eingeschaltet.
11 Zum Abschalten des Herds bringen Sie alle
Bedienelemente in Stellung .
Achtung
Bei einem Ausfall der elektrischen
Stromversorgung wird die gesamte
Programmierung der elektronischen Schaltuhr
gelöscht, als Uhrzeit wird 00:00 blinkend
angezeigt. Sie müssen diese anschließend
stellen und erneut programmieren.
This manual suits for next models
1
Table of contents
Languages:
Other Teka Microwave Oven manuals

Teka
Teka MWL 20 BI User manual

Teka
Teka MWE205FI User manual

Teka
Teka MWE 207 FI User manual

Teka
Teka MB 620 BI User manual

Teka
Teka MWE 250 FI User manual

Teka
Teka MWE 201 FI User manual

Teka
Teka MWX 45 BIS User manual

Teka
Teka MWE 208 FI User manual

Teka
Teka MS 622 BIS User manual

Teka
Teka MWE 225 FI User manual

Teka
Teka MWX 45 BIS User manual

Teka
Teka MGE 237 NXS ES User manual

Teka
Teka MWE 259 FI User manual

Teka
Teka ML 822 BIS User manual

Teka
Teka MWE 255 FI User manual

Teka
Teka MWE 210 G User manual

Teka
Teka MWL 20 BIT User manual

Teka
Teka MM 20 AG User manual

Teka
Teka MWE 255 FI User manual

Teka
Teka MLH 845 SS User manual