Teka GCO3G1P User manual

GAS FREESTANDING
OVEN USERS MANUAL
GCO3G1P 60x60 INOX
MANUAL DE USUARIO
DE COCINA DE GAS COMPLETA
GCO3G1P 60x60 INOX
BEDIENUNGSANLEITUNG
FÜR VOLLSTÄNDIGES GASOFEN
GCO3G1P 60x60 INOX
NOTICE DUTILISATION ET
DINSTALLATION CUISINIERE
GCO3G1P 60x60 INOX
GCO3G1P 60x60 INOX

Our Esteemed Customer,
We Take offering quality products more than your expectation as
a goal, offers you the products produced in modern facilities
carefully and particularly tested for quality.
Your manual is prepared in order to help you to use your apparatus
that is manufactured y the most recent technology, with confidence
and maximum effciency.
Before use of your apparatus, carefully read this guide that includes
the asic information for right and safe installation, maintenance
and use please contact to the nearest Authorized Service for
mounting of your product.

CONTENTS :
1.P rt : PRESENTATION AND SIZES OF PRODUCT
2.P rt : WARNINGS
3.P rt : INSTALLATION AND PREPARATIONS FOR USE
3.1 Environment where the apparatus will e installed
3.2 Installation oven
3.3 Adjustment of feet
3.4. Mounting of gas hose and imperviousness control
3.5 Electric connection and safety
3.6 General warnings and measures
3.7 Gas conversions
4.P rt : USE OF YOUR OVEN
4.1 Use of the cookers containing gas
4.2 Use of oven part-gas cookers
4.2.1 Oven burner
4.2.2 Grill burner and roasting skewer
4.3 Accessories used in oven
5.P rt : CLEANING AND MAINTENANCE
5.1 Cleaning
5.2 Maintenance
6.P rt : SERVICE AND TRANSPORT
6.1 Requirements efore contanting to service
6.2 Information related to the transport

PART 1: PRESENTATION AND SIZES OF PRODUCT
1.1 PRESENTATION :
10
11
Part of List:
1- Cooktop Cover
2- Cooktop
3- Control Panel
4- Oven Door Handle
- Drawer Cover
6- Supply leg
7- Oven Door
8- Oven Tray
9- Wire Grid
10- Grill Broiler
11- Oven Lamp
12- Rapid Burner
13- uxillary Burner
14- Hobe Grids
1 - Semi-Rapid Burner
1
2
3
456
7
8
9
888
12
13 14
15
SIZE
(cm)
MODELL
TG 66
TG 56
60*60*85 60*60*90
50*60*85 50*60*90

Part 2 : WARNINGS
TAKE ALL IMPORTANT SECURITY MEASURES AND READ THE MANUAL COMPLETELY
BEFORE USING THE APPARATUS
This apparatus has een designed for non-professionel, domestic use only.
Surely control whether there is any damage after you unpacked the apparatus.
If there is any defect; do not use the apparatus and immediately contact to the authorized
maintenance service. As the materials used for package (nylon, stapler, strafoam...etc)
may cause harmful effects to children, they should e collected and removed immediately.
The apparatus must e set up y an authorized technician and put into use. The producer is
not responsi le for any damage that might e caused y defective placement, and set up
unauthorized personel.
Before connecting your apparatus to the electric and gas network, carefully control whether
it is appropriate for the features determined on the package and/ or data plate on the
apparatus.
Compare the features of the electricity network with the technical information on the
presentation la el efore plugging the apparatus in.
If you will not use the apparatus for a long time, plug it off. Keep the main control switch off.
Also when you do not use the apparatus, keep the gas tap off.
The feeding ca le must never e changed y the customer. When it is damaged y any
reason, please contact to your authorized service.
Turn the apparatus off efore the operations such as cleaning or maintenance. You can do
it after plugging it off or turning the main switches off.
Some parts of apparatus may hold its heat for a long time, it is required to wait for it to cool
efore touching onto the points that are exposed to the heat directly.
Do not keep flamma le materials close while the apparatus is operating.
Pay attention to the ca les of the other electrical devices operating near the apparatus,
so as not to touch to hot points.
Pay attention the switches to e 0, when the apparatus does not operate.
The use of a gas cooking appliance results in the production of heat and moisture in the
room in which it is installed. Ensure that the kitchen is well ventilated: keep natural ventilation
holes open or install a mechanical ventilation device (mechanical extractor hood)
Prolonged intensive use of the appliance may call for additional ventilation,
for example opening of a window or more effective ventilation, for example increasing the
level of mechanical ventilation where present.
Turn off all urners efore shutting the lid.
This manual is prepared for more than one model in common. Your apparatus may not have
some of the features that is explained in manual. Pay attention to the expressions that have
figures, while you are reading the operating manual.
Accesi le parts may e hot when the grill is in use. Young children should e kept away.
Keep children away from the oven.
FOR EFFICIENCY AND SECURITY OF APPARATUS, WE RECOMMEND YOU ALWAYS TO
USE THE ORIGINAL SPARE PARTS AND TO CALL ONLY OUR AUTHORIZED SERVICES
IN CASE OF NEED.

Part 3 : INSTALLATION AND PREPARATION FOR USE
This modern, functional and practical oven, that was manufactured with the most quality
parts and materials, will meet your needs in every respect. You must surely read this
manual in order not to have any pro lem in future and to e a le to have successfull
results. The following information are the required rules for right installation and service
processes. It must e read especially y the technician who will install the apparatus.
Contact To Authorized Service For Mounting Of Your Oven.
3.1 ENVIRONMENT WHERE YOUR APPARATUS WILL BE INSTALLED
Your oven must e set up and used in a place where it will always have ventilation.
While operating, this appliance needs 2m3/h air per kw input.
There must e a natural ventilation enough to provide the gas to e used in the environ-
ment. The average air flow must directly come in through the air holes that will e opened
on the walls that are opened towards outside.
These air holes must have at least the cross section of 100cm2 that is effective for air
transition (One or more air holes can e opened.) (Figure1-2)
This hole (or holes) must e opened oth from the inside and from the outside as it/they
will never e clogged and prefera ly must e placed close to the ottom and at opposite
side of the smokes of the urned gases that were emptied. If it seems not possi le to
open these ventilations in the place where the apparatus is set up, the needed air can
also e o tained through the next place in condition that this place must not e the ed
room or a dangerous place and also it must e ventilated as required.
Air inlet section
min. 100cm2
Air inlet section
min. 100cm2
Figure 1 Figure 2

COOKER HOOD
Min. 60 cm.
Min. 42 cm.
Min. 42 cm.
Min. 65 cm.(with hood)
Min.70 cm(without hood)
Emptying of the Burned Gases from Environment
The cooking apparutuses that operate with gas, throw the urned gas wastes
out directly to the outside or through the paddle oxes that were connected to the
sewer ventilator channel. If it seems not possi le to install a paddle ox, it is required to
set an electric fan onto the window or wall that is opened to the outside. This electric
fan must have the capacity to change the air of the kitchen environment 3-5 times of
its own volume of air per hour (Figure 3-4)
Air inlet section
min. 100cm2
Cooker hood flue
Air inlet section
min. 100cm2
Electrical ventilator
figure 3 figure 4
figure 5

3.2 INSTALLATION OF OVEN
There are some factors that must e paid attention to while installing your oven. Surely
pay attention to while installing your oven. Surely pay attention to our elow suggestions
in order to e a le to prevent any pro lems and/ or dangerous situations that may
occur later.
It can e placed close to other furniture on condition that in the area where the oven
is set up, the furnitures height must not exceed the height of the cooker panel.
Pay attention not to place it near the refrigerator, there must e no flamma le or
inflamma le materials such as curtain, waterproof cloth,.....etc. that will egin to urn
quickly, while selecting place for oven.
It is required there must e least 2 cm lank space etween the ack cover of oven and
wall for air circulation.
The furniture close to oven must e manufactured resistans to heat more than 500C
of the room temperature.
If the kitchen furniture are higher than the pan which the ovens cookers are on, it must
e at least 11cm away from the ovens side.
The minimum heights from the ovens pan and wall cup oards and cooker hoods with
fan over the oven, are shown as elow. Thus, the paddle ox must e at minimum 650mm
height from the cooker pan (Figure 5)
If there is no cooker hood, this height must not e less than 700mm.
3.3 ADJUSTMENT OF FEET
Your oven stands on 4 adjusta le feet. As the feet are adjusted in low location, it is
required to control whether it is alanced efore installing the oven. You can make this
adjustment as turning the feet clockwise if required. It is possi le to raise the apparatus
maximum 15mm via the feet. If the feet are adjusted appropriately, it is required not to
move the apparatus y dragging, otherwise it is required to place it y lifting it up.
3.4 MOUNTING OF GAS HOSE AND IMPERVIOUSNESS CONTROL
The gas of apparatus must also e connected in accordance with standards. The adjusted
gas type of apparatus must e determined on the type sign oard on the ack of the
apparatus. You can find the information related to appropriate gas types and appropriate
gas injectors on technical data ta le. Pay attention that the feeding gas pressure must e
appropriate for the values on technical data ta le to e a le to get the most efficiency and
to ensure the least consumption. If the pressure of used gas is different than these values
or changea le, it is required to affix an availa le pressure regulator on the entrance pipe. It is
surely required to contact to the authorized service to make these adjusments.

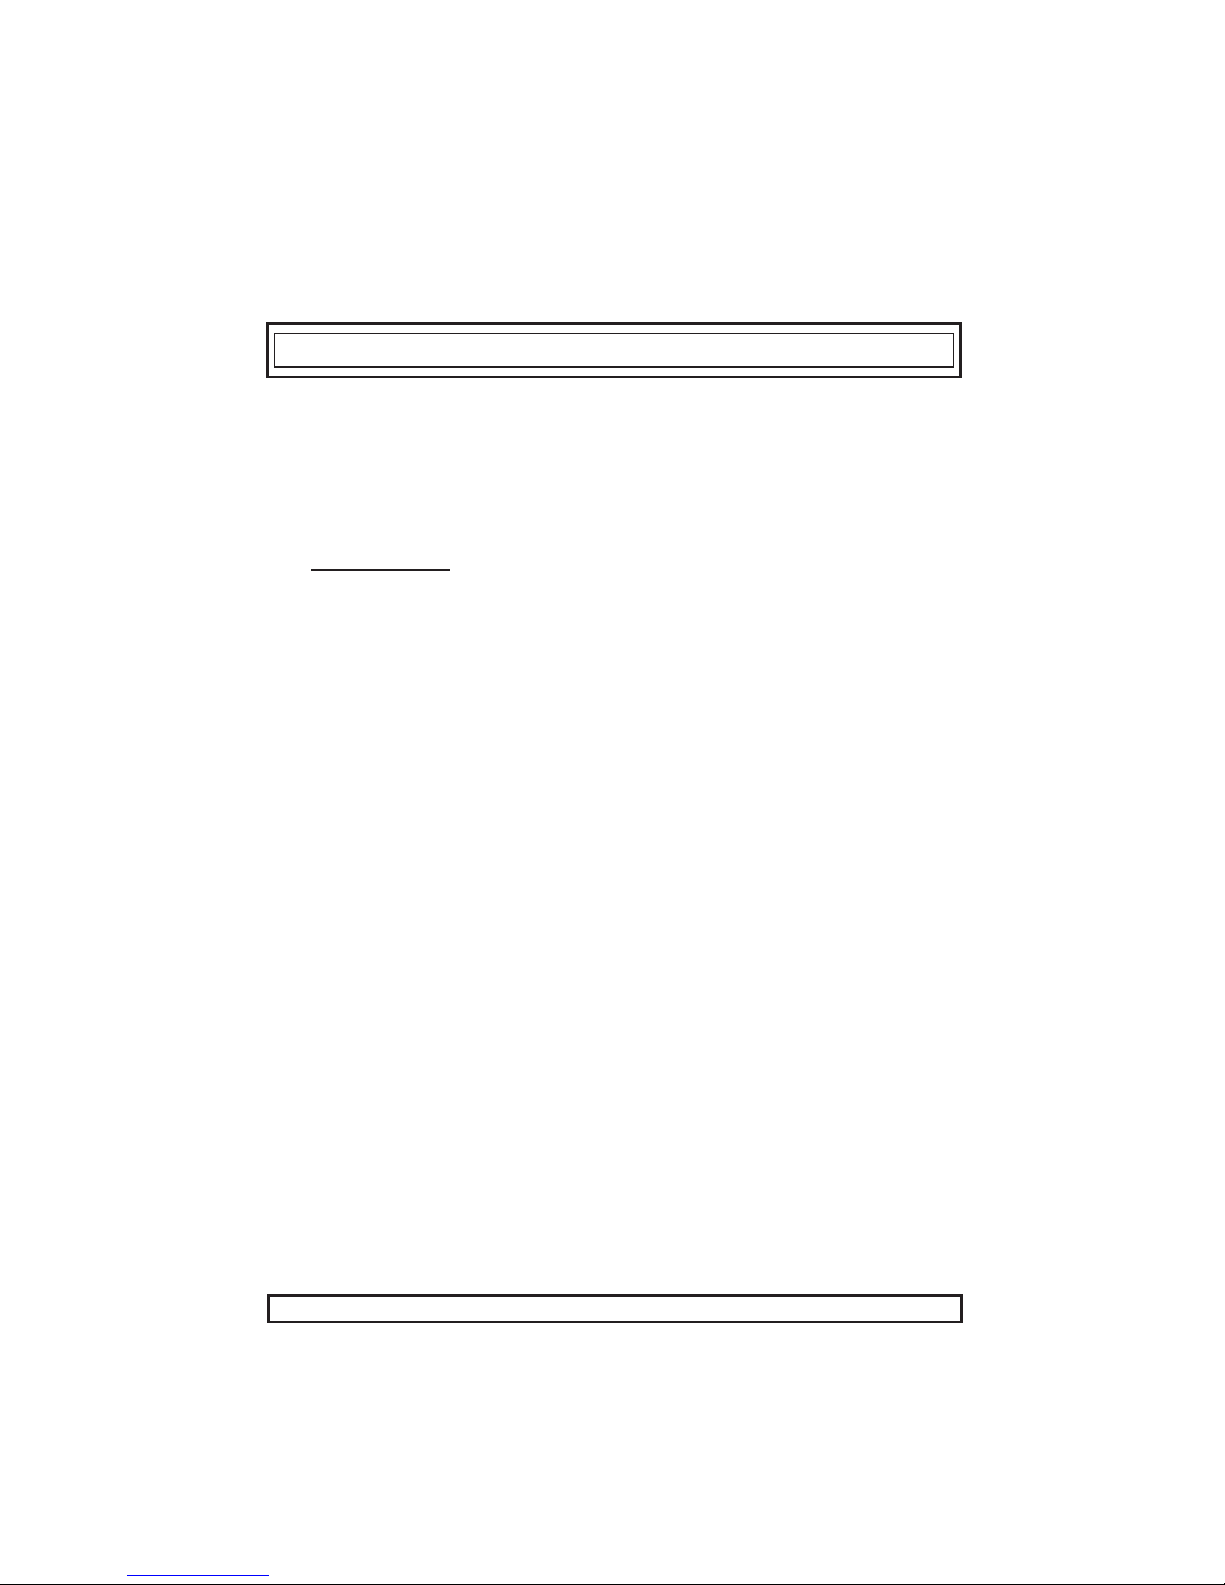
The plastic hose that is fixed onto the gas entrance of apparatus with a pipe collar, must
e used while connecting for Butane-Propane gas. Connect your apparatus with a short
and impervious hose as much as possi le to the gas resource. The hoses permitted
maximum lenght is 1.5m. The hose that rings gas to the apparatus must e changed (1)
once a year for your security.
The points th t must be p id ttention while connecting the hose;
No parts of the hose must not touch to any place that has heat more than 500C.
The lenght of hose must not exceed 1.5m.
The hose must not e ruptured, e tightened or e folded.
The hose must not touch to the sharp corners, moving things, must not e defective.
The hose must e controlled from end efore mounting, it must e o served whether
there is any production defect.
As gas is turned on, all connection parts and hose must e controlled with prepared much
u ly water at first after the gas entrance connections are completely finished. Never
use a lighter, match,...etc while making this process.
The tightening pipe collars must clear of rust.
The expirence dates must not have exceeded over 5 years.
As affixing an end of hose to the detector, other end to the gas entrance adaptor of oven
tightly, hold it with a sheet iron pipe collar and screwdriver very tightly. If no
connection is made with hose in limitation of conditions that were explained a ove, flexi le
metal hose can e used. It is required to contact to the authorized service to e a le to
connect appropriately at security standards on this condition and a technician must do this
connection.
Your oven is adjusted to operate y NG. If it is required to e operated y LPG gas, contact
to the nearest Authorized dealer. While gas is eing connected for LPG gas, on the gas
entrance of apparatus,hose connection apparate as descri ed in Figure must e used
and it must e connected y a technician (Figure ). The flexi le hose must not syrely
touch to the sharp places and there must e no damage.
ATTENTION!!!
Surel do not use an match and lighter for control of gas leakage.
3. ELECTRIC CONNECTION AND SECURITY
During the electric connection, surely follow the instructions elow.
The earthing ca le must e connected to the terminal. You have to ensure the ca le with
insulation to e connected to the power source during the connection of ca le. If there is
not any appropriate earthed electric outlet in accordance with regulations in the place where
the apparatus will e installed, immediately contact to our authorized service.
The earthed electric outlet must e close to the apparatus. Surely do not use the extension
cord.
The feeding ca le must not touch to the hot surface of the product.
In case the feeding ca le is damaged, surely contact to Qualified Service. The ca le must
e changed y the authorized service.
The wrong electric connection may damage your apparatus. Such damage is not in
guarantee extent.
The apparatus is adjusted as appropriate for 220-240 Volts of electricity. If the network
electricity is different than this informed value, immediately contact to our authorized
service.

The electric ca le must not touch to the hot parts of apparatus. The electric ca le must not
touch the ack part of the apparatus. Otherwise the electric ca le of apparatus may e
damaged. And this situation may cause short circuit.
The producer firm declares that it has no responsi ility against any kind of damages and
losses that emanate from the following security norms.
3.6 GENERAL WARNINGS AND MEASURES
Your apparatus is produced in accordance with the related security instructions connected
with electrical apparatus. The maintenance and repair works must e made just y the
authorized service technician who is trained y the producer company. The installation
and repair works without following rules may endanger you.
While your appliance operates, its outside surfaces heat up. The interior surfaces of oven,
components that ensures the heat and steam that goes out are quite hot. Even if the
apparatus is turned off, these parts hold its heat for a specific time. Do not touch onto the
hot surfaces. Keep children away.
Do not leave the cooker while cooking with solid or liquid oils. There may e flaming up on
condition of extreme heating. Never pour water to the flames occuring from oil. Cover the
saucepan or frypan with its cover in order to choke the flame that has occured in this
case and turn the cooker off.
The oven and heat adjustment switches must e adjusted for cooking in your oven.
Otherwise the oven does not operate.
when the door or drawer of oven is open do not leave anything on it . You may un alance
your apparatus or reak the cover.
Do not put heavy things or flamma le, urna le goods (nylon, plastic ag,paper,cloth...etc)
into the lover drawer.
Plug the appliance off the electrical network when you do not use the apparatus and keep
the gas valve off.
Protect your apparatus against atmospheric effects. Do not leave it to effects such as sun,
rain, snow, powder...etc.
3.7 GAS CONVERSIONS
Cauti n : The f ll wing pr cedures must be undertaken by auth rized service pers nel.
Changing Injectors :
The gas urners adapt to different types of gas, y replacing the corresponding injectors to
gas on use.
For this purpose, following steps should e performed.
Cut off the feeding gas flow and electric current.
Remove the cap and the adapter.
Unscrew the injectors.
Replace the injector with the ones corresponding to the type of gas that is going to e used,
according to the information chart.

Changing Injectors of Gas Ovens and Grills :
In order to change the oven and grill urner injectors:
Remove the oven and gas urners y unscrewing to the assem ly screws located on the
foremost tip of the urner.
Remove the existing injectors placed on the injector holder and replace them with the new
injectors supplied in the spare set.
Figure 6

Adjusting The Reduced Flame Position :
In appliances equipped with Flame Failure Devices and microswitches at the same time,the
control panel should be removed in order to reach the adjusting screw safely.
For reduced flame position the y pass screw must e loosened in transformation from
LPG to NG. In transformation from NG to LPG, the same screw must e fastened. Make
sure that the appliance is unpluged from the electric current and the gas feed is open.
Ignite the urners and leave them on in minimum position.
Remove the kno s ecause the screws are accesi le only when the kno s are removed.
With the help of a small screwdriver fasten or loosen the y pass screw 900, which makes
the flame of the urner come down to the minimum (Figure 6).
When the flame has a length of at least 4mm, the gas is well distri uted. Make sure that
the flame does not die out when passing from the maximum position to the minimum
position.
Changing the Gas Inlet :
The gas feeding manifold protruding from the ack of the cooker must e visi le completely,
any means connection (nut,hose etc.) must e placed with attention to avoid
any contact with parts that will heat up.
It is highly recommended to lock the access to pipe connection, while the cooker is in use
or when the gas supply is open.
During the gas connection process, the pipe of the appliance should e kept stationary,while
the connected part (mechanical, LPG or NG nut) is fixed. Always use the seals supplied in the
spare set etween the connection surfaces.
For connection of uthane-type gases (LPG) use connection A for flexi le hose connection.
For connection of methane type gases(NG),
*Use B type connection in Spain, Italy, Portugal, Greece, France and Algeria for use
with flexi le hose connection.
*Use C type connection in Letonia and Luxem urg for mechanical connection. This
connection may also e optionally used in some areas in France, Algeria,Spain, Portugal and
Italy. *Use C type connection in Germany and Belgium with an additional ISO7/ISO228
adapter and Netherlands with an additional Besca adapter, supplied in the spare set.
An example of usage is shown in E.
*For ll types of g ses use D type connection in United Kingdom nd Irel nd.
In all cases, the flexi le gas hose should neither pass ehind an oven, nor e in contact with
premises that may cause com ustion. Furthermore, make sure that all connections are done
according to the national legal requirements for gas appliances.

4.1 USE OF COOKERS CONTAINING GAS
Surely and carefully read the instructions that were enriched with pictures for your use of
convenience and to e a le to get the most efficiency from your apparatus.
The signs on the control switches, states that which cookers are turned on y them. Use
your electrical lighter or match to turn on any cooker containing gas. Press onto the
switch, turn to maximum at the opposite of clockwise. Each cooker can operate at
maximum, minimum, moderate and powers among them. These positions are shown with
maximum and minimum signs apart from off 0 position on switches. You can adjust to
wished location y turning the switch from off position opposite to clockwise and carrying
it out in a suita le manner to the signs. Also, to turn off the apparatus,it is required to turn
the switch clockwise and until it stops (It stops at 0 location).
IMMEDIATE Ignition System in Cookers
Some models have immediate ignition system on cookers. You can easily recognize them
via the turning on spark plugs. To operate the system; it is required to press slightly onto
the switch marked with its sym ol, as turning the switch of the cooker that you want to turn
on opposite to clockwise.
In order to o tain the most efficiency from the cookers, pay attention to the sizes of
saucepans that you put the on the cookers and the sausepans to have flat ases. Do
not use concave and convex ased saucepans. Pay attention to use saucepans that have
sizes determined in figure. If the dishes that have less than 14cm diameter,
use a coffee pot carrier.
Gas Flame Failure Device (FFD) (If Your Product Has This Feature)
Gas flame failure device is used for every flamma le gas in order to prevent the gas
leakage y the result of turning on the gas taps y the children randomly or
dieing down that may occur y the result of overflowing of liquid on upper flamma le ones.
Turn the switch opposite to clockwise onwards. This situation will ignite automatically one
after another. After the turning on, when the switch is hold on pressed location for
approximately 3 seconds as pressing forward until the point where the switch reaches, the
thermic component senses the cookers flame and opes the gas way. At dieing out that
may e ecause of overflowing of liquid and such reasons, the thermic unit senses the loss
of heat and cuts off the gas way in a time period less than 60 seconds.
Part 4 : USE OF YOUR OVEN
4.2 USE OF OVEN PART - GAS COOKERS
4.2.1 Oven Burner
Ignition of the oven urner can e performed in two ways, depending on the model of your
cooker:
Ignition b Spark Button : If your oven is equipped with a spark utton, you should press
the oven valve and rotate the valve kno to the point where you want to perform the
cooking, while also pressing the ignition utton. As the valve is equipped with a Flame
Failure Device (FFD), please follow the procedures explained under the clause 4.3.
Take spark utton will automatically create sparks etween the spark ignitor and the urner,
causing the ignition to occur. As soon as the ignition occurs, the spark utton can e
released.
4.2.2 Grill Burner and Roasting Skewer
The operation of the Grill urner is not dividedinto temperature grades, it only operates in
a single mode to create a constant source of heat. To do this, the valve of the grill urner
should e rotated until the designated marker for grill.
Ignition of the grill urner can e performed in 2 ways, similliar to the oven urner.

Igniti n by Spark Butt n : If your oven is equipped with a spark utton, you should press the
grill valve and rotate the valve kno to the grill point, while also pressing the ignition utton.
As the valve is equipped with a Flame Failure Device (FFD), please follow the procedures
explained under the clause 4.3. The spark utton will automatically create sparks etween
the spark ignitor and the urner causing the ignition occurs, the spark utton can e
released.
Manual Igniti n : If your oven is not equipped y any of the ignition aids mentioned a ove,
or if there is an electrical lackout where you cannot use these aids, you shoud perform a
manual ignition. For a manual ignition, you should press the grill valve and rotate the valve
kno to the grill point, while holding a flame source (i.e. a lighter or match,etc) just aside the
foremost urner holes laced on either side of the grill urner. As soon as you see the
urner is ignited,you can release the flame source. As the valve is equipped with a Flame
Failure Device (FFD), please follow the procedures explained under the clause 4.3.
In any case, while the grill urner is operated, the grill protection lid must e placed
etween the oven panel and the top edge of the oven door. The grill urner should never
e operated whitout the grill protection lid, as this will cause damage to the oven due to
overheating in the control panel, as well as posing danger to the user and young children
who come in contact with the oven.
CAUTION : Accessible parts may be h t when the grill is in use. Y ung children sh uld be kept away.
R asting Skewer : This function is used to roast chicken or other kind of meat on a skewer.
To use this function, place the skewer through the meat, y thrusting the skewer inside the
meat. Fix the meat tightly in its place y using the two forks placed on the skewer. Place a
tray on the 3rd shelf. Place the skewer housing on the tray as appropriate, and place the
skewer on the housing, while the tip of the skewer is inserted into the rotor hole. Push
therotary skewer utton to start the rotor.
While roastig food using the skewer, grill urner must e operated. The o ligation of
using the grill protection lid also holds for this function.
CAUTION :
* If the urner has not lit after 15 seconds, stop operating the device, and open the
compartment door and/or wait at least 1 minute efore attempting a further ignition of the
urner.
* In the event of the urner flames eing accidentally extinguished, turn off the urner control
and do not attempt to re-ignite the urner at least one minute.
POSITION
MAX.
7
5
.
3
.
1
MIN.
TEMPERATURE
2900C
2500C
2400C
2200C
2000C
1900C
1800C
1600C
For the thermost tic ovens, the numbers th t re gr phed round the v lve
correspond to the following temper tures.
60x60
.
1450C
POSITION
MAX.
5
.
3
.
1
MIN.
TEMPERATURE
2700C
2500C
2400C
2200C
2000C
1900C
1800C
50x60
.
1600C

4.3 Accessories Used in Oven
It is recommended to use the cooking dishes that are determined at the cooking ta les
depended on the feature of food that will e cooked. You can also use glass dishes,
cake molds, special oven trays that are appropriate for use in oven, that you are a le to
assure in market, apart from the oven trays and grill wire chicken roasting skewer that are
given together with your oven. Pay attention to the information related to the su ject that
were given y the manufacturer firm.
In case small size dishes are used, place the dish onto the grill wire, as it will completely e
on the middle part of the wire. The following information must also e followed for the
enameled dishes.
If the food that will e cooked does not cover the oven tray completely, if the food is taken
from the deep freezer or the tray is eing used for collection of foods juices that flow during
grilling, the form changes can e o served in tray ecause of the high heat that occur
during cooking or roasting.
The tray will return to its old form only when the tray cooled after cooking. This is a normal
physical event that occurs during heat transfer.
Do not leave this tray or dish in cold environment right away after cooking in glasss tray or
dish.
Do not put onto the cold and wet grounds. Place on a dry kitchen cloth or dish cross, ensure
it to cools slowly. Otherwise the glass tray or dish may e roken.
If you will grill in your oven; we recommend you to use the grill that was given in tray together
with product (If your product includes this material). So, the oils that spatter and flow, will not
dirty the inside of oven. If you will use the ig wire grill; put a trayonto one of the lower
shelves for oils not to e collected. Also put some water into it for cleaning easiness.
Use 4th and 5th shelves while grilling and oil the grill for the ingredients that youwill grill not
to stick to the grill.
As explained in the corresponding clauses, never attempt to use the gas operated grill
grill urner without the grill protection lid. If your oven has a gas operated grill urner, ut
the grill protection lid is missing, or if the lid is damaged and cannot e used,request a
spare lid from the nearest authorized service.

.1 CLEANING
Be sure that all control switches are off and your apparatus cooled efore cleaning your oven.
Plug off the apparatus.
Control whether they are appropriate and recommended y the manufacturer efore using the
cleaning materials on your oven. As they may damage the surfaces, do not use caustic
creams, a rasive cleaning powders, thick wire wool or hard tools. In case the liquids that
overflows around your oven urn, the enameled place may e damaged. Immediately clean
the overflew liquids.
Part : CLEANING AND MAINTENANCE OF YOUR OVEN
Cleaning of Inside of Your Oven
Surely plug ff the ven bef re starting cleaning
The inside of enameled oven is cleaned in the est way when the oven is warm. Wipe the
oven with a soft cloth that had een hemmed in soapy water after each use. Later wipe it with
a wet cloth once more and then dry it. It may e required to use a liquid cleaning material
from time to time and make a complete cleaning. Do not clean with dry and powder cleansers.
Cleaning of Your Ovens Cover
In order to e a le to clean the cover of your oven from inside and outside, use a glass cleaner.
Then rinse, dry it with a dry cloth.
Cleaning of Gas Cookers, Hob Part
Lift up the saucepan carriers, hats and heads of cookers containing gas on upper part of your
oven. Wipe and clean the ack panel with a soapy cloth. Wash the hats and heads of cookers
containing gas and rinse them. Pay attention to detents to pass and settle completely while
placing the ack panels after drying. Do not clean the ack panel with a wire for dirty dishes.
It causes the surface e scratched.
The enamel where the saucepan carriers touch to the flame on end parts, may get old and
sha y. The end parts of which the enamels get old and sha y do not cause to rust. Using
them
.2 MAINTENANCE
Change of Oven Lamp
At first plug offthe oven and pay attention to oven is cool. Also remove the ampoule after
removing the cover in front of lamp. Affix the new ampoule resistant to 3000C to the place of
the ampoule that you removed (230 V, 25 Watt, Type E14). Replace the lamp protective glass.
Your oven will e ready for use after this process.
Other Controls
Periodically control the gas connection pipe. Even if any simple a normality is felt, inform the
technical service to have it changed. We recommend it to e changed once a year.
If any a normality is felt while operating the command switches of cooker and oven,
contact to the authorized service.

6.1 REQUIREMENTS BEFORE CONTANTÝNG TO SERVICE
If the ven d es n t perate ;
The oven may e plugged off, there has een a lack out. On models fitted with a timer, time
may not e regulated.
If the ven d es n t heat ;
The heat may e not adjusted with ovens heater control switch.
If the interi r lighting lamp d es n t light ;
The electricity must e controlled.
It must e controlled whether the lamps are defective. If they are defective, you can change
them as following the guide.
C king (If l wer-upper part d es n t c k equally) ;
Control the shelf locations, cooking period and heat values according to the manual.
Except these, if ou still have an problem with our product, please call to the
Authorized Service.
Part 6 : SERVICE AND TRANSPORT
6.2 INFORMATION RELATED TO TRANSPORT
If y u need any transp rt ;
Keep the original case of product and carry it with its original case when needed to e
carried. Follow the transport signs on case.
Tape the cooker on upper parts, hats and heads and saucepan carriers to the cooking panels.
Place a paper etween the upper cover and cooking panel, cover the upper
cover, then tape it to the side surfaces of oven.
Tape card oard or paper onto the front cover on interior glass of oven as it will e
suita le to the traysi, for the wire grill and trays in your oven not to damage
to the ovens cover during transport.
Also tape the ovenscovers to the side walls.
If it d es n t have the riginal case ;
Take measure for the external surfaces (glass and painted surfaces) of oven against possi le
lows.

Ta le 4
RAPID BURNER
Injector diam.(%mm)
Nominal Rating (kw)
Min. Rating (kw)
Consumption in 1h
Consumption in 1h
(at 150C and 1013mbar press)
AUXILLARY BURNER
Injector diam.(%mm)
Nominal Rating (kw)
Min. Rating (kw)
Consumption in 1h
Consumption in 1h
(at 150C and 1013mbar press)
MEDIUM BURNER
Injector diam.(%mm)
Nominal Rating (kw)
Min. Rating (kw)
Consumption in 1h
Consumption in 1h
(at 150C and 1013mbar press)
WOK BURNER
Injector diam.(%mm)
Nominal Rating (kw)
Min. Rating (kw)
Consumption in 1h
Consumption in 1h
(at 150C and 1013mbar press)
LPG
G2
OVEN BURNER
Injector diam.(%mm)
Nominal Rating (kw)
Min. Rating (kw)
Consumption in 1h
Consumption in 1h
(at 150C and 1013mbar press)
GRILL BURNER
Injector diam.(%mm)
Nominal Rating (kw)
Min. Rating (kw)
Consumption in 1h
Consumption in 1h
(at 150C and 1013mbar press)
G30
28-30 mbar
85
3
0.85
218.13 gr/h
50
1
0.4
72.71 gr/h
65
1.75
0.65
127.25 gr/h
98
3.8
1.55
276.3 gr/h
76
2.8
1.4
203.6 gr/h
68
2.2
--
160 gr/h
G31
28-30/37 mbar
85
3
0.85
214.28 gr/h
50
1
0.4
71.42 gr/h
65
1.75
0.65
125 gr/h
98
3.8
1.55
271.42 gr/h
76
2.8
1.4
200 gr/h
68
2.2
--
157.14 gr/h
77
3.8
1.9
276.3 gr/h
58
1.75
0.65
127.25gr/h
43
1
0.5
72.71 gr/h
75
3
1.23
218.13 gr/h
G30
50 mbar
68
2.8
1.4
203.6 gr/h
62
2.2
--
160 gr/h
NG
G20
20 mbar
115
3
0.7
285.7 lt/h
72
1
0.3
95.24 lt/h
97
1.75
0.495
166.66 lt/h
135
3.8
1.7
361.9 lt/h
120
2.8
1.4
266.7 lt/h
110
2.2
--
209.5 lt/h
25 mbar
125
3
0.82
332.2 lt/h
72
1
0.3
110.74 lt/h
94
1.75
0.495
193.79 lt/h
148
3.8
1.6
420.82 lt/h
120
2.8
1.4
310.1 lt/h
110
2.2
--
243.6 lt/h


Estimado cliente,
Ofrecer productos de calidad más allá de sus expectativas es nuestro
o jetivo, por lo que le ofrecemos productos fa ricados en instalaciones
modernas pro ados con mimo y a consciencia.
Este manual se ha redactado para ayudarle a utilizar el aparato, que
se ha fa ricado con la tecnología más actual, con seguridad y con
la máxima eficiencia energética.
Antes de utilizar este aparato, léase detenidamente esta guía, en la
que encontrará la información ásica para una instalación,
mantenimiento y uso seguro. Póngase en contacto con su servicio
de asistencia técnica más cercano para la instalación del producto.
Table of contents
Languages:
Other Teka Oven manuals

Teka
Teka FS 901 5GE SS LPG User manual

Teka
Teka HSB 635 User manual

Teka
Teka HK-800 Owner's manual

Teka
Teka HSC635 Maintenance and service guide

Teka
Teka HLB User manual

Teka
Teka HLB SC User manual

Teka
Teka HA-845 Owner's manual

Teka
Teka HA-845 User manual

Teka
Teka HLC 844 C User manual

Teka
Teka IOVEN User manual