Teka HGS 740 SS 230 NAT User manual

INSTRUCTION MANUAL
ИНСТРУКЦИЯ ПО ЭКСПЛУАТАЦИИ
ΕΓΧΕΙΡΊΔΙΟ ΟΔΗΓΙΏΝ
HGS 740 SS 230 NAT / HGS 740 SS 230 LPG
HGR 650 230 NAT
P21220R05

CONTENTS
SAFETY PRECAUTIONS..........................................................
WARNINGS FOR PROPER TRANSPORTATION.......................
INSTALLATION INSTRUCTIONS .............................................
ELECTRICAL CONNECTION....................................................
PRODUCT SPECIFICATIONS AND USAGE................................
CONNECTING TO THE GAS SUPPLY........................................
TECHNICAL SPECIFICATIONS..................................................
CLEANING AND MAINTENANCE ............................................

Dear Customer,
We would like to thank you and congratulate you on your choice.
This new product has been carefully designed and built using top
quality materials, and meticulously tested to ensure that it meets all
your culinary requirements.
Please read this user manual thoroughly before you use this
appliance. It is important that you understand all the control
functions before commencing to cook with your appliance.
Please remember the advice and warnings shown on page 3 which
is headed “SAFETY PRECAUTIONS”. This appliance is designed for
domestic household use when integrated into kitchen units.
NOTE: The units, adjacent furniture and all materials used in the
installation must be able to withstand a minimum temperature rise
of 75°C above ambient temperature during periods of operation.
This information is for quidance only and the actual withstand
temperature rise will depend on the performance rating fort he
surface finish of the kitchen units. Certain types of kitchen unit
surface finishes (e.g. vinly) are particularly prone to heat damage or
discolouration at temperatures lower than the above quidelines.

SAFETY PRECAUTIONS
WARNING : this appliance must be earthed.
This appliance complies with all current Europcan safety legislation,
however the producer do wish to emphasise that compliance does
not remove the fact that the appliance surfaces will be come hot
during use and head after operation.
The producer advise that this appliance is not intended for use by
young children or infirm persons unless they have been adequately
supervised by a responsible person to ensure that they can use the
appilance safety. Young children should be supervised to ensure
they do not play with the appliance. If it is necessary for younger
family members to be in the kitchen, please ensure that they are
kept under close supervision at all times. During use, the appliance
becomes hot, care should be taken to avoid touching heating
elements inside the oven.
WARNING: Accessible parts will become hot when in use. To avoid
burns and scalds children should be kept away. Do not leave heated
oil or fat unattended as there is a risk of fire. Do not pour water
directly into the inside of a hot oven: The enamel coating could be
damaged. Do not place pans or baking trays on the bottom of oven
cavities or line any part of the oven cavity with aluminium foil.
-Do not allow electrical fittings or cables to be in contact with hot
areas of the appliance.
-Do not use the appliance for space heating or to dry clothes.
-Do not use a steam cleaner with this appliance.
-Do not install the appliance next to curtains or soft furnishings.

-Do not attempt to lift or move cooking appliances by pulling on any
door or handle as this can cause damage.
-Always use oven gloves when moving food in or out of the cavity.
-Before any cleaning operation inside the oven, wait until it has
cooled down.
NOTE: This appliance must be correctly installed by a suitable
qualified person, strictly in accordance with the manufacturer’s
instructions. The producer declines any responsibility for injury or
damage to persons or property as a result of improper use or
installation of this appliance.
Heat, steam and moisture will be created during use, take care to
avoid injury and ensure that the room is adequately ventilated. If
prolonged use occurs, additional ventilation may be required –
please consult your Qualified installer if you are in any doubt the
amount required.
IMPORTANT:
Do not use the front handle to carry the
appliance or
remove the appliance from the package.

WARNINGS FOR PROPER TRANSPORTATION
Keep the original package of the appliance.
To move the appliance properly, use the original package with
consideration to the markings on the package.
In cases where the original package could not be kept;
oCare for any possible measures to prevent any impact to the
appliance.
oDo not place heavy objects on the appliance.
oDuring transportation carry the appliance by holding the door
side on the top.
Respect for the Environment:
The documentation for this appliance is printed on paper
bleached without chlorine or recycled paper to contribute
to protecting the environment. The packaging was designed
to prevent damage to the environment; they are
ecological products that can be recovered or recycled.
Recycling the packing saves raw materials and reduces
the volume of industrial and domestic waste.
THE PACKING MATERIAL is 100%
recyclable and marked with the recycling symbol.
Dispose of in conformity with local law. The
packing material (plastic bags, polystyrene parts,
etc.) must be kept out of the reach of children
because it is potentially dangerous. THIS
APPLIANCE is marked in conformity with Gas
Appliances Directive 2009/142/EC
Low Voltage Directive 2006/95/EC
Electromagnetic Compatibility 2004/108/EC
Waste Electrical and Electronic Equipment (WEEE). By making sure

that this product is disposed of correctly, the user contributes to
preventing potential negative consequences for the environment
and health.
THE SYMBOL on the product or accompanying documentation
indicates that this product must not be treated as domestic waste
but must be delivered to a suitable collection point for the recycling
of electrical and electronic equipment
DISPOSAL MUST BE MADE in conformity with local laws on waste
disposal.
FOR ADDITIONAL INFORMATION about the treatment, recovery and
recycling of this product, contact the local office of competence, the
domestic waste collection service or the store where the product
was purchased.
BEFORE SCRAPPING, make it unusable by cutting the electrical cord.
INSTALLATION INSTRUCTIONS
It is important that all installation procedures be performed by a
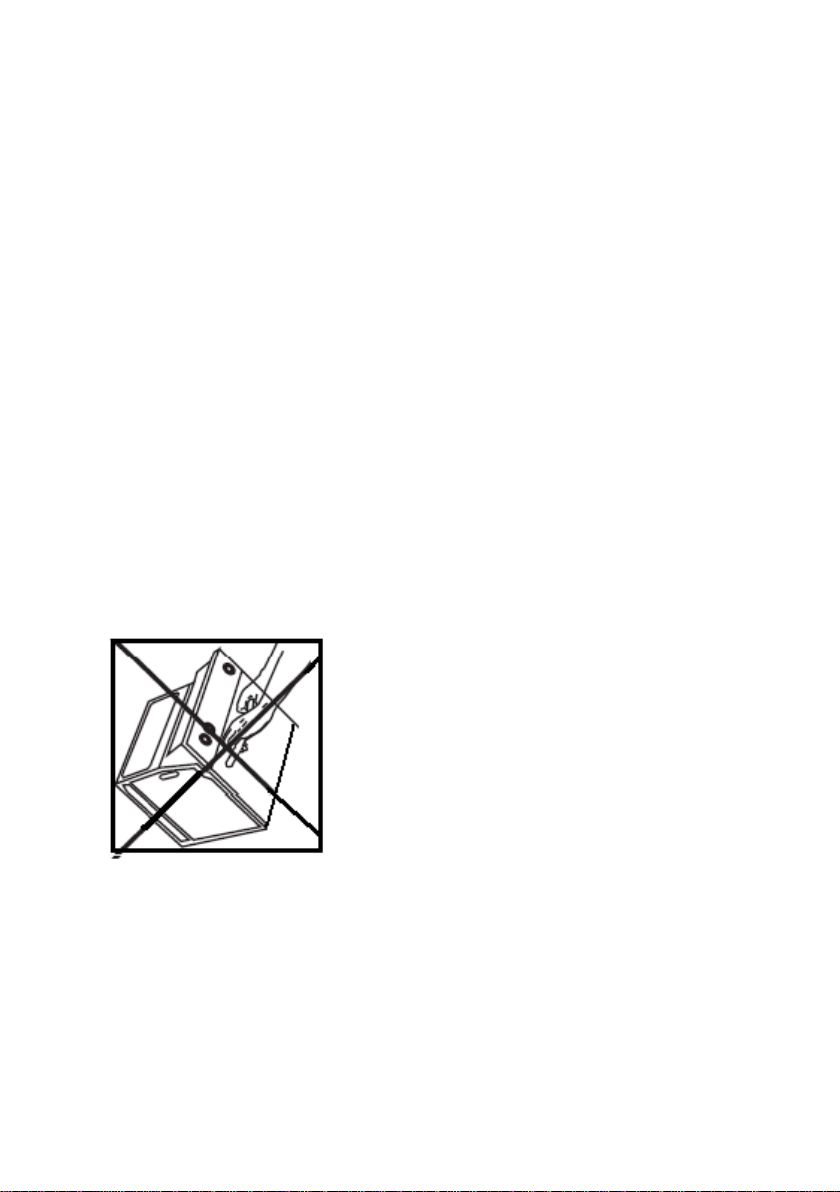
qualified technician. After unpacking the oven to connect it, rest it
on its base without damaging it. Do not lift the oven by yhe door
handle, but hold it at the sides. Do not lift the oven by the gas
connection. Make sure that the appliance has not been damaged
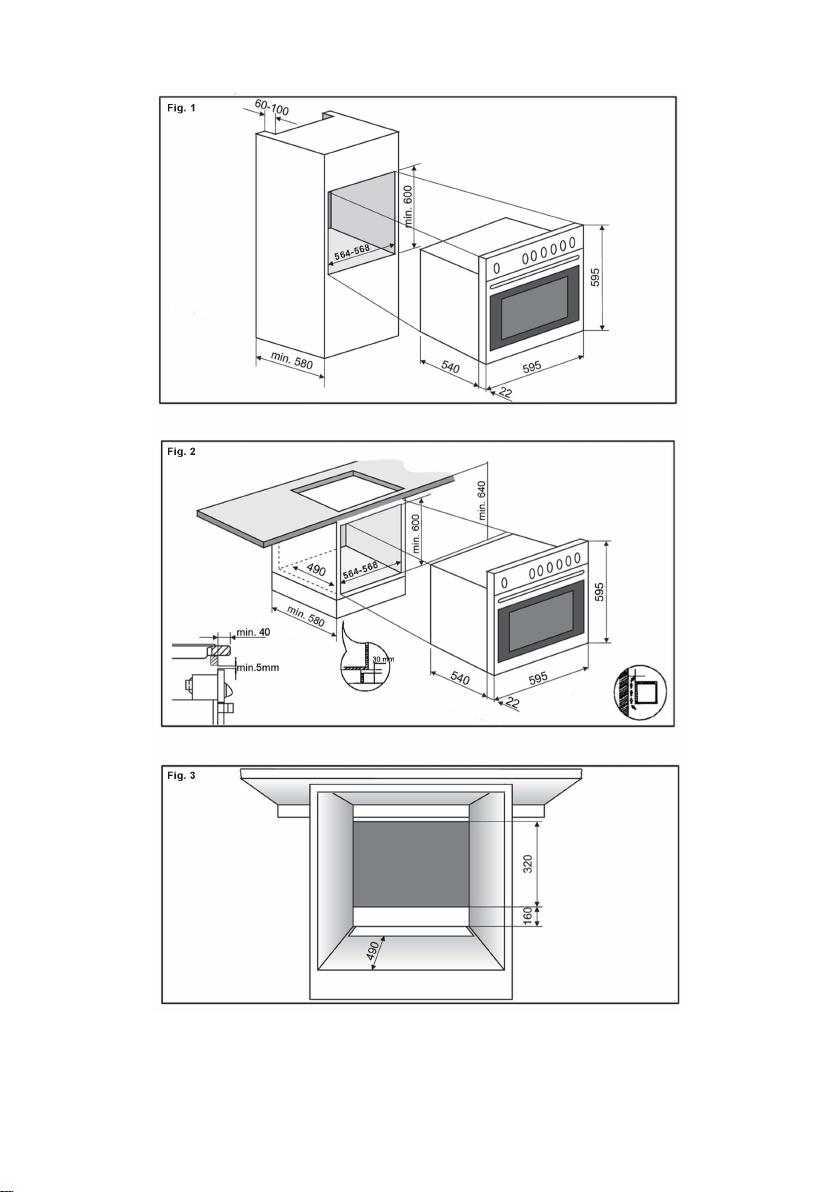
during transport, Oven dimensions and kitchen unit dimensions are
shown in the opposite figure. Kitchen units in contact with the oven
must be heat resistans: min. 75°C above ambient temperature
during periods of operation. House the oven in the unit cavity, lifting
it at the sides and making sure that the supply cable is not trapped.
For correct ventilation, follow the ventilation opening directions

shown in the figure, secure the oven to the kitchen unit with the
screws. Before Installation. Comments . To unpack the oven, pull
the tab located on the lower part of the box and to move it, hold
door handle . . A nichle is required in the kitchen unit as per the
dimensions shown on the figure, pro-viding a minumun depth of
580 mm.
To fit multifunction ovens in their locations, the back part of the
unit corresponding to The shaded area of fİgure 6, must not have
any projections (reinforcements, pipes, sockets, etc)
The adhesive used for the platic covering of kitchen furniture must
be able to withstand temperatures up to 58°C.
INSTALLING THE OVEN
For all ovens and after carrying out the electrical connection, 1
Introduce the oven into the kitchen unit, taking care not to trap the
cable, and not to put it on the upper part of the oven. 2 Fix the oven
to the unit by means of the 4 screws supplied via the holes that can
be seen when the door is opened. 3 Check that the oven housing is
not in contact with the sides of the unit and that there is at least
2mm separating the neighbouring units.
INSTALLATION SCHEME : It is fundamental to ensure a proper air
circulation to the back side of the appliance; The cut-off dimensions
must be observed. If needed, there can be larger cut-outs than what
indicated.


INSTALLATION LOCATION
In order for the gas unit to work properly it is essentital that the air
necessary for burning the gas flows into the area naturally. The
installer must follow the safety norms for the country of installation.
The flow of air into the area must come directly througy openings
made in the exterior walls. These openings must have a free
passage section of at least 1 00 cm2 (one or more openings can be
made.) Products of combustion must be exhausted through a hood
connected to a fume flue or directly outside. In the event that it is
not possible to install the hood, it is necessary to use an electric
ventilation fan installed in the outside wall or window of the area so
long as there is an opening for air to enter the area in conformity
with current law. This electric ventilation fan must have a flow
capacity sufficient to guarantee that 3 to 5 times the volume of air
in the room is xechanged every hour.
ELECTRICAL CONNECTION
Electrical Connection Attention: do not connect to the power
supply before you have finished connecting the oven and cooktop.
Make sure that installation and hook-up are performed by a
qualified technician in accordance with the manufacturer's
instructions and in compliance with local regulations. The installer is
responsible for the correct electrical connection and for the
observance of the safety rules. The oven must be connected to the
electricity supply by means of an all-pole disconnect switch with
minimum contact gap of 3 mm. The appliance must be earthed by
law.Do not use multiple sockets or extensions.After the oven has
been installed, the electrial componenets must be inaccessible.

Make sure that the voltage stated on te appliance rating plate is the
same as the voltage in your home. The rating plate is on the lower
front edge of the oven (visible with the door open.) If teh power
supply cable needs replacing, make sure that it is replaced with a
cable similar to the one provided by the Manufacturer (H05 RR-F
type) and that installation is performed by Service Center or a
qalified technician. The appliance is equipped with the cable for the
elecrical connection without plug. The wires in the mains supply
lead are coloured in accordance with the following code:
Green and Yellow-Earth
Blue-Neutral
Brown-Live
The connection must be made as follows: The wire coloured Green
and Yellow must be connected to the terminal marked 'E' or the
earth symbol or coloured green or green and yellow. The wire
coloured Blue must be connected to the terminal marked 'N' or
coloured blue or black. The wire coloured Brown must be connected
to the terminal market 'L' or coloured brown or red.
NOTE: The electrical outlet is to be positioned in an easily accessible
position adjacent to the appliance. In the event that it is necessary
to replace the mains lead, the replacement must conform to the
specification listed in the Tecnical
Data ensuring the correct colour code
connection and that all screws are
lightened sufficiently.

Control Panel
HGS 740 SS 230 NAT (Gas oven & Gas grill)
HGS 740 SS 230 LPG (Gas oven & Gas grill)
HGR 650 230 NAT (Gas oven & Gas grill)
1. On/Off (heating) indicator light
2. Oven light selector knob
3. Oven function / Thermostat selector knob
4. Minute minder knob.

in 15 seconds, keep the oven door open and wait for at least 1
minute before trying again the electric ignition. Note: When doing
the electric ignition for the first time, it is quite normal having to try
many times the electric ignition, because of the air inside the gas
pipe. Once started the flame of the burner, keep pressed the knob
for 10 seconds so as the thermocouple warms up deactivating the
safety valve, which otherwise would block the gas flow. Keeping the
door closed, check that the oven burner has ignited; if not, repeat
the operation. Always check perfect operation of the burner with
the door closed.
DURING OVEN OPERATION
Keeping the door closed, check the correct working of the cooling
fan. Cooling fan starts after the oven reaches to a certain
temperature for energy saving and stops at a certain temperature
inspite being shut off. If the cooling fan doesn't start operate in this
way: 1 Check there has been no interruption in the electricity
supply; if so, stop cooking, switch off the oven and wait for the
electricity to come. 2 lfthere has not been any interruption in the
electricity supply, do not use the oven and call the After-sales
Service. If the oven door is opened during cooking operations, the
cooling fan stops in order to prevent burning heat in the direction of
the user. Once the door has been closed, the cooling fan starts
again; if this not happens, check again the points 1 and 2.
Switch the gas oven on and set the thermo-stat knob to between
180°C and 260°C. The oven door must be closed.

GRILL+ TURN SPIT
This type of cooking allows you to brown the food. With the selector
in this posions, the grill and spit automacally operate together.
OVEN LIGHT
This allows the user to be able to see inside the oven easier.
TURNSPIT
This funcon allows using the spit while gas oven is running to cook
without grill.
GRILL
This type of cooking is parcularly suitablefor quick browning. If the
grill is gaseous then proceed the use as described in gas oven below.
Just try turning the knob clockwise.
If the oven thermostat knob is accidentally turned during operaon
of the electric grill, a safety device will prevent operaon of the grill.
To restore operaon, simply turn the oven knob unl the oven knob
unl the moving reference mark coincides with the fixed reference
mark on the front panel (closed).
TURBO FAN
The fan distributes the heat at the
rear of the oven. Due to the uniform heat distribuon, it allows
roasng and baking to take place at two heights at the same me.

SPIT
Slide the food onto the spit rod between the two forks, securing it in
a stable position by means of the forks to prevent straining the
motor. Fit the spit rod into the hole of the spit motor. and rest it on
the support provided. Place the collecting plate on lowest shelf.
Switch the grill on.
MECHANICAL MINUTE MINDER
This run-back timer can be used independently of an oven cooking
cycle for up to 120 minutes of timing. To set timer turn the knob
fully clockwise until it stops and then back to the reqyired time.
After exriry of the set time the timer will have returned to the '0'
position and an acoustic signal is briefly emitted.

ELECTRONICAL MINUTE MINDER
On connecting the oven, you will notice that 12:00 appears on the
clock and that a light begins to flash above the symbol.
Pressing the"+" and"-" buttons the correct time can be set on the
clock, which is subsequently stored and the flashing light goes out.
MANUAL USE
After setting the correct time, the oven is ready for use. Select a
temperature and a cooking function. To switch off the oven, set the
controls to the position .
Functions of the Electronic Clock Programmer Warning function:
This function generates a warning tone at a specified time.
Switching off the clock light
To switch off the clock light. press two buttons at the same time
and, after several seconds the screen of your clock will go out. To
re-light the clock, press any button and the current time will
reappear. This function can only be used when the clock shows the
current time and there is no function programmed (No function
symbol is lit). The clock light can be switched off , when the oven is
not in use.

WARNING FUNCTION
1) Press the MODE button until the signal above the symbol
begins to flash.
2) Choose the time when you want the alarm to sound, pressing
the"+" or"-" buttons.
3) Subsequently, the light will remain on indicating that the alarm
is programmed.
4) At the end of the programmed time, an alarm will sound and
the light will begin to flash.
5) Press any button to turn off the alarm and the screen shows the
current time again.

NOTES
Use of gas cooking appliance produces heat and moisture in the
room in which it is installed. ThE room must therefore be well
ventilated by keeping the natural air vents clear (fig. 1) and by acti-
vating the mechanical aeration device (suction hood or electric fan
fig. 2 and fig. 3). IntensivE and lengthy use of the appliance may
require additional ventilation. This can be achieved b} opening a
window or by increasing the power of the mechanical exhausting
system if installed.
CONNECTING TO THE GAS SUPPLY
The gas supply system must conform to current local law.
The type of gas for which the oven has been adjusted is shown on
the rating plate on the lower edge of the oven front (visible with the
door open) and on the packing. Before making the connection,
adjust the oven to the type of gas in the home.

The connection between the gas connection and thE pipe must be
made in one of the two following ways (see the drawing on bottom
page):
-using a connector without a sealing ring (the oven connector is
conical: ISO R 7)
-interposing the metal sealing ring provided.
ATTENTION:when finished check that there are no gas leaks. Use
soap and water, or another liquid suitable for the purpose, to check
for gas leaks. Do not use a flame to search for gas leaks.
WARNING: the use of flexible rubber tubing attached to the outlet
connector is prohibited because it cannot be inspected.
Adapting to the gas in use : It is possible to use other types of gas
by adapting the burner adjusment as follows:
-Make sure that the oven is not connected to the electric power
supply.
-Open the oven door completely and remove the oven bottom.
Remove the burner by unscrewing its screw, then unscrew the
injector and replace it.
-Reassemble the burner in the oven and the oven bottom.
This manual suits for next models
2
Table of contents
Other Teka Oven manuals