tekkiwear H9R User manual

Sport Camera -H9R
User Manual
CAUTIONS
- This is a 4K acon camera, It is normal for the housing to exert heat under use.
- Don´t expose the product directly to high temperatures over 40°C.
- Please peel o Transparent protecve lms on lens and screen of camera before using.
- Please properly protect well the lens and screen of camera aer using.
- Keep it safe from falling and dropping.
- Keep it distance from any strong magnec interference objects like electrical machine to avoid
strong radio waves that might be damaging the product and aect the sound or image quality.
- In case of overheang, unwanted smoke from the device, unplug it immediately from the power
outlet to prevent hazardous re.
- Keep it safety from children while on charging
Tips
- Verify the camera is in Video Mode, Press and hold the Up Buon to turn on/o Wi-Fi.
- Verify the camera is in Video Mode, Press quickly the Down Buon to turn on/o remote.
- Verify the camera is in Photo Mode, Press and hold the Up Buon or Down Buon to Zoom
in/out.
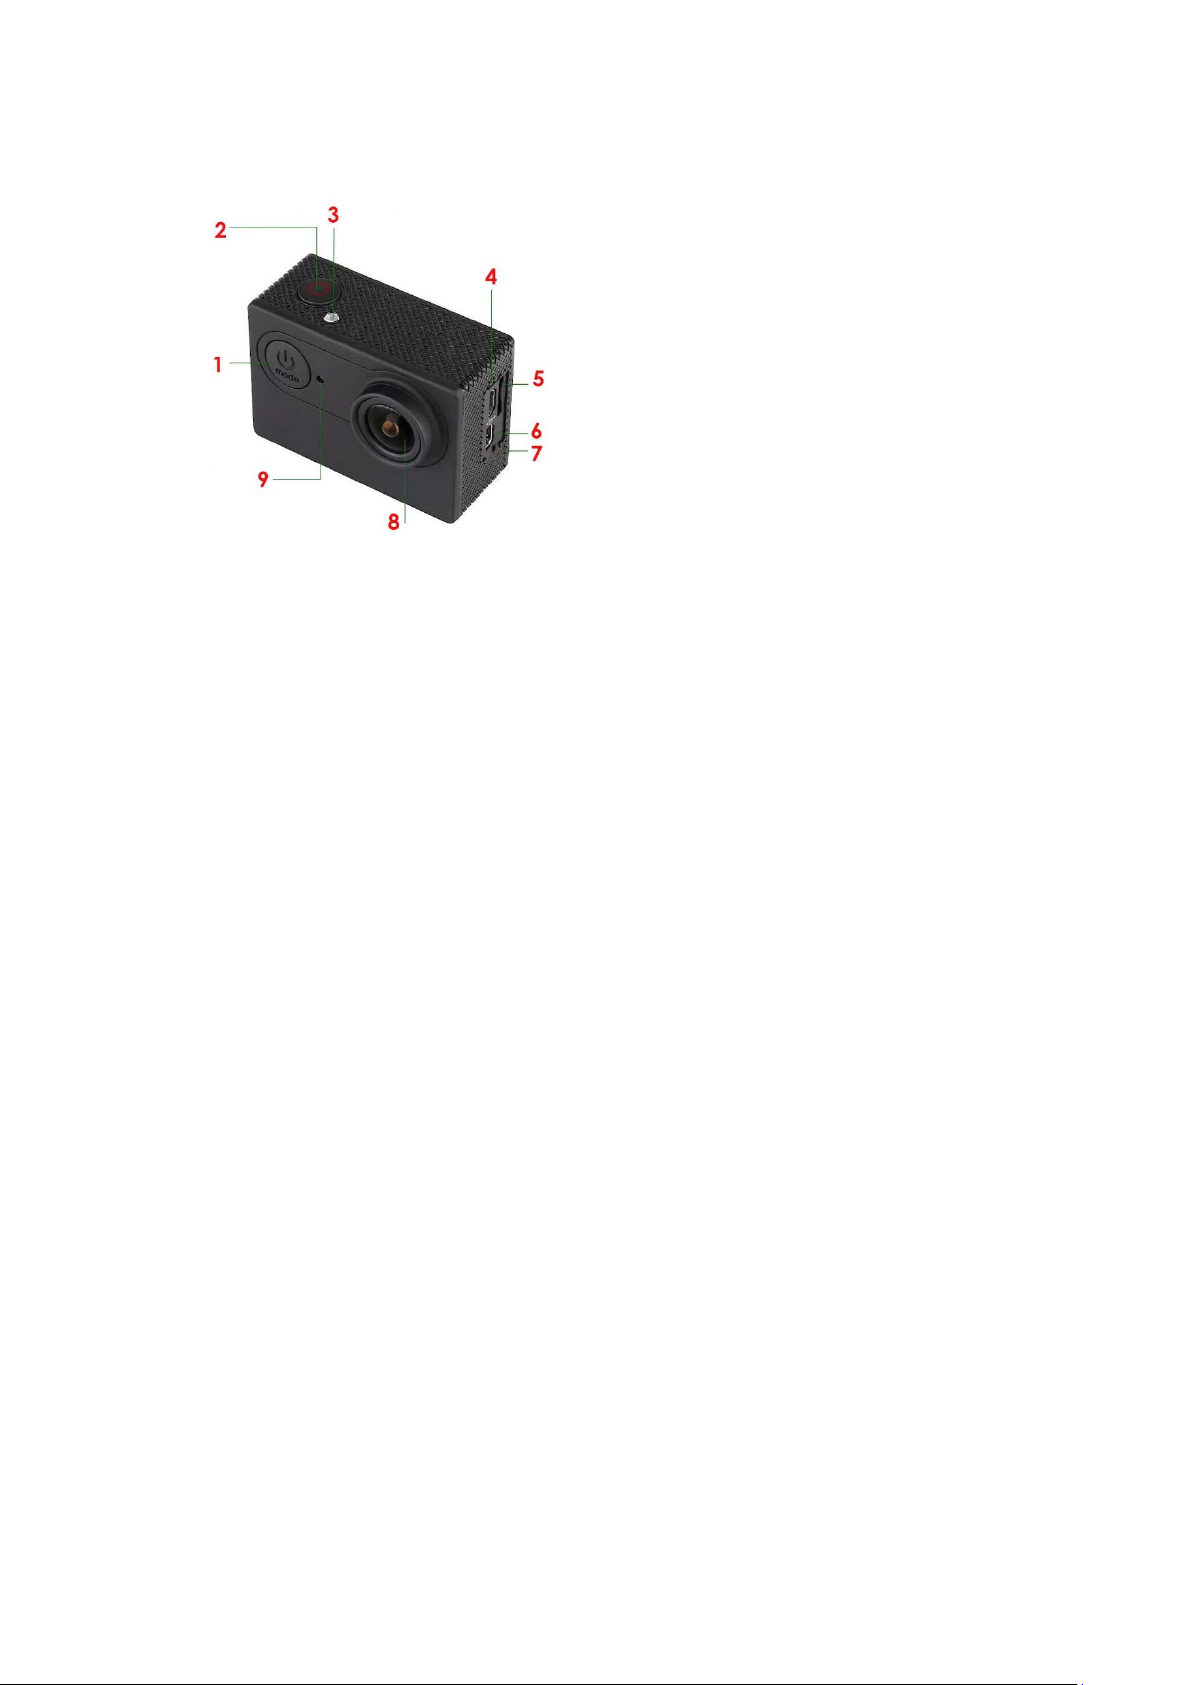
THE BASIC
1. Mode / On-O Buon
2. Shuer / Select Buon
3. Status indicator light
4. USB port
5. SD card slot
6. Mini HDMI out
7. External MIC input
8. Lens
9. Charging status light
GETTING STARTED
HELLO
Welcome to your new camera. To capture video and photos, you need a micro SD card (sold
separately). We strongly recommend to use the branded memory cards purchased from regular
channels for maximum reliability and stability during recording and in high vibraon acvies.
STORAGE/MICRO CARDS
Use brand name memory cards that meet following requirements:
- micro SD, micro SDHC, or micro SDXC
- Class 10 or UHS-I at least for 1080P or 720P video resoluon
- UHS-III rang at least for 4K Video resoluon
- Capacity up to 128GB (FAT32)
NOTES:
- Please format the micro SD, micro SDHC and micro SDXC memory card on the camera before
using.
- Please insert the memory card in correct way . if not , the card slot maybe damage by the wrong
way.
- To keep your micro SD card in good condion, reformat it on a regular basis.
- Micro SD card stops recording when the storage of each his is over 4GB and starts to record
again on a new le.
- Reformang erases all of your content, so be sure to ooad your photos and videos rst.
- Don' t place your Most SD card near strong magnec objects to avoid data error or loss.
To Power On:
Press and hold the Mode buon for seconds. The camera beeps while the camera status light is
on.
To Power O:
Press and hold the Mode buon for three seconds. The camera beeps while the camera status
light is o.
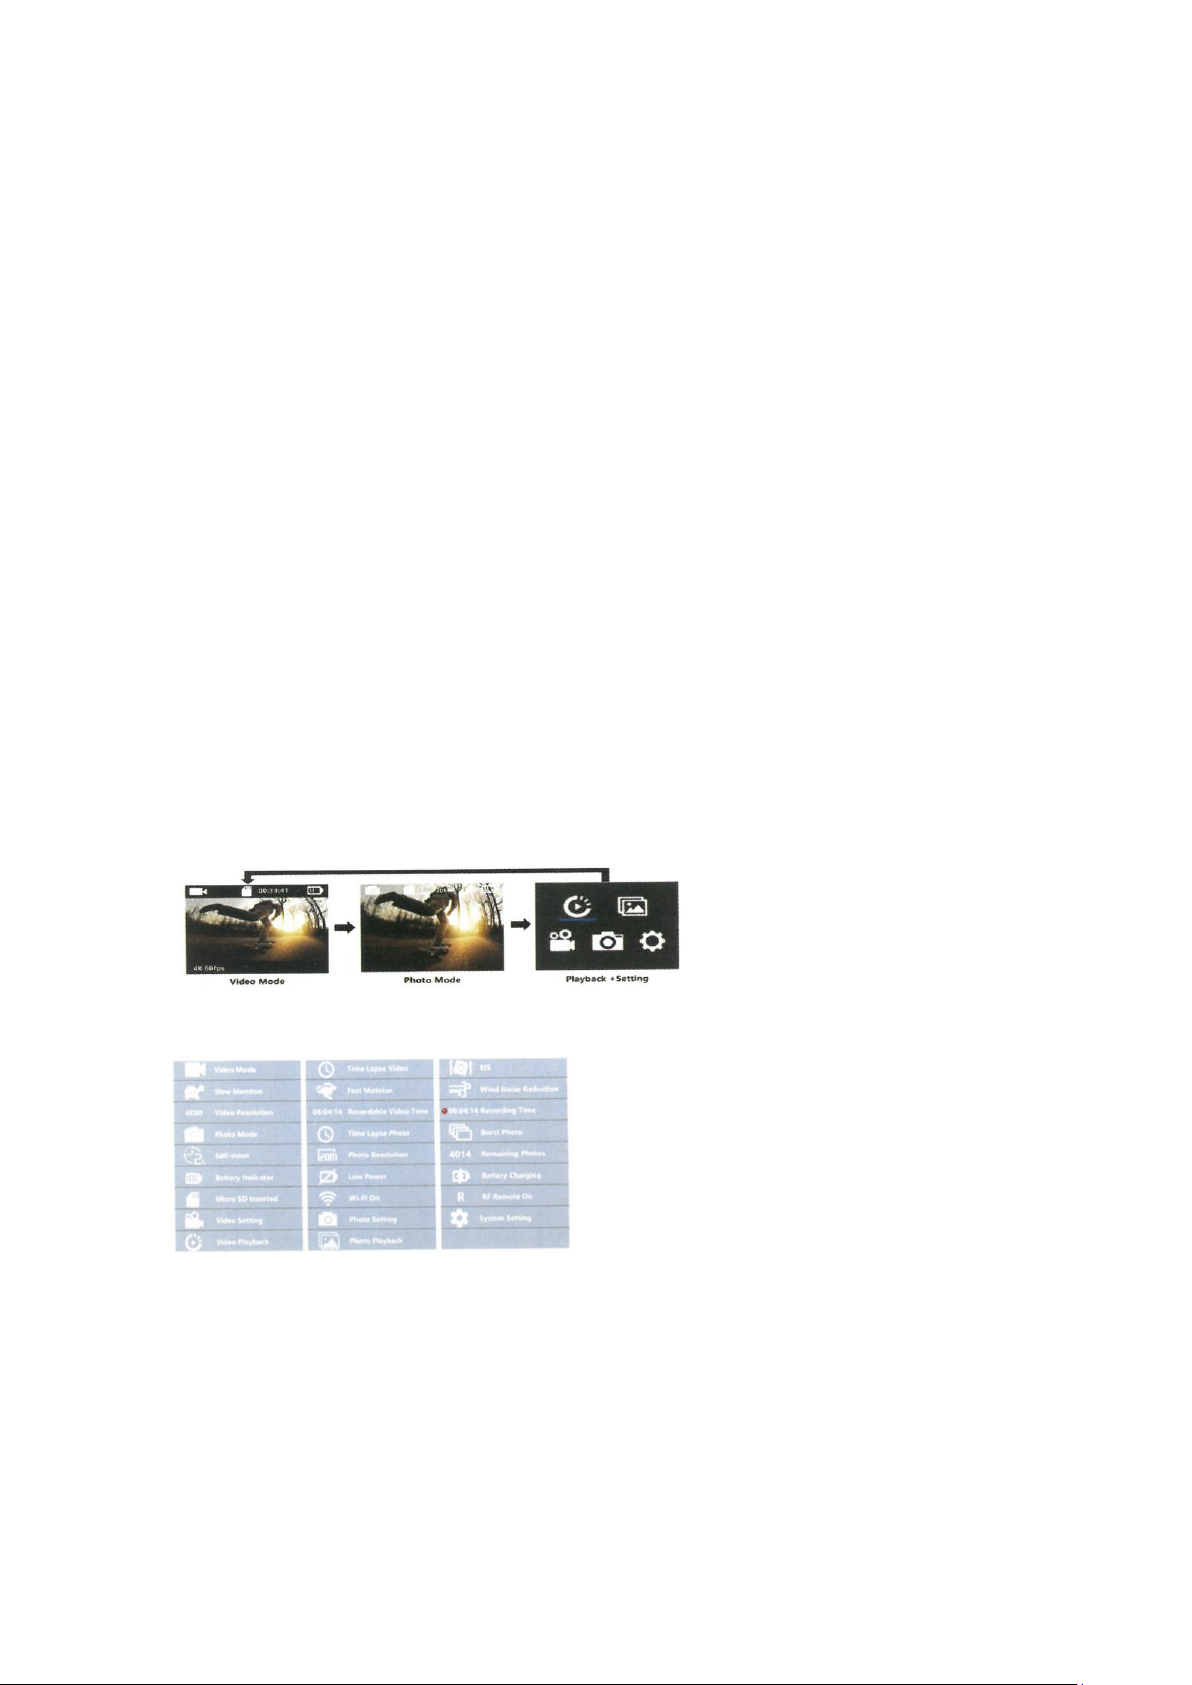
OVERVIEW OF MODES
Turn camera ON and repeatedly press the Mode Buon to cycle through camera modes and
sengs. The modes will appear in following order:
OSD DESCRIPTION:
CUSTOMIZING YOUR CAMERA
Repeatedly press the Mode Buon quickly to Playback and Seng Menu, use the UP or Down
Buon to cycle through the various opons, and press the Shuer/Select Buon to select desired
opon, to exit, press Mode Buon.

VIDEO SETTING
- Video Resoluon: 4K 60fps (3840.2160) / 4K 30fps (3840.2160) / 1080P 120fps (1920.1080 )
1080P 60fps (1920.1080) / 1080P 30fps (1920*1080 ) / 720P 240fps (1080.720 ) Default seng
is 4K 30fps.
Note:
- When capturing video at high resoluon or high frame rates such as 4K 60/30fps, the camera
may become hot and consume more power, which is normal.
- FAT32 format Micro SD card stops recording when the storage of each le is over 4GB and starts
to record again on a new le
- Since the exposure me of 4K60 will be shorter than 4K30 in low light scenes, 4K60 video will
be darker than 4K30 in low light environment. In order to get beer low-light video eects, it is
recommended to turn on low-light mode in low-light scenes such as
indoor/night/tunnel/underground parking. In order to avoid overexposure, it is recommended
to turn o the low light mode in highlights such as beaches and snow.
EV (Exposure Value): -3 to +3
By defau your camera uses the enre image to determine the appropriate exposure level.
However EV lets you select an area that you want the camera to priorize when determining
exposure. This seng is parcularly useful in shots where an important region might otherwise
be over or underexposed. When you change this seng, the LCD display immediately shows you
the eect on your image. If you change mode, the camera returns to using the enre scene to
determine the correct level of exposure.
EIS (Electronic Image Stabilizaon) On/O
This camera is equipped EIS funcon with 6-axis gyroscope to detect moon changes. When the
camera lts, moves, shakes, the sensor use image cross-border compensaon algorithm to
compensate the change and produce stable videos, especially in acvies with relavely small
angle (about 6 degrees) but fast moon including cycling, motorcycling, and hand-held uses.
Note:
- EIS does not support 1080P 120fps / 720P 240fps video resoluon.
- If you turn on EIS, Loop Video, Time Lapse Video, TL Duraion, Slow Moon and Auto Low Light
will not be available automacally.
Loop Video : O / 1min / 5min
When the micro SD card is full, the new les will cover the old one if loop recording is on.
Note:

- FAT32 format Micro SD card stops recording when the storage of each le is over 4 Gb and starts
to record again on a new le.
- If you select Loop Video, EIS, Time-lapse Video, TL Duraon, Slow Moon and Auto Low Light
will not be available automacally.
TL Duraon
Unlimited / 5Mins / 10Mins / 15Mins / 20Mins / 30Mins / 60Mins
Connuously create Time Lapse Video at specic duraon.
If you want to set Time Lapse Duraon, please turn on Time Lapse Video rst.
Slow Moon
On / O Slow moon is an eect in lm-making whereby me appears to be slowed down.
Note:
- If you select Slow Moon, please turn o EIS Time-Lapse Video and Fast Moon rst, then
choose 1080P 60fps / 720P 120fps Video Resoluon.
- If you select Slow Moon, EIS, Time-Lapse Video and Fast Moon will not be available
automacally.
Fast Moon
O / 2x / 4x / 6x / 10x /15x Acon that appears to move faster than normal on the screen,
accomplish by lming the acon at less than normal speed in the camera and then projecng it
at normal speed.
Note:
- lf you select Fast Moon, please turn o EIS, Time-Lapse Video and Slow Moon rst.
- If you select Fast Moon, Time-lapse Video and Slow Moon will not be available automacally.
Wind Noise Reducon
On / O Turn on Wind Noise reducon funcon, it can lower the noise to an acceptable level.
Auto low Light On / O
Default seng is O. Auto Low Light mode will automacally adjust the brightness in low light
condions to achieve the best low light performance.
Date Stamp: O / Date / Date & Time
If you turn on Date Stamp, this camera adds date/me stamp to the videos you record. If you
turn o Date Stamp, this camera will not add date/me stamp to the videos you record.
PHOTO SETTING
- Photo Resoluon: 20M / 14M / 10M / 8M Default seng is 12M

- ISO: Auto / 100 / 200 / 400 / 800 / 1600 / 3200 Default seng is Auto. ISO determines the
camera' s sensivity to light, and creates a trade-o between brightness and resulng image
noise. Image noise refers to the degree of graininess in the image. low light, higher ISO values
result in brighter images, but with greater image noise.Lower values result in lower image noise,
but darker images. When you change this sengthe display immediately shows you the eect
on your image.
- EV (Exposure Value) -3 to +3 by default, your camera u.s the enre image to determine the
appropriate exposure level. However. EV lets you select an area that you want the camera to
priorize when determining exposure. This seng is parcularly useful in shots where an
important region might otherwise be over- or underexposed. When you change this seng, the
LCD display immediately shows you the eect on your image. If you change modes, the camera
retums to using the enre image to determine the correct level of exposure.
- Time Lapse Photo: O / 3Sec / SSec / 10Sec / 30Sec / 1min Time Lapse Photo captures a series
of photos at specied intervals. Use this mode to capture photos of any acvity then choose the
best ones later. Note: If you select Time Lapse Photo, Burst Photo, Delay Timer and Long
Exposure will not be available automacally.
- TL Duraon: Unlimited / 5mins / 10Mins /15Mins / 20Mins/ 30Mins / 60Mins Defauh seng is
Unlimited. Note: If you want to select TL Duraon, please turn on Time Lapse Photo rst.
- Burst Photo: O / 3photos / 5photos / 15Photos / 30Photos Default seng is o. Connuous
shoong can take up to 30 photos in a certain amount of me, making it ideal for fast-moving
events.
If you select Burst Photo funcon, Time Lap, Photo, TL Duraon and Long Exposure will not be
available automacally.
- Delay Timer: 2 sec / 10 sec A Delay Timer gives a delay between pressing the shuer release
and the shuer's ring. It is most commonly used to let photographers to take a photo of
themselves (oen wrth family).
Note: If use Delay Timer funcon. Time Lapse Photo, TL Duraon and Long Exposure will not be
available automacally.
- Long Exposure : O / 1sec / 2sec / Ssec / 8sec / 30sec / 60sec Default seng is o.
Long Exposure is an exposure method that selects a slow shuer speed. Long exposures can
make dark scenes clearer and get fantasc eects. Especially in night vision scenes such as .arry
sky or city night trac, the camera can also take fantasc photos at night.
Note: If you select Long Exposure funcon, Time Lapse Photo, TL Duraon, Burst Photo and Delay
Timer will not be available automacally.
- Date Stamp: O / Date / Date & Time If you turn on Stamp, this camera adds stamp to the
photos you take. If you tum o Stamp, this camera will not add stamp to the photos you take.
SYSTEM SETTING
- Frequency: 50Hz/60Hz Default seng is 50 Hz.
- Sound: Shuer / Boot-up / Beep / Volume

- Shuer On / O Sets the camera's shuer sound.
- Boot-up: On /O Sets the your camera's power on sound.
- Beep: On/O Sets the camera's operaon sound.
- Volume: 0/1/2/3 Sets the volume of your camera, record sound.
- AE Meter: Center / Mul / Spot Default seng is Center .
In photography, the metering mode refers to the way in which a camera determines exposure.
Cameras generally allow the user to select between center, average or spot metering modes. The
dierent metering modes allow the user to select the most appropriate one for use in a variety
of lighng condions
AWB: Auto / daylight / cloudy / incandescent / uorecent / Snorkeling / Snow Mode
AWB (Auto White Balance) lets you adjust the color temperature of videos and photos to
opmize for cool or warm lighng condions. When you manage this seng, the LCD display
immediately shows you the eect on your image.
Note:
- Snorkeling mode provides color correcon while capturing footage in blue water or clear
freshwater at depths of 5 to 33 (1.5 to 10m)
- Snow mode can suppress overexposure in high-brightness environments such much snow eld
or beach.
Eect: standart / black and white / natural / negave / retro.
Default seng is Normal.
LDC ( Lens Distoron Correcon ) : On / O
Default seng is o. Turn on Distoron Correcon, it can correct the image distoron.
Date St Time: YYMMDD 00:00:00
The date and me are automacally updated when you connect your camera to the iSmart DV
app. However, you can manually change these seng, if needed. Note: • lf the baery is
removed from the camera for an extended period of me, the date and me will be reset
automacally.
• Screen Saver: O / 1min / 3min / 5min Turns o the LCD display aer a period of inacvity to
save baery life. To turn on the LCD display again, press any buon on the camera.
• Upside Down: On/O This seng determines the orientaon of seng menu.
Power O: O / 1min / 3min / 5min Powers o your camera aer a period of inacvity to save
baery life.
• Wi-Fi: On/O Default seng is o.
• RF Remote: On/O Default seng is o.

• Driving Mode: O/On, If you turn on car mode and connect camera with car charger, the
camera will turn on automacally and start recording if you start your car´s engine and the
camera will turn o and stop recording if you Turn o the car' s engine.
Note: Must use a 5V 1A output car charger.
- Reset Wi-Fi: Yes / No This opon can erase the camera' s WiFi data .
- Language: English / Chinese / Italiano / Español / Portugues / Deutsch / Français / PoIski
Sets the language that appears on the camera.
- Format Yes/No
To keep your micro SD card in good condion, reformat it on a regular basis. Reformang erases
all of your content, so be sure to ooad your photos and videos rst To reformat your card, press
the mode buon to enter system seng, then press down buon several mes to enter Format
> Format Card? > YES.
- Reset Yes/No This opon resets all sengs to their default values.
- Version : Mod. / Version / Number / Dated You can check the model, soware version and
updated me of your camera.
NOTE: Soware veron is the main informaon of rmware upgrade, troubleshoong and aer-
saIes. If necesary, please provide the soware version informaon to our aer-sales team so that
we can serve you in me.
• Memory Card: Capacity / Free Space Card Info opon let you check the capacity and free space
of your micro SD card.
• Recommended Micro SD: The card in the list meets the required card speed for 4K video
recording, it is highly recommended to use it rst.
Note: If the camera's baery is removed, all sengs will be restored to the factory default
sengs.
VIDEO MODE
VIDEO
To record video, verify the camera is in desired Video Seng opon and set the desired video
resoluon, if the Video icon in your camera's LCD is not showing, press the Mode Buon
repeatedly to the Video Seng menu and select the desired opon, such as Loop Video / Time-
lapse Video /Slow Moon / Fast Moon, etc.
- To Start Recording: To press the Shuer Buon. The camera' s blue Working Indicator will ash
and a Red Dot will show on the screen while recording.
- To Stop Recording: To press the Shuer Buon. The camera Working Indicator stop ashing and
the Re dot disappear on the screen to indicate recording has stopped
Notes
- FAT32 format Micro SD card stops recording when the storage of each le is over 4 GB and start
to record again on a new le

- This camera automacally stops recording when the baery is out of power. Your video will
saved before the camera powers o. The video will not be saved, and even the video will be
damaged, if the baery is took out or loss power during recording.
- Due to the baery's characterics and environmental temperature requirements, such as high
temperatures can cause the baery to expand. In high temperature environments, especially in
the summer, when you use this camera as a dash camera, we strongly recommend that you
remove the baery and use the car power directly, but when the car's engine is turned o, the
carnera will immediately turn o, the date and me set and last video record. will not be saved
- This camera automacally stops recording when the SD card is the looping record funcon is
turn o.
PHOTO MODE
PHOTO
To capture photo, verify the camera is in desired Photo Seng opon and set the desired photo
resoluon, if the photo icon in your camera' s LCD is not showing, press the Mode Buon
repeatly to the Photo Seng menu and select the desird opon such as Time-lapse Photo / Burst
Photo / Delay Timer / Long Exposure, etc.
- To capture a photo: In the Photo mode, Press the Shuer Buon. The camera will emit the
camera shuer sound.
- To capture Time-Lapse Photo sedes Verify camera is selected desired Time Lapse Photo mode,
Press the Shuer Buon, The camera will trigger connuous shoong at the set interval and TL
duraon, the camera will emit shuer sound each me a photo is taken. To stop Time Lapse
Photo, Press the Shuer Buon again.
- To capture a Burst Photo series: Verify the camera is selected desired Burst Photo opon, Press
the Shuer Buon, the camera will emit shuer sound each me a photo is taken.
- To capture a Delay Timer Photo: Verify the camera is selected desired Delay Timer opon, Press
the Shuer Buon, the camera iniates countdown and emit shuer sound each me a photo
is taken.
NOTE:
- If use Time Lapse Photo funcon, Burst Photo, Delay Timer and Long Exposure will not be
available automacally.
- If the Time Lapse photo funcon is not turned on, the TL Duraon funcon is invalid even if the
TL Duraon' s related opon is set.
PLAYBACK
PLAYING BACK ON CAMERA.
1 . Enter Video or Photo playback mode. If the SD card contains a lot of content, it might take a
minute for it to Ioad.
2 . Press the Up / Down Buon to scroll through the video or photo les.
3 . Press Shuer Buon to open vid. or photo in full-screen view.

4 . To return to the le list, press Mode Buon.
5 . To exit the Playback mode, press Mode Buon again.
PLAYING BACK ON TV
1 . Turn on the TV
2 . Connect the Mini HDMI end to the port on camera and HDMI end to HDMI port on the TV
3 . Select the right input source on the TV
4 . Turn on the camera aer a while, you can preview the camera from TV
5 . Seng your camera into the video/photo Playback
6. Select the desired content to playback
Note:
- If the camera is connected TV with HDMI cable, the camera do not support to take videos or
photo, only for Playback.
- HDMI cable is not included in the standard package, you will need buy an extra HDMI cable.
- PLAYING BACK ON COMPUTER
To play back your video and photos on a computer, you must rst transfer these les to a
computer. Transferring also frees up space on your micro SD card for new content. To ooad
les to a computer using a card reader (sold separately) and your computer' s le explorer,
connect the card reader to the compute, then insert the micro SD card. You can then transfer
les to your computer or delete selected les on your card. Note that you must use a card reader
to ooad photos or audio les. With this method, playback resoluon depends on the resoluon
of the device a. its ability to play back that resoluon.
NOTE:
- 4K requires a high data transmission stream. If you playback 4K video ie through a card reader,
you may not be able to obtain sound playback. order to get beer playback results, it is strongly
recommended to copy the 4K video directly to the computer to playback.
- This camera might be compable with the les from dierent soluon camera or other device.
- The quick me player is a good compability with MOV format video les. We strongly
recommend using the Quick Time Player to play back video rst on your computer.
DELETE FILE ON CAMERA
1. Verify the camera is in Video or Photo Playback menu, if your micro SD card contains a lot of
content it might take a minute for it to Ioad.
2. Press the Up or Down Buon to locate the le you want to delete.
3. Press and hold the Up Buon for seconds. The screen shows " Delete File" .
4. Press the Up or Down Buon to locate the desired opon: "Single File- or "All Files" then Press
Shuer Buon to select the desired opon.
5. Press the Up or Down Buon to locate the desired opon: " Yes / No" .

6. If you select "Yes" , then Press Shuer Buon to delete the le you want if you select - No" ,
then Press Shuer Buon to back the playback mode.
BATTERY
The camera contains sensive cornponents, including the baery. • BATTERY STORAGE AND
HANDLING
- Do not store in temperature above 140°F/60°C.
- Avoid exposing your camera to very cold or very hot temperatures. Low or high temperature
condions may temporarily shorten the baery life or cause the camera to temporarily stop
working properly. Avoid dramac changes in temperature or humidity when using the camera,
as condensaon may form on or within the camera.
- Do not dry the camera or baery with an external heat source such as a microwave oven or
hair dryer.
- Damage to the camera or baery caused by contact with liquid inside the camera is not covered
under the warranty.
- Do not store your baery with metal objects, such as coins, keys or necklaces. If the baery
terminals come in contact with metal objects, this may cause a re.
- Do not make any unauthorized alteraons to the camera. Doing so rnay compromise safety,
regulatory compliance, performance, and may void the warranty.
- Please do no throw the camera or its baery to the garbage,nd a specic recycling point for
it.
WARNING:
- Do not drop, disassemble, open, crush, bend, deform, puncture, shred,microwave, incinerate
or paint the camera or baery.
- Do not insert foreign objects into the baery opening on the camera.
- Do not use the camera or the baery if it has been damaged - for example, if cracked, punctured
or harmed by water. Disassembling or puncturing the baery can cause an explosion or re.
CHARGING THE BATTERY
1.Connect the camera to USB power supply (5V/lA commended).
2.The charging status light remains ON while the baery is charging.
3.The charging status light will turn OFF when the baery is fully charged.
Notes:
- Charging me: 4-hours for 5V DA power supply
- Please make sure the camera is shuled down while charging.
- Remove the baery before using as a dash camera and use 5V/lA brand-name car charger.
MAXIMIZING BATTERY LIFE

lithe baery reaches 0% while recording, the camera saves the le and powers o. To maximize
baery life, follow these guidelines when possible:
- Turn o Wireless Connecons
- Capture video at lower frame rates and resoluons
- Use Screen Saver seng.
Wi-Fi APP
The Wi-Fi App lets you control your camera remotely using a smart phone or tablet. Features
include the camera control, live preview, playback and sharing of select content and more.
The iSmart DV App is compable with smart phones and tablets listed below:
For Apple IOS: iPhone6 (plus), 6s (plus), (iOS above 12) iPhone Air & Mini ( iOS above 12)
For Android: Android 4x Quad-Core devices (above Android 7.0)
CONNECT TO THE iSmart DV APP
1. Download iSmart DV app to your mobile device from the Apple App Store or Google Play;
Link to Apple App Store (for iOS Smartphones):
Link to Google Play (for Android Smartphones):
2. Turn on the camera, then press Up Buon for seconds to turn on Wi-Fi; the WiFi name and
password informaon will appear on the display, Press Up Buon for seconds again if you want
to turn o Wi-Fi
3. Turn on Wi-Fi Seng of your mobile device, connect to the Wi-Fi SSID "iSmart DV"
4. Enter the password: "1234567890"

5. Open the app "iSmart DV" on your smart phone or tablet
6. Tap “Add new camera”
7. Tap “Wi-Fi connect”
Note: Press “Up Buon” for any seconds again to turn o the Wi-Fi
DOWNLOADING AND SHARE YOUR CONTENT
1. Open the -iSmart DV- app.
2. Tap -Albums icon- at the le comer of the boom screen.
3. Select les in -Photos- or "Videos- at the top of the screen.
4. Tap "Download icon" at the right corner of the boom screen to download
5. Save or Share your content
NOTES:
The camera Wi-Fi is a point to point signal source, which supports only one telephone connecon
at one me and does not support two or more phones. If two phones turn on Wi-Fi at the same
me, one phone is successfully connected to the camera's Wi-Fi, and the other will no long e r
connect to the camera, or even interfere with the transmission of the signal. The camera Wi-Fi
bandwidth is relavely narrow, and its signal will be aected by distance, other signals,
electromagnec waves, obstacles and other factors. 2 to 5 seconds signal delay is normal.Wi-Fi
distance is about 5-10 meters.
- When the phone and camera connect through Wi-Fi, the power of the camera will increase.
The camera's temperature will rise rapidly, and the consumpon of camera baeries will also
increase. This is a normal phenomenon.
- Since many kinds of phones in the market, and the phone system is constantly updated, iSmart
DV app needs me to synchronize mely updates, if iSmart DV app can not be compable to

your phone, please tell us your phone' s model and system version informaon, we will in the
rst me synchronize your phone.
- If you nd your phone can not connect the camera's WIFI, please conrm that your connecon
is correct, if yes, and sll can not connect Please delete the Wi-Fi SSID of the camera in your
phone Wi-Fi seng and reconnect. If necessary, you can also delete the iSmart DV app from your
phone and re-download and re-install it.
EXTERNAL MIC
This camera can be compable with a external Wired Omni-direconal Mono Microphone
2.5mm.
Insert the external MIC to DC2.5 MIC port, the camera will automacally switch to record the
sound from the external MIC. This will help to reduce the noise and get beer video sound.
Specicaons:
Style: Collar Clip Mono Microphone
Polar Paerns: Omnidireconal
Frequency Range: 30Hz-15000Hz
Output Impedance: 2.2K Ohm
Sensivity: 34dBt2dB
Plugging: 2.5mm
SNR: >60dB
Wire Length: approx. 1M/3.28
Communicaon: Wired
Storage temperature range: -20 to +60°C
Operaon temperature range: -10 to +55°C
2.4G Wireless Remote:
Splash-proof only, not waterproof / Range 5M
HOW TO TURN ON/OFF THE REMOTE:
Select ON/OFF in the Seng Menu to turn on/o the 2.4G remote controller.

Way2: In the Video mode, press the Down Buon for seconds to turn on/o the 2.4G remote
controller quickly.
Video
To start recording: Press the Video Buon.
To stop recording: Press the Video Buon again.
Photo
To take a photo: Press the Photo Buon.
NOTES:
- Verify the camera is in Video/Photo Mode rst, if the camera is set in Playback or Seng Menu,
the camera can not be controlled by the remote.
- Be sure to remove the remote control baery and put it in a safe and reliable place , if do not
use for a long me.
- The remote control will always be in standby state. If the indicator is not on, the baery was
out of power. In order to conrm the normal use of the remote control, please replace the
remote control baery regularly and in me as following steps:
Step 1: Use a 1.84 mm p screwdriver (not included) to remove the 4 screws on the back cover,
allowing you to open it.
Step 2: Remove another 4 screws on PCB board.
Step 3: Li the PCB board and slide out the baery, as shown in the picture.
Step 4: Instal the new baery, keeping the + pole facing up.
Step 5: Install all 4 screws back onto the PCB board.
Step 6: Install the 4 screws back into the cover.
WATERPROOF CASE
Specially designed for diving, surng, snorkeling and other water sports acvies. The
waterproof case does not only oer greater waterproof protecon to your camera, it also oers
extra protecon against dust, scratches and shocks. Light and easy to carry, excellent PMMA
material endows it with high quality.With the use of the waterproof case, you can record
acvies even 30M under water and it won't damage the shoong eect, clear and vivid.Your
movement and photographic eect won' t be aected by an-surf pressure. Convenient to link
camera with other accessories mount through this waterproof case.
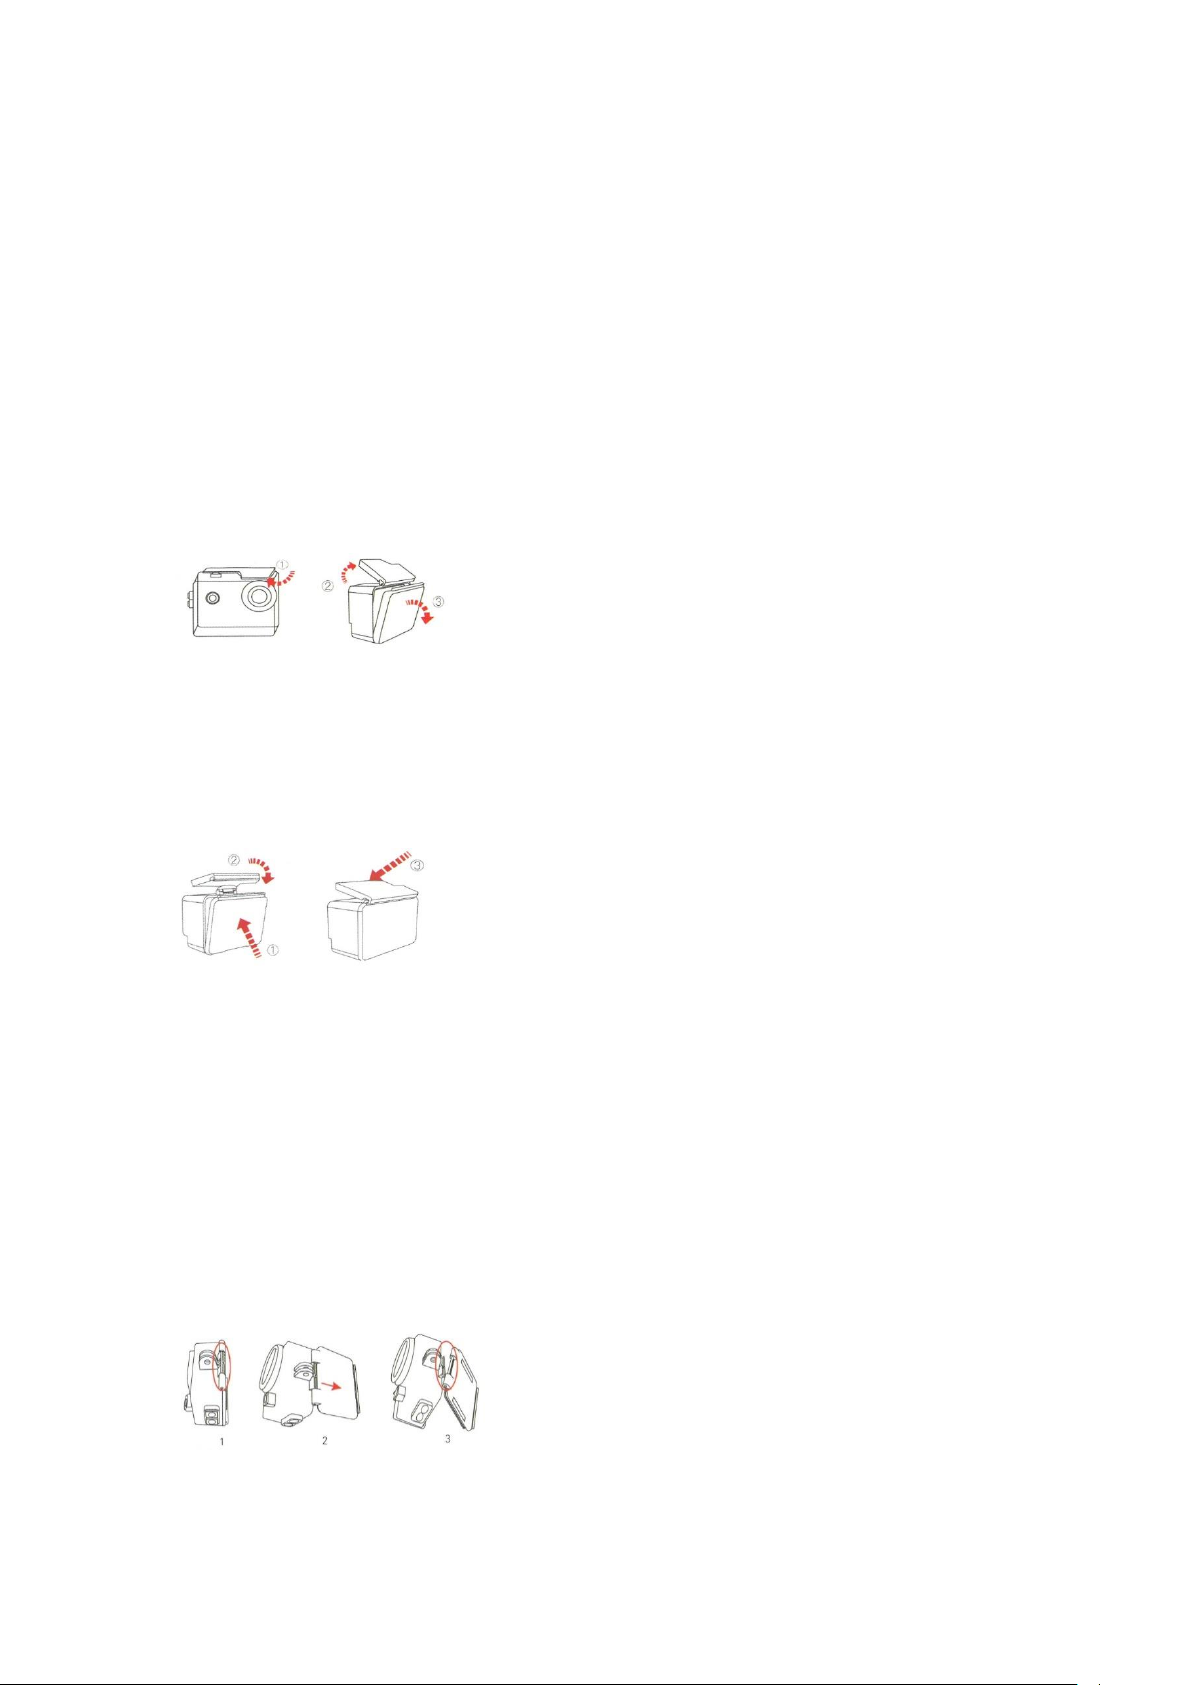
HOW TO OPEN:
1) Pick the black latch up on the top of the case.
2) Pull up the buckle of the case.
3) Open the back cover of the case.
HOW TO CLOSE:
1) Please close the back door of the case.
2) Pull down the latch and lock it to the back door.
3) Press down the buckle.
Tips:
1. Please tear the protecve lms on the waterproof case lens before shoot/record;
2. To achieve beer waterproof performance, the voice record within the waterproof case will
be weakened.
DUST-PROOF BACKDOOR REPLACEMENT:
If the dustproof back door cannot be used under water due to leakage or normal wear of the
rubber gasket, it must be replaced.

1) Find the slot of the waterproof case as circled place.
2) Hold the case with your hands, pull the waterproof back cover o.
3) Insert the lower half of the dust-proof backdoor in the slot, then push the upper half into the
slot unl the whole backdoor being totally installed
NOTES:
- In order to capture a clear video or photo, please tear o the lens protecon lm of the
waterproof shell before use, and protect well the lens window from scratch aer use.
- Before sealing the waterproof case, keep the camera housing' s White Silicone Seal Ring clean,
a single hair or grain of sand cause a leak. You can test by closing the case without inserng the
camera. Submerse the case completely in the water for about a minute. Remove the case from
the water, dry o its exterior with a towel, and then open the case. If the interior is dry,the case
is safe for use under water.
- Before sealing the waterproof case, make sure the waterproof case is sealed well before use.If
the white silicone sealing ring is found to be hardened, deformed or damaged, please stop using
this water tank and replace the new waterproof shell in me
- Please dry it in me aer use, otherwise the waterproof shell metal buon will dust and reduce
the waterproof performance. Aer use in in seawater or seaside, you will need to rinse the
outside of the housing with fresh water and then dry. This will prevent corrosion of the hinge pin
and salt buildup in the seal, which can cause failure. Do not ush the interior with water
- When use the camera with the waterproof in low temperature, such as Winter, Rainy Day,
Underwater and so on, please do the an fogging treatment so as to avoid the blurred video. It
is recommended to add an-fog lm; insert the an-fog lm into the waterproof case to prevent
the lens from fogging in low temperature or humid environment;
- Keep it safe from falling and dropping and high temperature above 80°C.
- Waterproof shell is vulnerable product, we strongly recommend ,according to the usage of the
environment and frequency, to replace the waterproof shell in me
Mounng Your Camera

Aach your camera to helmets, gear and equipment. The following assembly methods are for
reference only!
Notes:
- Our standard accessories are the basic version. If you need dierent types of accessories, you
need to purchase them separately.
- With dierent types of accessories, the camera can be used in dierent occasions. Please
purchase dierent types of accessories kit according to actual needs.
- Our cameras can be parally compable with accessories from other brands.
Table of contents
Other tekkiwear Action Camera manuals


