TeknoStamap ECO SMART 6514 User manual

USE AND MAINTENANCE MANUAL
AUTOMATIC DOUGH SHEETER
Mod. SMART-AUTOSMART
1/96
Revision
n°1
date
21.04.2009
AUTOMATIC DOUGH SHEETER
AUTOSMART – SMART
INDISMART - ECOSMART
T
HIS MANUAL CONTAINS THE GUARANTEE COUPON
20.07.2006

USE AND MAINTENANCE MANUAL
AUTOMATIC DOUGH SHEETER
Mod. SMART-AUTOSMART
2/96
Revision
n°1
date
21.04.2009
1- GENERAL ............................................................................................................. 4
1.1.
GUARANTEE ................................................................................................................. 5
to be copied and rendered to the supplier .................................................................................. 5
This coupon has to be mailed back to the supplier before starting working with the machine .... 5
1.2 GENERAL WARNINGS AND APPLICATION....................................................................... 6
1.3 RATING PLATE DATA ......................................................................................................... 7
1.4 TRANSPORT INSTRUCTIONS............................................................................................ 8
1.5 ASSEMBLY.......................................................................................................................... 9
1.7 INSTRUCTIONS FOR INDOOR HANDLING...................................................................... 10
1.8 DECOMMISSIONING......................................................................................................... 12
2- TECHNICAL SPECIFICATION ........................................................................... 13
2.1 TECHNICAL DESCRIPTION.............................................................................................. 14
2.2 TECHNICAL SPECIFICATIONS ........................................................................................ 31
2.3 ELECTRIC DIAGRAMS...................................................................................................... 34
3- STARTING UP .................................................................................................... 46
3.1 INSTALLATION.................................................................................................................. 47
3.2 CONNECTION TO THE MAINS ......................................................................................... 48
4 - INSTRUCTIONS FOR USE................................................................................ 49
4.1 GENERAL INFORMATION ................................................................................................ 50
4.2 USE OF THE MACHINE .................................................................................................... 52
4.3
COMMANDS ON THE SHEETER ................................................................................ 53
5- MAINTENANCE AND CLEANING...................................................................... 54
5.1 MAINTENANCE ................................................................................................................. 55
5.2 CLEANING......................................................................................................................... 55
6- OPERATING FAULTS ........................................................................................ 58
6.1 TROUBLE SHOOTING ...................................................................................................... 59
7- SAFETY WARNINGS.......................................................................................... 60
7.1 SAFETY DEVICES............................................................................................................. 61
7.2 SAFETY AND IDENTIFICATION PLATES ......................................................................... 62
7.3 PROHIBITIONS AND OBLIGATIONS FOR PREVENTION OF ACCIDENTS .................... 64
8- SPARE PARTS ................................................................................................... 65
8.1 INSTRUCTIONS FOR ORDERING .................................................................................... 66
8.2 TAV. N°1 - - STRUCTURE AND COMPONENTS ...... .................................................... 67
8.3 TAV. N°2 - CLUTCH UNIT ....................... ........................................................................ 68
8.4 TAV. N°3 - SIDE PANEL CLUTCH UNIT............ .............................................................. 70
8.5 TAV. N°4 - TOUCH-SCREEN UNIT ................. ................................................................ 71
8.6 TAV. N°5 – REAR SIDE UNIT...................... ...................................................................... 72
8.7 TAV. N°6 – CHAINS UNIT........................ ......................................................................... 74
8.8 TAV. N°7 – PULLEYS UNIT ........................ ....................................................................... 75
8.9 TAV. N.8 – SCRAPERS UNIT............................................................................................ 77
8.10 TAV. N°9 - CONVEYOR BELT UNIT............... ............................................................... 78
8.12 TAV. N°11 – SAFETY GRIDS UNIT ............................................................... 82
8.13 TAV. N°12 - FLOUR DUSTER.................... .................................................................... 84
8.14 TAV. N°13 - FLOUR DUSTER.................... .................................................................... 85
8.15 TAV. N°14 - FLOUR DUSTER.................... .................................................................... 86

USE AND MAINTENANCE MANUAL
AUTOMATIC DOUGH SHEETER
Mod. SMART-AUTOSMART
3/96
Revision
n°1
date
21.04.2009
8.16 TAV. N°15 - FLOUR DUSTER.................... .................................................................... 86
8.17 TAV. N°16 – FLOUR DUSTER UNIT ............................................................. 88
8.18 TAV. N°17 – ELECTRIC PLANT .................................................................... 90
8.19 TAV. N°18 – PANELS UNIT ........................................................................... 91
9- ACCESSORIES ON REQUEST.......................................................................... 92
9.1
- AUTOMATIC FLOUR DUSTER.................................................................................. 93
9.2
- AUTOMATIC DOUGH WINDER................................................................................. 93
9.3
- CUTTING DEVICE ..................................................................................................... 93
9.4
– DIE-CUTTERS UPON REQUEST ............................................................................. 93
10- ELECTRICAL EQUIPMENT ............................................................................. 94
10.1 DESCRIPTION................................................................................................................. 95
10.2 DOCUMENTATION.......................................................................................................... 96

USE AND MAINTENANCE MANUAL
AUTOMATIC DOUGH SHEETER
Mod. SMART-AUTOSMART
4/96
Revision n°1
date 20.07.2006
Technical Assistance Service tel. +39/0444414731
1- GENERAL

USE AND MAINTENANCE MANUAL
AUTOMATIC DOUGH SHEETER
Mod. SMART-AUTOSMART
5/96
Revision n°1
date 20.07.2006
Technical Assistance Service tel. +39/0444414731
1.1. GUARANTEE
The manufacturer guarantees the good working and the quality of this sheeter for a period of 6
months from the shipping date, in the case ONLY of mailing the underneath filled and signed
coupon within 15 days from receipt of the machine.
The guarantee will be valid only with the correct use and maintenance of the machine as per
enclosed instructions.
The guarantee won’t be any more valid in in the following cases:
−non-authorised modifications or work on the machine;
−use of non-original spare parts or parts not specific for the model;
−failure to follow the instructions, even partially.
−normal wear of the concerned parts.
The guarantee is limited to the substitution of the defected part only. All the other claims such as
indemnities for interruption of the production or similar are not considered in the guarantee.
If necessary, the supplier can ask the machine to be returned for repair during the guarantee
period.
---------------------------------------------------------------------------------------------------------------------------------
to be copied and rendered to the supplier
This coupon has to be mailed back to the supplier before starting working with the
machine
GUARANTEE
COUPON
T
HE MANUFACTURER GUARANTEE FOR
:
MODEL
_____________________________________________________________
SERIAL NUMBER
_______________________________________________________
DATE OF INSTALLATION
__________________________________________________
NAME AND COMPLETE ADDRESS
____________________________________________

USE AND MAINTENANCE MANUAL
AUTOMATIC DOUGH SHEETER
Mod. SMART-AUTOSMART
6/96
Revision n°1
date 20.07.2006
Technical Assistance Service tel. +39/0444414731
1.2 GENERAL WARNINGS AND APPLICATION
The aim of this manual is:
−To facilitate understanding and operation of the machine and enable the system to be used to
its full technical potential.
−To provide instructions for the most effective and rational maintenance and help the operator to
understand any faults and how to remedy them.
−To warn against risks inherent in use of the machine due to failure to observe the safety
regulations.
−To indicate working limits for maintaining hygiene and environmental conditions and to ensure
health at work.
These pages must be read carefully before starting the machine.
This manual forms an integral part of the product; it must be kept near the machine for prompt
easy consultation and must also be kept for future reference until the machine is scrapped.
The manufacturer does not guarantee the technical-legal suitability of the installation premises and
machine supporting services but provides all instructions for correct installation in the relevant
section of this manual.
For the above, the user is advised to contact an expert professional technician, also for
compliance with any local laws or regulations.
•The machine is designed for the food industry.
It is a machine designed for sheeting of dough obtained with different types of ingredients like
flour, water, sugar, fat, butter, salt, yeast, etc. and of medium consistency for cake-making in
general.
•The machine must be used only for the purpose for which it has been designed. All other uses
are considered inappropriate and therefore unreasonable.
The manufacturer cannot be held liable for incorrect use, inappropriate and/or
unreasonable acts.
The manufacturer cannot be held liable for any damage caused by inappropriate, incorrect
or unreasonable use, for example:
−inappropriate use by non-trained personnel;
−non-authorised modifications or work on the machine;
−use of non-original spare parts or parts not specific for the model;
−failure to follow the instructions, even partially.

USE AND MAINTENANCE MANUAL
AUTOMATIC DOUGH SHEETER
Mod. SMART-AUTOSMART
7/96
Revision n°1
date 20.07.2006
Technical Assistance Service tel. +39/0444414731
1.3 RATING PLATE DATA
the picture 0A shows exactly the registration plate applied on the machine. On picture 2 an arrow
indicates the position where this plate is fixed on the basement of the machine. The plate is
realised in serigraphed aluminium and all the registration datas are wirtten with permanent ink, to
last as long as possible.
It is forbidden to remove of replace the plate “CE MARKING”. If the plate is damaged or removed
please inform TeknoStamap immediately
picture 0A
CONSTR. YEAR
V Hz
PHASES
A
KV
GRISIGNANO - VICENZA
ITALY
SERIAL N°

USE AND MAINTENANCE MANUAL
AUTOMATIC DOUGH SHEETER
Mod. SMART-AUTOSMART
8/96
Revision n°1
date 20.07.2006
Technical Assistance Service tel. +39/0444414731
1.4 TRANSPORT INSTRUCTIONS
B
H
A
H
B
A
A B
PACKAGING DATA
−The machine is supplied on a pallet, in a strapped triple-layer corrugated cardboard box.
Mod. packaging weight
KG.
A mm B mm H mm
ECO SMART 6514 Pallet and wooden crate 1490 1440 1900
ECO SMART 6516 Pallet and wooden crate
1490 1440 1900
SMART 6514 Pallet and wooden crate
1490 1440 1900
SMART 6516 Pallet and wooden crate
1490 1440 1900
AUTO SMART 6514 Pallet and wooden crate
1490 1440 1400
Pallet and wooden crate
940 2040 700
AUTO SMART Pallet and wooden crate
1490 1440 1400
Pallet and wooden crate
940 2040 700
INSTRUCTIONS FOR TRANSPORT AND UNLOADING
−Loading and unloading from the vehicle can be performed:
−by means of crane, see figure “A”
−by means of forklift truck, see figure “B”.
−The machine must be transported adopting all precautions to prevent damage to the machine.
−In particular the machine must not be placed on top of other materials and vice versa either
during transport or storage.
−During transport the machine must be positioned so that it cannot be knocked by other
materials loaded on the same vehicle.
−Before unloading from the vehicle, check that the packaging is intact and that there is no risk of
tipping over.
−During unloading, place the machine carefully on the ground to prevent it being knocked.
!
CAUTION When handling, pay attention to all the indications on the packaging. The
capacity of the belts must be adequate for the weight of the packages. Do
not use metal belts.

USE AND MAINTENANCE MANUAL
AUTOMATIC DOUGH SHEETER
Mod. SMART-AUTOSMART
9/96
Revision n°1
date 20.07.2006
Technical Assistance Service tel. +39/0444414731
1.5 ASSEMBLY
The machine is delivered on a pallet and wrapped with plastic and protected
by a wooden crate.. In order to assure a safe transportation, the working
tables are diassembled and packed separately.
It is necessary to take off the plastic carefully in order to avoid the tables or
other compounds to fall down.
Unpack the machine from the crate rendering free all the components.
Release the screws (1)
Before proceeding with assembly of the flour recovers and worktops see
item 1.7 instructions for inside handling. Lay the flour recovering sheet as
per picture and proceed with screwing (1). The worktops are assembled
through a baionnet coupling. Use a rigid lever of 50 cm to work easily.
The rotation pin has to be inserted on the rear side of the machine first as
per side picture.
By using the lever (1) push the worktop unitl
the grooved shaft will go inside the proper seat (2). To facilitate this
operation a porthole has been done on the side panel for the grooved
shaft passage. Once the link is done, pull the belt on order to make the
shaft rotating (motorised cylinder); in this way the coupling is perfectly
done. A plug located near to the flour duster will be connected to the
Mains.
USE AND MAINTENANCE MANUAL
AUTOMATIC DOUGH SHEETER
Mod. SMART-AUTOSMART
10/96
Revision n°1
date 20.07.2006
Technical Assistance Service tel. +39/0444414731
1.7 INSTRUCTIONS FOR INDOOR HANDLING
mod. AUTOSMART. The most easy way to
move this automatic sheeter is to position it
meanwhile the worktops and flour
recovering sheets are not assembled. The
machine is provided with 2 rear wheels, 2
front wheels and 2 levelling feet (which have
to be adjusted in a second time to ensure a
correct stability). The 2 front wheels are
operated by 2 small pedals. Locate the
sheeter on the suitable place with enough
room for the worktop assembly. The front
wheels can be moved lifting the basement for a few cm by means of the front handle. Once the
sheeter is positionned the wheels are stopped through the pedals. Once the worktops are
assembled it is possible to make some small adjustments acting always on the front wheels. To
give more stability just act on the levelling feet located close to the front wheels.
Modello SMART Modello ECOSMART
The sheeter mod. SMART is provided with three wheels, two rear wheels(*) and one front wheel,
and two stabiliser feet located at the side of the front wheel. The front wheel is operated by a
mechanical pedal located at the front of the machine just above floor level. The stabiliser feet are
designed to ensure correct machine stability with respect to the floor. The machine must be
positioned in its place of work using the wheels. As soon as you have found the ideal work
position, press the pedal: the machine will be lowered slightly and the two feet will rest on the floor.
To move the machine again, raise it four centimetres by means of the handle and release the
weight. The front wheel is now ready for operation.
If you need to clean the floor or other, the two side worktops can be raised. This operation must be
performed raising one worktop at a time. Once maximum lifting position has been reached, a
mechanical stop will cut in consisting of a pin in the worktop engaging in a slot in the protection
grid.
Once the machine is positionned on the other place, stabilise it through the pedal located on the
bottom of the basement.

USE AND MAINTENANCE MANUAL
AUTOMATIC DOUGH SHEETER
Mod. SMART-AUTOSMART
11/96
Revision n°1
date 20.07.2006
Technical Assistance Service tel. +39/0444414731
!
CAUTION Indoor handling must be performed by adopting all the precautions
necessary to prevent damage to the machine components.
(*) The front or rear position is defined with respect to an operator standing in front of the
calibration thickness adjustment handle.
.

USE AND MAINTENANCE MANUAL
AUTOMATIC DOUGH SHEETER
Mod. SMART-AUTOSMART
12/96
Revision n°1
date 20.07.2006
Technical Assistance Service tel. +39/0444414731
1.8 DECOMMISSIONING
1.7.1 SETTING ASIDE
−If the machine has to be stored, it must be protected against dust and stored in a covered
place.
−If the machine is not going to be used for a long time, it must be protected against dust and
atmospheric agents by means of appropriate covering.
−No special precautions are required for the motor and electrical system; simply follow the above
instructions.
1.7.2 DISMANTLING
−To dismantle the machine, proceed as follows:
1. Eliminate the electricity supply cable.
2. Remove all moving parts that could be a hazard.
3. Dispose of the majority of parts as scrap metal and take to authorised scrapyards.
4. The other parts, plastic for example, must be disposed of according to current
regulations, via specialist firms if necessary.
Norm CEE 75/442 concerning dismantling of general waste materials
Norm CEE 78/319 concerning dismantling of toxic and noxious substances
Norm CE 75/439 concerning the elimination of used oils

USE AND MAINTENANCE MANUAL
AUTOMATIC DOUGH SHEETER
Mod. SMART-AUTOSMART
13/96
Revision n°1
date 20.07.2006
Technical Assistance Service tel. +39/0444414731
2- TECHNICAL SPECIFICATION

USE AND MAINTENANCE MANUAL
AUTOMATIC DOUGH SHEETER
Mod. SMART-AUTOSMART
14/96
Revision n°1
date 20.07.2006
Technical Assistance Service tel. +39/0444414731
2.1 TECHNICAL DESCRIPTION
APPLICATION
•The machine is designed for the food industry.
It is a machine designed for sheeting of dough obtained with different types of ingredients like
flour, water, sugar, fat, butter, salt, yeast, etc. and of medium consistency for cake-making in
general.
•The machine must be used only for the purpose for which it has been designed. All other uses
are considered inappropriate and therefore unreasonable.
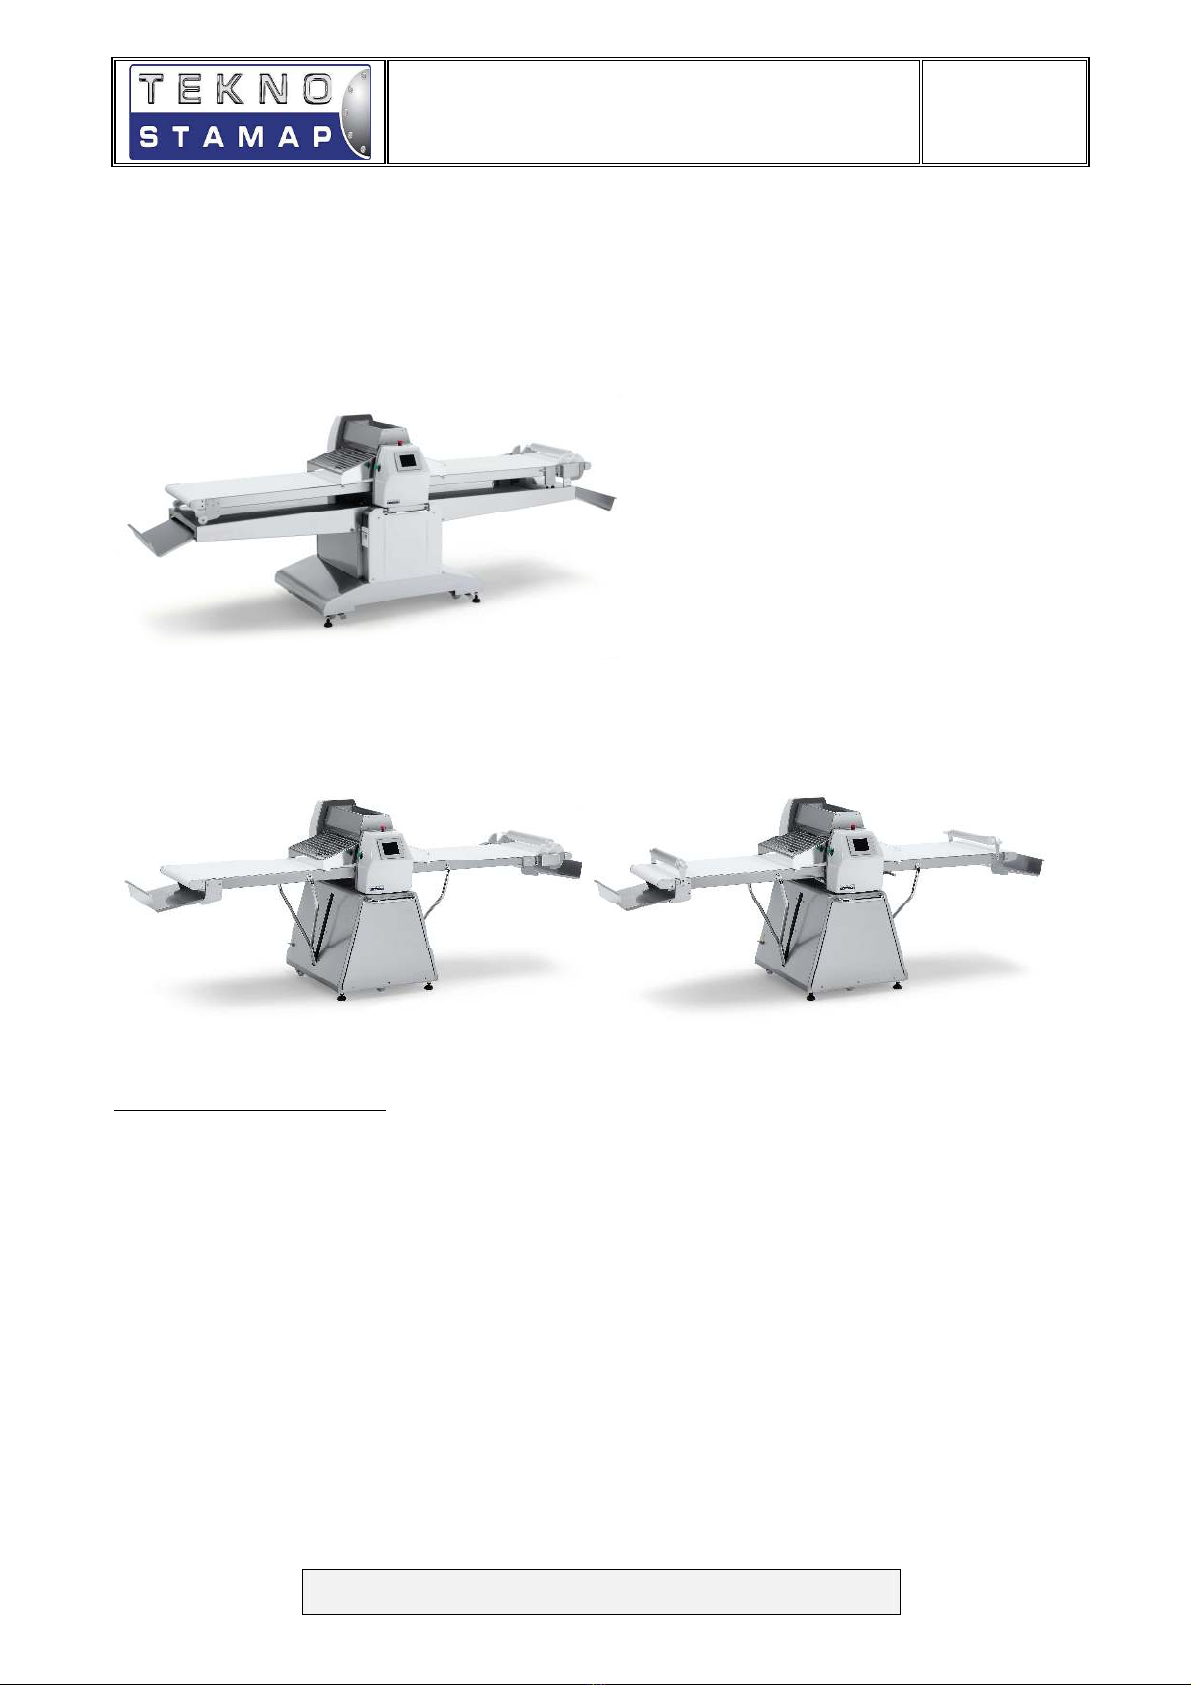
COMPOSITION OF THE MACHINE
Model ECOSMART
9
21 20
1
18
19
15
17 16 14
13
11
7
6
5
4
10 3
12
8
22 22
−The dough sheeter consists mainly of a supporting structure (1) two plastic covering panels (3)
- (4) and two side structure covering panels (5) – (6).
−The supporting structure (1) consists of a shaped welded metal sheet made of painted steel
with two sides (in aluminium) fitted above it and screwed together by means of metal spacers.
−Cover (3) houses the belt drive unit. Cover (6) houses the electric motor and cover (4) the drive
unit, called clutch unit, for reversing the movement of the machine.
−The basement is provided with levelling system (20) to ensure machine stability.
Optionals: automatic dough winder, automatic flour duster, cutting device, all the items are in
stainless steel.

USE AND MAINTENANCE MANUAL
AUTOMATIC DOUGH SHEETER
Mod. SMART-AUTOSMART
15/96
Revision n°1
date 20.07.2006
Technical Assistance Service tel. +39/0444414731
Model : SMART
1
3
4
5
67
8
10
11
12
13 14
15
16 9
17
18
19
20
21
18
19
17 16 14
13
11 9
10
12
20
1
21
22
23
10 9
5
4
3
67
8
This model is similar to ECOSMART except for the lever 22 which has not been foreseen on the
SMART version.
Optionals: automatic dough winder as per AUTOSMART version (10), automatic flour duster as
per AUTOSMART version (9), cutting device (16) with command levers (22 and 23), all the items
are in stainless steel
Model: AUTOSMART

USE AND MAINTENANCE MANUAL
AUTOMATIC DOUGH SHEETER
Mod. SMART-AUTOSMART
16/96
Revision n°1
date 20.07.2006
Technical Assistance Service tel. +39/0444414731
15
20
1
21
4
7
5
8
3
6
12
10
9
11
13
14
9
10
19
17
The floor standing basement (1) is entirely made of stainless steel, inside is located the electric
installation and the motor. 2 side panels (5,6) can be easily removed for local inspections and
mechanical or electrical repairs.
The upper part of the machine consists of 2 sides in aluminium screwed together by means of
steel spacers. All the machine components are assembled on these sides and protected by 2
plastic covers (3 and 4). Inside the larger panel (the back one 3) is located the pulleys group and
all the devices for the automatic moving system of cylinders. Inside the front panel (4) is located
the clutch group.
The basement is provided with levelling system (20) to ensure machine stability.
An automatic dough winder (10) with its dough pin allows to wind automatically the dough.
The automatic flour duster (9) with digital touch-screen for automatic settings allows the uniform
distribution of a light voile of flour during the working phase

USE AND MAINTENANCE MANUAL
AUTOMATIC DOUGH SHEETER
Mod. SMART-AUTOSMART
17/96
Revision n°1
date 20.07.2006
Technical Assistance Service tel. +39/0444414731
WORKING
1. START: once everything has been carefully checked it is possible to start the machine by
pressing the general switch (7) (see illustrated drwg on chap.2.1 – technical description).
The Touch-screen will inform the operator that the sheeter is poceeding with a general
automatic control in order to verify all the inside processors; a few minutes later the load-
program will start. Once the program loading is over, an automatic PCMCA files
scanning will start to reset the touch-screen. The fig. 1 will appears on the touch-screen.
(AVVIO= START – premere pulsante sx o dx= press right or left key-button)
Fig. 1
Once the fig. 1 is appeared, under the word “START” the writing (1)“press on right or left
keybutton” appears ; it means it will be necessary to press on green keybuttons (14,15)
(see illustrated drwg chap.2.1 technical description) after having been ensured that the
emergency push-button is unlocked
Fig. 2

USE AND MAINTENANCE MANUAL
AUTOMATIC DOUGH SHEETER
Mod. SMART-AUTOSMART
18/96
Revision n°1
date 20.07.2006
Technical Assistance Service tel. +39/0444414731
Before starting any manoeuvre be sure that red push-button is unlocked and the safety
grids are down. Fig.2 will appear on the screen as working screen; before starting the
programation we advise to cancel all the alarm information (6).
The key-button (8) will reset the machine and the calibrating cylinders will be at maximum
opening. The starting of flour duster is activated by a simple push-button ON/OFF. On
upper side of the screen it is possible to read the name and program number (4,5) in case
of started program acting on key-button STOP (7) it is possible to stop correctly the
working phase. By pressing on left green key-button (15 – see illustrated drwg chap.2.1
technical description) as indicated on picture, it is possible to operate without any
problem. To start a new program, the operator has only to touch the screen on the picture
located on the left button side (3) in order to enter in datas.
Fig. 3
In this section (fig.3) the operator can find various functions: SETTINGS (9), MANUAL
FUNCTIONS (10), in this case it is possible to operate manually, PROGRAMMING (11)
(which can be quick or slow), PROGRAMS LIST (12) (where the operator will find the preset
user’s programs) VISUALISE/MODIFY (13), DOUBLE PROGRAM (12B), EXIT (14) to return
back at first screening.
2. WORKING METHOD: it is possible to select the way of working desired on the
automatic sheeter SMART: it can be manual or automatic.
3. MANUAL WORKING: the sheeter can work in manual version, meaning the operator can
act directly on the machine.
USE AND MAINTENANCE MANUAL
AUTOMATIC DOUGH SHEETER
Mod. SMART-AUTOSMART
19/96
Revision n°1
date 20.07.2006
Technical Assistance Service tel. +39/0444414731
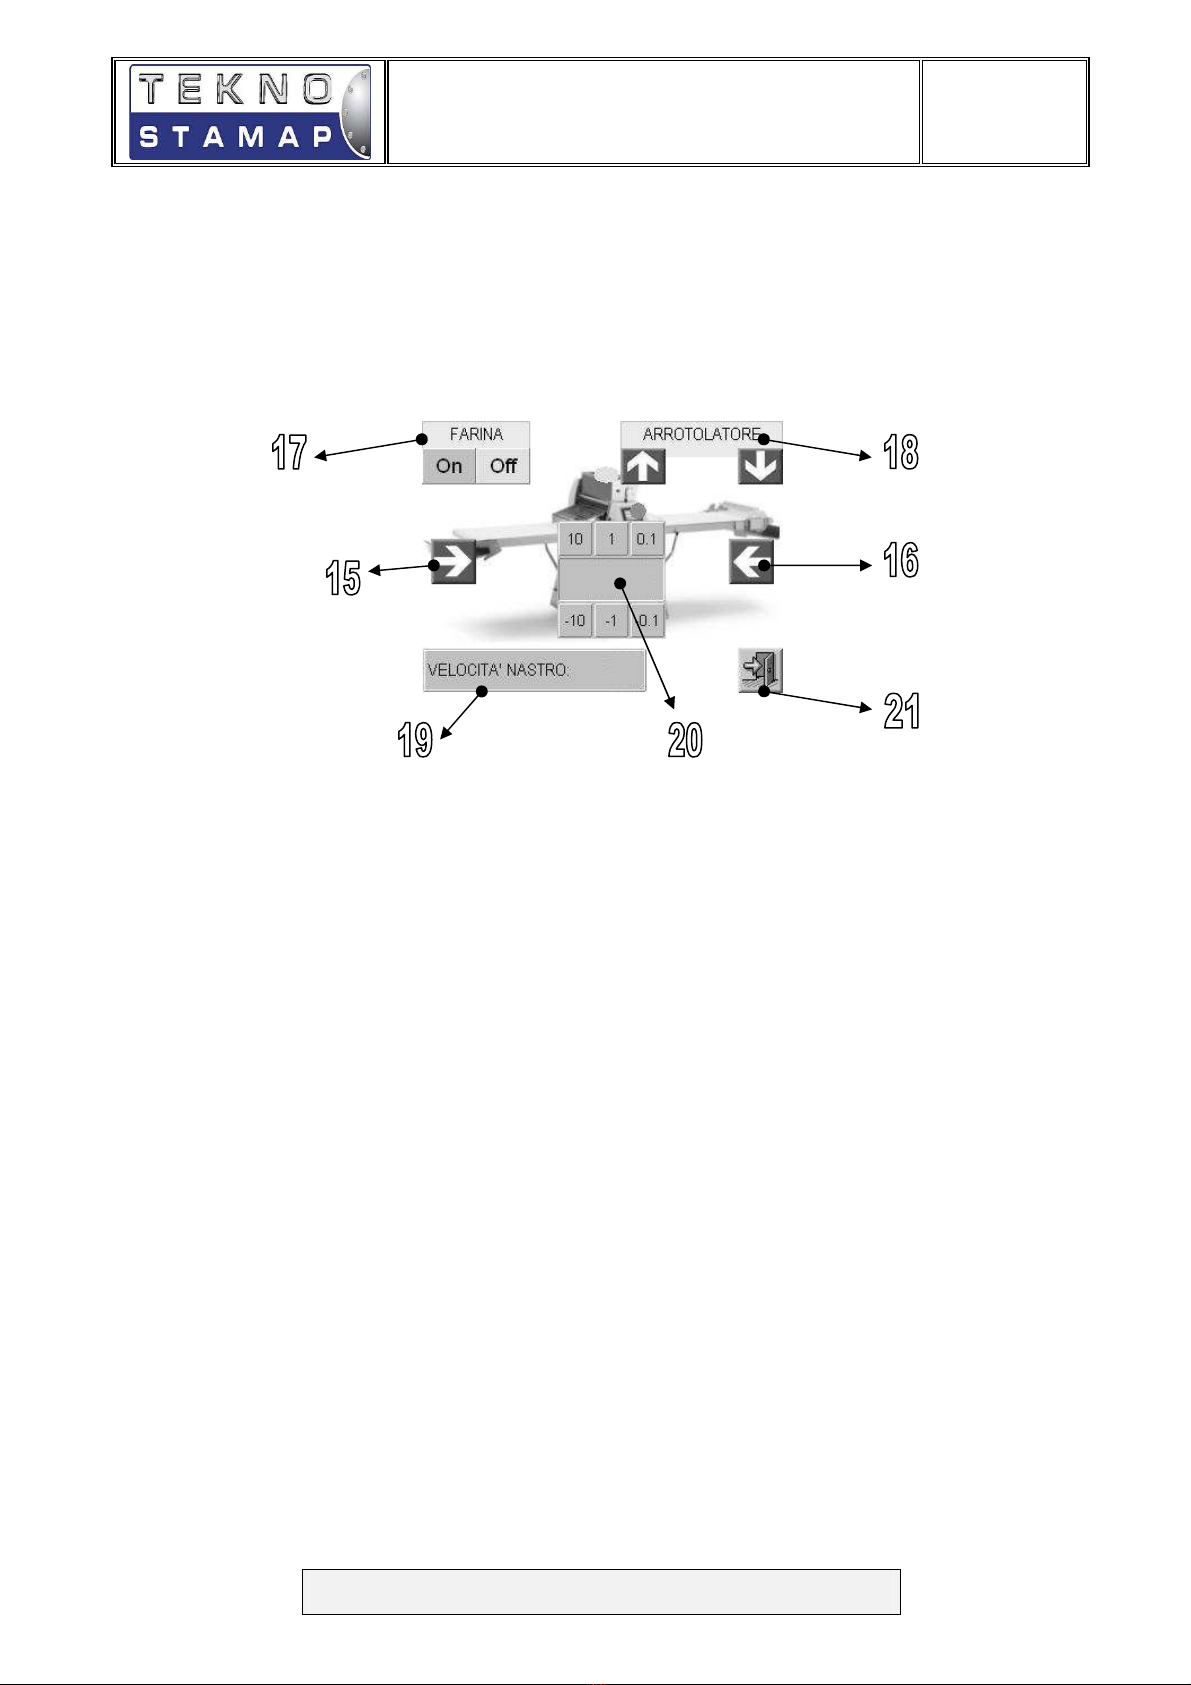
Fig. 4
On the side part of screenning (fig.4) there are 2 arrows →←(15,16) . By pressing
them it is possible to make the belts revolving on one side or the other or alternatively to
move them through the 2 green key-buttons (14,15 illustrated drwg chap.2.1. technical
description). Pressing the flour duster button on left upper side (17) it is possible to
make it working or not; but it is necessary to verify the position of the key-button on the
flour duster. Anyway, the flour duster working is coordinated with belts movement.
on the upper right side the key-buttons with arrows ↑↓(18) make the dough winder
working up or down (all these movements are done in actual time. On the bottom left
side (19) it is possible to adjust the belt speed from 100mm/sec to 10mm/sec.
At last, the data on centre of screenning (20) indicates the thickness of the dough
(height of cylinders) which can be varied by imputing of dough thickness in mm; the
machine will automatically adjust the height.
To return back to the main screenning, it is necessary only to act on th right bottom key-
button. (21)

USE AND MAINTENANCE MANUAL
AUTOMATIC DOUGH SHEETER
Mod. SMART-AUTOSMART
20/96
Revision n°1
date 20.07.2006
Technical Assistance Service tel. +39/0444414731
4. AUTOMATIC WORKING
Fig. 5
The automatic programation allows to proceed with 2 types of programs: quick
programation (22) and manual programation (23) Before selecting one of these 2 options,
the operator has to make sure that the machine has been reset, meaning that cylinders are
fully opened. To do this, it is necessary to go back to initial window per to press reset key-
button.
Once this check is over, it is possible to select in the SETTINGS window the programation
window (11) (fig.13) which will open the window to select the type au automatic
programation (fig.5)
•Quick programation
Fig. 6
Selecting the quick programation the following window (fig.6) will be opened. Here it is
possible to select a set of parameters inside the machine without necessity of inserting
them manually, but having the possibilty to modify them at any moment. First of all it is
This manual suits for next models
4
Table of contents
Other TeknoStamap Commercial Food Equipment manuals

Popular Commercial Food Equipment manuals by other brands


Diamond
Diamond AL1TB/H2-R2 Installation, Operating and Maintenance Instruction

Salva
Salva IVERPAN FC-18 User instructions

Allure
Allure Melanger JR6t Operator's manual

saro
saro FKT 935 operating instructions

Hussmann
Hussmann Rear Roll-in Dairy Installation & operation manual

Cornelius
Cornelius IDC PRO 255 Service manual

Moduline
Moduline HSH E Series Service manual

MINERVA OMEGA
MINERVA OMEGA DERBY 270 operating instructions

Diamond
Diamond OPTIMA 700 Installation, use and maintenance instructions

Diamond
Diamond G9/PLCA4 operating instructions

Cuppone
Cuppone BERNINI BRN 280 Installation

Arneg
Arneg Atlanta Direction for Installation and Use