Teledyne Lecroy Summit Z58 User manual

Summit Z58 Exerciser/Analyzer System
Introduction
The Summit Z58 is Teledyne LeCroy’s fifth generation protocol exerciser (traffic generator), providing support for the PCI
Express 5.0 specification with up to x8 lanes and up to 32.0 GT/s data rates. The Summit Z58 can emulate either a PCI
Express Root Complex or Device Endpoint, allowing new designs to be tested against known standards.
In addition to the exerciser features, the Summit Z58 can optionally be configured to include analyzer capabilities that
would make it a self-contained solution for PCI Express development. Use this document for quick installation and setup.
If you experience problems or need more information on latest software version and for host machine requirements, see
the Readme file or the Summit Z58 User Manual on the PCIe Protocol Analysis Software installation or at the Teledyne
LeCroy website (teledynelecroy.com/sw/pciexpress).
Components
The package includes the following components:
• Summit Z58 Main board
• Summit Z5 Controller board
• 12 inch Controller Cable
• Two (2) TX SSC CLK Cables
• Power Adapter (Output: 24 VDC, 9.2 Amps, 220 Watts)
• USB Type-C cable
• Ethernet cable
• Quick Start Guide (this document)
Summit Z58™PCI Express®5.0 x8
Protocol Exerciser / Analyzer
Quick Start Guide
1
2
Unpacking the Exerciser
Inspect the received shipping container for any damage. Unpack the container and account for each of the system components listed on the
accompanying packing list. Visually inspect each component for absence of damage. In the event of damage, notify the shipper and Teledyne
LeCroy. Retain all shipping materials for shipper’s inspection.
Attention: Use precautions for handling electrostatic-sensitive devices when working with the Summit Z58
3
Please see the Summit Z5 User Manual for component specifications and further details.

Summit Z58 PCI Express 5.0 Protocol Exerciser Components
The Summit Z58 PCI Express 5.0 Protocol Exerciser consists of a two board set: the Controller Board and the Main Board.
The Controller Board has the following interfaces and LED indicators:
Controller Board: Power and Data Ports
Controller Board: Display Screen and LED Indicators
Controller Board: Interface Connector to Main Board
• 24V DC Power Input
• USB interface
• Ethernet Interface
• Sync/Data Interface
• Power On LED Indicator
• Status LED Indicator
• Trigger LED Indicator
• Speed (GT/s) LED Indicator
• Training LED Indicator
• Signal Activity LED Indicators:Tx[7:0] and Rx[7:0]
• Interface with Main Board
• SW1 Power ON/OFF push button enable switch
• Power ON/OFF push button
To 24V 6.5A
Power Adapter
To Sync/Data
Port on
Optional
Analyzer
USB to Host CPUEthernet to Host CPU
Power, Status and Trigger Indicators Traffic Speed Indicators Training Mode Indicator
Signal Activity
Indicators
Power ON/OFF push button
Remote power
enable switch
Status Display
Controller Interface Connector
4

Main Board: Interface Connector to Controller Board
Controller Board to Main Board Cable
Main Board Interface Connector
PCIe Edge
Connector
Airflow intake for Summit
Z58 Main board
TX SSC CLK OUT Connector
12 inch Controller Cable
SW1: Remote Power Enable Switch
This switch allows the Z58 to be powered on remotely from a network controlled AC power port.
SW1: Remote Power Enable Switch
SW1 Selection Z5 Controller
0 Summit Z5 System power controlled by Power ON Pushbutton.
Default position.
1
Power ON pushbutton is bypassed. Remote power ON/OFF can be
achieved by AC power strip controlled by network. In this case the
Power ON pushbutton is disabled.

Assembly Instructions
If the Summit Z58 is to be used to emulate a root complex it will usually be installed in the Teledyne LeCroy PXP500™or other Gen5
capable Test Platforms. In this case, please refer to the Teledyne LeCroy PXP500 or other platform specific documentation for detailed
installation instructions.
If the Summit Z58 is going to be installed into a motherboard or backplane, follow the steps below:
1. Make sure host system if powered Off.
2. Plug Z58 main board in the PCIe Slot near the Z5 Controller.
3. Secure Z58 main board bracket to host chassis with screw.
4. Attach 12" cable to the Z58 main board. The connectors are keyed so only one end can be connected.
5. Attach the TX SSC CLK cable to the connector on the front of the Main Board.
6. Gently tighten the cable screws with your fingers make sure the connector is properly attached. Do not use tools or Overtighten.
7. Attach the other end of the 12" cable to the Z58 Controller board making sure the connector is properly attached and the screws
gently tightened. Do not use tools or Overtighten.
Align Cable with Main Board Attach Cable to Exerciser
Card and Gently Tighten Screws
Align Cable with Controller Board Attach Cable to Controller
Board and Gently Tighten Screws
5

Summit Z58 Main Board
Summit Z5 Controller Board
12 inch Controller Cable connecting
Main Board to Controller Board
TX SSC CLK Cable

7. Plug in the output cable of the Power Adapter to the power connector on the Summit Z5 Controller Board (see figure below):
8. Install the PCIe Protocol Analysis Software following the steps below (See section "6").
9. Power ON the Summit Z58 system.
10. Use PCIe Protocol Analysis Software to configure it and start the exerciser/analyzer (See section "8").
11. You can setup and connect the Summit Z58 to your host machine though either a USB or Ethernet connection. (See section "7").
12. After the Summit Z58 is setup and connected, the next step is to connect your DUT to the system and start recording traffic (See
section "8").
13. Power ON the host DUT.
Warning: Do not disconnect the 12" cable while the Summit Z58 system is powered ON.
Note: If the Summit Z58 will be installed in a PXP500 or Gen5 capable platform, follow the installation steps in the Summit Z5 User Manual.
Push the power plug into
the controller’s power
connector until you hear a
"click" noise.
Controller’s
Power Connector
Power Plug (about to be
attached to Controller)
Note:
To disconnect the power cable from the Controller Board, the outer sleeve of the end of the connector must be pulled back to
free the locking mechanism. With the sleeve pulled back, the connector can be disconnected from the Controller Board.
Make sure airflow is not blocked to the intake for the Summit Z58. This may happen when
installing a large DUT card on the slot next to the Summit Z58 Main board.

Installing the Software
To install the software, download the latest software by going to teledynelecroy.com/sw/pciexpress.
First-time user registration is required.
Note: You must install the software before connecting the Summit Z58 to the host machine for the first time and Administrator privileges
are required during the installation process.
Note: If you get an error message during installation of the drivers, consult your system administrator.
To start the PCIe Protocol Analysis after installation, click on the executable icon in:
Start > All Programs > LeCroy > PCIe Protocol Suite
The Summit Z58 is supported starting from version 11.43 of the PCIe Protocol Analysis and later. Please refer to the Readme notes and
Summit Z58 User Manual for recommended configurations and additional information. User manuals for your Teledyne LeCroy PCI
Express products can be found in: Start > All Programs > LeCroy > PCIe Protocol Suite Documents.
Refer to the System Requirements in the readme file for information about the exact Windows operating systems supported.
6
7
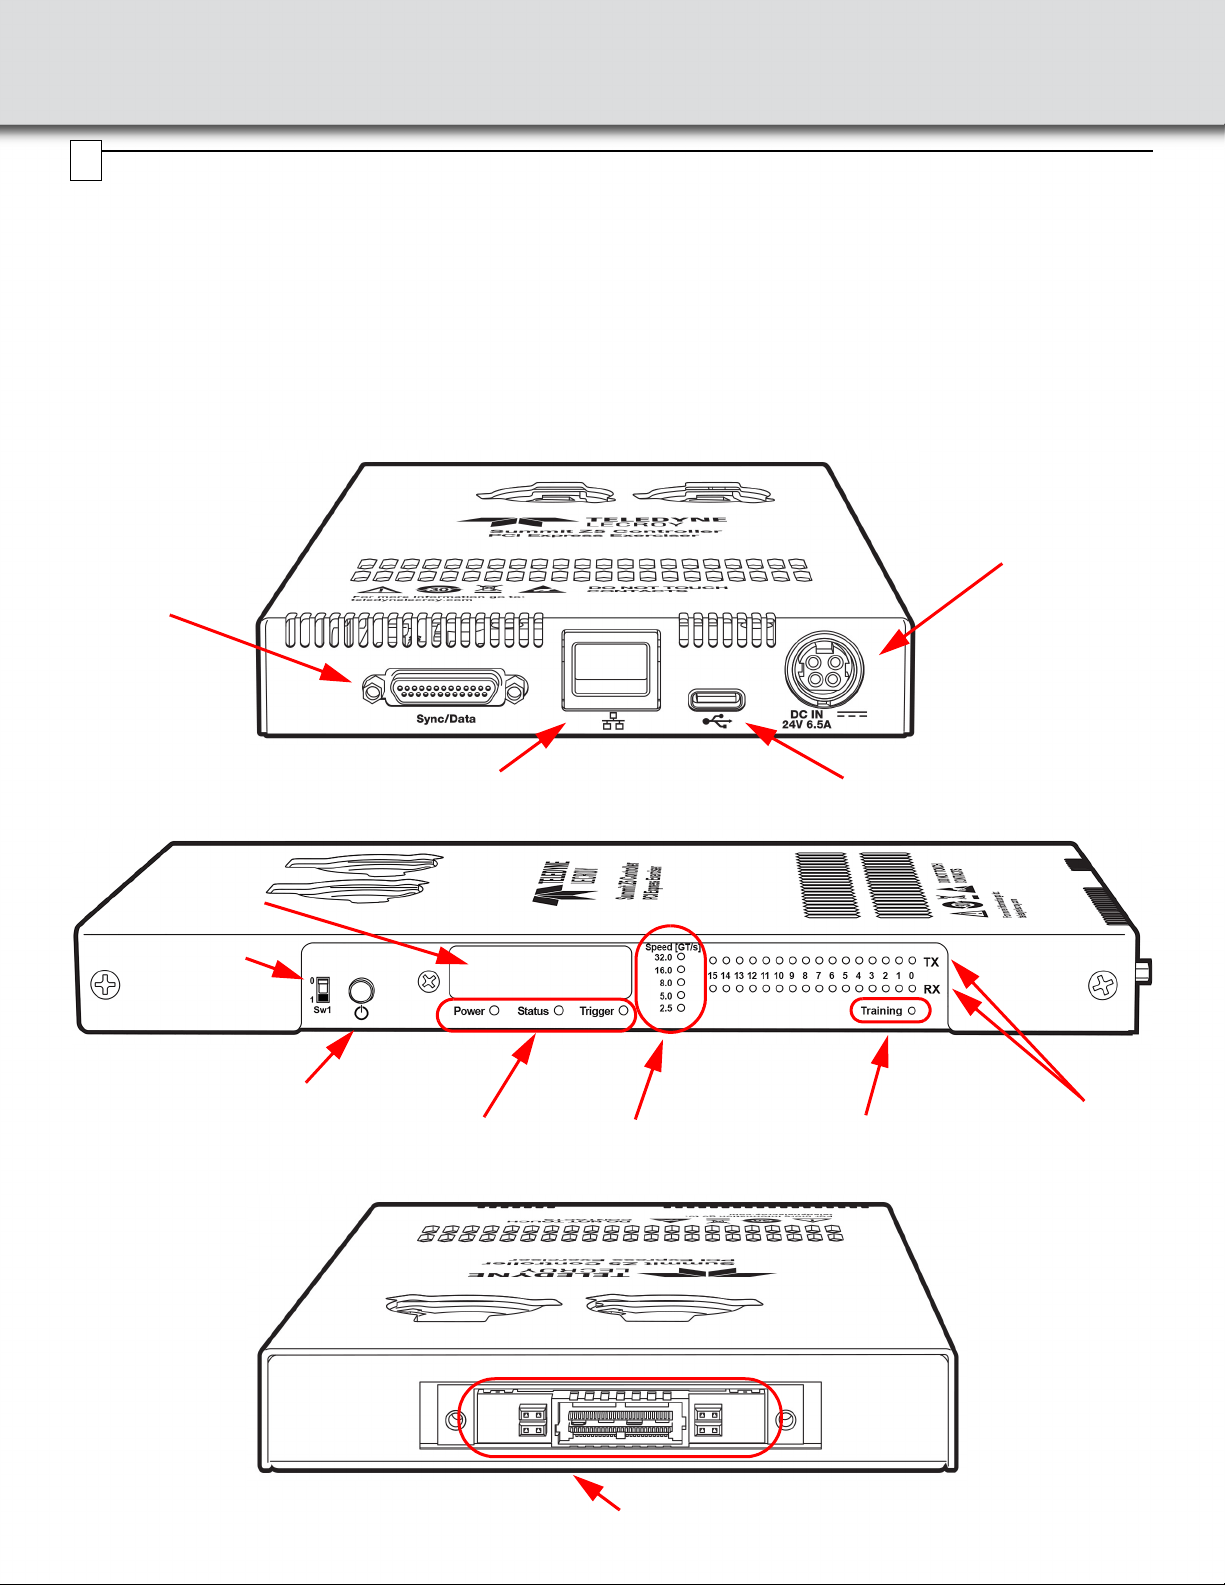
Setting Up and Connecting the Summit Z58 Protocol Exerciser
You can connect the Summit Z58 Protocol Exerciser to the host machine using USB or Ethernet.
Using an Ethernet Connection
To set up the Summit Z58 using an Ethernet connection:
1. Install PCIe Protocol Analysis on the host machine.
2. Connect the Power Adapter to a 100-volt to 240-volt, 50 Hz to
60 Hz, 220 W power outlet using the provided power cord.
3. Connect the Ethernet cable between the Ethernet port on the
Summit Z58 and an Ethernet port in the local network.
4. Power on the Summit Z58 by plugging the 24-V DC power
cable into the Controller Card and then pressing the power
button.
Note 1: No driver installation is needed for Summit Z58 to operate
over a network.
Note 2: At power-on, the Summit Z58 Protocol Exerciser initializes
and performs a self-diagnostic.
Note 3: Summit Z58 is configured at the factory to use dynamic IP
setting and will get all required network parameters from
the DHCP server on your network. If the DHCP server is
not available, or to connect Summit Z58 directly to the host
machine, you can reconfigure the network settings
through the PCIe Protocol Analysis (see Summit Z58 User
Manual).
Connecting to Summit Z58 in the software
(Assuming the host PC and the Summit Z58 are on the same
subnet, Start the PCI Protocol Suite software, otherwise please
refer to the Summit Z58 User Manual.)
Start the PCIe Protocol Analysis and perform the following procedure
to connect to a Summit Z58 over the network.
1. Select the Setup > All connected devices… menu in the
PCIe Protocol Analysis application to display the Analyzer
Devices dialog.
The Summit devices in the list are marked:
•Locked: Some other client on the network is already con-
nected to that device
•Ready to connect: Available for connection
2. Select your Summit Z58 device in the list and press the
Connect button to execute the connection procedure. After the
connection is established, the application displays the
Connection Properties dialog.
3. Select an option:
•Automatically connect to the device: When the
application is started or when the named device appears
on the network while the PCIe Protocol Analysis
application is running on this computer, the PCIe Protocol
Analysis application will try to connect to the named
device.
•Ask if I want to connect to the device: When the
application is started or when the named device appears
on the network while the PCIe Protocol Analysis
application is running on this computer, the PCIe Protocol
Analysis application will display a message box allowing
you to connect to the named device.
•Take no action: When you start the application or when
the named device appears on the network while the PCIe
Protocol Analysis application is running on this computer,
you must connect manually to use the named device.
Note: When you close the application on this computer (or
you perform manual disconnect), the application
disconnects from the device.
4. Press OK in the Connection Properties dialog. After you finish
the connect procedure, the Summit Z58 to which you have
connected is marked as Connected and you can use it for
recording.
Note 1: To disconnect from a device, display this dialog, select the
device, and click the Disconnect button.
Note 2: The Summit Z58 will not appear in the Analyzer Device
dialog if it is connected on a different Subnet on your local
network. You can connect to it on the Subnet by specifying
its IP address in the Add Device dialog.
172.16.133.115
Connected
172.16.133.115

Trademarks and Servicemarks
Teledyne LeCroy, PCIe Protocol Suite, PCIe Protocol Analysis, Summit
Z58, PXP500 and PCI Express Gen5 Test Platform are trademarks of
Teledyne LeCroy. Microsoft and Windows are registered trademarks of
Microsoft Inc. All other trademarks are property of their respective
companies.
Changes
Product specifications are subject to change without notice.
Teledyne LeCroy reserves the right to revise the information in this
document without notice or penalty.
Teledyne LeCroy Customer Support
Online Download
Periodically check the Teledyne LeCroy Protocol Solutions Group web site
for software updates and other support related to this product. Software
updates are available to users with a current Maintenance Agreement.
Web: teledynelecroy.com/tm/software/PCIe
E-mail: [email protected]
Support: teledynelecroy.com/support/contact
© 2020 Teledyne LeCroy, Inc. All rights reserved. Part Number: 932517-00 Rev C
This document may be printed and reproduced without additional permission, but all copies should contain this copyright notice.
Connecting to the DUT and Generating Traffic
The Summit Z58 PCI Express Protocol Exerciser can test both the host and device sides as well as performing analysis of a PCI Express link as explained
below:
For Motherboards and Host Controllers
1. If not already powered off, power off the Summit Z58 and the DUT.
2. Insert the Main Board portion of the Summit Z58 into a PCI Express slot in the DUT. (Skip the next set of steps and go to Power on).
For PCI Express Add-on Cards
1. If not already powered off, power off the Summit Z58 and the PXP500 or Gen5 capable Test Platform and the DUT. For details of the operation of the
PXP500 refer to the PXP500 PCI Express Test Platform Quick Start Guide and User Manual.
2. Insert the Main Board portion of the Summit Z58 into the PXP500 or Gen5 capable PCI Express Test Platform.
3. Assemble completely the Summit Z58 according to above instructions (see See section "5").
4. Insert the edge connector of the DUT into the remaining PXP500 or Gen5 capable PCI Express Test Platform slot.
Power on the Summit Z58 and then the DUT
Important: Power on the Summit Z58 before you power on the DUT.
1. Power on the Summit Z58.
2. Open the PCIe Protocol Analysis application on the host machine. Configure the Summit Z58 to start proper traffic generation. See Summit Z58 User
Manual for details.
3. If testing a motherboard, power on the motherboard. If testing a DUT, power on the DUT.
Generating Traffic (see Summit Z58 User Manual for details)
1. Use the default settings or set options in the Generation Options dialog box.
2. Start the PCIe Protocol Analysis, if necessary, and open an existing script file or create a new script.
3. Start generation by clicking the Start Traffic Generation button on the Status bar. This action causes the software to download the script to the
device. After the download completes, the device starts executing the script. As the script executes, the Status bar displays script progress.
Note: Script execution can be terminated at any time by clicking the Stop Generation button on the toolbar.
Using a USB Connection
To set up the Summit Z58 using a USB connection:
1. Install PCIe Protocol Analysis on the host machine.
2. Connect the Power Adapter to a 100-volt to 240-volt, 50 Hz to 60 Hz,
220 W power outlet using the provided power cord.
3. Connect the USB port to a USB port on the host machine using a
USB cable.
4. Power on the Summit Z58 by plugging the 24-V DC power cable into
the Controller Card and then pressing the power button.
Note 1: At power-on, the Summit Z58 initializes and performs a
self-diagnostic.
Note 2: Using the USB Connection will connect the host to the Summit
Z58 automatically without using the Device Manager.
5. The Summit Z58 will be recognized by the host machine as a USB
device.
Follow the Microsoft®Windows®on-screen Plug-and-Play
instructions for the automatic installation of the Summit Z58 as a
USB device on your analyzing host machine. (The required USB
drivers are included with the software download and were installed
on your system when you installed the software.)
Click Finish when you see the message that says “Windows has
finished installing the software that your new hardware requires” and
the file has been installed in your host machine.
6. Start the PCIe Protocol Analysis, so you can start working with
Summit Z58.
8
Environmental Conditions
• Temperature: Operating 41° F to 104° F (5° C to 40° C)
• Temperature: Non-Operating -4° F to 140° F (-20° C to 60° C)
• Humidity: Operating 5% to 80% RH (non-condensing) @ <= 86° F or <= 30° C
• Humidity: Operating 50% max RH (non-condensing) @ 104° F or 40° C
Note: These conditions are for normal operation of the Summit Z58 and are not meant o be interpreted as environmental chamber testing.
9
Table of contents
Other Teledyne Lecroy Network Hardware manuals
Popular Network Hardware manuals by other brands

Infoblox
Infoblox 1405 Series installation guide

Fortinet
Fortinet FortiAP 234G quick start guide

Cisco
Cisco MERAKI CW9166D1 installation guide

Clare Controls
Clare Controls ClareVision CV-M161620-04 installation guide

HMS
HMS Anybus Wireless Bridge II Startup guide

Motorola
Motorola PMP 400 Supplement to User’s Manual

Solid State Logic
Solid State Logic Duende Mini installation guide

peplink
peplink Pepwave Device Connector Rugged user manual

Contemporary Research
Contemporary Research ICE-HE product manual

ITOH DENKI
ITOH DENKI Power Moller 24 CBM-105FN manual

Leonton
Leonton GINJ-0201-AT-24 Series user manual

Nortel
Nortel Meridian SL-100 Reference manual