Teledyne M41d User manual

M41d HBR3 Video Analyzer/Generator - Quick Start Guide Rev. A1
Page 1 Rev A6 - May 29, 2020
M41d HBR3 Video
Analyzer/Generator
for DisplayPort Testing
Quick Start Guide
Rev: A6

M41d HBR3 Video Analyzer/Generator - Quick Start Guide Rev. A1
Page 2 Rev A6 - May 29, 2020
Table of Contents
1Scope of this Quick Start Guide 3
1.1 Topics Covered in this Quick Start Guide 3
1.2 Changes to this Quick Start Guide 3
2About the M41d 4
3About the ATP Manager GUI Application 4
4Getting Started 6
4.1 What is in the M41d shipping box? 6
4.2 Positioning/Orientation 6
4.3 Connectors and Controls 7
4.4 Gettting the M41d Up and Running 8
5Managing the M41d with ATP Manager from a PC 12
5.1 Install the M41d ATP Manager GUI Application 13
5.2 Setting the Instrument date and time 20
6Connecting the Devices Under Test 21
6.1 Connecting a DisplayPort Source Device Under
Test 22
6.2 Connecting a DisplayPort Sink Device Under Test 23
6.3 Connecting a DisplayPort Source and Sink for
Passive Aux Channel Monitoring 24
7Upgrading ATP Manager 26

M41d HBR3 Video Analyzer/Generator - Quick Start Guide Rev. A1
Page 3 Rev A6 - May 29, 2020
1Scope of this Quick Start Guide
This Quick Start Guide provides basic setup and configuration of the
M41d HBR3 Video Analyzer/Generator and the Advanced Test Platform
(ATP) Manager GUI application used to manage it.
1.1 Topics Covered in this Quick Start Guide
The following high level tasks are described in this Quick Start Guide:
Getting Started Procedures
Provisioning the IP address of the M41d.
Installing the M41d ATP Manager on a PC.
Establishing an IP session between an M41d and the host PC
running the ATP Manager.
Connecting the DisplayPort source or sink devices under test to
the M41d.
This Quick Start Guide does not include descriptive or procedural
information for any of the video test functions of the M41d applications
themselves. Procedures for the functional applications are covered in the
M41d User Guide. The User Guide is available from the product page on
the quantumdata website https://www.quantumdata.com/M41d.html.
1.2 Changes to this Quick Start Guide
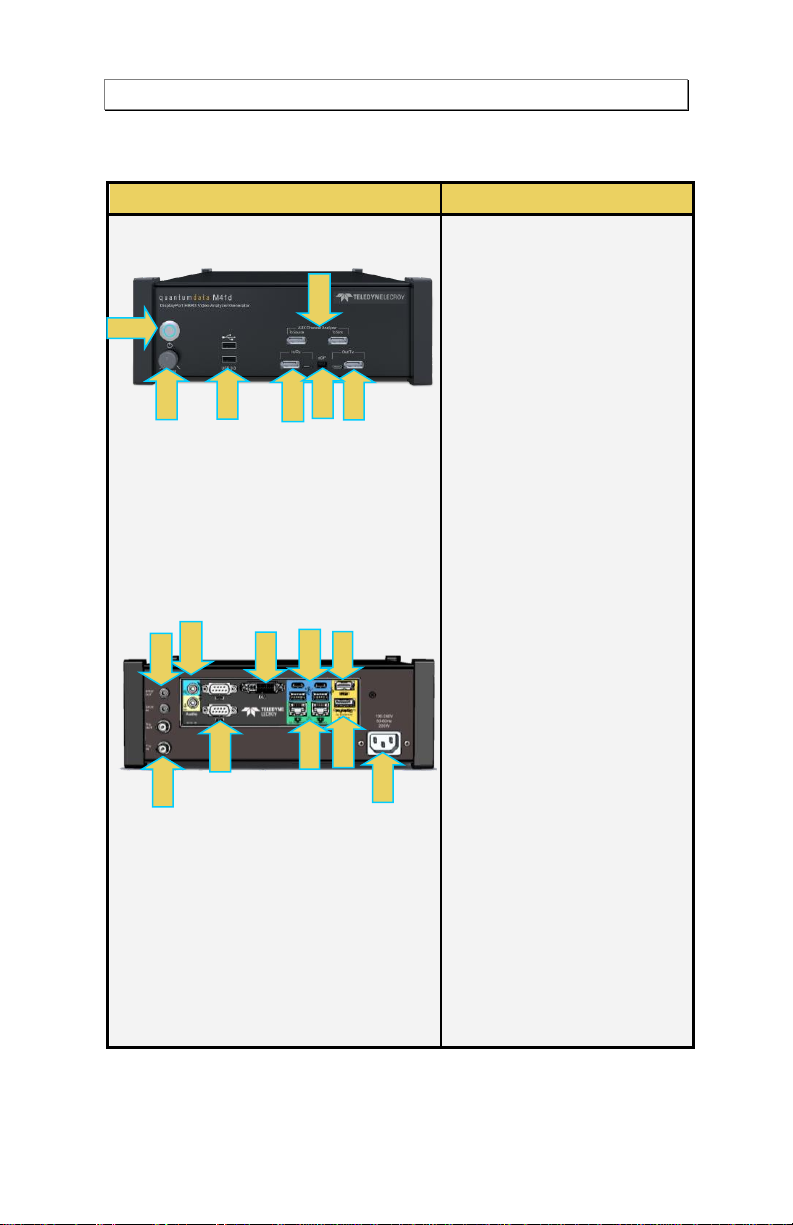
This QSG has been updated to inform users that you must connect the
external display to the HDMI admin port (not the DisplayPort port) on the
back of the M41d, before you power up the M41d system. If you have
powered up the M41d prior to connected a display you will have to
reboot the M41d.
Note: Please be sure to check the quantumdata website
(https://www.quantumdata.com/M41d.html) for updates to this Quick
Start Guide & User Guide.

M41d HBR3 Video Analyzer/Generator - Quick Start Guide Rev. A1
Page 4 Rev A6 - May 29, 2020
2About the M41d
The M41d is a compact versatile test instruments offering entry level
functional testing that can be extended through software licenses to full
compliance testers with sophisticated analysis and diagnostic
capabilities.
M41d HBR3 Video Analyzer/Generator
3About the ATP Manager GUI Application
The M41d is operated through the Advanced Test Platform (ATP)
Manager. The ATP Manager is a GUI application that can run either on a
Windows host PC or on an external display connected to the HDMI or
DisplayPort port on the back of the M41d.
When operating from a host PC the ATP Manager application has to be
installed on the PC. When operating from an external display, a mouse
(provided) is required and a keyboard is optional but recommended. In
this case of the external display, the ATP Manager is running on the
M41d itself but the ATP Manager GUI is displayed on the external
monitor. These operational scenarios are shown below.

M41d HBR3 Video Analyzer/Generator - Quick Start Guide Rev. A1
Page 5 Rev A6 - May 29, 2020
ATP Manager Running on External Display (Source Test Example)
ATP Manager Running on Host PC (Sink Test Example)

M41d HBR3 Video Analyzer/Generator - Quick Start Guide Rev. A1
Page 6 Rev A6 - May 29, 2020
4Getting Started
This chapter explains what is involved in getting your M41d up and
operating.
4.1 What is in the M41d shipping box?
When a Teledyne LeCroy quantumdata M41d is shipped it will contain
the following additional items:
•AC Power Line Cord.
•CE mark declaration.
•DisplayPort to DisplayPort Cable.
•DisplayPort to USB-C Cable.
•DisplayPort Passive Monitoring Cable
•DisplayPort Passive Monitoring Cable Quick Reference Sheet.
•Ethernet Cable.
•Mouse.
•This Quick Start Guide.
4.2 Positioning/Orientation
The M41d can be positioned either flat or upright. These two orientations
are depicted below:
Flat Positioning Upright Positioning

M41d HBR3 Video Analyzer/Generator - Quick Start Guide Rev. A1
Page 7 Rev A6 - May 29, 2020
4.3 Connectors and Controls
The table below describes the M41d connectors and controls.
M41d Configurations
Information / Function
Protocol Analyzer in M41d
Front panel:
▪A –DP HBR3 Rx ports for
testing DP sources. One (1)
Standard DP port; One (1)
USB-C DP Alt Mode port.
▪B –DP HBR3 Rx port for
analyzing DP sinks. One (1)
Standard DP port; One (1)
USB-C DP Alt Mode port.
▪C –Aux Channel Monitor ports
for passive monitoring of DP Aux
Chan.
▪D –USB ports (2) used for
connecting a mouse and
keyboard.
▪E –Volume knob for turning up
or down the volume for the
internal speaker.
▪F –Power button; press and
release.
▪G –eDP block for Backlight
Control (See Note Below).
Back panel:
▪H –Power plug (110-220VAC
50/60Hz)
▪I - HDMI –Admin port for
connecting external HDMI UHD
display for M41d ATP Manager.
▪J - DisplayPort –Not
recommended for use currently.
▪K - USB/USB-C (2 ea.) –For
mouse & keyboard.
▪L - RJ45 (2) - E1 Network for
connecting host PC running ATP
Mgr. E2 Aux –Future.
▪M - DVI –Possible future use.
▪N - RS-232 (2) –Possible future
use.
▪O - Audio (2) –Possible future
use.
▪P - TRIG IN/OUT –Future.
▪Q - RCA SPDIF OUT –OUT:
Possible future use.
A
H
C
E
D
F
J
I
K
L
M
N
O
P
Q
B
G

M41d HBR3 Video Analyzer/Generator - Quick Start Guide Rev. A1
Page 8 Rev A6 - May 29, 2020
Note: The eDP header block is used for controlling the backlight of an
eDP display. The pinout and functions are shown below.
eDP Pin Configurations:
1. BL_Enable (Possible Future Rx input)
2. BL_Enable (Tx Output)
3. BL_PWM_DIM (Possible Future RX input)
4. BL_PWM_DIM (TX Output)
5. Ground
6. Ground
4.4 Gettting the M41d Up and Running
Use the following procedures to get your M41d up and running.
1. Remove the M41d from the shipping box and lay it flat or upright on
your desktop or benchtop.
2. Connect the M41d power cable (provided) to a suitable outlet
(110-240V 50/60Hz). The power socket is on the back of the M41d
as shown below.
3. Connect an external HDMI or DisplayPort monitor to the HDMI or
DisplayPort connectors on the back of the M41d; labeled “External
Monitor”at the location indicated below.

M41d HBR3 Video Analyzer/Generator - Quick Start Guide Rev. A1
Page 9 Rev A6 - May 29, 2020
The setup is depicted below.
4. Connect a mouse to one of the USB ports on the front or back of the
M41d as shown below.
5. Optionally connect a keyboard to one of the other USB ports on the
front or the back of the M41d. You can also use the virtual
keyboards that present themselves in the ATP Manager.

M41d HBR3 Video Analyzer/Generator - Quick Start Guide Rev. A1
Page 10 Rev A6 - May 29, 2020
6. Power up the M41d via the power button on the front of the M41d.
Notes: Regarding Power Button color:
- The Power button will be Red if the power is off when a power
connection in is in place in the back of the M41d.
- The Power button will be Blue (or Yellow) during
initialization.
- The Power button will be Green when the M41d has
completed full initialization.
The ATP Manager application will appear on the external display as
shown below.

M41d HBR3 Video Analyzer/Generator - Quick Start Guide Rev. A1
Page 11 Rev A6 - May 29, 2020
7. Connect your DisplayPort source or sink device under test to the
appropriate In/Rx or Out/Tx port on the front of the M41d. The
following example shows an DisplayPort source device connected.
You can fully operate the M41d through the ATP Manager using this
connection scenario with a keyboard, mouse and external monitor.
However, there is an alternative way with the ATP Manager

M41d HBR3 Video Analyzer/Generator - Quick Start Guide Rev. A1
Page 12 Rev A6 - May 29, 2020
application running on a host Windows PC as described in the
following section.
Important Notes Using External Monitor for ATP Manager
Note 1: Selection of external monitor
Due to HDCP 2.3 content protection schemes you will have to use an
HDCP 2.3-enabled external monitor to view HDCP 2.3 protected
content from a 4K or 8K source in the ATP Manager GUI. We have
qualified the Dell UltraSharp 27 inch Monitor Model U2718Q. Other 4K
HDCP 2.3 displays may work as well.
Note 2: Changing the ATP Manager GUI Display Resolution
You can change the resolution that the ATP Manager GUI is display at
on the connected monitor using the Mint Linux utilities. Follow these
steps:
Step 1: Click on the lower right corner icon to access Shutdown menu.
Under GUI Appliation click on the Close button. The ATP Manager GUI
will close.
Step 2: Once the ATP Manager is shutdown, click on the Mint icon
(green M) on the lower left corner of the monitor to access the Mint
Linux Controls.
Step 3: Select the Settings primary menu on the left and then on the
right select Display Configuration secondary menu. The Display
Configuration menu appears.
Step 4: Set the resolution to 1080p using the Resolution pull-down
menu. The resolution should change and persist through a reboot.

M41d HBR3 Video Analyzer/Generator - Quick Start Guide Rev. A1
Page 13 Rev A6 - May 29, 2020
5Managing the M41d with ATP Manager
from a PC
You can operate the M41d from the ATP Manager application installed
on a host PC. You will have to first download and install the ATP
Manager GUI application on your Windows PC. You will then need to
connect your PC to the M41d over an Ethernet IP connection. These
procedures are provided below.
Please note: You will have to have completed the procedures in the
subsection above (4.3 Gettting the M41d Up and Running) in order to
complete the following steps.
5.1 Install the M41d ATP Manager GUI
Application
This procedure describes how to install the ATP Manager application on
your host PC.
1. Download the ATP Manager GUI application from the quantumdata
downloads page: http://www.quantumdata.com/downloads.html.

M41d HBR3 Video Analyzer/Generator - Quick Start Guide Rev. A1
Page 14 Rev A6 - May 29, 2020
Double click on ATP Manager and follow the installation prompts to
install the ATP Manager on your Windows PC.
2. After installation completes, run the new ATP Manager. It should be
available in the Start Menu under All Programs →Quantum Data,
and also from an icon on your host PC Desktop.
Note: Verify that the version number in the title bar matches the
version on the website.
3. Connect your PC to the M41d using an Ethernet cable. The
connection is made to the Rj45 jack on the back of the M41d labeled
E1 to Network as shown below.
The Ethernet IP connection from the host PC to the M41d can be
accomplished through your corporate network or you can connect
directly. Both scenarios are depicted below.

M41d HBR3 Video Analyzer/Generator - Quick Start Guide Rev. A1
Page 15 Rev A6 - May 29, 2020
PC Running ATP Manager w/ Ethernet Connection thru
Corporate LAN
PC Running ATP Manager with Ethernet Direct Connection
4. Set the IP address of the M41d from the Other page under the
Control window of the ATP Manager GUI. Select the Instrument
Network Settings icon. A dialog box appears enabling you to set
DHCP or specify an IP address. Sample screen shots of these
windows are shown below.

M41d HBR3 Video Analyzer/Generator - Quick Start Guide Rev. A1
Page 16 Rev A6 - May 29, 2020
Note: Be sure to use an IP address that is compatible with your
corporate LAN or your PC if you are connecting directly.
5. Power cycle the M41d with the power button on the front panel.
6. A dialog box will appear on the ATP Manager. Select Shutdown.
Wait 5 seconds and reapply power.

M41d HBR3 Video Analyzer/Generator - Quick Start Guide Rev. A1
Page 17 Rev A6 - May 29, 2020
7. Add your M41d to the ATP Manager application using the green +
Add icon or the + Add item on the Instrument pull-down menu
identified below.
The Add Instrument dialog appears enabling you to enter the
name and IP information for the M41d that you are trying to connect
to (below).

M41d HBR3 Video Analyzer/Generator - Quick Start Guide Rev. A1
Page 18 Rev A6 - May 29, 2020
8. Enter the name (any suitable name) and IP address of the M41d
that you want to connect to in the Add Instrument dialog box
(above) and click on the Add activation button.
You will see a series of messages on a dialog boxes describing the
progress. One example is shown below:
The M41d with the IP address you entered appears on the list in the
ATP Navigator panel (below). The ATP Manager application will
automatically connect to the M41d once you add the M41d to the
application.
9. (If not already connected) Connect to the M41d using either the
Connect icon or the Connect item on the right click menu as shown
in the screen below. Note that you can also double click on the
M41d in the Instrument dialog box in order to initiate a connection.

M41d HBR3 Video Analyzer/Generator - Quick Start Guide Rev. A1
Page 19 Rev A6 - May 29, 2020
Once the connection is made the information about the connected
M41d is available via the right click menu.
The information is then displayed in a separate window. The
information on the Instrument Information window tells you the
firmware and hardware release and version information as well as
what options you have. This information will be helpful if you call
quantumdata customer support during an upgrade process.

M41d HBR3 Video Analyzer/Generator - Quick Start Guide Rev. A1
Page 20 Rev A6 - May 29, 2020
5.2 Setting the Instrument date and time
This procedure describes how to set a M41d’s data and time. The
procedure assumes that you have connected to an M41d through the
external ATP Manager.
To set the date and time of the M41d:
1. From the Other page (Page 4) of the Apps Window select Set
Instrument Date/Time.
Table of contents
Popular Media Converter manuals by other brands

Visual Tools
Visual Tools AX-TV user manual

CHD Elektroservis
CHD Elektroservis 8-443 user manual

Klipsch
Klipsch kmc1 Battery Replacement Procedure

Digitus professional
Digitus professional DN-95205 quick start guide

Eizo
Eizo SSZ-9700 instruction manual

Thinklogical
Thinklogical SDI to HDMI Converter/Extender product manual